U2-P1-S3耳背墙分项
- 格式:doc
- 大小:73.50 KB
- 文档页数:4


Bose® 301® Series IV Direct/Reflecting® SpeakersOwner’s GuideOctober 30, 2001AM181869_04_V.pdfThank youCongratulations on your purchase of Bose® 301® Series IV Direct/Reflecting® speakers. Theirintegrated system of advanced Bose technologies delivers superior sound reproductionfrom a bookshelf design.For your recordsSerial numbers are located on the back of each 301 speaker.Serial numbers:___________________________and_______________________________Dealer name:__________________________________________________________________Dealer phone:________________________________Purchase date:__________________We suggest you keep your sales slip and warranty card together with this owner’s guide.Paul Olean, General Manager, Bose EuropeManufacturer’s authorized EUrepresentative2October 30, 2001AM181869_04_V.pdfWhere to find...Setting UpBefore you begin (4)Unpack the carton (4)Select the locations for your 301® speakers (5)Choose the cord (6)Prepare the cord (6)Make the connections (6)Check the connections (7)Test the speakers (7)Using and Maintaining Your 301® Series IV SpeakersEnjoying sound in a variety of ways (8)Cleaning the speakers (8)Warranty period (8)Troubleshooting (9)Customer service (9)Product InformationTechnical information (10)Optional accessories (10)Bose® Corporation.................................................................................inside back coverAM181869_04_V.pdf October 30, 2001 34October 30, 2001AM181869_04_V .pdfBefore you beginYour 301® Series IV Direct/Reflecting ® speakers re-create a natural balance of reflected and direct sound energy for an open, spacious performance. They are designed at Bose ® to bring you high-quality listening pleasure.The Direct/Reflecting ® tweeter inside each speaker creates a pattern of sound similar to what you experience at a live concert. In addition, the Stereo Targeting ® tweeters help establish the natural balance of sound, for full enjoyment of stereo even when you move around the room. These distinct left and right speakers also feature tuned port enclosures that contribute to their deep, room-filling bass. An advanced crossover design adds to the realism and clear definition of both musical instruments and voices.Your 301 Series IV speakers are significantly different from conventional speakers, so be sure to read this owner’s guide. It will help you set up and use your speakers properly, for the greatest enjoyment.Unpack the cartonCarefully unpack the carton and save all packing materials for possible future use. Check the carton contents (Figure 1).If either speaker appears damaged, do not use them. Instead, repack both speakers in the original carton and notify your authorized Bose dealer immediately.Note: Now is a good time to record the speaker serial numbers on page 2 of this guide and on your warranty card.CAUTION:T o avoid danger of suffocation,keep the plastic bags that wrap these speakers out of the reach of children.Select the locations for your 301® speakersBose® 301 speakers are designed to fit horizontally on a table or shelf (Figure 2). Be sure to choose a stable and level surface for each speaker.Place the left and right speakers (marked on the back of each one) on the left and right sides of your room, as you face them. Exactly where you put them depends on the size and style of your room and where you think they sound best. Feel free to experiment to find a location that is both convenient and provides the sound you prefer.Note: Because the grilles on the front of each speaker protect the drivers inside, we recommend that you do not remove the grilles.Here are some basic guidelines:•Place the speakers 4 to 12 feet (1 to 4 m) apart.•Choose a stable and level surface for each speaker, and attach the rubber feet.•Leave at least 12 inches (30 cm) of space from the end of a speaker to the side wall.•Leave at least 18 inches (45 cm) from the speakers to the floor or ceiling.•Leave at least 24 inches (60 cm) from the speakers to any TV screens or monitors.•Keep the back of the speakers within 18 inches (45 cm) of the wall behind them.•Do not place the speakers exactly halfway between the floor and ceiling or any other sound-reflecting hard surface.•Do not put the speakers in a vertical position.Note: Bose speaker stands or wall brackets can extend your placement options. See “Optional accessories” on page 10.CAUTION:301 speakers are designed specifically for placement on a stationary shelf, table, or stand. On smooth surfaces like marble, glass or highly pol-ished wood, vibrations may cause the speakers to slide. So be sure to attach the self-adhesive rubber feet to the bottom surface of each speaker for added stability and protection. The feet go in the corners of the flat surface, inside the seam.Do not use these speakers in a moving vehicle.T o mount the speakers on a wall, use only the Bose WB-3 wall mounting bracket. Please follow the mounting instructions that come with these brackets. Improperly mounted speakers may fall, causing injury and damage.cover of this owner’s guide.Figure 2Placement guidelinesCAUTION:For the most realistic soundimage, make sure the leftspeaker is placed on the leftand the right speaker is onthe right side of your room, asyou face them.AM181869_04_V.pdf October 30, 2001 5CAUTION:Never use broken or frayed wiring, which can result in electrical shock or damage.Choose the cordIt is important to use the proper gauge (thickness) of speaker cord. Standard zip cord (2-conductor, 18-gauge wire) works for most applications. Y ou can find this wire at most electrical and hardware stores.You will need thicker wire if your speakers will be more than 30 feet (9 m) from a receiver (or amplifier). Refer to the wire recommendations under “T echnical information” on page 10, or contact your authorized Bose ® dealer for more information.Note: Before running speaker cord through a wall or under a floor, check your localbuilding code requirements and safety regulations. You may want to contact an electrical installer for this information.Prepare the cordSpeaker cord consists of two insulated wires. The insulation around one wire is marked(striped, collared, or ribbed). This marked wire is always positive (+). The plain wire is always negative (–). These wires correspond to the red (+) and black (–) terminals on the speakers and the receiver.At the ends of each cord, strip approximately 1⁄2 inch (12 mm) of insulation from both wires.Twist the bare end of each wire so loose strands will not touch across terminals. Be sure to connect each wire to the proper terminal (positive to positive and negative to negative).Note: It is sometimes difficult to distinguish wire markings. Inspect both wires carefully.Make the connectionsJust press the terminal tab on the back of each speaker to insert the appropriate wire CAUTION:Before making any connec-Check the connectionsCheck to be sure all connections are made positive to positive (+ to +) and negative to negative (– to –) (Figure 4). Make sure that no loose strands of wire touch across terminals. Bridged wires can short circuit and damage the amplifier. Tighten any loose connections before you plug in the receiver and turn it on.T est the speakersTo make sure your speakers operate correctly:1.Place the speakers less than 6 inches (15 cm) apart, facing each other.2.Turn on your receiver. Set the receiver to MONO (monophonic), if that is an option onyour receiver.3.Make sure that all special effects (such as surround sound) are turned off.4.Set the balance control to normal (center position).5.Play some deep bass passages of music through the speaker.The sound should seem to come from a point between the two speakers. The bass should be full and natural. If it is not, one of the connections may be reversed, causing the speakers to play out of phase (refer to “Make the connections” on page 6).To correct the problem, make sure all the wires are connected positive to positive (+ to +) and negative to negative (– to –). Then repeat steps 1 through 5 above to re-testthe speakers.Figure 4 Completed connectionsAM181869_04_V.pdf October 30, 2001 7Enjoying sound in a variety of waysBose® 301® Series IV Direct/Reflecting® speakers are designed to work with a variety ofstereo receivers and amplifiers. The open, spacious performance of these speakersalso makes them an ideal choice for home theater, or for listening to CD’s, tapes, or radiobroadcasts (Figure 5).301® Series IV Direct/Reflecting®speaker sound pathCleaning the speakersClean the surface of your speakers with a soft damp cloth. Do not use any sprays near thesystem or allow liquids to spill into any openings. Also, do not use any solvents, chemicals,or cleaning solutions containing alcohol, ammonia, or abrasives.The speaker grille panels require no special care. You may vacuum them carefully to removedust.Warranty periodBose 301 Series IV Direct/Reflecting® speakers are covered by a limited 5-year transferablewarranty. Details of the coverage are provided on the warranty card that came with yourspeakers. Please fill out the information section on your card, detach, and mail to Bose.8October 30, 2001AM181869_04_V.pdfTroubleshootingProblem What to doNo sound• Make sure the receiver is plugged in and turned on.•Check to be sure the AC power (mains) outlet is working.•Disconnect any headphones plugged into the headphone jack.•Make sure the receiver is not set to MUTE.•Refer to the owner’s guide that came with your receiver.•Check connections to both the speakers and the receiver.Refer to “Make the connections” on page 6. Correct any connec-tion errors.No sound from•Disconnect the working speaker from the receiver.one speaker•Switch the cord of the “faulty” speaker from its original receiverjacks to the other set of jacks (the working speaker was originallyattached to those jacks).– If the speaker now works, the problem is in your receiver.– If the speaker does not work, continue below.•Remove the cord from the working speaker and connect it to the“faulty” speaker and either set of receiver jacks.– If the speaker now works, the problem was in the originalspeaker cord.– If the speaker does not work, the problem is in the speaker.One speaker•Follow the same procedure for the problem of no sound fromsounds distorted one speaker, as outlined above.Not enough•Adjust the bass and treble controls on the receiver.bass or treble•Check the connections to make sure they are correctly in phase(+ to + and – to –). Refer to “Make the connections” on page 6.•Move the speakers closer to or farther from the side walls or othersound-reflecting hard surfaces.Customer serviceIf the troubleshooting guidelines above do not solve your problem, contact your authorizedBose® dealer to arrange for service. T o obtain information or service directly from Bose, referto the listing at the end of this guide. Bose Corporation will make every effort to correct anyproblem within the terms of your warranty.AM181869_04_V.pdf October 30, 2001 9T echnical informationFeaturesDirect/Reflecting® speaker designStereo T argeting® tweetersTuned port enclosureSyncom® computer quality controlDriver complementOne (1) 8-inch (20 cm) wooferOne (1) 3-inch (7.6 cm) high-sensitivity tweeterOne (1) 2-inch (5 cm) high-sensitivity tweeterCompatibility/ImpedanceCompatible with amplifiers and receivers rated from 10 to 150 watts per channel. Rated 8 ohmsWire recommendationsBased on a maximum frequencies response deviation of ± 0.5 dBGauge Length18 (0.75 mm2)30 ft (9 m) maximum16 (1.5 mm2)45 ft (14 m) maximum14 (2.0 mm2)70 ft (21 m) maximumEnclosurePolymer and vinyl veneer over wood construction with black, rosewood, or gray finishSize/WeightSpeaker: 101⁄4"H x 163⁄8"W x 91⁄2"D (26 x 42 x 24 cm)Each speaker, unpacked: 11.6 lb (5.2 kg)Speaker pair in shipping carton: 27.7 lb (12.5 kg)Optional accessoriesBose® AS-3 speaker stands and WB-3 wall mounting brackets are designed for use with 301® Series IV Direct/Reflecting®speakers. For information, or to order accessories, contact your authorized Bose dealer. T o contact Bose directly, refer to the listing at the back of this owner’s guide.Figure 6Bose® AS-3 speaker stand andWB-3 wall mounting brackets10October 30, 2001AM181869_04_V.pdfItaliaBose S.p.A., Via della Magliana 87600148 Roma www.bose.iTTEL 06-65670802FAX 06-65680167JapanBose K.K., Shibuya YT Building 28-3 Maruyama-cho Shibuya-ku, Tokyo 150TEL 3-5489-0955FAX 3-5489-0592NederlandBose B.V ., Nijverheidstraat 81135 GE Edam TEL 0299-390111FAX 0299-390109NorgeBose A/S, Solheimsgate 11N-2001, Lillestr øm TEL 63-817380FAX 63-810819ÖsterreichBose Ges.m.b.H., Vienna Business ParkWienerbergstrasse 7 (10.OG)A-1100 Vienna TEL 01-60404340FAX 01-604043423SchweizBose AG, R ünenbergerstrasse 134460-Gelterkinden TEL 061-9815544FAX 061-9815502SverigeBose A/S, Blands ädsgatan 2DS-43146 M ölndal TEL 31-878850FAX 31-274891United KingdomBose Limited1 Ambley GreenGillingham Business Park Gillingham, Kent ME8 ONJTEL 0870-741-4500FAX 0870-741-4545From other locationsBose Customer Service, 1 New York Ave.Framingham, MA 01701-9168 USATEL (508) 766-1900FAX (508) 766-1919World Wide WebUSABose Corporation, The Mountain Framingham, MA 01701-91681-800-367-4008Phone hours - ET (eastern time):Weekdays 8:30 a.m. to 8 p.m.Saturdays 9 a.m. to 3 p.m.CanadaBose Ltd., 1-35 East Beaver Creek RoadRichmond Hill, Ontario L4B 1B31-800-465-2673Phone hours - ET (eastern time):Weekdays 9 a.m. to 5 p.m.European OfficeBose Products B.V ., Nijverheidstraat 81135 GE Edam, Nederland TEL 0299-390111FAX 0299-390114AustraliaBose Pty Limited, 1 Sorrell StreetParramatta NSW, 2150TEL 02 9204-6111FAX 02 9204-6122Belgique/Belgi ëBose N.V ., Limesweg 2, B-3700 T ongerenTEL 012-390800FAX 012-390840DanmarkBose A/S, Industrivej 7, 2605 Br øndby TEL 4343-7777FAX 4343-7818DeutschlandBose GmbH, Max-Planck-Stra ße 36dD-61381 Friedrichsdorf TEL 06172-71040FAX 06172-710419FranceBose S.A., 6, rue Saint Vincent78100 Saint Germain en Laye TEL 01-30616363FAX 01-30614105IndiaBose Corporation India Private Limited W-16, Greater Kailash-II New Delhi 110 048TEL (011) 648 4462FAX (011) 648 4463IrelandBose CorporationCarrickmacross, Co Monaghan TEL (042) 9661988FAX (042) 9661998©2000 Bose CorporationThe Mountain, Framingham, MA 01701-9168 USA 181869 AM Rev.04 JN97807。


耳机的四种单元结构,你真的了解了吗?对于HIFI烧友来说,至今仍有少部分人对于耳机单元弄不清楚动圈、动铁、平板、静电这四大基础结构的发声单元有什么区别,又有什么特点。
毕竟对于常规烧友来说最普及的还是动铁与动圈单元,已经两者混合使用的圈铁模式,那平板与静电单元又是什么,原理是什么却不是很清楚。
今天乙迷就来为大家说道说道这几种耳机单元发声方式以及原理,还有最具有代表性的产品。
希望大家在看完之后不但更能了解耳机的发声原理,还能根据自己喜欢的听音风格,最终找到适合自己的耳机。
动圈单元动圈是目前使用最多、最广泛的一款发声单元,原理也非常简单。
时至今日,我们用的还是从1910年以来相同的扬声器设计模式,动圈的工作原理与扬声器类似,动圈单元振膜上附有线圈,变化的电流通过线圈产生磁场,与下方的永久磁体作用从而使振膜片震动发声。
拜亚动力引以为傲的特斯拉技术单元,是在一定体积的限制下,将音圈运动的磁隙的磁力密度提高到超过1T的水平。
它以强大的高磁密度单元和真实无染色,低失真的声音再现而著称。
这种新单元能将额外的磁能量能被转化成声学能量,给予声音更多能量。
动圈的线圈与振膜材质、直径,这对于声音来说不可控因素也比较大,所以不同直径、不同材质的单元也会有些差异。
=森海塞尔 IE80S=对于森海塞尔来说,在发烧友心中除了耳机中的王者ORPHEUS (大奥),而更加被发烧友们所熟知的都是8系列了,从HD800、IE800、IE80、IE8。
而去年森海塞尔决定再次升级IE系列,既将原来主流的IE80升级为IE80S。
IE80S的风格很有森海塞尔IE8、IE80的味道,它突出了高频的解析力以及低频的量感和下潜,声场规模完整的特点。
而中频上乐器与人声的位置问题,这些也都在IE80S上有了完美的修缮。
但对于经常听流行人声,特别是流行女声的烧友以及喜好日系ACG的烧,实话说IE80S还真未必适合你的。
=拜亚动力榭兰图=对于榭兰图来说,是拜亚动力首次将旗舰耳机技术应用在了耳塞上的第一款产品,我们乙迷达人上周也写过一篇专门介绍榭兰图的帖子,需要了解的烧友可以去翻看一下。
Summary1介绍 (3)2蓝牙射频性能测试 (4)2.1发射功率 (4)2.2调制特性:频率偏移 (4)2.3初始载波频率容许量 (5)2.4灵敏度 (5)2.5灵敏度限值 (5)2.6阻塞 (6)3无线链路范围 (6)4协同工作能力 (7)4.1GSM通信下的蓝牙灵敏度 (7)4.2蓝牙通信下的GSM灵敏度限值 (7)5附录 (9)5.1测试条件 (9)5.1.1 常规测试条件 (9)5.1.2 极限测试条件 (9)1介绍在M5和E6项目中采用的蓝牙模块是菲利普的BGB204。
BGB204符合蓝牙协议1.2。
在M5和E6项目中,蓝牙模块支持class 2功率等级,并且不支持功率控制。
蓝牙模块的射频测试项目包括:射频性能测试无线链路范围测试协调工作能力测试蓝牙模块射频性能测试项目中的功率谱密度,输出功率谱的频率范围,邻道功率,载波频率漂移,载波干扰和交调性能测试并没有包括在本文档中。
菲利普对BGB204的这些性能进行了测试和质量控制,这些性能符合蓝牙协议1.2。
本文档中的射频性能测试包括了蓝牙模块的原理图和版图能够影响的射频测试项目。
参考文档:Core System Package Part A : Radio Frequency Test Suite Structure (TSS) and Test Purposes (TP) Specification 1.2 : Revision 1.2.3 Document n° 20.B.353/1.2.3测试设备:Rohde & Schwarz CMU200 option K53 (Bluetooth)2蓝牙射频性能测试蓝牙射频性能测试的所有测试项目都是在连接模式下进行的。
蓝牙天线与蓝牙模块的功率输出电路断开,功率输出电路通过50ohm连接器与测试设备CMU连接。
2.1发射功率蓝牙模块符合class 2 功率等级,所以发射功率应该满足下面要求:-6dBm < Pout < 4dBm.测试方法:蓝牙模块通过50ohm连接器与蓝牙测试设备CMU连接。
拆解报告:AnkerLiberty2Pro真无线蓝牙耳机2011年10月,Anker诞生于美国加州,由前Google中国工程师Steven Yang(阳萌)创办,为全球注册品牌。
其产品涵盖移动电源、充电器、蓝牙外设、数据线等智能数码周边,重点市场覆盖北美、日本、欧洲、中国等100多个国家和地区。
作为手机充电配件届的TOP厂商,Anker从真无线耳机市场爆发前夕就做了大量的准备,推出了Soundcore声阔这一品牌专注于音频市场,既有音箱类产品,如我爱音频网拆解过的Soundcore Flare燃!无线蓝牙音箱、Soudcore 无线充电蓝牙音箱;也有TWS真无线耳机,像我爱音频网拆解过的Anker Soundcore Spirit Pro运动防水蓝牙耳机、Anker Soundcore Liberty Air TWS真无线耳机,Anker Liberty Air 2 真无线蓝牙耳机。
此次我爱音频网拆解的是Liberty 2 Pro真无线耳机,它凭借出色的同轴圈铁技术,HearID个性化定制声音,获得了10位格莱美大师的推荐,在海外市场受到较多好评。
此外这款产品还搭载高通QCC3020芯片,拥有8+32小时长续航、支持Qi无线充电功能。
下面就通过拆解来看看Anker这款圈铁TWS耳机内部的结构如何。
一、Anker Liberty 2 Pro 开箱包装盒正面,是Anker Soundcore声阔的家族风格,有较大面积的耳机渲染图,和较大字体的产品特色功能,此次Liberty 2 Pro的卖点是“In-Ear Studio Performance”,“耳朵里的录音室”,强调其音质出色。
包装盒背面由三部分信息组成,顶部的产品型号为Soundcore声阔,Liberty 2 Pro;使用HearID个性化定制声音功能,需要下载Soundcore的APP,在安静环境下测试听力,就会生成一项个性化的EQ方案。
临床研究TIP-300插入式耳机与TDH-50P耳罩式耳机的耳间衰减比较陈小宏1 张学渊1 黄青平1摘要 目的 比较TIP-300插入式耳机耳间衰减(insert earphone interaural attenuation,IEIA)与TDH-50P耳罩式耳机耳间衰减(supra-aural earphone in teraural attenuation,SEIA)的差异,为TIP-300插入式耳机的临床应用提供参考依据。
方法 利用GSI61临床听力计、T IP-300插入式耳机和TDH-50P耳罩式耳机,对一组单耳全聋而另一耳听力正常者35人(男13人,女22人)进行纯音气导的耳间衰减测试。
结果 TIP-300插入式耳机与TDH-50P耳罩式耳机组间耳间衰减有显著性差异;其中TIP-300插入式耳机组内的某些频率之间耳间衰减也有显著性差异。
结论 在低中频测听范围,TIP-300插入式耳机的耳间衰减比TDH-50P耳罩式耳机大。
关键词 测听 插入式耳机 耳间衰减中图分类号 R764.5 文献标识码 A 文章编号 1006-7299(2003)03-0180-02Comparison of Inter-aural Attenuations between the TIP-300insert Earphoneand the Telephon ics TDH-50P Supra-au ral EarphoneChen Xiaohong,Zhang Xueyuan,Huang Qingping(Department of Otolaryngology,Affiliated to Southwest Hospital of ThirdM ilitary Medical U niversity,Chongqing,400038)Abstract Objective To afford a clinical reference for applications of T IP-300insert earphone in accordance with its difference in inter-aural attenuation from the telephonics TDH-50P supra-aural earphone.Methods Detections of inter-au ral attenuation for pure tone air conduction were performed on the enrolled individuals combined with unilateral anakusis and one normal ear(male and female were13and22respectively)by GSI61audiometer、TIP-300insert earphone or telephonics TDH-50Psupra-aural earphone.R esults Inter-aural attenuation differences were significant(P<0.001)bet ween the TIP-300in sert earphone group and the TDH-50P supra-aural earphone group when the frequence ranged from125to8000Hz.Addi tional ly,attenuations at different frequencies within the TIP-300group differed significan tly.Conclusion TIP-300insert earphone had a much stronger in ter-aural attenuation than telephonics TDH-50P supra-aural earphone at low or mediu m frequency spectrum audiometry.Key words Audiometry Insert earphone Inter-aural attenuation双耳气导或气骨导听阈差达到耳间衰减时,就应该对非测试耳进行掩蔽[1]。
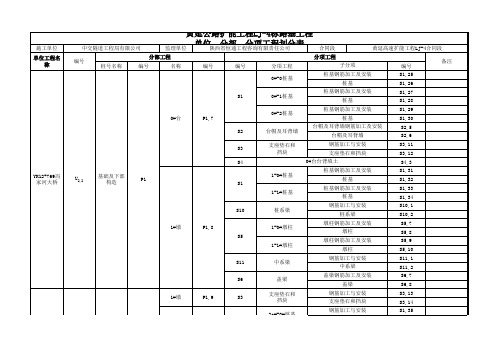
徐明高速公路路基工程XMLJ-04标
K40+950利民沟中桥
0#台基础及下部构造
耳背墙
(分项工程)
开
工
报
告
安徽省路桥工程集团有限责任公司
二○一二年五月十二日
分部(项)工程开工通知
监-06合同号:XMLJ-04承包人:安徽省路桥工程集团有限责任公司编号:
致:徐明高速公路路基工程第四合同段项目经理部
经审查K40+950利民沟中桥0#台耳背墙
工程的第U2-P1-S3 号开工报告,其施工准备工作已完成,具备开工条件,准于年____月____日开工。
其它需要说明的事项:
1、施工测量放样已完成。
2、原材料试验检测已完成。
高级驻地监理工程师(签名):__________
______年_ __月_ __日
抄送:
抄报:
监理工程师发件人(签名):
______年___月___日承包人收件人(签名)
______年___月___日
分部(项)工程开工申报表
监-05 合同号:XMLJ-04 承包人:安徽省路桥工程集团有限责任公司编号:
工程名称K40+950利民沟中桥
0#台耳背墙
起讫桩号K40+950
开工日期2012.05.12 计划工期3天
施工准备情况
材料所需各种原材料经检测合格后进场试验各种标准实验完成并上报批复
机械设备施工所需机械、设备已进场
施工组织及劳力安排组织机构已建立、施工班组已进场征地拆迁征地工作已协商完成
进度计划进度计划已编制
其它说明:
附件1.施工图审查报表
2.施工放样报验单及附表
承包人项目经理(签名):
______年___月___日监理组收件人(签名):
______年___月___日监理工程师意见:
监理工程师(签名):______年___月___日
徐州至明光高速公路安徽段工程建设项目
施工图审查申报表
监-01-1合同号:XMLJ-04 承包人:安徽省路桥工程集团有限责任公司编号:
工程名称K40+950利民沟中桥0#台耳背墙第 1_页共_1_页
序
图名图号审查意见
号
1 第三册S4-3(1)-4-7 经审查施工图无误
要求批准日期
附件:
审查人(签名):项目经理(签名):
监理工程师意见及签名:
日期:。