劲客N2162产品资料
- 格式:pptx
- 大小:7.16 MB
- 文档页数:25

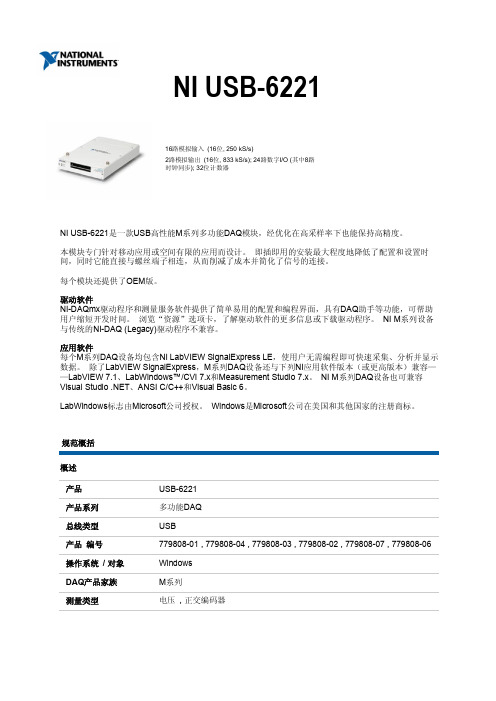
TN2115SA02K 用户手册300mW NFC能量采集, 2KB EEPROM, I2C, 7个输出 IO, 自适应能量采集控制ISO14443A 协议,106Kbps NFC数据速率,能量采集输出端口,LDO1.产品特色∙标准NFC动态标签-106kbps数据速率-2KB片上EEPROM存储-标准TYPE2标签-可外接MCU扩展为TYPE4标签-标签内存可选EEPROM或RAM-透传模式-7 字节可配置UID∙高效的能量采集与管理-专为能量采集优化的NFC模拟前端-高达300mW的能量采集-可为整个IC供电-可为整个系统供电-能量输出:高压/3.3V/1.8V-自适应能量采集:兼顾能量与稳定性-超级电容接口-NFC 数据传输保护∙高速串行数据接口-I2C 从接口,最高400kbps速率-可配置片内寄存器,读写EEPROM-可用于数据透传∙低功耗-平均功耗600uA2.产品描述2.1.概述TN2115SA02K是一款符合ISO14443A标准的无源NFC Type2动态标签。
这款动态标签使用了启纬智芯的独有TurboNFC技术,可支持高效的NFC能量采集。
当配合使用常见的带有NFC功能的手机时,TN2115SA02K可以采集到多达300mW的功率。
如此高的采集功率不仅可以支持TN2115SA02K在无源模式下运行,还可以为像传感器、显示器、电机等外接器件供电。
TN2115SA02K具有2KB的EEPROM和2KB的RAM作为标签内存区域,可根据需要灵活选择使用哪块区域存储数据。
NFC接口支持ISO14443A 标准,速率106kbps。
同时带有一个高速I2C接口,最大速率400kbps,可用于配置和数据读取与存储。
该芯片支持透传机制,允许NFC读写器通过芯片与同I2C连接的MCU直接通信。
TN2115SA02K单片支持Type2类型NFC标签的功能,配合透传功能可实现Type4类标签的各项功能。

金龙XMQ6112AY豪华版参数配置、合同主要条款及相关要求一、大客车主要参数1品牌金龙XMQ6112AY豪华版2车辆尺寸(mm)10990*2500*35803发动机国六排放,潍柴wp8.320E61,额定功228Kw,发动机舱温报警装置4座位数37+1(位)5变速器法士特六档变速器(两软轴,带气助力)6离合器萨克斯离合器7缓速器TELMA缓速器、带温度报警装置8制动器东风德纳桥,前后盘式制动器9龙翼车载电脑系统龙翼车载电脑影音版10ABS进口WABCOΛBS+ESC11新科技安全系统车道偏离及前向防撞预警系统12智能系统多功能智能方向盘13驱动控制系统智慧驱动控制系统14空调金龙空调,热值30000大卡,比泽尔压缩机15轮胎米其林轮胎16水暖独立水暧17悬架德国大陆六气囊空气悬架18升降装置车身带升降装置19行李舱门向上平移式行李舱门20座椅优宜(升级版)高档皮质航空座椅,扶手,脚踏,座椅前后左右可调,2点伸缩式安全带21司机椅气囊减震司机椅22内饰材料1095阻燃内饰材料23行李架整体式内行李架(带阅读灯)24窗户全封闭玻璃,左右两侧最后一块玻璃开内嵌式推拉窗,乘客门开推拉窗,单片式前档风玻璃25地板凹地板,高级耐磨木纹地板26电视前19口寸自动翻转液晶电视+320G硬盘,麦克风27倒车监视器彩色液晶倒车监视器28天窗换气扇顶风窗29内饰贯通式样LED灯,车内无钉化包层柱30安全锤侧窗所有立柱安装带报警安全锤4个31监控系统视频监控系统32行车记录仪卫星定位行车记录仪33灭火器发动机舱自动灭火装置,车厢内2个4kg灭火器34油漆颜色金属漆,香槟金(SJ770B)35工具随车工具1套、千斤顶36其他电子风扇,骆驼免维护蓄电池,LED光源自动大灯,电子钟、乘客和驾驶座椅下方USB充电插座、无线WIFl二、服务要求1、供货方交车前,必须办理好车辆临时牌照;2、供货方代办采购方车辆上牌等后续工作;3、采购方其他正常工作需求。

achieve big everydayThe Renault KWID has arrived. Let the world take notice. Get behind the wheel and make a statement. Your favourite KWID is now even bolder, more stylish and ready to take action in your day-to-day life.With an SUV-inspired design, high ground clearance, ample interior space and great performance, you are on board with all the style and attitude of an SUV. It also comes with next-gen technology such as the Floor Console Mounted AMT Dial, 20.32 cm Touchscreen MediaNAV and LED Digital Instrument Cluster that always keeps you on track for adventure.Say hello to the latest showstopper in town.style that speaks for itselfThe Renault KWID is built to stand out with Signature Ornate Lighting that includesSUV-styled Headlamps, Silver Streak LED DRLs and Tail Lamps with LED Light Guides. The exterior design is further enhanced with a Stylish Grille, Boomerang Shaped Sculpted Roof and Arching Roof Rails. The new Dual Tone exterior comes with a trendy ‘Climber’ Decal on the c-pillar. The Dual ToneMulti-Spoke Flex Wheels along with a High Ground Clearance of 184 mm & SUV Skid Plates further accentuate the SUV stance of the car.The Renault KWID comes with Dual Tone interiors & a spacious, comfortable Ergo Smart Cabin. The front-seats are 4-way adjustableto give the most ideal seating and driving position. This is accentuated by Metal Mustard and White Fabric Seat Upholstery with Striped Embossing. The Sporty Steering Wheels, Stylish Dashboard with a Piano Black Centre Fascia, Touchscreen MediaNAV Evolution with Sporty White Surrounds* and AMT Dial Surrounds in Sporty White accent add a touch of vibrancy.*sporty white accents available in Climber MTstylish grille with silver streak LED DRLstail lamps with LED light guidesThe KWID features a fully Digital Instrument Cluster with LED Illumination and Sportier Graphics coupled with Digital Tachometer, Gear Shift Indicator* and On-board computer. The first-in-class^ 20.32 cm TouchscreenMediaNAV Evolution takes infotainment to the next level with Android Auto, Apple CarPlay, Video Playback and Voice Recognition.Furthermore, the Floor Console Mounted AMT Dial with three modes is designed to make driving effortless while the Reverse Parking Camera with Guidelines helps you park even in the tightest spots.The Renault KWID’s Smart Control Efficiency (SCe) engine technology for accurate air-to-fuel ratio monitoring optimises performance and fuel efficiency.The suspension system of the Renault KWID is calibrated for an optimum ride. Choose between the peppy 1.0L engine or thefuel-efficient 0.8L engine and make the most of every drive.*present in MT versions only. ^first to introduce this feature.LED digital instrument clusterreverse parking camera with guidelinesfloor console mounted AMT dialdual tone interiors with day/night adjustable IRVMfuture-ready technology , power-packed performanceDiscover comfort and convenience like never before in the Renault KWID. Its spaciousinteriors offer a best-in-class #Boot Space of 279 litres expandable up to 620 litres. The cabin space is optimised with ample storage spaces including mobile and wallet storage in the front console, a glove box, a parcel shelf and bottle holders on the front doors. Front and Rear Power Sockets, Front & Rear PowerWindows and a Fast USB Charger further add to its convenience.The Renault KWID comes with standard safety features like Driver and Passenger Airbags, ABS and EBD, Seat Belt Reminder, Overspeed Alert, Reverse Parking Sensors and Driver side Pyro & Pre-tensioner with Load Limiter. All of these ensure complete peace of mind.#within immediate segment.dual airbagssuperior space & comfort,enhanced safetyboot space of 279 litres - expandableup to 620 litresergo smart cabin with sporty Metal Mustard and White seat upholstery and striped embossing**1L only. ^^ EASY-R only. * available only in RXL and RXL(O) only.RXL 0.8L MT & 1.0L MTDESIGN- Stylish Graphite grille- Body coloured bumpersNEW RXL (O) = RXL+ 0.8L MT & 1.0L MTRXT = RXL(O)+ 1.0L MT/EASY-RCLIMBER = RXT+1.0L MT/EASY-R WITH SPORTY WHITE ACCENTSMETAL MUSTARD - DUAL TONE FIERY REDICE COOL WHITE - DUAL TONEOUTBACK BRONZE MOONLIGHT SILVERZANSKAR BLUEwritten authorisation from Renault is prohibited. segment definition based on Renault internal classification.www.renault.co.in Call:180****4444。
INTRODUCTIONThis service manual has been prepared to provide necessary information concerning the maintenance and repair procedures for the NISSAN FORKLIFT Q02series.Any changes effected in the series after publication of this service manual will be announced in a technical bulletin.It is,therefore,recommended that each relevant technical bulletin be inserted in front of each section and be used together with the service manual as a reference.If a new model requires different service method or has undergone a major change,revised sec-tions will be issued to replace the applicable sections.Each revised section will include the descrip-tion of how to service the parts for the former specifications.The publication of a revised section will be announced in the technical bulletin.This service manual consists of fourteen sections as shown in the following table,which gives the updated symbols.When a revised service manual is issued,this''INTRODUCTION"sheet should be replaced with a revised one.Section Symbol GENERAL INFORMA nON(GI) MAINTENANCE(MA) CONTROL SYSTEM(CS) BATTERY&CHARGER(BC) ELECTRICAL SYSTEM(EL)MOTOR MECHANISM(MM) DIFFERENTIAL CARRIER(DF)FRONT AXLE(FA)REAR AXLE(RA)BRAKE SYSTEM(BR) STEERING SYSTEM(ST) HYDRAULIC SYSTEM(HD) LOADING MECHANISM(LM)BODY&FRAME(BF)Printed in The Netherlands Edition:July1997Printing:August1997(01) Publication No.SM7E-Q020GOFOREWORDThis manual contains maintenance and repair procedures.In order to assure your safety and the efficient functioning of the lift truck, this manual should be read thoroughly. It is especially important that the PRECAUTIONS in the GI section be completely understood before starting any repair task.All information in this manual is based on the latest product information at the time of publication.The right is reserved to make changes in specifications and methods at any time without notice.IMPORTANT SAFETY NOTICEThe proper performance of service is essential for both the safety of the technician and the efficient functioning of the lift truck.The service methods in this Service Manual are described in such a manner that the service may be performed safely and accurately.Service varies with the procedures used, the skills of the technician and the tools and parts available.Accordingly, anyone using service procedures, tools or parts which are not specifically recommended by NISSAN must first be completely satisfied that neither personal safety nor the lift truck's safety will be jeopardized by the service method selected.No modifications or alterations to a powered industrial truck, which may affect, for example, capacity, stability or safety requirements of the truck shall be made without the prior written approval of NISSAN, its authorized representative, or a successor thereof. Contact an authorized NISSAN FORKLIFT dealer before making any modification or alteration to your industrial truck that may affect, for example braking, steering, visibility and the addition of removable attachments. After getting approval of NISSAN, its authorized representative, or a successor thereof, capacity plate, decals tags and operation and maintenance handbooks shall also be changed to the appropriate one.Only in the event that NISSAN is no longer in business and there is no successor in the interest to the business, the user may arrange for a modification or alteration to a powered industrial truck, provided, however, that the user shall:A.Arrange for the modification or alteration to be designed, tested and implemented by an engineer(s)expert in industrial trucks and their safety;B.Maintain a permanent record of the design, test(s) and implementation of the modification oralteration;C.Approve and make appropriate changes to the capacity plate(s), decals, tags and InstructionHandbook;D.Affix a permanent and readily visible label to the truck stating the manner in which the truck hasbeen modified or altered together with the date of the modification or alteration, and the name and address of the organization that accomplished the tasks.© 2010 NFE B.V. Printed in The NetherlandsRevised November 2008GENERAL INFORMATIONSECTION GI CONTENTSHOW TO USE THIS MANUAL2 Outline of This Manual2 Technical Term Definitions3 Manual Illustrations5 HOW TO READ WIRING DIAGRAMS6 Description8 IDENTIFICATION INFORMATION10 Vehicle Model Classification Number10 Vehicle Identification Number11 Identification Plate11GENERAL PRECAUTIONS12 JACKING,TOWING AND LIFTING15 Jacking15 Towing(Freeing a stuck vehicle)16 Lifting16 TIGHTENING TORQUE OF STANDARDBOLTS 18Outline of This ManualSectionSection title TopicssymbolHow to use this manual,identification information,generalGI General information precautions,jacking,lifting,towing and tightening torque of stan-dard bolts.MA Maintenance Inspection,adjustment,part replacement and lubricant replenish-mentPrecautions,controller unit inspection and adjustment,meterCS Control system panel,LCD letter display mode description,trouble diagnostic procedures,trouble diagnoses for controller and battery charging systems.BC Battery and battery charger Precautions,battery and battery charger.Precautions,electrical component parts,location of electricalEL Electrical system units,harness layout,fuses,lighting system,meter panel,miscel-laneous electrical parts and location of optional parts.Service data and specifications,trouble diagnoses andMM Motor mechanism corrections,precautions and preparation,traction motor,hydrau-lic pump motor,power steering motor and motor inspection.Service data and specifications,trouble diagnoses andOF Differential carrier corrections,precautions and preparation,construction,removal,disassembly,inspection,assembly and installation.Service data and specifications,trouble diagnoses andFA Front axle corrections,precautions and preparation,construction,compo-nent parts,hub and axle housing.Service data and specifications,trouble diagnoses andRA Rear axle corrections,precautions and preparation,construction,compo-nent parts,removal,inspection,installation and adjustment.Service data and specifications,trouble diagnoses andBR Brake system corrections,precautions and preparation,construction,brake assembly,brake pedal,master cylinder,brake piping and parking brake.Service data and specifications,trouble diagnoses andST Steering system corrections,precautions and preparation,steering wheel,steering column assembly,steering gear box,power cylinder and steering linkage.Service data and specifications,trouble diagnoses andHD Hydraulic system corrections,precautions and preparation,hydraulic piping system,hydraulic pump(gear pump),control valve,control lever, tilt cylinder,lift(mast)cylinder and oil tank.Service data,trouble diagnoses and corrections,precautions andLM Loading mechanism preparation,construction,backrest,lift chain,carriage assemblyand mast assembly.BF Forklift body and frameService data,precautions,construction,removal,installation,body parts and accessories.This Manual contains the essential information required to perform effective forklift maintenance procedures.All forklift units are rmational configuration in the CS(control system)sec-tion differs from that of other sections.The CS section introduces how to utilize information in the section.Outline of This Manual(Cont'd)MAIN TEXT ENTRIESMain text entries describe unit removal,unit disassembly,inspection, unit reassembly,unit installation and adjustment procedures.Step-by-step descriptions are provided for all of these procedures. Together with the step-by-step descriptions,other important informa-tion is provided.This information includes service points and tips, basic units and values,required specified tightening torques and required special service rmation pertaining to common tools generally found in all maintenance facilities is generally omitted.This information is included in the exploded part views and other drawings as required.OTHER ENTRIESThe following information is included at the beginning of all sections as a supplement to the main text.Service data and specificationsAdjustment values,part selection information and specified tighten-ing torque values are shown for all procedures described in the main text.Trouble diagnoses and correctionsIndividual symptoms,probable causes and remedial measures indi-cated by these symptoms are described.Precautions and preparation•Precautionary and reference information related to the entire sec-tion is provided.•Special service tools are required for some maintenance proce-dures.Special service tool name,tool number and tool applica-tion information as well as illustrations depicting tool shapes are included.Technical Term DefinitionsSPECIFIC TERMSWARNING:Warns you of instructions that must be followed to prevent severe personal injury and/or fatal accident.CAUTION:Warns you of instructions that must be followed to prevent per-sonal injury and/or damage to some parts of the vehicle. NOTE:Provides helpful information to perform a smooth and effective ser-vice procedure.Standard value or specifications:The allowable range for a given measured value during inspection and adjustment.Limit value:The maximum or minImum acceptable measured value during inspection and adjustment.Technical Term Definitions (Cont'd)MEASURING UNITS AND VALUESSpecified torque,pressure,force and other values used in this Manual are primarily expressed as the SI unit (International System of Unit).The values following the SI unit and enclosed in parenthe-ses ()are expressed in the metric system and in the yard/pound system.Example:Tightening torque:9-12Nom(0.9-1.2kgf-m,6.5-8.7ft-Ib)II ISI unitMetric system Foot/pound systemMain unit conversionsMetric Foot/pound Conversion 81unitfactor to 81system systemunitTorque and kgf-m-9.807moment Nom-ft-lb1.356kgf-9.807ForceN-Ib4.448kg/cm 2-98.07kPa-psi6.895Pressurekg/cm 2-0.0981MPa-psi0.0069NOTE:Converting the unit in metric system or foot/pound system to SI unit is shown below.Unit in metric system or yard/pound system x conversion factor =SI unitManual IllustrationsEXPLODED VIEWSThese contain part names,tightening torques,lubrication points and other information necessary to performremoval,disassembly,repair,reassembly and installation procedures.(See example below.)~:Always replace after every disassembly(O.J :Nom (kgf-m,ft-Ib)~:Nissan GenuineLiquid Gasket or equivalentm :Nissanrubber grease +-:Brakegreasepoint(O.J7.8-11.8(0.8-1.2,5.8-8.7)\~:~~BackplatePrimary shoeBRT0005Symbols used in exploded viewsSymbolMeaningSymbolMeaningSpecified tightening torque is required for part(O.Jinstallation.When a torque range is given,use the ~Always replace after every disassembly.average figure as the standard.mShould be lubricated with specified grease.*Select parts of proper thickness.~Should be lubricated with oil.{:rAdjustmentis required.~Sealing pointHOW TO READ WIRING DIAGRAMSBR ~ToGI-EXAMPLE-04~•--L/G ~Next pageBRrF!ilSIGNAL•B SWITCH@)••G/RLG~~POWER POSITIONAr------------------,GI-EXAMPL-02;r--_....R "'""o op';o,,'"Ii"./2QJml!~L@G/R4!~L9__I~~G/R~G/R-.----._------G/RToEL-EXAMPL\L-4t---@(]I)@1IP2ILCMD G/R•9I~~l-~2_-I~I I ,.=-'CD '-T'.LG/RII10P2!0--O~O------<VI~@I!r-,L:@)I @1G/R:@i12:0IiRELAY(li)I~io~.-.J@-u~2:0MOTORCONTROLLER00@T T.91••_L-B +ToEL-EXAMPL15P1:P01models@:P02modelsPreceding pager--------------,I ~I I 100~~I 120WI II..._------------_..1~@)~Bo290291@295945BGIM0002BUY NOW Then Instant Download the Complete Manual Thank you very much!。
Instrument PanelDriver Information InterfaceThe driver information interface shows information such as the estimated travelable distance and fuel economy of the vehicle. It also displays messages such as warnings and other helpful information.■Accessing contents in the main displayPress the (home) button, then roll the left selector wheel to scroll to the content you want to see. Press the left selector wheel to see detailed information.■Switching the Display1Switching the DisplayTo go back to the previous screen, press the (back) button.You can edit, add, or delete the meter contents using the audio/information screen.2Customizing the Meter P.272Instrument Panel(Home) Button Left Selector WheelRoll the left selectorwheel.WarningsP.Safety SupportP.MaintenanceP.Rear Seat BeltsP.Driver AttentionP.Driving SupportP.Traffic SignP.NavigationP.Power/ChargeP.Eco DriveP.Power FlowP.Range & FuelP.Fuel EconomyP.Speed & Time P.AudioP.PhoneP.Instrument Panel■Sub displayPress the TRIP button to change the display.Shows the total number of miles or kilometers that your vehicle has accumulated.■OdometerOdometerOutside TemperatureTrip A Trip BTRIP ButtonInstrument Panel Shows the total number of miles or kilometers driven since the last reset. Meters Aand B can be used to measure two separate trips.■Resetting a trip meterTo reset a trip meter, display it, then press and hold the TRIP Button. The trip meteris reset to 0.0.Shows the outside temperature in Fahrenheit (U.S.) or Celsius (Canada).■Adjusting the outside temperature displayAdjust the temperature reading by up to ±5°F or ±3°C if the temperature readingseems incorrect.■Trip Meter■Outside Temperature1Trip MeterSwitch between trip meter A and trip meter B bypressing the TRIP Button.1Outside TemperatureThe temperature sensor is in the front bumper.Road heat and exhaust from another vehicle canaffect the temperature reading when your vehiclespeed is less than 19 mph (30 km/h).It may take several minutes for the display to beupdated after the temperature reading has stabilized.You can adjust the temperature reading.2Customized Features P.357Instrument PanelRoll the left selector wheel to switch between trip computer A and trip computer B.■Range & FuelLeft Selector WheelRollInstrument Panel ■Trip meterShows the total number of miles or kilometers driven since the last reset. Meters Aand B can be used to measure two separate trips.Resetting a trip meterTo reset the trip meter, display it, then press the left selector wheel and then selectReset.u The trip meter is reset to 0.0.■Average fuel economy (Avg. Fuel)Shows the estimated average fuel economy of each trip meter in mpg or l/100 km.The display is updated at set intervals. When a trip meter is reset, the average fueleconomy is also reset.■Instant fuel economyShows the instant fuel economy as a bar graph in mpg or l/100 km.■RangeShows the estimated distance you can travel on the remaining power and fuel. Thisestimated distance is based on the vehicle’s current fuel economy.1Trip meterSwitch between trip meter A and trip meter B byrolling the left selector wheel.When resetting the trip meter in the Range & Fuel,the trip meter in the sub display resets at the sametime.1Average fuel economy (Avg. Fuel)You can change when to reset the average fueleconomy.2Customized Features P.357Instrument PanelRoll the left selector wheel to switch between trip computer A and trip computer B.■Speed & TimeRollLeft Selector WheelInstrument Panel ■Trip meter2Trip meter P.148■Elapsed timeShows the time elapsed since Trip A or Trip B was reset.■Average speed (Avg. Speed)Shows the average speed in mph or km/h since Trip A or Trip B was reset.1Elapsed timeYou can change when to reset the elapsed time.2Customized Features P.3571Average speed (Avg. Speed)You can change when to reset the average speed.2Customized Features P.357Instrument Panel■CompassShows the compass screen.■Turn-by-Turn DirectionsWhen driving guidance is provided by the navigation system *, Android Auto or Apple CarPlay, turn-by-turn directions to your destination appear.2Refer to the Navigation System Manual 2Android Auto P.3262Apple CarPlay P.320■Navigation1NavigationYou can select whether to have the turn-by-turn display come on or not during the route guidance.2Customized Features P.357Turn-by-turn directions may not be available for all apps.When the compass or turn-by-turn directions are displayed, you can control some navigation system functions on the driver information interface by scrolling the left selector wheel.2Refer to the navigation systemModels with navigation systemCompassTurn-By-Turn Driving Directions*Not available on all modelsInstrument Panel2Driver Information Interface Warning andInformation Messages P.115Shows the remaining oil life and MaintenanceMinder TM.2Maintenance Minder TM P.533■Warnings1WarningsIf there are no Warnings, None message appears onthe driver information interface.If there are multiple warnings, you can roll the leftselector wheel to see other warnings.(Example)■MaintenanceInstrument PanelShows the current phone information.2Bluetooth ® HandsFreeLink ® P.381■PhoneInstrument Panel■Electric motorThe degree to which the electric motor isbeing powered is displayed by the readings onthe POWER side.■Battery charge in progressThe degree to which the High Voltage batteryis being charged is displayed by the readingson the CHARGE side.■Speed/Distance UnitsEnables you to show another unit on thedriver information interface, head-up display*and audio/information screen and set thedisplayed measurements to read in eithermiles and mph or km and km/h.Press and hold the left selector wheel whenyou select Power/Charge on the driverinformation interface. Each time you do this,the unit will change from miles, mph to km,km/h or vice versa. After this, a confirmationscreen will appear for a few seconds.■POWER/CHARGE Gauge*Not available on all modelsInstrument PanelShows the current audio information.2Audio System Basic Operation P.257Shows the traffic sign recognition system.2Traffic Sign Recognition System P.493■Audio■Traffic Sign Recognition SystemInstrument PanelAppears when any of the rear seat belts arelatched or unlatched.2Seat Belt Reminder P.46■Rear Seat Belt ReminderInstrument PanelThe Driver Attention Monitor analyzes steering inputs to determine if the vehicle is being driven in a manner consistent with drowsy or inattentive driving. If it determines that the vehicle is being driven in such a manner, it will display the degree of the driver’s attention on the driver information interface.When you select Driver Attention on thedriver information interface, bars on it light upin white to indicate the degree of the driver’sattention.2Accessing contents in the main displayP.143■Driver Attention Monitor 1Driver Attention Monitor The Driver Attention Monitor cannot always detect if the driver is tired or inattentive.Regardless of the system’s feedback, if you arefeeling tired, stop in a safe location and rest for as long as needed.Driver InformationInterfaceLeft Selector Wheel(Home) Button LevelInstrument Panel If two bars light up, the Driver Attention Level Low message will appear.If one bar lights up, the Driver Attention Level Low. Time For A Break message will appear, a beep will sound, and the steering wheel will vibrate.If this message appears, stop in a safe location and rest for as long as needed.The message will disappear when the left selector wheel is pressed or when the system has determined that the driver is driving normally.If the driver does not take a break and the monitor continues to detect that the driver is very tired, the message will appear again after approximately 15 minutes, accompanied by a beep and steering wheel vibrations.The message does not appear when thetraveling time is 30 minutes or less.Instrument Panel■The Driver Attention Monitor resets when:•The power system is turned off.•The driver unfastens the seat belt and opens the door while the vehicle is stopped.■For the Driver Attention Monitor to function:•The vehicle must be traveling above 25 mph (40 km/h).•The electric power steering (EPS) system indicator must be off.■Depending on driving conditions or other factors, the Driver Attention Monitor may not function in the following circumstances:•The steering assist function of the Lane Keeping Assist System (LKAS) is active.2Lane Keeping Assist System (LKAS) P.480•The condition of the road is poor, e.g. the surface is unpaved or bumpy.•It is windy.•The driver is frequently operating the vehicle in an assertive manner such as changing lanes or accelerating.■CustomizingYou can change the Driver Attention Monitor settings. Select Tactile And Audible Alert , Tactile Alert , or OFF .2Customized Features P.3571For the Driver Attention Monitor to function:The bars on the driver information interface remain grayed out unless the Driver Attention Monitor isfunctioning.Instrument PanelShows the distance between your vehicle andthe vehicle detected ahead.Informs you whether ACC with Low SpeedFollow and/or LKAS is activated or not. If ACCwith Low Speed Follow is activated, the setfollowing interval is displayed. If LKAS isactivated, the displayed lane marks change toindicate that LKAS is activated.2Adaptive Cruise Control (ACC) with LowSpeed Follow P.4642Lane Keeping Assist System (LKAS) P.480■Driving Support Information1Driving Support InformationIn case ACC with Low Speed Follow is not activated,when the distance between your vehicle and thevehicle ahead becomes too small, the section behindthe vehicle icon turns amber and alerts you.Amber gradation Icon of vehicle aheadDistance to vehicle aheadWhen ACC with Low Speed Follow andLKAS are OnSet Vehicle IntervalACC with Low Speed Follow on: The section behind the vehicle icon turns green.LKAS on: The lane outlines appear on the display.LKAS starts: The lane lines change to solid ones.LKAS suspend: The lane lines change to dotted ones.Instrument PanelIndicates the status of RDM, Low Speed Braking Control *, CMBS TM , and blind spot information system *, such as On, Off, or Failure, by color and letters.The following colors indicate the status of any of the above mentioned systems:•Green: The system is on.•Gray: The system is off.•Amber: There is a problem with the system.■Safety Support 1Safety Support If a system is indicated by the color amber, have your vehicle checked by a dealer immediately.To turn on or off each system, first rotate the leftselector wheel to switch displays. From the next display you can select which system to turn on or off.2RDM On and Off P.4912CMBS TM On and Off P.4532Blind spot information system on and offP.4452System On and Off P.461You can also confirm the status of each function bythe color of the safety support indicator.2Safety Support Indicator (Amber) P.1112Safety Support Indicator (Green/Gray)P.114Even when the Low Speed Braking Control icon is green, if the parking sensor is turned off for the rearonly, the brake assist will not operate when reversing.2Turning off All Rear Sensors P.518Models with Low Speed Braking ControlBraking Control Icon and Status *Not available on all modelsInstrument PanelShows the average fuel economy for the lastthree driving cycles (1-3), and the currentdriving cycle (0) in mpg or l/100 km.Each time you set the power mode to ON, thedisplay is updated, and the oldest record isdeleted.■Average Fuel Economy Recordsuu Gauges and Displays u Driver Information Interface Instrument Panel■Eco Drive Display The vehicle icon on the display moves forward or backward while driving.The more aggressive the acceleration is, the further the icon moves forward.The more aggressive the deceleration is, the further the icon moves backward.Keep the icon near the center of the circle for better fuel economy while driving.■Eco Drive Display/Drive Cycle Score/Lifetime Points 1Eco Drive Display Switch between the average fuel economy A and average fuel economy B by rolling the left selector wheel.Decelerationuu Gauges and Displays u Driver Information InterfaceInstrument Panel ■Drive Cycle Score/Lifetime PointsAppear for a few seconds when you set the power mode to VEHICLE OFF. Each has three stages. Depending on your driving style, the leaf icon(s) and the gauge increase or decrease to indicate that you have reached a different stage of fuel economy.■Resetting the Drive Cycle Score1.Make sure the shift position is in P. Turn the power mode to ON.2.If ECON mode is on, press the ECON button to turn it off.3.Turn the power mode to VEHICLE OFF.4.Turn the power mode to ON again.u Make sure to complete steps from 4 through 6 within 30 seconds.5.Depress the brake pedal twice.6.Press the ECON button twice.u The color of the ambient meter will turn to monochrome.7.Turn the power mode to VEHICLE OFF.Lifetime PointsAdvancinguu Gauges and Displays u Driver Information Interface Instrument Panel Displays the power flow of the motor and engine, indicating the vehicle’s power source and whether the battery is being charged.■Power Flow Monitor 1Power Flow Monitor While the vehicle is stationary with the engine running, the following may appear on the driverinformation interface.Power is supplied by the motor and the engine.Hybrid (HV)The engine is running and the motor is charging the HighVoltage battery.Power is being supplied by the engine only.Engine ONEngine OFFPower is supplied by the motor.Electric Vehicle (EV)The engine is running and the motor is charging the HighVoltage battery.Engine (Direct Drive)The motor is charging the High Voltage battery.Regeneration。