托利多IND221-1000 ,仪表
- 格式:doc
- 大小:54.50 KB
- 文档页数:2

托利多ind221分度值设置摘要:1.托利多ind221分度值设置简介2.托利多ind221分度值设置方法3.托利多ind221分度值设置注意事项4.总结正文:托利多ind221分度值设置是针对托利多ind221设备进行的参数调整,以达到更精确的测量结果。
下面将详细介绍托利多ind221分度值设置的详细步骤及其注意事项。
1.托利多ind221分度值设置简介托利多ind221是一款高精度的测量设备,广泛应用于各种工业领域。
为了确保测量结果的准确性,需要定期对设备进行校准和分度值设置。
托利多ind221分度值设置是一项重要的工作,涉及到设备的测量精度,因此需要操作人员具备一定的专业知识和技能。
2.托利多ind221分度值设置方法托利多ind221分度值设置的具体操作步骤如下:(1)准备工作:首先,确保设备已经关闭并断电。
同时,需要准备相应的工具,如万用表、示波器等,以便在进行分度值设置过程中进行实时监测。
(2)连接设备:将托利多ind221与计算机连接,打开设备对应的软件。
(3)进入设置界面:在软件界面中,找到分度值设置选项,点击进入。
(4)调整分度值:根据设备实际情况和测量需求,调整托利多ind221的分度值。
通常情况下,分度值的调整范围在0.01~1之间。
(5)保存设置:在调整好分度值后,点击软件界面上的保存按钮,将设置结果保存到设备中。
3.托利多ind221分度值设置注意事项在进行托利多ind221分度值设置时,需要注意以下几点:(1)确保设备处于关闭状态,避免在操作过程中发生意外触电事故。
(2)分度值的调整要根据实际测量需求进行,过大或过小的分度值都可能影响到测量结果的准确性。
(3)在调整分度值过程中,要密切关注设备的状态,如有异常情况,应立即停止操作,并与专业人士联系。
4.总结托利多ind221分度值设置是一项关键的工作,关系到设备的测量精度。
因此,操作人员需要具备一定的专业知识和技能,按照正确的步骤进行操作。
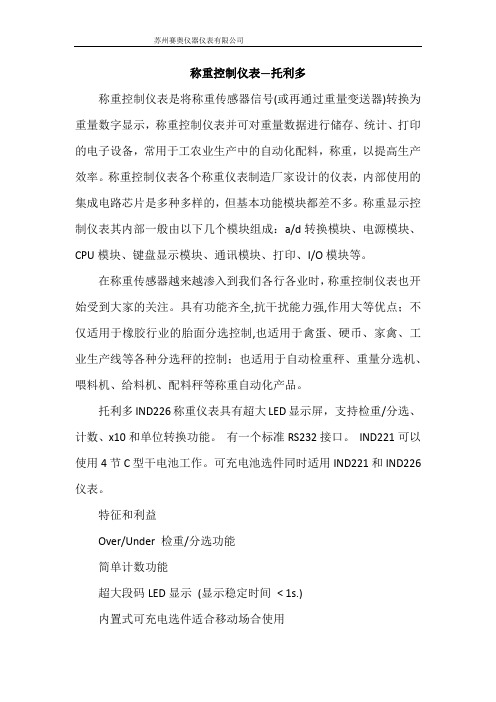
称重控制仪表—托利多称重控制仪表是将称重传感器信号(或再通过重量变送器)转换为重量数字显示,称重控制仪表并可对重量数据进行储存、统计、打印的电子设备,常用于工农业生产中的自动化配料,称重,以提高生产效率。
称重控制仪表各个称重仪表制造厂家设计的仪表,内部使用的集成电路芯片是多种多样的,但基本功能模块都差不多。
称重显示控制仪表其内部一般由以下几个模块组成:a/d转换模块、电源模块、CPU模块、键盘显示模块、通讯模块、打印、I/O模块等。
在称重传感器越来越渗入到我们各行各业时,称重控制仪表也开始受到大家的关注。
具有功能齐全,抗干扰能力强,作用大等优点;不仅适用于橡胶行业的胎面分选控制,也适用于禽蛋、硬币、家禽、工业生产线等各种分选秤的控制;也适用于自动检重秤、重量分选机、喂料机、给料机、配料秤等称重自动化产品。
托利多IND226称重仪表具有超大LED显示屏,支持检重/分选、计数、x10和单位转换功能。
有一个标准RS232接口。
IND221可以使用4节C型干电池工作。
可充电池选件同时适用IND221和IND226仪表。
特征和利益Over/Under 检重/分选功能简单计数功能超大段码LED显示(显示稳定时间< 1s.)内置式可充电选件适合移动场合使用IP65/IP67 –适用于恶劣环境标准带隔离的RS232 接口最大显示分度30'000dOIML 6000e 和NTEP 10'000d 认证最多可驱动. 4个350 ohm 传感器规格 - IND226 - 称重仪表装备选项台式, 立柱或墙式解决方案30000d显示器 6 位, 1.2" 7-段码LED 显示键盘6键附件立柱支架,墙式支架应用计数, 检重/分选, x10 or 单位转换(kg,lb)保护等级IP65/IP67危险区域(防爆)认证无外壳不锈钢Number of attachable1platforms选件可充式镍氢电池Resolution (approvable) OIML 6000e, NTEP 10000d适合的秤台/ 称重模块analog platforms max. 4x350Ω尺寸220x130x137mm / 8,7x5,1x5,4"(LxHxW)接口RS232物料号(s) 72183989。

梅特勒托利多p h计说明书-CAL-FENGHAI.-(YICAI)-Company One1梅特勒托利多p h计说明书文稿归稿存档编号:[KKUY-KKIO69-OTM243-OLUI129-21、技术参数1.1测量范围:pH ~;-1999~1999mV;0~100℃1.2分辨率:;1mV;℃1.3电源:220V/50Hz,9V/DC1.4尺寸/重量:200×175×52mm/1.5环境条件:环境温度:5~40℃;相对湿度:5%~80%2、操作规程校准缓冲溶液组pH计可进行1,2或3点校准,如果使用仪表内置的标准缓冲液组,在校准过程中,仪表能够自动识别标准缓冲溶液的pH值。
仪表内置四组标准缓冲溶液组:对于每一组缓冲液,自动温度补测程序都已固化在仪表中(见附录)。
校准设置:短按设置键,当前MTC温度值闪烁,按读数键确定。
当前预置缓冲液组闪烁,使用▲或▼键来选择使用的缓冲液组,按读数键确认。
一点校准将电极放入缓冲液中,并按校准键开始校准,校准和测量图标将同时显示。
在信号稳定后仪表根据预选终点的方式自动终点(显示屏显现√A)或按读数键手动终点(显示屏显现√)。
按读数键后,仪表显示零点和斜率,然后自动退回到测量画面。
注意:当进行一点校准时,只有零点被调节。
如果电极之前进行过多点校准,它的斜率会被保存。
否则理论斜率,即pH被采纳。
长按校准键,仪表将显示斜率和零点值,然后仪表退回到测量画面。
两点校准按中所述执行一点校准。
仪表自动终点或手动终点后,请不要按读数键,否则将退回测量状态。
用去离子水冲洗电极。
将电极放入下一个校准缓冲液中,并按校准键开始下一点校准。
在信号稳定后仪表根据预选终点方式自动终点或按读数键手动终点。
按读数键后,仪表显示零点和斜率,同时保存校准数据,然后自动退回到测量画面。
三点校准:如一样进行3点校准。
注意:推荐使用温度探头或带内置温度探头的电极。
如果使用MTC模式。
则应将所有缓冲溶液和样品溶液保持在相同的设定温度上。


DCS-1000N操作手册(PLC-V1.1.0;TP-V1.3.0)©Mettler-Toledo , Inc. 2008Mettler Toledo 版权所有。
未经许可不得翻印、修改或引用。
METTLER TOLEDO 为Mettler-Toledo, Inc 的注册商标METTLER TOLEDO 保留修改本手册的权利目录1.概况 (4)2.产品基本参数和主要技术性能指标 (4)3.主要功能介绍 (4)4. 4.IND331称重控制终端主要操作说明 (5)² 4.1 IND331仪表各功能键说明 (5)² 4.2秤的标定及标准参数设定 (6)5.操作说明 (7)5.1控制面板说明 (7)5.2控制柜上电操作 (10)5.3控制柜断电操作 (10)5.4秤的手动操作 (10)5.5初始化操作 (10)5.6秤的自动操作 (10)5.6.1吨袋包装过程的自动操作 (10)5.6.2 空秤超差的处理 (11)5.6.3 超差告警的处理及自动工作的再启动 (11)5.6.4 自动工作过程的中止 (11)5.6.5 自动工作过程的中途退出 (11)5触摸屏操作 (12)6与中控室的接口信号说明 (19)6.1无源触点信号(TO DCS) (19)6.2无源触点信号(FROM DCS) (20)6.3模拟量信号(FROM DCS) (20)7 5 维护和保养 (21)8附录2:IND331参数一览表 (22)1.概况IBC981电子包装秤是梅特勒-托利多(常州)称重设备系统有限公司在现有DCS 型电子包装秤的基础上延伸开发的产品,主要针对集装袋(Intermediate Bulk Container)的包装形式,用于散状物料的自动定量包装。
2.产品基本参数和主要技术性能指标适用物料:具有良好流动性的粉、粒状物料。
(例如:PET、PBT、PTA等)适用包装袋:柔性集装袋,有如下特性:PP编织材料(PE内衬膜或PE淋膜)4只悬挂吊耳公称容积800~1300L (GB/T10454-2000)包装净重:800~1000kg/包;计量精度:±1 kg包装速度:25~40包/小时使用温度:-10℃~+40℃输送方式:输送机运输(托盘-辊道式)3.主要功能介绍²操作简单,称量过程自动化;²完善的充填工艺;²粗细加料独立可调,集装袋适应性强;²采用净重式称量;准确可靠;²用PLC控制自动松袋和脱钩;²气动提升系统;²采用触摸屏,友好的中文人机界面;²用风机(加装空气过滤器)进行空袋涨袋;²气动夹袋;²装袋/装集装箱二种工作模式切换;²可选配打印机进行数据打印;²扩展性强,可选DP-Profibus总线、Modbus-RTU协议总线,模拟量输出等接口。
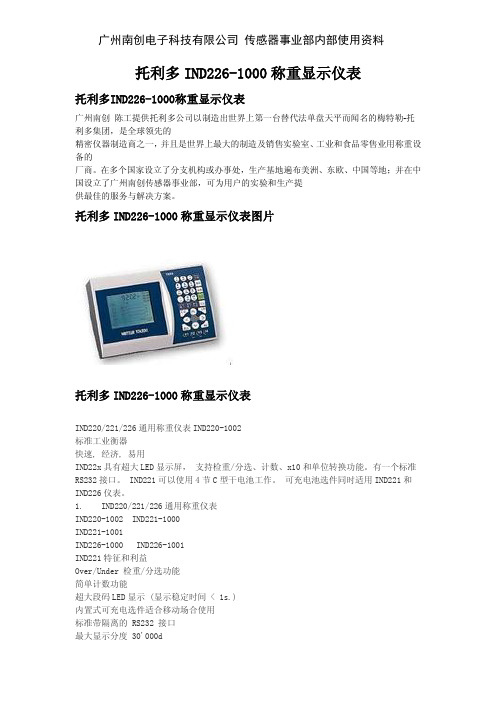
广州南创电子科技有限公司 传感器事业部内部使用资料托利多IND226-1000称重显示仪表托利多IND226-1000称重显示仪表广州南创陈工提供托利多公司以制造出世界上第一台替代法单盘天平而闻名的梅特勒-托利多集团,是全球领先的精密仪器制造商之一,并且是世界上最大的制造及销售实验室、工业和食品零售业用称重设备的厂商。
在多个国家设立了分支机构或办事处,生产基地遍布美洲、东欧、中国等地;并在中国设立了广州南创传感器事业部,可为用户的实验和生产提供最佳的服务与解决方案。
托利多IND226-1000称重显示仪表图片托利多IND226-1000称重显示仪表IND220/221/226通用称重仪表IND220-1002标准工业衡器快速, 经济, 易用IND22x具有超大LED显示屏,支持检重/分选、计数、x10和单位转换功能。
有一个标准RS232接口。
IND221可以使用4节C型干电池工作。
可充电池选件同时适用IND221和IND226仪表。
1. IND220/221/226通用称重仪表IND220-1002 IND221-1000IND221-1001IND226-1000 IND226-1001IND221特征和利益Over/Under 检重/分选功能简单计数功能超大段码LED显示 (显示稳定时间 < 1s.)内置式可充电选件适合移动场合使用标准带隔离的 RS232 接口最大显示分度 30'000dOIML 6000e 和 NTEP 10'000d 认证最多可驱动. 4个350 ohm 传感器本条信息METTLER TOLEDO IND220-1002仪表托利多IND226-1000称重显示仪表技术指标安装尺寸 220mmx150mmx156mm外壳塑料 IP54 防护显示 6 位1.2 英寸超大高亮绿色LED 显示。
固态显示器防撞击按键 6 个功能键准确度 OIML 6000e, NTEP 10000d量程双量程分度数 1,000 - 30,000 分度A/D 速率 27 次/秒传感器驱动能力最多可接4 个350 欧姆传感器交流电源 100-240VAC 50/60Hz 宽电压输入直流电源镍氢可充电池(选件)/干电池单位转换 kg、lb设定参数保护设定参数双备份,参数永不丢失主要功能 x10 功能 / 检重功能,两种显示模式可选 / 计数功能,带APW 自动增强中、英文打印功能。
托利多ind221分度值设置
【原创版】
目录
1.托利多 ind221 分度值的概念
2.设置托利多 ind221 分度值的步骤
3.注意事项和常见问题
正文
一、托利多 ind221 分度值的概念
托利多 ind221 是一种测量仪器,用于测量各种物理量,如长度、角度、压力等。
分度值是指测量仪器上最小可分辨的单位,也称为最小刻度值。
分度值的设置对于精确测量至关重要,直接影响到测量结果的准确性和精度。
二、设置托利多 ind221 分度值的步骤
1.首先,打开托利多 ind221 测量仪器,找到分度值设置菜单。
通常在设置菜单中,有一个选项叫做“分度值设置”或者“最小刻度值设置”。
2.其次,根据需要测量的物理量,选择相应的分度值。
例如,如果需要测量长度,则选择长度单位,如毫米、厘米等;如果需要测量角度,则选择角度单位,如度、分、秒等。
3.最后,根据实际测量需求,设置合适的分度值。
通常情况下,分度值越小,测量结果越精确;但是,分度值越小,测量时间也会相应增加。
因此,需要根据实际需求,权衡精度和效率,选择合适的分度值。
三、注意事项和常见问题
1.在设置分度值时,需要确保测量仪器已经校准,否则可能导致测量结果不准确。
2.在使用过程中,如果发现分度值设置不合理,可以随时调整。
但是,需要注意,调整分度值可能会影响已经进行的测量结果。
3.如果在设置分度值过程中遇到问题,可以参考说明书或者咨询专业人士。
总之,设置托利多 ind221 分度值是保证测量结果准确性和精度的重要环节。
IND221IND226Industry TerminalUser/Service ManualMETTLER TOLEDO182837 (2006-5-25)PRECAUTIONSREAD this manual BEFORE operating or servicing this equipment.FOLLOW these instructions carefully.SA VE this manual for future reference.DO NOT allow untrained personnel to operate, clean, inspect, maintain, service, or tamper with this equipment.ALWAYS DISCONNECT this equipment from the power source before cleaning or performing maintenance.Note: If the unit has been stored or transported in below freezing temperatures, allow the unit to warm up to room temperature before turning on AC power.In conformance with the European Directive 2002/96/ EC on Waste Electrical and Electronic Equipment (WEEE) this device may not be disposed of in domestic waste.This also applies to countries outside the EU, per their specific requirements.Please dispose of this product in accordance with local regulations at the collecting point specified for electrical and electronic equipment.If you have any questions, please contact the responsible authority or the distributor from which you purchased this device.Should this device be passed on to other parties (for private or professional use), the content of this regulation must also be related.Thank you for your contribution to environmental protection.Contents1.0Overview (1)1.1 Specification (1)functions (1)1.2 Main1.3 Dimensions (2)information (2)1.4 Order2.0Install (3)package (3)the2.1 OpenConnect (3)2.2 Electronic2.2.1Open the terminal (3)2.2.2Load Cell Connect (3)2.2.3Com1 RS232 (4)2.3 Leadseal (4)Pack Option (5)2.4 Battery2.4.1Battery install (5)2.4.2Recharge Battery (5)2.4.3Use Battery (5)3.0Operation (1)3.1 Operation HMI (1)3.2 Basic function operation (1)3.2.1On/Off key (1)3.2.2Zero (1)3.2.3Tare (1)3.2.4Clear (2)3.2.5Print (2)functions (2)3.3 Expand3.3.1X10 Function (2)3.3.2Unit switch (2)3.3.3Over/Under Function (2)3.3.4Counting Function (4)4.0Setup (1)4.1 EnterSetup (1)in setup (1)4.2 KeysDetails (10)4.3 Setup5.0Terminal Maintenance (17)maintenance (17)5.1 DailyMessages (17)5.2 Error5.3 Software download (18)1.0 Overview1.1 Specificationz 6 digits 1.2” /30.5mm large green LED display. Robust long life. z 6 Function keys, simple and easy.z IND221: Plastic, Protection IP5x.z IND226: Stainless steel, Protection: IP65.z Executive voltage:+5VDC.z Load Cell capability: Maximum 4-350ohm analog load cell.z Zero signal input ranges: 0-5mV.z SPAN signal input ranges: 1-10mV.z Resolution: 1,000,000.z Increments: 1,000 - 30,000z A/D Rates: 27 /seconds.z Working voltage: 100-240VAC, 0.1ADC: NI-HM rechargeable battery (Optional)DC: C Size Dry Battery (only for IND221)z RS232 Serial portz Working temperature: -10°C - +40°C, Relative Humidity < 90%. z Storage temperature: -20°C - +60°C, Relative Humidity < 90%.1.2 Main functionsz Basic weighing: Zero, Tare, Clear, Print.z Auto print function.z Units switch: kg, lb.z x10 function / Simple check weighing / Counting.z English/Chinese print formats.z Support micro ticket printer PQ16.z Power saving technology. Low battery icon.z Auto power off.z Software download1.3 DimensionsIND221IND2261.4 Order informationModel Name Descriptions P/N IND221-1000 Plastic Standard(with dry battery case) 72183995 IND221-1001 Plastic With Ni-MH rechargeable battery 72183997IND226-1000 Harsh, Standard 72183987 IND226-1001 Harsh, With Ni-MH rechargeable battery 721839892.0 InstallThis part will talk about the installation for IND221 and IND226. Please read this chapter carefully before install.2.1 Open the packageOpen the package, and check all the parts with the checklist. Make sure no parts were damaged and missing.Remove the terminal from its protective package.2.2 Electronic Connect 2.2.1 Open the terminalThe IND221 terminal use 4 screws to lock the front cover.The front panel of the IND226 terminal is locked in place by four spring clips attached to the enclosure body. To gain access to the terminal’s PCB for internal wiring and setting switches, separate the front panel from the enclosure as follows:Insert the tip of a flat-blade screwdriver into one of the two slots located on the bottom of the front panel assembly and gently push in toward the enclosure. A “pop” sound is made when the cover is released.2.2.2 Load Cell Connect7 Pins terminal strip. Pin 1 - +EXC Pin 5 - -SIG Pin 2 - +SEN Pin 6 - -SEN Pin 3 - +SIG Pin 7 - -EXC Pin 4 - Shield+E X C +S E N +S I G S h i e l d -S I G -S E N -E X CFor 4 wires load cell, you should short the W1 two pins, and short the W2 two pins in PCB.IND221 use PG9 cable bush grip, the allow cable diameter is 4 to 9mm. IND226 use PG11 cable bush grip, the allow cable diameter is 5 to 10mm. We recommend use CMX or CM cables for load cell connect. The cable information: z Type: CMX, CM z Parameter: 6x0.2mm 2 z Voltage: Max. 380Vz Temperature range: -30~+80° z Cable diam: 6.1±0.15mm.z Isolation material: UBEC180 polyethylene. z Protection jacket: 90°C HZ-90(318#)2.2.3 Com1 RS232IND221:RS232 use D-Sub Male connectorPin 2 - RXD Pin 3 - TXD Pin 5 - GNDIND226:Serial port use 3 Pins terminal strip. Pin 1 - TXDPin 2 - RXD Pin 3 - GND2.3 Lead sealAfter setup and calibration you can seal the terminal.Lead sealing:IND221: IND226:1T X D R X D G ND6 7 8 9123235IN D226C omputerD B92.4 Battery Pack Option2.4.1 Battery installRecharge PCB install:IND221 IND226 NI-HM battery package install:IND221 IND2262.4.2 Recharge BatteryWhen the low battery cursor light on red color, it means the battery voltage is low, you can still continuous your work for about one hour..When the low battery cursor flash on red color, it means the battery voltage is too low, you should charge the battery immediately.Plug the AC power line will automatic recharge the battery, and the low battery cursor will light on green color. Normally the charge time is about 12 hours.For new terminal, please charge the battery for 12 hours before use the battery.2.4.3 Use BatteryFull charged battery can continuous work 35 hours.The following setup can longer the work hours:z Set timeout (F3.1.1), When the scale hasn’t operate for certain time, the terminal will automatic turn off the display. Only kg cursor light. And when the scale was added weight or press any key on terminal. The terminal will automatically turn on the display.z Set brightness to low (F3.1.2). When the terminal use battery, the display brightness will turn to low, when use AC power, the display brightness will automatically change to high.z Set Auto power off (F3.2), When the scale haven’t any operation in certain times, the terminal will automatically power off.Note: Remove the battery out if the terminal will be stored for a long time.3.0 Operation 3.1 Operation HMIBatteryUnitsRanges FunctionMotionNet“Under OK Over” is use for check weighing. You can stick ”Count APW PCS” label for counting function.3.2 Basic function operation3.2.1 On/Off keyHold the key 2 seconds, All display segments will light. Theterminal will show software part number [178037] [L 1.00].Then the terminal will show the normal weight.In normal display state, Hold this key 2 seconds, the terminalwill show [ -OFF-], then power off.Zero the scale.Tare the scale, the display will change to Net mode..3.2.4 ClearClear the tare, the display will go back to gross mode.Print the current weight.3.3 Expand functions 3.3.1 X10 FunctionF2.1 is set to ÑÖUL10 - x10 function. The terminal will showmore accuracy weight for 20 seconds.Print is forbidden in this mode.3.3.2 Unit switchF2.1 is set to Unit – Unit switch Presskey, you can switch theweight units at kg or lb.3.3.3 Over/Under FunctionF2.1 is set to OVEr - Over/Under functionz F2.1.1 is set to CHECh - Check weighing mode. Target weight setting:Press key to switch Over/UnderThe terminal show the old target weight..Under OK Over NET >|1|< >|2|< lb kgUnder OK Over NET >|1|< >|2|< lb kgUnder OK Over NET >|1|< >|2|< lb kgCount APW PCS NET >|1|< >|2|< lb kgUnder OK Over NET >|1|< >|2|< lb kgUnder OK Over NET >|1|< >|2|< lb kgIf F2.2.2 is set to WEIGHt - Get target weight from weighing. Then you can putthe target weight in scale platform. PressIf F2.2.2 is set to MAnUAL - Manually set the target weight. You can input target weight directly, then press Enter to confirm.Operation:Current weight less than target weight and over tolerance.Current weight near the target weight and within tolerance.Current weight larger than target weight and over tolerance.z F2.1.1 is set to CLASS- Classifying mode. Target weight setting:key to switch Over/Underpress Tare key to tare the weight.The terminal show the old target weight..If F2.2.2 is set to WEIGHt -Get target weight from weighing. Then you can put If F2.2.2 is set to MAnUAL - Manually set the target weight. You can input target weight directly, then press Enter to confirm.Operation:Under OK Over NET >|1|< >|2|< lb kgUnder OK Over NET >|1|< >|2|< lb kgUnder OK Over NET >|1|< >|2|< lb kgUnder OK Over NET >|1|< >|2|< lb kgUnder OK Over NET >|1|< >|2|< lb kgUnder OK Over NET >|1|< >|2|< lb kgUnder OK Over NET >|1|< >|2|< lb kgUnder OK Over NET >|1|< >|2|< lb kgUnder OK Over NET >|1|< >|2|< lb kgCurrent weight less than target weight and over tolerance.Current weight near the target weight and within tolerance.Current weight larger than target weight and over tolerance.3.3.4 Counting FunctionF2.1 is set to Count - Counting function. Stick “Count APW PCS” label at “Under OK Over” position. Display Mode switch:Normal display mode.mode, show average piece weight.Sampling:5,10,20,50. Put the sample pieces on scale platform, press Enter to confirm.Display mode will go back to counting PCS mode.APW Enhancement:If F2.3 = On , Enable APW enhancement function. Then after the pieces number increased, the terminal will automatically adjust the average weight to get more accuracy pieces number.Under OK Over NET >|1|< >|2|< lb kgUnder OK Over NET >|1|< >|2|< lb kgUnder OK Over NET >|1|< >|2|< lb kgCount APW PCS NET >|1|< >|2|< lb kgCount APW PCS NET >|1|< >|2|< lb kgCount APW PCS NET >|1|< >|2|< lb kgCount APW PCS NET >|1|< >|2|< lb kgCount APW PCS NET >|1|< >|2|< lb kgCount APW PCS NET >|1|< >|2|< lb kg4.0 Setup4.1 Enter Setupkey 2 seconds, terminal will show [MAStEr] . Ask for password: Supervisor password:parameters).to confirm. Terminal will show [SEtUp] ..If F1.1is set OIML or NTEP. Then F1, F5.1 and F5.4 will be disabled for setup.The only way you can setup them is turn off the terminal, hold the S1 key in PCB, then turn on the terminal. The terminal will show “SEtUp” directly, now you can setup everything.4.2 Keys in setupparameterparameterGo back to previous setupDigits Input: Press4.3 Setup DetailsF1 – ScaleF1.1 – ApprovalSelection: no(Factory default) - noneOIÑÖL- OIMLntEP- NTEPotHEr- Other approvalF1.2 – Scale Capacity & IncrementsF1.2.1 – UnitsSelection: 1- kg (Factory default)2- lbF1.2.2– RangesSelection: 1 r - 1 Range (Factory default)2 r- 2 RangesF1.2.3– Capacity (First Range)Selection: 3 … 20’000 (Factory default 6)F1.2.4 – Increments (First Range)Selection: 0.0001 … 10(Factory default0.001)F1.2.5– Capacity (Second Range)Selection: 3 … 20’000 (Factory default 3)Notes: Capacity (Second Range) should less than Increments (First Range).F1.2.6–Increments (Second Range)Selection: 0.0001 ~ 10(Factory default 0.001)F1.3– CalibrationF1.3.1GEO AdjustmentSelection: 0…31 (Factory default16)F1.3.2 – LinearitySelection: On- EnabledOFF- Disabled (Factory default)F1.3.3 – Calibrationz If F1.3.2is set to On[E SCL]Empty scale.Remove any load from scale platform, then press Enter to confirm.Terminal will count down from [10 CAL] to [ 0 CAL].[FULL Ld] Add full load.Add load on the scale platform, then press Enter.[000000]Input weight number, then press Enter to confirm. Terminal will count down from [10 CAL] to [0 CAL].[ donE ]Complete.z If F1.3.2is set to OFF[E SCL]Empty scale.Remove any load from scale platform, then press Enter to confirm.Terminal will count down from [10 CAL] to [ 0 CAL].[Add Ld]Add middle loadAdd load on the scale platform, then press Enter.[000000]Input weight number, then press Enter to confirm. Terminal will count down from [10 CAL] to [0 CAL].[FULL Ld]Add full load.Add load on the scale platform, then press Enter.[000000] Input weight number, then press Enter to confirm. Terminal will count down from [10 CAL] to [0 CAL].[ donE ]Complete.F1.4– Zero FunctionF1.4.1– AZMSelection: OFF, 0.5d(Factory default),1d,3dF1.4.2– Power up ZeroSelection: OFF, 2%,10%(Factory default), 20%F1.4.3– Pushbutton ZeroSelection: OFF,2%(Factory default),10%,20%If F1.1 is set to OIML, Then F1.4.2 will set to 10%, and F1.4.3 will set to 2%.F1.5– Tare FunctionF1.5.1–Auto TareSelection: On, OFF(Factory default)F1.5.2– Auto ClearSelection: On, OFF(Factory default)F1.5.3 – Tare InterlockSelection: On, OFF(Factory default)F1.5.4– Auto Tare threshold.Selection: 0 - FS(Factory default10d)F1.5.5 – Auto Tare reset thresholdSelection: 0 - FS(Factory default10d)F1.6– Digital filterF1.6.1– Digital filerSelection: Lo- LowÑÖEd (Factory default) - MiddleHIGH- HighF1.6.2 – Motion rangeSelection:0.5d(Factory default),1d,3dF1.10 – F1 Factory defaultReset all F1 parameters to Factory default. Not include calibration values. F2– ApplicationF2.1– F key functionSelection: ÑÖUL10(Factory default) - x10Unit- Unit switchOVEr- Over/UnderCount- CountingF2.2 – Over/Under functionF2.2.1– Display modeSelection: CHECh(Factory default) - Check weighingCLASS- ClassifyingF2.2.2– Target InputSelection: WEIGHt(Factory default)- By weightMAnUAL- ManuallyF2.2.3– Plus ToleranceSelection: 0…FS(Factory default 10d)F2.2.4– Minus ToleranceSelection: 0…FS(Factory default10d)F2.3– APW Enhancement(F2.1is set to Counting)Selection: On,OFF(Factory default)F2.10– F2 reset to Factory defaultAll F2parameters will be set to Factory default.F3 – TerminalF3.1– DisplayF3.1.1– Screen saver timeoutSelection: 0, 10 - 999seconds (Factory default60s) 0 will disabled this function.F3.1.2– BrightnessSelection: Lo(Factory default) - Low brightHIGH - High brightRecommend to set Low if you use battery to operation.F3.2– Auto power offSelection:0, 5~60 minutes (Factory default 5 minutes)0will disabled this function.F3.3– Battery typeSelection: drY(Factory default) - Dry batteryni-ÑÖx -Ni-MH rechargeable batteryLEAd-A -Lead-Acid rechargeable batteryF3.10 – F3 reset to Factory defaultAll F3 Parameters will be set to Factory default.F4– CommunicationF4.1– ConnectionsSelection: Print(Factory default) - Demand printAutoprintAPrint -SICS- SICSContin- Toledo continuous mode F4.2– FormatF4.2.1– Line formatSelection: ÑÖULti(Factory default) - Multi linelineSingleSinGLE -F4.2.2– Print formatSelection: StAndr(Factory default)- StandardOVEr -Over/UnderCountCount -F4.2.3– Print languagesSelection: EnG(Factory default) - EnglishChineseCHn -F4.2.4– Add Line FeedSelection: 0~9 (Factory default 3)F4.2.5– Auto print thresholdSelection: 0 ~ FS (Factory default10)F4.2.6– Auto print reset thresholdSelection: 0 ~ FS (Factory default10)F4.3– Com1F4.3.1 – Baud rateSelection: 1200,2400,4800,9600(Factory default),19200F4.3.2 – Data bits/ParitySelection: 7-odd- 7 bits odd parity7-EvEn - 7 bits even parity8-nonE(Factory default)- 8 bits none parityF4.3.3– Xon/XoffEnabled Selection: On -OFF (Factory default) - DisabledF4.3.4– ChecksumEnabledSelection: On -OFF(Factory default) - DisabledF4.10 – F4 reset to Factory defaultAll F4parameters will reset to Factory default.F5 – MaintenanceF5.1– Calibration valuesF5.1.1 – Zero CountsF5.1.2 – Middle load weight (half capacity)F5.1.3 – Middle load countsF5.1.4– Full load weightF5.1.5– Full load CountsF5.2 – Keypad testTerminal show “PrESS”, You can press Zero, Tare, F, Clear, Print. On/Off key to exit.F5.3– Display testAll display segments will light.F5.4– Display internal resolutionDisplay internal resolution.F5.5 – COM1 testConnect COM1 to computer to test COM1.F5.6– Print setupPrint all setup parameters.F5.10– Reset all parameters to Factory defaultReset all F1~F4 Reset all parameters to Factory default. Not include calibration values.F6 – Exit Setup[SAVE] Press Enter to confirm save changes and exit..Press Tare key, the terminal will show[AbOrt] , will not save changes and exit.5.0 Terminal Maintenance5.1 Daily maintenanceMain PCB:connector.- KeypadJ1J2 - Load cell connector.connector.- RS232J3J6 - AC power in, 87~264VAC.J7 - DC power in, from rechargeable PCB and Dry battery.out, to rechargeable PCB.powerJ8- ACW1 ,W2 - 4 wires load cell connectors.use.W3- Factoryswitch.S1- CalibrationF1 - Fuse, 250V 1.5A.5.2 Error Messagesreasons Solution Message Possible{||||}Over load, more than 9dabove scale capacityReduce the load<____>Under Zero 5d Zero the scale{|no|}<_no_>Over the zero range Remove the load--no-- Key forbidden Check setupErr 3 EEPROM verify error Reset the terminalErr 35 Scale is in motion whencalibrationCheck the scale Err 4 Samples number too small. Add sample number Err 6 EEPROM W/R error Replace EEPROM Err 70 The keys hold too longThe key may be shortReplace keypadTerminal auto power off Terminal is set auto power off.Battery voltage to low.Press On/off keyRecharge batteryTerminal not lightafter power onFuse break Replace fusebattery can’t be charged Batter type set incorrectBattery was damagedSet F3.3 the correctbattery type.Replace battery.Battery working hour decreasedrapidly Battery charge not full.Battery life was reachedCharge battery longerReplace new battery5.3 Software downloadIND221 and IND226 can download software in the field by using Windows HyperTerminal software. Protocol: 19200, 8, None, Xmodem.METTLER TOLEDO (Changzhou) Scale & Syatem Ltd. Address: 111 Changxi Road, Changzhou, Jiangsu, ChinaTel: +86 519 6642040Fax: +86 519 6641991ZIP code: 213001 。
托利多IND221-1000仪表
托利多IND221-1000仪表产品介绍
1.2¨/ 30mm超大显示
IND22X系列称重显示仪是梅特勒-托利多公司最新推出的具有超大高亮LED显示的称重仪表
采用树型菜单,操作简单易学
先进的数据处理,可以快速反应称重结果
独有的仪表节电技术,有效提高电池使用寿命
超大LED显示,适合各种环境应用。
称重结果一目了然
绿色仪表无铅设计和制造,符合欧洲RoHS要求
托利多IND221-1000仪表图片
托利多IND221-1000仪表
IND220-221-226:
IND220-1002
IND221-1000
IND221-1001
IND226-1000
IND226-1001
XK3122:
IND780称重终端
78S面板式单色
78L防尘式单色
78R面板式彩色
78J妨尘式彩色
以上不单独销售,须与以下选件组合销售
IND780插槽1-6
1 模拟秤台接口板
3 PowerCell数字秤台接口板
4 IDNet,DigiNet数字秤台接口板
A RS232/422/485串行接口板
B 4进4出继电器接口板
托利多IND221-1000仪表
以上内容技术参数以《OIML60号国际建议》92年版为基础,最新具体变化可查看《JJG669—12托利多广州南创传感器事业部检定规程》。