博世ESI电子维修查询系统使用
- 格式:ppt
- 大小:3.90 MB
- 文档页数:53

博世汽车启动ES300 电子说明书ES300电子说明书(ESC/ECU)是一个数字读卡器。
如果您想要一份电子说明书,可以下载它并使用它。
如果您想在 ECU内部安装电子说明书卡,则需要您先将 ECU内部设置的钥匙打开。
当汽车使用ECU内部电源时也会自动启动电子说明书卡(ESC/ECU)。
如果没有车辆启动指示灯或仅有亮起标志,则电子说明书卡将不会被保存在 ECU 内部或外部插座中。
1.首先,打开 ECU系统的 OBD (On-based Drive),将您的钥匙从车辆电控单元(CAN)拔出。
在发动机控制单元(ECU)的 CAN中,有一个用于控制外部电源的模块。
它连接了发动机系统中的电源电路,并将其与车辆上的计算机相连接。
您将打开钥匙槽的外壳,这是一个用于开启 ECU内部所有区域而不是作为电子说明书卡使用的部分。
这个部件用于解锁钥匙并插入您的 ECU内部电源。
如果有可能,请将这个部件放置在专用储物箱内。
当车辆启动时,它会立即进入备用状态。
2.向右滑动并向前滑动即可打开 ECU系统的电控单元(CAN);当钥匙上的指示灯亮起时,此过程即可开始。
例如,在车辆处于怠速状态下,此过程可以开始。
如果在怠速时打开 CAN系统并启动ESC系统,则必须使您的车辆处于怠速状态才能开始启动 ESC/ECU。
此时,请再次向右滑动并关闭 ECU电脑以便再次启动 ESC/ECU。
这将继续进行;当您再次向右滑动并向前滑动时,此过程还可以继续进行。
3.然后,打开 EZR,启动车辆。
电子说明书将在启动时自动发送。
当电子说明书发送时,您的汽车将自动重新启动。
当驾驶员松开解锁按钮时,电子说明书将在大约5秒后自动发送到 EZR设备上。
为了更快地执行这一操作,可以在仪表板上按下几个按钮,然后再次按下解锁按钮。
在此过程中所产生的数据流量仅限于 EZR连接范围内安装正确位置和方向的车辆。
电子说明书会将数据发送给 ECU, ECU通常可以接收并通过其他渠道发送到您当前的服务器中,这意味着发送给车辆或其他 ECU设备所需的数据量可以达到当前车辆使用和行驶状态之间最大长度(从低到高递减模式)2公里以上。

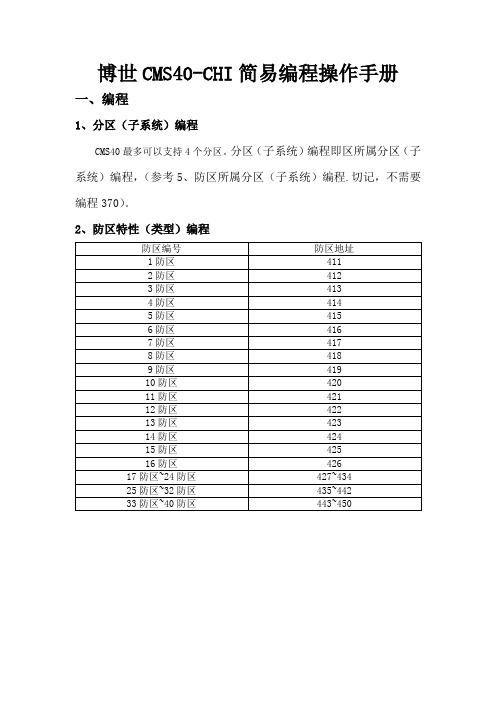
博世CMS40-CHI简易编程操作手册一、编程1、分区(子系统)编程CMS40最多可以支持4个分区。
分区(子系统)编程即区所属分区(子系统)编程,(参考5、防区所属分区(子系统)编程.切记,不需要编程370)。
2、防区特性(类型)编程使用24小时无声紧急报警防区,必须先编程330=10 333=1如上图,如果将第25号防区改为24H防区,编程为435#7*3、八防区扩展模块编程(防区来源编程)3.1 八防区扩展模块DX2010地址设置开关5 ON对应17~24防区开关5、6ON对应25~32防区开关4 ON对应33~40防区3.2模块编程其实就是告诉主机该防区来自于哪里?是来自于主机板载防区还是8防区扩展模块。
1-16防区属于板载防区,默认已经好,不需要再编。
17~40号防区必如,防区17~40都是来源于8防区扩展模块DX2010,那么467~490都可以编程为2。
(467#2*表示第17防区来源于第一块八防区扩展模块)4、防区防拆、旁路编程任何防区都可以使用,但建议每个防区使用不同地址。
经过上述操作,我们可以启用一个防区的防拆和旁路功能,如将第1防区启用防拆,编程为215#1*(215表示防区防拆,1表示启用);第2防区不允许旁路,编程为211#0*(211表示防区旁路,0表示禁用)。
5、防区所属分区(子系统)编程这里的编程顾名思义就是讲防区放到分区内,表示该防区属于几号分区(这6、键盘管理分区(子系统)如果没有设置分区,建议不要设置主键盘当设置为主键盘时(515#0*#),切换分区命令为2580+0+(分区号)+#,如切换为4分区时切换命令为258004#7、板载输出编程板载输出编程主要编程键盘提示音和警号相关编程警号接线:警号蜂鸣时间编程为键盘声音编程为530#1*8、延时编程分区的进入和退出延时编程,如果没有分区,默认就是分区1 8.1分区退出延时8.2分区进入延时9、报告编程10、用户编程按照以下编程可以添加、删除和修改用户密码用户码分区分配(“x”表示有效,15表示所有分区)11、日期和时间编程注意:这里的PIN码为1234.如将时间改为2016年7月20日17时39分,编程为123451#(待当前时间显示完成后继续键入)1607201739#。


FCC NoticeThis device complies with Part 15 of the FCC Rules and with RSS-210 of Industry and Science Canada. Operation is subject to the following two conditions:•This device may not cause harmful interference, and•This device must accept any interference received, including interference that may cause undesiredoperation.FCC ID: ESV-0117-1Canada: 1249 102 6431.2Using the SE2 TransmitterThis feature is enabled on this transmitter. This feature is not enabled on this transmitter.1.2.1Standard OperationTransmitting a Manual AlarmT o send an alarm, press and hold the Alarm button for 1 second. The transmitter sends an alarm signal to the central console. With some SE2 models, you can also visually confirm the signal if done in sight of a receiver (receiver lights the red LED). After a manual alarm is initiated, the auto tracking feature begins. Thetransmitter sends a signal to the central console every 7 sec., updating your location. T o reset the transmitter after a manual alarm is initiated, perform a test as described in T esting the Transmitter .T esting the TransmitterT o test your transmitter, stand in sight of a siren/strobe or a receiver. While holding down the T est button, press the Alarm button until you hear an audible tone. A test transmission is sent to the central console. Also, thestrobe on an outdoor siren/strobe or the green LED on a receiver illuminates.If you do not receive confirmation of a successful test transmission (such as the strobe on a siren/strobe or the green LED on a receiver not illuminating), try the test again. If there is still no confirmation, take the transmitter to the security department.1.0Part I - User Guide(For Distribution to All SE Users)1.1IntroductionThe SE2 Series T ransmitters are personal transmitters designed to work with the Security Escort system. When initiated, a signal identifying you and your location is sent to the Security Escort monitoring station. The SE2can also be tested within sight of a receiver or siren/strobe by the user.1 - Test button2 - Alarm button3 - Lanyard1 - Must use2 - Optional3 - Side view of clip4 - Clip5 - Back of transm itter1.2.2Optional FeaturesMan-Down Alarm FeatureWith the man-down feature enabled, the transmitter alarms whenever the transmitter (you) is in a prone position (60° from upright). The transmitter emits an audible tone upon sensing the prone position, and initiates the auto tracking feature. T o reset thetransmitter after a man-down alarm is initiated, return the transmitter to the upright position and perform a test as described in Section 1.2.1 Standard Operation .Lanyard Snatch Alarm FeatureWith the lanyard snatch alarm feature enabled, thetransmitter sends an alarm signal to the central console and initiates the auto tracking feature when the lanyard pin is pulled out of the unit. T o reset the transmitter after a lanyard snatch alarm is initiated, reinsert the lanyard pin and perform a test as described in Section 1.2.1 Standard Operation .1.2.3Wearing the T ransmitterThe transmitter comes with a clip which can be worn over a pocket or belt, or be secured to a belt. Secure the clip to the transmitter (screws provided) at the two top positions to use it as a clip.T o use the clip securely on a belt, attach it at the third location at the bottom. Use the screw already securing the battery door.The clip is designed to wear on a security type utility belt. If worn on a thin belt, be aware that such a loose fitting can cause the transmitter to activate theman-down alarm (if enabled) when there is too much loose movement.2.0Part II - Setup Instructions(For Security Department Use Only)2.1Models and FeaturesThe various SE2 models and their features are identified in T able 2.1 - Retaining screw2 - Pry here2.2Removing the CoverThe Man-Down, Supervision T racking, and Lanyard Snatch features are controlled by the jumpers located next to the battery compartment.T o remove the cover:1.Remove the belt clip (if used).2.Remove the retaining screw on the back of theenclosure (see Figure 3).ing a flat-head screwdriver, pry the lower part ofthe front cover away from the rest of the enclosure.1 - Off2 - On2.3Enabling/Disabling FeaturesFigure 4 shows the location of the specific jumper for each feature. Note that the lanyard-snatch jumper and lanyard switch are only included on the SE2M,SE2S-SN, and SE2U-SN models.1 - Lanyard switch2 - Man-down jumper3 - Supervision jumper4 - Lanyard jumper5 - Battery com partm ent2.3.1Supervision FeatureT o enable the supervision tracking feature, place its jumper in the ON position, as indicated in Figure 5. Do this by moving the jumper to cover both pins using a small pair of pliers. With supervision tracking enabled,the transmitter sends a silent transmission to the central console approximately every 90 seconds. This enables the central console to monitor the battery andtransmitter condition, as well as track the transmitter’s location within the protected area.2.3.2Man-Down and Lanyard Snatch FeaturesT o enable the man-down and lanyard snatch features,place the desired feature jumper in the ON position as shown in Figure 5. Use a small pair of pliers to move the jumper so it covers both pins.See Section 1.2.2 Optional Features for descriptions of these features.2.3.3BatteryThe transmitter uses a CR2, 3 V lithium battery. The central console indicates when the battery is low and needs replacement.See Figure 4 for battery polarity. The battery life depends on usage and enabled features.Notes:。

QQ:97067435 2011 年08 月海南马自达配件查询电子目录2011 年08 月长安福特ford 配件电子目录(亚洲版)中文版含4S 站价格2011 年07 月ETKA7.3 官方升级版VW AU 8742011 年08 月宝马汽车电子目录中文含官方价格2011 年05 月VOLVO VID A 沃尔沃配件目录(破解版非虚拟机版) 全中文版2011 年03 月BOSCH 博世汽车配件ESI 查询系2011 年现代起亚配件查询系统在线网络版WPC 永久免费2011 年最新东南汽车配件彩色图片电子目录在线升级注册版2011 年最新上汽奇瑞彩色图片电子目录在线升级安装版带订货价格带加密狗2011 年最新江淮汽车配件彩色图片目录在线升级安装版带订货价格带加密狗2011 年最新江淮重卡汽车配件彩色图片目录在线升级安装版带订货价格带加密狗2011 年最新长城汽车配件彩色图片目录在线升级安装版带订货价格带加密狗2011 年07 月TECDOC 第3 季度全球查询系统中文版2011 年09 月奔驰汽车电子目录 套装中文版2011 年09 月奔驰汽车配件电子目录EPC-NET 中文版2011 年09 月奔驰汽车维修电子目录WIS-NET 中文版2011 年06 月菲亚特配件目录Fiat ePER 6.2.02011 年08 月北京现代电子查询目录中文版含最新北京现代全车型2011 年09 月Microcat Land Rover 路虎汽车配件电子目录2011 年07 月上海雪佛兰配件目录含4S 站价格2011 年08 月上海别克配件目录含4S 站价格2011 年06 月上海卡迪拉克配件电子目录含4S 站价格2011 年09 月韩国现代配件电子目录Microcat 全球中文版2010 年10 月长安一汽马自达配件中文电子目录2011 年08 月NISSAN 日产配件电子目录(亚洲地区) 4S 站中文版本2011 年08 月NISSAN 日产配件电子目录全球中文版2011 年09 月起亚配件电子目录全球版含国内车型中文版2011 年06 月OPEL 欧宝配件电子目录EPC 42011 年06 月雷诺Renault dialogys 3.96 电子目录2011 年07 月全球汽配查询软件-ATRIS 第2 季度2011 年07 月丰田原版配件电子目录4S 站中文版EPC3 一般地区2011 年07 月丰田原版配件电子目录4S 站中文版EPC3 全球版2011 年06 月MG Rover 罗孚汽车电子目录2011 年04 月三菱MMC ASA 1.4.2 配件电子目录亚洲/欧洲版2011 年04 月三菱MMC ASA 1.4.2 配件电子目录日本版2011 年04 月三菱MMC ASA 1.4.2 配件电子目录USA 版2011 年06 月雪佛兰Chevrolet GME EPC 4.02011 年06 月广州东风本田配件电子目录中文4S 站版亚太地区(歌诗图,思铂睿)2011 年DENSO ETSI 日本电装油泵配件型号查询2011 年05 月本田Honda V18.00 配件电子目录. 欧美版2010 年06 月Scania Epc 斯堪尼亚配件电子目录2011 年07 月MANTIS 德国猛狼配件电子目录2011 年03 月DAF Rapido 卡车及公共汽车配件目录2011 年保时捷汽车配件电子目录7.2 可以在2011 年05 月福特Microcat FORD 欧版配件电子目录2011 年04 月SUZUKI Worldwide 铃木配件电子目录:国际版(含奥拓,雨燕) 2011 年02 月马自达电子目录MAZDA EPC 英文2011 年01 月奔驰配件价格查询系统PL652010 年07 月奔驰配件人民币价格查询系统2010 年11 月雪铁龙汽车电子目录Backup+ SEDRE 中文版2010 年11 月标致汽车配件电子目录Backup+ SEDRE 中文版2010 年05 月SUBARU 富士汽车配件电子目录日本地区中文版2010 年11 月大宇双龙汽车电子目录2011 年01 月丰田配件电子目录中文版Microcat LIVE 所有地区2011 年03 月ZF Trading InCat 波箱电子目录2010 年04 月上海斯柯达配件目录(包含明锐晶锐新车)2010 年05 月宾利汽车配件电子目录2010 年04 月上海大众汽车配件维修电子目录2010 年02 月上汽荣威配件目录含4S 站价格2011 年05 月SUBARU 富士汽车配件电子目录EUR USA 中文版2011 年06 月Opel Vauxhall epc 4 欧宝配件电子目录GM2011 年06 月福特FORD USA 配件电子目录2011 年01 月GM 通用汽车配件目录EPC 全球版2010 年09 月卡特彼勒Caterpillar SIS 配件目录2010 年02 月康明斯Cummins INCAL2011 年02 月克莱斯勒Chryslervr USA EPC2010 年05 月Volvo IMPACT 大巴/卡车电子目录2011 年03 月雷诺Trucks Consult 卡车重型车电子目录2010 年10 月依维柯重型车配件目录Iveco Power=========================================2009 年10 月捷豹新版配件电子目录Jepc v32009 年08 月大发汽车配件电子目录2008 年06 月上海通用五菱配件目录2009 年10 月克莱斯勒汽车配件全球版电子目录2009 年06 月宝马KSD 维修系统2009 年03 月克莱斯勒配件电子目录中文版含北京克莱斯勒-大捷龙-大/小切诺基-JEEP-欧兰德-速跑等所有车型2009 年03 月猎豹CS7 经销商配件查询系统2009 年03 月宝马BMW DIS , TIS, SSS IBM 维修系统2009 年金杯通用雪佛兰开拓者/皮卡配件电子目录2009 年02 月台湾帝宝DEPO 汽车灯具电子目录2009 年02 月法雷奥配件电子目录2009 年01 月绅宝汽车配件电子目录2009 年最新版特高DAYCO 配件目录Dayco Catalogue2009 年ZF(猫头鹰)InCat 产品电子目录============================================================== ======================。
博世欧洲精英使用手册一、设备打开1.按下锅炉控制面板左上角的电源开关,运行设备;2.控制面板下方的运行指示灯亮,温度指示灯显示采暖或生活热水温度。
燃烧过程中,燃烧器指示灯亮。
二、打开集中供热功能1.旋转采暖温度控制按钮(控制面板左边一个按钮),调节采暖温度:——地板采暖:位置2(约50℃)。
注:初次使用温度不宜调的太高,一般在20至30℃即可。
最高温度不得超过60℃。
——散热片系统:位置6(约80℃).利用热水温度调节按钮,,调节生活热水温度。
温度指示不显示热水温度,加热过程中,温度显示灭,当燃烧器点燃后,燃烧器指示灯亮起。
热水温度可设置在40℃-60℃之间,单实际温度取决于热水量,热水量越大,温度越低。
1.保持设备打开状态。
2.逆时针旋转采暖温度控制按钮,至最左端。
采暖泵关闭。
3.夏季模式下,温度指示关闭。
注:当压力表水压低于正常水压时,应打开补水阀补水,直到水压压力处于正常范围内。
然后一定要关闭补水阀,否则会造成锅炉泄水。
五、故障代码博世欧洲之星操作手册一、设备打开1.首先确认燃气阀门已经打开,锅炉电源插头已插上;2.按下锅炉控制面板左上角的电源开关,运行设备;3.显示屏上显示采暖的出水温度二、试运行:1.打开系统散热片的所有阀门;2.打开补水阀,生活冷水阀,注水至1到2巴的压力,然后关闭冷水阀3.散热片排气;4.打开冷水阀,将系统压力重新充注到1-2巴5.打开燃气阀三、打开集中供热功能1.热水温度可设置在45℃至82℃之间;2.若为地板采暖系统,采暖温度不得高于60℃;3.旋转控制面板左下角的采暖控制旋钮,调节采暖温度;(初次使用时不宜调太高)4.采暖类型不同,最大采暖出水温度设置不同:——地板采暖系统:2档(约50℃)1.调节锅炉控制面板右下角的生活热水温度调节旋钮来设置生活热水温度;2.显示屏上显示的仍是采暖出水温度3.生活热水温度可在40℃和60℃之间设置。
但水龙头的世界出水温度取决于进水量的大小,进水量越大,温度越低。
1VG4 AutoDome® 自动监控系列1.1VG4 系列用户手册补遗:安装和更新所需的软件要在 Microsoft® Internet Explorer 中观看来自启用 IP 的 VG4 AutoDome 的实况视频,或者要更改VG4 AutoDome 配置,您必须在此文件夹中安装下列软件:1.Sun® Java2.Microsoft® .NET 2.x3.Microsoft® DirectX 9.0c4.MPEG-ActiveX 4.245.ConfigManager 01.60.0074.0您可以在博世安防系统网站上获得所需软件的最新版本。
要查找软件,请按以下说明执行:1.启动 Web 浏览器访问 网站。
2.在 Web 页面的左侧窗格中单击“CCTV”或“产品”链接。
图 1.1 中文主页3.在左窗格中的该部分下方,单击“点击查阅简体中文版产品目录”链接。
图 1.2 产品目录链接4.在左窗格中的“下载库”部分下方,单击“软件”链接。
图 1.3 软件链接5.单击“确定”同意遵守“博世软件许可协议”。
图 1.4 博世最终用户许可协议6.在中间框内的“软件”标题下方,单击“闭路监控系统”链接。
图 1.5 主软件框7.单击“自动监控系统”链接访问博世云台摄像机的软件。
图 1.6 云台摄像机链接在单击“云台摄像机”后,浏览器会打开用于 VG4 和 VEZ AutoDomes 的软件下载页面。
图 1.7 VG4 软件下载页面8.向下滚动页面至“AutoDome® TCP/IP 通信模块”部分。
图 1.8 所需的软件9.右键单击“EN 选择”,然后从下列软件包的弹出菜单中选择“目标另存为”:-Sun® Java-Microsoft® .NET 2.x-Microsoft® DirectX 9.0c-MPEG-ActiveX 4.24-ConfigManager 01.60.0074.010.将每个软件包保存到装有 Microsoft Internet Explorer 的计算机。