flair基本教程(案例)
- 格式:pdf
- 大小:742.06 KB
- 文档页数:27

关注phoenics 上海飞熠软件技术有限公司 TUTORIAL- Simulation of a Labyrinth Flow.FLAIR Tutorial 1: Investigating library case I203 FLAIR Tutorial 2: A room with two radiators Tutorial 3 Comfort index in a roomFLAIR Tutorial 4: Fire in a room关注phoenics 上海飞熠软件技术有限公司 TUTORIAL- Simulation of a Labyrinth Flow.This tutorial shows how to set up and run the simulation of steady turbulent flow of air with heat exchange. The geometry is 2-dimensional, of (y-direction) depth 1.0m, with the other dimensions shown in the figurebelow:wherein:•••••••• INLET is an aperture through which air at 20 degrees C enters at a prescribed velocity of 0.5m/s, giving an inlet Reynolds Number of 15000; OUTLET is a fixed-pressure aperture, where the pressure is held close to 0.0 Pa, relative to the external pressure;WALL-W is an adiabatic boundary wall; WALL-E is an adiabatic boundary wall; IN-PLATE is an internal plate, the only function of which is to obstruct the flow; IN-BLOCK is a block of copper; H-BLOCK is a block of aluminium; L-BLOCK is a block of aluminium, supplied uniformly with 100 watts of electrical heat.Preliminary remarks1. The tutorial must therefore explain how to:o introduce objects comprising blocks of different materials;关注phoenics 上海飞熠软件技术有限公司 o provide them with heat sources, if required;o introduce also objects (inlets, outlets, plates) having no volume, which however affect the flow in prescribedways;o prescribe the sizes and positions of each object.2. In addition to physically-meaningful data of the above kind, all CFD codes, and therefore PHOENICS also, requirenon-physical inputs such as:o a grid of computational cells;o instructions about how many iterations to make of the trial-and-error solution process; o how much data to print.3. The non-physical settings suggested below are such as to make the calculations rapid rather than accurate.4. Other tutorials will be provided which will enable you to explore the influences of the settings on accuracy and speed ofcalculation.Starting the tutorialFirst close any windows which are already running PHOENICS modules.Then activate the PHOENICS Satellite module, in its VR-Editor mode, by either:1. clicking on the PHOENICS VR icon on the desktop; or2. entering the Run Modules panel of the PHOENICS Commander, and then clicking the VRE button; or3. typing 'vre' at the Command prompt.Your working directory, i.e. the folder in which will appear all the files which the tutorial creates, will be, according to the method which you have used:1. /PHOENICS/d_priv1 [You can change this, if you wish, by clicking the 'options button' at the top of the satellite panel;or2. that which appears after: set globdata(cwd) in the file:/PHOENICS/d_pc/userpref/pcprefs . [You can change this, ifyou wish, by clicking the 'Customise' button of the PHOENICS Commander Top Page]; or3. that of the prompt itself.In PHOENICS-VR Editor•• When the Editor starts execution, what it shows on the screen at first will depend on what happens to be in your working directory. You can disregard this. [If you see the words: 'Display From Current Q1', click the top-right X so as to close the panel ] Make a fresh start by:o clicking first on 'File';o then on 'Start New Case';o then on 'Core';o then on 'OK' to confirm the resetting.You are now ready to begin. •关注phoenics 上海飞熠软件技术有限公司 Set the domain size••• Click on 'Menu' or 'M' (according to whether the 'C ontrol panel' is visible) [If it is not, you can make it so by clicking on 'View']. Set 'Simulation of a Labyrinth Flow' as the Title. Click on 'Geometry'.Note that clicking on '?' at the top right of any panel and then on a menu button will provide 'help'.•• Change the X-Domain Size to 2.0 m. Click 'OK' to close the Grid mesh settings dialog. Select the working fluid• Click on 'Properties' which will elicit a page like this:• Note that关注phoenics 上海飞熠软件技术有限公司 o the properties are already those of "Air at 20 deg C, 1 atm" by default.o The ambient (external) temperature is 20 degC, and the ambient pressure is 0 Pa relative to 1atm.•• Since these correspond to the present case, there is no setting to make. Click on 'Top menu' to accept.Indicate for which variables solution is required••••• Click on 'Models'. Leave the 'solution for velocities and pressure' ON. Click on'energy equation', and select 'Temperature'. Click on 'OK'. Leave the turbulence models setting as 'KECHEN'. This indicates that the 'KE' and 'EP' (kinetic energy and dissipation rate of turbulence) are to be solved by the CHEN method. Click on 'Top menu', then on 'OK' to exit the Main Menu.Re-sizing the domainThe domain no longer fits the screen; to resize, click on the pull-down arrow next to the 'R' icon on the toolbar; then 'Fit to window'.Introduce the required objects•• Click on the 'object-management' button ('O' on the toolbar or on the Control panel, also sometimes called 'hand set'). This will display the 'object-management' window with a list of objects of which only 'DOMAIN' is currently present.关注phoenics 上海飞熠软件技术有限公司 •• You will now introduce the objects which you require, one-by-one, giving each a position and size, corresponding to those in the above diagram. You will also introduce 'attributes', for example material, velocity or temperature, so completing the description of thesituation to be simulated.1. Introduce the H-BLOCK objecto In the Object-management dialog, click on 'Object', 'New' and 'New Object'. o Change name to H-BLOCK (which stands for 'high block'). o Click on 'Size' and set SIZE of object as:Xsize: tick 'To end'Ysize: tick 'To end'Zsize: 0.05o Click on 'Place' and set Position of object as:Xpos: 0.0Ypos: 0.0Zpos: Tick 'At end'o Click on 'General'.Select Type: Blockage (default).To change the material, click on 'Attributes', click on 'Types', click on SOLIDS then'OK', and then on 'ALUMINIUM at 27 deg C' and 'OK';. Click on 'OK' to exit the Attributes menu, and on 'OK' to close the Object Specification Dialogue Box. o H-BLOCK will now appear in the Object-Management list of objects.2. Introduce the L-BLOCK objecto Click on 'Object', 'New' and 'New Object'. o Change name to L-BLOCK (which stands for 'low block'). o Click on 'Size' and set SIZE of object as:Xsize: tick 'To end'Ysize: tick 'To end'Zsize: 0.05o Note that no position coordinates need to be given because the defaults (0.0, 0.0, 0.0) suffice in this case. o Click on 'General'.Define Type: Blockage (default).Click on 'Attributes', select material as ALUMINIUM as above. Set a HEAT SOURCE of 100 W. Click on 'Adiabatic', and select 'Fixed heat Flux'. Click on Value andenter 100.Click on 'OK' to return to the Object Specification Dialogue Box, and on 'OK' to close the ObjectDialogue Box.3. Introduce the WALL-E objecto Click on 'Object', 'New' and New Object'. o Change name to WALL-E (which stands for 'east wall'). o Click on 'Size' and set SIZE of object as:关注phoenics 上海飞熠软件技术有限公司 Xsize: 0.0Ysize: tick 'To end'Zsize: tick 'To end'o Click on 'Place' and set Position of object as:Xpos: tick 'At end'Ypos: 0.0Zpos: 0.5o Click on 'General'.Define Type: Plate.Note that a Plate differs from a Blockage in having zero thickness. Click on 'OK' to close the Object Specification Dialogue Box.4. Introduce the WALL-W objecto Click on 'Object', 'New' and New Object'.o Change name to WALL-W (which stands for 'west wall').o Click on 'Size' and set SIZE of object as:Xsize: 0.0Ysize: tick 'To end'Zsize: 0.5o Note that no position coordinates need to be given because the defaults (0.0, 0.0, 0.0) suffice in this case. o Click on 'General'.Define Type: Plate.Click on 'OK' to close the Object Specification Dialogue Box.5. Introduce the IN-PLATE objecto Click on 'Object', 'New' and New Object'.o Change name to IN-PLATE (which stands for 'interior plate').o Click on 'Size' and set SIZE of object as:Xsize: 0.0Ysize: tick 'To end'Zsize: 0.65o Click on 'Place' and set Position of object as:Xpos: 0.5Ypos: 0.0Zpos: 0.3o Click on 'General'.Define Type: Plate.Click on 'OK' to close the Object Specification Dialogue Box.6. Introduce the IN-BLOCK objecto Click on 'Object', 'New' and New Object'.o Change name to IN-BLOCK (which stands for 'interior block').o Click on 'Size' and set SIZE of object as:关注phoenics 上海飞熠软件技术有限公司 Xsize: 0.4Ysize: tick 'To end'Zsize: 0.65o Click on 'Place' and set Position of object as:Xpos: 1.0Ypos: 0.0Zpos: 0.05o Click on 'General'.Define Type: Blockage (default).Click on 'Attributes', then on 'Other materials', select 'Solids' then COPPER. Click on 'OK' to return to the Object Dialogue Box, o and on 'OK' to close the Object Dialogue Box.7. Introduce the INLET objecto Click on 'Object', 'New' and New Object'. o Change name to INLET.o Click on 'Size' and set SIZE of object as:Xsize: 0.0Ysize: tick 'To end'Zsize: 0.45o Click on 'Place' and set Position of object as:Xpos: 0.0Ypos: 0.0Zpos: 0.5o Click on 'General'.Define Type: Inlet.Click on 'Attributes' and set the velocity in X-direction to 0.5 m/s. Leave the temperature at 'Ambient', 20 degrees C for the inflowing air. Click on 'OK' to close the Attributes menu, and on 'OK' in the Object Specification Dialogue Box.8. Introduce the OUTLET objecto Click on 'Object', 'New' and New Object'. o Change name to OUTLET.o Click on 'Size' and set SIZE of object as:Xsize: 0.0Ysize: tick 'To end'Zsize: 0.45o Click on 'Place' and set Position of object as:Xpos: tick 'At end'Ypos: 0.0Zpos: 0.05o Click on 'General'.Define Type: Outlet.Leave the default values in the Attributes dialogue box.关注phoenics 上海飞熠软件技术有限公司 Click on 'OK' to exit the Object Dialogue Box.Inspect the 'default' gridThe PHOENICS satellite sets a computational grid which has sufficient lines at least to co-incide with the extremities of all the objects which have been introduced, with some additional lines in-between.This is known as the 'default' grid. It can be displayed by pressing the 'Mesh toggle' button, which in the present case should generate a picture such as the following.• Click anywhere on the image, and the 'Grid Mesh Settings' dialog box will appear.The grid in all three directions is set to 'Auto'. This gives 20 cells in X and Z, and 1 cell in Y. New users are advised not to make any changes at present.The grid is too coarse (i.e. lines are too few) for accuracy but will suffice for the tutorial. Click on 'OK' to close the dialog box.• Click on 'Mesh toggle' again to turn off the mesh display.The remaining solution-control parametersIn later tutorials, you will be invited to click on 'Menu' and then on 'Numerics', in order to inspect and modify other solution-control parameters. However, the defaults which have been set will suffice for the present purposes.关注phoenics 上海飞熠软件技术有限公司 Setting the Probe Location• Before running the solver, it is a good idea to place the probe in a suitable place to monitor the convergence of thesolution. Too close to an inlet, and the value will settle down very quickly before the rest of the solution. Placed in a recirculation zone, it may still show traces of change even though the bulk solution is converged. In this case, to the right of the IN-BLOCK object is fine.• Click on the probe icon on the toolbar or double-click the probe itself, and move the probe to X=1.8, Y=0.5, Z=0.3. Running the SolverYou are now ready to perform the simulation by activating the PHOENICS solver module (known as 'Earth'). In order to do so, click on 'Run', 'Solver'(Earth), and click on 'OK' to confirm.You will then see, in quick succession, indications on the screen of:••• the activation of the module; the reading by the solver of the input data which your tutorial session has prepared for it; the progress of the calculation, represented by the generation of curves which look like this:关注phoenics 上海飞熠软件技术有限公司 •Click the 'END' button to terminate the calculation and to return to the VR Environment. You are now able to launch the VR Viewer, in order to inspect the results of your calculation.Using the VR Viewer.Click on 'Run', 'Post processor', then GUI Post processor (VR Viewer) . Click 'OK' on the file names dialog to accept the default files.• To view:oVelocity vectors - click on the 'Vector toggle' . Vectors are coloured by the current plotting variable, but theirlength is always related to the absolute velocity.oContours - click on the 'Contour toggle'oStreamlines - click on the 'Streamline management' buttonoIso-surfaces - click on the 'Iso-Surface toggle'• To select the plotting variable:关注phoenics 上海飞熠软件技术有限公司 o To select Pressure - click on the 'Select Pressure button' oTo select Velocity - click on the 'Select Velocity button' .oTo select Temperature - click on the 'Select Temperature button' oTo select any other variable - click on the 'Select a Variable button' •• To change the direction of the plotting plane, set the slice direction to X, Y or Z To change the position of the plotting plane, move the probe using the probe position buttons.Alternatively, click on the probe iconProbe Location dialog.• on the toolbar or double-click the probe itself to bring up the A typical plot from this case is:关注phoenics 上海飞熠软件技术有限公司Checking the S ource Balance •• It is very important to know whether the inflows and outflows of mass and energy are in balance. If they are, it is a good sign that the solution is convergent. If they are not, the solution is definitely not converged. For further information on the assessment of Convergence, see the lecture . Open the Object-Management dialog, and right-click on the Domain entry. From the context menu select 'Showresults'.关注phoenics 上海飞熠软件技术有限公司•• This will display the sources and sinks of all variables. The section showing 'Nett source of R1 at...' shows the mass source in kg/s at each inlet and outlet.•• Positive values are inflo ws,negative values are outflows. The 'nett sum' at the end of the section should be close to zero, as all the mass entering must leave. The section showing 'Nett source of TEM1 at...' shows the energy source in Watts for each heat source or sink.关注phoenics 上海飞熠软件技术有限公司•• Positive values are sources, negative values are sinks. The energy source at the inlet is mass flow*specific heat*inlet temperature in Kelvin. The 'nett sum' should also be close to zero. In this case, it is a bit high, showing that convergence is not complete. These balances can also be checked by inspecting the RESULT file. This contains an echo of the inputs, a selection ofthe solution and the source balances. Click on 'File', 'Open file for editing', then 'Result'. Scroll down the file until you reach the section headed 'Sources and sinks'.Saving the results.• In the VR Viewer click on 'File' then 'Save as a case'; create a new folder called'LABYRINTH ' and save as 'CASE1'.These actions will place in the folder the following files:o case1.q1, a copy of the Q1 file created in the tutorial;o case1.res, a copy of the RESULT file printed by the solver at the end of its execution; o case1.phi, a copy of the PHI file which the VIEWER uses as the basis of its displays; o case1.gif, an image representing the approach to convergence, such as was shown above; ando case1.pat and case1.pbc, which there is no need to describe now.These will be discussed in later tutorials.关注phoenics 上海飞熠软件技术有限公司 FLAIR Tutorial 1: Investigating library case I203This tutorial is to illustrate how to load case I203, Ventilation of Hackney Hall from the FLAIR library andinvestigate its settings, run the case and view the results. However, this is a 3D real application and the user does not have to run through the case as it may take a few hours to complete.Starting FLAIR with the default room••• Click the FLAIR icon (a desktop shortcut created by the FLAIR installation program); or Start the VR-Editor by clicking on 'Start', 'Programs', 'FLAIR', then 'FLAIR-VR'. Click on the 'File' button and then select 'Start new case', followed by 'FLAIR' and 'OK'. The FLAIR VR-Environment screen should appear, which shows the default room with the dimensions10mx10mx3m.Loading the library case I203•Click on the 'File - Load from libraries'. This will bring up the 'load from library' dialog as shown below•• If you If you know the number of the case you want to load, type it into the 'case number' data entry box and click OK Otherwise, click on 'Browse' and you will see the following dialog box关注phoenics 上海飞熠软件技术有限公司••Use the '+' next to Special-purpose programs to expand the library listings Click on'Flair library' and 'Large cases'. Case I203 will be on the listings• Select cas e I203 and click 'OK' to confirm the selected case number, and then OK to load it. There willbe a display window which provides a link to the description. Click on the link, you will see the following details:The case was three dimensional, and the flow was steady.The geometry within the domain was created using PHOENICS-VR. As the auditorium was very nearly symmetrical, only half of the domain was modeled.The theatre includes balconies modeled as a series of stepped Cartesian blockages, and a new object was created to model the curved roof and stage.The computational domain is 33m long by 11.4m wide by 12.7m high, a 60*20*50 cells Cartesian grid was used, and PARSOL technique was used to map the non- Cartesian elements of the geometry; e.g. the curved roof and stage.The domain is filled with air, and ideal gas law was used in calculating pressure-temperature-density relationships. The roof, floors and walls were modeled using a material with the following properties; density: 1700kg/m***3, specific heat:800J/kg/degK, thermal conductivity: 0.62W/m/degK. • • • • •关注phoenics 上海飞熠软件技术有限公司 •••••• The effects of gravity were included by way of sources of momentum in the equations for the z component velocity using the built in buoyancy facilities available in PHOENICS. The LVEL model of turbulence is used to close the Reynolds-averaged Nervier-Stokes equations. The air supply under the balcony, on the long side of the theatre, is introduced at 12degC. The incoming air velocity, from this long, slot is fixed at 3m/s, giving a mass flow rate of about 2.5m***3/s. Further air is supplied under the seating, at the rear of the auditorium only, at 18degC. The inflow supply rate is0.7m***3/s, providing by seven 70mm high inlets. The occupant and light gains were modeled using heat sources respectively equivalent to 145W/m**2 and 50W/m**2. The ten outlets at the top of the domain were modeled as 500mm long by 250mm wide fixed pressureopenings.You may close the window after viewing the description. After successful loading, the geometry of caseI203 will appear on the screen as shown below •This case was to simulate the air flow and thermal characteristics in the theartre influenced by theventilation system.Investigating the model settings关注phoenics 上海飞熠软件技术有限公司 •Click on the 'Object management' button,management dialog box as shown below. . You will see all the objects listed on the object• You may double click on each of those objects and investigate their attributes. For example, you doubleclick on object IN37 (reference no. 36). This will bring up the 'Object specification' dialog box as shownbelow.• Click on 'Attributes' button to bring up the 'Object attributes' panel as shown below. The settings showthat the air is coming into the theatre at the speed of 0.16 m/s with the temeparture of 18 degree C.关注phoenics 上海飞熠软件技术有限公司• You can investigate the physical model settings by clicking on 'Main menu' button, and click oneach model panel, for example 'Models' as shown below. As can be seen, the pressure, velocities and temperature are solved. The constant effective turbulence viscosity is used for the turbulence modelling.关注phoenics 上海飞熠软件技术有限公司Running the solver•To obtain a solution for the loaded case, click 'Run - Solver' as shown below. Then click 'OK' to confirm.As the Earth solver starts and the flow calculations commence, two graphs should appear on the screen.The left-hand graph shows the variation of solved variables at the monitoring point that was set during the model definition. The right-hand graph shows the variation of errors as the solution progresses.A 3D real application like this requires 5-6 hours of computing time on a 3Mhz PC. Viewing the results• To run the Viewer, click on 'Run - Post processor - GUI post processor (VR Viewer)'. 关注phoenics 上海飞熠软件技术有限公司 • When the 'File names' dialog appears, click 'OK' to accept the current result files. You may use the'Object management' dialog box to hide some of objects. Click on the 'T' (Select temperature) button,Click on 'C', (select a variable) button,dialog box as shown below on the main control panel. • •on the main control panel to bring up the 'Viewer options'•••• Set the 'Maximum value' to 24 C Click on 'Streamline management' button, . Move the probe position to X = 26; Y = 6.0; Z = 2.46. Click on 'Object' menu and click on'Options' to bring up the 'Stream Options' dialog box and choose thefollowing settings关注phoenics 上海飞熠软件技术有限公司••Click on 'OK' to return to the 'Streamline management' dialog box. Click on 'Object' and select 'New' as shown belowThe following streamlines will be displayed on the screen.关注phoenics 上海飞熠软件技术有限公司 FLAIR Tutorial 2: A room with two radiatorsThis case models a three-dimensional room, consisting of two closed windows, a door. The radiators underneath each window produce a total heat flux of 500W and the walls are fixed at 20 degree C. TheIMMERSOL model is used. The 'Duplicate object' function is used for the creation of the second window and radiator. The material of the radiators is selected from the property database.The following picture shows the geometry.Setting up the modelStart FLAIR with the default roomClick FLAIR icon (a desktop shortcut created by the FLAIR installation program); or • Start the VR-Editor by clicking on 'Start', 'Programs', 'FLAIR', then 'FLAIR-VR'. • Click on the 'File' button and then select 'Start new case', followed by 'FLAIR' and'OK'. •关注phoenics 上海飞熠软件技术有限公司 The FLAIR VR-Environment screen should appear, which shows the default room with the dimensions 10mx10mx3m.Resizing the room• Change the size to 3m in x-direction, 5m in y-direction and 2.7m in z-direction respectively onthe control panel. Alternatively, the user may click on the main 'Menu' and then bring up the'Geometry' panel to change the room size.Click on "Reset" button,'OK'. on the movement panel, and then click on "Fit to window" and •Adding objects to the rooma. add a door• Click on the 'Object' menu and select 'New' (New Object) on the 'Object management' dialogbox to bring up the 'Object specification' dialog boxChange name to 'DOOR'.• Click on the 'Size' button and set 'Size' of the object as: •X: 1.0 mY: 0.0 mZ: 2.0 m• Click on the 'Place' button and se t 'Position' of the object as:X: 2.0 mY: 0.0 mZ: 0.0 mClick on 'General' button and set value of 'Type' to be 'PLATE'.• Click on 'Attributes', and leave the default setting 'Adiabatic'• Click on 'OK' to return to the 'Object specification' dialog box. Click on 'OK' again. •b. add the first window• Click on the 'Object' menu and select 'New' (New Object) on the 'Object management' dialogbox to bring up the 'Object specification' dialog boxChange name to 'WIND1'.• Click on the 'Size' button and set'Size' of the object as: •关注phoenics 上海飞熠软件技术有限公司 X:0.00 mY:0.98 mZ:0.87 m• Click on the 'Place' button and set 'Position' of the object as: X: 0.0 mY: 1.28 mZ: 1.0 m• Click on 'Shape' and a click on 'Geometry' selection will bring up the following dialog boxSelect WINDOW1 from d_object/public/furnture and click on 'Save' • Click on'General' button and select 'PLATE' from the object 'Type' list . • Click on 'Attributes', and then set the 'Energy source' to 'Surface temperature' and value to 15degree C.• Click on 'OK' to return to the 'Object specification' dialog box. Click on 'OK' again to exit from the'Object specification' dialog. •c. add the second window by duplicating the first window••Click on the WIND1 object to highlight it on the 'Object management' dialog. Click on 'Duplicate object' button, . followed by clicking 'OK' to confirm duplicating. Note that the newly duplicated object will be at the same place as the original one.关注phoenics 上海飞熠软件技术有限公司 Click on 'Object' menu and select 'Refresh' on the Object Management dialog box. This will bring the newly duplicated object into the list of objects.• Double click on the newly dup licated object to bring up the "Object specification" dialog box. • Change the name to WIND2• Click on the 'Place' button and set 'Position' of the object as: •X: 0.0 mY: 2.92 m。

初中英语翻翻书制作教程Alright, let's dive into the world of "Middle School English Flip-Chart Creation: A How-To Guide with a Twist!"Step 1: The Big IdeaFirst things first, you need a concept that's as catchy as a pop song from the '80s. Think of a theme that'll make your students go "Whoa, this is going to be epic!" Maybe it's "Around the World in 80 Idioms" or "The Wild West of Verbs."Step 2: Gather Your GearYou're going to need a few things:- A flip chart or a large piece of paper- Colorful markers (because who doesn't love a good rainbow of ink?)- Your trusty English textbook (or the internet, ifyou're feeling adventurous)- A sense of humor (it's the secret sauce!)Step 3: Sketch It OutBefore you go all Picasso on your flip chart, sketch outyour layout. Decide where the jokes will go, where the grammar will hang out, and where the vocab will vibe. Remember, a good flip chart is like a party – everyone has a place to dance.Step 4: The Vocabulary VaultPop in some vocab words that are as fun as a bouncy castle. Use pictures, puns, and playful phrases to make them stick. For example, "Breathtaking" could be illustrated with a character gasping for air in front of a stunning view.Step 5: Grammar GaloreGrammar can be groovy if you play it right. Break down the rules with examples that are as clear as a sunny day. Use cartoons or dialogues to show how it all fits together. Remember, a picture's worth a thousand words – or at least a few grammar lessons.Step 6: The Joke ZoneHere's where you let your inner comedian shine. Sprinkle in jokes that are as light as a feather but as memorable as a catchy tune. A pun here, a play on words there – it's all about keeping it fun and engaging.Step 7: The Review RoundupOnce your flip chart is a work of art, it's time to review. Walk through it with a friend or family member,making sure it's as easy to follow as a one-lane road.They'll be your guinea pigs, so treat them well!Step 8: The Grand UnveilingNow, it's showtime! Unveil your masterpiece to your class with the flair of a magician pulling a rabbit out of a hat. Watch as their eyes light up, and their minds open to theworld of English.Step 9: The Feedback LoopAfter the show, gather feedback. What worked? What didn't? Use this to refine your flip chart, making it better than the latest superhero sequel.Step 10: The EncoreRevise, refine, and repeat. Your flip chart isn't a one-hit-wonder; it's a classic that'll be passed down through the halls of middle school history.And there you have it, folks! A flip chart that's notonly educational but also a ticket to a world of laughter and learning. Now go forth and create, and may your flip chartsbe as legendary as the tales of old!。

Unit 31. unnerve (l. 5): make someone lose self-control, confidence or courage 使某人失去自制力、信心或勇气E.g.: His encounter with the guard dog had completely unnerved him. 他遇上了警卫犬,把他吓坏了。
The experience completely unnerved me.那段经历使我彻底丧失了信心。
unnerving adj.: upsetting, frighteningE.g.:She found the whole interview rather unnerving. 她觉得整个面试都让人气馁。
2.tangible (l.8): substantially real; material可触摸的, 可触知的, 有形的;明确的, 确凿的, 实际的Sculpture is a tangible art form. 雕刻是一种可触摸的艺术形式。
The policy has not yet brought any tangible benefits. 这项政策还没有带来任何实质性的好处。
3.bullion (l.8): gold or silver in bulk or bars, before it is made into coins, etc. 金或银锭(条)4.heft (l.9): lift something in order to judge or estimate its weight 举起…以掂重量(Note 5)E.g.: pick a stone up and heft it 捡起一块石头掂一掂有多重hefty adj.: of considerate weight 重的E.g.: The baby is a hefty armful. 这娃娃抱在手里挺沉的。


FIR滤波器设计与实现实验报告目录一、实验概述 (2)1. 实验目的 (3)2. 实验原理 (3)3. 实验设备与工具 (4)4. 实验内容与步骤 (6)5. 实验数据与结果分析 (7)二、FIR滤波器设计 (8)1. 滤波器设计基本概念 (9)2. 系数求解方法 (10)频谱采样法 (11)最小均方误差法 (14)3. 常用FIR滤波器类型 (15)线性相位FIR滤波器 (16)非线性相位FIR滤波器 (18)4. 设计实例与比较 (19)三、FIR滤波器实现 (20)1. 硬件实现基础 (21)2. 软件实现方法 (22)3. 实现过程中的关键问题与解决方案 (23)4. 滤波器性能评估指标 (25)四、实验结果与分析 (26)1. 实验数据记录与处理 (27)2. 滤波器性能测试与分析 (29)通带波动 (30)虚部衰减 (31)相位失真 (32)3. 与其他设计方案的对比与讨论 (33)五、总结与展望 (34)1. 实验成果总结 (35)2. 存在问题与不足 (36)3. 未来发展方向与改进措施 (37)一、实验概述本次实验的主要目标是设计并实现一个有限脉冲响应(Finite Impulse Response,简称FIR)滤波器。
FIR滤波器是数字信号处理中常用的一种滤波器,具有线性相位响应和易于设计的优点。
本次实验旨在通过实践加深我们对FIR滤波器设计和实现过程的理解,提升我们的实践能力和问题解决能力。
在实验过程中,我们将首先理解FIR滤波器的基本原理和特性,包括其工作原理、设计方法和性能指标。
我们将选择合适的实验工具和环境,例如MATLAB或Python等编程环境,进行FIR滤波器的设计。
我们还将关注滤波器的实现过程,包括代码编写、性能测试和结果分析等步骤。
通过这次实验,我们期望能够深入理解FIR滤波器的设计和实现过程,并能够将理论知识应用到实践中,提高我们的工程实践能力。
本次实验报告将按照“设计原理设计方法实现过程实验结果与分析”的逻辑结构进行组织,让读者能够清晰地了解我们实验的全过程,以及我们从中获得的收获和启示。

实验四ATR-FTIR实验实验目的1. 了解衰减全反射的基本原理2。
学会用ATR-OMNI采样器采集固体样品的红外光谱图。
实验仪器傅立叶变换红外光谱仪及职能OMNI采样器实验原理当入社的红外光通过具有高折射率的锗晶体(光密介质)后再入射到样品(光疏介质)的表面上,且入射角大于临界角时,入射光将完全被反射.实际上,光线并不是在样品表面被直接反射回来,而是贯穿到样品表面内一定深度(一般为几百纳米到几微米之间)后再返回表面。
如果样品在入射光的频率范围内有吸收,则反射光的强度在被吸收的频率位置衰减,因而产生和普通吸收相似的现象,所得光谱也与投射法红外光谱法类似。
实验步骤1.打开电脑及红外光谱仪主机电源,预热半小时。
2。
安装ATR—OMNI采样器3。
设置试验参数;4.将样品的测试面直接放在锗晶体上,旋转OMNI采样器固定钮,压住样品.5.在4000~600波数范围内扫描,采集样品的衰减全反射红外光谱谱图。
实验数据及其处理D:\10热动\澳币.0 澳币 固体31/10/20123333.293293.302921.132855.452366.021733.691703.161638.721557.771452.351428.951362.961335.091314.901279.431247.111204.481159.681108.371053.041029.69767.26704.30664.39617.355001000150020002500300035004000Wavenumber cm-10.000.010.020.030.04A b s o r b a n c e U n i t s Page 1/1通过解析红外光谱图,得知,该物质有如下的特征峰:波峰 波数/描述1 3333。
29 醇和酚分子间氢键O-H 伸缩振动;酰胺N-H 伸缩振动2 3293。
30 醇和酚分子间氢键O-H 伸缩振动;酰胺N —H 伸缩振动;炔烃C —H 伸缩振动3 2921.13 烷烃C-H 伸缩振动4 2855.45 羧酸二聚体;烷烃C-H 伸缩振动 5 2366.02 烷烃饱和烃C —H 伸缩振动6 1733。

教你一个小时背完F2L的41个标准公式简体版(57678125转换)前言:(由于原版本为繁体版,不方便阅读,所以我吧繁体转换为了简体,方便大家的阅读)很多人被F2L的公式量所吓到,所以对学习F2L充满忐忑。
于是某些高手提出了从整体上理解F2L的观点,然后再试着自己逐个完成。
其实理解这是一个很好的方法,但是每个人的理解力不同,而且一些究级高手也提出了最好是理解加记忆公式才是提高速度好办法的观点。
我想究级高手之所以有这麽高的水准,除了大量的练习及聪明之外,所用的方法相对来说也是比较正确的,否则也很难达到这个水准。
我个人为学习F2L也看了关于理解的几个帖子,属于半理解状态,自己试了下,随便一种状态,是能转回去的,但是有些就快一些,有一些就容易陷入误区,转了好一会才转回去。
既然无论是理解也好还是背也好,都需要不断练习,为什么不采取一些快捷的方法呢?先大概理解F2L的整体思路,然后通过背公式以及练习去全部理解F2L,我个人认为这样学习更快些。
好了,不说废话了,讲讲我个人迅速记忆F2L公式的方法。
其实F2L虽然看起来公式很多,但是联系性很强,在理解的基础上背起来很快的,下面我就把各个公式的联系写出来,方便大家记忆。
公式1-3无须多说,层先法第二层,想必大家就很熟悉了。
一、第一组公式记忆(公式4-11)首先在理解的基础上背公式4-7,然后再去看公式8-11,你就会发现,公式4和8,只有U和U’的方向是相反的,R和R’是一样的,公式4很好记,记完了公式4,只需知道公式8的U和U’和公式4的U和U’相反即可,公式8记忆完成。
公式5和9,联系性解释起来麻烦点,直接背即可,不多说。
公式6和10,7和11状态同公式4和8一样,同理记忆。
在这里大家还要注意下,公式6和7的U和U’都是一样的,公式10和11也是,这里也最好联系下,这样背起来就更快了。
这里只需背5个。
(大家如果看的不是很懂可以多看几遍我上面的文字,理解上面的关係之后,对下面的公式记忆更方便的。
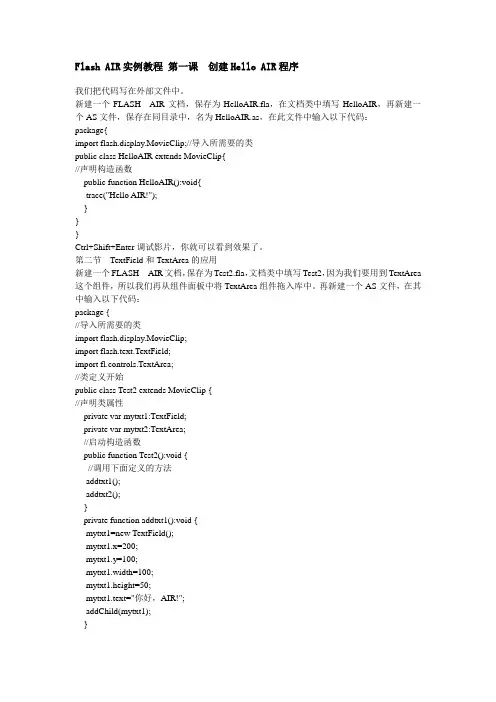
Flash AIR实例教程第一课创建Hello AIR程序我们把代码写在外部文件中。
新建一个FLASH AIR文档,保存为HelloAIR.fla,在文档类中填写HelloAIR,再新建一个AS文件,保存在同目录中,名为HelloAIR.as,在此文件中输入以下代码:package{import flash.display.MovieClip;//导入所需要的类public class HelloAIR extends MovieClip{//声明构造函数public function HelloAIR():void{trace("Hello AIR!");}}}Ctrl+Shift+Enter调试影片,你就可以看到效果了。
第二节TextField和TextArea的应用新建一个FLASH AIR文档,保存为Test2.fla,文档类中填写Test2,因为我们要用到TextArea 这个组件,所以我们再从组件面板中将TextArea组件拖入库中。
再新建一个AS文件,在其中输入以下代码:package {//导入所需要的类import flash.display.MovieClip;import flash.text.TextField;import fl.controls.TextArea;//类定义开始public class Test2 extends MovieClip {//声明类属性private var mytxt1:TextField;private var mytxt2:TextArea;//启动构造函数public function Test2():void {//调用下面定义的方法addtxt1();addtxt2();}private function addtxt1():void {mytxt1=new TextField();mytxt1.x=200;mytxt1.y=100;mytxt1.width=100;mytxt1.height=50;mytxt1.text="你好,AIR!";addChild(mytxt1);}private function addtxt2():void{mytxt2=new TextArea();mytxt2.setSize(100,50);mytxt2.editable=false;mytxt2.text="你好,AIR!";mytxt2.x=300;mytxt2.y=100;addChild(mytxt2);}}}Ctrl+S保存,Ctrl+Shift+Enter调试影片就可以看到效果了。

傅立叶变换红外光谱仪操作指导—nicolet6700型一、 仪器简介1、型号名称:Nicolet 6700 高级傅里叶变换红外光谱仪 美国2、适用范围:本方法适用于液体、固体、气体、金属材料表面镀膜等样品。
它可以检测样品的分子结构特征,还可对混合物中各组份进行定量分析,本仪器的测量范围为4000~400 cm -1。
3、方法原理:红外光谱是根据物质吸收辐射能量后引起分子振动的能级跃迁,记录跃迁过程而获得该分子的红外吸收光谱。
二、 基本操作(一)试样制备方法1、固体样品(1)压片法:取1~2mg 的样品在玛瑙研钵中研磨成细粉末与干燥的溴化钾(A. R.级)粉末(约100mg ,粒度200目)混合均匀,装入模具内,在压片机上压制成片测试。
玛瑙研钵 压片模具(2)糊状法:在玛瑙研钵中,将干燥的样品研磨成细粉末。
然后滴入1~2滴液体石蜡混研成糊状,涂于KBr 或BaF 2晶片上测试。
(3)溶液法:把样品溶解在适当的溶液中,注入液体池内测试。
所选择的溶剂应不腐蚀池窗,在分析波数范围内没有吸收,并对溶质不产生溶剂效应。
一般使用0.1mm 的液体池,溶液浓度在10%左右为宜。
a :镜片;b :液体池部件(不含镜片); c: 装配图; d :使用方法abcd2、液体样品(1)液膜法:油状或粘稠液体,直接涂于KBr晶片上测试。
流动性大,沸点低(≤100℃)的液体,可夹在两块KBr晶片之间或直接注入厚度适当的液体池内测试(液体池的安装见说明书)。
对极性样品的清洗剂一般用CHCl3,非极性样品清洗剂一般用CCl4。
样品池BaF2镜片KBr镜片(杜绝含水样品)(2)水溶液样品:可用有机溶剂萃取水中的有机物,然后将溶剂挥发干,所留下的液体涂于KBr晶片上测试。
应特别注意含水的样品坚决不能直接接触KBr或NaCl窗片液体池内测试。
3、塑料、高聚物样品(1)溶液涂膜:把样品溶于适当的溶剂中,然后把溶液一滴一滴的滴加在KBr晶片上,待溶剂挥发后把留在晶片上的液膜进行测试。
第二章中枢神经系统第一节脑病例2-1【临床病史】患者,男,62岁。
主诉:“无明显诱因出现头痛,以右侧颞顶部胀痛为主”来我院就诊,行颅脑MRI增强检查。
[描述]右侧颞叶类圆形异常信号灶,T1WI呈低信号,T2WI呈稍高信号,病变周围环以长T1长T2信号水肿,T2FLAIR呈稍高信号,DWI呈不均匀高信号,增强扫描病变呈不规则花环样强化,右侧侧脑室受压,中线结构略向左侧移位。
【诊断】高级别星形细胞瘤。
【鉴别诊断】1.脑脓肿:脓肿壁较光滑,厚薄均匀,一般无壁结节,DWI呈高信号。
2.转移瘤:转移瘤的壁较厚且不均匀,内缘凹凸不平,且瘤周水肿常更广泛。
病例2-2【临床病史】患者,女,54岁。
主因“无明显诱因出现头晕,伴恶心、呕吐”来我院就诊,行MRI增强+DWI+MRS检查。
【描述】右侧颞叶不规则异常信号灶,病变呈长T1长T2信号,T2FLAIR呈高信号,DWI呈稍高信号,增强扫描病变未见强化。
MRS未见异常。
【诊断】低级别星形细胞瘤。
【病理】(右颞部)符合星形细胞瘤Ⅱ级。
IHC结果: MGMT(+)、IDH-1(+)、Ki-67index1%。
【鉴别诊断】1.脑梗死:脑梗死的病变形态与血管区供应一致,皮髓质同时受累,边界清楚,有脑回样强化。
2.蛛网膜囊肿:病变边界清晰,DWI呈低信号。
3.胆脂瘤:MRI呈短T1长T2信号。
病例2-3【临床病史】患者,男性,44岁。
主诉:“头痛8天,以双侧颞部、眼眶为著,持续不缓解,加重伴恶心、呕吐3天”。
既往健康。
遂行颅脑CT增强和MRI增强检查。
【描述】CT:额部近中线处椭圆形以等密度为主的病灶,密度不均匀,内点状低密度灶,增强扫描病变明显强化,内可见点状未强化区。
MRI:额部近中线处椭圆形以等T1等T2信号为主的病变,信号不均匀,内可见点状长T1长T2信号囊变坏死灶,点状长T1短T2信号钙化灶,边缘呈分叶,增强扫描明显不均匀强化,病变周围环以长T1长T2信号水肿带,临近脑组织受压。
目录目录 (1)1简介 (5)1.1FLAIR是什么? (5)1.2FLAIR 可以做些什么? (8)1.3FLAIR 组成部分以及PHOENICS的关系 (9)1.3.1FLAIR模块 (9)1.3.2FLAIR与PHOENICS的关系 (9)1.4FLAIR 与众不同的功能 (9)1.4.1用户接口功能(In-Form) (9)1.4.2自动收敛控制 (10)1.4.3PARSOL技术 (10)1.4.4嵌套网格 (11)1.4.5LVEL 湍流模型 (12)1.4.6IMMERSOL 辐射模型 (12)2启动FLAIR程序 (14)2.1FLAIR的操作方式 (14)2.1.1Satellite ....................................................................................... 错误!未定义书签。
2.1.2Commander................................................................................ 错误!未定义书签。
2.1.3VR-Environment......................................................................... 错误!未定义书签。
2.2FLAIR 在线帮助和用户手册 (14)2.2.1Problem description (15)2.2.2建立模型 (15)2.2.3启动求解器 (24)2.2.4使用VR-Viewer 查看结果 (25)2.2.5从VR中打印图片 (28)2.2.6总结 (29)3暖通设备组件和暖通模型 (30)3.1可以使用的那些模型文件和介绍....................................................... 错误!未定义书签。
FLAIR序列在脑部MRI的应用初探
徐海如;姚世文
【期刊名称】《中国现代医药科技》
【年(卷),期】2004(004)003
【摘要】目的探讨液体衰减反转恢复序列(FLAIR)在脑部疾病MRI检查中的应用价值。
方法对39例脑部疾病患者同时行MRT2加权像及FLAIR检查,比较两种序列对病灶的显示情况。
结果 FLAIR共检出病灶225个,常规T2加权像检出109个,FLAIR显示病灶的能力更为清晰,病灶与正常脑组织的对比度更高,在显示脑组织深部皮层下及脑室旁病灶方面更有优势,可显示常规T2加权像未能显示的小病灶。
结论 FLAIR可作为颅脑MRI检查常规序列的补充,有利于提高病变的检出率,减少漏诊。
【总页数】2页(P82-83)
【作者】徐海如;姚世文
【作者单位】江苏省如皋市人民医院放射科226500
【正文语种】中文
【中图分类】R742
【相关文献】
1.儿童病毒性脑炎的MRI诊断及FLAIR序列的临床应用 [J], 龙艳;高志霖
2.低场FlAIR和DWI序列在脑部MRI的应用价值 [J], 朱蓉蓉;高永斌;哈若水;陈大治
3.FLAIR 序列T1加权与SE序列T1加权在颅脑MRI检查中的应用 [J], 孟凡莲;于秀荣;于建民;耿海;李林坤;全世杰;李伟
4.T2WI-FLAIR增强序列在脑部疾病诊断中的应用进展 [J], 苏梦瑶;周智鹏
5.MRI-FLAIR序列高信号血管征对急性脑梗死的应用价值研究 [J], 陈少云;虞海卓;杨慧强;吴张平;宋大桥;商发科
因版权原因,仅展示原文概要,查看原文内容请购买。