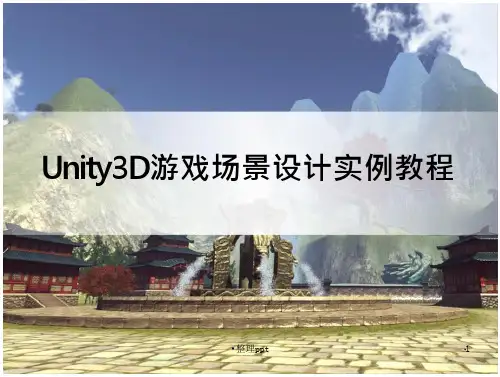
Unity 3D游戏场景设计实例教程 CHAPTER 4 Unity3D山体地形的制作
- 格式:pptx
- 大小:8.10 MB
- 文档页数:4
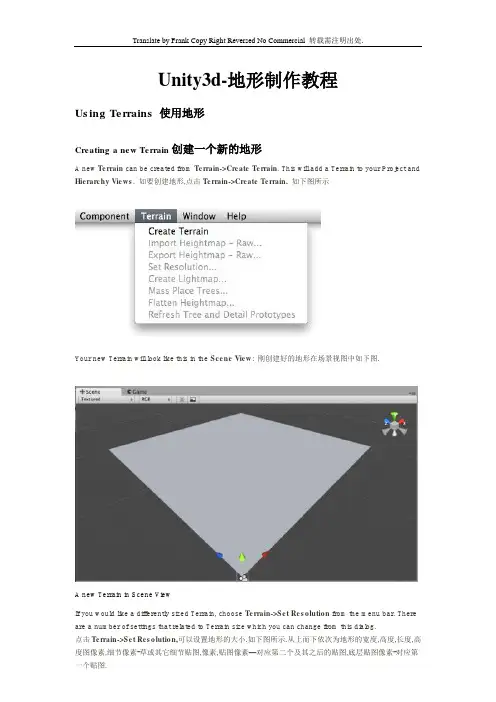
Unity3d-地形制作教程Using Terrains 使用地形Creating a new Terrain创建一个新的地形A new Terrain can be created from Terrain->Create Terrain. This will add a Terrain to your Project and Hierarchy Views. 如要创建地形,点击Terrain->Create Terrain. 如下图所示Your new Terrain will look like this in the Scene View: 刚创建好的地形在场景视图中如下图.A new Terrain in Scene ViewIf you would like a differently sized Terrain, choose Terrain->Set Resolution from the menu bar. There are a number of settings that related to Terrain size which you can change from this dialog.点击Terrain->Set Resolution,可以设置地形的大小.如下图所示.从上而下依次为地形的宽度,高度,长度,高度图像素,细节像素-草或其它细节贴图,像素,贴图像素—对应第二个及其之后的贴图,底层贴图像素-对应第一个贴图.Setting the resolution of your terrain.On the above image, there are values that can be changed.These values are:∙Terrain Width: The width of the Terrain in units.∙Terrain Height: The height of the Terrain in units.∙Terrain Length: The length of the Terrain in units.∙HeightMap Resolution: The HeightMap resolution for the selected Terrain.∙Detail Resolution: The resolution of the map that controls grass and detail meshes. For performance reasons (to save on draw calls) the lower you set this number the better.∙Control Texture Resolution: The resolution of the splat map used to layer the different textures painted onto the Terrain.∙Base Texture Resolution: The resolution of the composite texture that is used in place of the splat map at certain distances.Navigating the TerrainTerrains work a bit differently than other GameObjects. Most notably, there is no Transform Gizmo that allows you to position the Terrain. Instead, you use Brushes to paint and manipulate your Terrain. If you do want to reposition a Terrain, you can modify its Transform Position values in the Inspector. This allows you to move your Terrain around, but you cannot rotate or scale it.地形对象与其他游戏对象有点不同,它没有转换轴,不可以通过鼠标直接改变它的坐标.如果要改变坐标,可以通过在属性面板修改.不过不可以旋转和缩放.While your Terrain is selected in the Hierarchy, you can gracefully navigate the terrain with the F (focus) key. When you press F, wherever your mouse is positioned will be moved to the center of the Scene View. This allows you to touch up an area, and quickly zoom over to a different area and change something else. If your mouse is not hovering over an area of the Terrain when you press the F key, the entire Terrain will be centered in your Scene View.地形被选择后,按F按可以以鼠标点击位置为中心察看地形.如果没有用鼠标点击任何一点,会以整个地形为中心察看地形.Editing the Terrain 编辑地形With the Terrain selected, you can look at the Inspector to see some incredible new Terrain editing tools.选择地形后,在属性面板会出现7个按钮以方便地形的编辑.从左到右依次为高度工具.特定高度工具.平滑工具.贴图工具.画树工具.细节工具.其他设置.如下图所示.Terrain Editing Tools appear in the InspectorEach rectangular button is a different Terrain tool. There are tools to change the height, paint splat maps, or attach details like trees or rocks. To use a specific tool, click on it. You will then see a short description of the tool appear in text below the tool buttons.点击任何一个按钮,按钮下面都会出现关于此按钮的说明及相关的快捷键.Most of the tools make use of a brush. Many different brushes are displayed for any tool that uses a brush. To select a brush, just click on it. The currently selected brush will display a preview when you hover the mouse over the terrain, at the size you have specified.每个工具都有不同的笔刷.选取笔刷后,在地形上都会出现蓝色图形表示笔刷的范围.You will use all of these brushes in the Scene View to paint directly onto your Terrain. Simply choose the tool and brush you want, then click & drag on the Terrain to alter it in real-time. To paint height, textures, or decorations, you must have the Terrain selected in the Hierarchy View.花点时间熟悉这些工具.选取一个工具及笔刷,用拖放的方式就可以实时地编辑地形.F键,多用用这个键,你会发现没有它,修改地形是件困难与痛苦的事.享受它带来的方便吧…Note: When you have a brush selected, move your mouse over the Terrain in the Scene View and press F. This will center the Scene View over the mouse pointer position and automatically zoom in to the Brush Size distance. This is the quickest & easiest way to navigate around your Terrain while creating it.Terrain Keyboard Shortcuts 地形编辑的快捷键While Terrain Inspector is active, those keyboard shortcuts can be used for fast editing (all of them customizable in Unity Preferences): 以下是地形编辑的快捷键.只有在地形被选取后才可用.∙Shift-Q to Shift-Y selects active terrain tool. Shift-Q 到Shift-Y 对应从左到右六个工具∙Comma (,) and dot (.) cycle through active brush. 逗号和句号向前或向后选取笔刷∙Shift-comma (<) and Shift-dot (>) cycle through active tree/texture/detail object. Shift-逗号和Shift-句号向前或向后选取树/贴图/细节物体.以下是对各个工具的详细说明.Height 地形高度工具Using any of the Terrain editing tools is very simple. You will literally paint the Terrain from within the Scene View. For the height tools and all others, you just have to select the tool, and click the Terrain in Scene View to manipulate it in real-time.使用地形工具画地形是很简单的.你所要做的就是选取工具,再用鼠标在地形上拖拽就可以实时地画出地形.不然,要画出游戏级别的地形,还要一张原画以及多多的练习.总体的思路就是先画高度,再分出层次,画贴图,画树以及增加细节.Raising & Lowering HeightThe first tool on the left is the Raise Height tool .第一个工具:地形高度工具.With this tool, you paint brush strokes that will raise the height of the Terrain. Clicking the mouse once will increment the height. Keeping the mouse button depressed and moving the mouse will continually raise the height until the maximum height is reached.使用这个工具,可以依据笔刷的类型及强度画出隆起或凹陷的地形(初始时不可用).按鼠标一次,就会隆起地形.按住鼠标同时拖拽,可以不断隆起地形.直到达到最大高度.如下图所示.You can use any of the brushes to achieve different results 使用不同的笔刷可以得到不同的效果.If you want to lower the height when you click, hold the Shift key. 如要凹陷地形,按住Shift 键.如下图所示在做地形时,一个很重要的按键就是F键.多多用这个键吧.Note:When you have a brush selected, move your mouse over the Terrain in the Scene View and press F. This will center the Scene View over the mouse pointer position and automatically zoom in to the Brush Size distance. This is the quickest & easiest way to navigate around your Terrain while creating it.Paint HeightThe second tool from the left is the Paint Height tool .第二个工具,最大高度工具. 可以设定最大高度,当达到这个高度后,地形就不再加高.周围高度一样时,就会变平.这个工具用于分出地形高度的层次.Shift键在这个工具上的用途是选取最大高度.This tool allows you to specify a target height, and move any part of the terrain toward that height. Once the terrain reaches the target height, it will stop moving and rest at that height.To specify the target height, hold Shift and click on the terrain at the height you desire. You can also manually adjust the Height slider in the Inspector.Now you've specified the target height, and any clicks you make on the terrain will move the terrain up or down to reach that height. 下图所示,最大高度工具的应用.Smoothing HeightThe third tool from the left is the Smoothing Height tool . 第三个工具是高度平滑工具.用于再个不高度地形之间的过渡部分.这样地形不会有棱有角.如下图所示.This tool allows you to soften any height differences within the area you're painting. Like the other brushes, paint the areas you want to smooth in the Scene View.Working with Heightmaps 高度图创建地形If you like, you can import a greyscale Heightmap created in Photoshop, or from real-world geography data and apply it to your Terrain. To do this, choose Terrain->Import Heightmap - Raw..., then selectthe desired RAW file. You'll then see some import settings. These will be set for you, but you have the option of changing the size of your Terrain from this dialog if you like. When you're ready, click the Import button. Once the Heightmap has been applied to the Terrain, you can edit it normally with all the Tools described above. Note that the Unity Heightmap importer can only import grayscale raw files. Thus you can't create a raw heightmap using RGB channels, you must use grayscale.用Photoshop或其他3D软件导出灰度图可以使用灰度图来创建地形.灰度图的格式应为RAW格式.点击, Terrain->Import Heightmap – Raw 出现对话框,可以修改地形的大小.点击Import就可以创建地形了.创建好后,你可以使用所有的地形工具再进行编辑. Unity可以支持16位的灰度图.可以通过Photoshop,Bryce,Terragen这几个软件来创建灰度图.同样,可以在Unity中导出灰度图.在Terrain->Import Heightmap - Raw...对话框中,点击Export.就OK. 通过Terrain->Flatten....命令可以将地形整体设置一个高度.这个命令最好在最初使用.不然,做好的地形会变成平面.需要重新编辑.Unity works with RAW files which make use of full 16-bit resolution. Any other heightmap editing application like Bryce, Terragen, or Photoshop can work with a Unity Heightmap at full resolution.You also have the option of exporting your Heightmap to RAW format. Choose Terrain->Import Heightmap - Raw... and you'll see a export settings dialog. Make any changes you like, and click Export to save your new Heightmap.Unity also provides an easy way to flatten your terrain. Choose Terrain->Flatten.... This lets you flatten your terrain to a height you specify in the wizard.Textures 给地形加贴图Decorate the landscape of your terrain by tiling Terrain Textures across the entire terrain. You can blend and combine Terrain Textures to make smooth transitions from one map to another, or to keep the surroundings varied. 地形贴图就如角色贴图一样,是地形整体风貌.出于游戏整体性能和地形引擎数据结构的原因.地形的贴图数最好是4的倍数.Terrain Textures are also called splat maps. What this means is you can define several repeating high resolution textures and blend between them arbitrarily, using alpha maps which you paint directly onto the Terrain. Because the textures are not large compared to the size of the terrain, the distribution size of the Textures is very small.Note: Using an amount of textures in a multiple of four provides the greatest benefit for performance and storage of the Terrain alpha maps.To being working with textures, click on the Paint Textures button下图所示就是贴图画笔in the Inspector.Adding a Terrain Texture为地形增加贴图Before you can begin painting Terrain Textures, you will add at least one to the Terrain from your Project folder. Click the Options Button->Add Texture.... 如图所示, Options Button->Add Texture....你需要为地形增加贴图,才能用贴图来画地形.第一个地形会作用于整个地形.第二个之后的贴图才能用笔刷画.重复以上步骤就可以为地形增加需要的贴图了.如果要更换贴图,就在当前贴图选取后(被选取的贴图会以高亮蓝色表示),点击Edit Texture,之后就可以重新选取贴图.另一个Remove Texture 就是移除贴图.贴图尺寸越小,过渡会越自然.反之亦然.This will bring up the Add Terrain Texture dialog.The Add Terrain Texture dialog 在Splat 中选取需要的贴图文件.第二三个参数是贴图的尺寸大小.From here, select a tileable texture in the Splat property. You can either drag a texture to the property from the Project View, or choose one from the drop-down.Now, set the Tile Size X and Tile Size Y properties. The larger the number, the larger each "tile" of the texture will be scaled. Textures with large Tile Sizes will be repeated fewer times across the entire Terrain. Smaller numbers will repeat the texture more often with smaller tiles.Click the Add Button and you'll see your first Terrain Texture tile across the entire Terrain.Repeat this process for as many Terrain Textures as you like.Painting Terrain Textures 画地形贴图Once you've added at least two Terrain Textures, you can blend them together in various ways. This part gets really fun, so let's jump right to the good stuff. 为地形增加了两个或以上贴图后,就可以使用贴图画地形了.选取贴图和笔刷,用鼠标在地形上拖拽,画贴图就是如此简单.画贴图时记得使用F和Alt键,这样的效率会更高.Select the Terrain Texture you want to use. The currently selected Terrain Texture will be highlighted in blue.Select the Brush you want to use. The currently selected Brush will be highlighted in blue.Select the Brush Size, Opacity, and Target Strength.Click and drag on the terrain to draw the Terrain Texture.上图从上而下参数为:笔刷大小,透明度,笔刷强度Use a variety of Textures, Brushes, Sizes, and Opacities to create a great variety of blended styles.不同的笔刷,大小和透明度可以得到不同的效果.Note:When you have a brush selected, move your mouse over the Terrain in the Scene View and press F. This will center the Scene View over the mouse pointer position and automatically zoom in to the Brush Size distance. This is the quickest & easiest way to navigate around your Terrain while creating it.TreesUnity's Terrain Engine has special support for Trees. You can put thousands of trees onto a Terrain, and render them in-game with a practical frame rate. This works by rendering trees near the camera in full 3D, and transitioning far-away trees to 2D billboards. Billboards in the distance will automatically update to orient themselves correctly as they are viewed from different angles. This transition system makes a detailed tree environment very simple for performance. You have complete control over tweaking the parameters of the mesh-to-billboard transition so you can get the best performance you need.You can easily paint lots of trees for beautiful environments like thisAdding Trees 增加树木Select the Place Trees button in the Inspector.Before you can place trees on your terrain, you have to add them to the library of available trees. To do this, click the Edit Trees button->Add Tree. You'll see the Add Tree dialog appear.The Add Tree dialogSelect the tree from your Project View and drag it to the Tree variable. You can also edit the Bend Factor if you want to add an additional bit of animated "bending in the wind" effect to the trees. When you're ready, click Add. The tree will now appear selected in the Inspector.The newly added tree appears selected in the InspectorYou can add as many trees as you like. Each one will be selectable in the Inspector for you to place on your Terrain.The currently selected tree will always be highlighted in blue增加树和增加贴图是一样的,所不同的只是Blend factor 这个参数,如果要有树在风中摇摆的效果,就设置为1 或以上,不要风的效果就设置为0. 按住Shift, 可以移除树.还是两个快捷键F键和Alt键.可以提高效率.Painting TreesWhile still using the Place Trees tool, click anywhere on the Terrain to place your trees. To erase trees, hold the Shift button and click on the Terrain.Painting trees is as easy as using a paintbrush toolThere are a number of options at your disposal when placing trees. 树的参数如下Brush Size Radius in meters of the tree placing brush. 以米为单位,树的半径.一次画多少棵树Tree Spacing Percentage of tree width between trees.树与树之间的百分数Color Variation Allowed amount of color difference between each tree. 树与树之间颜色差的范围Tree Height Height adjustment of each tree compared to the asset.场景中树与模型之间高度比Height Variation Allowed amount of difference in height between each tree.树与树之间的高度比Tree Width Width adjustment of each tree compared to the asset. 场景中树与模型之间宽度比Width Variation Allowed amount of difference in width between each tree. 树与树之间的宽度比Tree Painting Tips 技巧:不同区域选用不同的笔刷类型.通过树之间的距离(Tree Space)来表现树的疏密.Different Brush sizes cover different area sizesAdjust Tree Spacing to change the density of the trees you're paintingEditing Trees通过Edit Trees button->Edit Detail 或双击树,会出现对话框,可以设置树的参数.To change any import parameters for an added tree, select the detail and choose Edit Treesbutton->Edit Detail. Or double-click the tree you want to edit. You will then see the Edit Tree dialog, and you can change any of the settings.Mass Placement If you don't want to paint your trees and you just want a whole forest created, you can use Terrain->Mass Place Trees. Here, you will see the Mass Place Trees dialog. You can set the number of trees you want placed, and they'll be instantly positioned. All the trees added to your Terrain will be used in this mass placement. 通过Terrain->Mass Place Trees, 可以一次增加数量巨大的树.下图一次增加一万棵树.树的类型以当前选取的为准.10,000 Trees placed at onceRefreshing Source AssetsIf you make any updates to your tree asset source file, it must be manually re-imported into the Terrain. To do this, use Terrain->Refresh Tree and Detail Prototypes. This is done after you've changed your source asset and saved it, and will refresh the trees in your Terrain immediately.如果使用第三方软件修改树的模型.需要使用Terrain->Refresh Tree and Detail Prototypes.来更新Creating Trees 自定义树Every tree should consist of a single mesh with two Materials. One for the trunk and one for the leaves. For performance reasons, triangle count should be kept below 2000 for an average tree. The fewer triangles the better. The pivot point of the tree mesh must be exactly at the root of the tree, that is at the point where the tree should meet the surface it is placed on. This makes it the easiest to import into Unity and other modelling applications.树的模型由一个网格加两个材质组成.一个材质用于树干,另一材质用于树叶.基于性能上的考虑,一棵树的三角面数应少于2000.越少性能越好.树的轴中心应刚好在树根.树干的材质文件命名为:树的文件名+Bark,树叶的命名为树的文件名+Branch.模型文件以FBX格式存放.如需一次画一棵以上的树,需再做一个模型,把好几棵树放在一个FBX文件里.模型文件名与文件夹的名称要一致.可以参考官方的模型,之后再创建模型.Trees must use the Nature/Soft Occlusion Leaves and Nature/Soft Occlusion Bark shader. In order to use those shaders you also have to place the tree in a special folder that contains the name "Ambient-Occlusion". When you place a model in that folder and reimport it, Unity will calculate soft ambient occlusion specialized for trees. The "Nature/Soft Occlusion" shaders need this information. If you don't follow the naming conventions the tree will look weird with completely black parts.树需要使用Nature/Soft Occlusion Leaves和Nature/Soft Occlusion Bark shader 这两个效果.把树的整个文件夹放到Trees Ambient-Occlusion夹内.在Unity 项目面板里找到自定义树的FBX文件,在属性面板可以看到shader 选取项.在下拉菜单为树干选取Nature/Soft Occlusion Bark 效果.为树叶选取Nature/Soft Occlusion Leaves 效果. 从官方网站上可以下载到Terrain Demo.unitypackage, 这个资源包里有不少树,可以商用.如果真的需要自定义树模型,最好也好好看看官方的树是怎么建模,明白之后再进行建模.Unity also ships with several high quality trees in the "Terrain Demo.unitypackage". You can use those trees readily in your game. Even if you don't want to use the builtin trees, we strongly recommend that you take a look at those trees as an example on how to model trees.Using Low Poly Trees 低模树创建One branch with leaves is done with only six triangles and shows quite a bit of curvature. You can add more triangles for even more curvature. But the main point is: When making trees, work with triangles not with quads. If you use quads you basically need twice as many triangles to get the same curvature on branches. 一个树叉用六个三面效果还不错,如果要更好,可以增加三角面.重点就是需三角而不是四角来创建模型.如果用四角,可以把它分成两个三角面.,The tree itself wastes a lot of fillrate by having large polygons but almost everything is invisible due to the alpha. This should be avoided for performance reasons and of course because the goal is to make dense trees. This is one of the things that makes Oblivion's trees look great. They are so dense you cant even see through the leaves. 树的模型如有大多边形时,因透明通道的原因.会很浪费内存,同时会导致不可见.这是必须避免的,以提高性能.更重要的是,我们的目标是通过三角面做茂密的树.茂密得可以我们的眼睛都没法穿透它.Setting up Tree Collisions设置树的碰撞.If you'd like your trees to make use of colliders, it's very easy. When you've imported your Tree asset file, all you need to do is instantiate it in the Scene View, add a Capsule Collider and tweak it, and make the GameObject into a new Prefab. Then when you're adding trees to your Terrain, you add the tree Prefab with the Capsule Collider attached. You can only use Capsule Colliders when adding collisions with trees. 设置树的碰撞是件很简单的事情.只需要把树拖入场景,加上Capsule Collider这个碰撞,再做成预制就可以了.在加树的时候选取这个预制就OK.Grass 画草工具The Paint Foliage button allows you to paint grass, rocks, or other decorations around the Terrain. To paint grass, choose Edit Details button->Add Grass Texture. You don't need to create a mesh for grass, just a texture. 如上图就是画草的工具.当然它还可以画石头,或其他可以作为地形装饰的东西.同样,需要先加草的贴图之后才能画.以下是它的参数.The Add Grass Texture dialogAt this dialog, you can fine-tune the appearance of the grass with the following options:Detail Texture The texture to be used for the grass.草的贴图Min Width Minimum width of each grass section in meters.以米为单位,草的最小宽度Max Width Maximum width of each grass section in meters. 以米为单位,草的最大宽度Min Height Minimum height of each grass section in meters. 以米为单位,草的最小高度Max Height Maximum height of each grass section in meters. 以米为单位,草的最大高度Noise Spread The size of noise-generated clusters of grass. Lower numbers mean less noise .树叶变黄生成器的大小,数值越小,变黄范围越小.Healthy Color Color of healthy grass, prominent in the center of Noise Spread clusters.健康叶的颜色.树叶中心的颜色Dry Color Color of dry grass, prominent on the outer edges of Noise Spread clusters.树叶干枯的颜色.树叶变黄外围的颜色Grayscale Lighting If enabled, grass textures will not be tinted by any colored light shining on the Terrain.灯光灰度.如果设置为可用,树叶会以灰度图渲染.Lightmap Factor How much the grass will be influenced by the Lightmap. Lightmap的影响范围Billboard If checked, this grass will always rotate to face the main Camera.如可用,草会总以主摄像机为中心旋转After you've clicked the Add button, you'll see the grass appear selectable in the Inspector.The added grass appears in the Inspector上图为在属性面板上加入草贴图后的效果Painting Grass 画草.方法和上面的工具一样.就不多言了.同样记得F键和Alt键.Painting grass works the same as painting textures or trees. Select the grass you want to paint, and paint right onto the Terrain in the Scene ViewPainting grass is easy as pieNote:When you have a brush selected, move your mouse over the Terrain in the Scene View and press F. This will center the Scene View over the mouse pointer position and automatically zoom in to the Brush Size distance. This is the quickest & easiest way to navigate around your Terrain while creating it.Editing Grass 草的编辑和树的一样.对比下图.修改参数最小/最大高/宽度来让它来点变化To change any import parameters for a particular Grass Texture, select it choose Edit Detailsbutton->Edit. You can also double-click it. You will then see the Edit Grass dialog appear, and be able to adjust the parameters described above.You'll find that changing a few parameters can make a world of difference. Even changing the Max/Min Width and Height parameters can vastly change the way the grass looks, even with the same number of grass objects painted on the Terrain.Grass created with the default parameters默认参数下的草The same number of painted grass objects, now wider and taller 修改宽度和高度的效果Detail Meshes 细节网格Any Terrain decoration that is not trees or grass should be created as a Detail Mesh. This is perfect for things like rocks, 3D shrubbery, or other static items. To add these, use the Paint Foliage button. Then choose Edit Details button->Add Detail Mesh. You will see the Add Detail Mesh dialog appear.在加草的工具上还可以增加细节网格物体.比如石头或其他可以装饰的物体.以下是其参数The Add Detail Mesh dialogDetail The mesh to be used for the detail.用作细节的网格物体.Noise Spread The size of noise-generated clusters of the Detail. Lower numbers mean less noise 细节燥波的大小..Random Width Limit for the amount of width variance between all detail objects.随机宽度Random Height Limit for the amount of height variance between all detail objects.随机高度Healthy Color Color of healthy detail objects, prominent in the center of Noise Spread clusters.细节物体的健康色.细节物体中心的颜色Dry Color Color of dry detail objects, prominent on the outer edges of Noise Spread clusters 细节物体的干燥色.细节物体外围的颜色..Grayscale Lighting If enabled, detail objects will not be tinted by any colored light shining on theTerrain.灰度灯的设置开关.可用的话,细节物体不带颜色.Lightmap Factor How much the detail objects will be influenced by the Lightmap.Lightmap的影响范围Render Mode Select whether this type of detail object will be lit using Grass lighting or normal Vertex lighting. Detail objects like rocks should use Vertex lighting.细节物体渲染的方式.用草的灯光渲染或用正常的锥形灯渲染After you've clicked the Add button, you'll see the Detail mesh appear in the Inspector. Detail meshes and grass will appear next to each other. 画细节的和草是一样的.就不多说了.The added Detail mesh appears in the Inspector, beside any Grass objectsPainting Detail MeshesPainting a Detail mesh works the same as painting textures, trees, or grass. Select the Detail you want to paint, and paint right onto the Terrain in the Scene View.Painting Detail meshes is very simpleNote: When you have a brush selected, move your mouse over the Terrain in the Scene View and press F. This will center the Scene View over the mouse pointer position and automatically zoom in to the Brush Size distance. This is the quickest & easiest way to navigate around your Terrain while creating it.Editing Details 修改细节物体.双击或用Edit Details button->Edit.To change any import parameters for a Detail Mesh, select it and choose Edit Details button->Edit. You will then see the Edit Detail Mesh dialog appear, and be able to adjust the parameters described above.Refreshing Source Assets如果用第三方软件修改细节网格后,需要用Terrain->Refresh Tree and Detail Prototypes.来更新.If you make any updates to your Detail Mesh asset source file, it must be manually re-imported into the Terrain. To do this, use Terrain->Refresh Tree and Detail Prototypes. This is done after you've changed your source asset and saved it, and will refresh the Detail Meshes in your Terrain immediately.Lightmaps 灯光贴图You can create and use a Lightmap, based on the Lights in your Scene. You should almost always use Lightmaps. A Lightmapped terrain looks substantially better than Vertex lit. On top of that a Lightmapped terrain also runs faster than a Vertex lit terrain! 基于场景里的灯光,可以创建灯光贴图.要做好地形,灯光贴图是必须的.对比下面两张图.第一张没有灯光贴图.第二张用了灯光贴图.A mountain view without a LightmapThe same mountain, now using a Lightmap. Much better!Creating a LightmapTo create a Lightmap, make sure you have at least one Directional Light in your scene. Then choose Terrain->Create Lightmap from the menu. Here you can set various options like the Resolution of the Lightmap, choose the Lights used in the Lightmap, Shadows, and Shadow Sampling.为了创建灯光贴图.场景中必须至少要有一个平行灯.通过Terrain->Create Lightmap 就可以创建灯光贴图.可以设置的参数比如分辩率,阴影,阴影取样.Toggling LightmapTo enable or disable the active Lightmap, select your Terrain and click the Terrain Settings tab. In Lighting popup, choose Lightmap or Pixel lighting mode.通过地形设置选项:如下图可以开启和关闭灯光贴图.灯光贴图必须使用平等灯才可用.Note: You must use a Directional Light to create the lightmap. Point and Spot Lights will not be taken into account when creating the lightmap.Other Settings 地形设置最后一个按键.参数如下There are a number of options under the Terrain Settings buttonin the Terrain Inspector.All additional Terrain SettingsBase TerrainPixel Error Amount of allowable errors in the display of Terrain Geometry. This is essentially a LOD setting. 地形容差.Base Map Dist.The distance that Terrain Textures will be displayed in high-resolution.高分辨率下显示地形贴图的距离.Lighting Terrain lighting mode:地形灯光模式.Vertex Terrain is lit by lights in vertex lit mode. 顶点灯光模式Lightmap Terrain uses lightmap and is not affected by lights.灯光贴图模式Pixel Terrain is lit by pixel & vertex lights up close, and fades out to lightmap in thedistance. Close by it can also receive shadows. 像素灯光模式Cast Shadows Should terrain cast shadows?地形是否显示阴影Tree & Detail Settings树与细节的设置Draw If enabled, all trees, grass, and detail meshes will be drawn .是否可画.可用的话所有树,草和细节都渲染.必须为可用,不然看不到树,草和细节Detail Distance Distance from the camera that details will stop being displayed.离摄像机多远之后不显示细节Tree Distance Distance from the camera that trees will stop being displayed. The higher this is, the further-distance trees can be seen.同上,不过这个是关于树的Billboard Start Distance from the camera that trees will start appearing as Billboards instead of Meshes.离摄像机多远树开始以图片而不是网格来显示Fade Length Total distance delta that trees will use to transition from Billboard orientation toMesh orientation.树的图片和网格方式显示距离.Max Mesh Trees Total number of allowed mesh trees to be capped in the Terrain.地形网格显示的最大数Wind Settings风的设置Speed The speed that wind blows through grass. 风的速度Size The areas of grass that are affected by wind all at once. 风可影响的范围Bending Amount that grass will bend due to wind.受风影响的树的数量Grass Tint Overall tint amount for all Grass and Detail Meshes.彩色显示草和细节的总数。


基于Unity3D的游戏场景设计基于Unity3D的游戏场景设计1. 引言游戏场景设计对于游戏的视觉效果和玩家体验至关重要。
随着Unity3D游戏引擎的不断发展,游戏场景的设计和制作变得更加简单和便捷。
本文将探讨基于Unity3D的游戏场景设计的一些关键要素和技巧,并分享一些实用的设计经验。
2. 游戏场景设计的目标良好的游戏场景设计可以提供更好的沉浸感和视觉体验,从而吸引玩家并增强游戏的乐趣。
设计一个令人印象深刻的游戏场景需要考虑以下几个目标:2.1 创造独特而吸引人的场景一个好的游戏场景应该具备独特的风格和吸引力,以吸引玩家驻足并探索。
创造出与众不同的视觉效果和独特的元素是实现这一目标的关键。
2.2 营造逼真的环境游戏场景需要模拟真实的环境,为玩家提供身临其境的感觉。
丰富的细节、精确的建模和逼真的光影效果等都是为了创造一个逼真的游戏世界。
2.3 提供合适的交互和趣味性游戏场景还应该提供与玩家互动的机会,并在其中融入一定的趣味性。
例如,可交互的物体、隐藏的彩蛋等都可以增加游戏的乐趣和挑战性。
3. 游戏场景设计的基本原则要设计一个出色的游戏场景,需要遵循一些基本的设计原则。
以下是一些常见的原则:3.1 游戏主题一致性游戏场景应该与游戏的主题和故事情节相一致。
场景设计中的元素和细节应该与游戏世界和角色相适应,从而增强游戏的沉浸感。
3.2 视觉平衡游戏场景设计需要注意视觉平衡,即通过合理布局和比例关系来达到视觉上的平衡感。
在设计中遵循几何、色彩和材质等方面的平衡是必要的。
3.3 空间和层次感游戏场景中的空间布局要考虑到玩家的观感和移动路径。
恰当的层次感可以增加场景的深度和立体感,从而提供更好的视觉效果。
3.4 自然流动和过渡游戏场景应该注重流畅的过渡和连接。
场景中的元素应该有连贯性,使得玩家在探索时感到流畅和自然。
4. 基于Unity3D的游戏场景设计技巧在使用Unity3D进行游戏场景设计时,以下技巧可能会帮助设计师实现他们的创意:4.1 使用预制资源Unity3D提供了大量的预制资源,包括模型、材质和特效等。
实验一班级:数媒1401 学号:201426020107 姓名:孔睿琦完成时间:2015.11.29一实验题目3D地形实现二实验目标熟悉Unity 3D的操作,学会制作复杂地形并添加细节,制作出较为美观的场景。
三实验平台Unity 3D四实验过程首先创建地形,在课本的指导下学会控制地形的高低起伏,用不同的笔刷、调节笔刷大小,并且适当地使用平滑工具。
此时地形仍为灰色。
接着给地形添加贴图,使用不同类型的texture,为地形上色。
此时地形已有丰富的色彩。
随后给地形添加树木,点击Edit Trees,添加一个树模型。
在Unity 3D自带的package中含有相关素材,有两种树。
再给地形添加草与网格元素,在地形菜单栏中选择第六个按钮,添加相应的素材,使用笔刷涂抹。
此时,地形基本成型,只是稍显单调。
于是准备再添加湖泊。
编辑地形高度,在山间按住shift的同时用笔刷点击,创造了一个洼地,用于存放湖泊。
找到standard assets里的water(pro),将daylight water直接拖入scene中,调整合适的大小,此时并没有看到水面。
调整y的值,出现水面。
由于水面是透明的,显示底部山峦表面的深绿色,不太美观,于是使用texture将水面下面的山地涂抹为蓝色,使之更为美观。
此时有一个疑问,实现下载的package不能正常使用,只能使用软件自带的package,效果很有限。
经过百度搜索,发现是因为素材存放路径存在中文字符。
在改变了存放路径后,成功导入了植物的package,于是在空地处自由添加各种样式的树木、灌木、花朵、草丛。
在这个过程中,发现如果视角很远,便不能看到添加的素材,如果视角很近,虽然能看到素材效果,但是一直需要移动画面,十分不便,暂且没有找到两全之策。
此时一个场景基本构建完毕,点击edit菜单下的set rendering,在skyboxes里添加一个素材,此时场景有了天空,顺便加入了光源。
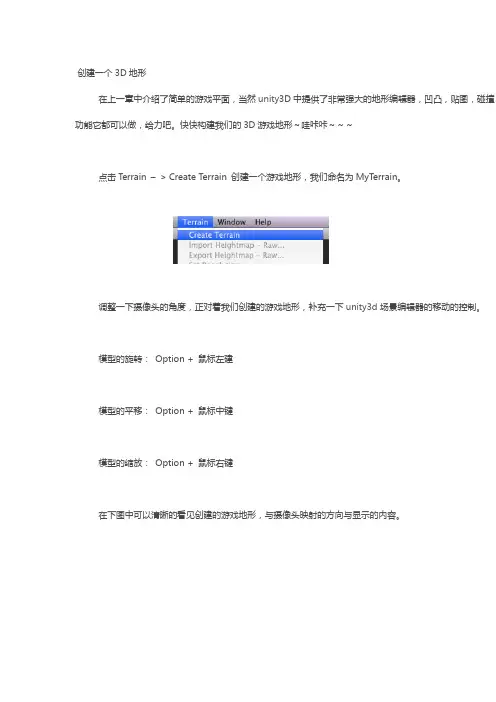
创建一个3D地形在上一章中介绍了简单的游戏平面,当然unity3D中提供了非常强大的地形编辑器,凹凸,贴图,碰撞,功能它都可以做,给力吧。
快快构建我们的3D游戏地形~哇咔咔~~~点击Terrain –> Create Terrain 创建一个游戏地形,我们命名为MyTerrain。
调整一下摄像头的角度,正对着我们创建的游戏地形,补充一下unity3d场景编辑器的移动的控制。
模型的旋转:Option + 鼠标左建模型的平移:Option + 鼠标中键模型的缩放:Option + 鼠标右键在下图中可以清晰的看见创建的游戏地形,与摄像头映射的方向与显示的内容。
出自狗刨学习网地形一旦创建完毕后,Unity3D会默认地形的大小,宽度,厚度,图像分辨率,纹理分辨率,等等,这些任意修改的。
点击Terrain –> set Resolution打开设置地形参数菜单,如下图所示。
如上图所示从上到下分别代表的含义是Terrain Width: 地形的宽度Terrain Height: 地形的高度Terrain Length:地形的长度HeightMap Resolution:地形高度图的分辨率.Detail Resolution:细节分辨率,控制草和细节网格地图的分辨率。
数值越高标示效果越好,想对也越消耗可能会卡。
根据情况适当的调节。
Control Texture Resolution:控制不同纹理的分辨率。
Base Texture Resolution:控制相对纹理分辨率,这里指一定范围内的。
设置完毕点击set Resolution按钮,有兴趣的朋友可以动态的修改一下参数,看看你的地形发生了什么这样子我们的地形表面就创建完毕,下面给地形上添加一些五彩缤纷的元素吧。
五彩缤纷的元素Hierarchy中点击T errain,Unity编辑器右侧栏中出现地形编辑窗口。
下图中红框内是比较重要的一些信下分别为。
1 .Position Rotation Scale地形的位置旋转缩放,任何模型物体点击后右侧都会出现这个窗口,标志着3D空间中的位置,修改参数模型也会跟着在三维空间中改变。

unity3d实例教程Unity3D是一款非常强大的游戏开发引擎,它允许开发者创建各种类型的游戏和应用程序。
本篇文章将介绍一些常见的Unity3D实例教程,帮助读者快速上手并了解Unity3D的基本功能和特性。
1.创建第一个游戏场景在Unity3D中,第一步是创建一个游戏场景。
为了创建一个简单的游戏场景,我们可以添加一个地形,一些角色模型和一些物体。
在Unity3D 中,我们可以使用场景视图来进行场景的组织和操作。
在本教程中,我们将学习如何创建一个游戏场景,并为场景添加一些基本的元素。
2.角色控制器和动画在游戏中,角色控制器和动画是非常重要的组成部分。
在Unity3D中,可以使用Animator组件来实现角色动画。
在本教程中,我们将学习如何创建一个简单的角色控制器,并为其添加一些基本的动画。
3.物理模拟和碰撞检测物理模拟和碰撞检测是游戏中常见的功能。
在Unity3D中,可以使用Rigidbody组件和Collider组件来实现物理模拟和碰撞检测。
在本教程中,我们将学习如何给物体添加Rigidbody组件,并设置一些基本的物理属性。
我们还将学习如何给物体添加Collider组件,并处理碰撞事件。
4.UI设计和用户交互UI设计和用户交互对于游戏的用户体验非常重要。
在Unity3D中,可以使用Canvas组件和EventSystem组件来实现UI设计和用户交互。
在本教程中,我们将学习如何创建一个简单的UI界面,并处理用户的点击事件。
5.渲染和光照渲染和光照是游戏视觉效果的关键部分。
在Unity3D中,可以使用Shader和光照设置来实现渲染和光照效果。
在本教程中,我们将学习如何创建自定义的Shader,并为场景设置一些基本的光照。
6.游戏优化和性能调优游戏优化和性能调优对于提高游戏性能和用户体验非常重要。
在Unity3D中,可以使用Profiler工具和一些优化技巧来进行游戏优化和性能调优。
在本教程中,我们将学习如何使用Profiler工具来分析游戏的性能,并实施一些常用的优化技巧。
学IT技能上我学院网Unity3D预设场景搭建教程Untiy3D场景搭建中,预设是一个存储在工程视图中可重用的游戏物体。
预设可以被插入到任意数量的场景中,并可多次出现在同一场景中。
当你添加一个预设到场景中,你就创建了一个它的实例。
所有的预设实例都与原始的预设相关联并且本质上是它的一个克隆。
不论在你的工程中存在多少实例,当你对预设作了任何改变后你将看到这种改变被应用到所有的实例上。
不论你的预设是单一的一个游戏物体或者是一组游戏物体,在预设的变换层次中所作的任何改变都建碑应用到它的实例上。
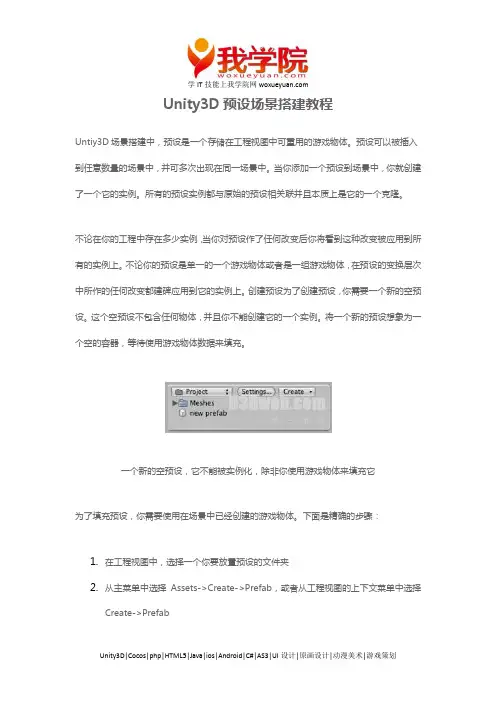
创建预设为了创建预设,你需要一个新的空预设。
这个空预设不包含任何物体,并且你不能创建它的一个实例。
将一个新的预设想象为一个空的容器,等待使用游戏物体数据来填充。
一个新的空预设,它不能被实例化,除非你使用游戏物体来填充它为了填充预设,你需要使用在场景中已经创建的游戏物体。
下面是精确的步骤:1.在工程视图中,选择一个你要放置预设的文件夹2.从主菜单中选择Assets->Create->Prefab,或者从工程视图的上下文菜单中选择Create->Prefab学IT技能上我学院网3.命名该预设4.在层次视图(Hierarchy view)中,选择你要放入预设的游戏物体5.将它们从层次使用中拖放到工程视图中在你执行了上述步骤后,游戏物体和它的子物体都将被拷贝到预设中。
现在,预设可以在多个实例中被重用。
在层次中的原始物体现在已经成了该预设的一个实例。
创建更多预设的实例是非常简单的。
实例化预设为了在当前场景中创建一个预设的实例,从工程视图中拖动预设到场景(Scene)或层次视图中。
这将从预设中拷贝所有父物体和所有的子物体。
这些游戏物体被连接到(linked)预设,在工程视图中将使用蓝色的文本来显示它们。
其中三个物体是预设的实例继承继承意味着当预设改变时,这些改变也将被应用到所有与之相连的物体上。
例如,如果你添加一个脚本到一个预设,那么所有该预设的实例都将包含该脚本。
Unity3D地形的制作Unity3D手册中介绍了两种地形制作方法:一、在SceneView中使用height tools直接绘制二、使用外部工具制作的heightmaps直接绘制地形很简单,不过只适合小面积地图的制作,对于真实游戏项目来说,这样拉地形实在太复杂,一般我们都会使用外部工具,比如PS,比如max来制作高度图,然后导出为一张灰度图,在引擎中将其转换为地形。
Unity3D也支持了这种做法,即导入HeightMap的方式,不过对HeightMap的格式有一个限定,必须是16bit的RAW格式灰度图,但是除此之外手册中再没有更多的描述。
没关系,Unity3D提供了将地形导出为HeightMap的方法,我们可以做一张小地图将其导出来,看一看就知道了。
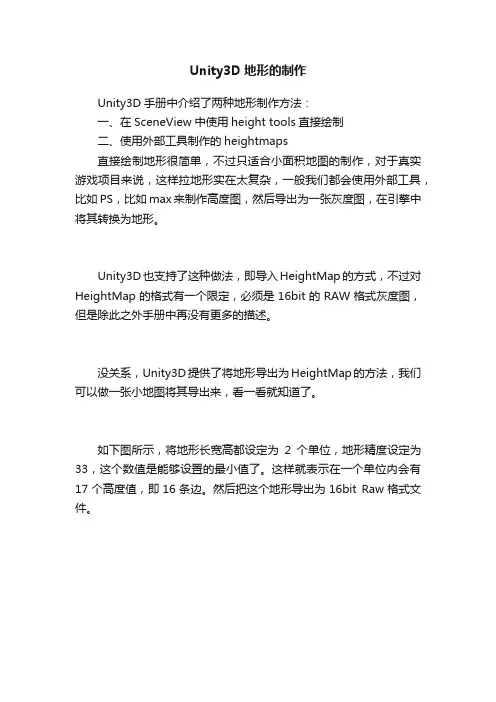
如下图所示,将地形长宽高都设定为2个单位,地形精度设定为33,这个数值是能够设置的最小值了。
这样就表示在一个单位内会有17个高度值,即16条边。
然后把这个地形导出为16bit Raw格式文件。
按照上面的数据,这个raw文件将会由33 * 33个16bit数据构成,所以文件大小应为 16 * 16 * 2 = 2178字节。
导出来的文件也确实如此,证明我们的推断是正确的。
注意这里的Heightmap Resolution一定是2的n次幂加1,至于为什么会这样,找一个介绍HeightMap的文档看一下就明白了。
既然验证了我们的推断是正确的,那试着在PS中创建一张HeightMap放到Unity3D中看看。
我们创建的HeightMap大小为129 * 129象素,如果我们让一个Unity3D单位由4个象素点构成,那么地图大小则为 (129 – 1) / 4 = 32,即32 * 32,高度值不需要太大,高为12就够了。
导入到Unity3D中后刷上一层Texture,再种上几棵树,最终的效果看上去是这样:还不错,其实我没这么好的艺术细胞,在PS里摆弄了半天后,还是决定到网上去找一张现成的HeightMap (囧)好了,场景制作应该不会有大问题了,下一步,看看怎么放两个会动的东西进去吧本文来自CSDN博客,转载请标明出处:/lfhfut/archive/2009/07/26/4380605.aspx。
Unity地形制作教程在Unity工作流程内,地形是一个不可缺少的重要元素,不论是游戏或虚拟现实都会使用到各种类型的地形效果,在这个教学中我们需要了解到地形的制作基本概念与,其中对于Unity的地形操作部分需要大量的操作练习.熟悉这些功能操作之后,相信对于游戏地形的制作与运用将会更得心应手。
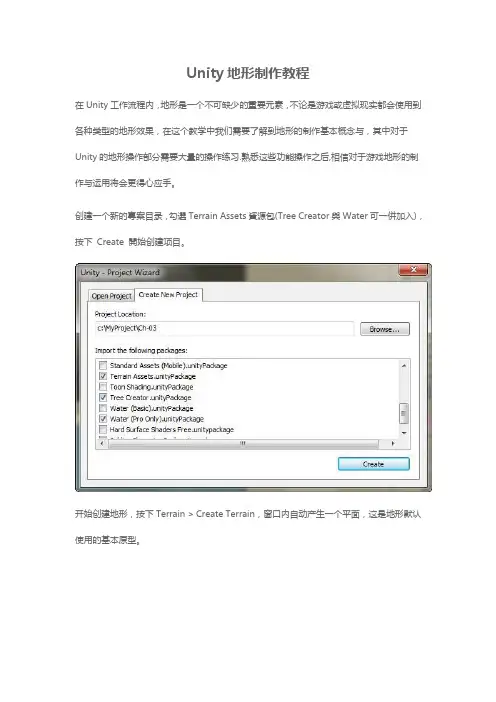
创建一个新的專案目录,勾選Terrain Assets資源包(Tree Creator與Water可一併加入),按下Create 開始创建项目。
开始创建地形,按下Terrain > Create Terrain,窗口内自动产生一个平面,这是地形默认使用的基本原型。
选择Terrain > Set Resolution 功能可以检视默认的地形所设定的基本参数,在这个选单内提供多样化的设定方式:Terrain Width : 地形的宽度Terrain Height : 地形的高度Terrain Length : 地形的长度HeightMap Resolution:地形高度图片所使用的分辨率.Detail Resolution : 这个数值高低用来控制草地和添加细节模型的分辨率。
数值越高效果越好,不过会大量消耗内存,可能会造成严重的延迟,大多数我们将这个数值控制在128到256之间会取得一个测试地形的开始。
Detail Resolution Per Patch : 每一个面片的细节设定值Control Texture Resolution : 控制贴图纹理的分辨率。
Base Texture Resolution : 控制地型基本贴图纹理分辨率。
在第一次的练习中,我们先采用内定的标准数值来进行地形绘制,直接按下Set Resolution 完成确认。
在Inspector 面板中的Terrain ( Script ) 是关于整个地形的所有功能设定,最上面的七个按钮为主功能区,由左至右的按钮功能分别是:1.Raise and Lower Terrain –绘制地形表面凹凸程度,如在绘制过程按下Shift 则将地形向下凹陷。
Unity3D场景搭建方法本教程将解释用于创建游戏场景的元素及方法。
1. 游戏物体(GameObject)在Unity中昀重要的就是游戏物体。
理解什么是游戏物体如何使用它是非常重要的。
该部分就将解释这个概念。
什么是游戏物体?在你的游戏中的任何东西都是游戏物体。
然而,游戏物体自身并不能做所有的事情。
在它们成为角色,环境或者特定的效果之前它们需要特定的属性。
但是物体中的每一个都会做许多不同的事情。
如果每一个物体都是一个游戏物体,我们怎么从一个静态房间中区分一个具有强大交互能力的物体?是什么使得游戏物体相互不同呢?答案就是游戏物体是一个容器。
他们是一个空的可以容纳不同块的盒子,而这些块组成了一个带有光照贴图的岛或是一个物理驱动的汽车。
为了真正理解游戏物体,你需要理解这些块;这些块被称为组件(Components)。
根据你要创建的物体的不同,你可以添加不同组件到一个游戏物体中。
将游戏物体想象为一个空的烹调罐,组件为不同的组成游戏的配料。
游戏物体与组件的关系现在我们知道游戏物体包含组件。
我们将通过使用昀常用的组件——变换组件(Transform)来讨论这两者之间的关系。
打开任意一个场景,创建一个新的游戏物体(使用 Shift-Command-N),选择他并查看检视面板(Instpector) Array空物体的检视面板你可能注意到了这里有两个完全不同的部分。
”GameObject”和”Transform”。
属于游戏物体部分的是关于游戏物体自身的信息。
这里只有物体的名称。
变换部分显示变换组件的信息。
当你创建一个新的物体时,将会自动包含一个变换组件。
所有的物体都会有一个变换组件。
在Unity中你不可能创建一个没有变换组件的物体,变换组件为所有物体提供了独特的功能。
变换组件变换组件是昀重要的组件之一。
它定义了游戏物体在场景视图中的位置,旋转,和缩放。
如果游戏物体没有旋转组件,那么它将不会存在世界中。
参考变换组件部分。
Unity3D教程宝典之地形前⾔:本⽂不是讲地形编辑器的使⽤,⽽是主要讲解:(1)地形相关知识(2)使⽤代码创建地形(3)使⽤AnimationCurve创建曲⾯地形(4)使⽤photoshop绘制地形表⾯,即SplatAlphaMap(5)使⽤代码为地形添加树本讲结构:⼀:地形的基础知识(1)地形编辑器的不⾜(2)地形结构(3)地形与SplatAlpha⼆:动态创建地形(1)动态创建简单平⾯地形(2)动态创建凹凸地形(3)利⽤AnimationCurve创建特殊曲线地形。
(4)动态创建地形,并设置splatPrototypes,最后使⽤photoShop绘制2D图编辑地形贴图。
(5)动态创建地形,使⽤photoShop绘制多张splats三:地形与树(1)TreePrototypes(2)TreeInstances⼀: 地形的基础知识(0)基本术语Splat:地形所使⽤的贴图,即Terrain Texture。
术语叫Splat或者 Splat map。
Splat Alhpa Map:地形贴图布局图,⽤图的rgba各个通道来表⽰贴图在地形上的使⽤,project界⾯⾥展开地形即可看见。
术语叫Splat Alpha Map,或者Alpha Map.(1)地形编辑器的不⾜地形Terrain是3D游戏⾥必不可少的⼀部分。
Unity提供的地形编辑器也⼗分好⽤,但是依然有少许不⾜和缺陷。
Unity地形编辑器的不⾜:a、地形只能是成⽚的抬⾼或者降低。
如果想定制某特定斜率,或者特定曲线的地形就没法实现了。
b、地形不能实时改变。
不过Unity提供了强⼤的地形脚本接⼝,可以弥补上述不⾜。
(2)地形结构⾸先要清楚, Terrain地形的包括Heightmap⾼度图,贴图信息,树信息等⼏乎所有数据都是储存TerrainData⾥,⽽TerrainData可以保存成地形⽂件,地形⽂件后缀为.asset。
任意⼯程导⼊地形⽂件后,在project窗⼝下都会显⽰为地形⽂件。
相关快捷键:Shif+Q,Shift+Y选择活动的地形工具逗号(,)和点号(.) 循环选择笔刷。
Shift+逗号(<),Shift+点(>)循环选择活动的树/纹理/细节对象。
不怎么好按。
按住Shift+笔刷的情况下可以擦除绘制在地形上的信息。
1地形创建如图方式创建地图。
前面3个分别控制地形的长宽高Terrain Width : 地形的宽度;Terrain Length : 地形的长度;Terrain Height : 地形的最大高度;HeightMap Resolution :高度图分辨率;(高度图可以用ps直接绘制,导入之后会形成3d 地形)Detail Resolution :控制草地和细节模型的地图分辨率,考虑性能这个值越低越好;Control Texture Resolution: 用于绘制到地形上混合不同纹理的溅斑贴图的分辨率;Base Texture Resolution:距离远了之后会用一张新的混合贴图代替溅斑贴图,这里代表这张替代贴图的分辨率。
3. Base Terrain 基本地形Pixel Error 像素容差:在显示地形网格时允许的错误数量。
这个其实是一个LOD配置。
当距离拉远之后,地形的复杂度会降低。
这个值控制复杂度变化远近的;Base Map Dist. 基本地图距离:需要显示高分辨率地图贴图的最大距离;Cast Shadows:控制是否投影;Material: 允许分配自定义的材质,这个材质呢必须是一个可以渲染地形的着色器。
比如说:Nature/Terrain/Diffuse (this shader is used if no material is assigned) or Nature/Terrain/Bumped Specular。
(这里在地形基本贴图没有设置的情况下将会使用这里的材质)Draw :是否绘制地形上的树木和草等细节;Detail Distance :细节的显示距离(当镜头距离细节物体多少米时开始显示细节物体);DetailDensity :细节的密度;一般定0.5;TreeDistance :树木显示距离(当镜头距离树木多少米时开始显示树木);BillBoardStart :树木开始使用广告牌的距离。