凯驰洗地机 B 60 中文操作手册
- 格式:pdf
- 大小:1.90 MB
- 文档页数:22

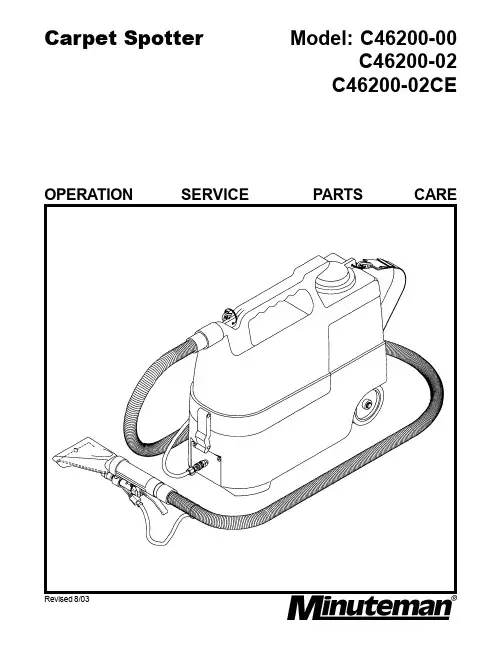
Carpet Spotter Revised 8/03OPERATION SERVICE PARTS CARE Model: C46200-00C46200-02C46200-02CEFOR COMMERCIAL USE ONLYIMPORTANT SAFETY INSTRUCTIONSWhen using an electrical appliance, basic precautions should always be followed, including the following:READ ALL INSTRUCTIONS BEFORE USINGWARNING - To reduce the risk of fire, electric shock, or injury:•Do not leave appliance when plugged in. Unplug from outlet when not in use andbefore servicing.WARNINGTo reduce the risk of electrical shock, do not expose to rain. Store indoors.•Use motorized tool on carpet moistened by the cleaning process.•Do not allow to be used as a toy. Close attention is necessary when used by or nearchildren.•Use only as described in this manual. Use only manufacturer’s recommendedattachments.•Do not use with damaged cord or plug. If appliance is not working as it should, hasbeen dropped, damaged, left outdoors, or dropped into water, return it to a servicecenter.•Do not pull or carry by cord, use cord as a handle, close a door on cord, or pull cordaround sharp edges or corners. Do not run appliance over cord. Keep cord away from heated surfaces.•Do not unplug by pulling on cord. To unplug, grasp the plug, not the cord.•Do not handle plug or appliance with wet hands.•Do not put any object into openings. Do not use with any opening blocked; keep freeof dust, lint, hair, and anything that may reduce air flow.•Keep hair, loose clothing, fingers, and all parts of body away from openings andmoving parts.•Do not pick up anything that is burning or smoking, such as cigarettes, matches, orhot ashes.•Do not use without dust-bag and/or filters in place.•Turn off all controls before unplugging.•Use extra care when cleaning on stairs.•Do not use to pick up flammable or combustible liquids such as gasoline or use inareas where they may be present.•Connect to a properly grounded outlet only. See grounding instructions.SAVE THESE INSTRUCTIONSINSPECTIONCarefully unpack and inspect your machine for shipping damage. Each unit is tested and thoroughly inspected before shipment, and any damage is the responsibility of the delivery carrier who should be notified immediately.ELECTRICAL - Model C46200-00 (115V)This machine is designed to operate on a standard 15 amp. 115 volt, 60 hz, AC circuit. Voltages below 105 volts AC or above 125 volts AC could cause serious damage to the motor. ELECTRICAL - Model C46200-02, C46200-02CE (230V)This machine is designed to operate on a standard 16 amp. type L fused 230 volt, 50 hz, AC circuit. Voltages below 200 volts AC or above 250 volts AC could cause serious damage to the motor. I.E.C. Class 1.WARNINGElectric motors can cause explosions when operated near explosive materials or vapors. Do not operate this machine near flammable materials such as solvents, thinners, fuels, grain dust, etc.GROUNDING INSTRUCTIONSThis appliance must be grounded. If it should malfunction or breakdown, grounding provides a path of least resistance for electric current to reduce the risk of electric shock. This appliance is equipped with a cord having an equipment-grounding conductor and grounding plug. The plug must be plugged into an appropriate outlet that is properly installed and grounded in accordance with all local codes and ordinances.DANGER - Improper connection of the equipment-grounding conductor can result in a risk of electric shock. Check with a qualified electrician or service person if you are in doubt as to whether the outlet is properly grounded. Do not modify the plug provided with the appliance -- if it will not fit the outlet, have a proper outlet installed by a qualified electrician.This appliance is for use on a nominal 120-volt circuit and has a grounding plug that looks like the plug illustrated in sketch A below. Make sure that the appliance is connected to an outlet having the same configuration as the plug. No adapter should be used with this appliance.USER MAINTENANCE INSTRUCTIONSAll service and repair should be performed by qualified vacuum service representative or electrician. No user serviceable components are employed in the electrical vacuum lid head assembly. No lubrication of the motor is required.DAILY MAINTENANCE1.Solution tank should be emptied after each use. Flush pumping system with 1 gallon ofclean water after use.2.Check and clean vacuum inlet and solution inlet strainer daily.3.Removable recovery tank, page 7, item 30, should be rinsed clean daily.4.Spray jet should be checked for correct spray pattern and cleaned if plugged. Do not cleanout spray tip with pins or wire, this may cause damage to the jet spray pattern and cause streaking.5.Protect equipment from freezing. Severe pumping system damage can occur if allowed tofreeze.6.Inspect vacuum hoses for tight connections. Check electrical cable for abrasion or cuts injacket. Cord should be replaced if worn or damaged.MONTHLY/BI-MONTHLY MAINTENANCEThe Solution Pump System should be purged monthly to remove alkaline residue build-up. To flush system out, use 1 quart of white vinegar to 1 1/2 gallons of clean hot water, followed by a clear 1 1/2 gallon rinse. Clean spray jets if required.CORD STORAGEWhile not in use storage can be accomplished by winding cord around top of machine. Cord hooks are provided.•Do not use with damaged cord or plug. If appliance is not working as it should, has been dropped, damaged, left outdoors, or dropped into water, return to service center.•Do not pull or carry by cord, use cord as handle, close a door on cord, or pull cord around sharp edges or corners. Do not run appliance over cord. Keep cord away from heated surfaces.•Do not unplug by pulling cord. To unplug, grasp the plug, not the cord.•Do not handle plug or appliance with wet hands.This equipment should be stored indoors and not exposed to rain.OPERATING INSTRUCTIONS1.Lift the recovery tank of solution tank by releasing the two latches.2.Add up to 1 1/2 gallons of hot water (maximum 140°F) to the solution tank. If chemicals arerequired, follow dilution ratios as specified on product label. Use only commerciallyavailable cleaning chemicals intended for use on carpet.3.Place recovery tank back on solution tank and fasten the two latches.4.Plug power cord into grounded wall outlet.5.Connect the vac/solution hose assembly to machine.6.This machine is equipped with a 3-position power switch. Ref. to figure below. The singlebar position is for vacuum only - center position is off. Double bar position is for vacuum pump and motorized tool (120V and standard 230V). Turn on machine in the single bar position (CE version 230V only).7.Always test upholstery for color fastness in a hidden area before beginning cleaningprocess.8.Warning: This unit does not contain any automatic liquid shut-off devices in the vacuumrecovery tank. Do not overfill. Always completely empty recovery tank before refillingsolution tank. If foam or liquid comes out of ventilation openings turn off immediately.Remove recovery tank and run for 1 minute to flush all liquid from vacuum fan chamber.BEFORE EACH USE OF THE CARPET SPOTTER:Parts Listing - 120V & 240VITEM PART NO QTY DESCRIPTION14502131Frame Weldment (120V)1A4502351Frame Weldment (230V)24502262Wheel 4"37407261Terminal Block 3-Position3A7421011Terminal Block 4-Position 43800641Foam Ring57403871Cord 18-3, 25 FT, Spade Term5A7422481Cord Asm 230V Crptsptr61500041Heyco Strain Relief77114001Nut-Pipe Lock 1/4 NPT87421021Switch 2-Position97622992Rubber Grommet107111042SCR-ST B 10 x .37117404481Ground Fault Interruptor 115V Only 124502521Bottom Gasket137422441Vac Motor Assy. 115V13A7422471Vac Motor Assy. 230V147125602SCR-MC 1/4-20 x .50 SS Nyloc 157115046WSR-Flat 1/4 SS168297571Pump 50 PSI 115V16A7421501Pump 230V, Bypass174500401Elbow PLT 3/8MPT x 3/8Barb 184502281Hose Output 1/4 ID x 15 CL 194520371Crimp Clamp 170R204502271Hose Input 3/8 ID x 12 CL 217102071SCR-MC 6-32 x .87 ST PL 227126388Nut-Hex 10-24 SS Nyloc 237125371SCR-MC 10-24 x .75 SS 247129081Nut-Flanged Wizz 10-24 257129052Nut-Hex 10-24267150291Decal - Serial Number277151791Decal - Spotter Switch 2845022211/4 90° BARB x 3/8 MPT 297113011Nut-Hex 6-32307150091Decal Warning318284901Crimp Clamp 140R327127702WSR-Int. Tooth 10337422401Wire Assy. Violet 16 AWG 120V Only 33A7422501Wire Assy. Violet 16 AWG 230V Only 347422411Wire Assy. Black 16 AWG 357422421Wire Assy. White 16 AWG 120V Only 367422431Wire Assy. White 16 AWG 377400992Wire Tie Small (not shown) 384502511Vac Motor Shroud394502531Front Gasket404502471Top Gasket417125434SCR-MC 10-24 x 3.50 FH SS 427125324SCR-MC 10-24 x 1.00 SS 437410381Receptacle44410-4419AA2Pop Rivet457153401Decal (120V)45A7153411Decal (240V)ITEMPART NO QTY DESCRIPTION 1450213CE 1Frame Weldment 24502262Wheel 4"37407261Terminal Screw Tab 43800641Foam Ring 57423811Cord Set 25 ft. 1.0 m.m.61500041Heyco Stain Relief 77114001Nut-Pipe Lock 1/4 NPT 87421021Switch 2 Position 97622992Rubber Grommet 107422921Ambassador CE RFI Torrid 117111242SCR-ST B 10 x .37 NI 124502521Bottom Gasket 137422471Vac Motor Assembly 230V 147125602SCR-MC 1/4-20 x .50 SS Nyloc 157115046WSR-Flat 1/4 SS 167421501Pump 230V Bypass 174500401Elbow PLTMPT x 3/8 Barb 184502281Hose Output 1/4 ID x 15 CL 194520371Crimp Clamp 170R 204502271Hose Input 3/8 ID x 12 CL 217102071SCR-MC 6-32 x .87 ST PL 227126388Nut-Hex 10-24 SS Nyloc 450220CE 230V European Parts ListingITEM PART NO QTY DESCRIPTION 237125371SCR-MC 10-24 x .75 SS 247129081Nut-Flanged Wizz 10-24257129052Nut-Hex 10-24267150291Decal - Serial Number 277151792Decal - Spotter Switch 2845022211/4 90° BARB x 3/8 MPT 297113011Nut-Hex 6-32307150091Decal Warning 318284901Crimp Clamp 140R 327127701EMI Filter 337422401EMI Filter Mounting Plate 347422412Terminal Insulated 357422424SCR-MC 10-24 x 1.00 SS 367422434SCR-MC 10-24 x 3.50 FH SS 377400992Wire Tie Small (not shown)384502511Vac Motor Shroud 394502531Front Gasket 404502471Top Gasket 417125434Wire Asy Violet 16G 427125324Wire Asy Black 16G 437410381Wire Asy 16G White 448276662Wire Asy 16G WhiteParts ListingITEM PART NO QTY DESCRIPTION177126212Nut-Keps 8-32 SS1871254014SCR-MC 10-24 x 3/8 SS 197127706WSR-Int Tooth 102071002510SCR-MC 8-32 x 3/8 SS 214502072Latch224301032Spring Hook2345022511/4 BARB x 1/8 FPT Brass 247127673WSR-Flat .406 x .75 x .03SS 254502051Quick Disconnect Plate264502211Quick Connect 2202 Coupler 277115526WSR-Int Tooth 8284502091Gasket 294502141Strap304502011Recovery Tank 317151882Decal, Gotcha!ITEM PART NO QTYDESCRIPTION1450202MCH 1Solution Tank Machined 24502291Filter Assembly 34502151Vac Pre-filter 47151801Decal 58323261O-Ring67115943WSR-Flat .56 x .88 x .0378*******/8 Hose BARB x 1/4 FPT 82602941Gasket 98289741Strainer104502161Solution Hose 117153802Decal, Minuteman1282895213/8 BARB x 1/4 MPT PLS 1383390611/4 Street 45 Brass 14000708.03RTV Sealant154520371Crimp Clamp 170R 168284901Crimp Clamp 140RParts ListingITEM PART NO QTY DESCRIPTION14502381Handle Weldment 24502391Frame Weldment 39000402Wheel41300322Hub Cap57115794WSR .56 x 1.0 x .09 67113751Nut 3/8-16 Nyloc77115081WSR .44 x 1.0 x .09 828001613” Caster97125462SCR-MC 10-32 x 1.0 SS 107113502Nut 10-32 Nyloc 119020001Optional - Carpet Spotting KitParts ListingITEM PART NO QTY DESCRIPTION 13900621O-Ring, Valve Seat 23900541Valve Stem, Brass 33900491Spring47123201WSR-Nylon .22 x .45 x .04 53900611O-Ring, Valve Stem 63900601O-Ring, Seal Valve 73900551Cap, Valve83900632Pin97118031Cotter Pin .06 x .75 103900531Trigger117126361Nut, Hex 10-32 SS 123900521Body133900561Mount147125451SCR-MC 10-32 x .87 SS 153900641Coupling164502481Spray Jet173900591Nozzel183900661Solution Valve Assy Comp 194502491Hose Assy Comp4502101Solution Hose, 9.5 Ft4502111Vacuum Hose Assy45021811/4 FPT x 1/8 Barb Brass4502191Q-Connect Male 22-2 SS45022311/8 Barb x 1/8 FPT Brass8280626Cable Tie Large8300822Hose Clamp 3/8LIMITED WARRANTYMinuteman International, Inc. warrants to the original purchaser/user that this product is free from defects in workmanship and materials under normal use and service for a period of one year from date of purchase. In addition, Minuteman International, Inc. will, at its option, honor labor warranty claims for the first 12 months from date of sale, provided such claims are submitted through and approved by factory authorized repair stations. Minuteman International, Inc. will, at its option, repair or replace without charge, except for transportation costs, parts that fail under normal use and service when operated and maintained in accordance with the applicable operation and instruction manuals.This warranty does not apply to normal wear, or to items whose life is dependent on their use and care, such as belts, cords, switches, hoses, rubber parts, electrical motor components or adjustments. Parts not manufactured by Minuteman International, Inc. such as engines, batteries, battery chargers, hydraulic pumps, and tires are covered by and subject to the warranties and/ or guarantees of their manufacturers. Please contact Minuteman International, Inc. for procedures in warranty claims against these manufacturers.Special warning to purchaser — Use of replacement filters and/or prefilters not manufactured by Minuteman International, Inc. or its designated licensees, will void all warranties expressed or implied.A potential health hazard exists without exact original equipment replacement.All warranteed items become the sole property of Minuteman International, Inc. or its original manufacturer, whichever the case may be.Minuteman International, Inc. disclaims any implied warranty, including the warranty of merchantability and the warranty of fitness for a particular purpose. Minuteman International, Inc. assumes no responsibility for any special, incidental or consequential damages.This limited warranty is applicable only in the U.S.A. and Canada, and is extended only to the original user/purchaser of this product. Customers outside the U.S.A. and Canada should contact their local distributor for export warranty policies. Minuteman International, Inc. is not responsible for costs or repairs performed by persons other than those specifically authorized by Minuteman International, Inc. This warranty does not apply to damage from transportation, alterations by unauthorized persons, misuse or abuse of the equipment, use of non-compatible chemicals, or damage to property, or loss of income due to malfunctions of the product.If a difficulty develops with this machine, you should contact the dealer from whom it was purchased.This warranty gives you specific legal rights, and you may have other rights which vary from state to state. Some states do not allow the exclusion or limitation of special, incidental or consequential damages, or limitations on how long an implied warranty lasts, so the above exclusions and limitations may not apply to you.World Headquarters Minuteman Canada, Inc.Minuteman International, Inc.2210 Drew Road111 South Rohlwing Road Mississauga, OntarioAddison, Illinois 60101L5S 1B1(630) 627-6900(905) 673-3222988610。
电瓶式洗地机操作规范一、检查、安装、调试:1、新机器在开箱前应检查包装箱是否完好。
若有损坏痕迹应立即与货运人或供应商联系。
2、开箱后,应检查装箱单与机器技术文件是否齐全,并按装箱单清点机器主机与零备件是否齐全、有无损坏。
若有缺损,应立即与供应商联系。
二、高效吸刷组件的安装:-----北京奥仕洁清洁设备有限公司1、向上拉高效吸刷提升杆,升起高效吸刷安装架。
2、松开高效吸刷上的两个拇指旋钮,把高效吸刷滑进安装架后面的槽内。
高效吸刷滚轮必须朝后。
3、拧紧所有旋钮。
三、电瓶式洗地机安全操作规程:1、操作前的检查。
清除地面上的杂物和其他颗粒类的垃圾。
检查机器是否已安装了清洗刷。
检查机器是否已安装了高效吸刷。
2、将清洁剂注入溶液箱。
检查溶液箱阀门是否闭紧。
向清水箱注入升60℃以下的温水。
按照工艺要求或清洁剂使用说明,加入适量的专业清洁剂。
3、向污水箱注入适量消泡剂。
4、安装清洗刷。
5、开启主开关钥匙,指示灯亮。
6、启动溶液喷嘴开关。
7、启动刷盘开关。
8、向前推动机器,开始清洗。
9、启动真空马达开关,放下吸水趴。
10、观察溶液在地面上的流量,调节控制杆至最佳流量。
11、洗结束时,关闭溶液开关。
关闭所有开关。
如果溶液箱排水,则应该继续吸水,将污水吸入污水箱。
12、升起高效吸刷13、排除污水。
拉出排水管,彻底排空后,拧紧堵头。
14、使用结束后,冲洗污水箱、过滤片。
注意不得将水喷到真空吸管内。
四、电瓶式洗地机的维护:1、每天维护。
取下并清洗洗地刷取下并清洗清、污水箱内污水过滤网。
排空并彻底清洗污水箱。
掀起污水箱盖,取出吸水进口的杂物。
升起高效吸刷把手,取下高效吸刷,用干布擦拭,并把高效吸刷放在直立位置,以防止损坏。
擦拭机器,用干净的抹布擦干电瓶上的水分。
五、电瓶式洗地机的电瓶维护:当指示台面电瓶容量指示灯闪亮时表示电瓶处于缺点状态,应停止工作,马上充电。
每次充电应在8小时以上。
每次充电时应敞开电瓶液注入口,防止电瓶液充电过程中膨胀。
清洗机操作说明手册中文版一:清洗机的概述对于热处理零件,其表面的质量对热理质量会有一定的影响,零件表面越是清洁、无污垢,对热处理质量影响越小。
爱协林多用炉生产线中的清洗机正是为此目的而设计的。
清洗机的清洗可分前清洗与后清洗。
前清洗是零件在热处理前,为去除机加工过程残留的油污、铁屑,净化零件表面而进行的清洗过程;后清洗是零件在热处理后,为清除其表面未淋干的残油而进行的清洗过程。
二:清洗机的工作原理简介爱协林清洗机主要由喷淋室、水槽、升降台、油水分离器等几部分组成。
喷淋室内壁上布满了许多喷淋头,工作时,从喷淋头喷出高速水流再加上喷淋头的旋转从而达到净化零件表面的目的。
水槽又分清水槽与碱水槽,清水槽盛着的是自来水,用来清洗零件表面的碱液;碱水槽内盛着的是自来水和清洗液的混合物,用来清洗零件表面的油污、铁屑。
两个槽子的水温均由杆式恒温器来控制。
升降台在碱水槽和喷淋室之间上下运动,以达到碱水除残油和清水除残碱目的。
油水分离器安装在清洗机的后面,其作用是把碱水槽中碱水和油分离开,使碱水重新流回碱水槽,分离出来的油排入水沟。
清洗机的喷淋室和槽体上另外有控制补水和液位的检测系统,烘干系统、发泡系统、翻板机构等。
行走小车把清洗零件送入喷淋室,关闭炉门,启动程序后,升降台下降入碱水槽,开始碱水清洗。
这时发泡系统启动,靠它吹出的高压空气搅动碱液,使零件表面的油污脱离其表面浮在碱液表面上。
这些油污流入积油槽,通过油泵把它抽到油水分离器中进行油水分离后,分离的碱水依然流回碱水槽,油污则排入水沟。
碱水清洗结束后,升降台上升到淋水位,开始淋碱水。
淋碱水结束后,升降台上升到原始位置,这时清水喷淋泵启动,开始清水喷淋。
高速水流从喷头中喷出,将零件表面未淋干的碱液用清水清洗干净。
喷出的清水则通过翻板机构返回清水槽。
清水喷淋结束后,开始淋清水,烘干系统也同时启动。
通过洪干系统将零件表面的残水烘干。
当升降台回到原始位置,烘干启动后,补水监控系统也启动,这时它检测一下水槽中清水和碱水液位是否下降。
清洁设备操作使用指南一.吸尘器在用于地毯吸尘时,应将吸尘扒头的毛刷按进去,在用于大理石、花岗石或木质地板吸尘时,应将扒头的毛刷按出来,吸窗帘上的灰尘时,应用带毛刷的小圆扒吸墙角或有槽的地方时应使用小方扒。
二.吸水机在吸尘时一定要加上尘隔,在硬质地面上吸水时一定要将尘隔取掉,在吸地毯上的水分时,将水扒改用不锈钢地毯专用和吸水扒,吸尘时用尘扒(带毛刷的扒头),吸水时用吸水扒(带胶边的扒头)。
三.多功能单擦机在洗涤硬质地面时,用刷毛较硬的地刷,清洗地毯时,用刷毛较强的地毯刷。
1.花岗石、大理石、木质地板等硬质地板的洗涤A.先将地面上多余的灰尘吸掉,吸尘前要将大的纸团、钉之类的大城物品拣掉。
B.用中性全能水稀释(比例见药水使用说明)后装入单擦机水箱,将手柄调节到大腿根部适当位置,将手柄上面的安全开至向中间推,用力将手柄下面的电源开关向上安即可启动机器。
C.将单擦机向左移时,即可将手柄稍微用力向下按,即可,向右移时,可将单擦机手柄稍微用力向上抬一点即可。
D.刷子每用移动时,需将先洗过的部分重叠之分之一。
E.洗完后用吸水机将水分吸掉。
F.地板干净后(不带泥沙和水分),将底蜡倒入榨水桶内,用一落蜡拖浸泡后榨干在地板上薄薄地涂上一层蜡,注意拖头要榨平、榨干,转弯时呈内八字,不要将蜡拖提起,不要留有缝隙。
G.在蜡面干后(不粘手即可)用面蜡和另一落蜡拖按上述方法操作即可。
H.待面蜡干后,用抛光机配上白色的花法垫抛光即可。
I.第二次打蜡时,需将以前旧蜡清洗干净,地蜡方法如下:用单擦机配上地刷,将起蜡水稀释后装水箱清洗蜡面,注意要将以前旧蜡全部清洗干净,然后用中性分能水将地面洗干净即可按上述方法打蜡。
2.地毯的保养A.清洗之前先吸尘,如果局部有顽固污渍,用喷壶装上队渍剂喷在污渍处,油性的先使用化油剂喷。
B.用多功能单擦机配上电子打泡箱(取下水箱,将打泡机上的电源插头在单擦机上插好),刷子用地毯刷。
C.将干泡地毯稀释后倒入水箱清洗,操作方法如前,泡箱上的电源开关要打开,上面的旋钮可调节泡沫的丰富量。
手推式洗地机操作流程及注意事项英文回答:Operating a manual floor scrubber requires a few steps to ensure effective cleaning. Here is a step-by-step guide on how to operate a manual floor scrubber:1. Preparing the machine: Before starting, make sure the floor scrubber is clean and in good working condition. Check the water and detergent levels, and ensure the brushes or pads are properly attached.2. Preparing the area: Clear the area of any obstacles or debris that may hinder the cleaning process. This includes moving furniture, rugs, or any other objects that may get in the way.3. Adjusting the settings: Depending on the type of floor and level of dirt, adjust the scrubber settings accordingly. This includes selecting the appropriate brushor pad, adjusting the water flow, and setting the desired speed.4. Starting the machine: Turn on the floor scrubber and wait for it to reach the desired speed. Most machines have a start button or lever that needs to be activated.5. Cleaning in a systematic pattern: Begin cleaning ina systematic pattern, starting from one corner of the room and moving towards the exit. This ensures complete coverage and prevents missing any areas.6. Applying the cleaning solution: Activate the water flow and apply the cleaning solution evenly on the floor. Make sure not to oversaturate the floor, as it may cause damage or leave streaks.7. Scrubbing the floor: Engage the brushes or pads and move the floor scrubber in a back-and-forth motion. Apply gentle pressure to remove dirt and stains effectively. Pay extra attention to high-traffic areas or areas with stubborn stains.8. Emptying and refilling the water tank: As the water tank gets filled with dirty water, periodically empty it and refill it with clean water. This ensures the cleaning solution remains effective throughout the process.9. Drying the floor: Once the cleaning is complete, turn off the floor scrubber and allow the floor to dry naturally. If necessary, use a mop or a dry cloth to remove any excess moisture.10. Cleaning and maintenance: After each use, clean the brushes or pads, empty and clean the water tank, and store the floor scrubber in a designated area. Regular maintenance, such as checking for any loose parts or worn-out brushes, is essential to keep the machine in good working condition.注意事项:Always wear appropriate protective gear, such as gloves and safety glasses, when operating a floor scrubber.Avoid using excessive force or pressure, as it may damage the floor or the machine.Be cautious of electrical cords and ensure they are properly secured and out of the way to prevent accidents.Follow the manufacturer's instructions and guidelines for the specific model of floor scrubber being used.Regularly inspect the machine for any signs of damage or malfunction and address them promptly.中文回答:手推式洗地机的操作需要遵循一系列步骤,以确保有效清洁。

亲爱的用户:用电瓶操作的设备 ---不要打扫/真空吸尘处理任何正燃烧或正发热的物体。
附注请您在第一次使用设备前仔细地阅读这些操作说明,并在操作中遵循它们。
把这些操作说明保存好以备将来做参考或可以提供给后来的使用者。
---本设备只适合用来清扫在本使用说明书中所规定类型的表面。
只有当你使用凯驰所推荐的电瓶和充电器时,才能接受保修索赔。
---总是遵从电瓶制造商和充电器制造商的使用说明。
请遵从搬运和处理电瓶的法定要求。
---不可以在危险区域使用或贮存设备。
不允许在危险地点使用设备。
---以下普遍适用:使高度易燃的物质远离设备(爆炸/着火的危险)。
---决不要让电瓶处于放电状态;一有可能就给它们重新充电。
环境保护---总是保持电瓶干净和干燥以防止蠕变电流。
保护电瓶避免它与杂质如金属粉末接触。
目录包装材料可以回收利用。
请不要把包装扔进普通垃圾的垃圾箱里,而应该安排对它们进行适当的回收利用。
安全使用说明2 指定用途2 操作和功能元件 2 启动之前3 启动 3 运行4 停止运转 4 维护保养 4 故障5 技术规格6 EC 一致声明 6 保修 6---在第一次使用设备之前,阅读并遵守这些使用说明及其附随的小册子:对于清扫车和真空清扫车的安全信息,编号:5.956-250。
---操作者必须正确使用本设备。
当用设备进行工作时,操作者必须考虑当地情况且必须注意第三者,特别是儿童。
---不可以让儿童,少年人或没有经过相应培训的人操作本设备。
---当从尘箱里清除玻璃,金属或其他锐边材料时,要戴适当的安全手套。
警告在传动带,边刷,容器和手推把柄处有被挤压或受伤害的危险。
当打开产品包装时,如果存在任何运输损坏,请通知您产品的销售地点。
→在使用设备前请阅读您设备的使用说明书,特别注意以下安全说明。
---在设备上的警示牌和信息牌所提供的关于安全操作的重要指示。
---除了本文中的说明,还必须遵守为防止出事故,由立法人所制定的安全技术措施和安全条例。
保洁洗地机操作流程洗地机对于保洁公司来说应该是基础的开荒清洁设备。
尤其是知名的、规模较大的公司。
掌握洗地机的基本使用方法,也是每一位保洁公司员工应该具有的基础技能。
下面安徽洁百利就给各地保洁公司们科普一下洗地机的基本使用方法,供大家参考学习。
手推式保洁洗地机使用方法拿到洗地机后,先检查,确保机器电力充足,无故障,无磨损,一切正常的情况下才可开始操作。
1、用水桶接清水/用随机配备的水管接水龙头。
将清水箱注满水,通过机器侧边的水位球可以知道水箱是否加满。
如果地面污渍脏,有明显的油污,那么就根据地面情况往清水箱内注入中性清洁剂或者去油剂。
按照清洁剂的说明照比例注入。
2、打开清水箱,注入消泡剂。
没有加清洁剂的情况下,此步省略。
3、插入钥匙,顺时针转动开关,整机通电。
4、手握吸水扒提升杆,放下吸水组件。
5、脚踩刷盘提升踏板,放下刷盘组件。
6、按下刷盘与吸水扒工作按钮。
7、手握洗地机操控把手,推动机器向前行驶,开始作业。
(手推半自动式)如果是手推全自动式机器,在推动之前按下前进按钮,并调节前进速度,整机没有推动的情况下,机器也会向前行驶,只是没有方向,需要保洁人员稍稍带动一下机器的作业方向。
驾驶式保洁洗地机使用方法1、驾驶式1-2-3步同手推式洗地机一样。
4、保洁人员坐上驾驶位,直接放下刷盘与吸水扒升降摇臂。
5、旋转调速按钮,根据工况调整合适的速度。
6、拨一下前进/后退开关。
7、脚踩驱动踏板,手扶方向盘,机器开始作业。
不管是手推式洗地机还是驾驶式洗地机,在作业完之后都要及时排放污水箱与清水箱并用清水冲洗,将机器停放于通风干燥之处,关闭电源开关,插上充电器,进行蓄电。
充完电才算是一个比较完整的操作流程。

在初次使用您的设备之前,请阅读并遵守这些说明。
将这些使用说明保存好以备未来作为参考或留给后来的使用者。
运输中出现损坏,立即通知销售人员。
正确的使用 1 功能 1 安全说明 1 安全设备 2 设备元件 3 启动 4 使用 4 停止 5 维护和保养 6 故障检修 7 保修 8 技术规格 8 CE 声明 8 设备被设计用水溶液来自动清洗金属加工业的零件。
--设备只能使用含水的洗涤剂。
--不要加注溶剂,易燃或易爆的液体。
--只可以使用在凯驰商品目录里列出的液体洗涤剂,和被用来清洗零件的洗涤剂。
在水容器里的液体洗涤剂通过加热元件在设定的温度下加热,然后通过泵运输到三个喷嘴件里。
把将被清洗的零件放置在电驱动的旋转桌上,零件绕着喷嘴件架旋转。
这样可以确保适当地清洗零件的所有面。
清洗时间结束后或手动复位后,泵和电旋转驱动设施会自动关闭。
现在可以将清洗好的零件取下来了。
内置的油水分离器是用来把油和洗涤剂液体分开的。
在清洗过程中,沾上油的零件会与洗涤剂接触。
为了确保最佳的清洗功能,油水分离器只能在清洗过程的间隔期启动操作。
--请在使用设备前阅读使用说明,特别注意以下的安全说明。
--在设备上的警告和信息板为安全操作提供了重要的指导。
--除了在使用说明里包含的信息,还必须遵守所有法定的安全和事故防范条例。
--铭牌上显示的电压必须与电源电压一致。
--安全等级I 的设备只能被连接到有适当接地保护的插座上。
--建议您将设备连接到带有一个30毫安逆电流保护开关的插座上,这个保护开关可以防止接错电流。
--请使用厂商规定的电源电缆。
当更换电缆时也可以使用相同的电缆。
对于具体型号参见电路图。
--操作会导致短期电网波动。
在不利的电网条件下,其他的设备可能会被干扰。
当电网阻抗低于0.15欧姆时,不会有干扰。
--决不要用湿手接触电源插头。
--确信电源线或延长电缆不会被碾坏,夹坏,拉坏等类似的行为而损坏。
保护电缆防止受热,沾油和碰触尖锐的边缘。
操作规程编号:LX-FS-A73453 洗地机安全生产操作规程标准范本In The Daily Work Environment, The Operation Standards Are Restricted, And Relevant Personnel Are Required To Abide By The Corresponding Procedures And Codes Of Conduct, So That The Overall BehaviorCan Reach The Specified Standards编写:_________________________审批:_________________________时间:________年_____月_____日A4打印/ 新修订/ 完整/ 内容可编辑洗地机安全生产操作规程标准范本使用说明:本操作规程资料适用于日常工作环境中对既定操作标准、规范进行约束,并要求相关人员共同遵守对应的办事规程与行动准则,使整体行为或活动达到或超越规定的标准。
资料内容可按真实状况进行条款调整,套用时请仔细阅读。
它主要用于硬性地面清洗或地毯清洗,是大楼不可缺少的清洁设备之一,有单盘式和多盘式两种.(1)操作细则①装地刷与针盘,并使地刷与针盘按逆时针方向旋转。
②往水箱内注入清水和清洁剂,按比例兑水。
③插上电源,按下调节开关,将手柄杆调至适合自己的高度。
④从最靠电源插座的地方开始操作机器,防治机器压过电线。
(2)注意事项①工作时必须避免刷子接触电源线,以免电源线卷进刷子内。
②开动擦地机时,电源线要在操作者的背后。
③使用清洁剂时,注意不要让水弄湿马达。
④使用完毕,要注意安全,不要随便使手离开手柄,放开操纵杆,等机器完全停止后再切断电源,卸下地刷与针盘。
(3)保养工作①使用完毕,把机身及配件清洗干净。
②用干净布擦净机器、电线,将电线绕回机挂钩,机器必须存放在干燥地方。
23点击4点击点击56在装置首次运行前,请阅读并遵守原装说明书,并妥善保管以便日后或后继用户使用。
-首次启动前,请务必先阅读安全指示《Nr.5.956-249.0》!-如未遵守操作和安全说明,则会损坏装置并对操作人员和其他人造成危险。
-如发现运输中出现损坏,请立即通知供应商。
目录环境保护 1危险级别 1正确使用 1设备元件 2装置上的符号 2安全说明 2启动 3操作 4运输 5存储 5维护保养 6故障排除7保修8配件及备件8欧盟符合性声明8技术规格9环境保护包装材料可回收利用。
包装材料扔进生活垃圾中;将其回收利用。
废旧装置包含可回收贵重材料;请将此类材料回收利用。
电池、接排入环境。
集系统处理老旧装置。
材料组成说明(REACH)敬请访问以下网站,了解有关组成部分的最新信息:/REACH危险级别危险表示存在直接危险,可导致严重伤害或死亡。
警告表示存在潜在危险,可导致严重伤害或死亡。
注意表示存在潜在危险,可导致轻微伤害。
注意表示存在潜在危险,可导致财产损失。
正确使用-本装置适用于地板和墙面的干湿清洁。
-本装置适用于吸附各类设备上的干燥、不可燃及有害灰尘;符合EN 60 335–2–69,灰尘等级为L。
限制:不得将吸尘器用于吸附致癌物质。
-本装置适用于酒店、学校、医院、工厂、商铺、办公室和租赁公司等商业用途。
1.电极2.吸入管座3.吸管4.软管挂钩5.推把锁(仅限NT 50/1)6.窄缝吸头7.出风口、工作压力空气8.吸头9.吸头锁10.嵌入式提手11.尘筒12.转向轮13.把手14.进气口,电机冷却空气15.吸头16.硬喉管17.工具箱制楔18.橡胶套筒,可拧式19.固定用孔眼20.滤盖21.手提把手22.吸力调节器(连续式)23.工具适配器24.推把(仅限NT 50/1)25.过滤器摇振系统按钮(仅限Tact Te L)26.旋转按钮27.插座(仅限Tact Te L)28.吸头支架29.排水管(仅限NT 50/1)30.吸管支架31.电线挂钩(仅限NT 50/1)32.弯接头33.电源线34.弯接管支架(仅限NT 30/1、NT 40/1)35.过滤网架36.褶皱式过滤网(PES)37.过滤除尘38.铭牌警告:本装置包含有害灰尘。
擦地机、手推式洗地机、驾驶式洗地机操作指南一、擦地机操作指南擦地机怎么样?擦地机怎么使用?擦地机如何操作?擦地机好用吗?擦地机上手难不难?擦地机的使用经常会遇到哪些问题?经常有朋友会到网站来咨询这些问题。
关于擦地机的使用,是时候整理一些文字性的东西出来了。
擦地机是什么?目前我们针对擦地机有广义和狭义的两种解释。
广义的擦地机可以是洗地机、洗地车,也可以是地毯清洗机,也可以是石材翻新机以及石材晶面机。
广义的擦地机目前来说,只是我们针对地面清洗设备的一个统称。
狭义的擦地机,是能干泡清洗地毯,又能晶面处理石材,还能洗地、起腊、打磨、翻新石材的设备。
擦地机主要适合工矿、大厦、营业厅,尤其保洁公司用于石材日常护理及特殊处理。
石材的长期使用会令表面没有光泽、有凹凸不平的情况,使用擦地机可以有效解决此类问题,令石材、地毯等表面焕然一新。
今天我们所要说的擦地机操作指南主要是围绕狭义的擦地机来展开。
擦地机尽管功能非常多,操作却是一点也不难的。
操作擦地机主要有以下注意点:(1)操作擦地机尤其要注意电线,当擦地机处于使用中,操作人员需要将电线从擦地机的电源接口处经过身体的肩膀接到电源处。
这样可以有效避免绊倒引起突发危险事件。
(2)操作擦地机不能使用蛮力,当我们在使用机器的时候,擦地机处于高速运转状态,我们会感到机器力气很大,这个时候我们本能的会想要控制机器,导致人被机器拖着走。
其实这个时候正确的做法是,牢牢握住擦地机的扶手,不要使劲,跟着擦地机的方向走。
当我们需要人为驱动擦地机方向的时候,轻轻的用腰部或者腿部顶住起机器改变方向即可。
以上就是擦地机的操作方法,其实擦地机的使用非常简单,利用擦地机做清洁也非常方便。
二、手推式洗地机操作指南手推式洗地机怎么用?手推式洗地机如何操作?手推式洗地机如何使用?手推式洗地机距离我们的生活很远,因为一般情况下我们未必会接触这个设备,下面小编就带大家一起来了解手推式洗地机的使用。
要了解手推式洗地机的操作,我们首先要了解他的定义。
保洁洗地机使用技巧一、准备工作1. 确认清洁场所的环境和面积,以便选择合适的洗地机型号和规格。
2. 准备好所需的清洁液、刷子、海绵等清洁工具和材料。
3. 检查洗地机的电池、电机、管道等部件是否完好无损,确保机器的正常运行。
4. 根据清洁场所的地面材质和脏污程度,选择合适的刷子和清洁液。
二、清洁液配制1. 根据清洁液的说明书,按照比例将清洁液和清水进行配制。
2. 搅拌均匀后,将清洁液倒入洗地机的清洁液容器中。
3. 如果需要使用消毒液,请根据消毒液的说明书进行配制,并倒入洗地机的消毒液容器中。
三、启动洗地机1. 打开洗地机的电源开关,按下启动按钮,机器将自动进行自检。
2. 检查机器的自检结果,确保机器没有故障。
3. 根据清洁场所的面积和脏污程度,选择合适的清洗模式。
4. 调整洗地机的刷子高度和清洗力度,以便达到最佳的清洗效果。
四、清洗地面1. 将洗地机轻轻放在清洁的地面,确保机器与地面贴合。
2. 操作洗地机前进和后退,以实现地面的清洗。
3. 在清洗过程中,注意观察地面是否完全清洗干净,如果需要,可以手动调整刷子的角度和力度。
4. 如果遇到地面上的顽固污渍,可以使用海绵或刷子手动进行重点清洗。
五、污水回收1. 在清洗过程中,注意观察洗地机的污水箱是否已满。
2. 如果污水箱已满,将污水箱拆下来,倾倒污水,并用清水冲洗干净。
3. 在倾倒污水时,注意不要将污水溅到周围的环境中,以免影响他人行走或造成环境污染。
六、地面干燥1. 在清洗完成后,使用干净的拖布或毛巾将地面擦干。
2. 如果需要更快地干燥地面,可以使用吹风机或吸水机进行辅助干燥。
3. 确保地面干燥无水渍,以免造成人员滑倒或设备损坏。
七、清洁洗地机1. 在清洗完成后,将洗地机收回并关闭电源开关。
2. 使用清水冲洗洗地机的外壳和管道,去除表面的污渍和残留物。
3. 对于可拆卸的部件,如刷子、胶条等,可以使用清水进行彻底冲洗,并用毛巾擦干。
4. 在清洁完成后,将洗地机放置在通风干燥的地方,避免阳光直射或潮湿环境。
VCH 2s Operation Manual/dealersearchAlfred Kärcher SE & Co. KGAlfred-Kärcher-Str. 28-4071364 Winnenden (Germany)Tel.: +49 7195 14-097694100(09/21)安全须知使用吸尘器前请仔细阅读本说明书的所有内容。
本吸尘器为家用产品,建议不要用于工商业或其它重度清洁工况。
请不要用吸尘器吸洗涤剂、煤油、玻璃渣、针、水湿灰尘、污水、火柴等物品。
请不要用吸尘器吸水泥、石膏粉、墙粉等微小颗粒,或者玩具纸团等较大物体,否则会引起吸尘器堵塞、电机烧坏等故障。
请不要让吸尘器靠近火源及其他高温场所。
使用吸尘器时,请注意要装好滤芯组件及尘杯。
使用吸尘器时,请注意不要使吸入口阻塞,否则可能会引起电机故障。
请不要将水或者其他液体倾倒或溅入吸尘器中,以免引起短路烧坏吸尘器。
在使用新电池或者长期存放后第一次使用的电池,请将电池充满电。
长时间存放不使用本吸尘器时,请保证至少每三个月充放电一次。
当吸尘器充满电、需要清洁或维修时,请及时拔下充电器插头,请勿拉扯电源线。
清洁吸尘器时使用干布擦拭即可,不要用汽油、香蕉水等易使壳体龟裂或褪色的清洁剂。
请不要将吸尘器处于高温、低温等不利条件下使用或存放,建议在环境温度0-40℃ 的室内使用,请存放在阴凉干燥处,禁止长时间阳光照射。
请勿让儿童使用、玩耍吸尘器。
当吸尘器充满电无法工作时,必须到指定的维修点进行检测维修,请勿私自拆装。
废弃电池包应安全的回收处理,请勿随意丢弃。
如果充电线软线有损坏,为了避免危险,必须由制造商当地维修部或类似部门的专业人员更换。
············使用附件:扁吸组件插入尘杯前部吸口即可使用,旋转扁吸上的毛刷可实现自由切换。