Canon MX系列说明中文版
- 格式:docx
- 大小:495.30 KB
- 文档页数:3
Trouble shooting for MFP(MX318 AS EXAMPLE)
3. 与此同时,在电脑上会显示如图提示:提示用户“无法识别以下墨盒—黑色 彩色”并提示用户取消打印。
4. 此时,忽略此信息,不要按任何“取消打印”或“关于墨水”等选项,如下图中提示,长按住“停止/重置”键6-7秒,之后你会听到“嘀”声后即可,表明打印机已将其中的一色重置成功。
2. 当出现U051的提示代码后,表明
打印机正在读取墨盒信息数据
5. 重置后,打印机屏幕会显示“稍等”的提示
6. 因为用户装的是双色墨盒,因此在重置第一次后,打印机将会提示用户下个“U162”的信息,表明彩色墨盒需要重置(如没有此提示,用户可忽略)
7. 按照如上步骤重置彩色墨盒6-7秒即可
彩色重置后打印机显示的信息
2次重置后,我司的墨盒便可在打印机上安全的使用
Edited by Alex
2012-3-21。
ROBUST, RELIABLE AND HIGHLY EFFICIENT A3 MONO MULTIFUNCTION PRINTERS The ultimate document solution devices designed to excel in a modern office environment imageRUNNER 2600 SeriesPRODUCTIVITYUSER EXPERIENCE SECURITY CONTROL AND MAINTENANCEMOBILE CONNECTIVITYCanon Inc. Canon Europe English edition© Canon Europa N.V.,2019imageRUNNER 2600 SeriesPRODUCTIVITY• Fast print outputs and first copy out time (FCOT)• Customisation of on-screen applications increases workflow efficiency• Scan and convert documents to searchable PDF, Microsoft Word or Power Point files • Print Hold function for a convenient finaladjustment of print setting before job release • Smart media handling enables up to 30 paper types registration and automated size detection • Space saving optional inner finisher with staple-free binding and integrated manual staplingUSER EXPERIENCE• Intuitive operation via a large colour touchscreen with smartphone like usability• Advanced personalisation and customisation options tailored for user’s workflow needs• Integrated Home UI enables choice of frequently used settings from a single menu• Automatic recovery from sleep mode* byplacing paper on DADF or opening platen glass • Innovative production processes, includingwelded frame, ensure lasting machine longevity and reliabilityQUICK FACTS• Easy replacement of toner cartridge featuring anti-spill technology• Compact design allows for a convenient office arrangementsSECURITY• Secure boot at start-up enables preventative security measures to protect device from unauthorised modifications• Advanced device and cloud-based authentication options• Central control of security settings reduces administrator burden• Encrypted PDF, plus device and optional user signature PDF provide additional authentication security levels• Secure PIN and Forced Hold Print enhance document confidentiality• Further actions to counter malware attack on the network include third party SIEM system integration• Ensure data privacy across your network with IPsec and port filteringMOBILE CONNECTIVITY• Wireless LAN and QR code connection options for working from tablets and smartphones• Mobile compatible remote UI with optimised display layout allows users to change the settings of print jobs on the go• Support for Mopria, Apple Air Print, Google Cloud Print and Windows 10 Print• Canon’s PRINT Business app adds furtherfunctions to printing and scanning from mobile devices• Status of the machine and consumables can be read from the connected mobile devicesCONTROL AND MAINTENANCE• Centrally manage all devices on the network with cloud-based remote management options • Remote Operators Software Kit providesalternative access to device, simulating control panel and hard keys on a network PC screen for remote operation of all system functions • Compatibility with Canon’s uniFLOW software solutions allows for tracking and reporting of print jobs• e-Maintenance can improve uptime through remote diagnostics, automated meter readings and consumables monitoring*imageRUNNER 2645i onlySERVICESSOFTWAREHARDWARESERVICES• Print, Copy, Scan, Send and optional Fax • 7-inch/17.8cm WVGA colour touchscreen • Print Speed: 25ppm (A4)• Print resolution: 1,200x1,200 dpi • Automatic double-sided printing• Platen or DADF option (50 sheet capacity)• Scan speed: 25ipm (A4, Mono/CL)• Network, Wi-Fi, USB and QR code connectivity • Max paper input capacity: 2,300 sheetsimageRUNNER 2625i• Print, Copy, Scan, Send and optional Fax • 7-inch/17.8cm WVGA colour touchscreen • Print Speed: 30ppm (A4)• Print resolution: 1,200x1,200 dpi • Automatic double-sided printing • DADF standard (50 sheet capacity)• Scan speed: 30ipm (A4, Mono/CL)• Network, Wi-Fi, USB and QR code connectivity • Max paper input capacity: 2,300 sheetsimageRUNNER 2635i• Print, Copy, Scan, Send and optional Fax • 7-inch/17.8cm WVGA colour touchscreen • Print Speed: 45ppm (A4)• Print resolution: 1,200x1,200 dpi • Automatic double-sided printing • DADF standard (100 sheet capacity)• Scan speed: 55ipm (A4, Mono/CL)• Network, Wi-Fi, USB and QR code connectivity • Automatic recovery from sleep mode • Max paper input capacity: 2,300 sheetsimageRUNNER 2645i。
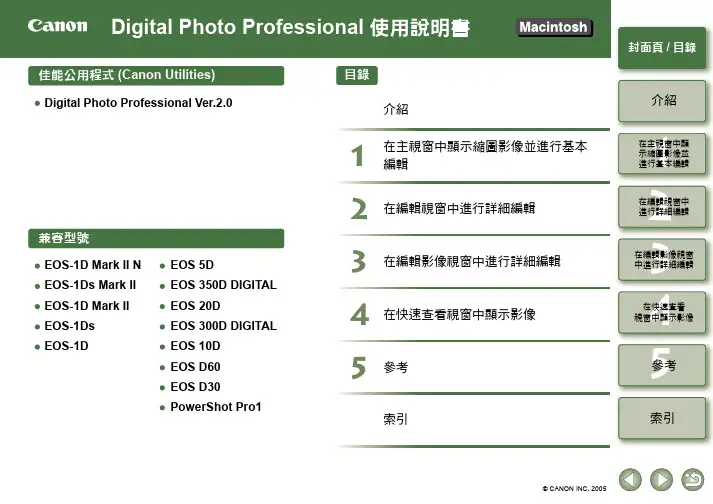
12345封面頁/目錄介紹在編輯視窗中進行詳細編輯在編輯影像視窗中進行詳細編輯參考索引在快速查看視窗中顯示影像在主視窗中顯示縮圖影像並進行基本編輯12345在編輯視窗中進行詳細編輯在主視窗中顯示縮圖影像並進行基本編輯在快速查看視窗中顯示影像索引參考在編輯影像視窗中進行詳細編輯介紹封面頁/目錄本章包括使用Digital Photo Professional 前必須閱讀的安全須知,如何使用本使用說明書、系統要求及支援的影像類型等資訊。
它也說明功能和視窗結構,並給出操作的範例。
●按一下項目顯示各頁。
主要功能...............................................................................................................................0-2系統要求...............................................................................................................................0-2支援的影像............................................................................................................................0-2功能視窗組態........................................................................................................................0-3操作範例...............................................................................................................................0-4關於本說明書感謝您購買本佳能產品。
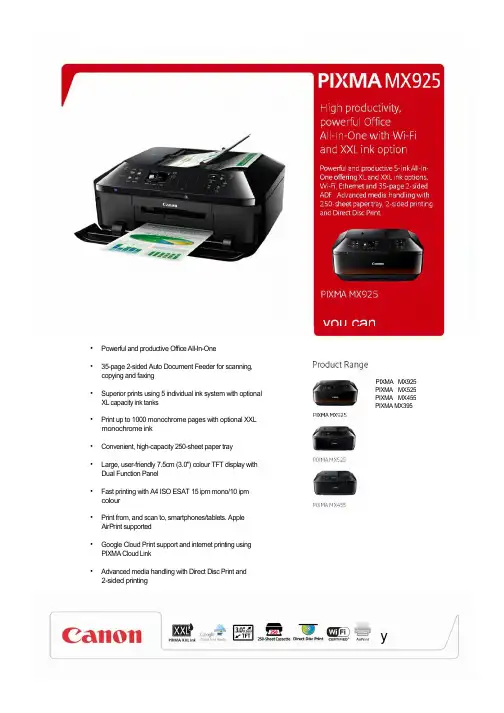
• Powerful and productive Office All-In-One• 35-page 2-sided Auto Document Feeder for scanning,copying and faxing• Superior prints using 5 individual ink system with optionalXL capacity ink tanks• Print up to 1000 monochrome pages with optional XXLmonochrome ink• Convenient, high-capacity 250-sheet paper tray• Large, user-friendly 7.5cm (3.0") colour TFT display withDual Function Panel• Fast printing with A4 ISO ESAT 15 ipm mono/10 ipmcolour• Print from, and scan to, smartphones/tablets. AppleAirPrint supported• Google Cloud Print support and internet printing usingPIXMA Cloud Link• Advanced media handling with Direct Disc Print and2-sided printingPIXMA MX925 PIXMA MX525 PIXMA MX455 PIXMA MX395yGeneral Specifications Footnotes[1]Ink droplets can be placed with a minimum pitch of 1/9600 inch. [2]Document print speed on plain paper is measured based on average of ESAT in Office Category Test of ISO/IEC 24734 standard. [3]Photo print speed is based on default driver setting using ISO/JIS-SCID N2 standard on Canon Photo Paper Plus Glossy II and does not take intoaccount data processing time on host computer. [4]Some features available in Windows driver only. [5]Declared yield value in accordance with ISO/IEC 24711 standard. Values obtained by continuous printing.[6]Actual transmission speed may vary depending on document complexity, fax settings at receiving end, and line conditions. [7]Optical resolution is a measure of maximum hardware sampling resolution based on ISO 14473 standard. When scanning in high resolution, the scan size is restricted (maximum optical resolution for A4 scan is 600dpi). [8]Colour document scan speed is measured with ISO/IEC 24735 Annex C Test Chart A. Scan speed indicates the time measured between pressing the scan button of the scanner driver and the on-screen status display turns off. [9]Colour document copyspeed is measured based on average of sFCOT and sESAT in Performance Test of ISO/IEC 29183 standard. [10]Requires connection over Wi-Fi network and installation of free Canon application: EPP for Android, Windows RT and iEPP for iOS. Not available in certain countries or regions. [11]Full HD Movie Print is available for MOV and MP4 movie files created by select Canon digital cameras and camcorders. Requires installation of software bundled with Canon video or digitalcamera, from which the movie was captured. MOV files require: ZoomBrowser EX / ImageBrowser (version 6.5 or later), MP4 files require: ImageBrowser EX (version 1.0 or later). [12]Easy-WebPrint EX requires Internet Explorer 7 or later[13]When printing ISO/JIS-SCID N2 pattern on 10x15cm Photo Paper Plus Glossy II using default settings. [14]When copying ISO/JIS-SCID N2 (printed by inkjet printer) on A4 size plain paper using default settings.Standard disclaimersAll specifications subject to change without notice.Print speed may vary depending on system configuration, interface, software, document complexity, print mode, page coverage, type of paper used etc. Ink yield may vary depending on texts/photos printed, applications software used, print mode and type of paper used. For yield information see /ink/yield . Scan speed may vary depending on system configuration, interface, software, scan mode settings and document size etc. Copy speed may vary depending on document complexity, copy mode, page coverage; type of paper used etc. and does not take into account warming up time. All brand and product names are trademarks of their respective companies. Microsoft,Windows and the Windows logo are trademarks, or registered trademarks of Microsoft Corporation in the United States and/or other countries. For more information on ChromaLife100+ please visit High productivity, powerful Office All-In-One with Wi-Fi andXXL ink optionPowerful and productive 5-ink All-In-One offering XL and XXL ink options, Wi-Fi, Ethernet and 35-page2-sided ADF. Advanced media handling with 250-sheet paper tray, 2-sided printing and Direct Disc Print.Sales start date: March 2013Positioning: Powerful 5-ink Wi-Fi All-In-One with XL and XXL inks for high productivity officesRecommended Retail Price MX925 EUR 6992B008AA 4960999922751 £179.00Recommended Retail Price PGI-550 PGBK 6496B001AA 4960999904580 £12.99CLI-551 BK 6508B001AA 4960999905235 £10.99CLI-551 C 6509B001AA 4960999905556 £10.99CLI-551 M 6510B001AA 4960999905242 £10.99CLI-551 Y 6511B001AA 4960999905563 £10.99Recommended Retail Price PGI-555PGBK XXL 8049B001AA 4960999965376 TBCPGI-550PGBK XL 6431B001AA 4960999904504 £15.99CLI-551BK XL 6443B001AA 4960999904948 £14.99CLI-551C XL 6444B001AA 4960999904931 £14.99CLI-551M XL 6445B001AA 4960999904924 £14.99CLI-551Y XL 6446B001AA 4960999904917 £14.99CLI-551 C/M/Y/BK Multipack 6509B009AA 8714574584416 £38.99Glossy Photo Paper ‘Everyday Use’ GP-501 (A4) 0775B001AB 4960999293929 £19.99Glossy Photo Paper ‘Everyday Use’ GP-501 (4"X6") 0775B003AA 4960999293967 £8.99High Resolution Paper HR-101N A4 200 SH 1033A001AB 4960999869131 £22.99High Resolution Paper HR-101N A4 50 SH 1033A002AB 4960999867090 £6.99Luster Paper LU-101 A4 20 SH 6211B006AA 4960999843995 £16.99Matte Photo Paper MP-101 A4 50 SH 7981A005AB 4960999174839 £11.99Photo Paper Plus Glossy II PP-201 4"X6" 50 SH 2311B003BA 4960999484198 £8.99Photo Paper Plus Glossy II PP-201 5"X7" 20 SH 2311B018BA 4960999537276 £5.99Photo Paper Plus Glossy II PP-201 A4 20 SH 2311B019BA 4960999537269 £9.99yPhoto Paper Plus Semi-gloss SG-201 4"X6" 50 SH 1686B015AA 4960999405339 £8.99Photo Paper Plus Semi-gloss SG-201 8"X10" 20 SH 1686B018AA 4960999405353 £11.99Photo Paper Plus Semi-gloss SG-201 A4 20 SH 1686B021AA 4960999405377 £11.99Photo Paper Pro Platinum PT-101 4"X6" 20 SH 2768B013AB 4960999575254 £7.99Photo Paper Pro Platinum PT-101 A4 20 SH 2768B016AB 4960999575285 £15.99Photo Stickers PS-101 4"x6" 5 SH 0001C001AA 4960999252957 £4.99T-Shirt Transfers TR-301 8938A001AA 4960999195186 £10.99Pro Variety Pack PVP-101 A4 10 SH TBC TBC TBCMix Variety Pack MVP-101 4"x6" & A4 20 SH TBC TBC TBCVariety Pack VP-101 4"X6" 20 SH TBC TBC TBCPhoto Frame/Calendar Pack PFC-101 5"x7" 20 SH 2311B054AA 8714574595597 TBCGreeting Card Pack GCP-101 4"x6" 10 SH 0775B077AA 8714574595559 TBCLogistics informationWeight (Net/Gross in kg) Individual 1 570.5 x 308 x 520.5 14.5/11.7Pallet (Upper) 12 1147 x 930 x 1045 175.8/174Pallet (Bottom) 12 1147 x 930 x 1045 175.8/174What’s in the box?• Printer • Multilingual set-up guides, set-up software and • Inks: 5 individual ink tanks PGI-550PGBK (Pigment user manualBlack), CLI-551BK (Black), CLI-551C (Cyan), • Software: My Image Garden and CREATIVE PARK CLI-551M (Magenta), CLI-551Y (Yellow) PREMIUM• CD tray • Warranty Sheet• Power cord • Ink Leaflet• Telephone cabley。

MX490 seriesOnline ManualRead Me First Useful Functions Available on the MachineOverview of the MachinePrintingCopyingScanningFaxingTroubleshootingEnglishContentsRead Me First. . . . . . . . . . . . . . . . . . . . . . . . . . . . . . . . . . . . . . . . . . . . . . . . . . . 18 How to Use the Online Manual. . . . . . . . . . . . . . . . . . . . . . . . . . . . . . . . . . . . . . 19 Trademarks and Licenses. . . . . . . . . . . . . . . . . . . . . . . . . . . . . . . . . . . . . . . . . . 20 Search Tips. . . . . . . . . . . . . . . . . . . . . . . . . . . . . . . . . . . . . . . . . . . . . . . . . . . . . 24 Notes on Operation Explanations. . . . . . . . . . . . . . . . . . . . . . . . . . . . . . . . . . . . 26 Useful Functions Available on the Machine. . . . . . . . . . . . . . . . . . . . . . . . . . . . . 27 Connect Wirelessly with Ease in "Access Point Mode". . . . . . . . . . . . . . . . . . . . . . . . . . . 28 Print Photos Easily Using My Image Garden. . . . . . . . . . . . . . . . . . . . . . . . . . . . . . . . . . . 29 Download a Variety of Content Materials. . . . . . . . . . . . . . . . . . . . . . . . . . . . . . . . . . . . . . 31 Print Items with Easy-PhotoPrint+ (Web Application). . . . . . . . . . . . . . . . . . . . . . . . . . . . . 32 Connection Methods Available on the Machine. . . . . . . . . . . . . . . . . . . . . . . . . . . . . . . . . 33 Connection without Using a Wireless Router (Windows XP). . . . . . . . . . . . . . . . . . . . . . . . . . . . . . . . . . 35 Restrictions. . . . . . . . . . . . . . . . . . . . . . . . . . . . . . . . . . . . . . . . . . . . . . . . . . . . . . . . . . . . . . . . . . . . . . . 38 Notice for Web Service Printing. . . . . . . . . . . . . . . . . . . . . . . . . . . . . . . . . . . . . . . . . . . . . 40 Using PIXMA Cloud Link. . . . . . . . . . . . . . . . . . . . . . . . . . . . . . . . . . . . . . . . . . . . . . . . . . 42 Using PIXMA Cloud Link from Your Smartphone, Tablet, or Computer. . . . . . . . . . . . . . . . . . . . . . . . . 43 Before Using Canon Inkjet Cloud Printing Center. . . . . . . . . . . . . . . . . . . . . . . . . . . . . . . . . . . . . . 44 Requirements for Canon Inkjet Cloud Printing Center operation. . . . . . . . . . . . . . . . . . . . . . . 45 Preparations Before Using Canon Inkjet Cloud Printing Center. . . . . . . . . . . . . . . . . . . . . . . . . . . 46 Printing Your Printer registration ID. . . . . . . . . . . . . . . . . . . . . . . . . . . . . . . . . . . . . . . . . . . . . 53Canon Inkjet Cloud Printing Center window. . . . . . . . . . . . . . . . . . . . . . . . . . . . . . . . . . . . . . 54 Using Canon Inkjet Cloud Printing Center. . . . . . . . . . . . . . . . . . . . . . . . . . . . . . . . . . . . . . . . . . . . 70Adding a Printer. . . . . . . . . . . . . . . . . . . . . . . . . . . . . . . . . . . . . . . . . . . . . . . . . . . . . . . . . . . . . . . . 74Adding a PIXMA Cloud Link User. . . . . . . . . . . . . . . . . . . . . . . . . . . . . . . . . . . . . . . . . . . . . . . . . . 76Troubleshooting Canon Inkjet Cloud Printing Center. . . . . . . . . . . . . . . . . . . . . . . . . . . . . . . . . . . 81 Printing with Google Cloud Print. . . . . . . . . . . . . . . . . . . . . . . . . . . . . . . . . . . . . . . . . . . . . 83 Preparations for Printing with Google Cloud Print. . . . . . . . . . . . . . . . . . . . . . . . . . . . . . . . . . . . . . . . . . 84 Printing from Computer or Smartphone with Google Cloud Print. . . . . . . . . . . . . . . . . . . . . . . . . . . . . . 88 Printing from AirPrint Compliant Device. . . . . . . . . . . . . . . . . . . . . . . . . . . . . . . . . . . . . . . 90 Checking Printer Information. . . . . . . . . . . . . . . . . . . . . . . . . . . . . . . . . . . . . . . . . . . . . . . 95 Online Storage Integration Function. . . . . . . . . . . . . . . . . . . . . . . . . . . . . . . . . . . . . . . . . . 97 Print Easily from a Smartphone or Tablet with PIXMA Printing Solutions. . . . . . . . . . . . . 98Overview of the Machine. . . . . . . . . . . . . . . . . . . . . . . . . . . . . . . . . . . . . . . . . . 100 Safety Guide. . . . . . . . . . . . . . . . . . . . . . . . . . . . . . . . . . . . . . . . . . . . . . . . . . . . . . . . . . . 101 Safety Precautions. . . . . . . . . . . . . . . . . . . . . . . . . . . . . . . . . . . . . . . . . . . . . . . . . . . . . . . . . . . . . . . . . 102 Regulatory and Safety Information. . . . . . . . . . . . . . . . . . . . . . . . . . . . . . . . . . . . . . . . . . . . . . . . . . . . 103 Main Components and Basic Operations. . . . . . . . . . . . . . . . . . . . . . . . . . . . . . . . . . . . . 109 Main Components. . . . . . . . . . . . . . . . . . . . . . . . . . . . . . . . . . . . . . . . . . . . . . . . . . . . . . . . . . . . . . . . . 110 Front View. . . . . . . . . . . . . . . . . . . . . . . . . . . . . . . . . . . . . . . . . . . . . . . . . . . . . . . . . . . . . . . . . . . 111Rear View. . . . . . . . . . . . . . . . . . . . . . . . . . . . . . . . . . . . . . . . . . . . . . . . . . . . . . . . . . . . . . . . . . . 113Inside View. . . . . . . . . . . . . . . . . . . . . . . . . . . . . . . . . . . . . . . . . . . . . . . . . . . . . . . . . . . . . . . . . . 114Operation Panel. . . . . . . . . . . . . . . . . . . . . . . . . . . . . . . . . . . . . . . . . . . . . . . . . . . . . . . . . . . . . . . 115 About the Power Supply of the Machine. . . . . . . . . . . . . . . . . . . . . . . . . . . . . . . . . . . . . . . . . . . . . . . . 117 Confirming that the Power Is On. . . . . . . . . . . . . . . . . . . . . . . . . . . . . . . . . . . . . . . . . . . . . . . . . . 118Turning the Machine On and Off. . . . . . . . . . . . . . . . . . . . . . . . . . . . . . . . . . . . . . . . . . . . . . . . . . 119Notice for the Power Plug/Power Cord. . . . . . . . . . . . . . . . . . . . . . . . . . . . . . . . . . . . . . . . . . . . . 120Notice for Unplugging the Power Cord. . . . . . . . . . . . . . . . . . . . . . . . . . . . . . . . . . . . . . . . . . . . . 121 LCD and Operation Panel. . . . . . . . . . . . . . . . . . . . . . . . . . . . . . . . . . . . . . . . . . . . . . . . . . . . . . . . . . . 122 Entering Numbers, Letters, and Symbols. . . . . . . . . . . . . . . . . . . . . . . . . . . . . . . . . . . . . . . . . . . . . . . 124 Loading Paper / Originals. . . . . . . . . . . . . . . . . . . . . . . . . . . . . . . . . . . . . . . . . . . . . . . . . 126 Loading Paper. . . . . . . . . . . . . . . . . . . . . . . . . . . . . . . . . . . . . . . . . . . . . . . . . . . . . . . . . . . . . . . . . . . . 127 Loading Plain Paper / Photo Paper. . . . . . . . . . . . . . . . . . . . . . . . . . . . . . . . . . . . . . . . . . . . . . . . 128Loading Envelopes. . . . . . . . . . . . . . . . . . . . . . . . . . . . . . . . . . . . . . . . . . . . . . . . . . . . . . . . . . . . 133Media Types You Can Use. . . . . . . . . . . . . . . . . . . . . . . . . . . . . . . . . . . . . . . . . . . . . . . . . . . . . . 138 Paper Load Limit. . . . . . . . . . . . . . . . . . . . . . . . . . . . . . . . . . . . . . . . . . . . . . . . . . . . . . . . . . 140 Media Types You Cannot Use. . . . . . . . . . . . . . . . . . . . . . . . . . . . . . . . . . . . . . . . . . . . . . . . . . . . 142Printing Area. . . . . . . . . . . . . . . . . . . . . . . . . . . . . . . . . . . . . . . . . . . . . . . . . . . . . . . . . . . . . . . . . 143 Printing Area. . . . . . . . . . . . . . . . . . . . . . . . . . . . . . . . . . . . . . . . . . . . . . . . . . . . . . . . . . . . . 144Other Sizes than Letter, Legal, Envelopes. . . . . . . . . . . . . . . . . . . . . . . . . . . . . . . . . . . . . . 145Letter, Legal. . . . . . . . . . . . . . . . . . . . . . . . . . . . . . . . . . . . . . . . . . . . . . . . . . . . . . . . . . . . . . 146Envelopes. . . . . . . . . . . . . . . . . . . . . . . . . . . . . . . . . . . . . . . . . . . . . . . . . . . . . . . . . . . . . . . 147 Loading Originals. . . . . . . . . . . . . . . . . . . . . . . . . . . . . . . . . . . . . . . . . . . . . . . . . . . . . . . . . . . . . . . . . . 148 Position to Load Originals. . . . . . . . . . . . . . . . . . . . . . . . . . . . . . . . . . . . . . . . . . . . . . . . . . . . . . . 149Loading Originals on the Platen Glass. . . . . . . . . . . . . . . . . . . . . . . . . . . . . . . . . . . . . . . . . . . . . 150Loading Documents in the ADF (Auto Document Feeder). . . . . . . . . . . . . . . . . . . . . . . . . . . . . . 151How to Load Originals for Each Function. . . . . . . . . . . . . . . . . . . . . . . . . . . . . . . . . . . . . . . . . . . 152Replacing a FINE Cartridge. . . . . . . . . . . . . . . . . . . . . . . . . . . . . . . . . . . . . . . . . . . . . . . . . . . . . . . . . . 157 Checking the Ink Status. . . . . . . . . . . . . . . . . . . . . . . . . . . . . . . . . . . . . . . . . . . . . . . . . . . . . . . . . . . . . 163 Checking the Ink Status with the LCD on the Machine. . . . . . . . . . . . . . . . . . . . . . . . . . . . . . . . . 164 Maintenance. . . . . . . . . . . . . . . . . . . . . . . . . . . . . . . . . . . . . . . . . . . . . . . . . . . . . . . . . . . 165 When Printing Becomes Faint or Colors Are Incorrect. . . . . . . . . . . . . . . . . . . . . . . . . . . . . . . . . . . . . 166 Maintenance Procedure. . . . . . . . . . . . . . . . . . . . . . . . . . . . . . . . . . . . . . . . . . . . . . . . . . . . . . . . . 167 Printing the Nozzle Check Pattern. . . . . . . . . . . . . . . . . . . . . . . . . . . . . . . . . . . . . . . . . . . . . . . . . 169 Examining the Nozzle Check Pattern. . . . . . . . . . . . . . . . . . . . . . . . . . . . . . . . . . . . . . . . . . . . . . 170 Cleaning the Print Head. . . . . . . . . . . . . . . . . . . . . . . . . . . . . . . . . . . . . . . . . . . . . . . . . . . . . . . . . 171 Cleaning the Print Head Deeply. . . . . . . . . . . . . . . . . . . . . . . . . . . . . . . . . . . . . . . . . . . . . . . . . . 172 Aligning the Print Head. . . . . . . . . . . . . . . . . . . . . . . . . . . . . . . . . . . . . . . . . . . . . . . . . . . . . . . . . 173 Performing Maintenance from a Computer. . . . . . . . . . . . . . . . . . . . . . . . . . . . . . . . . . . . . . . . . . . . . . 176 Cleaning the Print Heads from Your Computer. . . . . . . . . . . . . . . . . . . . . . . . . . . . . . . . . . . . . . . 177 Aligning the Print Head. . . . . . . . . . . . . . . . . . . . . . . . . . . . . . . . . . . . . . . . . . . . . . . . . . . . . . . . . 179 Aligning the Print Head Position from Your Computer. . . . . . . . . . . . . . . . . . . . . . . . . . . . . . . . . . 180 Aligning the Print Head Position Automatically from Your Computer. . . . . . . . . . . . . . . . . . . . . . 184 Use Your Computer to Print a Nozzle Check Pattern. . . . . . . . . . . . . . . . . . . . . . . . . . . . . . . . . . 186 Cleaning the Machine. . . . . . . . . . . . . . . . . . . . . . . . . . . . . . . . . . . . . . . . . . . . . . . . . . . . . . . . . . . . . . 187 Cleaning the Exterior of the Machine. . . . . . . . . . . . . . . . . . . . . . . . . . . . . . . . . . . . . . . . . . . . . . . 188 Cleaning the Platen Glass and Document Cover. . . . . . . . . . . . . . . . . . . . . . . . . . . . . . . . . . . . . 189 Cleaning the ADF (Auto Document Feeder). . . . . . . . . . . . . . . . . . . . . . . . . . . . . . . . . . . . . . . . . 190 Cleaning the Paper Feed Roller. . . . . . . . . . . . . . . . . . . . . . . . . . . . . . . . . . . . . . . . . . . . . . . . . . 192 Cleaning the Inside of the Machine (Bottom Plate Cleaning). . . . . . . . . . . . . . . . . . . . . . . . . . . . 193 Changing the Machine Settings. . . . . . . . . . . . . . . . . . . . . . . . . . . . . . . . . . . . . . . . . . . . 195 Changing Machine Settings from Your Computer. . . . . . . . . . . . . . . . . . . . . . . . . . . . . . . . . . . . . . . . . 196 Changing the Print Options. . . . . . . . . . . . . . . . . . . . . . . . . . . . . . . . . . . . . . . . . . . . . . . . . . . . . . 197 Registering a Frequently Used Printing Profile. . . . . . . . . . . . . . . . . . . . . . . . . . . . . . . . . . . . . . . 198 Setting the Ink Cartridge to be Used. . . . . . . . . . . . . . . . . . . . . . . . . . . . . . . . . . . . . . . . . . . . . . . 200 Managing the Printer Power. . . . . . . . . . . . . . . . . . . . . . . . . . . . . . . . . . . . . . . . . . . . . . . . . . . . . 201 Reducing the Printer Noise. . . . . . . . . . . . . . . . . . . . . . . . . . . . . . . . . . . . . . . . . . . . . . . . . . . . . . 203 Changing the Printer Operation Mode. . . . . . . . . . . . . . . . . . . . . . . . . . . . . . . . . . . . . . . . . . . . . . 204 Changing the Machine Settings on the LCD. . . . . . . . . . . . . . . . . . . . . . . . . . . . . . . . . . . . . . . . . . . . . 206 Changing the Machine Settings on the LCD. . . . . . . . . . . . . . . . . . . . . . . . . . . . . . . . . . . . . . . . . 207 Fax settings. . . . . . . . . . . . . . . . . . . . . . . . . . . . . . . . . . . . . . . . . . . . . . . . . . . . . . . . . . . . . . . . . . 208 Output settings. . . . . . . . . . . . . . . . . . . . . . . . . . . . . . . . . . . . . . . . . . . . . . . . . . . . . . . . . . . . . . . . 212Dev. user settings. . . . . . . . . . . . . . . . . . . . . . . . . . . . . . . . . . . . . . . . . . . . . . . . . . . . . . . . . . . . . 215 Firmware update. . . . . . . . . . . . . . . . . . . . . . . . . . . . . . . . . . . . . . . . . . . . . . . . . . . . . . . . . . . . . . 217 Cassette settings. . . . . . . . . . . . . . . . . . . . . . . . . . . . . . . . . . . . . . . . . . . . . . . . . . . . . . . . . . . . . . 218 Reset setting. . . . . . . . . . . . . . . . . . . . . . . . . . . . . . . . . . . . . . . . . . . . . . . . . . . . . . . . . . . . . . . . . 219 About Quiet setting. . . . . . . . . . . . . . . . . . . . . . . . . . . . . . . . . . . . . . . . . . . . . . . . . . . . . . . . . . . . 220 Using the Machine with the Access Point Mode. . . . . . . . . . . . . . . . . . . . . . . . . . . . . . . . . . . . . . 221 Information about Network Connection. . . . . . . . . . . . . . . . . . . . . . . . . . . . . . . . . . . . . . 224 Useful Information about Network Connection. . . . . . . . . . . . . . . . . . . . . . . . . . . . . . . . . . . . . . . . . . . 225 Default Values Set at Factory (Network). . . . . . . . . . . . . . . . . . . . . . . . . . . . . . . . . . . . . . . . . . . . 226 Connecting the Machine to the Computer Using a USB Cable. . . . . . . . . . . . . . . . . . . . . . . . . . . 227 When Detecting the Printers Have the Same Name during Setup. . . . . . . . . . . . . . . . . . . . . . . . 228 Connecting to Other Computer with LAN/Changing the Connection Method from USB to LAN. . 229 Printing Out Network Setting Information. . . . . . . . . . . . . . . . . . . . . . . . . . . . . . . . . . . . . . . . . . . 230 About Network Communication. . . . . . . . . . . . . . . . . . . . . . . . . . . . . . . . . . . . . . . . . . . . 232 Changing and Confirming Network Settings. . . . . . . . . . . . . . . . . . . . . . . . . . . . . . . . . . . . . . . . . . . . . 233 IJ Network Tool. . . . . . . . . . . . . . . . . . . . . . . . . . . . . . . . . . . . . . . . . . . . . . . . . . . . . . . . . . . . . . . 234 Changing the Settings in the Wireless LAN Sheet. . . . . . . . . . . . . . . . . . . . . . . . . . . . . . . . . . . . 235 Changing the WEP Detailed Settings. . . . . . . . . . . . . . . . . . . . . . . . . . . . . . . . . . . . . . . . . . . . . . 237 Changing the WPA/WPA2 Detailed Settings. . . . . . . . . . . . . . . . . . . . . . . . . . . . . . . . . . . . . . . . . 239 Changing the Settings in the Wired LAN Sheet. . . . . . . . . . . . . . . . . . . . . . . . . . . . . . . . . . . . . . . 242 Changing the Settings in the Admin Password Sheet. . . . . . . . . . . . . . . . . . . . . . . . . . . . . . . . . . 243 Monitoring Wireless Network Status. . . . . . . . . . . . . . . . . . . . . . . . . . . . . . . . . . . . . . . . . . . . . . . 244 Initializing the Network Settings of the Machine. . . . . . . . . . . . . . . . . . . . . . . . . . . . . . . . . . . . . . 247 Viewing the Modified Settings. . . . . . . . . . . . . . . . . . . . . . . . . . . . . . . . . . . . . . . . . . . . . . . . . . . . 248 Screens for Network Connection of IJ Network Tool. . . . . . . . . . . . . . . . . . . . . . . . . . . . . . . . . . . . . . . 249 Canon IJ Network Tool Screen. . . . . . . . . . . . . . . . . . . . . . . . . . . . . . . . . . . . . . . . . . . . . . . . . . . 250 Configuration Screen. . . . . . . . . . . . . . . . . . . . . . . . . . . . . . . . . . . . . . . . . . . . . . . . . . . . . . . . . . . 254 Wireless LAN Sheet. . . . . . . . . . . . . . . . . . . . . . . . . . . . . . . . . . . . . . . . . . . . . . . . . . . . . . . . . . . . 255 Search Screen. . . . . . . . . . . . . . . . . . . . . . . . . . . . . . . . . . . . . . . . . . . . . . . . . . . . . . . . . . . . . . . . 257 WEP Details Screen. . . . . . . . . . . . . . . . . . . . . . . . . . . . . . . . . . . . . . . . . . . . . . . . . . . . . . . . . . . 259 WPA/WPA2 Details Screen. . . . . . . . . . . . . . . . . . . . . . . . . . . . . . . . . . . . . . . . . . . . . . . . . . . . . . 260 Authentication Type Confirmation Screen. . . . . . . . . . . . . . . . . . . . . . . . . . . . . . . . . . . . . . . . . . . 261 PSK:Passphrase and Dynamic Encryption Setup Screen. . . . . . . . . . . . . . . . . . . . . . . . . . . . . . . 262 Setup Information Confirmation Screen. . . . . . . . . . . . . . . . . . . . . . . . . . . . . . . . . . . . . . . . . . . . . 263 Wired LAN Sheet. . . . . . . . . . . . . . . . . . . . . . . . . . . . . . . . . . . . . . . . . . . . . . . . . . . . . . . . . . . . . . 264 Admin Password Sheet. . . . . . . . . . . . . . . . . . . . . . . . . . . . . . . . . . . . . . . . . . . . . . . . . . . . . . . . . 265 Network Information Screen. . . . . . . . . . . . . . . . . . . . . . . . . . . . . . . . . . . . . . . . . . . . . . . . . . . . . 266 Access Control Sheet. . . . . . . . . . . . . . . . . . . . . . . . . . . . . . . . . . . . . . . . . . . . . . . . . . . . . . . . . . 267Edit Accessible MAC Address Screen/Add Accessible MAC Address Screen. . . . . . . . . . . . . . . 271Edit Accessible IP Address Screen/Add Accessible IP Address Screen. . . . . . . . . . . . . . . . . . . . 272 Other Screens of IJ Network Tool. . . . . . . . . . . . . . . . . . . . . . . . . . . . . . . . . . . . . . . . . . . . . . . . . . . . . 273 Canon IJ Network Tool Screen. . . . . . . . . . . . . . . . . . . . . . . . . . . . . . . . . . . . . . . . . . . . . . . . . . . 274Status Screen. . . . . . . . . . . . . . . . . . . . . . . . . . . . . . . . . . . . . . . . . . . . . . . . . . . . . . . . . . . . . . . . 278Connection Performance Measurement Screen. . . . . . . . . . . . . . . . . . . . . . . . . . . . . . . . . . . . . . 279Maintenance Screen. . . . . . . . . . . . . . . . . . . . . . . . . . . . . . . . . . . . . . . . . . . . . . . . . . . . . . . . . . . 281Network Setup of the Card Slot Screen. . . . . . . . . . . . . . . . . . . . . . . . . . . . . . . . . . . . . . . . . . . . . 282Associate Port Screen. . . . . . . . . . . . . . . . . . . . . . . . . . . . . . . . . . . . . . . . . . . . . . . . . . . . . . . . . . 284Network Information Screen. . . . . . . . . . . . . . . . . . . . . . . . . . . . . . . . . . . . . . . . . . . . . . . . . . . . . 285 Appendix for Network Communication. . . . . . . . . . . . . . . . . . . . . . . . . . . . . . . . . . . . . . . . . . . . . . . . . . 286 Using the Card Slot over a Network. . . . . . . . . . . . . . . . . . . . . . . . . . . . . . . . . . . . . . . . . . . . . . . 287When the Printer Driver Is Not Associated with a Port. . . . . . . . . . . . . . . . . . . . . . . . . . . . . . . . . 289About Technical Terms. . . . . . . . . . . . . . . . . . . . . . . . . . . . . . . . . . . . . . . . . . . . . . . . . . . . . . . . . 290Restrictions. . . . . . . . . . . . . . . . . . . . . . . . . . . . . . . . . . . . . . . . . . . . . . . . . . . . . . . . . . . . . . . . . . 296About Firewall. . . . . . . . . . . . . . . . . . . . . . . . . . . . . . . . . . . . . . . . . . . . . . . . . . . . . . . . . . . . . . . . 297 Tips for Ensuring Optimal Printing Quality. . . . . . . . . . . . . . . . . . . . . . . . . . . . . . . . . . . . 298 Useful Information about Ink. . . . . . . . . . . . . . . . . . . . . . . . . . . . . . . . . . . . . . . . . . . . . . . . . . . . . . . . . 299 Key Points to Successful Printing. . . . . . . . . . . . . . . . . . . . . . . . . . . . . . . . . . . . . . . . . . . . . . . . . . . . . 300 Be Sure to Check Paper Settings before Printing. . . . . . . . . . . . . . . . . . . . . . . . . . . . . . . . . . . . . . . . . 301 Be Sure to Set Cassette Paper Information after Loading Paper. . . . . . . . . . . . . . . . . . . . . . . . . . . . . 302 Canceling a Print Job. . . . . . . . . . . . . . . . . . . . . . . . . . . . . . . . . . . . . . . . . . . . . . . . . . . . . . . . . . . . . . . 303 Storing Printed Images. . . . . . . . . . . . . . . . . . . . . . . . . . . . . . . . . . . . . . . . . . . . . . . . . . . . . . . . . . . . . 304 Key to Enjoying Consistent Printing Quality. . . . . . . . . . . . . . . . . . . . . . . . . . . . . . . . . . . . . . . . . . . . . . 305 Precautions for Safe Transport of the Machine. . . . . . . . . . . . . . . . . . . . . . . . . . . . . . . . . . . . . . . . . . . 306 Legal Limitations on Use of Your Product and Use of Images. . . . . . . . . . . . . . . . . . . . . 308 Specifications. . . . . . . . . . . . . . . . . . . . . . . . . . . . . . . . . . . . . . . . . . . . . . . . . . . . . . . . . . 309 About the Administrator Password. . . . . . . . . . . . . . . . . . . . . . . . . . . . . . . . . . 314 List of Function for Each Model. . . . . . . . . . . . . . . . . . . . . . . . . . . . . . . . . . . . . 315 Printing. . . . . . . . . . . . . . . . . . . . . . . . . . . . . . . . . . . . . . . . . . . . . . . . . . . . . . . 318 Printing from a Computer. . . . . . . . . . . . . . . . . . . . . . . . . . . . . . . . . . . . . . . . . . . . . . . . . 319 Printing with Application Software that You are Using (Printer Driver). . . . . . . . . . . . . . . . . . . . . . . . . 320 Printing with Easy Setup. . . . . . . . . . . . . . . . . . . . . . . . . . . . . . . . . . . . . . . . . . . . . . . . . . . . . . . . 321 Paper Settings on the Printer Driver and the Printer (Media Type). . . . . . . . . . . . . . . . . . . . 324Paper Settings on the Printer Driver and the Printer (Paper Size). . . . . . . . . . . . . . . . . . . . 325 Various Printing Methods. . . . . . . . . . . . . . . . . . . . . . . . . . . . . . . . . . . . . . . . . . . . . . . . . . . . . . . . 326Setting a Page Size and Orientation. . . . . . . . . . . . . . . . . . . . . . . . . . . . . . . . . . . . . . . . . . . 327 Setting the Number of Copies and Printing Order. . . . . . . . . . . . . . . . . . . . . . . . . . . . . . . . . 328 Setting the Stapling Margin. . . . . . . . . . . . . . . . . . . . . . . . . . . . . . . . . . . . . . . . . . . . . . . . . . 330 Execute Borderless Printing. . . . . . . . . . . . . . . . . . . . . . . . . . . . . . . . . . . . . . . . . . . . . . . . . 332 Fit-to-Page Printing. . . . . . . . . . . . . . . . . . . . . . . . . . . . . . . . . . . . . . . . . . . . . . . . . . . . . . . . 335 Scaled Printing. . . . . . . . . . . . . . . . . . . . . . . . . . . . . . . . . . . . . . . . . . . . . . . . . . . . . . . . . . . . 337 Page Layout Printing. . . . . . . . . . . . . . . . . . . . . . . . . . . . . . . . . . . . . . . . . . . . . . . . . . . . . . . 340 Tiling/Poster Printing. . . . . . . . . . . . . . . . . . . . . . . . . . . . . . . . . . . . . . . . . . . . . . . . . . . . . . . 342 Booklet Printing. . . . . . . . . . . . . . . . . . . . . . . . . . . . . . . . . . . . . . . . . . . . . . . . . . . . . . . . . . . 345 Duplex Printing. . . . . . . . . . . . . . . . . . . . . . . . . . . . . . . . . . . . . . . . . . . . . . . . . . . . . . . . . . . 347 Stamp/Background Printing. . . . . . . . . . . . . . . . . . . . . . . . . . . . . . . . . . . . . . . . . . . . . . . . . . 349 Registering a Stamp. . . . . . . . . . . . . . . . . . . . . . . . . . . . . . . . . . . . . . . . . . . . . . . . . . . . . . . 352 Registering Image Data to be Used as a Background. . . . . . . . . . . . . . . . . . . . . . . . . . . . . . 355 Setting Up Envelope Printing. . . . . . . . . . . . . . . . . . . . . . . . . . . . . . . . . . . . . . . . . . . . . . . . . 358 Displaying the Print Results before Printing. . . . . . . . . . . . . . . . . . . . . . . . . . . . . . . . . . . . . 360 Setting Paper Dimensions (Custom Size). . . . . . . . . . . . . . . . . . . . . . . . . . . . . . . . . . . . . . . 361 Editing the Print Document or Reprinting from the Print History. . . . . . . . . . . . . . . . . . . . . . 363 Changing the Print Quality and Correcting Image Data. . . . . . . . . . . . . . . . . . . . . . . . . . . . . . . . . 366 Setting the Print Quality Level (Custom). . . . . . . . . . . . . . . . . . . . . . . . . . . . . . . . . . . . . . . . 367 Printing a Color Document in Monochrome. . . . . . . . . . . . . . . . . . . . . . . . . . . . . . . . . . . . . . 369 Specifying Color Correction. . . . . . . . . . . . . . . . . . . . . . . . . . . . . . . . . . . . . . . . . . . . . . . . . . 370 Optimal Photo Printing of Image Data. . . . . . . . . . . . . . . . . . . . . . . . . . . . . . . . . . . . . . . . . . 372 Adjusting Colors with the Printer Driver. . . . . . . . . . . . . . . . . . . . . . . . . . . . . . . . . . . . . . . . . 373 Printing with ICC Profiles. . . . . . . . . . . . . . . . . . . . . . . . . . . . . . . . . . . . . . . . . . . . . . . . . . . . 375 Adjusting Color Balance. . . . . . . . . . . . . . . . . . . . . . . . . . . . . . . . . . . . . . . . . . . . . . . . . . . . 378 Adjusting Color Balance Using Sample Patterns (Printer Driver). . . . . . . . . . . . . . . . . . . . . 380 Adjusting Brightness. . . . . . . . . . . . . . . . . . . . . . . . . . . . . . . . . . . . . . . . . . . . . . . . . . . . . . . 384 Adjusting Intensity. . . . . . . . . . . . . . . . . . . . . . . . . . . . . . . . . . . . . . . . . . . . . . . . . . . . . . . . . 386 Adjusting Contrast. . . . . . . . . . . . . . . . . . . . . . . . . . . . . . . . . . . . . . . . . . . . . . . . . . . . . . . . . 388 Adjusting Intensity/Contrast Using Sample Patterns (Printer Driver). . . . . . . . . . . . . . . . . . . 390 Overview of the Printer Driver. . . . . . . . . . . . . . . . . . . . . . . . . . . . . . . . . . . . . . . . . . . . . . . . . . . . 394 Canon IJ Printer Driver. . . . . . . . . . . . . . . . . . . . . . . . . . . . . . . . . . . . . . . . . . . . . . . . . . . . . 395 How to Open the Printer Driver Setup Window. . . . . . . . . . . . . . . . . . . . . . . . . . . . . . . . . . . 396 Canon IJ Status Monitor. . . . . . . . . . . . . . . . . . . . . . . . . . . . . . . . . . . . . . . . . . . . . . . . . . . . 397 Checking the Ink Status from Your Computer. . . . . . . . . . . . . . . . . . . . . . . . . . . . . . . . . . . . 398 Canon IJ Preview. . . . . . . . . . . . . . . . . . . . . . . . . . . . . . . . . . . . . . . . . . . . . . . . . . . . . . . . . . 399 Deleting the Undesired Print Job. . . . . . . . . . . . . . . . . . . . . . . . . . . . . . . . . . . . . . . . . . . . . . 400 Instructions for Use (Printer Driver). . . . . . . . . . . . . . . . . . . . . . . . . . . . . . . . . . . . . . . . . . . . 401 Printer Driver Description. . . . . . . . . . . . . . . . . . . . . . . . . . . . . . . . . . . . . . . . . . . . . . . . . . . . . . . . 403。
康耐视相机操作使用说明书文件状态:■草稿□修改□定稿文档密级□不保密■内部□机密项目名称版本号 1.0描述康耐视相机操作使用说明书编写人余国鹰编写日期2015/9/10 审核人审核日期目录一、康耐视相机具体设置 (3)1.1软件安装 ......................................................................................................... 错误!未定义书签。
1.2流程编辑 (3)1.3C ODESYS通信注意事项 (6)二、相机标定 (7)2.1相机校准 (7)2.2绝对坐标实现 (9)2.3相对坐标实现 (10)三、示教器示例程序 (11)3.1绝对坐标实现范例 (11)3.2相对坐标实现范例 (11)四、CODESYS逻辑开发 (13)4.1S OCKET通信开发 (13)4.2外部点数据处理 (14)五、细节说明 (17)康耐视相机操作使用说明书一、 康耐视相机具体设置1.1 软件安装双击康耐视相机软件Cognex_In-Sight_Software_4.8.1,按照步骤一步步安装即可。
1.2 流程编辑1. 设置电脑本地连接IPV4地址为192.168.39.12(设置为39段即可)。
2. 双击康耐视In-Sight 浏览器软件进入相机设置界面,软件会自动搜索连接的相机设备,如下图1.1所示。
图1.13. 双击相机设备(红色椭圆内设备图标),进入相机编辑界面,如下图1.2所示。
图1.2上海新时达机器人有限公司4. 在应用程序步骤中,开始、设置工具、配置结果、完成这4个步骤形成一个完整的相机操作流程;开始单击“开始”中“已连接”,如下图1.3所示,可以进行连接设备、断开设备、刷新、添加等操作。
图1.3单击“开始”中的“设置图像”,如下图1.4所示。
在“采集/加载图像”对话框中,“触发器”按钮是进行拍照,“实况视频”按钮是实时显示相机中的图像,“从PC加载图像”按钮是加载一张存在的图像。
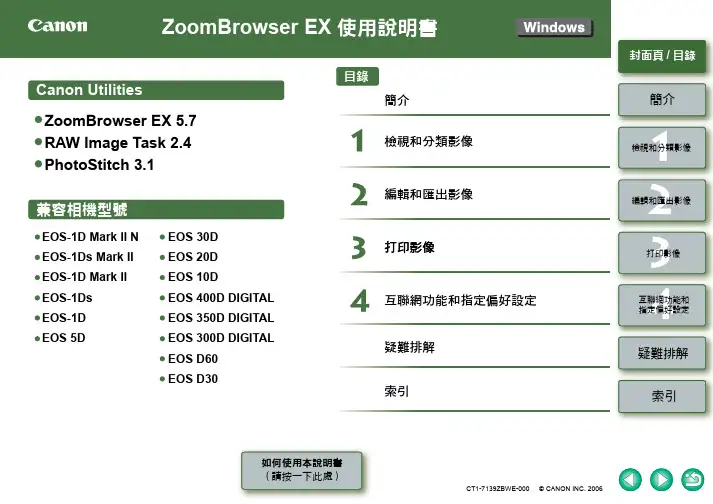
1234封面頁/ 目錄簡介檢視和分類影像編輯和匯出影像打印影像疑難排解索引互聯網功能和指定偏好設定1234封面頁/ 目錄簡介檢視和分類影像編輯和匯出影像打印影像疑難排解索引互聯網功能和指定偏好設定1234封面頁/ 目錄簡介檢視和分類影像編輯和匯出影像打印影像疑難排解索引互聯網功能和指定偏好設定參考頁碼以圓括弧( )或內容中的藍字表示。
按一下頁碼以移至對應頁面。
按一下可移至上一頁。
方括弧[ ]內的文字表示電腦螢幕呈現的如選單名稱、按鈕名稱和視窗名稱等。
按一下可移至下一頁。
按一下可返回先前顯示的頁面。
O 本說明書中,Windows XP Professional/Home Edition 簡稱為「Windows XP 」,Windows Millennium Edition 簡稱為「Windows Me 」,Windows 2000 Professional 簡稱為「Windows 2000」,Windows 98 Second Edition 簡稱為「Windows 98SE 」。
O 有關使用軟件應用程式的資訊,請參閱各軟件應用程式的「說明」檔案。
O 有關各軟件功能限制的資訊,請參閱各軟件應用程式的「Readme 」檔案。
Readme : 按一下[開始(Start)]按鈕X 選擇[所有程式(All Programs)] (Windows XP 以外的其他Windows 作業系統是[程式集(Programs)]) X [Canon Utilities] X 各軟件應用程式的資料夾X 各軟件應用程式的「Readme 」檔案。
O 顯示螢幕中相機名稱顯示為「EOS XXX 」。
O 本說明書以Windows XP 的顯示螢幕為示範。
O 本說明書中< >內的文字表示鍵盤上的鍵和相機按鈕的名稱。
O本說明書中X 表示如右圖所示的操作次序。
範例:[檢視(View)]選單X [顯示資訊(Show Information)] X [檔案名稱(File Name)]。
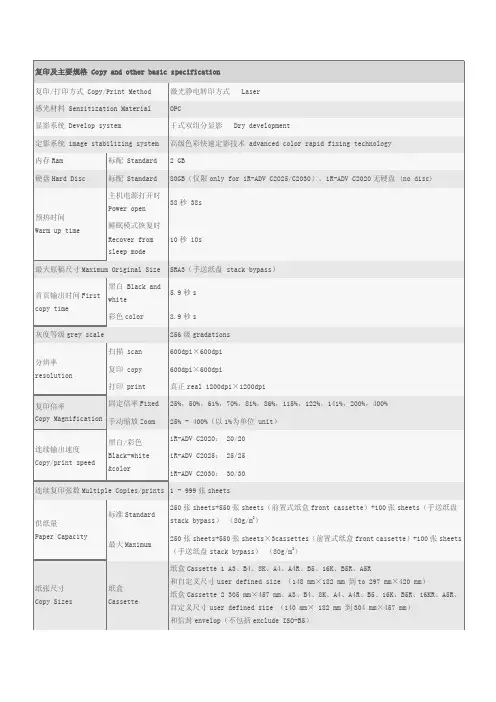
复印及主要规格 Copy and other basic specification复印/打印方式 Copy/Print Method 激光静电转印方式 Laser感光材料 Sensitization Material OPC显影系统 Develop system 干式双组分显影 Dry development定影系统 image stabilizing system 高级色彩快速定影技术 advanced color rapid fixing technology内存Ram 标配 Standard 2 GB硬盘Hard Disc 标配 Standard 80GB(仅限only for iR-ADV C2025/C2030),iR-ADV C2020无硬盘 (no disc)预热时间Warm up time 主机电源打开时Power open38秒 38s 睡眠模式恢复时Recover fromsleep mode10秒 10s最大原稿尺寸Maximum Original Size SRA3(手送纸盘 stack bypass)首页输出时间First copy time 黑白 Black andwhite5.9秒s 彩色color 8.9秒s灰度等级grey scale 256级gradations分辨率resolution 扫描 scan 600dpi×600dpi复印 copy 600dpi×600dpi打印 print 真正real 1200dpi×1200dpi复印倍率Copy Magnification 固定倍率Fixed 25%,50%,61%,70%,81%,86%,115%,122%,141%,200%,400% 手动缩放Zoom 25% - 400%(以1%为单位 unit)连续输出速度Copy/print speed 黑白/彩色Black-white&coloriR-ADV C2020: 20/20iR-ADV C2025: 25/25iR-ADV C2030: 30/30连续复印张数Multiple Copies/prints 1 - 999张sheets供纸量Paper Capacity 标准Standard250张sheets+550张sheets(前置式纸盒front cassette)+100张sheets(手送纸盘stack bypass)(80g/m2)最大Maximum250张sheets+550张sheets×3cassettes(前置式纸盒front cassette)+100张sheets(手送纸盘stack bypass)(80g/m2)纸张尺寸Copy Sizes 纸盒Cassette纸盒Cassette 1 A3、B4、8K、A4、A4R、B5、16K、B5R、A5R和自定义尺寸user defined size (148 mm×182 mm 到to 297 mm×420 mm)纸盒Cassette 2 305 mm×457 mm、A3、B4、8K、A4、A4R、B5、16K、B5R、16KR、A5R、自定义尺寸user defined size (140 mm× 182 mm 到304 mm×457 mm)和信封envelop(不包括exclude ISO-B5)手送纸盘Stack bypass 305 mm×457 mm、320 mm×450 mm(SRA3)、A3、B4、8K、A4、A4R、B5、16K、B5R、A5、A5R、自定义尺寸user defined size(99 mm×140 mm 到320 mm×457 mm)和信封envelop纸张厚度Thickness of sheets 纸盒Cassette纸盒cassette 1 64 to 120 g/m2纸盒cassette 2 64 to 163 g/m2手送纸盘stackbypass64 to 220 g/m2出纸托盘容量Tray capacity 100 张sheets(80 g/m2)电源 Power supply 220 V AC、50 Hz、4 A 最大功耗 Maximum Consumption 1.5kw尺寸(宽×深×高)Dimension(W*D*H) iR-ADV C2030/C2025:928 mm×565 mm×680 mm iR-ADV C2020:928 mm×565 mm×650 mm安装空间(宽×深)Install space (W*H) iR-ADV C2030/C2025:846 mm×680 mm(多功能托盘拉出时when using multifunction Tray)iR-ADV C2020:846 mm×650 mm(多功能托盘拉出时when using multifunction Tray)主机重量Weight iR-ADV C2030/C2025:约approx 87 kgiR-ADV C2020:约approx 76 kg打印规格 Print SpecificationUFR II (标配standard)打印分辨率Resolution 真正Real 1200dpi×1200dpi打印语言PDL UFR II接口Interface 10Base-T/100Base-TX/1000Base-T(RJ-45) USB 2.0 网络协议Network Protocol TCP/IP,IPX/SPX,Apple Talk,SMB/CIFS系统环境System Windows 2000(SP1 或更高版本or later)、Windows XP、Windows Vista、Windows 7、Windows Server 2003、Windows Server 2008、Mac OS X、Red Hat Linux 7.2、Solaris Version 2.6 或更高版本or laterPCL打印组件-AG1(选配)PCL print module (optional)打印分辨率Resolution 真正1200dpi×1200dpi打印语言PDL PCL 5c,PCL 6接口Interface 10Base-T/100Base-TX/1000Base-T(RJ-45) USB 2.0 网络协议 Network Protocol TCP/IP,IPX/SPX,Apple Talk,SMB/CIFS系统环境System Windows 2000(SP1 或更高版本or later)、Windows XP、Windows Vista、Windows 7、Windows Server 2003、Windows Server 2008、Mac OS X、Red Hat Linux 7.2、Solaris Version 2.6 或更高版本or laterPS打印组件-AG1(选配)PS print module (optional)打印分辨率Resolution 真正1200dpi×1200dpi打印语言PDL Genuine Adobe PS3接口Interface 10Base-T/100Base-TX/1000Base-T(RJ-45) USB 2.0 网络协议Network Protocol TCP/IP,IPX/SPX,Apple Talk,SMB/CIFS系统环境System Windows 2000(SP1 或更高版本or later)、Windows XP、Windows Vista、Windows 7、Windows Server 2003、Windows Server 2008、Mac OS X、Red Hat Linux 7.2、Solaris Version 2.6 或更高版本or later传真规格(选配)Fax (Optional)Super G3传真组件Fax module-AH1双路Super G3传真组件Fax module -AH1适用线路Circuit 公用交换电话网 PSTN调制解调速度Modem Speed Super G3:33.6kbps; G3:14.4kbps数据压缩方式Data Compress Method MH,MR,MMR,JBIG传输速度 Transmit Speed JBIG 大约2.6秒 Approx 2.6s发送原稿尺寸 Sending size A3-A5R(其中B5按照B4尺寸发送B5 is sent like B4;B5R,A5,A5R按照A4尺寸发送B5R,A5,A5R are sent like A4)接受传真尺寸 Receiving size A3-A5R扫描规格(选配)Scan specification (Optional)扫描方式Scan mode 推式pushing,拉式pulling 色彩方式Color mode 彩色colorful扫描分辨率Resolution 最大maximum 600dpi×600dpi文件存储格式(推式)File format(pushing) PDF:压缩Compression、轮廓contour、OCR、用户签名user signature、优化最适合网络的network optimization PDF、PDF/A-1b、Reader ExtensionsXPS:压缩compression、OCR、用户签名user signature耗材Consumption墨粉toner NPG-52墨粉(黑)black NPG-52墨粉(青)blue NPG-52墨粉(品红)redNPG-52墨粉(黄)yellow感光鼓organic photoconductive drum NPG-52感光鼓(黑)black NPG-52感光鼓(青)blue NPG-52感光鼓(品红)red NPG-52感光鼓(黄)yellow佳能复印纸Canon copy paper A4 70g复印纸 copy paper A3 70g复印纸copy paper A4 80g复印纸copy paper A3 80g复印纸copy paper。
Canon pixmaMP145打印机使用手册本电子手册的屏幕包括两个部分:菜单框架(左侧)和内容框架(右侧)。
注释本节以英文屏幕拍图为例进行说明。
(1)菜单框架(2)内容框架注释1.本手册中说明的操作只适用于运行安装有service pack 2的windows xp操作系统(以下称为“windows xp sp2”)或运行mac os x 10.4.x操作系统的计算机。
根据所用的操作系统,操作可能有所不同。
2.以上示例中使用windows环境下的屏幕。
macintosh环境下的屏幕外观稍有不同。
1 从菜单浏览单击菜单框架中的某个标题。
内容框架中会出现相应的主题。
2 在内容框架中浏览(1)带有蓝色下划线的文本是本手册中相关章节的链接。
单击该链接跳转至相关页面。
3 打印本手册windows要打印某个主题,单击内容框架以确保其处于激活状态,然后单击打印按钮。
注释不激活内容框架而单击打印按钮可以打印菜单框架。
macintosh要打印某个主题,单击内容框架以确保其处于激活状态,然后在文件(file)菜单上选择打印...(print...),并单击打印(print)按钮。
注释不激活内容框架而单击打印(print)按钮可以打印菜单框架。
4 通过关键字搜索主题可以通过输入关键字搜索主题。
windows单击显示按钮。
在搜索屏幕中,输入关键字并单击列出主题按钮。
从搜索结果列表中选择要阅读的主题,然后单击显示按钮。
将显示该页面。
注释此功能搜索计算机上已安装的所有电子手册。
macintosh注释1搜索xxx:搜索当前电子手册。
* “xxx”表示本机的名称和电子手册的标题。
2搜索所有帮助:搜索计算机上安装的所有在线帮助。
5 本手册中使用的符号如果忽略这些说明,可能会由于不正确的设备操作,而导致死亡或严重的人身伤害。
为了能够安全地操作,必须留意这些警告。
如果忽略这些说明,可能会由于不正确的设备操作,而导致人身伤害或器材损坏。
Canon PIXMA MX368贲墨多功能一体机省钱绝对是每个用户都喜闻乐见的事,这不,佳能就对旗下的经典入门机型MX300 系列进行了小幅微调,新款MX368的功能配置进一步精简,从而带来的最直接变化就是产品售价的下降,不足千元的购买成本对于一款提供传真功能的机型来说很有亲和力。
MX368提供了打印、复印、扫描和传真四项基本功能,并配置了便于处理多页文档的ADF自动送稿器,同时它的打印质量还不错,文档和照片品质都令人满意,如果你并不需要将一体机连入网络共享使用,作为一款个人产品,MX368是个适合的选择,至少它在价格上很容易让人接受。
从MX318以来,MX300系列就保持了统一的外观风格,黑白相间的“专属”配色,圆润的机身线条,使你很容易在众多机型中分辨出它们。
MX368的体型保持得不错,凭借小巧的体积(458 x 415 x 198mm)它能很舒服地置于桌面上使用,而且它的重量(8.5kg也很轻,摆放和移动都十分自如。
MX368 的外观和控制面板配置均与老款机型没有太大差异,其30 页的ADF 依然巧妙地“隐藏”在扫描盖板内,使用过该系列产品的用户几乎不需要熟悉的过程就能很快上手。
控制面板的区域很大,几乎占了整个一体机的宽度,位于中央的是一个单色双行LCD显示屏何显示中文),屏幕的两侧分别是功能转换键和数字键区。
复印、扫描和传真这三项主要功能可通过面板上的功能快捷键进行转换,很容易操作,只是功能设置的快捷键较少,比如复印质量、尺寸、对比度等常用的复印设置均需要深入两至三级菜单后才能调整,其操控的便利性仍有待改善。
另外,由于显示屏没有提供背光照明,在较为昏暗的使用环境中,屏幕上的信息会较难辨识。
MX368提供了一个前置USB接口,支持PictBridge 数码相机直连照片打印功能(不支持从USB打印),并能方便地将扫描结果保存至U盘中。
扫描至U盘无疑是一项很便利的功能,它大大简化了扫描操作,而且用户在扫描时无需顾及驱动的安装,也回避了相对复杂的软件操作,只需在控制面板上进行简单的选择,即可轻松获得文稿的扫描件,是一项既实用又便利的功能。
密级:文档编号:佳能EOS系列相机模块使用说明郑州新开普电子股份有限公司总页数版本建立日期2013.07.19 编制人杨光远审核人批准人批准日期保管人存放位置文件修改控制*变化序号版本修改内容、页码及条款修改人批准人修改日期状态1 1.0.0.0 A 初稿杨光远2013-07-192 1.0.0.1 M 修改增加休眠时间设置杨光远2013.09.121系统支持的相机类型系统当前支持的类型如下:EOS 40DEOS-1Ds Mark IIIEOS DIGITAL REBEL Xsi/450D/ Kiss X2EOS DIGITAL REBEL XS/ 1000D/ KISS FEOS 50DEOS 5D Mark IIEOS Kiss X3/EOS REBEL T1i /EOS 500DEOS 7DEOS-1D Mark IVEOS-1D Mark IIIEOS Kiss X4/EOS REBEL T2i /EOS 550DEOS 60DEOS Kiss X5/EOS REBEL T3i /EOS 600DEOS Kiss X50/EOS REBEL T3 /EOS 1100D对应驱动说明:2.8驱动,支持450D、500D、550D、1000D2.9驱动,支持60D及2.8驱动2.10驱动,支持600D 1100D及2.9驱动2相机运行环境相机要求运行在:Windows XP (Home / Professional), Vista, 7 系统下3系统安装顺序1、安装相机软件(EOS Solution光盘,自定义安装)(此时要断开相机)2、重启系统后,连接相机到PC3、相机每次连接到PC后,原相机软件会自动运行,退出原厂家系统。
4、运行制卡中心。
5、在参数设置中设置相应的相机型号,如EOS系列相机6、选择EOS系列相机7、相机安装时,要向左则倒位安放(数据线向下方向)说明:如果安装后相机不可用,可以先行从公司ftp上(程序发布区/相机_佳能相机_驱动程序vX.X.rar),下载对应驱动,进行测试,如果依然存在问题,再行联系公司技术人员。
Canon PIXMA MX928喷墨多功能一体机作者:卢小雷来源:《个人电脑》2013年第05期速度与质量一直是一对互不相让的矛盾体,通常情况下,高品质输出对应的是低速度,而强调高速则不可避免地要在打印效果上做出些许让步。
例如,我们所熟知的照片一体机和商用一体机这两类侧重点截然不同的机型就是对此很好地诠释,对于前者输出效果是第一位的,它力求完美地再现原有画面,而商用机型的着眼点则多在性能表现上。
不过,佳能似乎一直在试图找到两者之间的平衡,在保证良好打印效果的同时,还能拥有令人满意的输出速度,看看佳能前几代MX系列机型,你会发现这种平衡的基因始终贯穿其中。
毫无疑问,作为MX系列的最新旗舰机型,MX928也同样具有该系列特有的魅力,它的速度表现或许略微低调,很难给人带来惊艳的感觉,但它的打印品质绝对可以算得上出类拔萃,无论是打印文档还是输出照片,它都能出色的呈现出来。
而且,新机型还强化了移动打印,并新增了多种规格的耗材可供选择,在操作便利性和成本控制方面都有不俗的表现。
MX928的外观基本延续了前代MX898的设计,无论是材质选用,还是造型结构都能依稀能看到MX898的影子。
要说最显著的变化也就是MX928的供纸系统,它与佳能本轮的其它一体机新品一样,都将机器后部的垂直进纸器移到了一体机的正面下方,一上一下组成双纸盒系统。
MX928的控制面板与MX898如出一辙,两者之间没有太大差异,它同样采用了一块3英寸的彩色液晶屏和16键的双功能智能操作面板。
双功能面板的视觉效果还是很不错的,按键的功能和背光显示会依据一体机当前的功能自行变换,在一定程度上的确可以实现引导用户进行操作的意图。
而且按键数量的减少,也使得控制区域更集中,能够更快地找到需要使用的按键。
MX928的直接打印功能相当丰富,它不仅支持PictBridge规范,可通过Wi-Fi与符合该标准的数码相机(目前支持无线PictBridge的数码相机并不算多,且基本上限于佳能品牌)无线直连打印,而且还能从智能手机(使用佳能iepp软件)或U盘上打印照片。
Trouble shooting for MFP(MX318 AS EXAMPLE)
3. 与此同时,在电脑上会显示如图提示:提示用户“无法识别以下墨盒—黑色 彩色”并提示用户取消打印。
4. 此时,忽略此信息,不要按任何“取消打印”或“关于墨水”等选项,如下图中提示,长按住“停止/重置”键6-7秒,之后你会听到“嘀”声后即可,表明打印机已将其中的一色重置成功。
2. 当出现U051的提示代码后,表明
打印机正在读取墨盒信息数据
5. 重置后,打印机屏幕会显示“稍等”的提示
6. 因为用户装的是双色墨盒,因此在重置第一次后,打印机将会提示用户下个“U162”的信息,表明彩色墨盒需要重置(如没有此提示,用户可忽略)
7. 按照如上步骤重置彩色墨盒6-7秒即可
彩色重置后打印机显示的信息
2次重置后,我司的墨盒便可在打印机上安全的使用
Edited by Alex
2012-3-21。