cubepro中文使用说明书
- 格式:pdf
- 大小:4.14 MB
- 文档页数:89
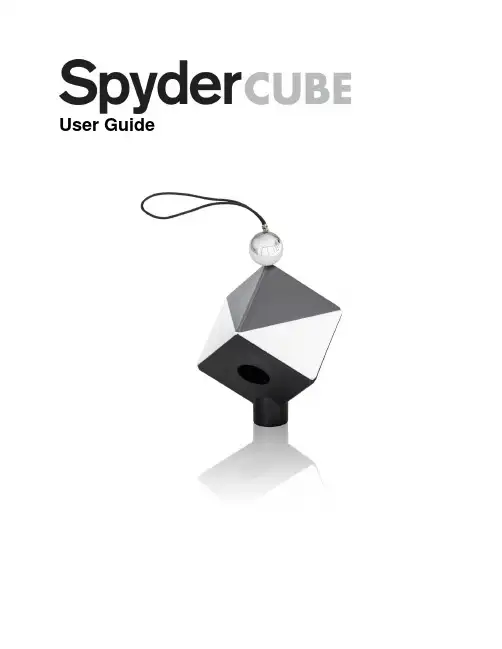
User GuideIntroduction (3)Why use the SpyderCUBE (4)Photographing the SpyderCUBE (5)Selecting the White Point in your Software (6)Setting the contrast range in your image (9)Apply Settings to multiple images (13)IntroductionThank you for purchasing your new Spyder®CUBE. This document will provide a step by step guide to getting the most out of using your SpyderCUBE to achieve proper color balanced photographs.Why use the SpyderCUBE?When creating digital photographs, you need to tell the software what the color temperature of the image is, measured in Kelvin. Every light source has a different Kelvin value, for example, the sun typically has a value of 5500-6500K while a fluorescent light can be anywhere from 3200-7500K and your typical household tungsten bulb can range from 2500-2900K and strobes are about 5200K. With such a wide range of color temperatures in your everyday photographic environments, you need a constant to show the software what neutral is.The SpyderCUBE is also very useful in post processing to help set your contrast range properly.Photographing the SpyderCUBEThe SpyderCUBE can either be handheld by the subject or an assistant, placed on a light stand or tripod, or placed on or hung from an object in the scene. Orient the SpyderCUBE with the chrome ball on top when taking a picture of it.SpyderCUBE on a “Selfie-Stick”:We recommend shooting the SpyderCUBE at the start of every new lighting scene as this will make your post production work easier.If you are shooting with sunlight, shoot a new picture of the SpyderCUBE periodically as the color temperature of the sun can change as the day progresses.Selecting the White Point in your SoftwareEvery processing software you are likely to be using like Adobe Photoshop, Adobe Lightroom, Capture One, etc. will have a tool for adjusting the White Balance of a picture, though they may have different names.-Adobe Lightroom: White Balance Selector-Adobe Photoshop Camera Raw: White Balance Tool-Capture One: Pick White BalanceAll of these tools have the same function, and that is to tell the software what is a neutral color in the scene, and this is where your SpyderCUBE comes in. Adobe Camera Raw:LightroomCapture One:When you are doing your processing, bring up the image that you captured with the SpyderCUBE in it. Using the white balance tool in your software, use the eye dropper to select the visually lightest grey face on the cube, the side facing the primary light source.Setting the contrast range in your imageIn addition to the grey faces on your SpyderCUBE, there are 4 other useful tools; the chrome ball, the white faces, the black face, and the black trap.When processing your images, you can use all of these tools to ensure you have the correct range of detail in your image. Turn on the over and under exposure warnings in your software. This will show you if any portion of your image is out of gamut, meaning if there is detail in the highlights and/or shadows that are too bright or too dark to be reproduced properly.Notice the slight overexposure warning on this image in the chrome ball:While it is okay to have a highlight warning on the chrome ball, you do not want to have the warning appear on the white faces:Next, keep an eye on the black faces and the black trap. It is okay to have a shadow warning on your black trap:You do not want to have the warning appear on the black faces:Once you have a properly exposed image, you can proceed to batch apply these settings to the rest of the images in this sequence.Apply Settings to multiple imagesOnce you have completed all image adjustments, you can proceed to batch apply these settings to the rest of the images in this sequence.In most programs, you can select this as the image to use to sync other images with.In some other programs, you will have to save the settings from the SpyderCUBE image as a preset to apply to your other images from the same lighting.Datacolor and Spyder are trademarks or registered trademarks of Datacolor.© Copyright 2016 Datacolor. All rights reserved.。

2010c u beLOW TiRe PReSSuRe WARninG LiGHT inSTRuMenT BRiGHTneSS cOnTROL* TWin TRiP OdOMeTeR*HeAdLiGHT And TuRn SiGnAL cOnTROL WindSHieLd WiPeR AndWASHeR SWiTcHSTeeRinG WHeeL SWiTcHeS fOR AudiOcOnTROL/BLueTOOTH®cRuiSe cOnTROLTiL T STeeRinGVeHicLe dYnAMic cOnTROL (Vdc)Off SWiTcHfueL-fiLLeR dOOR ReLeASeHOOd ReLeASe*AudiO SYSTeMfROnT PASSenGeR AiR BAGSTATuS LiGHTcLiMATe cOnTROL01 02 03 0405081206091314 0710110102030405090612070814 111013*See your Owner’s Manual for more information.This easy-to-use Quick Reference Guide is intended to help you more fully appreciate some of the unique features and functions of your new vehicle. However, it is not intended to replace your Owner’s Manual. The Owner’s Manual contains more detailed information to help you better understand the important safety warnings, features, operation and maintenance of your vehicle. All information, specifications, photographs and illustrations in this publication are those in effect at the time of printing. niSSAn reserves the right to change specifications or design without notice and without obligation.The niSSAn intelligent key™ allows you to lock or unlock your vehicle, opennOTe: it is important to make sure the intelligent key is with you (that is, inonce.01 Move the shift lever to the P (PARk) position and applyAcceSSORY POSiTiOnPress the ignition switch START/STOP button once without depressing the brake pedal to access the Acc position. This position activates electrical accessories such as the radio.Press the ignition switch START/STOP button a second time without depressing the brake pedal to access the On position. This position turns on the ignition switch and all electrical accessories.niSSAn inTeLLiGenT keY™ BATTeRY diScHARGeif the battery of the intelligent key is completely discharged, the Array intelligent key system warning light in the instrument panel blinks inyellow after pushing the ignition switch START/STOP button. To startthe engine with a discharged intelligent key, perform the followingprocedure:Move the shift lever to the P (PARk) position.firmly apply the foot brake.Touch the ignition switch START/STOP button with the intelligentkey. A chime will sound.Push the ignition switch START/STOP button while depressingthe brake pedal within 10 seconds after the chime sounds. Theengine will start.if the intelligent key system warning light in the instrument panel is blinking in green, replace the battery as soon as possible. This warning means that the intelligent key battery is almost discharged. nOTe: if the ignition switch is pushed without depressing the brake pedal, the ignition switch will change to the Acc position.OPeninG THe BAck dOORTo open the back door, unlock and pull the handle.unlock the back door using one of the following01 operations:Push the button on the keyfob or the intelligentkey twice.Push the back door Request Switch 01(if soequipped).Push the power door lock switch to the unlock position.insert the key into the driver’s door key cylinder and turn towards the rear of the vehicle twice.1B 04051A 02 030102AB STEERING WHEEL SWITCHES FOR AUDIO CONTROL/* (if socan be used to perform the following:switch for less than 1.5 seconds to changeswitch for more than 1.5 secondsswitch for less than 1.5 seconds to change tracks on a cd, iPod® orvolume control is a trademark of Apple inc., registered in the u.S. and other countries.6switch or tap the brake pedal.switch. The vehicle returns to the last set cruising speed when the vehicle speed is over 24 MPH (38 km/h).switch. The cRuiSe indicator light in AUTOMATIC CLIMATE CONTROL (if so equipped)01 AUTO BUTTONPress the AUTO button 01 . use the temperature control buttons 02 to set the desired temperature. This will allow the fan speed, air flow distribution and temperature to be automatically maintained at the selected temperature.T o disable auto mode, press the MODE button 03 , one of the fan speed control buttons 04 or the front defroster control button 05 .02 TEMPERATURE CONTROL BUTTONS Press the temperature control buttons 02 , up to increase the temperature or down to decrease the temperature.The temperature range is between 60°f and 90°f .0510040308090702010603MODE BUTTONPress the MODE button03to cycle through the following air flow outlets:Air flows from the center and side vents.Air flows from the center, side and foot vents.Air flows mainly from the foot vents.Air flows from the defroster and foot vents.Air flows mainly from the defroster vents.04FAN SPEED CONTROL BUTTONSPress the (slower) or (faster) button to adjust the fan speed.using the fan speed control buttons will disable the auto mode; to resume auto mode, press the AUTO button01.05DEFROSTING/DEMISTING FRONT AND SIDE WINDOWSPress the defroster control button to turn the system on. The A/c automatically turnson when the defroster mode is selected.use the temperature control buttons02to set the desired temperature.T o set the defroster on high, press the fan speed control button to increase the fanspeed to the maximum setting.06DEFROSTING REAR WINDOW AND OUTSIDE HEATED MIRRORS (if so equipped)Push the rear window defroster switch on.Push the rear window defroster switch again to manually turn the defroster off.This function automatically turns off after approximately 15 minutes.07A/C BUTTONPress the A/C button to manually turn the A/c on or off.08AIR RECIRCULATION BUTTONPress the air recirculation button to recirculate air inside the vehicle; the indicator light on the button will illuminate.The air recirculation mode can only be selected if the air flow mode control is in thefollowing positions: , or.Press and hold the air recirculation button for more than 2 seconds to set automatic control for the air recirculation and outside air circulation modes.09OUTSIDE AIR BUTTONPress the outside air button to draw fresh air into the vehicle; the indicator light on the button will illuminate.10OFF BUTTONPress the OFF button to turn the climate control system off.8FM/AM/SAT* RADIO WITH CD PLA YER (if so equipped)01SCAN BUTTONPress the SCAN button to stop at each broadcasting station (fM, AM or XM ®) for 5 seconds. Pressing the button again during this 5-second period will stop scan tuning and the radio willremain tuned to that station.02EJECT BUTTONPress the button. The cd will eject.03STATION SELECT BUTTONSY our radio is equipped with three separate banks, each with six station presets. choose a radio band AM, fM1 or fM2 using the FM/AM button. T une to the desired station using Seek/cAT or ScAn tuning. Press and hold any of the desired STATiOn SeLecTbuttons (1 - 6) until a beep is heard. The station is now set in memory.04RDM and 05RPT BUTTONSPress the RDM or RPT buttons to change the play pattern while listening to a cd or iPod ®/uSB.06SEEK/CAT BUTTONSTo scan through each broadcasting station, press the SEEK/CAT buttons.To skip from one track to another on a cd, iPod ® or uSB device, press the SEEK/CAT buttons.To rewind or fast forward a cd, iPod ® or uSB device, press and hold the SEEK/CATbuttons. Release the buttons to return to normal play.07FM/AM BUTTONPressing the FM/AM button will change the band to either AM, fM1 or fM2 radio stations.08CD BUTTONPress the CD button to play a cd.01030405070911100612020809AUX BUTTONPress the AUX button to play a compatible device such as an MP3 player when it is plugged into the AUX (auxiliary) jack. The AUX button is also used to play a device plugged into the USB jack. if there are devices plugged into both the AUX jack and the USB jack, pressing the AUX button will toggle between the two functions. if so equipped, you can also press the AUX button to access XM® SAT1 and SAT2 preset banks.nOTe: Y ou may need to adjust the volume on any compatible device plugged into the auxiliary jack to find the most desired sound level of the audio system.10ENTER/SETTINGS BUTTON AND11TUNE/SCROLL CONTROL DIAL T o manually tune the radio, turn the TUNE/SCROLL dial. if playing a cd that is formattedwith MP3/WMA folders, turn the TUNE/SCROLL dial to scroll through the available folders.To adjust the Bass, Treble, fade, Balance, Speed Sensitive Volume (SSV), Brightness,contrast and clock (On/Off) press the ENTER/SETTINGS button until the desiredmode is displayed, then turn the TUNE/SCROLL dial to adjust to the desired level.12iPod® PLA YER OPERATION (if so equipped)The USB jack is located in the lower center of the instrument panel. connect the cable that is supplied with your iPod® to the outlet, and then attach the other end of the cable to your iPod®. if compatible, the battery of your iPod® will charge during the connection to the vehicle.PLA YING AN iPod®The interface for iPod® operation shown on the vehicle center display is similar to the iPod®interface. The iPod® can only be operated by the vehicle audio controls while connected.Select the iPod® by using one of the following methods:Press the12iPod®/MENU button.Press the SOURCE select switch on the steering wheel.SEEK/CAT BUTTONS AND TUNE/SCROLL DIALPress the SEEK/CAT buttons while a track is being played; the next track or the beginning of the current track will be played.Press and hold either SEEK/CAT (rewind or fast forward) button for more than approximately1.5 seconds, the track will play while rewinding or fast forwarding. When the SEEK/CAT(rewind or fast forward) button is released, the track will return to the normal playing speed.Press the iPod MENU button, then use the TUNE/SCROLL dial to scroll through themenu (Playlists, Artists, Albums, Songs, Podcasts, Genres, composers and Audiobooks) and press ENTER to make a selection. The display will return to the previous menu or list screen each time the iPod MENU button is pressed.if the system is turned off while the iPod® is playing, the iPod® will start when the ON/OFF or iPod MENU button is pressed. depending on the iPod® or software version, some functions may not work as described.*XM® Satellite Radio is only available on vehicles equipped with optional XM® Satellite subscription service.jack cover, connect the uSB end of the cable supplied to the jack, then connect the other end of the cable to the iPod®. When the(if compatible) will01When the shift lever is moved to the R (ReVeRSe) position, the monitorellow 3 ft (1 m); Green 7 ft (2 m) and 10 ft (3 m).01switch again to activate the Vdc system. The The Vdc system is active while the vehicle is running until the switch is pushed to turn off.by a small adult, child or child restraint as outlined in the Owner’s Manual, the will illuminateair bag is OFF and will not inflate in a crash.When the front-passenger’s seat is occupied and the passenger meets the conditions outlinedto indicate that the front passenger air *When the system detects that the front-passenger’s seat is unoccupied, the front passenger air bag status light will not illuminate even though the front passenger air0101030202010101.o raise the seatback, lift up each seatback and push it to the upright position until it is latched. After raising the seatback, pull the seat belt buckles out of the seat cushion pockets until theyHANDS-FREE PHONE SYSTEM (if so equipped)button on the steering wheel to activate voice recognition.Speak in a clear and natural voice without pausing between words.To go back to the previous command, say “Go back” or “correction.”To cancel a voice recognition session, simply wait 5 seconds; say “cancel,” “Quit” or pressTo increase or decrease the volume of the voice prompts, press the VOL (volume) control switch or on the steering wheel or turn the POWER/VOLUME knob on theaudio system while the system is responding.if the Voice Recognition system does not recognize your voice commands, train the system using the Speaker Adaptation Mode. See your Owner’s Manual for detailed information.Some commands are not available while the vehicle is in motion.The “Help” command can be used in any menu to hear a list of available commands.Please refer to the cellular phone manufacturer’s Owner’s Manual for detailed information regarding your Bluetooth® phone.For recommended phones and detailed instructions, please visit/bluetooth.cOnnecTinG YOuR PHOneTo use the hands-free feature, you need to set up, or connect, the system to recognize your compatible cellular phone(s). five compatible Bluetooth®-enabled phones can be connected. After setup, the system automatically connects with a connected phone when the ignition is in the Acc or On position, as long as the phone is on and in the vehicle.nOTe: Some cellular phones require the user to enable the automatic reconnection feature. Please refer to the cellular phone manufacturer’s Owner’s Manual for Bluetooth® setup information. cOnnecTinG PROceduRenOTe: The vehicle must be stationary when connecting the phone.1. Press the button on the steering wheel. The system announces the available commands.2. Say “connect Phone.”3. The system acknowledges the previous command and announces the next set of availablecommands. Say “Add phone.”4. initiate connecting from the phone.The connecting procedure varies according to each cellular phone model. for detailedconnecting instructions and a list of compatible phones, please visit/bluetooth.When prompted for a Passkey code, enter “1234” from the handset. (The Passkey code is assigned by niSSAn and cannot be changed.)5. Say a name for the phone when the system asks you to provide one. Y ou can give the phonea name of your choice.MAkinG A PHOne cALL1. Press the button.2. After the tone, do one of the following:Say “call.” After the system responds, say the name of the person in the phonebook.Say “call Phone number.” After waiting for the tone, say [number]. for example, say “call Phone number.” After waiting for the tone, say “123-456-7891.”Say “Redial” to redial the previous phone number.16 Say “call Phone number.” After the system responds, say “Special number” to dial more than 10 digits or special characters.Y ou can say all the digits of a 7- or 10-digit phone number at one time.for a 10-digit number, saying the phone number in groups of 3, 3 and 4 digits may improve recognition for some speakers. To use this group dialing method, say only the first 3 digits of the phone number. After the system recognizes the number, it will request the next 3 digits and finally the last 4 digits.if a phone number is incorrectly recognized, you can try entering the phone number again using the 3-3-4 group dialing procedure by saying “correction.”When you have finished speaking the phone number wait for the system to repeat it back to you, then say “dial.”ReceiVinG/endinG A PHOne cALLWhen you receive a phone call, a ring tone sounds through the audio system.To accept the call, press the button. To reject the call, press the button.To hang up the phone at the end of a call or to disconnect during call placement, pressthe button.HOW TO SAY nuMBeRSniSSAn Voice Recognition permits numbers to be spoken in a variety of ways.Say “zero” or “oh” for “0.” example: 1-800-662-6200 – Say “one eight zero zero six six two six two oh oh.”Say “pound” for “#.” Say “star” for “*” (available when using the “call Phone number” then “Special number” command and the “Send” command during a call).Say “plus” for “+” (available only when using the “call Phone number” then “Special number”command).Say “pause” for a 2-second pause.uSinG YOuR PHOneBOOkWhen a compatible phone is connected to the system, the phonebook is automatically downloaded. This allows you to access your phonebook from the Bluetooth® system to call contacts by name. up to 1,000 phone numbers will be transferred. T o access your phonebook:1. Press the button and wait for the tone.2. Say “Phonebook.”3. Wait for the tone, then say [a name] or say “List names.” The name must be said exactly as itis entered in your phonebook for the system to recognize it. for example, say “Phonebook”then after the system responds, say “Michelle.”The phonebook can transfer multiple numbers for each entry. if you select a name with multiple numbers, the system will ask you which number you want to dial.17The system allows for up to 40 voice tags to be recorded. Y ou can record a voice tag for phone-book entries that the system has difficulty recognizing or to directly dial an entry with multiple numbers. To record a voice tag:1. Press the button and wait for the tone.2. Say “Phonebook.”3. Wait for the tone, then say [a name] or say “List names.” Select the name for which you want to record a voice tag.4. Say “Record name.”nissan, the nissan Brand Symbol, “SHifT_” tagline, Z and nissan model names are nissan trademarks.© 2009 nissan north America, inc.QR0e-0Z12u0Printing: October 2009 (03)。
Cube软件功能说明(2009-12-23 17:01:33)转载标签:cube软件特点功能仿真杂谈分类:软件交通Cube产品特点·Cube 是一套成熟的交通规划和控制软件,在世界各地广泛应用,尤其是在北美,欧洲,和亚洲的部分地区。
以下是Cube 的特点:·Cube 提供一套交通规划和模拟软件,可以满足用户各种不同的需要,其各个软件间相互互补,形成一个统一的整体。
·Cube 与GIS 紧密结合,为用户提供强大的图形界面。
Citilabs 和世界领先的GIS 公司ESRI 是合作夥伴关系,Cube 的软件可以直接应用ArcGIS 的数据文件,从而将交通规划和GIS 融为一体。
·Cube 与GIS 紧密结合,为用户提供强大的图形界面。
Citilabs 和世界领先的GIS 公司ESRI 是合作夥伴关系,Cube 的软件可以直接应用ArcGIS 的数据文件,从而将交通规划和GIS 融为一体。
·用Cube 进行交通规划分析,即可以用Cube 的程序语言来编写模型,也可以用流程图直观构造模型,便於用户理解和使用。
·Cube 具有开放式的结构,很容易与用其他语言编写的用户应用程序相连接。
·Cube 以最先进的交通规划和控制理论为基础,不仅可以用于传统的四步规划,改良的四步规划,还可用于新一代的activity-based 或tourbased的模型。
·Cube 适用于大规模的城市交通规划,其容许的小区数,节点数,道路数都能满足最大的都市地区的交通规划需求。
·Cube 内部采用优化的运算结构和高精度的数据存储方式,运算速度快,精确性高。
功能特性Cube Base 是一个集成的交通规划编辑系统,它包括道路网络,公交线路,矩阵,数据库和程序等编辑器。
多个窗口可以同时打开,提供直观的工具用于交通规划项目的设计,调整和模拟。
同时,它可以组织和管理不同的规划方案,也可以用GIS 的图形功能来显示和编辑输入输出文件。

中文简体使用手册亲爱的用户:非常感谢您选购这款CUBE产品。
我们衷心希望您能从中获得长久的享受。
祝愿您从该产品中获得最好的多媒体体验!本手册中包含的所有信息在出版时都是正确的。
但是,由于我们不断对产品进行更新和改进,因此在您设备上的软件,在外观和功能上可能与本手册中所描述的内容略有差别。
目录注意事项 (3)1. CUBE 基本功能 (4)1.1 CUBE 硬件配置----------------------------------------------------------------- 41.2 CUBE 软件配置----------------------------------------------------------------- 42. CUBE 设备描述 (5)2.1 触摸屏-------------------------------------------------------------------------- 52.2 Camera -------------------------------------------------------------------------- 52.3 Home键------------------------------------------------------------------------- 52.4 充电指示灯---------------------------------------------------------------------- 52.5 Menu键------------------------------------------------------------------------- 62.6 Back键--------------------------------------------------------------------------- 62.7 Mic孔---------------------------------------------------------------------------- 62.8 T-Flash卡------------------------------------------------------------------------ 62.9 Mini USB ------------------------------------------------------------------------- 62.10 电源拨钮----------------------------------------------------------------------- 62.11 Earjack -------------------------------------------------------------------------- 62.12 DC ------------------------------------------------------------------------------ 63. 首次使用CUBE (7)3.1 电池管理及充电------------------------------------------------------------------ 73.2 打开/关闭MID设备-------------------------------------------------------------- 73.3 与PC连接------------------------------------------------------------------------ 84. CUBE 设备基本操作 (8)4.1 主界面描述----------------------------------------------------------------------- 84.2 菜单界面描述-------------------------------------------------------------------- 104.3 状态栏描述---------------------------------------------------------------------- 104.4 使用触摸屏---------------------------------------------------------------------- 115. CUBE 设备基本设置 (12)5.1 无线控制------------------------------------------------------------------------ 125.2 声音和显示---------------------------------------------------------------------- 145.3 安全性和位置-------------------------------------------------------------------- 155.4 应用程序------------------------------------------------------------------------- 1615.5 SD卡和MID存储------------------------------------------------------------------ 165.6 日期和时间----------------------------------------------------------------------- 175.7 区域和文本----------------------------------------------------------------------- 175.8 触摸屏校准----------------------------------------------------------------------- 185.9 USB模式选择--------------------------------------------------------------------- 185.10 关于MID ------------------------------------------------------------------------ 186. CUBE 软件安装及管理 (19)6.1 APK安装器----------------------------------------------------------------------- 196.2 ES文件浏览器-------------------------------------------------------------------- 216.3 ES任务管理器-------------------------------------------------------------------- 226.4 应用市场------------------------------------------------------------------------ 237. CUBE 软件应用与操作 (23)7.1 图片浏览------------------------------------------------------------------------ 237.2 音乐播放------------------------------------------------------------------------ 257.3 视频播放------------------------------------------------------------------------ 277.4 电子书-------------------------------------------------------------------------- 287.5 将图片/音乐/视频等文件传输到CUBE 设备------------------------------------ 297.6 优酷----------------------------------------------------------------------------- 297.7 网络浏览器---------------------------------------------------------------------- 307.8 电子邮件------------------------------------------------------------------------ 317.9 网络聊天------------------------------------------------------------------------ 327.10 Google Map ------------------------------------------------------------------- 337.11 日历--------------------------------------------------------------------------- 347.12 计算器------------------------------------------------------------------------- 347.13 闹钟时钟----------------------------------------------------------------------- 347.14 天气预报----------------------------------------------------------------------- 358. CUBE 疑难解答 (35)2注意事项本手册包含重要的安全措施和正确使用产品的信息,以避免事故发生,确信在使用该产品之前仔细阅读该手册。
Products Solutions Services简明操作指南流量计Proline 500Modbus RS485科里奥利质量流量计(变送器部分)本文档为《简明操作指南》,不能替代设备随箱包装中的《操作手册》。
设备的《简明操作指南》由两部分组成:变送器的《简明操作指南》(第二部分)包含变送器信息。
传感器的《简明操作指南》(第一部分)→ 3KA01318D/28/ZH/03.22-00715819942022-08-01流量计 Proline 5002Endress+Hauser流量计 Proline 500流量计的《简明操作指南》Endress+Hauser 3流量计的《简明操作指南》仪表由一台变送器和一个传感器组成。
流量计的《简明操作指南》包含《传感器简明操作指南》和《变送器简明操作指南》,分别介绍了变送器和传感器调试操作:•第一部分:《传感器简明操作指南》•第二部分:《变送器简明操作指南》需要同时参照上述两本《简明操作指南》进行流量计调试,它们配套使用,互为补充:《传感器简明操作指南》(第一部分)《传感器简明操作指南》的文档对象是负责测量仪表安装的专业人员。
•到货验收和产品标识•储存和运输•安装《变送器简明操作指南》(第二部分)"《变送器简明操作指南》的文档对象是负责进行测量仪表调试、组态设置和参数设置的专业人员(直至获取第一个测量值)。
"•产品描述•安装•电气连接•操作方式•系统集成•调试•诊断信息其他设备文档本文档为《变送器简明操作指南》(第二部分)。
《传感器简明操作指南》(第一部分)的获取方式:•网址:/deviceviewer•智能手机/平板电脑:Endress+Hauser Operations App 详细设备信息参见《操作手册》和其他文档资料:•网址:/deviceviewer•智能手机/平板电脑:Endress+Hauser Operations App目录流量计 Proline 5004Endress+Hauser目录1文档信息 (5)1.1信息图标 (5)2安全指南 (7)2.1人员要求............................................................................72.2指定用途............................................................................72.3工作场所安全.........................................................................82.4操作安全............................................................................82.5产品安全............................................................................82.6IT 安全.............................................................................92.7设备的IT 安全........................................................................93产品描述 (10)4安装 (11)4.1安装变送器外壳......................................................................114.2旋转变送器外壳......................................................................134.3旋转显示模块........................................................................144.4盖板锁定...........................................................................154.5变送器的安装后检查..................................................................165电气连接 (17)5.1电气安全...........................................................................175.2接线要求...........................................................................175.3连接测量设备........................................................................215.4确保电势平衡........................................................................305.5硬件设置...........................................................................305.6确保防护等级........................................................................305.7连接后检查.........................................................................316操作方式 (32)6.1操作方式概述........................................................................326.2操作菜单的结构和功能.................................................................336.3通过现场显示单元访问操作菜单..........................................................346.4通过调试软件访问操作菜单.............................................................376.5通过Web 服务器访问操作菜单..........................................................377系统集成 (37)8调试 (38)8.1功能检查...........................................................................388.2设置显示语言........................................................................388.3设置测量设备........................................................................388.4写保护设置,防止未经授权的访问........................................................399诊断信息 (39)流量计 Proline 500文档信息1 文档信息1.1 信息图标1.1.1 安全图标危险状况警示图标。
3DSMax2012插件大全.MAXMATTER 印刷特效Atomizer 喷雾器特效Pandora 潘朵拉特效Bones Pro MAX 骨骼变形特效Sand Blaster 粒子系统Chameleon 变色龙特效Shag Fur 毛发特效Clay Studio 泥塑特效Splash MAX 水花溅起特效Clay Studio Pro 泥塑特效专业版Surface Tools 模型建立工具特效Comicshop 卡通化特效Texture Lab 质感实验室特效Fractal Flow MAX 画面扭曲特效Tree Factory 树木工厂MAX Glider 滑行器特效UltraShock 大震动特效Gradient 渐层特效Illustrate 2.0 勾边特效MetaReyes4.0 肌肉塑型特效Lightning 闪电特效DirtyReyes 风化老旧特效ClothReyes2.0 布的模拟特效JetaReyes 表情模拟特效CartoonReyes 卡通化特效24to30fps 这是一个将最后输出动画由每秒24帧提升到每秒30帧的插件,它会自动插入过渡帧adplate 一个广告牌插件,让你轻松的做出翻板的效果afrmat40 让你在普通的材质上使用光线追踪效果airfoil2 能让你方便的生成螺旋桨array2 后期合成中可以产生阵列的效果bgndcolor2 可在后期合成中定义背景blobmod 粘团插件blur20b2 后期合成中可以指定特定材质或物体进行模糊blurfire 模糊火焰,产生火炬等效果grid 新的栅格物体hair 强力的头发生成器,功能很强大,但计算量很大helicoi2 回旋体生成器hft 便利的图象滤镜工具HYPERMATTER 这是一个必须拥有的PLUGINS,能在MAX中实现soft body 让你的物体拥有动人的特性intspl 插入式样条曲线修改器killer2 堆积插件lag 滞后修改器lwoimp02 LightWave 物体导入插件maskmod 遮罩修改器max2iv 能将max文件转化为iv文件maxdir2 max场景浏览器,象windows的浏览器一样方便mesh2spl2 网格物体转变为样条曲线修改器meshtools 网格物体修改器工具mfr2 强大的物体修改器工具mli2max 为导入AutoCAD渲染材质而开发的插件bomb2 改进的标准爆炸brick 程序砖块材质插件calculat 后期合成编排插件ccube2 程序化的彩色立方体材质cellular 细胞插件chase 新粒子系统"追逐重力"colorcorrect_v20 色彩校正插件colorize 彩色化纹理combust2 先进的燃烧插件,包括节点燃烧,物体燃烧,粒子燃烧counter_v2_0 计数器插件counter2 后期合成中的视频计数器crosssec 交叉选择物体生成器directx out DirextX输出插件dots 杂点化程序材质druid 草皮生成器的限定版,功能很强大edge2spl 边界转变成样条曲线的修改器efxstair 楼梯生成器,非常好用ego_112 乐高拼装积木生成器emesh2r2 改进的EditMesh编辑器espline2 改进的EditSpline编辑器fastprts 粘稠超级粒子系统filters 三个后期合成插件calpha.flt(裁剪后期合成中图片的alpha通道),galpha.flt(裁剪后期合成中抖动模式图片的alpha通道),seebuf.flt(可以让你看见如ZBuffer、标准、材质标识等通道)flip2 后期合成中产生反转的效果footpaht 步迹插件,可配合"角色工作室"一起使用glowplus 增强的后期合成中的晕光插件grav 新增的三个空间扭曲重力系统gravity2 新增三个粒子系统gray2 灰化后期合成插件,能产生黑白动画mosaic2 后期合成马赛克插件mountain 山脉生成器ms1r2 表面修改工具noise2d 2DNoise修改器nspline 样条曲线法线修改器objexp 物体输出插件part 标准粒子物体增强版partlist 物体计算列表插件pathutil 路径控制插件pdisp 粒子系统置换修改器pgrav 重力粒子修改器pid 片面物体材质ID修改器plugmgr 插件管理器pmod 变形图修改器point3d 3D实点生成器polycount 多边形计数器ppaint 粒子物体材质器pspline 粒子曲线物体生成器push 能使衣服不和身体网格物体交叉的插件raymtl 光线跟踪材质rgb2 max-sgi SGI图片格式输入和输出插件rhinomax2imp 能输出Rhino 3DM文件格式roller 滚动控制器,能让你的车正确的沿路面滚动rotate2 后期合成中翻页效果rubik 魔方插件sbr2_072 空间扭曲物体新增"柔化爆炸"scatter 发生器生成器sgilogo SGI标志生成器shift2 变化修改器sketch 后期合成中草图效果snapshot 快照插件,使你可以脱离Biped控制spider 蜘蛛网插件,不用麻烦的画了splatter 飞沫材质插件sspot 柔化点光物体stamper 后期合成中生成个人印章的插件supelips2 超级椭圆生成器surround 环视浏览器,很方便看模型tess 镶嵌花纹生成器texporter2 往网格物体上贴图的工具thaw2 融化插件,效果很好.可以达到"终结者II"的效果tprint2 文字列表插件transplugin 半透明材质tvlines 后期合成中生成电视线的插件viewz2 检查Z缓冲的插件vp1r2 一组后期合成插件water2 能生成真实下雨涟漪的材质wing2 飞翼生成器zcomp Z缓冲Matte材质zfocus2 Z轴聚焦后期合成插件4D PAINT 能够让你直接在3D模型上随心所欲涂鸦一番的材质编辑工具包.请将fourd.dlu 拷到max/stdplugs目录下,这样才能直接将max场景导入4D PANIT.AEGIS 可以对MAX的任何粒子施加反射,发散等作用力AFTERBURN 能够生成真实的云,烟雾等等,效果十分好ALL PURPOSE PARTICLES 增强性的粒子系统ATOMIZER 能进行空间变形的粒子系统BONESPRO 创建骨架变形的PLUGINSCARTOONREYES 利用它能制作出广播级的卡通片COMICSHOP 十分优秀的生成2D CARTOON的pluginsCLOTHESREYES 用于模拟织物的运动,效果令人惊异,绝对值得一试Davinci3D 一个新出的建模工具,有很多独特的地方,十分值得尝试DIRTYEYE 能够将金光闪闪的物体神奇般的变成刚从垃圾堆中捡出的肮赃的石头FastPrts 是一个替代MAX本身的几个粒子系统的.作者称它能百倍提高metaparticle 的着色速度.我试了一下,果然快了许多FRACTFLOW 直接对生成的图象处理,可以实现涟漪,波动,热力等等效果.GENESIS 漂亮的光影效果HYPERMATTER 这是一个必须拥有的PLUGINS,能在MAX中实现soft body 让你的物体拥有动人的特性Illstr3 也是一个做CARTOON的PLUGINS.界面很漂亮JETAREYES 1 2 3 4用于做面部动画lcrt 能够平滑的观察你的场景,通过生成自己的格式.Lumetool Map 一个可能会改变你的用键习惯的pluginsMaxmatter 一组特殊的贴图材质,用于砖墙等MAXTRAX 可以作出各种轨迹,如车的滑痕等Maxtitle 文字处理MATHMAX 由数学公式决定你的空间变形METAREYES 能够计算出人体或动物的肌肉组织MORPHMAGIC PRO 专业级的动作变形软件,WESTWOOD的“银翼杀手”可是用它作的哦OUTBURST 3DSMAX上最强的粒子系统,强烈推荐PANMAX 几个特殊透镜的集合,如钻石,椭圆....proteus 一个新出的METABALL建模工具.最令人感兴趣的是它号称能直接把MESH物体转化为变形球radioray 这个版本里有几个灯光模型RAYGUN 专为MAX设计的光线追踪系统RAYMAX 为3D MAX设计的第一套光线追踪计算系统realpeople 利用贴图在场景中加入人,树等物体REALLENSFLARE 逼真的光照效果,能模拟各种太阳光照和其它光照效果procluster 利用粒子系统模拟云,雾,烟等效果SANDBLASTER 克隆专家,用它不用吹灰之力就能造出成千上百的小鸟、鱼群/将bong.dll 拷到max目录下.SHAG FUR 做毛发效果用的SPLASH 能产生“打水漂”的特效和水花飞溅的效果Smirk 和MORPHMAGIC一样.5M哦.SURFACE TOOLS 产生光滑的表面treedruid 可以做trees和grass.TREE FACTORY 有了它,可以打破“十年树人,百年造树”的老话——总而言之是个专业级的造树工具.将bong.dll拷到max目录下.Ultrashock 请到这儿看.X-RAY 很奇特的材质24TO30FPS 转换工具ACI2MAT 导入AutoCAD文件的工具BILLBOARD lookat控制器CARRERA 修改器COLORTAB DEM2MAX 对象生成工具DETACHER 拆卸器EXCLUDE 光线辅助工具FASTPRTS 粒子系统HSPLINE 修改器MAX20BJ MAYA(*.obj *.mtl)导出文件MLI2MAX 导入AutoCAD MOEBIUS 对象生成工具NURBSER 曲线工具OBJ2MAX MAYA(*.obj *.mtl)导入文件PANORAMAPARALLAX 过滤工具PARTLIST 对象编辑PATCHWORK 材质编辑器PROFILE 修改器类似与loft功能PSIALPHA 效果过滤PTEXTURE 设置粒子的编辑器RFIELDS 图象过滤工具ROLLER 路径工具SGILOGO SANPASHOTSOAPFILM SPIDER 产生蜘蛛网STICKS 编辑器TERRAIN 产生山及地带的工具TOYTRAIN 一个系统plugins VISTASCRWATER2 V3.1 材质工具XIDMARYCETHRU 光效工具GRADYENT 渐变编辑器AMBIENT 材质工具MIX Port ToolsMatID Mask 材质工具Progress HookSoft Selection Paint直接在Edit Mesh上上色的工具Supertape3DMAX的Video Post的插件,将动画由电影模式转为电视模式ACI2MAT 重新设置物体的材质为基础色,特别适用于CAD模型的导入BILLBOARD 一个增强的LOOKAT动画控制器(包括2D转化)CARRERA 增强的样条曲线修改器COLORTAB 用于创建ASCII色彩栏外的材质库DEM2MAX 用于输入数字化视图(Digital Elevation)贴图DETACHER 在网格物体上进行网面分离EXCLUDE 可以通过一个对象去设置灯光include或exclude的列表FASTPRTS 提供3DMAX超级粒子的重新编辑功能(包括完整帮助)HSPLINE 又一个spline增强编辑器INTERLACE 一个video post的插件,可以将影象进行交互处理生成立体环形图象MAX2OBJ 从3DMAX中导出Alias|Wavefront的OBJ和MTL文件MLI2MAX 可以从AutoCAD Render material libraries导入3DMAXMOEBIUS 可以产生moebius效果的录音NURBSER V3.1 修正了NURBS curve的一些错误OBJ2MAX V3.1 可以允许导入Alias|Wavefront的OBJ和MTL文件PANORAMA 用于渲染生成全景图象,可以用Live Picture's Viewer观看PARALLAX 这是提供一个渲染特效和Video Post的滤镜PARTLIST 可以将场景内的物体进行计算和分类(也适用于CAD)PATCHWORK V3.1 是一个类似于checker的贴图插件,可以用来定义圆形、三角和方形贴图PHOTOMETER 这是一个帮助插件,用于测量场景中色彩PROFILE V3.1 一个类似于lofter的场景修改器PSIALPHA 这是effect和video post的插件,用于制作alpha通道PTEXTURE 材质插件,根据粒子的速度和尺寸设置粒子的色彩RFIELDS 影象滤镜,反转图象顺序ROLLER 专用于控制对象的滚动动画(车轮,硬币等)SGILOGO 产生新的基本物体的插件SNAPSHOT 创建PRS 帧物体(子物体),使用导入混合图象产生新的动画SPIDER 画蜘蛛网的插件STICKS 一个网格对象修改器,编辑网格物体的边缘TERRAIN 专门用于建立地形和山峰TOYTRAIN V3.1 这是一个系统插件WATER2 V3.1 贴图插件,用于创建水波纹,水珠下落的动画贴图XIDMARY V3.2 增添一个立体摄像机DgMotionControl 1.0 Loads and applies Kuper motion control data to a Free Camera Illustrate! 5.1 FOR 3DMAX4的卡通插件(1.85MB)DgOverlay 1.0 Overlays text and data information on the final rendered image DgMagnify 1.0 Creates "fish eye lense" type distortions over an area of the image DIGIMATION.X-RAY.V1.6E 渲染工具加X-RAY独有的质材系统,又一渲染的好选择Seascape-max3 用来模拟波澜壮阔的大海的插件Lightscape for MAX3 PLUG 老牌的渲染巨匠为3DMAX/VIZ的插件Creature creator 顾名思义又一狂猛的MAX Plugin Manual,组合式的生物建模工具Mental ray 2.1 Mental ray 2.1本地完整版下载39MB是当今(最?)强大的渲染引擎.而它现在有了For 3DS Max3.x的版本4D PAINT 能够让你直接在3D模型上随心所欲涂鸦一番的材质编辑工具包,可以在三维物体上绘画各种贴图的插件SIS.SPECIAL.PURPOSE.PARTICLES.V1.2 能创建不计数量的characters ALL PURPOSE PARTICLES 增强性的粒子系统BONES PRO 创建骨架变形的PLUG-INSIncredible Comic Shop, for 3D Studio 3d max的卡通插件,利用它能制作出广播级的卡通片Simcloth 能模拟布料的仿真插件,很好用DIRTYREYES 能够将金光闪闪的物体神奇般的变成刚从垃圾堆中捡出的肮赃的石头GLIDER 特殊的空间变形特效插件JETAREYES 能让人摆出各种姿态LENZFX 能模拟出各种光照效果的插件,MAX2.0中内置MORPHMAGIC PRO 专业级的动作变形软件OUTBURST 原来是Softimage 的一个粒子系统插件,现在转移到3D MAX上了,3DSMAX 上最强的粒子系统RAYGUN 专为MAX设计的光线追踪系统DigiPeople 专门生成人物模型的的工具,想建造虚拟现实世界吗REALLENSFLARE 逼真的光照效果,能模拟各种太阳光照和其它光照效果thaw 制作融化效果,不错的插件fractflo 一个做波动效果的插件fire 顾名思义当然是做火的插件pwadruid 一个做树的插件,又是好东西Genesis 起源光效过滤器,能产生各种光线效果,如镜头光斑、光环、星云、激光、放电等SHAG HAIR 能给任何物体长出毛来LAMBSOFT.SMIRK.V1.5 又极好用的变形工具,制作口型的好帮手SURFACE TOOLS 产生光滑的表面TREE FACTORY 有了它,可以打破"十年树人,百年造树"的老话--总而言之是个专业级的造树工具Atomizer 可以对MAX的任何粒子施加反射,发散等作用力AFTERBURN2.5 AFTERBURN20 能够生成真实的云,烟雾等等,效果十分好ALL PURPOSE PARTICLES 增强性的粒子系统PARTICLE.STUDIO.V1.08e 能进行空间变形的粒子系统BONESPRO 创建骨架变形的PLUG-INS CARTOONREYES 利用它能制作出广播级的卡通片Illustrate! 3 3d max的卡通材质,十分优秀的生成2D CARTOON的plugins CLOTHESREYES 3-2.5 用于模拟织物的运动,效果令人惊异,绝对值得一试Davinci3D 一个新出的建模工具,有很多独特的地方,十分值得尝试.FastPrts 是一个替代MAX本身的几个粒子系统的.作者称它能百倍提高MetaReyes MAX的着色速度.我试了一下,果然快了许多.FRACTFLOW 直接对生成的图象处理,可以实现涟漪,波动,热力等等效果.Sand-max3.0 沙漠风暴插件,漂亮的质材粒子效果HYPERMATTER 这是一个必须拥有的PLUGINS,能在MAX中实现soft body 让你的物体拥有动人的特性.DIGIMATION.ILLUSTRATE.V5.FOR.3DSMAX 大名鼎鼎的粒子系统相信不用介绍了。
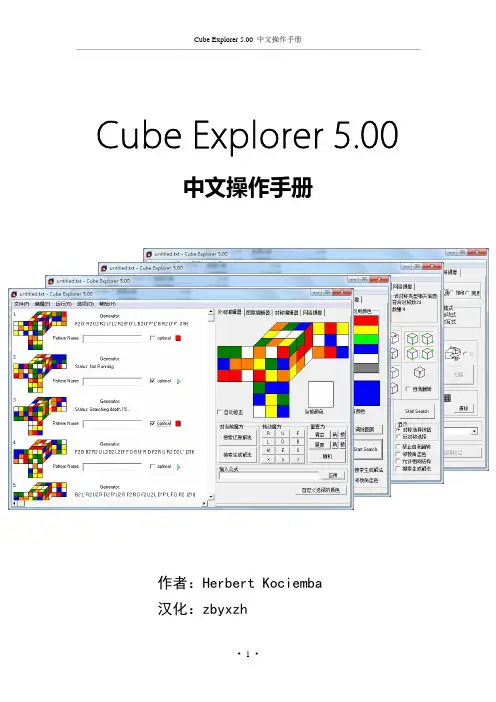
中文操作手册作者:Herbert Kociemba汉化:zbyxzh本手册的文字内容主要来源于Cube Explorer 5.00版附带的帮助文档,原作者为Herbert Kociemba。
考虑到实用性和普及率,本手册只对说明文档的“Overview”和“Exploring the Cube”部分进行了翻译。
“The Mathematics behind Cube Explorer”等章节的内容请参考后续的汉化资料。
本手册推荐配合Cube Explorer 5.00汉化版进行使用。
该汉化版下载地址为:/viewthread.php?tid=50160本手册汉化作者为zbyxzh,本汉化只为个人兴趣和技术交流所作。
欢迎大家就Cube Explorer的使用心得展开讨论和交流,也欢迎在本手册的发布帖上进行提问,我会尽己所能提供帮助!由于时间较紧,加上本人才疏学浅,翻译过程中难免出现错误和遗漏。
请各位朋友不吝赐教!我的E-mail:zbyxzh@zbyxzh2010年4月第一章 概述 ……………………………………………………………… 4 基本定义 ………………………………………………………… 5求解魔方的算法 ………………………………………………… 6二阶段算法简述 ………………………………………………… 8 第二章 魔方探索 ………………………………………………………… 10 了解Cube Explorer的设计 …………………………………… 10安装Cube Explorer…………………………………………… 11外观编辑器 ……………………………………………………… 12图案编辑器 ……………………………………………………… 14对称编辑器 ……………………………………………………… 16网络摄像页面 …………………………………………………… 19主窗口 …………………………………………………………… 23编辑菜单 ………………………………………………………… 25运行菜单 ………………………………………………………… 27选项菜单 ………………………………………………………… 28求解不完整魔方 ………………………………………………… 31Cube Explorer接口…………………………………………… 35使用帮助系统 …………………………………………………… 38 第三章 附录 ……………………………………………………………… 39Cube Explorer,并不像其他许多软件一样,仅能对魔方进行模拟,或者采取冗长的策略对打乱的魔方进行还原。
中文简体使用手册亲爱的用户:非常感谢您选购这款CUBE产品。
我们衷心希望您能从中获得长久的享受。
祝愿您从该产品中获得最好的多媒体体验!本手册中包含的所有信息在出版时都是正确的。
但是,由于我们不断对产品进行更新和改进,因此在您设备上的软件,在外观和功能上可能与本手册中所描述的内容略有差别。
目录注意事项 (3)1. CUBE 基本功能 (4)1.1 CUBE 硬件配置----------------------------------------------------------------- 41.2 CUBE 软件配置----------------------------------------------------------------- 42. CUBE 设备描述 (5)2.1 触摸屏-------------------------------------------------------------------------- 52.2 Camera -------------------------------------------------------------------------- 52.3 Home键------------------------------------------------------------------------- 52.4 充电指示灯---------------------------------------------------------------------- 52.5 Menu键------------------------------------------------------------------------- 62.6 Back键--------------------------------------------------------------------------- 62.7 Mic孔---------------------------------------------------------------------------- 62.8 T-Flash卡------------------------------------------------------------------------ 62.9 Mini USB ------------------------------------------------------------------------- 62.10 电源拨钮----------------------------------------------------------------------- 62.11 Earjack -------------------------------------------------------------------------- 62.12 DC ------------------------------------------------------------------------------ 63. 首次使用CUBE (7)3.1 电池管理及充电------------------------------------------------------------------ 73.2 打开/关闭MID设备-------------------------------------------------------------- 73.3 与PC连接------------------------------------------------------------------------ 84. CUBE 设备基本操作 (8)4.1 主界面描述----------------------------------------------------------------------- 84.2 菜单界面描述-------------------------------------------------------------------- 104.3 状态栏描述---------------------------------------------------------------------- 104.4 使用触摸屏---------------------------------------------------------------------- 115. CUBE 设备基本设置 (12)5.1 无线控制------------------------------------------------------------------------ 125.2 声音和显示---------------------------------------------------------------------- 145.3 安全性和位置-------------------------------------------------------------------- 155.4 应用程序------------------------------------------------------------------------- 1615.5 SD卡和MID存储------------------------------------------------------------------ 165.6 日期和时间----------------------------------------------------------------------- 175.7 区域和文本----------------------------------------------------------------------- 175.8 触摸屏校准----------------------------------------------------------------------- 185.9 USB模式选择--------------------------------------------------------------------- 185.10 关于MID ------------------------------------------------------------------------ 186. CUBE 软件安装及管理 (19)6.1 APK安装器----------------------------------------------------------------------- 196.2 ES文件浏览器-------------------------------------------------------------------- 216.3 ES任务管理器-------------------------------------------------------------------- 226.4 应用市场------------------------------------------------------------------------ 237. CUBE 软件应用与操作 (23)7.1 图片浏览------------------------------------------------------------------------ 237.2 音乐播放------------------------------------------------------------------------ 257.3 视频播放------------------------------------------------------------------------ 277.4 电子书-------------------------------------------------------------------------- 287.5 将图片/音乐/视频等文件传输到CUBE 设备------------------------------------ 297.6 优酷----------------------------------------------------------------------------- 297.7 网络浏览器---------------------------------------------------------------------- 307.8 电子邮件------------------------------------------------------------------------ 317.9 网络聊天------------------------------------------------------------------------ 327.10 Google Map ------------------------------------------------------------------- 337.11 日历--------------------------------------------------------------------------- 347.12 计算器------------------------------------------------------------------------- 347.13 闹钟时钟----------------------------------------------------------------------- 347.14 天气预报----------------------------------------------------------------------- 358. CUBE 疑难解答 (35)2注意事项本手册包含重要的安全措施和正确使用产品的信息,以避免事故发生,确信在使用该产品之前仔细阅读该手册。
ROBOGUIDE 仿真说明手册V1页脚内容11 简介---用ROBO PRO 软件控制慧鱼模型 (4)1.1 ...... ROBO Pro 的安装 (4)1.2 . 安装ROBO 接口的USB 驱动程序 (5)1.3 ............. 第一步 (8)2 .. 编程前的快速硬件测试 (12)2.1 ... 将接口板和电脑相连 .. (12)2.2 ..... 接口板的正确设置 .. (12)2.3 错误连接: 未与接口板建立连接? (14)2.4 . 各部分都工作正常吗 – 接口板测试 (14)3 . 级别一:第一个控制程序 (16)3.1 ....... 创制一个新程序 .. (16)3.2 ....... 控制程序的模块 .. (17)3.3 插入、移动和修改程序模块 (17)3.4 ....... 连接各程序模块 .. (20)3.5对首个控制程序的测试 21 3.6其他程序模块 (22)3.6.1时间延迟 ... 22 3.6.2等待输入 .... 23 3.6.3脉冲计数 .... 23 3.6.4循环计数 (24)3.7在线和下载操作的差别 244 .. 第二级: 用子程序控制 (28)4.1 ... 你的第一个子程序: .. (29)4.2 ......... 子程序库: (33)4.2.1 ...... 使用库: .. (33)4.2.2 使用你自己的库: (34)4.3 ...... 编辑子程序符号 (35)5 级别3: 变量,面板& 指令 (36)5.1 ......... 变量和指令 (36)5.2 .... 变量组和多个进程 .. (38)5.3 .............. 面板 .. (38)5.4 ............. 定时器 .. (42)5.5 .... 指令输入和子程序 .. (43)5.6 ........ 列表(阵列) .. (45)5.7 ............. 运算器 .. (46)6 扩展模块和多种接口的控制 (50)6.1 ........... 扩展模块 (50)6.2 ........... 多重接口 .. (50)6.3 在子程序中接口板的分配 (52)6.4 ........ 技巧 和窍门 .. (52)6.5 如何改变接口板序列号和固件版本号 (53)7 ......... 编程模块概览.. (55)7.1 ... 基本模块(第一级) (55)目录ROBOGUIDE 仿真说明手册V1页脚内容27.1.1 .......... 开始 . (55)7.1.2 .......... 结束 . (55)7.1.3 ....... 数字分支 . (55)7.1.4 ....... 模拟分支 . (56)7.1.5 .......... 延时 . (56)7.1.6 ....... 马达输出 . (57)7.1.7 .. 灯输出(第二级) (58)7.1.8 ....... 输入等待 . (59)7.1.9 ..... 脉冲计数器 . (60)7.1.10 .... 循环计数器 . (61)7.2 子程序 I/O (第 2-3级) (62)7.2.1 . 子程序入口(第二级) (62)7.2.2 . 子程序出口(第二级) (62)7.2.3 .. 子程序指令输入(第三级) (62)7.2.4 .. 子程序指令输出(第三级) (62)7.3 . 变量,列表 ... (第三级) .. (63)7.3.1 ....... 全局变量 . (63)7.3.2 ....... 局部变量 . (64)7.3.3 .......... 常量 . (64)7.3.4 ..... 定时器变量 . (65)7.3.5 .......... 序列 . (66)7.4 ....... 指令(第三级) .. (68)7.4.1 ...... = (赋值) . (69)7.4.2 ........ + (加) . (69)7.4.3 ....... – (减) . (69)7.4.4 ......... 向右 . (69)7.4.5 ......... 向左 . (69)7.4.6 ......... 停止 . (70)7.4.7 ......... 打开 . (70)7.4.8 ......... 关闭 . (70)7.4.9 ......... 文本 . (70)7.4.10 ..... 添加数值 . (70)7.4.11 ..... 删除数值 . (70)7.4.12 ..... 交换数值 . (71)7.5 . 比较,等待 ... (第三级) .. (71)7.5.1 . 判断 (带数据输入) (71)7.5.2 . 与固定值作比较 (72)7.5.3 ......... 比较 . (72)7.5.4 ......... 延时 . (72)7.5.5 ....... 等待... . (73)7.5.6 .... 脉冲计数器 . (73)7.6 ..... 接口板输入/输出 .. (74)7.6.1 .... 数字量输入 (74)7.6.2 .... 模拟量输入 . (74)ROBOGUIDE仿真说明手册V17.6.3..... 红外线输入 (76)7.6.4...... 马达输出 (76)7.6.5........ 灯输出 (77)7.6.6...... 面板输入 (79)7.6.7...... 面板输出 (79)7.7............. 运算器 .. (80)7.7.1..... 算数运算器 (80)7.7.2..... 逻辑运算器 (81)8 .. 面板模块和面板: 概览 (82)8.1............... 显示 .. (82)8.1.1.......... 仪表 (82)8.1.2... Text display文本显示 (83)8.1.3........ 指示灯 (84)8.2........... 控制模块 .. (85)8.2.1.......... 按钮 (85)8.2.2.......... 滑块 (86)9 ............ 绘图功能.. (88)页脚内容3ROBOGUIDE仿真说明手册V11简介---用ROBO PRO软件控制慧鱼模型你一定曾经问过自己,机器人是如何执行被分配的任务,看上去就象有一只无形的手在操纵它。


Abb. 1: proGAV Prüfi Abb.2 proGAV MasteriscproGAV KompassNeben dem proGAV Prüfi nstrumenteine weitere Möglichkeit, den eingestellten Öff-nungsdruck zu messen. Der proGAV Kompass wird über dem implantierten Ventil auf die Haut gesetzt und solange leicht kreisend bewegt, bis sich die innere Scheibe stabil ausrichtet. Der Öffnungsdruck entspricht dem in Richtung Abb. 3: proGAV Kompass4 Abb. 4: proGAV VerstellinstrumentAbb. 5b: proGAV VerstellkreiselAbb. 6: Das proGAV ist eine Kombination aus verstell-barer Differenzdruckeinheit und Gravitationseinheit.Im Folgenden wird der Aufbau des proGAV beschrieben. Abb. 7 zeigt eine schematische oGAV atische Gravitationseinheitverstellbare Differenzdruckeinheit 5646312Abb. 7: proGAV im Querschnitt1 Saphirkugel2 Stabfeder3 Rotor4 Tantalkugel5 Saphirkugel6 Konnektor unter dem KatheterAbb. 11: Röntgenbild der Gravitationseinheita) groß, 1 Ring = 20 cmH2O,KodierungsringUNVERBINDLICHE DRUCKSTUFEN-Einstellempfehlung für die verstellbare Differenzdruckeinheit Standard (Kinder und NPH-Patienten)Defensiv (z.B. Patienten mit extrem weiten Ventrikeln, Aquäduktstenosen oder stark erhöhtem ICP)Abb. 14a: Einstellung des proGAV Verstellinstruments Achtung: Der neu eingestellte Öffnungs-druck des Ventils sollte pro Einstellung nichtmehr als 8 cmH2O von dem gemessenenÖffnungsdruck abweichen, da es anderen-falls zu Fehlern kommen kann (siehe Erklä-rung unter 4.).Das proGAV Verstellinstrument wird zentriert auf das Ventil aufgesetzt. Dabei muss die Mar-kierung auf dem proGAV Verstellinstrument bzw. das Ablesefester in Richtung proximalem (zum Ventrikel führenden) Katheter zeigen.Ist das proGAV Verstellinstrument zentral auf dem Ventil positioniert, wird der Entriegelungs-knopf gedrückt und die Verstellspitze bewegt sich aus dem Boden des proGAV Verstellinstru-ment s. Damit wird im Ventil die mechanische Bremse gelöst und der gewünschte Öffnungs-druck eingestellt (Abb. 14b).a)b)Abb. 15a: Verstellung mit der proGAV VerstellscheibecbAbb. 15b: Aufsetzen und Andrücken der proGAV Ver-stellscheibe auf die verstellbare Differenzdruckeinheit cbAbb. 18: Röntgenbild Stellung 0 cmH2OFig. 1: proGAV Verifi Fig.2 proGAV MasterdiscproGAV CompassAlongside the proGAV Compassadditional device for measuring the adjusted opening pressure. The proGAV Compassbe used to locate the valve when palpation is not possible. The proGAV Compassthe skin over the implanted valve and moved inFig. 3: proGAV CompassAirbubbles inside the proGAV Compassnot affect its functionality!4 Fig. 4:proGAV Adjustment ToolFig. 5b: proGAV Check-mateFig. 6: The proGAV is a combination of an adjustable DP-unit and a gravitational unit.Federal law restricts this device to sale by or the silicone catheter (6) always allows a later disconnection of the catheter if necessary.by or discongravitational unitadjustable differential pressure unit (adjustable DP-unit)5646312Fig. 7: Schematic cross section of the proGAV1 sapphire ball2 bow spring3 rotor4 tantalum ball5 sapphire ball6 connector under the silicone catheterFig. 11: X-ray image of the gravitational unita) large, 1 ring = 20 cmH2O,coding ringRECOMMENDATION OF PRESSURE Standard (children and NPH-patients) Defensive ( (e.g. patients with extremelywide ventricles and highly elevated ICPor aqueductal stenosis)Special (e.g. patients with pseudotumorFig. 14a: Adjustment of the proGAV Adjustment Tool Caution: The new opening pressure set-ting of the valve must not differ from the measured opening pressure by more than 8 cmHO in any one setting (see Nr.4).2bcFig. 15a: Adjustment with the proGAV AdjustmentDiscFor changing the opening pressure, press down the proGAV Adjustment Disc and re-lease (Fig. 15b). Do not press and turn. Finally, remove the proGAV Adjustment Disc and confi rm the setting with the proGAV Verifi cation Tool.bcFig. 18: Radiograph pressure setting 0 cmH21: proGAV 测压工具 proGAV 控制盘proGAV 罗盘proGAV 罗盘旁边有一个附加装置,用于测量已调节开启压力后的阀门。
stm32cudeproammer 用法(原创实用版)目录1.STM32CubeIDE 简介2.STM32CubeMX 简介3.如何使用 STM32CubePROGMMER4.总结正文【1.STM32CubeIDE 简介】STM32CubeIDE 是一个基于 Eclipse 的集成开发环境 (IDE),专为STM32 微控制器开发人员设计。
该 IDE 旨在简化 STM32 微控制器的开发流程,提供丰富的功能和工具,包括代码编辑、调试、仿真和固件烧写等。
【2.STM32CubeMX 简介】STM32CubeMX 是一个图形化的微控制器配置工具,可以帮助开发人员快速配置 STM32 微控制器的各项参数,例如时钟、GPIO、中断和外设等。
使用 STM32CubeMX 可以生成初始化代码和配置文件,方便开发人员进行后续的开发工作。
【3.如何使用 STM32CubePROGMMER】STM32CubePROGMMER 是 STM32CubeIDE 中的一个插件,用于编程和配置 STM32 微控制器的 Flash 存储器。
使用 STM32CubePROGMMER 可以快速烧写固件到 STM32 微控制器,并支持多种烧写模式,例如烧写单个文件、烧写整个工程和批量烧写等。
以下是使用 STM32CubePROGMMER 进行固件烧写的步骤:(1) 创建一个新的 STM32CubeIDE 工程,并选择相应的 STM32 微控制器型号。
(2) 使用 STM32CubeMX 配置微控制器的各项参数,并生成配置文件。
(3) 在 STM32CubeIDE 中编写代码,并将代码保存到工程中。
(4) 在 STM32CubeIDE 中打开“Tools”菜单,选择“STM32CubePROGMMER”选项,然后选择“烧写固件”。
(5) 在弹出的烧写对话框中,选择要烧写的文件和目标微控制器,然后点击“烧写”按钮。
(6) 等待烧写完成,并在烧写成功后重新启动 STM32 微控制器。
Cube Cube Pro Cube G Cube Mini Cube 4nano Cube DJ Cube2-In / 2-Out Recording USB InterfaceCube Pro4-In / 4-Out Recording USB Interface4-In (1 Mic/1 Guitar) / 4-Out Recording USB Interface with S/PDIF and MIDI I/O Cube MiniCompact 2-In (1 Mic + Switchable Mic/Guitar In) / 2-Out Recording USB InterfaceIntroductionWhat's in the package Features Cube Cube Pro Cube G Cube Mini Cube 4Nano Cube DJ Front Panel Cube Cube Pro Cube G Cube Mini Cube 4Nano Cube DJRear Panel Cube Cube Pro Cube G Cube Mini Cube 4Nano Cube DJMac driver installation MAC Software control panel Windows driver installation Windows Control Panel Hardware Connections Cube Cube Pro Cube G Cube Mini Cube 4Nano Cube DJMinimum System Requirements Specifications Cube Cube Pro Cube G Cube Mini Cube 4Nano Cube DJServicesContents1CUBESeries12-72345678-118899101112-1512121314141526-2926272728282930-353031323334353616-171819-2122-2529Please follow the step-by-step procedures below to install your Cube series USB recording interface and its driver.12Turn on your MacNote: Do not connect the Cube series digital audio interface to your Mac yetInsert the provided driver CD into your CD-Rom.After you have inserted the provided Driver CD into your CD-Rom, a pop-up window should appear as shown in Diagram 1, then click on the"Mac” folder to open the installation files list. Click “ICON_Cube.mpkg”Diagram 23Welcome Screen appearsChoose "Continue" when you see the Welcome Screen shown in Diagram 34Set install locationClick the "Change install location” button if you would like to set your preferred install location, otherwise click the “Install” button.Diagram 3Diagram 4Diagram 55Installation startThe driver installation has started, please wait until the process has completed.16Diagram 1CUBESeriesDiagram 6 Diagram 7 Diagram 8 Diagram 9Software control panelCUBESeriesThe “Playback” and “Monitor” mixers work like a matrix mixer. Activate and adjust the correspondence input or output channel level. They are very useful and make your inputs and outputs very flexible. You may route any of your input(s) to any output(s).Playback Mixer18Hardware inputs level metering Cube – Ch 1,2 input level meteringCube Pro – Ch 1,2 & Ch 3,4 input level metering Cube G – Ch 1,2 & S/PDIF input level metering Cube Mini – Ch 1,2 input level meteringCube 4 Nano – Ch 1,2 & S/PDIF input level metering Cube DJ – Ch 1,2 & Ch 3,4 input level meteringShowing the input level for the hardware input channel.Hardware outputs level metering Cube – Ch 1,2 output level meteringCube Pro – Ch 1,2 & Ch 3,4 output level metering Cube G – Ch 1,2 & S/PDIF output level metering Cube Mini – Ch 1,2 output level meteringCube 4 Nano – Ch 1,2 & S/PDIF output level metering Cube DJ – Ch 1,2 & S/PDIF output level metering Showing the output level for the hardware output channel.Software outputs level metering Cube – Ch 1,2 output level meteringCube Pro – Ch 1,2 & Ch 3,4 output level metering Cube G – Ch 1,2 & S/PDIF output level metering Cube Mini – Ch 1,2 output level meteringCube 4 Nano – Ch 1,2 & S/PDIF output level metering Cube DJ – Ch 1,2 & Ch 3,4 output level meteringShowing the input level for the software input channel.Hardware outputs level metering Cube – Ch 1,2 output level meteringCube Pro – Ch 1,2 & Ch 3,4 output level metering Cube G– Ch 1,2 & S/PDIF output level metering Cube Mini – Ch 1,2 output level meteringCube 4 Nano – Ch 1,2 & S/PDIF output level metering Cube DJ – Ch 1,2 & S/PDIF output level metering Showing the output level for the hardware output channel.Monitor MixerPlayback MixerMonitor MixerWindows driver installationPlease follow the step-by-step procedures below to install your Cube series USB recording interface and its driver.12345Turn on your computerNote: Do not connect the Cube series digital audio interface to yourcomputer yetInsert the Driver CD into your CD-Rom.After you have inserted the providedDriver CD into your CD-Rom, anInstallation screen should appear asshown in Diagram 1, then click"Windows Driver” for thedriver installation"Note: If the Installationscreen do not appaerautomatically. Go to theCD folder anddouble click "Setup"Installation Wizard appearChoose "Next" when you see theWelcome Screen as Diagram 2shownLicense AgreementCheck mark the “I accept the termsin the License Agreement” andclick “Next”.Confirm driver installationA confirmation on the driverinstallation screen will appear,click “Next”.19CUBE SeriesDiagram 1Diagram 2Diagram 3Diagram 4Driver setupChoose the location of the driver and click "Next" as shown in Diagram 5678Diagram 5Diagram 6Software installation window A window as shown in Diagram 7 shoould appear. Choose "Install this driver software anyway"Note: Although this message appears, the Cube series driver is fully tested andsupports Windows XP, Vista & Windows 720Installation startThe installation process has started, the process may take some time depending on your computerperformance, please be patient and wait for the process to finish.Diagram 7Diagram 89Setup completedA window as shown in Diagram 8 should appear. Choose "Next”.CUBESeriesConnect your Cube series digital audio interfaceNow connect the Cube series digital audio interface to your computer's USB port and click "Finish".Note: Cube series audio interfaces only support USB 2.0. Your computer must have an USB2.0 port.Driver installation completedCube/CubePro/CubeG/Cube Mini/Cube 4 Nano/Cube DJ driver installation has completed and is ready to use.Diagram 910Note: For the latest driver updates please check 1211Installing device driver software The Cube driver is installingDiagram 10Launch the software control panel You may click the Cube logo on the system tray to launch the software control panel (Page 22).13Diagram 11Diagram 1221C U B ES e r i e sWindows Control PanelSample rate settingsSelect your desired sampling rate from 44.1KHz to 192KHz on the pull downwindow shown n Diagram 1. Click"Apply" after the selection has been made to set the value.Diagram 1Diagram 2Buffer Size settingsYou may select the buffer size for "Streaming" and "ASIO". Click "Apply" after you have made the selections.(Note: If a clicking sound occurs, youshould change to a larger buffer size for the settings. If the largest buffer size has been selected and there is still a clicking sound. It means your computer performance is not able to handle the task. (It is not caused by the Cube series digital audio interface)Diagram 3Device settingsShows the serial number & product ID of your Cube/Cube Pro/Cube G/CubeMini/Cube 4 Nano or Cube DJ device. If it doesn't show, it means your device is not properly installed. Please go through the “Driver Installation” process again (Page 19).Monitor MixerClick this button to launch the "Monitor Mixer" (Page 23)Playback MixerClick this button to launch the "Playback Mixer" (Page 24)S/PDIF Status and Pass Through (Cube G/Cube 4 Nano only)Showing the S/PDIF device signal status.S/PDIF Pass Through (Cube G/Cube 4 Nano only)"Tick" the box if you want S/PDIF signal pass through22CUBESeriesDiagram 423 Hardware inputs level metering– Ch 1,2 input level meteringCube Pro – Ch 1,2 & Ch 3,4 input level meteringCube G – Ch 1,2 & S/PDIF input level meteringCube Mini – Ch 1,2 input level meteringCube 4 Nano – Ch 1,2 & S/PDIF input level metering Cube DJ – Ch 1,2 & Ch 3,4 input level metering Showing the input level for the hardware input channel.23 Software outputs level metering– Ch 1,2 output level meteringCube Pro – Ch 1,2 & Ch 3,4 output level metering Cube G – Ch 1,2 & S/PDIF output level metering Cube Mini – Ch 1,2 output level meteringCube 4Nano – Ch 1,2 & S/PDIF output level metering Cube DJ – Ch 1,2 & Ch 3,4 output level metering Showing the input level for the software input channel.25789103456Virtual inputs level meteringCube - Virtual1,2 input level meteringCube Pro - Virtual1,2 & Virtual3,4 input level metering Cube G - Virtual1,2 input level metering Cube Mini - Virtual1,2 input level metering Cube 4 Nano - Virtual1,2 input level meteringCube DJ - Virtual1,2 & Virtual3,4 input level metering Showing the input level for the virtual input channel.Link switchSwitch to adjust both channels level simultaneously.Mute switchSwitch to mute the corresponding channel.“0dB” switchSwitch to instantly adjust the corresponding channel to “0dB” level.Gain control faderSlide to adjust the gain level for the corresponding channel.Inputs & Outputs Matrix switchesSwitch to turn On/Off the corresponding hardware input channel route to the corresponding hardware output channel. The matrix is very useful and makes your inputs and outputs very flexible. You may route any of your input(s) to any output(s).Inputs & Outputs Matrix Mixer "Tick" the box to activate the mixer.Inputs & Outputs Matrix Mixer Gain ControlAdjust the gain for the corresponding hardware channel.After finishing the adjustment, click "Close" to close the window.C U B ES e r i e sMac / PCMac / PCMac / PC Mac / PCMac / PCSpecifications (Measured at 48KHz Sample Rate)30Line Inputs 1/2(Unbanced):Frequency Response:.............................. 22Hz to 22kHz (+/-0.1dB) Dynamic Range: ......................................100dB, A-weightedSignal-to-Noise Ratio: .............................-100dB, A-weightedTHD+N: ....................................................<0.0061% (-90dB)Crosstalk: .................................................-100dB @ 1kHzNominal Input Level: ...............................Unbalanced: +4dBV, typical; Maximum Input level: .............................Unbalanced: +11dBV, typical; Input Impedance: ....................................10K Ohms, typicalLine Outputs 1/2 (Unbanced):Frequency Response: ..............................22Hz 22kHz (+/-0.1dB)Dynamic Range: .......................................102dB, A-weightedSignal-to-Noise Ratio: ...............................-102dB, A-weightedTHD+N: .....................................................<0.003% (-90 dB)Crosstalk: ..................................................-100dB @ 1kHzNominal Output Level: .............................Unbalanced: +4dBV, typical; Maximum Output Level: ...........................+11dBV, typical;Output Impedance: ..................................150 OhmLoad Impedance: ......................................600 Ohm minimumHeadphone Outputs: 1 & 2 (at Maximum Volume; Into 100 Ohm load): Frequency Response: ..............................22Hz to 22kHz (+/-1dB)Power into Ohms: ....................................90 mW into 100 OhmsTHD+N: ....................................................<0.06% (-66dB)Signal-to-Noise Ratio: ..............................-90dB, A-weightedMax Output Level into 100 Ohms: ...........+2.0dBV, typicalOutput Impedance: ..................................75 OhmLoad Impedance: .....................................32 to 600 Ohms CubeCUBE SeriesCube ProLine Inputs 1/4(Unbanced):Frequency Response:...............................22Hz to 22kHz (+/-0.1dB) Dynamic Range: ......................................100dB, A-weightedSignal-to-Noise Ratio: ..............................-100dB, A-weightedTHD+N: ....................................................<0.0061% (-90dB)Crosstalk: .................................................-100dB @ 1kHzNominal Input Level: ...............................Unbalanced: +4dBV, typical; Maximum Input level: .............................Unbalanced: +11dBV, typical; Input Impedance: ....................................10K Ohms, typicalLine Outputs 1/4 (Unbanced):Frequency Response: ..............................22Hz 22kHz (+/-0.1dB) Dynamic Range: .......................................102dB, A-weightedSignal-to-Noise Ratio: ..............................-102dB, A-weightedTHD+N: ....................................................<0.003% (-90 dB)Crosstalk: .................................................-100dB @ 1kHzNominal Output Level: ............................Unbalanced: +4dBV, typical; Maximum Output Level: ..........................+11dBV, typical;Output Impedance: .................................150 OhmLoad Impedance: .....................................600 Ohm minimumHeadphone Outputs: 1 & 2 (at Maximum Volume; Into 100 Ohm load): Frequency Response: ..............................22Hz to 22kHz (+/-1dB) Power into Ohms: ....................................90 mW into 100 OhmsTHD+N: ....................................................<0.06% (-66dB)Signal-to-Noise Ratio: ..............................-90dB, A-weightedMax Output Level into 100 Ohms: ...........+2.0dBV, typicalOutput Impedance: .................................75 OhmLoad Impedance: .....................................32 to 600 Ohms 31C U B ES e r i e sCube GMic1 / Inst2 Inputs (at Minimum Gain): Frequency Response: ..............................22Hz to 22kHz (+/-0.1dB) Dynamic Range: ......................................100dB, A-weighted Signal-to-Noise Ratio: ..............................-100dB, A-weighted THD+N: ....................................................<0.0061% (-90dB) Crosstalk: .................................................-100dB @ 1kHz Input Impedance: ....................................Inst in: 500K Ohms, typical; Mic in: 1.8K Ohms, typical Adjustable Gain: ......................................+34dB Total Gain Range: .....................................+50dBLine Inputs 1/2(Unbanced): Frequency Response: ..............................22Hz to 22kHz (+/-0.1dB) Dynamic Range: .......................................100dB, A-weighted Signal-to-Noise Ratio: ..............................-100dB, A-weighted THD+N: ....................................................<0.0061% (-90dB) Crosstalk: .................................................-100dB @ 1kHz Nominal Input Level: ...............................Unbalanced: +4dBV, typical; Maximum Input level: .............................Unbalanced: +11dBV, typical; Input Impedance: ....................................10K Ohms, typicalLine Outputs 1/2 (Unbanced): Frequency Response: ..............................22Hz 22kHz (+/-0.1dB) Dynamic Range: .......................................102dB, A-weighted Signal-to-Noise Ratio: ..............................-102dB, A-weighted THD+N: ....................................................<0.003% (-90 dB) Crosstalk: .................................................-100dB @ 1kHz Nominal Output Level: ............................Unbalanced: +4dBV, typical; Maximum Output Level: .........................+11dBV, typical; Output Impedance: .................................150 Ohm Load Impedance: .....................................600 Ohm minimumHeadphone Outputs: (at Maximum Volume; Into 100 Ohm load): Frequency Response: ..............................22Hz to 22kHz (+/-1dB) Power into Ohms: ....................................90 mW into 100 Ohms THD+N: ....................................................<0.06% (-66dB) Signal-to-Noise Ratio: ..............................-90dB, A-weighted Max Output Level into 100 Ohms: ..........+2.0dBV, typical Output Impedance: .................................75 Ohm Load Impedance: .....................................32 to 600 Ohms 32CUBE SeriesCube MiniInst1/2 & Mic2 Inputs:Frequency Response: ..............................22Hz to 22kHz (+/-0.1dB) Dynamic Range: ......................................100dB, A-weightedSignal-to-Noise Ratio: .............................-100dB, A-weightedTHD+N: ...................................................<0.0061% (-90dB)Crosstalk: ................................................-100dB @ 1kHzInput Impedance: ...................................Inst in: 500K Ohms, typical; Mic in: 1.8K Ohms, typical Total Gain Range: ....................................+45dBLine Outputs 1/2 (Stereo, Unbanced):Frequency Response: ..............................22Hz 22kHz (+/-0.1dB) Dynamic Range: ......................................102dB, A-weightedSignal-to-Noise Ratio: .............................-102dB, A-weightedTHD+N: ....................................................<0.003% (-90 dB)Crosstalk: .................................................-100dB @ 1kHzNominal Output Level: ............................Unbalanced: +4dBV, typical; Maximum Output Level: .........................+11dBV, typical;Output Impedance: .................................150 OhmLoad Impedance: ....................................600 Ohm minimumHeadphone Outputs: 1 & 2 (at Maximum Volume; Into 100 Ohm load): Frequency Response: ..............................22Hz to 22kHz (+/-1dB) Power into Ohms: ...................................90 mW into 100 OhmsTHD+N: ....................................................<0.06% (-66dB)Signal-to-Noise Ratio: .............................-90dB, A-weightedMax Output Level into 100 Ohms: ..........+2.0dBV, typicalOutput Impedance: .................................75 OhmLoad Impedance: .....................................32 to 600 Ohms 33C U B ES e r i e sCube 4NanoMic1 / 2 Inputs (at Minimum Gain): Frequency Response: .............................22Hz to 22kHz (+/-0.1dB) Dynamic Range: ......................................100dB, A-weighted Signal-to-Noise Ratio: ..............................-100dB, A-weighted THD+N: ....................................................<0.0061% (-90dB) Crosstalk: .................................................-87dB @ 1kHz Input Impedance: ...................................Mic in: 1.8K Ohms, typical Adjustable Gain: .....................................+34dB Total Gain Range: ....................................+50dBInst1 / 2 Inputs (at Minimum Gain): Frequency Response: ..............................22Hz to 22kHz (+/-0.1dB) Dynamic Range: ......................................100dB, A-weighted Signal-to-Noise Ratio: .............................-100dB, A-weighted THD+N: ...................................................<0.0061% (-90dB) Crosstalk: ................................................-87dB @ 1kHzInput Impedance: ...................................Inst in: 500K Ohms, typical; Adjustable Gain: .....................................+39dB Total Gain Range: ....................................+39dBLine Outputs 1/2 (Unbanced): Frequency Response: ..............................22Hz 22kHz (+/-0.1dB) Dynamic Range: ......................................102dB, A-weighted Signal-to-Noise Ratio: ..............................-102dB, A-weighted THD+N: ....................................................<0.003% (-90 dB) Crosstalk: .................................................-87dB @ 1kHz Nominal Output Level: ............................Unbalanced: +4dBV, typical; Maximum Output Level: .........................+11dBV, typical; Output Impedance: .................................150 Ohm Load Impedance: .....................................600 Ohm minimumHeadphone Outputs: 1 & 2 (at Maximum Volume; Into 100 Ohm load): Frequency Response: ..............................22Hz to 22kHz (+/-1dB) Power into Ohms: ...................................90 mW into 100 Ohms THD+N: ....................................................<0.06% (-66dB) Signal-to-Noise Ratio: .............................-90dB, A-weighted Max Output Level into 100 Ohms: ..........+2.0dBV, typical Output Impedance: .................................75 Ohm Load Impedance: .....................................32 to 600 Ohms 34CUBE SeriesCube DJMic Inputs (at Minimum Gain): Frequency Response: ..............................22Hz to 22kHz (+/-0.1dB) Dynamic Range: ......................................100dB, A-weighted Signal-to-Noise Ratio: .............................-100dB, A-weighted THD+N: ....................................................<0.0061% (-90dB) Crosstalk: .................................................-87dB @ 1kHz Input Impedance: ...................................Mic in: 1.8K Ohms, typical Adjustable ...............................................Gain: +34dB Total Gain Range: ....................................+50dBLine Inputs 1-4(Unbanced): Frequency Response: ..............................22Hz to 22kHz (+/-0.1dB) Dynamic Range: ......................................100dB, A-weighted Signal-to-Noise Ratio: .............................-100dB, A-weighted THD+N: ....................................................<0.0061% (-90dB) Crosstalk: ................................................-87dB @ 1kHz Nominal Input Level: ..............................Unbalanced: +4dBV, typical; Maximum Input level: ............................Unbalanced: +11dBV, typical; Input Impedance: ...................................10K Ohms, typicalPhono Inputs 1-4: Frequency Response: ..............................22Hz to 22kHz (+/-0.1dB) Dynamic Range: ......................................100dB, A-weighted Signal-to-Noise Ratio: .............................-100dB, A-weighted THD+N: ...................................................<0.0061% (-90dB) Crosstalk: ................................................-87dB @ 1kHz Nominal Input Level: ..............................Unbalanced: -29dBV, typical; Maximum Input level: ............................Unbalanced: -22dBV, typical; Input Impedance: ...................................47K Ohms, typicalLine Outputs 1-4 (Unbanced): Frequency Response: ..............................22Hz to 22kHz (+/-0.1dB) Dynamic Range: ......................................102dB, A-weighted Signal-to-Noise Ratio: .............................-102dB, A-weighted THD+N: ...................................................<0.003% (-90 dB) Crosstalk: ................................................-100dB @ 1kHz Nominal Output Level: ............................Unbalanced: +4dBV, typical; Maximum Output Level: .........................+11dBV, typical; Output Impedance: ................................150 Ohm Load Impedance: ....................................600 Ohm minimumHeadphone Outputs: 1 & 2 (at Maximum Volume; Into 100 Ohm load): Frequency Response: ..............................22Hz to 22kHz (+/-1dB) Power into Ohms: ...................................90 mW into 100 Ohms THD+N: ...................................................<0.06% (-66dB) Signal-to-Noise Ratio: .............................-90dB, A-weighted Max Output Level into 100 Ohms: ..........+2.0dBV, typical Output Impedance: ................................75 Ohm Load Impedance: ....................................32 to 600 Ohms35C U B ES e r i e sServicesIf your Cube series audio interface needs servicing, follow these instructions.1. Ensure the problem is not related to operation error or external systemdevices.2. Keep this owner's manual. We don't need it to repair the unit.3. Pack the unit in its original packaging including end card and box. This is very important. If you have lost the packaging, please make sure you have packed the unit properly. ICON is not responsible for any damage thatoccurs due to non-factory packing.4. Ship to the ICON tech support center or the local return authorization.U.S. OFFICE:ICON Digital Corp.2222 Pleasant View Road Suite #1Middleton, WI 53562 USAASIA OFFICE:ICON (Asia) Corp.Unit 807-810, 8/F., Sunley Centre,No. 9 Wing Yin Street, Kwai Chung, NT., Hong Kong.5. For additional update information please visit our website at: CUBE Series36。
COVER PAGE:!Lume Cube Quick Start Guide!PAGE 1:!HELLOCongratulations on your new Lume Cub e™. This Quick Start Guide will show you t h e fundamentals of capturing night imagery with your Lume Cube. Life does not stop when the sun goes down so why should you? See More. Do More. Be More.!JOIN US/lumecube/lumecube/lumecube/lumecubePAGE 2:!LUME CUBE APP•The Lume Cube App gives you ultimate control of your Lume Cube.•Capture and save photos and videos directly from the Lume Cube App.•Connect, operate and control individual or dual Lume Cubes.•Remotely access Brightness, Red Eye and Battery Levels.•Easily share your creations across Social Networks.•For the ability to control more than two cubes simultaneously and for access to additional features download the Lume Cube Pro App.Download your Lume Cube or Lume Cube Pro App from the iTunes App Store orthe Google Play Store. You can also watch an overview video of the Lume CubeApp at PAGE 3:!REGISTRATION!Register your Lume Cube to activate and sync with the Lume Cube App. This will ensure your waranty is validated and will give you immediate access to future product updates.Install and open the app. When prompted enter your name, email address and the serial number provided below or on the back of the packaging. Your done!PAGE 4:POWERCONTROLLeft Button - Press the Left (Video) Button to turn on video mode and to cycle through the 10 brightness settings.Right Button - Press the right (Flash) button to enable Bluetooth or hold for 3 seconds to enable the optical sensor. The Flash button will also turn o ff the video mode. PAGE 5 and PAGE 6MODES !Flash - Perfect for capturing still images or selfies with any of your casual capturedevices. To turn on the flash, open your Lume Cube App and look for the lightning bolt in the upper left corner. A blinking lightning bolt means you are not connected, a solid blue lightning bolt indicates the app and your Lume Cube have synced. If you are unable to connect please check to ensure the Bluetooth setting in your device is activated. You are now ready to use the flash.Video - Video mode provides a constant light source for your Smartphone, Action Cam or Digital Camera. Press the left button on top of your Lume Cube to turn on video mode. While the Lume Cube is in video mode click the left (video) button to cycle through the 10 brightness settings. The brightness levels are also completely adjustable through the app.•For best results please take the time to charge your Lume Cube before first use. •Access the charging port by unscrewing the waterproof USB cover counter clockwise. Connect, operate and control individual or dual Lume Cubes.•The top control buttons will illuminate. Red indicates charging, no lightindicates full charge.•When charging is complete, screw the USB cover firmly back into place ensuring a tight waterproof seal.Optical Slave - Optical slave mode allows your Lume Cube to detect additional light sources and fire simultaneously. Hold the right (Flash) button for 3 seconds to enable the Optical Slave. Or, open the Pro Mode in the Lume Cube Pro App to turn on the “Opto Trigger”. Next, position your main light source directly at the Lume Cube to trigger the flash when your main flash fires.Red Eye - The Red Eye mode will fire a sequence of short flashes before the final flash to reduce Red Eye in your images. This is best used in low light when taking portraits, selfies or group shots.WARRANTY PAGES:!LUME CUBE LIMITED WARRANTY!Who is covered:This warranty is extended only to the original end-use purchaser or the person receiving the product as a gift, and shall not be extended to any other person or transferee.!What is covered:Lume Cube warrants that this product, when delivered to you in new condition, in original packaging, from a Lume Cube authorized reseller or directly from Lume Cube and used in normal conditions, is free from any defects in manufacturing, materials and workmanship.!What is not covered:This warranty does not cover defects resulting from improper or unreasonable use or maintenance; failure to follow operating instructions; accident; excess moisture; power surges; connections to improper voltage supply;unauthorized alteration or modification of original condition; damages caused by inadequate packing or shipping procedures; loss of, damages caused by use with non-Lume Cube products; product that requires modification or adaptation to enable it to operate in any country other than the country for which it was designed, manufactured, approved and/or authorized,or repair of products damaged by these modifications; and products purchased from unauthorizeddealers.What we will do:During the warranty period, we will, at our sole option, repair or replace (using new or refurbished replacement parts) any defective parts within a reasonable period of time and free of charge.!What we will not do:Pay shipping, insurance or transportation charges from you to us, or any import fees, duties and taxes.What you must do to obtain Limited Warranty Service:Return product, with proof of purchase from an authorized Lume Cube dealer or from Lume Cube, using the following procedures. Contact the Lume Cube dealer or distribution organization in your country/region (visit Lume for contact information) for specific return and shipping instructions. Label and ship the product, freight prepaid, to the address provided by Lume Cube dealer or distribution organization. Place any necessary return authorization number prominently on the outside of the carton. Cartons not bearing a return authorization number, where required, will be refused. !Other Conditions:The provisions of this limited warranty are in lieu of any other warranty, whether expressed or implied, written of oral, including any warranty of merchantability or fitness for a particular purpose. Lume Cube,Inc. maximum liability shall not exceed the actual purchase price paid by you for the product. In no event shall Lume Cube,Inc. be liable for loss of, damage or indirect damages howsoever caused including without limitation the replacement of equipment and property. This warranty is void if the label bearing the serial number has been removed or defaced.!Australian Consumers:The benefits given by the Lume Cube limited warranty are in addition to other rights and remedies available to you. Our products come with guarantees that cannot be excluded under Australian Consumer Law. You are entitled to a replacement or refund for major failure and compensation for any other reasonably foreseeable loss or damage. You are also entitled to have the product repaired or replaced if it fails to be of the acceptable quality.PAGE 11:!SHAREWe truly can’t wait to see what you are inspired to create with your new Lume Cube.We’d love to see your photos & videos so please share with us on social media orupload your content to !PAGE 12:!SPECS1500 Lumen LED750 LUX @ 1MCRI - 80-85Color Temp: 6000K (+/- 5%)Run Time: 20+ Minutes in full power video mode. Mixed use 2+ hours.Charge Time: 60 minutesWaterproof to 100ft (30M)For more help and support visit !PAGE 13:!WARNINGS•The Lume Cube is VERY BRIGHT. Do not look directly into the LED.•Due to the nature of LED lighting, when used for extended periods of timethe Lume Cube will become hot to the touch. Use care when operating. Aninternal sensor will turn the cube off at 60° C / 140° F.•Use only with approved USB Charging devices.•Do not dispose of product in fire or expose to extreme heat.•Do not attempt to disassemble product. Removing the back casing will void warranty.•Not to be used for personal night vision or safety lighting. Designedspecifically for providing illumination for video and photographic activitiesonly.•Do not use the Lume Cube if the body had been cracked, punctured ordamaged by water. If water is able to enter the Lume Cube electrical failurewill result.。
文章题目:探索STM32CubeProgrammer的功能和用法一、STM32CubeProgrammer的简介1.1 STM32CubeProgrammer的定位和作用在嵌入式系统开发中,STM32CubeProgrammer是STMicroelectronics(ST)推出的一款全功能软件工具,旨在为开发人员提供高效和便捷的方式来编程STM32微控制器,以及对其进行调试和验证。
1.2 STM32CubeProgrammer的主要特点在使用STM32CubeProgrammer时,我们可以充分利用其丰富的特性,包括支持多种编程方式、广泛的微控制器支持、强大的调试功能和良好的界面友好性等,这些特点使得STM32CubeProgrammer成为嵌入式开发过程中不可或缺的一部分。
二、STM32CubeProgrammer的功能探索2.1 编程方式STM32CubeProgrammer支持多种编程方式,包括各类接口的下载和调试,例如ST-LINK、JTAG、SWD等,开发者可以根据实际需求来选择合适的编程方式。
2.2 微控制器支持当我们使用STM32CubeProgrammer进行开发时,不同型号的STM32微控制器都能得到充分的支持,这为我们的开发工作提供了更多的灵活性和选择空间。
2.3 调试功能在使用STM32CubeProgrammer进行开发时,我们可以通过该工具来实现对微控制器的调试和验证,这将帮助我们更快地发现并解决开发中的问题。
2.4 界面友好性STM32CubeProgrammer的用户界面设计得十分友好,使得开发者能够快速上手,并且更加高效地完成各项开发任务。
三、STM32CubeProgrammer的用法探讨3.1 基本操作流程在使用STM32CubeProgrammer时,我们首先需要根据实际开发需求,选择合适的编程方式,接着连接STM32微控制器与开发环境,然后进行对应的编程或调试操作。
RoboPro中⽂软件⼿册ROBOPro GB USA1简介---⽤ROBO PRO软件控制慧鱼模型2 1.1ROBO Pro的安装 (2) 1.2安装ROBO接⼝的USB驱动程序. 21.3第⼀步 (4)2编程前的快速硬件测试 (6)2.1将接⼝板和电脑相连 (6)2.2接⼝板的正确设置 (6)2.3错误连接: 未与接⼝板建⽴连接? . 72.4各部分都⼯作正常吗–接⼝板测试7 3级别⼀:第⼀个控制程序 (8)3.1创制⼀个新程序 (8)3.2控制程序的模块 (8)3.3插⼊、移动和修改程序模块 (8)3.4连接各程序模块 (10)3.5对⾸个控制程序的测试 (10)3.6其他程序模块 (11)3.6.1时间延迟 (11)3.6.2等待输⼊ (12)3.6.3脉冲计数 (12)3.6.4循环计数 (12)3.7在线和下载操作的差别 (12)4第⼆级: ⽤⼦程序控制 (15)4.1你的第⼀个⼦程序: (15)4.2⼦程序库: (18)4.2.1使⽤库: (18)4.2.2使⽤你⾃⼰的库: (18)4.3编辑⼦程序符号 (18)5级别3: 变量,⾯板& 指令 (20)5.1变量和指令 (20)5.2变量组和多个进程 (21)5.3⾯板 (21)5.4定时器 (23)5.5指令输⼊和⼦程序 (23)5.6列表(阵列) (25)5.7运算器 (25)6扩展模块和多种接⼝的控制 (28)6.1扩展模块 (28)6.2多重接⼝ (28)6.3在⼦程序中接⼝板的分配 (29)6.4技巧和窍门 (29)6.5如何改变接⼝板序列号和固件版本号29 7编程模块概览 (31)7.1基本模块(第⼀级) (31)7.1.1开始 (31)7.1.2结束 (31)7.1.3数字分⽀ (31)7.1.4模拟分⽀ (31)7.1.5延时 (31)7.1.6马达输出 (32)7.1.7灯输出(第⼆级) (32)7.1.8输⼊等待 (33)7.1.9脉冲计数器 (33)7.1.10循环计数器 (33)7.2⼦程序 I/O (第 2-3级) (34)7.2.1⼦程序⼊⼝(第⼆级) (34)7.2.2⼦程序出⼝(第⼆级) (34)7.2.3⼦程序指令输⼊(第三级) (34)7.2.4⼦程序指令输出(第三级) (34)7.3变量,列表 ... (第三级) (34)7.3.1全局变量 (35)7.3.2局部变量 (35)7.3.3常量 (35)7.3.4定时器变量 (35)7.3.5序列 (36)7.4指令(第三级) (37)7.4.1= (赋值) (38)7.4.2+ (加) (38)7.4.3– (减) (38)7.4.4向右 (38)7.4.5向左 (38)7.4.6停⽌ (38)7.4.7打开 (38)7.4.8关闭 (38)7.4.9⽂本 (38)7.4.10添加数值 (39)7.4.11删除数值 (39)7.4.12交换数值 (39)7.5⽐较,等待 ... (第三级) (39) 7.5.1判断 (带数据输⼊) (39) 7.5.2与固定值作⽐较 (39)7.5.3⽐较 (39)7.5.4延时 (39)7.5.5等待 (40)7.5.6脉冲计数器 (40)7.6接⼝板输⼊/输出 (40)7.6.1数字量输⼊ (40)7.6.2模拟量输⼊ (41)7.6.3红外线输⼊ (41)7.6.4马达输出 (41)7.6.5灯输出 (42)7.6.6⾯板输⼊ (42)7.6.7⾯板输出 (43)7.7运算器 (43)7.7.1算数运算器 (43)7.7.2逻辑运算器 (43)8⾯板模块和⾯板: 概览 (45) 8.1显⽰ (45)8.1.1仪表 (45)8.1.2Text display ⽂本显⽰ (45) 8.1.3指⽰灯 (46)8.2控制模块 (46)8.2.1按钮 (46)8.2.2滑块 (47)9绘图功能 (48)⽬录11简介---⽤ROBO PRO软件控制慧鱼模型你⼀定曾经问过⾃⼰,机器⼈是如何执⾏被分配的任务,看上去就象有⼀只⽆形的⼿在操纵它。