TunelabPro使用说明书
- 格式:doc
- 大小:34.00 KB
- 文档页数:8
Tunelab_pro教程(可编辑)安装与注册1.索取注册号:在PC机上运行“算号器”Key Generator,在“用户名”栏填上你的英语(拼音)名字、点击“确定”,这时“序列号”一栏即可出现与你输入名字相配套的“注册号”。
将“名字”和“注册号”用纸笔记录下来备用。
2.安装系统:运行tunelab_pro_setup.exe。
注意装文过程中界面除系统配置文件之外的一些附加文件(很有用的文件)安装路径及目录的提示,若不加更改的话,这些附加文件将会被默认安装到你PC机“我的文档”里。
3.注册:安装完成后,桌面上即有TuneLabPro的快捷方式,点击它、启动该系统。
点击左上第一行菜单栏的Help项,在下拉菜单中先“Enter License Infomation”,在出对话框的上面一行填上你的“名字”,下面一行填上索取到的“注册号”,然后点OK、再点确认,这时tunelab会自动退出,当再次启动系统时你的名字就会显示在主界面右的上角,以示注册成功。
tunelab 界面介绍然后说一下标准界面上所有的显示的意义(红色字体)A:相差显示,如果钢琴发出的声音偏低,则黑色块往左移动。
反之则往右移动B:所调的音的显示,如果你在调C1,则可以通过键入字母c,1,软件就会显示到C1了。
如果是#C1,则按大写C,1以此类推。
往旁边的音移动,可以通过按左右键来切换。
软件也有自动切换功能。
C:精度显示,这是一个白色小色带,如果钢琴的误差在1cent之外,则全白。
如果进入1cent范围之内,则色块会从外向内变灰。
灰色满了,也就是正好到位了。
D:光谱显示,道理同A,中间的红线为基准,左低右高。
一般在调中低音区的时候,看A区比较方便,而在调试最高的那几个音的时候,看D得显示则快捷多了。
校准步骤:首先,你需要有一个可靠的440赫兹的频率发生器(TuneLab使用交流群的“共享”里的‘UFO-频率发生器’即可下载到PC里、打开运行将界面频率值改设为440Hz并使其发响即可使用)。

翻译好的罗氏公司T u n e l试剂盒操作说明书SANY标准化小组 #QS8QHH-HHGX8Q8-GNHHJ8-HHMHGN#罗氏(R o c h e)公司T u n e l试剂盒操作说明书(Insitucelldeathdetectionkit-POD法)一、原理:TUNEL(TdT-mediateddUTPnickendlabeling)细胞凋亡检测试剂盒是用来检测组织细胞在凋亡早期过程中细胞核DNA的断裂情况。
其原理是荧光素(fluorescein)标记的dUTP在脱氧核糖核苷酸末端转移酶(TdTEnzyme)的作用下,可以连接到凋亡细胞中断裂DNA的3’-OH末端,并与连接辣根过氧化酶(HRP,horse-radishperoxidase)的荧光素抗体特异性结合,后者又与HRP底物二氨基联苯胺(DAB)反应产生很强的颜色反应(呈深棕色),特异准确地定位正在凋亡的细胞,因而在光学显微镜下即可观察凋亡细胞;由于正常的或正在增殖的细胞几乎没有DNA断裂,因而没有3‘-OH形成,很少能够被染色。
本试剂盒适用于组织样本(石蜡包埋、冰冻和超薄切片)和细胞样本(细胞涂片)在单细胞水平上的凋亡原位检测。
还可应用于抗肿瘤药的药效评价,以及通过双色法确定细胞死亡类型和分化阶段。
二、器材与试剂器材:光学显微镜及其成像系统、小型染色缸、湿盒(塑料饭盒与纱布)、塑料盖玻片或封口膜、吸管、各种规格的加样器及枪头等;试剂:试剂盒含:1号(蓝盖)EnzymeSolution酶溶液:TdT10×、2号(紫盖)LabelSolution标记液:荧光素标记的dUTP1×、3号(棕瓶)Converter-POD:标记荧光素抗体的HRP;自备试剂:PBS、双蒸水、二甲苯、梯度乙醇(100、95、90、80、70%)、DAB工作液(临用前配制,5μl20×DAB+1μL30%H2O2+94μlPBS)、ProteinaseK工作液(10-20μg/mlin10mMTris/HCl,pH7.4-8)或细胞通透液(0.1%TritonX-100溶于0.1%柠檬酸钠,临用前配制)、苏木素或甲基绿、DNase1(3000U/ml–3U/mlin50mMTris-HCl,pH7.5,10mMMgCl2,1mg/mlBSA)等。
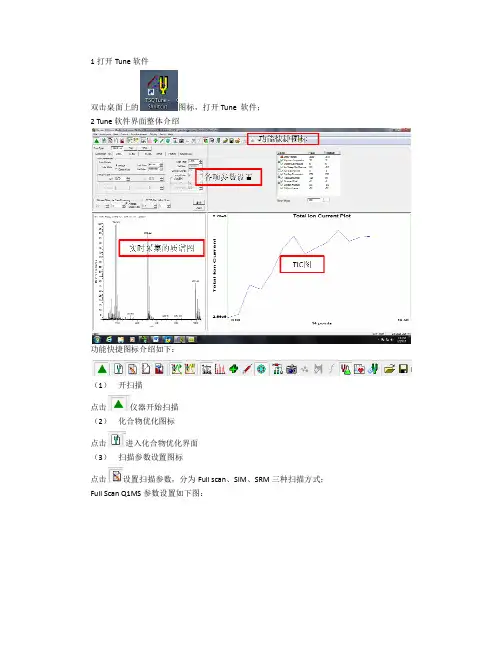
1 打开 Tune 软件双击桌面上的图标,打开 Tune 软件;2 Tune 软件界面整体介绍功能快捷图标介绍如下:(1) 开扫描 点击 仪器开始扫描(2) 化合物优化图标 点击 进入化合物优化界面(3) 扫描参数设置图标 点击 设置扫描参数,分为 Full scan、SIM、SRM 三种扫描方式;Full Scan Q1MS 参数设置如下图:Entry Mode 可选择 FM/LM(分别输入扫描范围起止的质荷比)或者 Center Mass(输入 center mass 和 scan width 一般用 20,表示以 center mass 为中心正负 10amu 的扫描范 围) b) Scan Time:扫描时间输入 1s c) Peak Width Q1:选择 0.7 d) Data Processing:选择 Average,输入 10 Full Scan Q3MS 参数设置如下图(具体设置同 Full Scan Q1MS) : a)MS/MS Parent 参数设置如下图:a) Entry Mode 可选择 FM/LM(分别输入扫描范围起止的质荷比)或者 Center Mass(输入 center mass 和 scan width 一般用 20, 表示以 center mass 为中心正负 10amu 的扫描范围) b) Scan Time:扫描时间输入 1 或 0.5s c) Peak Width Q1:选择 0.7 d) Charge State:输入 1e) Product Mass 输入要检测的子离子碎片的质荷比 f) Collision Energy:输入碰撞能量,一般用 25~35 g) Q2 CID Gas:输入 1.5 MS/MS Product 参数设置如下图:a) Entry Mode 可选择 FM/LM(分别输入扫描范围起止的质荷比)或者 Center Mass(输入 center mass 和 scan width 一般用 20, 表示以 center mass 为中心正负 10amu 的扫描范围) b) Scan Time:扫描时间输入 1 或 0.5s c) Peak Width Q1:选择 0.7 d) Charge State/Product Ion:输入 1 e) Parent Mass 输入要检测的母离子的质荷比 f) Collision Energy:输入碰撞能量,一般用 25~35 g) Q2 CID Gas:输入 1.5 h) Energy Ramp:输入 10~15 MS/MS Neutral Loss 参数设置如下图:a) Entry Mode 可选择 FM/LM(分别输入扫描范围起止的质荷比)或者 Center Mass(输入 center mass 和 scan width 一般用 20, 表示以 center mass 为中心正负 10amu 的扫描范围) b) Scan Time:扫描时间输入 1 或 0.5s c) Peak Width Q1:选择 0.7 d) Charge State/Product Ion:输入 1e) Neutral Loss Mass 输入中性丢失的分子量 f) Collision Energy:输入碰撞能量,一般用 25~35 g) Q2 CID Gas:输入 1.5 SIM 参数设置如下图:a) b) c) d) e)Scan Width:输入 2.0 Scan Time:扫描时间输入 1 或 0.5s Peak Width Q1:选择 0.7 Use Tuned Tube Lens Value:打钩 Mass:输入要检测的离子的质荷比SRM 参数设置如下图:a) b) c) d)Scan Width:输入 0.01 Scan Time:扫描时间输入 0.1s Peak Width Q1:选择 0.7 在表格中输入母离子质荷比、子离子质荷比、碰撞能量和 tube lens(4) 质量轴校正图标 (5) 仪器参数诊断图标 (6) TIC 图扫描图标 (7) TIC 图暂停扫描图标 (8) 谱图平均及噪音过滤图标 ,具体设置如下图:average 是指的谱图平均,Chrom Filter 指的是过滤电噪音,这两个参数可都用 10 (9) 谱图采集方式设置 Centriod (10) 正负扫描模式设置 (11) 注射泵开关 点击 打开注射泵,点击菜单栏 Setup 中的 Syringe Pump & Sample Loop 进入流速更改界 分为 Profile 和 Centriod 两种,一般一级用 Profile,二级用面,Flow Rate:5ul/min;Syringe Type:Hamliton;Volume:500ul。
初次使用此软件的朋友,看了猫版的介绍,再加上这个指南文件,上手应当很轻松了。
献给部分英文比我还糟的朋友,呵呵Using this tutorial 如何使用此指南This tutorial is meant to be used as a step-by—step guide to certain operations in TuneLab Pro。
本指南将一步一步的指导您在TuneLab Pro中的操作。
Many of these operations involve the keyboard。
有相当一部分操作涉及到键盘的使用。
However, the keys that you press when this tutorial is displayed do not always go to TuneLab Pro.然而,当此帮助页面显示时,您按下键盘键并不总是能够回到TuneLab Pro操作界面。
In fact, every time you call this tutorial and every time you click in it,the tutorial acquire s the ”focus" of the keyboard.实际上,每当您查看本指南或者在本指南显示的区域内操作鼠标时,焦点总是被当前的指南页面获得的. To make the keys go to TuneLa b Pro,you need to give the focus back to TuneLab Pro. 要想使用键盘来控制Tune Lab Pro的操作,您需要使焦点回到TuneLab Pro界面中. You can do that by clicking anywhere inside the TuneLab Pro window. 您可使用鼠标点击TuneLab Pro窗口来实现。

BAIARDO TUNE PRO操作手册感谢购买 WILSON BAIARDO TUNE PRO 。
Baiardo Tune Pro 是一款突破性的球拍诊断器,具有尖端技术、简洁设计和超高效率,是适用于全球各种类型球拍的调谐器。
主要功能包括:• 可测量重量、平衡、挥重、杆身弯曲、线床硬度、拍面挠度、水平弯曲和垂直弯曲,涵盖 7 项球拍运动: 网球、羽毛球、壁球、短柄墙球、笼式网球、匹克球和平台网球• 可同时测量重量和平衡• 首台可测量垂直弯曲的机器• 使用预测软件精确进行球拍定制• 易于校准,确保准确性和可重复性• 可保存多达 6 项球拍配置资料本手册提供了有关组装和使用 Baiardo Tune Pro 机器的基本信息。
要了解更多信息,请访问 /baiardo 。
谨上Baiardo 开发团队•BAIARDO TUNE PRO警告和注意事项 (4)组装机器 (4)零部件说明 (5)启动 (6)启动机器 (6)用户界面 (6)切换语言 (7)启动诊断 (7)基本操作提醒 (8)密码 (8)选择新密码 (8)基础构件 (9)执行器头部 (9)执行器端头 (9)称重传感器 (10)支杆 (10)手柄限制装置 (11)拍柄对齐凸轮 (12)挥重夹具 (12)垂直弯曲固定器 (13)匹克球拍面挠度固定器 (13)羽毛球杆身弯曲固定器 (13)操作机器 (14)常规触摸屏操作 (14)选择运动 (15)设置测试 (15)重量和平衡 (16)挥重测试 (17)线床硬度 (18)水平弯曲测试 (19)垂直弯曲测试 (20)羽毛球杆身弯曲测试 (21)匹克球拍面挠度 (22)测试说明 (23)保存测试 (23)调谐模式 (24)什么是调谐模式? (24)设置调谐模式 (24)使用实时调谐模式 (25)使用计算模式 (26)校准 (27)重量和平衡 (27)校准:挥重 (28)更换装置进行挥重校准 (28)校准:RA (29)维修、维护和故障排除 (30)保修须知 (31)保修范围 (31)获取保修服务和零部件 (31)BAIARDO TUNE PRO 产品规格 (32)警告和注意事项请保存此类说明。
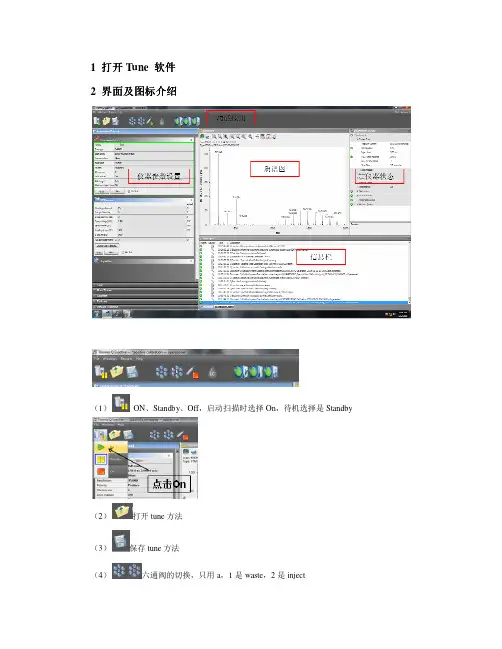
1 打开 Tune 软件 2 界面及图标介绍 界面及图标介绍(1)ON、Standby、Off,启动扫描时选择 On,待机选择是 Standby(2)打开 tune 方法(3) (4)保存 tune 方法 六通阀的切换,只用 a,1 是 waste,2 是 inject(5) (6)质谱注射泵,可以更改流速 三个灯都为绿色是正常状态,第 1 灯:指示仪器通讯是否正常,第 2个灯:指示仪器硬件状态是否正常,第 3 个灯:指示仪器的性能状态是否正常。
典型的变黄 原因有:校正过期。
建议重新校正,校正完成之后可恢复绿色。
将鼠标放在上述的灯上即可 显示变黄的信息提示。
3Instrument control 各项参数3.1 Scan parameters(1) Scan type:分为 Full MS-SIM 和 AIF-MS/MS; Full MS:一级全扫,要求 Last mass≤15*first mass SIM:当 full mass 的扫描范围小于 50 个质量数时,自动变为 SIM。
AIF:所有的离子全部碎裂,没有母离子的选择性,现在软件无法识别二级子离子是由哪个 母离子产生的,所以暂时不用这种方法。
MS/MS:设定 center/width,或者 scan range,这里设置的是母离子的质荷比; (2) Scan range:参考 scan type,scan type 中设置的是 full scan 时,这里设置全扫的质荷 比范围,如果 scan type 中选择的是 MS/MS,此处应设置子离子的扫描范围。
(3) Fragmentation:分为 source CID 和 NCE,一般做 full scan 时此项是关闭状态 Source CID:源内裂解,主要用于打开二聚体等非共价结合的键。
NCE:归一化碰撞能量。
仪器校正后,每个特定质荷比的离子都有一个对应将其打碎的能量 值,做小分子设为 35; (4) Resolution:分辨率代表仪器将不同质量数离子分开的能力,QE 可以达到 14 万,最 低分辨率为 1750。
LogicPro技巧1.导出键盘命令模板假设在自己的工作室里做一个项目,然后又需要到另一个工作室去完成混音工作,工作效率下降了。
但将使用的键盘命令模板导出,然后导入新的机器,能大幅提升工作效率。
只要记得保存替换前的模板,否则它们就再也找不回来了。
2.改变默认插件设置只要将任意一个喜欢的设置保存为名叫“#default”的patch文件就可以了。
现在当每一次载入软件乐器的时候,就会载入这个预置了。
记得备份最初的设置,以防以后可能会用得上。
这样做了以后,应该会节省很大一部分时间。
3.用tremolo实现自动声像变化(auto-pan)logic里并没有自动声像变化(auto-pan),但是可以将捆绑的tremolo插件转变为一个很棒的同步声像效果器。
只要确保相位(phase)设定在180度,对称值(symmetry)设定在50%,会发现马上就得到了自动声像变化的效果了。
现在再可以调下别的设置,看看有什么其他的变化。
4.简单易用的采样器使用logic里以loop为基础的工具时,最有用的一点就是能很快地切开loop,然后将结果传输给exs24采样器。
结果通常具有很强的回放能力,比如支持通过midi文件来回放其原有的形式。
要完成这个过程,只要在编配页面里,选择“音频(audio)”菜单,点击“将片段转换成新的采样轨道(convert regions to new sampler track)”。
它会帮助完成转换和其他所有的工作。
5.用颜色来编辑将所有的片段,轨道都用颜色编码。
做一个颜色编码的系统,在大脑里对它们进行分类,然后记住。
很快,当记住它们后,就有能力在看一眼的情况下知道某个工程里进行着什么样的项目。
6.链接利用插件中链接(link)按钮的优势可以节省屏幕的空间和防止视线的混乱。
启动链接(link)功能,所有的插件都会在同一个窗口中打开。
这个功能对于那些使用笔记本,屏幕空间很宝贵的人们来说,是非常实用的。

Great ideas need to be see n - and heard! TMProfessional, crystal-clear audio Includes ClearOne’s CONVERGE®Huddle CTH audioDSP mixer and Ceiling Mic Array for crystal-clear voice clarity and an unrivaled audio experience.Enhances Any Cloud-based AppAdd pro-quality audio and HD video to your app, such as COLLABORATE Space, Microsoft Teams, Zoom, WebEx, and GoToMeeting.Improve the BYOD experience in huddle spaces and small conference rooms by adding professional quality audio and video.COLLABORATE ® Versa TMPro 50APPLICATIONS• BYOD video conferencing • BYOD audio conferencing • In-room presentationWORKSPACES • Huddle spaces• Small meeting rooms • Executive offices> One CONVERGE® Huddle CTH audio DSP mixer for a professional audio experience > One Ceiling Microphone Array with360-degree coverage reducing noise and reverberation.> Clutter-free with optional CONVERGE Huddle VESA mount>One UNITE® 50 4K ultra-wide 120-degree ePTZ camera with 1080p30, and 3x digital zoom to capture all participants in a huddle space or small room.> Now, configure Versa Pro CT directly through the USB port, or use network Ethernet jack.> Monitor, control, and audit Versa Pro CT with CONVERGENCE TM unified AV network management software.> Complimentary 90-day trial ofCOLLABORATE Space, our powerful cloud-based video collaboration application with a full suite of audio, video, and meeting tools in a persistent space.Ceiling LoudspeakersCOLLABORATE ®Versa Pro 50Other product names and logos may be registered trademarks of their respective owners who do not necessarily endorse ClearOne or ClearOne’s products. All rights reserved. Information in this document subject to change without notice. DST-0160-001 Rev1.2 20200409 ©2020 ClearOne.SALES An D inq Uiri ESHeadquarters 5225 Wiley Post Way Suite 500Salt Lake City, UT 84116US & Canada Tel: +1.801.975.7200Fax: +1.801.303.5711international Tel: +1.801.975.7200*******************TechSupport Tel: +1.801.974.3760*************************SalesTel: +1.801.975.7200******************Versa Pro 150 using Room PC a display, with optional ClearOne Ceiling Loudspeakers2Other product names and logos may be registered trademarks of their respective owners who do not neces-sarily endorse ClearOne or ClearOne’s products. All rights reserved. Information in this document subject to change without notice. DST-0058-001 Rev2.6 20200617 ©2020 ClearOne.SALES AND INQUIRIESHeadquarters 5225 Wiley Post Way Suite 500Salt Lake City, UT 84116US & Canada Tel: 801.975.7200Fax: 801.303.5711International Tel: +1.801.975.7200*******************Tech Support Tel: 801.974.3760*************************SalesTel: 801.975.7200******************TM。

数字音频工作站Pro Tools LE教程上王磊PRO TOOLS 初级教程说明:本教程只适用于刚刚接触或正要学习PRO TOOLS的同学使用。
今天要给同学说一下在数字音频工作站领域中,最为流行并享有盛誉的音频软件Pro Tools(当然PRO TOOLS的高端产品视频功能也很强大,但我们这里只说音频这方面)。
由Digidesign公司出品的Pro Tools一直是录音行业所推崇的音频处理系统,专业版的TDM系统一般有Pro Tools 24 MIX Plus;Pro Tools 24 MIX;Pro Tools 24等;以及刚刚推出的Pro Tools HD系统。
Pro Tools的软件至今也已升级到6.9的版本。
还有最近出的两个小玩意MBOX和DIGI002。
我们所说的DIGI001系统是这些中最简单的一个,就是由简化版的PRO TOOLS LE软件加上硬件DIGI001组成。
简化版的Pro Tools我们称它为Pro Tools LE,由于绝大多数人都拿不出几十万人民币来购置一套带有硬件DSP功能的Pro Tools 的专业级系统,因此在这里我们就以简化版的Pro Tools 来详细介绍一下,几乎具备TDM系统的大部分重要功能的软件Pro Tools LE与硬件DiGi 001的具体使用。
首先我们先来认识它们:第一节Digi 001这个就是它了,(当然图中少了一块PCI的插卡,因为我没搞到它的图)Digi 001主要由外置接线箱(AD/DA转换器)和PCI插卡组成,中间用电缆连接,是一套真正的“即插即用”系统。
先看前面,在它的前面板上有两个Neutrik复合式(卡侬或大三芯通用)的Mic/LINE前级放大器,有独立的增益控制(GAIN),带有-26db的固定哀减(PAD)按钮,是专门为输入线路信号时使用的。
此外这两个接口还配有48V幻相供电(PHANTOM POWER),可直接接入需48V的电容话筒进行工作。
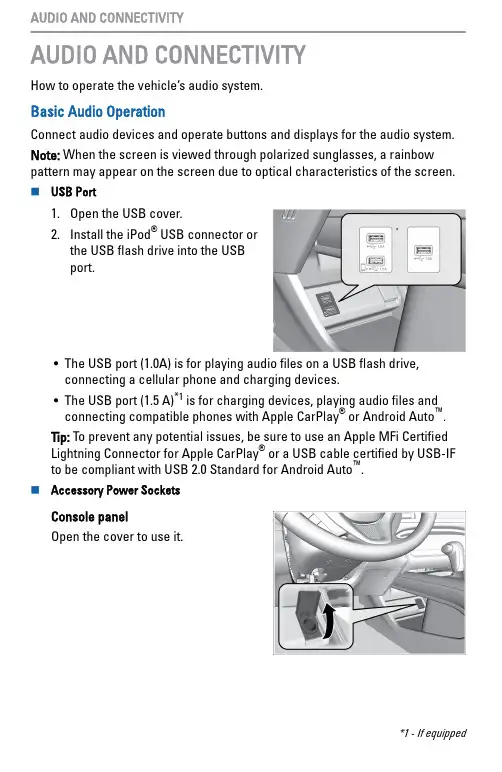
AUDIO AND CONNECTIVITYHow to operate the vehicle’s audio system.Basic Audio OperationConnect audio devices and operate buttons and displays for the audio system.Note: When the screen is viewed through polarized sunglasses, a rainbow pattern may appear on the screen due to optical characteristics of the screen.n USB Port1.Open the USB cover.2.Install the iPod ® USB connector or the USB flash drive into the USB port.•The USB port (1.0A) is for playing audio files on a USB flash drive,connecting a cellular phone and charging devices.•The USB port (1.5 A)*1 is for charging devices, playing audio files and connecting compatible phones with Apple CarPlay ® or Android Auto ™.Tip: To prevent any potential issues, be sure to use an Apple MFi Certified Lightning Connector for Apple CarPlay ® or a USB cable certified by USB-IF to be compliant with USB 2.0 Standard for Android Auto ™.n Accessory Power SocketsConsole panelOpen the cover to use it.*1 - If equipped AUDIO AND CONNECTIVITYRear of center consoleOpen the cover to use it.Canadian ModelsCargo area Open the cover to use it.Do not insert an automotive type cigarette lighter element. This canoverheat the power socket.AUDIO AND CONNECTIVITY。
Tunelab_pro教程(可编辑)安装与注册1.索取注册号:在PC机上运行“算号器”Key Generator,在“用户名”栏填上你的英语(拼音)名字、点击“确定”,这时“序列号”一栏即可出现与你输入名字相配套的“注册号”。
将“名字”和“注册号”用纸笔记录下来备用。
2.安装系统:运行tunelab_pro_setup.exe。
注意装文过程中界面除系统配置文件之外的一些附加文件(很有用的文件)安装路径及目录的提示,若不加更改的话,这些附加文件将会被默认安装到你PC机“我的文档”里。
3.注册:安装完成后,桌面上即有TuneLabPro的快捷方式,点击它、启动该系统。
点击左上第一行菜单栏的Help项,在下拉菜单中先“Enter License Infomation”,在出对话框的上面一行填上你的“名字”,下面一行填上索取到的“注册号”,然后点OK、再点确认,这时tunelab会自动退出,当再次启动系统时你的名字就会显示在主界面右的上角,以示注册成功。
tunelab 界面介绍然后说一下标准界面上所有的显示的意义(红色字体)A:相差显示,如果钢琴发出的声音偏低,则黑色块往左移动。
反之则往右移动B:所调的音的显示,如果你在调C1,则可以通过键入字母c,1,软件就会显示到C1了。
如果是#C1,则按大写C,1以此类推。
往旁边的音移动,可以通过按左右键来切换。
软件也有自动切换功能。
C:精度显示,这是一个白色小色带,如果钢琴的误差在1cent之外,则全白。
如果进入1cent范围之内,则色块会从外向内变灰。
灰色满了,也就是正好到位了。
D:光谱显示,道理同A,中间的红线为基准,左低右高。
一般在调中低音区的时候,看A区比较方便,而在调试最高的那几个音的时候,看D得显示则快捷多了。
校准步骤:首先,你需要有一个可靠的440赫兹的频率发生器(TuneLab使用交流群的“共享”里的‘UFO-频率发生器’即可下载到PC里、打开运行将界面频率值改设为440Hz并使其发响即可使用)。
使用说明书注意事项不当使用位置在以下位置使用本机可能造成故障。
• 阳光直射的位置• 极热、极冷、极潮湿的地方• 尘垢过多的场所• 振动过多的场所• 靠近磁场的位置电源应将指定的AC/AC电源线连至电压正确的交流电源,不应连至非本机设计电压的电源。
与其他电器的介面本机可能会对邻近的收音机、电视机造成干扰。
应在较远离收音机、电视机的位置操作本机。
小心使用不应对开关等控件过度用力,以免损坏。
小心保养机身外部沾污时应以干布拭抹,不应使用苯、香蕉水、清洁剂或易燃溶剂等液体清洗。
保存本说明书本说明书阅读后应予保存以便日后参阅。
确保异物不进入设备绝对不可将有液体的容器放在本机之上。
一旦有异物进入本机内部时,应拔除AC/AC电源,再联系就近的Korg或购买本机的分店。
THE FCC REGULATION WARNING (for U.S.A.)This equipment has been tested and found to comply with the limits for a Class B digital device, pur-suant to Part 15 of the FCC Rules. These limits are designed to provide reasonable protectionagainst harmful interference in a residential installation. This equipment generates, uses, and can radiate radio frequency energy and, if not installed and used in accordance with the instructions, may cause harmful interference to radio communications. However, there is no guarantee that interfer-ence will not occur in a particular installation. If this equipment does cause harmful interference to radio or television reception, which can be determined by turning the equipment off and on, the user is encouraged to try to correct the interference by one or more of the following measures:•Reorient or relocate the receiving antenna.•Increase the separation between the equipment and receiver.•Connect the equipment into an outlet on a circuit different from that to which the receiver isconnected.•Consult the dealer or an experienced radio/TV technician for help.Unauthorized changes or modification to this system can void the user’s authority to operate thisequipment.CE mark for European Harmonized StandardsCE mark which is attached to our company’s products of AC mains operated apparatus until Decem-ber 31, 1996 means it conforms to EMC Directive (89/336/EEC) and CE mark Directive (93/68/EEC).And, CE mark which is attached after January 1, 1997 means it conforms to EMC Directive (89/336/ EEC), CE mark Directive (93/68/EEC) and Low Voltage Directive (73/23/EEC).Also, CE mark which is attached to our company’s products of Battery operated apparatus means it conforms to EMC Directive (89/336/EEC) and CE mark Directive (93/68/EEC).数据处理操作不当或故障可引致记忆内容丢失,建议将重要数据储存至磁盘。
For life science research only. Not for usein diagnostic procedures. FOR IN VITRO USE ONLY.In Situ Cell Death Detection Kit, TMR redVersion April 2006Kit for detection and quantification of apoptosis (programmed cell death) at single cell level, based on labeling of DNA strand breaks (TUNEL technology): Analysis by fluorescence microscopy or flow cytometry.Cat. No. 12 156 792 910 1 Kit (50 tests) Store at Ϫ15 to Ϫ25°C1. PrefaceofContents1.1 Table (2)1. Preface1.1 Table of Contents 21.2 Kit Contents 32. Introduction (5)2.1Product Overview 5Information 82.2 Background3. Procedures and Required Materials (10)3.1Flow Chart 103.2Preparation of Sample Material 113.2.1Cell Suspension 113.2.2 Adherent Cells, Cell Smears, and Cytospin Preparations 123.2.3Tissue Sections 133.2.3.1 Treatment of Paraffin-Embedded Tissue 133.2.3.2 Treatment of Cryopreserved Tissue 153.3Labeling Protocol 163.3.1 Before you Begin 163.3.2 Labeling Protocol for Cell Suspensions 173.3.3Labeling Protocol for Adherent Cells, Cell Smears, Cytospin Preparations,and Tissues 183.3.4Labeling Protocol for Difficult Tissue 194. Typical results (20)5.Appendix (21)5.1Troubleshooting215.2 References 245.3 Ordering Information 251.2 KitContentsCaution The Label solution contains cacodylate, toxic by inhalation and swal-lowed, and cobalt dichloride, which may cause cancer by inhalation.Avoid exposure and obtain special instructions before use.When using do not eat, drink or smoke. After contact with skin, washimmediately with plenty of water. In case of accident or if you feelunwell seek medical advice immediately (show label where possible).Collect the supernatants from the labeling reactions in a tightly closed,non-breakable container and indicate contents. Discard as regulatedfor toxic waste.Kit Contents Please refer to the following table for the contents of the kit.Vial/CapLabel Contents1 blue Enzyme Solution•Terminal deoxynucleotidyl transferasefrom calf thymus (EC 2.7.7.31), recom-binant in E. coli, in storage buffer•10× conc.•5×50l2 red Label Solution•Nucleotide mixture in reaction buffer•1× conc.• 5 × 550 lAdditional Solutions Required In addition to the reagents listed above, you have to prepare several solutions. In the table you will find an overview about the equipment which is needed for the different procedures.Detailed information is given in front of each procedure.Procedure Equipment Reagents Preparation of sample material (section 3.2)•Cell suspension(section3.2.1)•Adherent cells, cell smearsand cytospin preparations (section 3.2.2.)•Cryopreserved tissue(section 3.2.3.2)•Shaker•V-bot-tomed 96-well micro-plate•Washing buffer: Phosphate bufferedsaline (PBS*)•Fixation solution: 4% Paraformaldehyde inPBS, pH 7.4, freshly prepared•Permeabilisation solution: 0.1% Triton X-100 in 0.1% sodium citrate, freshly pre-pared (6)Paraffin-embedded tissue (section 3.2.3.1)•Xylene and ethanol (absolute, 95%, 90%, 80%, 70%, diluted in double distilledwater)•Washing buffer: PBS*•Proteinase K*, nuclease free, working solution: [10–20 g/ml in 10 mM Tris/HCl, pH 7.4–8]Alternative treatments •Permeabilisation solution: (0.1% Triton1) X–100, 0.1% sodium citrate), freshly pre-pared•Pepsin* (0.25%–0.5% in HCl, pH 2) or trypsin*, 0.01 N HCl, nuclease free•0.1 M Citrate buffer, pH 6 for microwave irradiationLabeling protocol (section 3.3)Positive control (section 3.3.1)•Micrococcal nuclease or •DNase I recombinant*•Cell suspensions (section3.3.2)•Adherent cells (section3.3.3)•Parafilm orcoverslips•HumidifiedchamberWashing buffer: PBS*Difficult tissue (section 3.3.4)•Plastic jar•Microwave•Humidifiedchamber•Citrate buffer, 0.1 M, pH 6.0.•Washing buffer: PBS*•Tris-HCl, 0.1 M pH 7.5, containing 3%BSA* and 20% normal bovine serum1.2 KitContents,continued2. Introduction2.1Product OverviewTest Principle Cleavage of genomic DNA during apoptosis may yield double-stranded, low molecular weight DNA fragments (mono- and oligonu-cleosomes) as well as single strand breaks (“nicks“) in high molecularweight DNA.Those DNA strand breaks can be identified by labeling free 3’-OH ter-mini with modified nucleotides in an enzymatic reaction. Arraybreaks by terminal transferase.Application The In Situ Cell Death Detection Kit is designed as a precise, fast and simple, non-radioactive technique to detect and quantify apoptotic celldeath at single cell level in cells and tissues. Thus, the In Situ CellDeath Detection Kit can be used in many different assay systems.Examples are:•Detection of individual apoptotic cells in frozen and formalin fixedtissue sections in basic research.•Determination of sensitivity of malignant cells to drug induced apop-tosis in cancer research.•Typing of cells undergoing cell death in heterogeneous populationsby double staining procedures (6, 7).Specificity The TUNEL reaction preferentially labels DNA strand breaks gener-ated during apoptosis. This allows discrimination of apoptosis fromnecrosis and from primary DNA strand breaks induced by cytostaticdrugs or irradiation (3, 4).Test Interference False negative results: DNA cleavage can be absent or incomplete in some forms of apoptotic cell death (37). Sterical hindrance such asextracellular matrix components can prevent access of TdT to DNAstrand breaks. In either case false negative results may be obtained.False positive results: Extensive DNA fragmentation may occur in cer-tain forms of necrosis (38).DNA strand breaks may also be prominent in cell populations withhigh proliferative or metabolic activity. In either case false positiveresults may be obtained.To confirm apoptotic mode of cell death, the morphology of respectivecells should be examined very carefully. Morphological changes dur-ing apoptosis have a characteristic pattern. Therefore evaluation of cellmorphology is an important parameter in situations where there is anyambiguity regarding interpretation of results.Sample Material•Cell suspensions from•permanent cell lines (2, 27, 35),•lymphocytes and leukemic cells from peripheral blood (4),•thymocytes (1, 6),•bone marrow cells•fine needle biopsies (5)•Cytospins and cell smear preparations•Adherent cells cultured on chamber slides (31)•Frozen or formalin-fixed, paraffin-embedded tissue sections (1, 25,26, 29, 30, 32–34, 36, 39)Assay Time1-2 hours, excluding culture, fixation and permeabilisation of cells and preparation of tissue sections.Number of Tests The kit is designed for 50 tests.Kit Storage/ Stability The unopened kit is stable at Ϫ15 to Ϫ25°C through the expiration date printed on the label.Note: The TUNEL reaction mixture should be prepared immediately before use and should not be stored. Keep TUNEL reaction mixture on ice until use.Advantage Please refer to the following table.Benefit FeatureSensitive Detection of apoptotic cell death at single celllevel via fluorescence microscope and at cell pop-ulations via FACS analysis at very early stages (1,2, 6).Specific Preferential labeling of apoptosis versus necrosis(3, 4).Fast Short assay time (1–2 h).Convenient•No secondary detection system required.•One incubation and one washing step only.•Reagents are provided in stable, optimizedform.•No dilution steps required.•Application in combination with fluoresceinlabel possibleFlexible•Suitable for fixed cells and tissue. This allowsaccumulation, storage and transport of sam-ples (2, 5).•Double staining enables identification of typeand differentiation state of cells undergoingapoptosis (6).Function-tested Every lot is function-tested on apoptotic cells incomparison to a master lot.2.2 BackgroundInformationCell Death Two distinct modes of cell death, apoptosis and necrosis, can be dis-tinguished based on differences in morphological, biochemical andmolecular changes of dying cells.Programmed cell death or apoptosis is the most common form ofeukaryotic cell death. It is a physiological suicide mechanism that pre-serves homeostasis, in which cell death naturally occurs during normaltissue turnover (8, 9). In general, cells undergoing apoptosis display acharacteristic pattern of structural changes in nucleus and cytoplasm,including rapid blebbing of plasma membrane and nuclear disintegra-tion. The nuclear collapse is associated with extensive damage tochromatin and DNA-cleavage into oligonucleosomal length DNA frag-ments after activation of a calcium-dependent endogenous endonu-clease (10, 11). However, very rare exceptions have been describedwhere morphological features of apoptosis are not accompanied witholigonucleosomal DNA cleavage (37).Apoptosis Apoptosis is essential in many physiological processes, includingmaturation and effector mechanisms of the immune system (12, 13),embryonic development of tissue, organs and limbs (14), developmentof the nervous system (15, 16) and hormone-dependent tissueremodeling (17). Inappropriate regulation of apoptosis may play animportant role in many pathological conditions like ischemia, stroke,heart disease, cancer, AIDS, autoimmunity, hepatotoxicity and degen-erative diseases of the central nervous system (18–20).In oncology, extensive interest in apoptosis comes from the observa-tion, that this mode of cell death is triggered by a variety of antitumordrugs, radiation and hyperthermia, and that the intrinsic propensity oftumor cells to respond by apoptosis is modulated by expression ofseveral oncogenes and may be a prognostic marker for cancer treat-ment (21).Identification of Apoptosis Several methods have been described to identify apoptotic cells (22–24). Endonucleolysis is considered as the key biochemical event of apoptosis, resulting in cleavage of nuclear DNA into oligonucleosome-sized fragments. Therefore, this process is commonly used for detec-tion of apoptosis by the typical “DNA ladder” on agarose gels duringelectrophoresis. This method, however, can not provide information regarding apoptosis in individual cells nor relate cellular apoptosis to histological localization or cell differentiation. This can be done by enzymatic in situ labeling of apoptosis induced DNA strand breaks. DNA polymerase as well as terminal deoxynucleotidyl transferase (TdT) (1–6, 25–36) have been used for the incorporation of labeled nucleotides to DNA strand breaks in situ. The tailing reaction using TdT, which was also described as ISEL (in situ end labeling) (5, 35) or TUNEL (TdT-mediated dUTP nick end labeling) (1, 6, 31, 33) technique, has several advantages in comparison to the in situ nick translation (ISNT) using DNA polymerase:•Label intensity of apoptotic cells is higher with TUNEL compared to ISNT, resulting in an increased sensitivity (2, 4).•Kinetics of nucleotide incorporation is very rapid with TUNEL com-pared to the ISNT (2, 4).•TUNEL preferentially labels apoptosis in comparison to necrosis, thereby discriminating apoptosis from necrosis and from primary DNA strand breaks induced by antitumor drugs or radiation (3, 4).2.2 BackgroundInformation,continued3. ProceduresandR equired M aterialsThe working procedure described below was published by R. Sgoncand colleagues (6). The main advantage of this kit is the use of tetra-methyl- rhodamine- dUTP to directly label DNA strand breaks with redfluorescence. This allows the direct detection of DNA fragmentationin the red channel and secondary labeling with fluorescein in thegreen channel by flow cytometry or fluorescence microscopy.3.1Flow ChartAssay Procedure The assay procedure is explained in the following flow chart.Cell suspensionAdherentcells, cellsmears, andcytospinprepara-tionsCryopre-served tissuesectionsParaffin-embeddedtissue sections↓↓↓↓FixationDewaxation Rehydration Protease treat-ment↓↓↓Permeabilisation↓Labeling reactionwith TUNEL reaction mixture↓↓Analyze byflow cyto-metry or byfluores-cencemicroscopyAnalyze by fluorescence microscopy3.2Preparation of Sample Material3.2.1Cell SuspensionPrelabeling For dual parameter flow cytometry with fluorescein-conjugated anti-bodies, incubate the cells prior to fixation with the cell surface marker.Additional Buff-ers and Equip-ment Required •Washing buffer: Phosphate buffered saline (PBS)•Fixation solution: Paraformaldehyde (4% in PBS, pH 7.4), freshly pre-pared•Permeabilisation solution: 0.1% Triton X–100 in 0.1% sodium citrate, freshly prepared•Shaker•V-bottomed 96-well microplateNote:Use of a V-bottomed 96-well microplate minimize cell loss dur-ing fixation, permeabilisation and labeling and allows simultaneous preparation of multiple samples.Procedure Please find in the following protocol the procedure for cell fixation and permeabilisation.Note: Fix and permeabilisate two additional cells for the negative andpositive labeling controls.Step Action1Wash test sample 3 times in PBS and adjust to 2 × 10⁷cells/ml.2Transfer 100 l/well cell suspension into a V-bottomed 96-wellmicroplate.3Add 100 l/well of a freshly prepared Fixation solution to cellsuspension (final concentration 2% PFA).4Resuspend well and incubate 60 min at +15 to +25°C.Note:To avoid extensive clumping of cells, microplate should beincubated on a shaker during fixation.5Centrifuge microplate at 300 g for 10 min and remove fixative byflicking off or suction.6Wash cells once with 200 l/well PBS.7Centrifuge microplate at 300 g for 10 min and remove PBS byflicking off or suction.8Resuspend cells in 100 l/well Permeabilisation solution for2 min on ice (+2 to +8°C).9Proceed as described under 3.3.3.2.2 Adherent Cells, Cell Smears, and Cytospin PreparationsAdditional Solutions Required •Washing buffer: Phosphate buffered saline (PBS)•Fixation solution: 4% Paraformaldehyde in PBS, pH 7.4, freshly pre-pared•Permeabilisation solution: 0.1% Triton X-100 in 0.1% sodium citrate, freshly prepared (6)Procedure The following table describes preparations of adherent cells, cellsmears and cytospin.Note: Fix and permeabilisate two additional cell samples for the nega-tive and positive labeling controls.Step Action1Fix air dried cell samples with a freshly prepared Fixationsolution for 1 h at +15 to +25°C2Rinse slides with PBS.3Incubate in Permeabilisation solution for 2 min on ice (+2to +8°C).4Proceed as described under 3.3.3.2.3Tissue Sections3.2.3.1 Treatment of Paraffin-Embedded TissuePretreatment of Paraffin Embed-ded Tissue Tissue sections can be pretreated in 4 different ways. If you use Pro-teinase K the concentration, incubation time and temperature have to be optimized for each type of tissue (1, 29, 33, 36, 40, 41).Note: Use Proteinase K only from Roche Applied Science, because it is tested for absence of nucleases which might lead to false-positive results!The other 3 alternative procedures are also described in the following table (step 2).Additional Solutions Required •Xylene and ethanol (absolute, 95%, 90%, 80%, 70%, diluted in dou-ble distilled water)•Washing buffer: PBS•Proteinase K, PCR grade*, working solution: [10-20 g/ml in 10 mM Tris/HCl, pH 7.4-8]Alternative treatments•Permeabilisation solution: 0.1% Triton X–100, 0.1% sodium citrate, freshly prepared•Pepsin* (0.25% - 0.5% in HCl, pH 2) or trypsin*, 0.01 N HCl, nuclease free•0.1 M Citrate buffer, pH 6 for the microwave irradiationProcedure In the following table the pretreatment of paraffin-embedded tissuewith Proteinase K treatment and 3 alternative procedures aredescribed.Note: Add additional tissue sections for the negative and positivelabeling controls.Step Action1Dewax and rehydrate tissue section according to standardprotocols (e.g., by heating at +60°C followed by washing inxylene and rehydration through a graded series of ethanol anddouble dist. water) (1, 33, 36).2Incubate tissue section for 15–30 min at +21 to +37°C withProteinase K working solution.Alternatives:Treatment:1. Permeabilisa-tion solutionIncubate slides for 8 min.2. Pepsin* (30, 40)or trypsin*15–60 min at +37°C.3. Microwave irra-diation •Place the slide(s) in a plastic jar containing 200 ml 0.1 M Citrate buffer, pH 6.0.•Apply 350 W microwave irradia-tion for 5 min.3Rinse slide(s) twice with PBS.4Proceed as described under 3.3.3.2.3.1 Treatment of Paraffin-Embedded Tissue, continued3.2.3.2 Treatment of Cryopreserved TissueAdditional Solutions required •Fixation solution: 4% Paraformaldehyde in PBS, pH 7.4, freshly pre-pared•Washing buffer: PBS•Permeabilisation solution: 0.1% Triton X–100, 0.1% sodium citrate, freshly preparedCryopreserved Tissue In the following table the pretreatment of Cryopreserved tissue is described.Note: Fix and permeabilisate two additional samples for the negative and positive labeling controls.Step Action1Fix tissue section with Fixation solution for 20 min at +15 to +25°C.2Wash 30 min with PBS.Note:For storage, dehydrate fixed tissue sections 2 min inabsolute ethanol and store at Ϫ15 to Ϫ25°C.3Incubate slides in Permeabilisation solution for 2 min on ice (+2 to +8°C).4Proceed as described under 3.3.3.3Labeling Protocol 3.3.1Before you BeginPreparation of TUNEL Reaction MixtureOne pair of tubes (vial 1: Enzyme Solution, and vial 2: Label Solution) is sufficient for staining 10 samples by using 50 l TUNEL reaction mix-ture per sample and 2 negative controls by using 50 l Label Solution per control.Note : The TUNEL reaction mixture should be prepared immediately before use and should not be stored. Keep TUNEL reaction mixture on ice until use.Additional Reagents Required •Micrococcal nuclease or •DNase I recombinant *ControlsTwo negative controls and a positive control should be included in each experimental set up.* available from Roche Applied ScienceStep Action1Remove 100 l Label Solution (vial 2) for two negative con-trols.2Add total volume (50 l) of Enzyme Solution (vial 1) to the remaining 450 l Label Solution in vial 2 to obtain 500 l TUNEL reaction mixture.3Mix well to equilibrate components.Negative control:Incubate fixed and permeabilized cells in 50 l/well Label Solution (without terminal transferase) instead of TUNEL reaction mixture.Positive control:Incubate fixed and permeabilized cells with micro-coccal nuclease or DNase I recombinant (3000U/ml– 3 U/ml in 50 mM Tris-HCl, pH 7.5, 1 mg/ml BSA) for 10 min at +15 to +25°C to induce DNA strand breaks, prior to labeling procedures.3.3.2 Labeling Protocol for Cell SuspensionsAdditional Equipment and Reagents Required •Washing buffer: PBS •Humidified chamberProcedure Please refer to the following table.Step Action1Wash cells twice with PBS (200 l/well).2Resuspend in 50 l/well TUNEL reaction mixture.Note: For the negative control add 50 l Label solution.3Add lid and incubate for 60 min at +37°C in a humidifiedatmosphere in the dark.4Wash samples twice in PBS.5Transfer cells in a tube to a final volume of 250-500 l in PBS.6Samples can directly be analyzed by flow cytometry or fluo-rescence microscopy. For evaluation by fluorescence micros-copy use an excitation wavelength in the range of 520-560 nm(maximum 540 nm; green) and detection in the range of 570-620 nm (maximum 580 nm, red).3.3.3Labeling Protocol for Adherent Cells, Cell Smears, Cytospin Preparations,and TissuesAdditional Equipment and Reagents Required •Washing buffer: PBS •Parafilm or coverslips •Humidified chamberProcedure Please refer to the following table.Step Action1Rinse slides twice with PBS.2Dry area around sample.3Add 50 l TUNEL reaction mixture on sample.Note:For the negative control add 50 l Label solution each.To ensure a homogeneous spread of TUNEL reaction mixtureacross cell monolayer and to avoid evaporative loss, samplesshould be covered with parafilm or coverslip during incuba-tion.4Incubate slide in a humidified atmosphere for 60 min at +37°Cin the dark.5Rinse slide 3× with PBS.6Samples can directly be analysed under a fluorescence micro-scope or embedded with antifade prior to analysis. Use anexcitation wavelength in the range of 520-560 nm (maximum540 nm; green) and detection in the range of 570-620 nm(maximum 580 nm, red).3.3.4Labeling Protocol for Difficult TissueAdditional Equipment and Solutions Required •Citrate buffer, 0.1 M, pH 6.0.•Washing buffer: PBS•Tris-HCl, 0.1 M pH 7.5, containing 3% BSA and 20% normal bovine serum•Plastic jar•MicrowaveProcedure Please refer to the following table.Step Action1Dewax paraformaldehyde- or formalin-fixed tissue sectionsaccording to standard procedures.2Place the slide(s) in a plastic jar containing 200 ml 0.1 MCitrate buffer, pH 6.0.3•Apply 750 W (high) microwave irradiation for 1 min.•Cool rapidly by immediately adding 80 ml double dist.water (+20 to +25°C).•Transfer the slide(s) into PBS (+20 to +25°C).DO NOT perform a Proteinase K treatment!4Immerse the slide(s) for 30 min at +15 to +25°C in Tris-HCl,0.1 M pH 7.5, containing 3% BSA and 20% normalbovine serum.5•Rinse the slide(s) twice with PBS at +15 to +25°C.•Let excess fluid drain off.6Add 50 l of TUNEL reaction mixture on the section.Note: For the negative control add 50 l Label solution.7Incubate for 60 min at +37°C in a humidified atmosphere inthe dark.8•Rinse slide(s) three times in PBS for 5 min each.•Evaluate the section under a fluorescence microscope.results4. TypicalAssay Procedures•Incubate U937 cells at a density of 106 cells/ml in the presence ofcamptothecin (2 g/ml, 4 h at +37°C) to induce apoptosis.•As control for non-apoptotic population, an aliquot of the cells isincubated in normal culture medium without camptothecin.•Harvest cells and proceed as described under 3.2.1.Fig. 2: Analysis of camptothecin induced apoptosis in U937 cell by flow cytometryDotted line: Cells cultured in the absence of camptothecin.Solid line: Cells cultured in the presence of camptothecin (2 g/ml, 4 h).Cells analyzed under marker M1 are apoptotic (TUNEL positive)5.Appendix5.1TroubleshootingThis table describes various troubleshooting parameters.Problem Step/Reagent ofProcedurePossible Cause RecommendationNonspecific labeling Embedding oftissueUV-irradiation forpolymerization ofembedding material(e.g., methacrylate)leads to DNAstrand breaksTry different embedding material ordifferent polymerization reagent.Fixation Acidic fixatives(e.g., methacarn,Carnoy’s fixative)•Try 4% buffered paraformaldehyde.•Try formalin or glutaraldehyde.TUNELreactionTdT concentrationtoo highReduce concentration of TdT by dilu-ting it 1:2 up to 1:10 with TUNEL Dilu-tion Buffer*.Nucleases,PolymerasesSome tissues (e.g.,smooth muscles)show DNA strandbreaks very soonafter tissue prepa-ration.•Fix tissue immediately after organpreparation.•Perfuse fixative through liver vein.Some enzymes arestill active.Block with a solution containing ddUTPand dATP.High back-ground Sample Mycoplasma con-taminationMycoplasma Detection Kit*Highly proliferatingcellsDouble staining, e.g., with Annexin-V-Fluos*.Note: Measuring via microplate readernot possible because of too high back-ground.Fixation Formalin fixationleads to a yellowishstaining of cellscontaining melaninprecursors.Try methanol for fixation but take intoaccount that this might lead to reducedsensitivity.TUNEL reac-tionConcentration oflabeling mix is toohigh for mammacarcinoma.Reduce concentration of labeling mixto 50% by diluting with TUNEL DilutionBuffer.continued on next page* available from Roche Applied ScienceLow labeling Fixation Ethanol and metha-nol can lead to lowlabeling (nucleo-somes are notcross-linked withproteins during fix-ation and are lostduring the proce-dure steps)•Try 4% buffered paraformaldehyde.•Try formalin or glutaraldehyde.Extensive fixation leads to excessive cross-linking of proteins •Reduce fixation time.•Try 2% buffered paraformaldehyde.Permeabilisa-tion Permeabilisationtoo short so thatreagents can’treach their targetmolecules•Increase incubation time.•Incubate at higher temperature(e.g., +15 to +25°C).•Try Proteinase K (concentration andtime has to be optimized for eachtype of tissue).•Try 0.1 M sodium citrate at +70°Cfor 30 min.Paraffin-embedding Accessibility forreagents is too low•Treat tissue sections after dewaxingwith Proteinase K (concentration,time and temperature have to beoptimized for each type of tissue).•Try microwave irradiation at 370 W(low) for 5 min in 200 ml 0.1 M Cit-rate buffer pH 6.0 (has to be opti-mized for each type of tissue).continued on next pageProblem Step/Reagent ofProcedurePossible Cause RecommendationNo signal on positive con-trol DNasetreatmentConcentration ofDNase is too low•For cryosections apply 3 U/mlDNase I recombinant.•For paraffin-embedded tissue sec-tions apply 1500 U/ml DNase Irecombinant.•In general, use 1 U/ml DNase Irecombinant, dissolved in 10 mMTris-HCl, pH 7.4 containing 10 mMNaCl, 5 mM MnCl2, 0.1 mM CaCl2,25 mM KCl and incubate 30 min at+37°C.•Alternative buffer: Tris- HCl pH 7.5containing 1 mM MgCl2 and 1 mg/ml BSA.Counter-staining diminishes TUNEL staining DNA stain Too high concentra-tions of DNA dyeUse 0.1–1 g/ml BoBo–1 from Molec-ular Probes for counterstaining.Equivocal signals DoublestainingEarlier stage ofapoptosis thanstage detected byTUNEL reactionFor additional measurement of apopto-sis: M30 CytoDEATH* is suitable orAnnexin V – Fluos*.Problems with inter-pretation of results FACS Analysis Positive and nega-tive peaks are notdistinguishable,because too manyapoptotic bodiesacquired, apoptosisis too farChange apoptosis inducing procedure:2-3 Clusters should be visible in theFSC/SSC histogram:1.debris and apoptotic bodies2.whole cells3.shrinked cells gate should delete1.): clearly separated peaks.No signal for apop-tosisTime depends on cell line and inducingagents and should be optimized.Problem Step/Reagent ofProcedurePossible Cause Recommendation* available from Roche Applied Science。
Caractéristiques Son JBL Pure BassDiffusion sans fil via Bluetooth 5.0 Jusqu’à 40 h d’autonomie et charge rapide (5 min = 2 h)Connexion multi-pointsAppels mains libresConception légère, confortable et pliableDemandez à Siri ou dites Hey GoogleTune 570BT vous permet de diffuser le son puissant JBL Pure BassHARMAN International Industries, Incorporated 8500 Balboa Boulevard, Northridge, CA 91329 USA © 2020 HARMAN International Industries, Incorporated. Tous droits réservés. JBL est une marque de commerce d’HARMAN International Industries, Incorporated, enregistrée aux États-Unis et/ou dans d’autres pays. La marque et les logos Bluetooth® sont des marques déposées et sont détenues par Bluetooth SIG, Inc., et tout usage de ces marques par HARMAN International Industries, Incorporated se fait sous accord de licence. Les autres marques et noms commerciaux appartiennent à leurs détenteurs respectifs. Les caractéristiques, les spécifications et l’aspect sont susceptibles d’être modifiés sans préavis.Contenu de la boîte :Tune 570BT1 câble de recharge USB-C1 garantie/avertissements1 guide de démarrage rapideSpécifications techniques :Taille du haut-parleur : haut-parleurdynamique de 32 mmAlimentation : 5 V, 1 APoids : 160 gType de batterie des écouteurs : batterie aulithium-ion (3,7 V / 450 mAh)Temps de recharge : 2 hA utonomie en Bluetooth : jusqu’à 40 heuresRéponse en fréquence : 20 Hz – 20 kHzImpédance : 32 ohmsSensibilité : 103,5 dB SPL à 1 kHz/1 mWPression sonore max. : 95 dBSensibilité du microphone :-29 dBV à 1 kHz/PaVersion Bluetooth : 5Version de profil Bluetooth : A2DP v1.3,AVRCP v1.6, HFP v1.7Gamme de fréquences de l’émetteurBluetooth : 2,4 GHz – 2,4835 GHzPuissance de l’émetteur Bluetooth :< 8 dBmModulation de l’émetteur Bluetooth :GFSK, π/4DQPSK, 8DPSKTempérature de fonctionnement maximale :45 °C® à l’autre. Vous pouvez facilement。
LTQ Tune点击桌面上的图标,进入L TQ Tune的主界面or :仪器On or Standby 切换键:Tune键,调谐某m/z的离子或TIC强度:仪器校正:记录谱图:定义各扫描参数:打开一个Tune文件:保存当前的参数为Tune文件:显示曲线:Profile和Centroid 图的切换:正负离子检测模式的切换:图谱平均:LC的设置(U 3000由DC MSLink设置,Accela液相可由此键设置泵的参数):注射泵的开启及参数设置:质谱仪上六通阀的切换:质谱仪硬件各参数设置(注意:做实验时只需要修改离子源区参数,其他参数可不用修改)采集样品谱图1.连接管路,注射器吸取样品溶液后,将注射器安装至注射泵;2.打开扫描:点击,使该键切换为,仪器开始扫描;3.打开注射泵,点击,出现右图界面:选择“On”“Flow Rate”中键入流速在“Type”中选择注射器的类型“Volume”中下拉选择注射器的容量点击“OK”4.点击,设置需要采集的离子模式;5.点击,设置离子源区各参数,点击“Apply”,如下图:Heater Temp:加热温度Sheath Gas Flow Rate:鞘气流速Aux Gas Flow Rate:辅助气流速Sweep Gas Flow Rate:吹扫气流速I Spray Voltage:喷雾电压Capillary Temp:离子传输管的温度Capillary Voltage:离子传输管的电压Tube Lens:Tube Lens电压6.定义扫描模式,点击,进入如下界面:全扫描(Full Scan):Mass Range:选择质量范围,选NormalScan Rate:选择扫描速率,选NormalScan Type:选择扫描类型,选Full设置扫描范围:First Mass:扫描起始质荷比Last Mass:扫描末端质荷比设置好后点击“Apply”,应用设置的参数点击“OK”,关闭此设置参数窗口选择离子扫描(SIM):Mass Range:选择质量范围,选NormalScan Rate:选择扫描速率,选NormalScan Type:选择扫描类型,选SIM设置扫描范围:Center Mass:中心质荷比Width:扫描窗口宽度设置好后点击“Apply”,应用设置的参数点击“OK”,关闭此设置参数窗口多级质谱扫描(MS n):Mass Range:选择质量范围,选NormalScan Rate:选择扫描速率,选NormalScan Type:选择扫描类型,选Full做二级质谱(MS2),在n为2这一行中,“Parent Mass”中输入母离子的质荷比,“Act.Type”中选择碰撞模式CID,“Iso. Width”中输入提取母离子的隔离宽度,“Normalized Collision Energy”中输入碰撞能量;做三级质谱(MS3),在n为3这一行中,“Parent Mass”中输入三级母离子(二级子离子)的质荷比,“Act. Type”中选择碰撞模式CID,“Iso. Width”中输入提取三级母离子的隔离宽度,“Normalized Collision Energy”中输入碰撞能量;若还要做更多级质谱,以此类推。
Tunelab 调律软件这是Tunelab 调律软件的第一个页面,最上面一排按钮是工具条。
现把它从左到右顺序共16个纽译成中文,原文来自使用手册。
这些纽大部分都可以不碰它。
只用测量纽和调整曲线纽。
但有的朋友显然要搞清每个纽的作用,我们就一起来吧,我也没全搞清。
如有错误请大家指正,请貓版直接给修改吧。
Toolbar 工具条TuneLab Pro uses a toolbar for many functions. Here is the toolbar from TuneLab Pr 1、New Tuning File - prepares for creation of a new tuning, and may start auto measure sequence 创建新文件2、Open Tuning File - selects and load an existing tuning file. 打开已经存在的调律文件3、Save Tuning File - saves the current tuning in a file so it can recalled later 储存调律文件,在调律文件最后完成后,别忘了储存,此时要求你给文件起个名字。
toggles the sound generation mode 4、Sound On/Off -on and off 音频发生器,开/关,让它处于关。
5、Note Lower - switches to the next lowest note. (on the keyboard also works.) 向低音移动6、Note Higher - switches to the next higher note. ( on the keyboard also works.) 向高音移动7、Zero Offset - clears the offset to zero. (Z on the keyboard also works.) 清除偏调为零(别动它)8、Lock Mode - begins locking onto the note by automatically adjusting the offset (“.” also works.)锁定模式,(别动它)9、Zoom Out Spectrum Display - zooms out to show a wider range (“-” also works.) 缩小图形10、Zoom In Spectrum Display - zooms in to show a narrower range (“+” or“=” also works.) 放大图形11、Auto Note Switch, Both Direction - enables auto note switching in both directions 双向音移动开关12、Auto Note Switch, One Direction - enables auto note switching in just one direction 单向音移动开关13、Measure Inharmonicity - measures inharmonicity or current pitch in over-pull(pitch raise) mode (M)测量不和谐度,这是制作调律文件的最重要的第一步。
初次使用此软件的朋友,看了猫版的介绍,再加上这个指南文件,上手应当很轻松了。
献给部分英文比我还糟的朋友,呵呵Using this tutorial 如何使用此指南This tutorial is meant to be used as a step-by-step guide to certain operations in TuneL ab Pro. 本指南将一步一步的指导您在TuneLab Pro中的操作. Many of these operations i nvolve the keyboard.有相当一部分操作涉及到键盘的使用。
However, the keys that you press when this tutorial is displayed do not always go to TuneLab Pro.然而,当此帮助页面显示时,您按下键盘键并不总是能够回到TuneLab Pro操作界面。
In fact, every time y ou call this tutorial and every time you click in it, the tutorial acquires the "focus" of t he keyboard.实际上,每当您查看本指南或者在本指南显示的区域内操作鼠标时,焦点总是被当前的指南页面获得的。
To make the keys go to TuneLab Pro, you need to give the focus back to TuneLab Pro. 要想使用键盘来控制TuneLab Pro的操作,您需要使焦点回到TuneLab Pro界面中。
You can do that by clicking anywhere inside the TuneLab Pro win dow. 您可使用鼠标点击TuneLab Pro窗口来实现。
Remember to do that whenever the instructions in this tutorial call for using the keyboard.当执行本指南中使用键盘的操作时,记得上述的提示。
The contents list shows the tutorial topics. 目录列出本指导的主题。
Some topics requir e several pages. 部分主题包含了几页的内容。
These topics can be viewed by using the "--Next--" link at the bottom of a topic. 可使用页面底部的NEXT链接来进行翻页查看。
I f this help window gets in the way of some part of the TuneLab Pro screen, then you can click and drag the title bar of the tutorial window to move it out of the way. Yo u can even resize the help window by dragging at the borders.若此帮助窗口遮挡了Tun eLab Pro主窗口,您移动此窗口或拖拽边框改变大小。
Although this tutorial is focused primarily on how to do certain things, you can also fin d out why we do these things.尽管此指南已覆盖了大部分的主要操作内容,您仍可以进一步得到这些内容的解释。
Click on the links in the text that say "(Why)" and learn more about the operation being described.点击文本中的“Why”以得到更多的操作描述。
These topics show only the simplest way to do the operations shown. For more in-dept h coverage of any topic, see the Help Topics in the Help menu in TuneLab Pro.本指南仅指出了所列举操作的最简单的方式,要得到理为详尽的帮助主题,请参阅主程序的帮助菜单。
-----Selecting notes-----选择音uMake sure the keyboard caps lock is off (Why). 确认键盘的caps lock在关闭状态(If y ou select notes by pressing upper case versions of A-G, you will get the sharp version of these notes. To make sure you get the naturals, use only lower case.?如果为大写状态,您会选择带#的音)Press the B key.按B键,Note how the current n ote is now B. 注意当前音显示是B,The octave number after the B remains unchanged. 八度序号数没有变化。
Press the 3 key.按3键,Note how the current note is now B3.注意当前音显示为B3。
uPress the right arrow key several times. 按几下右方向键,Note how the current note goes up one note at a time. 可注意到当前音每次上行一个。
Press the left arrow key. Note how the current note goes down one note at a time.按左方向键,可看到当前音每次下行一个。
uPress the Pg-Up or Pg-Dn keys. Note how the octave number goes up or down one o ctave at a time.八度序数每次上行或下行一个。
uHold the shift key and press the right arrow key to enable automatic note switching (WhyYou enable auto note switching so that you can operate TuneLab Pro without touc hing the computer. 设置为自动切换方式您可以不用接触计算机来操作TuneLab Pro。
Tune Lab Pro listens to the notes you play and when it hears that you are playing the next note in the scale it will automatically switch to that note. TuneLab Pro监听您所弹奏的音,如果它听到您所弹音在下一个音的频率范围,它将自动切换到下一个音。
There are three different versions of auto note switching - auto up, auto down, and auto both. 有三种自动切换方式,自动上,自动下,全自动。
These modes can be enabled by holdin g the shift key and pressing the right arrow, the left arrow, or the left and right arro ws together. 可以按SHIFT+右,左,左右同时来进行切换。
Auto note switching is disabl ed by holding the shift key and pressing the down arrow. 退出自动切换模式只须按SHIF T+下方向键。
You can see the current state of auto note switching by noting which aut o note toolbar buttons are pushed in at the top of the screen. 您可以看到屏幕上端的音切换方式显示工具栏上的按钮呈弹起状态。
).按住SHIFT键按右方向键,设置自动切换方式。
uSelect note B3.选择B3uPlay note C4 on the piano. 弹奏C4,Note how the current note automatically switches to C4.当前设置显示当前音自动切换到C4。
uHold the shift key and press the down arrow key to turn off automatic note switching.按SHIFT+↓关闭自动切换状态。
Tuning with the spectrum display调音的频谱显示uSelect note A4.选择A4uPress the "+" key to select the zoomed-in view of the spectrum display.按+键选择放大查看模式。
uPlay A4 on a piano.弹奏钢琴A4,The spectrum display should show a graph with a p eak somewhere in the middle. 频谱图的曲线中部会出现一个波峰,If the peak is to th e left of the red line then the note on the piano is flat.如果波峰在红线的左侧,钢琴的A4音偏低。
If the peak is to the right of the red line then the note is sharp. 如果在红线右侧,则偏高。