珀挺清扫器安装说明书
- 格式:docx
- 大小:894.06 KB
- 文档页数:4
除尘器安装指导说明书本说明书是项目图纸和技术规范的一种补充。
如有冲突、遗漏则应以图纸和技术文本为准。
一.安装说明1设备保管与开箱验收1.1 总则在工地上卸下及搬运部件时必须要小心,尤其是对于滤袋、笼骨及电气设备这些容易受损的部件。
保管原则设备到达现场后,按下列要求保管。
1 堆放场地要合理布局,基础稳固,便于装运、作业,并作好防洪防涝设施。
1.2.2产品堆放要符合预装及安装工艺流程要求,避免多次倒运以防变形。
1入库时按装箱清单核对所有部件,仓库应尽可能靠近安装现场以减少不必要的二次倒运。
1以下部件应存放在室内,在不到将它们被安装的时候,不得将它们暴露在露天中。
a) 电气元件及控制柜b) 气动元件c) 气缸d) 螺栓、螺母及垫圈应按大小分箱存放e) 滤袋及笼骨f) 密封垫及密封材料g) 花板2 设备开箱验收2.1 设备开箱、清点、验收应有制造厂、用户、施工单位共同参加。
2.2 验收条件a.供货清册、装箱清单等技术文件资料齐全;b.设备铭牌上的型号、规格、数量与工程设计相符c.检查产品质量,如因运输、装卸、贮存过程产生变形和尺寸变动,应作校正,对无法修复的要给予报废及更换。
d.设备验收标准依据制造厂家设计图纸、有关技术文件及规定。
3 施工前准备3.1 安装单位应熟悉设备结构、性能、有关设计图纸和技术文件,编制施工组织设计文件,编制施工质量卡,施工过程中要严格做好质量检验记录。
3.2 按施工组织设计要求,进行场地平整、平台敷设,吊装机械设施、专用机具配制等工作。
3.3 制造厂作设备技术交底,必要时派员参加施工期间的技术指导。
4 设备的安装安装顺序是为施工监督员提供安装方面的帮助。
本标准程序仅供指导用。
本说明书是项目图纸和技术规范的补充。
如有冲突,应以项目图纸为准。
安装工作开始前,应先按基础图上的地脚螺栓和混凝土内凹坑的位置对基础进行检验。
如发现地脚螺栓超出公差,则必须重新定位。
只有各项尺寸检查合格后,才可开始钢支架的安装。
吸尘吸水机使用规程使用说明1、确定电源电压与本机相同。
2、接驳所有喉管,应选择适当的尘刷。
3、将吸尘管接到吸尘机吸嘴上。
4、切记请将电源线安放在机身吸嘴后方。
吸尘使用方法1、吸尘袋须先安装方可操作。
2、请保持机身清洁干净吸水使用方法1、吸水前请取出吸尘袋。
2、请取出圆桶内什物。
注意事项1、清理圆桶,切勿让任何污垢积聚在圆桶内。
2、彻底清洁吸尘袋。
3、检查电源电线,确保电源没有损坏。
4、用清洁剂加温水清洗吸尘袋及吹干后方可使用。
擦地机使用规程使用前的安全检查1、插座:LD-1500地面清洁机适合标准(13AMP,3销座),保证插座销子是直的,无可视的损坏。
2、电缆:在使用前检查电力供应,缆部没有剪或擦伤露出内部的电丝的状况,缆绳品质优越。
3、针盘:在装配机器之前,确保使用盘面符合机器的正确尺寸。
4、垫:确保所使用的地板维护垫符合清洁任务,干净并且优越。
5、刷:如果手头上的清洁操作需要刷子,先清洗地毯及地毯刷,确保刷子干净,且它的品质与需要的相符。
使用方法1、a、将手柄拉至直立位置;b、将机身平躺于地上;c、欲将刷子套在擦扣座上,请向逆时针方向转动,脱刷时向顺时针方向转动。
2、抽起115之高低调校手挚将手柄调至适合自己的高度和角度。
3、开机前先按紧安全锁,再按左或右的开关,刷子便会开始转动。
如果欲使刷机向右方移动,请将手柄轻微抽起;如果欲使刷机向左方移动,请将手柄轻微按下设备保养1、针座盘:当清洁工作完成后,从机械上撤走附件是非常重要的。
如果水箱里装满了清洁液,必须排尽。
水箱必须通过控制旋钮排溶液。
松开顶部的锁,把箱子从机械上取下来,在使用后要洗水箱,撤走操作盘。
向后倾斜机械,将机械把柄放在地下,顺时针旋转操纵盘,操纵面和刷子必须有一点松动,然后用力将其扯下。
2、电缆清洁:回复到机械直立的位置,当你盘旋缆绳时擦净它。
如注意其上的刻痕或擦痕,(暴露内部电丝),请报告维护部门,贮藏机器之前先将灰尘和污渍去除,在机器已经被清洁后如果使用了机械装置垫,请将其取下来,清洁干净,并且将其悬挂,以保持干燥。
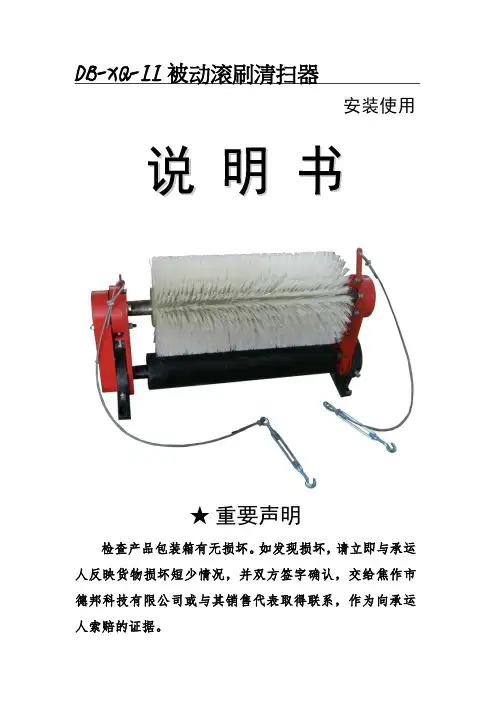
DB-XQ-II被动滚刷清扫器安装使用★重要声明检查产品包装箱有无损坏。
如发现损坏,请立即与承运人反映货物损坏短少情况,并双方签字确认,交给焦作市德邦科技有限公司或与其销售代表取得联系,作为向承运人索赔的证据。
安装前的重要提示1.安装之前,必须熟知工作中所用相关设备的安全操作规程以及施工现场的安全生产规范。
2.切断输送机的启动电源,挂上“有人操作,禁止合闸”的警示牌。
3.如果设备在井下或密闭的区域内,动用割枪或电焊之前,必须对煤气和灰尘含量进行检测。
确认煤气和灰尘含量在安全值范围内方可操作,否则,可能发生事故。
4.使用割枪或电焊机前,应使用阻燃罩将输送机皮带罩住,否则将有可能损坏皮带。
5.安装工作完毕,在启动输送机皮带之前,应将安装区域内和输送机皮带上的工具、铁器、焊渣等收拾干净。
否则将有可能造成严重的人身伤害,或者导致输送机皮带的损坏。
6.在输送机运行状态下,如果要调整清扫器,操作时千万要小心谨慎,防止手中的工具、身体或衣服被卷入输送带,导致严重的人身伤亡。
对于维护的操作,请在停机状态下进行,切记!产品说明输送带输送的物料往往带有粘性物质,如煤尘、泥浆、粉状物料,其中一部分会粘在输送带工作面上,在卸料时不能完全卸掉,随着皮带运转会粘在托辊上,长时间会造成以下后果:1.物料进入托辊的壳体内,从而增大轴承磨损,托辊壳体粘上物料会损伤和拉毛输送带的面胶,加速输送带损坏。
2.粘着物进入尾轮和改向滚筒,物料会粘在滚筒表面上,且越粘越多,造成输送带跑偏,增加输送带磨损,酿成不良后果。
3.物料粘在驱动滚筒上,加大对滚筒的摩擦力,会引起输送带面胶和滚筒包胶层的损坏。
4.物料没有及时清除,在整个工作通道内会形成落料区,造成环境污染,清扫劳动量增加,影响员工身心健康,增加企业成本。
因此,为保证带式输送机正常运转,必须将输送带上的附着物清扫干净。
如果清扫装置良好,对托辊、输送带等的寿命都可以延长。
由此可见,清扫器在带式输送机上有着不可忽视的作用。
清扫器分类及安装要求随着物流行业的逐渐成熟扩大,皮带输送机的使用也越来越多了,由于皮带输送机输送的物料杂乱,所以定时对皮带输送机的清理是不可少的,这时候就需要我们的好帮手-----皮带机清扫器来帮忙了,下面我们就来讲解一下皮带机清扫器的安装以及清洗过程。
一、清扫器分类及安装要求头部清扫器:头部清扫器用于皮带卸载滚筒回程皮带上面的清扫工作,该清扫器随皮带机配套,该清扫器配套有重锤涨紧或弹簧涨紧。
数量:普通皮带机1道、强力皮带机2道,清扫介质:普通皮带机使用胶条、强力皮带机使用合金或聚氨酯。
Zy16中部清扫器:也用于清理皮带非工作面,使下皮带面粘的物料尽量少地传送到下部托辊及改向滚筒上去。
安装位置:与皮带中部卸载点后方5米范围内,或皮带机机身(距离机头)2/3位置。
数量:普通皮带机至少1道、强力皮带机至少2道,清扫介质:普通皮带机使用胶条、强力皮带机使用胶条或聚氨酯。
尾部空段清扫器:负责皮带机机尾前非工作面的清扫。
数量:至少1道。
清扫介质:普通皮带机使用胶条、强力皮带机使用胶条或聚氨酯。
安装位置:机尾缓冲托辊架前方5米范围内。
中运智能集团制造二、安装及管理职责划分清扫器统一由皮带机管理单位进行加工及安装。
头部清扫器处卫生清理由皮带机机头司机负责;皮带机中部卸载点位置清扫器处卫生清理由搭接皮带机(刮板机)单位安排人员清理;皮带机中部空段清扫器处卫生清理由皮带机管理单位负责;皮带机机尾15米范围内如有下部设备搭接时,卫生由搭接皮带管理单位负责清理(多部设备同时搭接时,由近设备单位负责);皮带机机尾无设备搭接时,卫生由皮带机管理单位负责。
三、清扫器安装要求及完好标准1、刮板的清扫面应与胶带接触,其接触后清扫覆盖面积覆盖不应小于皮带宽度85%;800mm 皮带机清扫幅面宽度不低于680mm、1000mm皮带机清扫清扫幅面宽度不低于850mm、1200mm皮带机清扫清扫幅面宽度不低于1020mm。
2、清扫介质(胶条)厚度应不小于10mm,伸出固定框部分高度不小于20mm,固定框不能在皮带运行过程中磨带面。
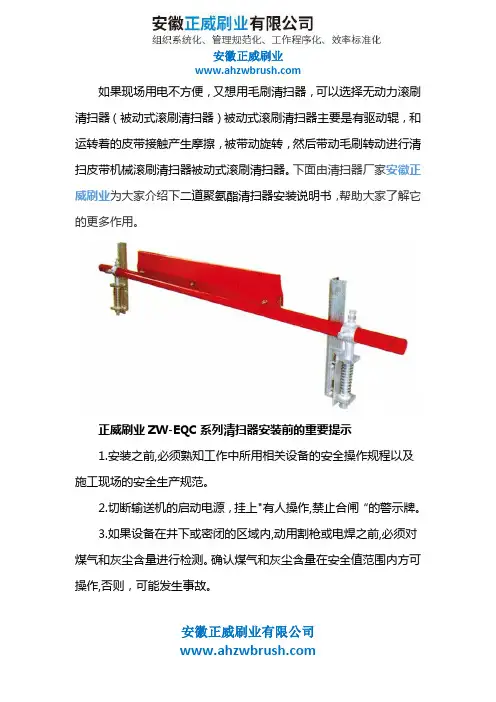
如果现场用电不方便,又想用毛刷清扫器,可以选择无动力滚刷清扫器(被动式滚刷清扫器)被动式滚刷清扫器主要是有驱动辊,和运转着的皮带接触产生摩擦,被带动旋转,然后带动毛刷转动进行清扫皮带机械滚刷清扫器被动式滚刷清扫器。
下面由清扫器厂家安徽正威刷业为大家介绍下二道聚氨酯清扫器安装说明书,帮助大家了解它的更多作用。
正威刷业ZW-EQC系列清扫器安装前的重要提示1.安装之前,必须熟知工作中所用相关设备的安全操作规程以及施工现场的安全生产规范。
2.切断输送机的启动电源,挂上"有人操作,禁止合闸“的警示牌。
3.如果设备在井下或密闭的区域内,动用割枪或电焊之前,必须对煤气和灰尘含量进行检测。
确认煤气和灰尘含量在安全值范围内方可操作,否则,可能发生事故。
安徽正威刷业有限公司4.使用割枪或电焊机前,应使用阻燃罩将输送机皮带罩住,否则将有可能损坏皮带。
5.安装工作完毕,在启动输送机皮带之前,应将安装区域内和输送机皮带上的工具、铁器、焊渣等收拾干净。
否则将有可能造成严重的人身伤害,或者导致输送机皮带的损坏。
6.在输送机运行状态下,如果要调整清扫器,操作时千万要小心谨慎,防止手中的工具、身体或衣服被卷入输送带,导致严重的人身伤亡。
对于维护的操作,请在停机状态下进行,切记!正威刷业ZW-EQC系列清扫器产品说明输送带输送的物料往往带有粘性物质,如煤尘、泥浆粉状物料,其中一部分会粘在输送带工作面上,在卸料时不能完全卸掉,随着皮带运转会粘在托辊上,长时间会造成以下后果:1.物料进入托辊的壳体内,从而增大轴承磨损,托辊壳体粘上物料会损伤和拉毛输送带的面胶,加速输送带损坏。
安徽正威刷业有限公司2.粘着物进入尾轮和改向滚筒,物料会粘在滚筒表面上,且越粘越多,造成输送带跑偏,增加输送带磨损,酿成不良后果。
3.物料粘在驱动滚筒上,加大对滚筒的摩擦力,会引起输送带面胶和滚筒包胶层的损坏。
4.物料没有及时清除,在整个工作通道内会形成落料区,造成环境污染,清扫劳动量增加,影响员工身心健康,增加企业成本。
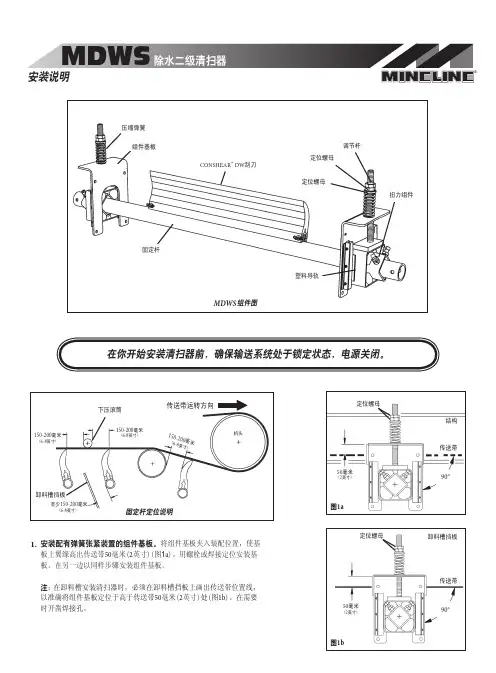
安装配有弹簧张紧装置的组件基板。
将组件基板夹入装配位置,使基板上翼缘高出传送带50毫米(2英寸)(图1a )。
用螺栓或焊接定位安装基板。
在另一边以同样步骤安装组件基板。
在卸料槽安装清扫器时,必须在卸料槽挡板上画出传送带位置线,以准确将组件基板定位于高于传送带50毫米(2英寸)处(图1b )。
在需要时开凿焊接孔。
固定杆定位说明机头150-200毫米(6-8英寸)传送带运转方向下压滚筒150-200毫米(6-8英寸)卸料槽挡板毫米)至少150-200毫米(6-8英寸)图1b90°传送带结构传送带90°50毫米(2英寸)50毫米(2英寸)在你开始安装清扫器前,确保输送系统处于锁定状态,电源关闭。
卸料槽挡板定位螺母定位螺母图1a组件基板定位螺母CONSHEAR ™ DW 刮刀塑料导轨固定杆定位螺母扭力组件调节杆压缩弹簧组件图MDWS设置刮刀压力。
松开两侧顶部的定位螺母。
调节定位螺母至适当弹簧压力(图4)。
弹簧长度决定压力大小,根据不同带宽对照以下弹簧长度表调节合适的弹簧长度。
©2003 Flexible Steel Lacing Company Printed in U.S.A.Mineline and ConShear are trademarks of Flexible Steel Lacing Company.U.S. Patent No. D482,508S Item Code X1267 Rev. 4/08试运转清扫器检查清扫效果。
若有震动产生或需提高清扫效果,可将压缩弹簧调整3毫米(1/8英寸),从而增加刮刀对传送带压力。
图3设置刮刀角度。
将固定杆/刮刀校准至传送带中心位置。
使用产品附带的刮刀角度模板,将刮刀与传送带间角度调至预设角度。
拧紧每侧扭力组件上的两颗固定螺丝,从而将固定杆定位(图3)。
在准确定位固定杆过程中,刮刀与传送带应无任何接触。
若在此过程中出现接触,调整调节杆上的定位螺母并重设角度,将固定杆位置调低。

皮带机清扫器安装方法
1. 准备工作:首先要确保安装皮带机清扫器的位置,清理工作完成后,皮带机停止运行并断电。
2. 安装准备:准备好所有安装所需的工具和材料,包括螺丝刀、螺丝、扳手和皮带机清扫器。
3. 清洗皮带机:使用合适的清洁剂和工具对皮带机进行彻底清洗,确保没有杂质和污垢。
4. 安装清扫器:根据清扫器的安装说明,将清扫器固定在皮带机上。
通常情况下,清扫器会用螺丝或其他固定装置将其固定在皮带机上。
5. 调整清扫器位置:根据需要,可以调整清扫器的位置,以确保其与皮带机表面的接触紧密且均匀。
6. 测试运行:安装完成后,确保清扫器安装稳固,并且皮带机能够正常运行。
可以手动启动皮带机,观察清扫器的运行情况,确保其有效清洁皮带机表面。
注意事项:
- 在安装过程中,务必遵循所有安全规定,穿戴好个人防护装备。
- 确保清扫器与皮带机的接触面平整,以避免任何卡阻或摩擦。
- 如果在安装过程中遇到任何问题,应立即停止操作并寻求专业人士的帮助。

安徽正威刷业有限公司清扫器在输送机上有着不可忽视的作用,主要用于清扫皮带正反面的粘料及杂物,煤矿、电力、钢铁、石化等企业的生产输送设备都依靠它来清扫。
下面由清扫器厂家安徽正威刷业为大家介绍下它的安装方法,帮助大家了解。
一、安装前的重要提示1.安装之前,必须熟知工作中所用相关设备的安全操作规程以及施工现场的安全生产规范。
2.切断输送机的启动电源,挂上”有人操作,禁止合闸”的警示牌。
3.如果设备在井下或密闭的区域内,动用割枪或电焊之前,必须对煤气和灰尘含量进行检测。
确认煤气和灰尘含量在安全值范围内方可操作,否则可能发生事故。
4.使用割枪或电焊对皮带输送机架开孔前,应使用阻燃罩将输送机皮带罩住,否则将有可能损坏皮带。
5.安装工作完毕,在启动输送机皮带之前,应将安装区域内和输送机皮带上的工具、铁器、焊渣等收拾干净。
否则将有可能造成严重的人身伤害,或者导致输送机皮带的损坏。
安徽正威刷业有限公司6.在输送机运行状态下,如果要调整清扫器的张紧力,操作时千万要小心谨慎,防止手中的工具、身体或衣服被卷入输送带,导致严重的人身伤亡。
对于维护的操作,请在停机状态下进行,切记!二、正威刷业清扫器的安装步骤1.按照发货清单,开箱检查,箱内应有主机架(装有刀片) , 左右弹簧张紧器各一只及相应安装紧固螺丝等配置。
如有不符,请与我公司或其区域销售代表联系,调整配齐。
2.请仔细阅读安装操作说明书,了解清扫器的组成结构。
3.测量皮带机头部滚筒的直径、皮带厚度、皮带宽度。
4.在头部漏斗外侧壁左右各开一个φ65圆孔(以头部滚筒轴心线为坐标原点划线,用气割开孔) ,同时在安装机架上开孔。
5.安装固定,使组装好的清扫器轴心线与滚筒抽心线平行,刀头紧贴带面,然后调整使刀尖线的中心对准滚筒轴心线的中心,将横梁底部的锁紧螺钉拧紧并用螺母锁定。
6.通过调节螺母调整弹簧长度,给刀头施加预紧力,然后用锁紧螺母锁紧。
三、正威刷业清扫器的维护三个月调整一次张紧力。

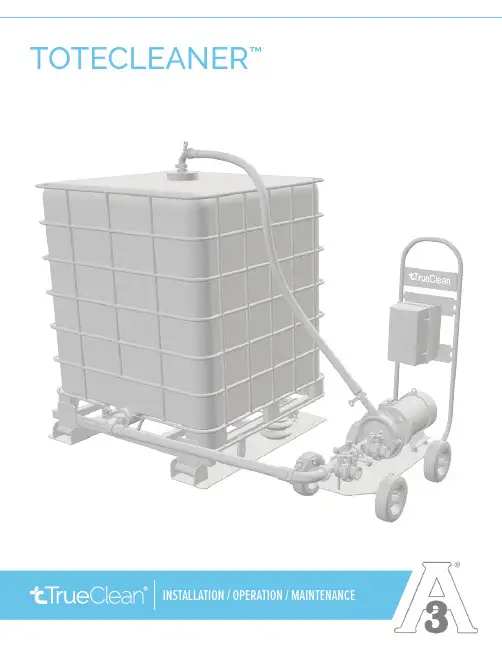
Table of ContentsIntroduction . . . . . . . . . . . . . . . . . . . . . . . . . . . . . . . . . . . . . . . . . . . . . . . . . . . . . . . . . . . . . . . . . . . . . . . . . . . . . . . . . . . . . .3 Safety . . . . . . . . . . . . . . . . . . . . . . . . . . . . . . . . . . . . . . . . . . . . . . . . . . . . . . . . . . . . . . . . . . . . . . . . . . . . . . . . . . . . . . . . . . . .4 At A Glance . . . . . . . . . . . . . . . . . . . . . . . . . . . . . . . . . . . . . . . . . . . . . . . . . . . . . . . . . . . . . . . . . . . . . . . . . . . . . . . . . . . . . . .5 Components . . . . . . . . . . . . . . . . . . . . . . . . . . . . . . . . . . . . . . . . . . . . . . . . . . . . . . . . . . . . . . . . . . . . . . . . . . . . . . . . . . . . .6 Installation . . . . . . . . . . . . . . . . . . . . . . . . . . . . . . . . . . . . . . . . . . . . . . . . . . . . . . . . . . . . . . . . . . . . . . . . . . . . . . . . . . . . .7-8 Sequence of Operation . . . . . . . . . . . . . . . . . . . . . . . . . . . . . . . . . . . . . . . . . . . . . . . . . . . . . . . . . . . . . . . . . . . . . . . .9-12 Maintenance . . . . . . . . . . . . . . . . . . . . . . . . . . . . . . . . . . . . . . . . . . . . . . . . . . . . . . . . . . . . . . . . . . . . . . . . . . . . . . . . .13-14 Parts Lists . . . . . . . . . . . . . . . . . . . . . . . . . . . . . . . . . . . . . . . . . . . . . . . . . . . . . . . . . . . . . . . . . . . . . . . . . . . . . . . . . . . .15-18 Notes . . . . . . . . . . . . . . . . . . . . . . . . . . . . . . . . . . . . . . . . . . . . . . . . . . . . . . . . . . . . . . . . . . . . . . . . . . . . . . . . . . . . . . . . .19-20 Warranty . . . . . . . . . . . . . . . . . . . . . . . . . . . . . . . . . . . . . . . . . . . . . . . . . . . . . . . . . . . . . . . . . . . . . . . . . . . . . . . . . . . . . . . .21IntroductionABOUTThank you for purchasing a TrueClean® product.This manual contains installation, operation, and maintenance instructions for the TrueClean ToteCleaner™ .TrueClean ToteCleaners are designed for minimal routine maintenance, but care and attention should be given to the instructions provided in this manual .Do not remove any labeling on any TrueClean product .Immediately replace any label that is missing .If, at any point, you have questions or concerns regarding your ToteCleaner, please call 800.654.5635 or 417.831.1411.SafetyIMPORTANT SAFETY INFORMATIONRead this manual before installing, operating, and maintaining this equipment .Failure to read the manual can result in personal injury and/or equipment damage .Do not attempt to remove and/or modify any TrueClean products or programming. Doing so can create unsafe conditions for the operator(s) and/or surrounding persons .Any change to TrueClean products or programming will void any and all warranties .Do not place any TrueClean product in an application where general product service ratings are exceeded. Doing so puts the operator(s) and/or surrounding persons at risk of personal injury and/ or result in equipment damage .Do not remove any labeling on any TrueClean product. Immediately replace any label that is missing .DISCLAIMER OF LIABILITYTrueClean does not assume responsibility and expressly disclaims liability for loss, damage, or expenses that arise in any way from the installation, operation, use, or maintenance performed in accordance with this manual .TrueClean assumes no responsibility for any infringement of patents or other rights of third parties that may result from use of the module .No license is granted by implication or otherwise under any patent or patent rights .TrueClean reserves the right to make changes to the product, specifications, or this manual without prior notice .At a Glance TOTECLEANER™1 Jet Spray Assembly Device2 Rotary Spray Assembly Device3 Tank Lid (a) with Down Tube (b)4 Pump5 VFD6 Pump Cart7 ToteTilter™ (sold separately)8Hose Kit (sold separately)78ComponentsVARIABLE FREQUENCY DRIVE (VFD):Become familiar with the control panel functions before operating the ToteCleaner . The following glossary defines objects found on the control panel.•START — turns the pump on once the system is completely installed •STOP — shuts the pump off • SPEED UP/DOWN — increases or decreases the motor Hz setpoint for pump speed .During cleaning, operators will target 30psig for the rotary spray device or full speed(60Hz) for the jet device.Note: The entire VFD user manual can be viewed online here.Stop Speed UpStartSpeed DownFig. 1 - VFDSPRAY ASSEMBLY INSTRUCTIONS:1. Apply anti-seize to threads on spray tube.2. Attach spray tube onto lid by threading it into the center bung. Be careful not to over-tighten,as this could damage the bung .3. Attach the provided cleaning device by screwing it onto the spray tube. Secure with an open-ended or adjustable wrench .a. Tighten, using the flats nearest the threads. Using the flats on the lower body can causedamage to the device .b. For full assembly, please refer to Figures 2 and 3.Fig. 2 - Alfa Laval GJ9 4-Nozzle 0.150Fig. 3 - MultiMidget 360 3/4” NPT1. Confirm that the tote is drained of all flowing product.2. Confirm that the tote to be cleaned is elevated at least seven inches off the floor.3. Confirm that the ToteCleaner cart is on a structurally sound, flat, and level surface.4. Screw spray assembly into large opening on the top of the tote .5. Connect 1.5” elbow to spray assembly with gasket* and clamp*.6. Connect 1.5” supply hose to elbow with gasket* and clamp*.7. Connect supply hose to pump outlet with gasket* and clamp*.8. Attach Camlock by Tri-Clamp® adapter to the tote outlet drain .9. Connect 2” elbow to the adapter with gasket* and clamp*.10. Connect 2” elbow to the return port on the cart with gasket* and clamp*.11. Connect 2” return hose from elbow on the tote outlet to the elbow on the cart.12. Connect water supply to supply port on cart with gasket* and clamp*.13. Connect drain hose to drain port with gasket* and clamp*. Run the hose to a safe place to drain.14. Plug the power cord into appropriate power supply, as labelled on the control panel .15. If appropriate, switch disconnect on remotely mounted electrical panel to ON .Note: *Included with Optional Hose Kit, sold separately.The TrueClean ToteCleaner is designed to allow versatility in the washes that can be performed . If cleaning needs are minimal, a rinse wash may be run by following the Rinse Wash sequence of operation .If the use of chemicals is desired, a caustic or acid wash may be run by following the Caustic/ Acid Wash sequence of operation .If both a caustic and an acid wash are desired, repeat the sequence of operation outlined under Caustic/Acid Wash .The steps for each are identical .If a sanitizer wash is desired, follow the Sanitizer Wash sequence of operation .Below are examples of common wash recipes .• Caustic wash: Initial rinse • Caustic wash • Post rinse• Caustic wash with sanitizer: Initial rinse • Caustic wash • Post rinse • Sanitizer wash• Caustic/acid wash: Initial rinse • Caustic wash • Post rinse • Acid wash • Post rinse• Caustic/acid wash with sanitizer: Initial rinse • Caustic wash • Post rinse • Acid wash • Post rinse • Sanitizer washRINSE WASH1. Close recirculation valve, and open supply and drain valves.• Please refer to Figure 4 for valve configuration.2. Confirm that there is water flowing to the supply valve.3. Press START button to start the pump .4. When wash is complete, push STOP button .5. Next, close the supply valve and allow the tote to completely drain.• If a rinse wash is the only wash to be run, also open the recirculation valve to allow the pump and supply hose to drain with the tote .• Please refer to Figure 5 for valve configuration.Fig. 4Fig. 5CAUSTIC/ACID WASH1. Close drain valve. Open recirculation and supply valves, allowing water to fill the tote.• Please refer to Figure 6 for valve configuration.2. Monitor water level until there are four to six inches of water in the bottom. Close the supplyvalve, taking care to leave the recirculation valve open .• Please refer to Figure 7 for valve configuration.3. Disconnect the elbow at the spray assembly, unscrew the spray assembly, and dose causticsolution into the tote through the lid connection .• CAUTION: Personal protective equipment (PPE) should be used when handling hazardous chemicals to protect the operator and/or bystanders from chemical contact .• Please refer to Figure 8 as an example of proper dosing procedure.4. Screw spray assembly back onto lid connection, and reattach elbow .5. Press START button to start the pump .6. When wash is complete, push STOP button .7. Next, open the drain and recirculation valves .Allow the tote to completely drain .• Please refer to Figure 5 for valve configuration.Fig. 7Fig. 6Fig. 8SANITIZER WASH1. Close drain valve. Open recirculation and supply valves, allowing water to begin filling the tote.• Please refer to Figure 6 for valve configuration.2. Monitor water level until there are four to six inches of water in the tote, then close the supplyvalve, taking care to leave the recirculation valve open .• Please refer to Figure 7 for valve configuration.3. Disconnect the elbow at the spray assembly, unscrew the spray assembly, and dose sanitizersolution into the tote through the lid connection .• CAUTION: Personal protective equipment (PPE) should be used when handling hazardous chemicals to protect the operator and/or bystanders from chemical contact .• Please refer to Figure 8 as an example of proper dosing procedure.4. Screw spray assembly back onto lid connection, and reattach elbow .5. Press START button to start the pump .6. When wash is complete, push STOP button .7. Close the supply valve and open the recirculation valve to allow the tote and hoses tocompletely drain .• Please refer to Figure 5 for valve configuration.8. Upon completion of the final wash power down, close all valves and disconnect all hoses fromthe tote .It is advised that preventative maintenance be performed periodically throughout the lifetime of this system to ensure longevity and maintain efficiency. There are four items that are maintainable on this system: pump, butterfly valves, spray device, and all Tri-Clamp gaskets.Click the links below to view the manuals and maintenance procedures for the pump, butterfly valves, and spray device .• VFD Manual• Alfa Laval MultiMidget Spray Device Manual• Alfa Laval GJ9 Spray Device Manual• Alfa Laval Solid C Pump Manual• Alfa Laval LKB Butterfly Valve Manual• Ace Hose ManualCentrifugal pump maintenance can be found on pages 14-22 of Alfa Laval SolidC Pump Manual . The recommended maintenance schedule can be found below in Figure 9.Fig. 9 - Pump Maintenance ScheduleButterfly valve maintenance can be found on pages 17-25 of Alfa Laval LKB Butterfly Valve Manual. The recommended maintenance schedule can be found below in Figure 10.Fig. 10 - Butterfly Maintenance ScheduleAlfa Laval GJ9 4-Nozzle 0.150 maintenance can be found on pages 18-29 of GJ9 Manual . MultiMidget 360 3/4” NPT maintenance can be found on pages 11 of MultiMidget Manual .The Tri-Clamp gaskets should be replaced once every three to six months. If it is found that the gaskets are failing prior to three months, replace gaskets accordingly .SPRAY ASSEMBLY PARTS LIST: TTC-SA-SDSPRAY ASSEMBLY PARTS LIST: TTC-SA-JDTOTECLEANER PARTS LISTOPTIONAL HOSE KIT PARTS LIST: TTC-HOSEKITParts ListWarrantyA .GENERAL PROVISIONS: Central States Industrial Equipment & Service Inc. (the “Company”) warrants exclusively tothe original purchaser (the “Customer”) that equipment or parts thereof manufactured and sold by the Company will be free from defects in material and workmanship only, under normal use and service, for a period of one (1) year from the original shipment date. The Company shall not be liable for any loss of revenue or profit, loss by reason of plant shutdown, non-operation or increased cost of operation, loss of products or materials, or other special or consequential loss or damages resulting from any such warranted defects .This warranty will not apply to any equipment or parts which has been subjected to accident, alteration, abuse, or misuse .This warranty is in lieu of all other warranties .All other warranties, both express or implied (including, but not limited to, the implied warranties of merchantability and fitness for a particular purpose) warranties are hereby excluded and waived. The Company’s only obligation and liability shall be to fulfill the warranty specifically stated herein. The Company will neither assume nor authorize any other person to assume for it any other obligation or liability in connection with the equipment or parts .In the event of a claim under this warranty, the Company’s sole and exclusive liability for any warranted equipment or parts shall be, at the Company’s option, limited to the following (a) the purchase price of the equipment or parts that are defective, (b) replacement of the defective equipment or parts or (c) repair of the defective equipment or parts .B .RETURN OF PARTS OR EQUIPMENT TO COMPANY PLANT: In the event the Company elects to inspect the allegeddefective equipment or parts for possible repair, Company will notify Customer in writing, and the equipment or parts must be returned with transportation cost prepaid by the Customer .In the event the Company’s inspection confirms defective equipment or parts covered by this warranty, the Company shall have the option to select any of the remedies described in Section A above .No transportation for returned or replaced items will be paid by the Company unless written approval for transportation charges is given by the Company .C .COMPONENTS NOT MANUFACTURED BY THE COMPANY: Components not manufactured by the Company, butfurnished as part of its equipment (for example: valves, controls, gauges, electrical switches or instruments, etc .) will be warranted by the Company only to the extent of the component manufacturer’s warranty .D .REPAIR OF EQUIPMENT INSTALLED IN THE CONTINENTAL UNITED STATES: In the event the Company electsto repair a covered item and it is, in the judgement of the Company, impractical to return the equipment or parts for repairs, the Company may arrange for the repairs to be made by its personnel or, at its option, sublet such repairs to a qualified company. The Customer will be expected to cooperate by making the equipment or parts available and accessible when the work is scheduled and is expected to provide the necessary utilities .If local labor conditions prohibit such work being done by Company personnel under the conditions and at the rates payable by its contracts with its employees, the Company obligation shall be limited to supervision of the work, replacement of defective parts, and labor costs in an amount equal to the amount which would be payable fora reasonable number of hours required to make the repairs at the rates payable under the terms of Companycontracts with its employees .In such event, all labor costs shall be paid by the Customer and the Company will reimburse the Customer to the extent set forth above .E .REPAIR OF EQUIPMENT INSTALLED OUTSIDE THE CONTINENTAL UNITED STATES: In the event the Companyelects to repair a covered item for a Customer located outside the continental United States and it is, in the judgement of the Company, impractical to return the equipment for repairs, the Company shall have the additional options (in addition to the other options described herein) of either sending a service representative to repair (or supervise the repairs) or paying Customer a reasonable amount to allow the Customer to have the repairs made locally; provided, that in such situation, Company shall have no obligation to repair or replace equipment or parts that are repaired on by third party contractors selected by Customer .21TC TOTECLEANER™ IOM—REV 2/21。

ZH底视图顶视图精准喷嘴SPOT CLEAN (局部)按钮RCON 传感器HOME 按钮盖闩检修水箱Home Base 充电座CLEAN (清洁)按钮清洁垫弹出按钮摄像头水箱水箱盖盖闩折叠式水箱提手线缆收纳IR 传感器窗口可拆卸滴水盘轮子感器关于 Braava jet ® m6 擦地机器人ZHZH开始使用1.5 4做好准备首先,您需要机器人、充电座、滴水盘和电源线。
1放置于充电座并插入电源选择靠近电源插座且 Wi-Fi 信号覆盖范围良好的区域。
将滴水盘置于充电座的前方。
将机器人滑到充电座触点上以激活电池。
此时光环会亮起,几分钟后,会发出提示声,表明机器人已唤醒。
将机器人连接到 iRobot HOME 应用程序,以支持远程控制、清洁自定义,并使机器人软件保持最新。
安装滴水盘唤醒机器人连接并更新2345警告: 为防止机器人跌落到楼梯,请确保充电座的位置与楼梯保持至少 1.2 米(4 英尺)的距离。
将电源线接入充电座并接通电源插座。
ZHCN为水箱注水将湿擦清洁垫或干扫清洁垫滑到机器人的下侧。
安装一块清洁垫按下机器人正面的按钮,拆下现有的清洁垫。
6从机器人上取出水箱。
然后装满水到顶部。
713 液体盎司385毫升ZHZH清洁经常使用机器人可保持地板清洁。
• 机器人将自动探查和清洁您的房屋,有条不紊地在地板上四处移动,借助单次清洁路径到下一个单次清洁路径之间的一些重叠,来确保地板上的每个点都被清洁三次。
如果您正在寻找比此默认设置更快或更深度的清洁,或者如果您想调整喷洒的水量,您可以从 iRobot HOME 应用程序中更改清洁首选项。
• 清洁工作结束后,无论是需要充电或是水箱需要重新加满时,机器人都将返回充电座。
注意: 注意: 充电时如果“CLEAN”文字闪烁,说明机器人正在进行清洁工作,并会在充电完成后自动从停止清洁的位置继续清洁。
• 要使机器人返回其充电座,请轻击。
蓝色光环模式表示机器人正在寻找充电座。
布袋除尘器安装调试运行说明书**环保工程有限公司除尘器安装使用说明书1、适用范围1.1 本说明书适用于布袋除尘器本体安装。
技术改造、大修亦可参照执行。
1.2 同类型布袋除尘器及某些产品的特殊规定与本说明书不一致时,应按特殊规定执行。
1.3 引用标准袋式除尘器安装要求验收规范JB/T8471袋式除尘器用滤料及滤袋技术条件GB12625袋式除尘器性能测试方法GB12138分室反吹袋式除尘器技术条件ZBJ88012袋式除尘器用直角式电磁脉冲阀技术条件JB/T5916袋式除尘器用滤袋框架技术条件JB/T5917脉冲喷吹类袋式除尘器JB/T8532袋式除尘器规格及性能表示方法GB6719-86袋式除尘器性能测试方法GB12138-892 概述:MDC脉冲袋式除尘器应用了许多专有技术,这些专有技术得到了各设计院、专家的认同并获得了实践的考证,使布袋除尘器的运行效果长期稳定可靠。
2.1.耐高温滤料应用技术:PPS滤料纤维作PTFE渗膜处理,解决了锅炉烟气温度高,普通滤料使用寿命短的问题,同时兼顾了滤料的性能价格比。
2.2.离线清灰检修技术:新型提升阀技术的应用,提高了滤袋的清灰效果,实现了除尘器的不停机检修功能,(离线、在线清灰方式可任意选择)。
2.3.除尘器保护技术:内旁路系统、预喷涂装置、测温测湿等在线检测设备的运用,解决了锅炉投油助燃及锅炉故障时对除尘器的保护问题。
2.4.检测、监控技术:针对锅炉除尘器使用特点,设置了烟气温度、湿度、除尘器运行压力检测、料位检测、运行设备故障检测等先进的在线检测、监控设备,能完成布袋除尘器内所有的测量、监视、控制、报警及保护和联锁等功能,可随时监控除尘器的运行。
2.5.PLC可编程控制器技术:采用PLC可编程控制器进行控制, 具备与系统DCS的通讯接口,可以实现对布袋除尘器进行手/自动控制。
3 设备结构:MDC锅炉布袋除尘器由除尘器本体、保护系统、压缩空气系统(包括储气罐、油水分离器、管路)、控制系统(包括仪器仪表、PLC柜、MCC柜、现场操作柜)等组成。
Irobot Braava380t擦地机器人操作使用说明•更新:2016-02-18 10:33这款擦地机器人是双11的时候购入的,根据说明书试用了几次发现并没有什么效果。
直到我发现了使用它的秘诀后,家里的地板就开始变得锃亮了。
甚至觉得它比扫地机器人要好用许多,有了它终于可以把擦地扫地这件事交给机器了。
1. 1先来看看机器的构造,摁下电源键后,机器人启动,选择擦地模式。
水滴状是湿擦,扫把状是干擦。
最佳的擦地顺序是先干擦,后湿擦。
因为在干擦状态下,白色毛巾会将地板上的毛发一起带走,这时再进行湿擦。
注意湿擦状态是无法带走毛发的。
2. 2再来说说说说Braava的配件,主要是两块毛巾和两种擦地模式粘版。
先从干擦模式说起,如下图是干擦粘板的正反面。
3. 3白色毛巾是干擦模式使用的毛巾,在干擦前将毛巾固定在粘板上,具体来说就是将粘板沿毛巾的线放置,毛巾多出来的部分塞进蓝色粘板里。
检查一下固定紧了,就可以开始干擦了。
说明书上写的是可以使用毛巾,于是刚买来的时候我一直没用毛巾,觉得这个东西并没有什么用。
直到我用上了毛巾才发现,原来它真的能把地擦干净。
看我用的这么脏你就知道我用过多少次了吧?4. 4这块是湿擦模式的粘版,正反面如下图。
使用的时候要先打开蓝色的注水口,将水注满,这样的话在湿擦的时候会自动出水。
5. 5蓝色的是湿擦毛巾,将注满水的粘板放在稍微浸湿的蓝色毛巾上,毛巾多出的部分反向粘在粘版的黑色区域。
注意有蓝色注水口的那一面,是粘毛巾面。
此外毛巾拍照所示的这一面是擦地面,毛巾反面擦地可能效果不佳。
6. 6机器人还配一个导航仪,一般只要给导航仪装上电池每次机器人开启导航仪就会自动开启,但是距离不要太远。
具体半径参看一下说明书,导航仪可以帮助机器人更好的规划路径。
此外,机器人还有地图记忆功能,在开机擦地的过程中,如果中途没有关闭过电源,擦过的地方一般不会重复再擦。
7.7最后是充电,机器人充电的插口在机器人背面,有一个圆形小孔。
P型合金清扫器说明书正威刷业ZW-PHJ系列产品用途:P型合金橡胶清扫器适用于输送煤泥、粉煤及砂石等的带式输送机高速回程皮带下表面附属物的第二次清扫。
安装在卸载滚筒下方回程段位置,解决残留物料在输送机回程段洒落造成的环境污染和残留物料粘黏在托辊上引起的回程皮带跑偏的问题。
正威刷业ZW-PHJ系列产品特点:一、P型合金清扫器刀片采用分体式结构,单片长度150mm,由天然橡胶和碳化钨复合纳米材料特制而成,清扫效果特别干净。
二、P型合金橡胶清扫器张紧器采用本公司专利设计产品。
独特的禁锢螺栓可以在频繁震动的工作环境下一直保持禁個不松动,提高了产品的可靠性。
三、碳化钨合金清扫器不适合皮带连接方式为金属带扣的带式输送机。
安徽正威刷业有限公司正威刷业ZW-PHJ系列规格型号安徽正威刷业有限公司注:ZW代表正威产品系列,PHJ代表第二道合金橡胶清扫器,-□□□□代表适用带宽正威刷业ZW-PHJ系列外形安装简图正威刷业ZW-PHJ系列技术参数安徽正威刷业有限公司准化”的发展目标。
依托学科优势,集成资源、突出特色、自主创新为建设发展思路,打造国内煤炭矿山行业产品研究开发、设计、经营服务为一体的高新技术企业。
公司主营业务包括矿山机械设备及配件,园林机械配件,工程设备配件,毛刷等各行业提供优良、产品和技术服务。
正威公司历经数载的风雨磨炼,在各界朋友的支持下,成就了皮带输送机辅助设备及毛刷等制造行业的一颗闪耀的明星。
公司秉承“以人为本、用户至上”的经营理念,抓质量、讲信誉、重服务、本着对国家、社会、用户负责任的态度,携手各社会团体和合作伙伴,积极协作、奋斗进取,以矫健的步伐迈向新未来。
安徽正威刷业有限公司。
目录1、适用范围 (2)2、设备保管与开箱验收 (2)3、施工前准备 (3)4、电除尘器本体安装 (3)5、安装中应注意的问题 (10)6、安装的最后检查 (10)7、安装调试内容 (11)8、附录《电除尘器调试大纲》。
(12)1、适用范围1.1本说明书适用于电除尘器本体安装。
技术改造、大修亦可参照执行。
1.2同类型电除尘器及某些产品的特殊规定与本说明书不一致时,应按特殊规定执行。
1.3引用标准JB/T5910-1997 电除尘器JB/T8536-1997 电除尘器机械安装技术条件JB5908-1991 电除尘器主要件抽样检验及包装运输贮存规范JB/T5906-1997 电除尘器阳极板JB/T5909.1-4 电除尘器用瓷绝缘子2、设备保管与开箱验收2.1 设备到达现场后,按下列要求保管。
2.1.1堆放场地要合理布局,基础稳固,便于装运、作业,并作好防洪防涝设施。
2.1.2 产品堆放要符合预装及安装工艺流程要求,避免多次倒运以防变形。
2.1.3 电除尘器零部件的包装运输、标志、贮存应符合JB5908-1991的规定。
2.2 设备开箱验收2.2.1 设备开箱、清点、验收应有制造厂、用户、施工单位共同参加。
2.2.2 验收条件a.供货清册、装箱清单等技术文件资料齐全;b.设备铭牌上的型号、规格、数量与工程设计相符;c.检查产品质量,如因运输、装卸、贮存过程产生变形和尺寸变动,应作校正,对无法修复的要给予报废及更换。
d.设备验收标准依据制造厂家设计图纸、有关技术文件及JB/T5910-1997规定。
3、施工前准备3.1 安装单位应熟悉设备结构、性能、有关设计图纸和技术文件,编制施工组织设计文件和施工质量卡,施工过程中要严格做好质量检验记录。
3.2 按施工组织设计要求,进行场地平整、平台敷设,吊装机械设施、专用机具配置等工作。
3.3 电瓷产品耐压试验应符合JB/T5909.1-4规定。
3.4 制造厂作设备技术交底,必要时派员参加施工期间的技术指导。
EZS2 Secondary Belt Cleaner Installation, Operationand Maintenance ManualRockline® EZS2 Secondary Belt CleanerSerial Number: _____________________________________________________________Purchase Date: ______________________________________________________________Purchased From: ____________________________________________________________Installation Date: ____________________________________________________________Serial number information can be found on the Serial Number Labelincluded in the Information Packet found in the cleaner carton.This information will be helpful for any future inquiries or questionsabout belt cleaner replacement parts, specifications or troubleshooting.EZS2® Secondary Belt CleanerTable of ContentsSection 1 – Important Information (2)1.1 General Introduction (2)1.2 User Benefits (2)1.3 Service Option (2)Section 2 – Safety Considerations and Precautions (3)2.1 Stationary Conveyors (3)2.2 Operating Conveyors (3)Section 3 – Pre-Installation Checks and Options (4)3.1 Checklist (4)Section 4 – Installation Instructions (5)Section 5 – Pre-Operation Checklist and Testing (7)5.1 Pre-Op Checklist (7)5.2 Test Run the Conveyor (7)Section 6 – Maintenance (8)6.1 New Installation Inspection (8)6.2 Routine Visual Inspection (8)6.3 Routine Physical Inspection (8)6.4 Blade Replacement Instructions (9)6.5 Maintenance Log (11)6.6 Cleaner Maintenance Checklist (12)Section 7 – Troubleshooting (13)Section 8 – Specs and CAD Drawings (14)8.1 Specifications and Guidelines (14)8.2 CAD Drawings (15)Section 9 – Replacement Parts (17)Section 10 – Other Flexco Conveyor Products (18)1Section 1 – Important Information1.1 General IntroductionWe at Flexco are very pleased that you have selected an EZS2 Secondary Belt Cleaner for your conveyor system.This manual will help you to understand the operation of this product and assist you in making it work up to its maximum efficiency over its lifetime of service.It is essential for safe and efficient operation that the information and guidelines presented be properly understood and implemented. This manual will provide safety precautions, installation instructions,maintenance procedures and troubleshooting tips.If, however, you have any questions or problems that are not covered, please visit our web site or contact our Customer Service Department:Web site: Customer Service: USA: 1-800-541-8028Visit for other Flexco locations and products.Please read this manual thoroughly and pass it on to any others who will be directly responsible forinstallation, operation and maintenance of this cleaner. While we have tried to make the installation and service tasks as easy and simple as possible, it does however require correct installation and regular inspections and adjustments to maintain top working condition.1.2 User BenefitsCorrect installation and regular maintenance will provide the following benefits for your operation:• Reduced conveyor downtime• Reduced man-hour labor• Lower maintenance budget costs• Increased service life for the belt cleaner and other conveyor components1.3 Service OptionThe EZS2 Secondary Belt Cleaner is designed to be easily installed and serviced by your on-site personnel.However, if you would prefer complete turn-key factory service, please contact your local Flexco Field Representative.2EZS2 Secondary Belt CleanerSection 2 – Safety Considerations and PrecautionsBefore installing and operating the EZS2 Secondary Belt Cleaner, it is important to review and understand the following safety information.There are set-up, maintenance and operational activities involving both stationary and operating conveyors. Each case has a safety protocol.2.1 Stationary ConveyorsThe following activities are performed on stationary conveyors:• Installation • Blade replacement • Repairs• Tension adjustments • CleaningIt is imperative that OSHA/MSHA Lockout/Tagout (LOTO)regulations, 9 CFR 1910.147, be followed before undertakingthe preceding activities. Failure to use LOTO exposesworkers to uncontrolled behavior of the belt cleaner causedby movement of the conveyor belt. Severe injury or deathcan result.Before working:• Lockout/Tagout the conveyor power source• Disengage any takeups• Clear the conveyor belt or clamp securely in placeUse Personal Protective Equipment (PPE):• Safety eyewear• Hardhats• Safety footwearClose quarters, springs and heavy componentscreate a worksite that compromises a worker’s eyes,feet and skull.PPE must be worn to control the foreseeablehazards associated with conveyor belt cleaners.Serious injuries can be avoided.2.2 Operating ConveyorsThere are two routine tasks that must be performed while the conveyor is running:• Inspection of the cleaning performance• Dynamic troubleshootingEvery belt cleaner is an in-running nip hazard. Nevertouch or prod an operating cleaner. Cleaner hazardscause instantaneous amputation and entrapment.Never adjust anything on an operating cleaner.Unforseeable belt projections and tears can catch oncleaners and cause violent movements of the cleanerstructure. Flailing hardware can cause serious injuryor death.Belt cleaners can become projectile hazards. Stay as farfrom the cleaner as practical and use safety eyewear andheadgear. Missiles can inflict serious injury.3Section 3 – Pre-installation Checks and Options 3.1 Checklist• Check that the cleaner size is correct for the beltline width• Check the belt cleaner carton and make sure all the parts are included• Review the “Tools Needed” list on the top of the installation instructions • Check the conveyor site:- Will the cleaner be installed on a chute-I s the install on an open head pulley requiring mounting structure4EZS2 Secondary Belt Cleaner5Section 4 – Installation Instructions4.1 EZS2 Secondary Belt Cleaner1. Install the mounting brackets. Determine thecorrect clamp block (left or right) and bracket needed for each side of the conveyor. The top strap should be offset away from the belt (you should be able to see the notch for the top strap from the outside of the conveyor). (Fig. 1a). Position the mounting bracket to locate the cleaner pole centerline 7" (175mm) below the beltline. The pole must be installed so the blades do not touch the belt. Positioning the bracketsperpendicular to the belt is recommended (Fig.1b).Mounting BracketFormflex ™ CushionAdjusting BracketClamp Block BoltsTop StrapTop StrapCushion PadAdjusting BoltLeft Clamp BlockRight Clamp Block PoleTipTools Needed:• Tape measure• (2) 3/4"(19mm) wrench or crescent wrenchSection 4 – Installation Instructions 4. Set the blade angle. With the gauge provided, rotate the pole sothe blades are set at the correct angle. Lock the pole in place by tightening the clamp block bolts (Fig. 4).4.1 EZS2 Secondary Belt Cleaner (cont.)Test run the cleaner and inspect the performance. If vibration occurs, the pole can be rotated to lay the cushion/blade back another 5° to 10° and then the blades must be retensioned. If more cleaning efficiency is desired, the blade tension can be increased in 1/4 turns on the adjusting nuts (see Step 5).6. Check the blade tension. Pull back on the outside blade until itbreaks contact with the belt and release (Fig.6). If the blades are correctly tensioned, the complete tip of the adjacent blade will be visible. If it is not, make a tension adjustment as instructed in Step 5.5. Set the blade tension. Loosen the 4 clamp block lock bolts (on theback of the mounting brackets) and turn the top adjusting jam nut on each side until the blades make light contact across the entire width of the belt. Make an additional 1 full turn on the adjusting nuts to tension the blades. Tighten the bottom adjusting nuts and the clamp block bolts (Fig. 5).3. Install the pole. Remove the clamp block top strap on one side,and on the opposite side loosen the clamp block bolt. Slide the pole across and into the loosened clamp block, replace the top strap on the clamp block, center the blades on the belt and tighten bothclamp block bolts finger tight.2. Choose the tensioner position. The tensioner is shippedmounted in the push-up position. Depending upon the space constraints of the installation, the tensioner can be optionally mounted in a pull-up position. To do this, loosen the threaded rod lock nut, unscrew the threaded rod and remove adjusting bracket lock bolt. Then move the adjusting bracket and threaded rod to the top of the clamp blocks (Fig. 2) and tighten threaded rod lock nut.Adjusting Bracket Lock BoltFig. 2Push-up Tensioning PositionPull-up Tensioning PositionThreaded Rod Lock NutSection 5 – Pre-Operation Checklist and Testing5.1 Pre-Op Checklist• Recheck that all fasteners are tightened properly• Add pole caps• Apply all supplied labels to the cleaner• Check the blade location on the belt• Be sure that all installation materials and tools have been removed from the belt and the conveyor area5.2 Test Run the Conveyor• Run the conveyor for at least 15 minutes and inspect the cleaning performance• Check the tensioner spring for recommended length (proper tensioning)• Make adjustments as necessaryNO TE: Observing the cleaner when it is running and performing properly will help to detect problems orwhen adjustments are needed later.78EZS2 Secondary Belt CleanerSection 6 – MaintenanceFlexco belt cleaners are designed to operate with minimum maintenance. However, to maintain superior performance some service is required. When the cleaner is installed a regular maintenance program should be set up. This program will ensure that the cleaner operates at optimal efficiency and problems can be identified and fixed before the cleaner stops working.All safety procedures for inspection of equipment (stationary or operating) must be observed. The EZS2 Secondary Belt Cleaner operates at the discharge end of the conveyor and is in direct contact with the moving belt. Only visual observations can be made while the belt is running. Service tasks can be done only with the conveyor stopped and by observing the correct lockout/tagout procedures.6.1 New Installation InspectionAfter the new cleaner has run for a few days a visual inspection should be made to ensure the cleaner is performing properly. Make adjustments as needed.6.3 Routine Physical Inspection (every 6-8 weeks)When the conveyor is not in operation and properly locked and tagged out a physical inspection of the cleaner to perform the following tasks:• Clean material buildup off of the cleaner blade and pole.• Closely inspect the blade for wear and any damage. Replace if needed.• Ensure full blade to belt contact.• Inspect the cleaner pole for damage.• Inspect all fasteners for tightness and wear. Tighten or replace as needed.• Replace any worn or damaged components.• Check the tension of the cleaner blade to the belt. Adjust the tension if necessary using the steps on page 6• When maintenance tasks are completed, test run the conveyor to ensure the cleaner is performing properly.6.2 Routine Visual Inspection (every 2-4 weeks)A visual inspection of the cleaner and belt can determine:• If adjusting brackets are set for optimal tensioning.• If the belt looks clean or if there are areas that are dirty.• If the blade is worn out and needs to be replaced.• If there is damage to the blade or other cleaner components.• If fugitive material is built up on the cleaner or in the transfer area.• If there is cover damage to the belt.• If there is vibration or bouncing of the cleaner on the belt.• If a snub pulley is used, a check should be made for material buildup on the pulley.• Significant signs of carryback.If any of the above conditions exist, a determination should be made on when the conveyor can be stopped for cleaner maintenance.96.4 Blade Replacement InstructionsBEFORE YOU BEGIN:PHYSICALLY LOCK OUT AND TAG THE CONVEYOR AT THE POWER SOURCE.1. Release the blade tension and remove worn blade tips.a. Loosen and turn the top adjusting bolt jam nuts 1" (25mm) above the tops of the adjusting brackets (Fig. 1a).b. Loosen the clamp block lock bolts on both sides and allow the pole to move down and rest on the raised top adjusting bolt jam nuts (Fig. 1b).c. Place location marks across the mounting bracket and the clamp block for quick repositioning after blade replacement (Fig. 1c).d. Remove the clamp block lock bolts and adjusting bracket lock bolts on each side and remove the pole with the clamp blocks and adjusting brackets attached (Fig. 1d).e. Remove the nuts, flat washers and lock washers from the tips and remove the worn tips (Fig. 1e).f. Insert new blade tips and install flat washers, lock washers and nuts finger tight. Buff the outside corners of the last tip on each side of thecleaner (Fig. 1f).Section 6 – MaintenanceFig. 1f6.4 Blade Replacement Instructions (C-Tips) (cont.)Section 6 – Maintenance5. Check the blade tip tension. Pull back on the outer blade in thedirection of belt travel until the blade breaks contact with the belt. Let go of the blade. With correct tension the full thickness of the adjacent blade tip should be visible in front of the outer blade (Fig. 5). Also check the center blade in same manner. Add tension in 1/2-turn increments on the top adjusting bolt jam nuts until view of full thickness of the adjacent blade tip is achieved.3. Reinstall the pole. Slide the pole back into position on themounting brackets, aligning the marks made on the bracket and clamp block. Install the two adjusting bracket lock bolts and tighten. Install the four clamp block lock bolts finger tight (Fig. 3).2. Align the blade tips. Push tips together so there is no more than a.010" to .015" gap between them. Position a straightedge along the top surface of new blade tips. Pull upward on each blade to align with the bottom of the straightedge and tighten the nuts (Fig. 2).4. Set the blade tension. Turn the top adjusting bolt jam nuts downuntil light tip to belt contact is made across the entire width of the cleaner. Add an additional 1½ turns on the top adjusting bolt jam nuts and lock the bottom adjusting bolt jam nuts. Tighten all clamp block lock bolts. N O TE: If the belt is cupped, do not overtension the blades tocontact the belt. A hold-down roller should be installed to flatten the belt (Fig. 4a and 4b). (Try the Stabilizing Return Roller or Stabilizing Roller Bracket Kit).6. Test run cleaner and inspect operation. If vibration occurs,increase tip tension by making 1/2-turn adjustments.Fig. 3Fig. 2Slide each blade upward to meet straightedgeAdjusting Bracket Lock BoltClamp Block Lock Bolts (2)StraightedgeFig. 4aFig. 4bSection 6 – Maintenance6.5 Maintenance LogConveyor Name/No.Date: Work done by: Service Quote #Activity:Date: Work done by: Service Quote #Activity:Date: Work done by: Service Quote #Activity:Date: Work done by: Service Quote #Activity:Date: Work done by: Service Quote #Activity:Date: Work done by: Service Quote #Activity:Date: Work done by: Service Quote #Activity:1112 EZS2 Secondary Belt Cleaner6.6 Cleaner Maintenance ChecklistSection 6 – Maintenance Site:Inspected by:Date:Belt Cleaner:Serial Number:Beltline Information:Beltline Number:Belt Condition:Belt Width:Head Pulley Diameter (Belt & Lagging):Belt Speed:fpmBelt Thickness:Belt Splice Condition of SpliceNumber of splicesSkivedUnskivedMaterial conveyedDays per week run Hours per day runBlade Life:Date blade installed:Date blade inspected:Is blade making complete contact with belt? Yes NoDistance from wear line:LEFT MIDDLERIGHTBlade condition:GoodMeasurement of spring:RequiredCurrentlyWas Cleaner Adjusted:Yes No Pole Condition:GoodBentWorn Lagging:Slide lagCeramicRubberOther NoneCondition of lagging:Good BadOtherCleaner's Overall Performance:( Rate the following 1 - 5, 1 = very poor - 5 = very good )Appearance:Comments:Location:Comments:Maintenance:Comments:Performance:Comments:Other Comments:Not contacting beltEstimated blade life:Damaged 18" 24" 30" 36" 42" 48" 54" 60" 72" (450mm) (600mm) (750mm) (900mm) (1050mm) (1200mm) (1350mm) (1500mm) (1800mm)Section 7 – Troubleshooting1314EZS2 Secondary Belt Cleaner8.1 Specifications and GuidelinesSection 8 – Specs and CAD Drawings Specifications:• Maximum Belt Speed ..........................................700 FPM (3.5M/sec)• Temperature Rating .............................................-30°F to 200°F (-35°C to 93°C) HT..........................................................................-30°F to 400°F (-35°C to 205°C)• Usable Blade Wear Length..................................3/8" (9mm)• Blade Material ...................................................... I mpact Resistant Tungsten Carbide(works with mechanical fasteners)• Available for Belt Widths ....................................18" to 72" (450 to 1800mm)• CEMA Cleaner Rating ........................................Class 3U.S. Patent No. 6,823,983HorizontalVerticalClearance Guidelines for InstallationHorizontal Clearance Required VerticalClearance Required in.mmin.mm41008 1/2 for 18"-54"2139 1/2 for 60"-72"238Pole Length SpecificationsBelt Width Blade Width Pole Length MaximumConveyor Span in.mm in.mm in.mm in.mm184501845052130047117524600246005814505313253075030750641600591475369003690070175065162542105042105076190071177548120048120082205077192554135054135088220083207560150060150094235089222572180072180010626501012525Pole Diameter - 2 3/8” (60mm)158.2 CAD Drawing – EZS2 with C-TipsSection 8 – Specs and CAD Drawings2.38606.861741.60.00157.396.20S E C T I O N A -AS P E C I F I C A T I O N SE Z S 2 S E C O N D A R Y C L E A N E RB E L T W I D T H 'A '(i n ) (m m )P O L E L E N G T H 'B '(i n ) (m m )N U M B E R O F T I P SO R D E R N U M B E R I T E M C O D E184505213003E Z S 2-1875643246005814504E Z S 2-2475644307506416005E Z S 2-3075645369007017506E Z S 2-36756464210507619007E Z S 2-42756474812008220508E Z S 2-48756485413508822009E Z S 2-547564960150094235010E Z S 2-6075650721800106265012E Z S 2-727565116EZS2 Secondary Belt Cleaner8.2 CAD Drawing – EZS2 Hi TempSection 8 – Specs and CAD Drawings (cont.)S P E C I F I C A T I O N SE Z S 2 S E C O N D A R Y C L E A N E RB E L T W I D T H 'A '(i n ) (m m )P O L E L E N G T H 'B '(i n ) (m m )N U M B E R O F T I P SO R D E R N U M B E R I T E M C O D E184505213003H T S 1876085246005814504H T S 2476086307506416005H T S 3076087369007017506H T S 36760884210507619007H T S 42760894812008220508H T S 48760905413508822009H T S 547609160150094235010H T S 6076092721800106265012H T S 727609317Section 9 – Replacement PartsMounting Kit Selection ChartCleaner Width78919 CCMK78920 CCMKHDEZS2 18" - 54" (450 - 1350mm)XEZS2 60" - 72" (1500 - 1800mm)XCleaner Tips and Cushions Required Per Cleaner Sizein.mmTips Required1845032460043075053690064210507481200854135096015001072180012Replacement PartsRef DescriptionOrdering Number Item CodeWt. Lbs.118" (450mm) Pole EZS2P1875652 25.0 24" (600mm) Pole EZS2P2475653 28.0 30" (750mm) Pole EZS2P3075654 30.0 36" (900mm) Pole EZS2P3675655 34.0 42" (1050mm) Pole EZS2P4275656 36.0 48" (1200mm) Pole EZS2P4875657 39.0 54" (1350mm) Pole EZS2P5475658 42.0 60" (1500mm) Pole EZS2P6075659 77.0 72" (1800mm) Pole EZS2P7275660 89.0 2C-Tip Kit* (1 ea.)ICT674535 0.7 3FormFlex ™ Cushion Kit* (incl. 1 cushion & 1 pad)FFCK 75661 1.5 3a High Temp Replacement Cushion Kit (incl. 1 cushion & 1 pad)HTSCK 76094 1.54Adjusting Bracket Kit* (1 ea.)PAB 75513 1.55Pole Clamp Kit LEFT* (1 ea.) (incl. item 7) for sizes 18"-54" (450-1350mm)CCKL 79224 6.8 5aHD Pole Clamp Kit LEFT* (1 ea.) (incl. item 7a) for sizes 60"-72" (1500-1800mm)CCKHDL 792258.7 6Pole Clamp Kit RIGHT* (1 ea.) (incl. item 7) for sizes 18"-54" (450-1350mm)CCKR 79228 6.86aHD Pole Clamp Kit RIGHT* (1 ea.) (incl. item 7a) for sizes 60"-72" (1500-1800mm)CCKHDR 792298.77Cradle Clamp Top Strap (1 ea.) for use on L or R Pole Clamp Kit CCKTS 79232 1.17aHD Cradle Clamp Top Strap (1 ea.) for use on L or R HD Pole Clamp Kit CCKHDTS 79233 1.78Mounting Bracket Kit (1 Right and 1 Left)EZS2MBK 75666 13.0 –Cradle Clamp Mounting Kit* for sizes 18"-54" (450-1350mm)(incl. 2 ea. Items 4 and 1 ea. Items 5, 6 & 8)CCMK 7891933.0 –HD Cradle Clamp Mounting Kit* for sizes 60"-72" (1500-1800mm)(incl. 2 ea. Items 4 and 1 ea. Items 5a, 6a & 8)CCMKHD7892036.7*Hardware Included Lead time: 1 working dayU.S. Patent No. 6,823,98327733a86a5a654118EZS2 Secondary Belt CleanerSection 10 – Other Flexco Conveyor ProductsFlexco provides many conveyor products that help your conveyors to run more efficiently and safely. These components solve typical conveyor problems and improve productivity. Here is a quick overview on just a few of them:• Patented ConShear™ blade renews its cleaning edge as it wears • Visual Tension Check™ for optimal blade tensioning and simple retensioning• Quick and easy one-pin blade replacement Material Path Option™ for optimal cleaning and reduced maintenance• Patented “pivot & tilt” design for superior training action • Dual sensor rollers on each side to minimize belt damage • Pivot point guaranteed not to freeze or seize up • Available for topside and return side belts• Exclusive Velocity Reduction Technology™ to better protect the belt• Slide-Out Service™ gives direct access to all impact bars for change-out• Impact bar supports for longer bar life • 4 models to custom fit to the application• A belt cleaner for the tail pulley• Exclusive blade design quickly spirals debris off the belt • Economical and easy to service • Available in vee or diagonal modelsPT Max™ Belt TrainerDRX Impact BedsBelt Plows• “Limited space” cleaners for tight conveyor applications • High Temp cleaners for severe, high heat applications • A rubber-fingered cleaner for chevron and raised-rib belts• Multiple cleaner styles in stainless steel for corrosive applications Flexco Specialty Belt Cleaners Rockline® EZP1 Precleaner • Long-wearing metal blades for superior cleaning efficiency • Individually mounted blades for consistent cleaning power • Easy to install, simple to service• Works with Flexco mechanical belt splicesFlexco Secondary Belt Cleaners1920EZS2 Secondary Belt Cleaner212525 Wisconsin Avenue • Downers Grove, IL 60515-4200 • USATel:(630)971-0150•Fax:(630)971-1180•E-mail:***************Visit for other Flexco locations and products.©2015 Flexible Steel Lacing Company. 11/15. For reorder: X2403。
安徽正威刷业有限公司
珀挺清扫器安装说明书主要用于清扫皮带正反面的粘料及杂物,煤矿、电力、钢铁、石化等企业的生产输送设备都依靠它来清扫。
下面由清扫器厂家安徽正威刷业为大家介绍下它的安装方法,帮助大家了解。
一、安装前的重要提示
1.安装之前,必须熟知工作中所用相关设备的安全操作规程以及施工现场的安全生产规范。
2.切断输送机的启动电源,挂上”有人操作,禁止合闸”的警示牌。
3.如果设备在井下或密闭的区域内,动用割枪或电焊之前,必须对煤气和灰尘含量进行检测。
确认煤气和灰尘含量在安全值范围内方可操作,否则可能发生事故。
4.使用割枪或电焊对皮带输送机架开孔前,应使用阻燃罩将输送机皮带罩住,否则将有可能损坏皮带。
5.安装工作完毕,在启动输送机皮带之前,应将安装区域内和输送机皮带上的工具、铁器、焊渣等收拾干净。
否则将有可能造成严重的人身伤害,或者导致输送机皮带的损坏。
安徽正威刷业有限公司
6.在输送机运行状态下,如果要调整清扫器的张紧力,操作时千万要小心谨慎,防止手中的工具、身体或衣服被卷入输送带,导致严重的人身伤亡。
对于维护的操作,请在停机状态下进行,切记!
二、珀挺清扫器的安装步骤
1.按照发货清单,开箱检查,箱内应有主机架(装有刀片) , 左右弹簧张紧器各一只及相应安装紧固螺丝等配置。
如有不符,请与我公司或其区域销售代表联系,调整配齐。
2.请仔细阅读安装操作说明书,了解清扫器的组成结构。
3.测量皮带机头部滚筒的直径、皮带厚度、皮带宽度。
4.安装固定,使组装好的清扫器轴心线与滚筒抽心线平行,刀头紧贴带面,然后调整使刀尖线的中心对准滚筒轴心线的中心,将横梁底部的锁紧螺钉拧紧并用螺母锁定。
5.通过调节螺母调整弹簧长度,给刀头施加预紧力,然后用锁紧螺母锁紧。
三、珀挺清扫器的维护
三个月调整一次张紧力。
为防止影响清扫效果,在日常使用过程中,不要让刀片之间夹杂绳索、铁丝等异物。
四、珀挺清扫器更换刀头
1. 切断输送机的启动电源,挂上“有人操作,禁止合闸”的警示牌。
2. 松开清扫器两端的紧固螺栓,转动刀头位置,使刀头与皮带脱
安徽正威刷业有限公司
离。
3. 逐个将固定螺丝取出,拿掉废刀头。
4. 逐个安上新刀头,并用螺栓固定好。
5. 重新扳回刀头位置,并紧固好螺栓。
6.开机试运转。
安徽正威刷业有限公司是一个充满生机和蓬勃发展高速企业。
公司努力致力于实现“组织系统化、管理规范化、工作程序化、效率标准化”的发展目标。
依托学科优势,集成资源、突出特色、自主创新为建设发展思路,打造国内煤炭矿山行业产品研究开发、设计、经营服务为一体的高新技术企业。
公司主营业务包括矿山机械设备及配件,园林机械配件,工程设备配件,毛刷等各行业提供优良、产品和技术服务。
正威公司历经数
安徽正威刷业有限公司
载的风雨磨炼,在各界朋友的支持下,成就了皮带输送机辅助设备及毛刷等制造行业的一颗闪耀的明星。
公司秉承“以人为本、用户至上”的经营理念,抓质量、讲信誉、重服务、本着对国家、社会、用户负责任的态度,携手各社会团体和合作伙伴,积极协作、奋斗进取,以矫健的步伐迈向新未来。
更多详情请点击咨询官网安徽正威刷业。