中文 宁波双嘉DC 系列操作说明书
- 格式:doc
- 大小:49.00 KB
- 文档页数:6

1DC1010/1020/1030/1040 产品手册1DC1000系列通用控制器中文操作手册2DC1010/1020/1030/1040 PRODUCT MANUAL3DC1010/1020/1030/1040 产品手册34DC1010/1020/1030/1040 PRODUCT MANUAL5DC1010/1020/1030/1040 产品手册 5LCK=0001, 只进入LEVEL1并允许改变SP 值 LCK=0101, 除改变LCK 功能外,其它任何参数不能改变7DC1010/1020/1030/1040 产品手册79DC1010/1020/1030/1040 产品手册9假设SET8.3=1,SP值西安市将被改成PV值显示。
达到期望SP值的时间将被减少。
达到SP值的剩余时间显示在参数‘TMER’中。
在此,倒计数的时间是与PV值相关,而不是程序段。
11DC1010/1020/1030/1040 产品手册1112DC1010/1020/1030/1040 PRODUCT MANUAL13DC1010/1020/1030/1040 产品手册133) 结束功能如果ALD 设定为 17 (* 参看选择表), 此程序将在程序8或程序段16结束。
* 这样,在显示窗口中的 PV 和 END 将闪烁,报警继电器动作。
如果程序少于八个程序段,控制器就没有END 命令。
这样,请将下一程序段的 OUT 设定为0(out=0),程序就将在下一设定程序段结束。
否则控制器将运行8个或16个程序段。
4) 连接功能PTN=1, 进行模式1, 它包含8个程序段 PTN=2, 进行模式2, 它包含8个程序段PTN=0, 连接进行模式1和模式2 ,共有碍6个程序段 (首先设定PTN1和PTN2, 然后设定 PTN=0)5) 其它功能 (*参看 level 4)SET8.1=1 程序重运行 SET8.2=0 无停电处理功能 SET8.2=1 有停电处理功能(如果电源中断, 控制器仍将保持内存记忆功能。

DISTRIBUTED BY:MEMBER:VEHICULAR DCSWING GA TE OPERA TORSACCESSORIES:CONTROL BOXES & SOLARVEHICULAR DCSWING GA TE OPERA TORSMagnetic Locks(115 VAC control box only)For added security, DKS offers Magnetic Locks for securing swing gates from unwanted entry with 1200 pounds of holding force. With outputs built into your chosen Swing Gate operator, its easy to install integrated Magnetic Locks to your access gate.SOLAR POWER DETAILS: - 18 Ah batteries (600 cycles*) are typically used to power a single operator. - 35 Ah batteries (1200 cycles*)are used for bi-parting (dual) gate operation.- U se the 10 Watt solar panel with 18 Ah batteries - U se the 20 watt solar panel with 35 Ah batteries - U sing a larger solar panel than recommended will result in battery damageChoosing the solar power option should be dependent on geographical location, number of cycles per day expected and accessories to be used. Solar panels must be located in an area clear of obstructions and shading to allow maximumsunlight to reach the panel. Snow, heavy fog and rain will affect solar panel performance. Solar operation is not recommended in areas where temperatures routinely fall below freezing (32°F or 0°C). Solar panels should be cleaned on a regular basis to ensure optimal performance.DETAILS:- Converts 115 VAC to 24 VDC operating voltage - Built-in battery charger- Magnetic lock power circuit - I ncludes two (2) 3.5 Ah back-up batteries (100 cycles*), 8040 receiver and the 8080-057 photo-eyeDeluxe Control BoxStandard Control BoxSolar Control Box24 VDC SOLAR POWERED CONTROL BOXES DETAILS: - I deal for remote locations where 115 VAC power is not available - 0.0 Amp SBPD circuit (Pat Pend) assures battery power is not used during idle times - S olar panel recharges battery power - 18 Ah and 35 Ah battery options – or supply your own batteries35 Amp/hrDual Gate Batteries18 Amp/hrSingle Gate Batteries* M aximum cycles on battery operation: Cycles shown are for a single operator, for dual operators, reduce this number by half. Actual number of cycles will vary depending on usage, accessories connected, gate weight,operating condition of the gate, temperature and charge state of the batteries.115 V olt AC Power Control BoxesSolar Powered Control Boxes and PanelsSystem includes:Photo-reflective entrapment protection device with a 40 ft. scan distance. Model 8040receiver can be used with MicroPlus or MicroClik transmitters and has a solar power mode.6006/Gates up to 18’ (5.48m) GA TE MOUNTEDLOW VOL T AGECOMP ACTDESIGN 6004/ COLUMN MOUNTED LOW VOLLOW PROFILEFEATURES FEATURES FEATURESSoft start/soft stop provides smooth gate operation soft start/soft stop.Loop Detectors Easy plug-in ports for DKSIncludes 8040 Receiver Photoeye IncludedUp to 40 ft. sensing range.Enclosed Easy InstallRear bracket pivots allowing theunit to be removed easily.ReliabilityDual GatesOverlap feature for dual gates.Low Profilemounts to the gate column.CompactEasy AccessWith removable cover.In-Ground Operatordoes not interfere with theaesthetics of the gate.Overlap Featurefor dual gates.DKS SWING GATE OPERATORS COMPACT RELIABLE EASY TO INSTALL SAFEQUIET CUSTOMIZABLE CORROSION-PROOF GEAR DRIVEN FULL Y ENCLOSED ADJUSTABLE BI-PARTING LOW VOLTAGE。
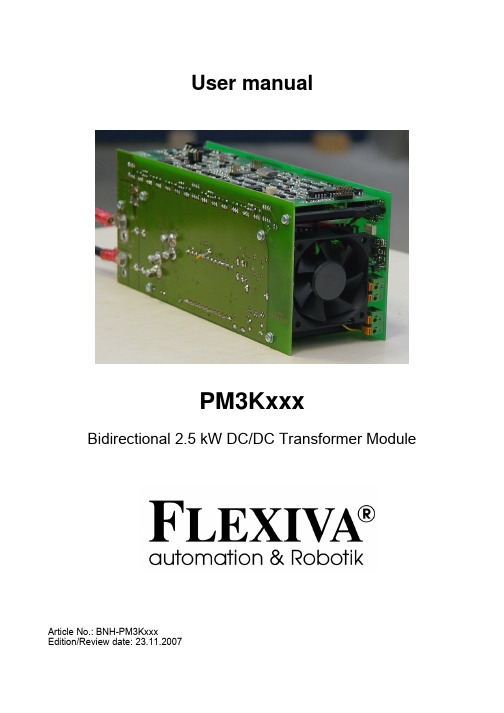
User manualPM3KxxxBidirectional 2.5 kW DC/DC Transformer ModuleArticle No.: BNH-PM3KxxxEdition/Review date: 23.11.2007PrefaceThis technical documentation shall provide an appropriate manipulation of theDC/DC-Transformer Modules PM3Kxxx. The modules serve the purpose ofbidirectional transformation of direct current voltages.The instruction hand book should be preserved.Texts, diagrams and tables shall neither be copied nor reproduced nor shall they bemade available to third parties without our express authorisation.We are also pointing out that this technical documentation is not part of an existing orprevious agreement or consent or part of a legal relationship.All obligations and liability result from the sales contract that also, solely contains theguarantee regulation. The contractual provisions are not affected by the technicaldocumentation.The documentations of the sub-suppliers are also effective to this documentation ofthe manufacturer.As a supplement to this instruction hand book, all the universally valid legal and otherbinding regulations with respect to prevention of accidents and on environmentalprotection shall be respected and instructed.Table of contents1Introduction (6)2Identification (7)2.1Product make and model designation (7)2.2Product versions / Software version / Edition (7)2.3Declaration of compliance with the product standards (8)3Product description (9)3.1General information / Utilisation in accordance with the regulations (9)3.2Technical information and Data (10)3.3Power/Performance connections (12)3.4Signal connections (13)3.5Safety information (16)3.5.1Safety measures during installation (16)3.5.2Residual dangers (16)3.5.3Skills and qualification of the operating staff (17)4Preparation/priming of the product for application (18)4.1Transportation (18)4.2Packaging (18)4.3Storage (18)4.4Initial operation (18)4.4.1Connection DC-Link (ZK) (18)4.4.2Connection variable voltage (VS) (18)4.4.3Setting module into operation (19)5Operation (20)5.1Mode of operation (20)5.1.1Operation modes (20)5.1.2Operation without a digital interface (22)5.1.3Parallel connection of modules on the VS-side (22)5.1.4Virtual capacitor (23)5.1.5Safety disconnection (23)5.1.6Miscellaneous errors (24)5.1.7Reducing current during high variable voltage (24)5.1.8Empty DC-Link (24)5.2Basic parameterisation (26)5.2.1Currents VS-side (26)5.2.2Voltages VS-side (27)5.2.3Voltages ZK-Side (28)5.2.4External (29)5.2.5Information (30)5.2.6Commands (31)5.2.7Oscilloscope (31)5.3Adjustment of the controller (34)5.3.1Controller parameter VS-controller (34)5.3.2Controller parameter ZK-controller (36)5.4Typical application cases / Parameterisation examples (38)5.5Troubleshooting (45)6Programming / Parameterisation (46)6.1Preliminary remarks (46)6.2The utilised ASCII-protocol (47)6.2.1Read / write (47)6.2.2ASCII-long / ASCII-short (49)6.2.3Specific example (50)6.2.4Error messages (50)6.3Communication by means of Terminal-Software (52)6.4Communication by means of ModulConfigSuite (52)7The parameterisation software ...ModulConfigSuite“. (53)7.1Preliminary remarks (53)7.2Installation (53)7.3De-installation (53)7.4Usage of the software (54)7.4.1Outline (54)7.4.2Single-Mode / Multi-Mode (54)7.4.3Groupings with the aid of colors / Background colors (55)7.4.4Meaning of the error codes (55)7.4.5Selection and allocation of the interfaces (56)7.4.6Connecting / disconnecting (57)7.4.7Storage / Loading of parameter settings (58)7.4.8Readout / Parameterising (58)7.4.9Data visualisation / Recording (59)8Maintenance service and repairs by the customer service (61)Table of figuresFig. 1: Principle (9)Fig. 2: Power/performance connections (12)Fig. 3: Signal connections (13)Fig. 4: Block circuit diagram of the voltage regulations (34)Fig. 5: Module parameterisation by means of Terminal-Software (52)Fig. 6: Configuration of the software (54)Fig. 7: Single-Mode / Module 4 (54)Fig. 8: Multi-Mode (55)Fig. 9: Grouping example (55)Fig. 10: Color key (55)Fig. 11: Example of error codes (56)Fig. 12: Meaning of the error codes (56)Fig. 13: Allocation of interfaces (57)Fig. 14: Information during connection interruption (57)Fig. 15: Dialogue for loading parameter setting data (58)Fig. 16: Buttons for Reading / Writing (Single-Mode) (59)Fig. 17: Dialogue box Display / Logging (59)Fig. 18: Recorded ASCII-Data (59)List of tablesTable 1: Pin-configuration SV1 (14)Table 2: Pin-configuration SV4 (15)Table 3: Properties in the operation modes (21)Table 4: Operation modes (21)Table 5: I/O-Special configurations (22)Table 6: Error codes (24)Table 7: Operation modes oscilloscope (33)Table 8: State values oscilloscope (33)Table 9: Settings RS232 (46)Table 10: General command sequences (47)Table 11: Complete summary of all the command codes (48)Table 12: Module answer during reading of a parameter /value (49)Table 13: Module answer during writing of a parameter / value (49)Table 14: Protocol switch over (49)Table 15: Reading ASCII-long (50)Table 16: Reading ASCII-short (50)Table 17: Writing ASCII-long (50)Table 18: Writing ASCII-short (50)Table 19: Error messages (51)In order to ensure the operator’s safety as well as to avoid possible damages on the module, it must be unconditionally assured, before utilisation of the module or facility connected thereto, that this user manual is completely read.The present user manual shall thereby help to better understanding of the DC/DC module as well as to be able to appropriately make use of the application/employment possibilities in accordance with the regulations.The operating personnel shall be very acquainted with all the components before start of operation. Special attention shall be paid to the section safety.The present user manual contains important information on the proper and economical utilisation of the DC/DC-Module. Observation of these instructions shall contribute to avoidance of danger, reduction of repair and maintenance costs as well as reduction of the breakdown periods, and an increase in the lifespan of the module.In the chapters of this manual there are some symbols at the margins. These symbols refer to function of the corresponding text paragraph, and are of importance with respect to the operation or maintenance. They refer to important descriptions or remarks:Caution!All sections with this symbol give hints on avoidance of damages on the equipment.InformationSections with this symbol give important information on an effective utilisation..The work steps that have been illustrated in logical sequence at the side of this symbol instruct the operator on the most ergonomical procedure of the operation..2.1 Product make and model designationZEMIS® PM3Kxxx2.2 Product versions / Software version / EditionProduct versions: PM3K030PM3K045PM3K060PM3K120Software version: 01.02Edition: 11/20072.3 Declaration of compliance with the product standards3 Productdescription3.1 General information / Utilisation in accordance with the regulationsThe DC/DC transformer module serves the purpose of interconnection, through aDC-Link, between different sources, drains and storage elements of electrical energywith different operation voltage ranges between 12V and 120V. It possesses anelectrical isolation, high degree of efficiency, flexible control as well as a digitalinterface. A simple connection of a 230V alternating current network is possible dueto the DC-Link voltage of 375V.Terms and definitions and abbreviationsFig. 1: PrincipleZK: DC-Link – Is hereby understood to be the side of the modulewhere the connection with other DC/DC modules or the couplingwith any other 380V DC component (e.g. inverter) can take place.VS: Variable voltage – Is hereby known as the side of the module onwhich the components are connected. The appellation outlet canequally be used, but however not very correct here due to thebidirectional mode of operation.Set-up operation: Designates the power flow from the VS side to the ZK side. Thesign of the current (vs_isoll) is hereby positive.Set-down operation: Designates the power flow from ZK-side to the VS-side. The sign of the current (vs_isoll) is hereby negative.3.2 Technical information and DataPerformance data:Maximum power output 2.5 kWVoltage and electricity ranges VS-side-100..0..100ADCPM3K030 0..30V-75..0..75ADCPM3K045 0..45VDC-50..0..50A PM3K060 0..60V-25..0..25ADCPM3K120 0..120VDC-Link voltage 365..385 V DCStation supply stand by: 5 W Operation: maximum 10 WInterfaces RS232 (CMOS-level), electrically isolatedDigital outputs 3 x 0…5 V (current limited with 330 Ω)Digital inputs 3 x 0...5 V (CMOS-level)Analogue input 2 x 0..10 V (internal resistance 55 kΩ)Cooling system Air conditioning (temperature controlled ventilator)Degree of efficiency > 90 %Ambient conditionsAmbient temperature range -20…50°C (during operation)Degree of protection IP 00Maximum humidity up to 90% (not condensed)Pollutants The surroundings should not have a great amountof dust, and especially no metal or graphite dust.EnclosureBodywork openframeDimensions 230 mm x 80 mm x 100 mmDeadweight ca. 1.7 kgScope of delivery•DC/DC-Module PM3Kxxx (pre-parameterised according to the model ofthe module)•Data storage media (CD)•Parameter settings for common applications (on CD)•Software for visualisation and parameterisations (on CD)•User manual (on CD)Optional•Device system for a maximum of 4 modules (alternative/model on demand) •Pre-parameterisation in accordance with the planned application•Initial operation in the client’s premises3.3 Power/PerformanceconnectionsFig. 2: Power/performance connectionsX1: ZK-connection•Connector with clamp maximum 2.5mm²X2: Auxiliary power supply•Connector with clamp maximum 2.5mm²•The module requires an auxiliary power supply 12...30V approx. 10W during operation, approx. 5W stand by.•Isolated onto the VS-Side with testing voltage. 600V DC onto the ZK-voltage. 6kVpX3: VS-connection•Cooling element – facing side is negative terminal•Bolted connection for power connection with screw M5•Please do not exercise excessive bending force on the printed circuit board, that is, bus bar / sheeting in the enclosure!connections3.4 SignalFig. 3: Signal connectionsJP1: Write protection electronic potentiometerJumper JP1 must be position in order to be able to describe/write the electronicpotentiometer for over current disconnection and over voltage /under voltagedisconnection, on the side of the hardware.JP2: Allocation power limitsThe current limits can be fixed with the help of the jumper field JP2. There are 3possibilities hereto:•Upper and lower limits of the electronic potentiometer (lower value negated)•Upper limit of the electronic potentiometer, lower 0 (only set-up operation possible)•Lower limit of the electronic potentiometer (negated), upper 0 (only set-down operation possible)SV1: Communication interfaceCommunication with the module takes place via an optically isolated serial interface.A supply voltage of 5V (approximately 30mA) shall be provided for the control of theopto-electronic coupler. The signals RXD and TXD can be switched on with the helpof SELECT, in order to activate several modules by a simple method. If SELECT islow, TXD will be highly resistive and RXD shall receive no signals. Hence, in case ofutilisation of several modules, the RXD and TXD lines can be switched on parallel,and the module currently activated can be selected with the aid of SELECT.Data rate: 115200bps,Format: 8bit+1 StoppbitThe signals OC_OK and OC_EN are provided for an additional safety feature:OC_OK shall be low if the DC-Link voltage exceeds the upper limit. Hence a module can inform all the others when this event occurs, whereby all the OC – OK signals are UND linked and OC – EN added. Through this means, it is then possible to avoid large scale damages during breakdown of the DC-Link voltage measuring amplifier.Pin abbreviationExplanation1 GND Ground2 VCC +5V3 OC_OK H: no ZK-over voltage4 NC Notused5 NC notused6 SELECT H: Serial interface activatedL: Serial interface deactivated7 OC_EN H: Module enabled8 RXD Inputdata9 NC notused10 TXD OutputdataTable 1: Pin-configuration SV1SV2 / SV3: Service interfacesSV2 and SV3 are programming connections for the micro controllers of the modules. They are not required for the operation and have to be left a lone.SV4: External signal inputs / signal outputsThe module is equipped with additional inputs and outputs. These are 3 digital inputs, 3 digital outputs and 2 analogue inputs, in order, either to collect data from connected components or to operate the module by means of the applied signals on these inputs.The ground of these connections is connected to the power ground of the VS – side.A direct connection of these two grounds should not be carried out, else a ground loop shall be produced and this will lead to malfunctioning and destruction of the module or the components connected thereto.Digital inputs: 0...5 V CMOS-level, rather not protection-wired Digital outputs: 0…5 V, power limited with 330Ohm-resistance Analogue inputs: 0..10 V Ù 0..1000, internal resistance 55kOhmPin AbbreviationExplanation1 GND Ground2 DA2 Digital output 23 AIN1 Analogue input 14 DA1 Digital output 15 AIN2 Analogue input 26 DE3 Digital input 37 VCC +5V8 DE2 Digital input 29 DA3 Digital output 110 DE1 Digital input 1 Table 2: Pin-configuration SV43.5 SafetyinformationThe DC/DC-Transformer –Module was designed and manufactured according torecognised regulations and provisions of technology, and came under safety testscrutiny before delivery.There is however danger for persons and for the DC/DC-Transformer module itself, incase of faulty operation.Every person, who installs, operates or carries out maintenance on the module must:1. read and particularly respect the instructions in this user manual,2. must be trained for this function and be well instructed.Protection rating IITest voltage between the ZK-Side and all the other potentials 6kVpTest voltage between auxiliary power supply and the VS-side 600Vp3.5.1 Safety measures during installationIn order to ensure a trouble-free operation and to obtain durability of the electroniccomponents, heat accumulation shall be avoided, especially on the front side of themodule (ventilator and opposite side). The installation location must be appropriatelychosen, so that the module can be adequately ventilated or aerated during operation.Caution!The cooling elements are connected to potentials, i.e. it is not permitted to touch them!3.5.2 ResidualdangersThe described product meets the technological standards and the recognisedtechnical safety provisions. However danger might still occur.The possible residual dangers in connection with the operation of the module thatmight occur, can originate through:•Utilisation of electrical / electronic components (sources, drains, storage or accumulators) of the third party supplier.• Electricity itselfThe effective specifications and safety instructions of all the correspondingcomponents mounted hereby, with respect to the operation and installation ormounting location must be respected and followed.3.5.3 Skills and qualification of the operating staffPlacing into operation and the connection of the module shall be carried out only bypersons who have undergone professional training in electro-technics or electricalengineering and who are in position to carrying out the power connectionsprofessionally.Basic knowledge of PCs and handling of the current WINDOWS operating system isnecessary for the utilisation of the delivered software in the scope of delivery. Detailsin this respect are found in the enclosed comprehensive programme description.4 Preparation/priming of the product for application4.1 TransportationDuring transportation the module shall not be exposed to vibrations, intenseagitations as well as thrust, else this might possibly lead to damages of the sensiblecomponents.4.2 PackagingBasically, appropriate, proper and environmentally friendly packaging materials shallbe used for transportation and consignment.Due to the fact that the module itself possesses a degree of protection IP00, atransport package that averts infiltration of water, dirt and dust must be selected.Positioning of conventional dehumidification materials in the package isrecommended. .4.3 StoragePermanent or long-lasting storage: closed rooms, dry, room temperatureoperation4.4 InitialThe following conditions must be ensured and checked before initial operation:•The professional installation and layout of all the necessary electrical connecting cables as well as the correct connection of all the components to the module.•The acknowledgement of the instructions and guidelines of this user manual.4.4.1 Connection DC-Link (ZK)•The diameter of the conductor/wire must be chosen in accordance with the anticipated electric current, 1.5mm² is recommended.•Take note of the polarity4.4.2 Connection variable voltage (VS)•The diameter of the conductor/wire must be chosen in accordance with the anticipated electric current.•Take note of the polarity•Conductors or wires must be provided with thimble or cable lugs and fixed by means of M% screws, appropriate screw nuts and two washers or grommets.4.4.3 Setting module into operation1. Read this documentation!2. Install auxiliary power supply3. Parameterise4. Install DC-Link and/or variable voltage5. Switch on5 Operation5.1 Mode of operationThe DC/DC-Transformer module can bi-directionally transfer power between DC-Linkwith a voltage of 350V…400V and a side with variable voltage. An extensive orcomprehensive parameterisation is necessary due to the fact that several degrees offreedom arise thereby. In order to attain maximum flexibility hereby, the adjustment ofthe DC-Link voltage and the output voltage shall be realised digitally.A PIDT1 control system exists for the DC-Link and the output (each) respectively.They are differently connected according to the operation mode. The output value ofthis connection shall be restricted by the corresponding maximum value andtransmitted to the hardware by means of the DAC (vs_isoll). Furthermore, the I-unitsof the control systems shall also be restricted during the limitation, so that they cannot run up to the maximum value. They will be held at the boundary value so that achange over from one control system to the other can take place without interruption.modes5.1.1 OperationTwo possibilities are provided for the connection of the output values of the outputvoltage control system and the DC-Link voltage control system.In the operation mode 0, a maximum value shall be applied in both control systems.This is suited for operation as an output transformer, i.e. power only flows out of themodule into a load or for utilisation by a buffer, e.g. of a double-layercapacitor/condenser or accumulator/storage battery. The connection of the controlsystem functions as follows: If the DC-Link voltage is higher than its regulated desiredvalue, the output voltage control system will be active, and maintains U VS constant. Ifthe voltage of the DC-Link now drops, the DC-Link voltage control system then winscontrol and tries to keep the DC-Link voltage constant. Hence the followingcharacteristics arise for this operation mode:•The output voltage shall be limited upwards, this, for example avoids overcharge of the buffer.•The DC-Link voltage shall be limited downwards, and this hinders breakdown of the DC-Link in the case of a bigger load.Voltages Tendencies Input (1) Output (0)U ZK<U ZKsoll U VS<U VSsoll IsollZ ↑IsollV ↓Isoll ↓ Isoll↑(discharge buffer)U ZK>U ZKsoll U VS<U VSsoll IsollZ ↓IsollV ↓Isoll ↓ Isoll↓(Output/charge Buffer)U ZK<U ZKsoll U VS>U VSsoll IsollZ ↑IsollV ↑Isoll ↑(Input e.g. BZ)Isoll ↑(Reload)U ZK>U ZKsoll U VS>U VSsollIsollZ ↓IsollV ↑Isoll ↓ Isoll↑(Reload)Table 3: Properties in the operation modesIn the operation mode 1 the minimum value of both control systems shall be used as electricity default value. This is favourable for the connection or coupling of sourcese.g. a fuel cell. In this operation mode, it is being avoided that the output voltageexceeds the desired value and thereby, for instance, causing damages to the fuelcell. In normal cases the DC-Link voltage control system is in operation and maintains the DC-Link voltage constant. The output voltage control system shall be active and shall reduce the current so that the desired value can not be undershot, only whenthe output voltage falls below the desired value.Parameter: mod_opmodeBit DecHexOperationmodeImaxIminUsollVS7 6 5 4 3 2 1 00 0 0 x 0 0 0 0 (16) 0 (0x10) 0x00 Output/buffer komm komm komm0 0 0 x 0 0 0 1 (17) 1 (0x11) 0x01 Input komm komm komm0 0 0 x 0 0 1 0 (18) 2 (0x12) 0x02 Output/buffer komm ainx ainy0 0 0 x 0 0 1 1 (19) 3 (0x13) 0x03 input komm ainx ainy0 0 0 x 0 1 0 0 (20) 4 (0x14) 0x04 Output/buffer ainx komm ainy0 0 0 x 0 1 0 1 (21) 5 (0x15) 0x05 input ainx komm ainy0 0 0 x 0 1 1 0 (22) 6 (0x16) 0x06 Output/buffer ainx ainy komm0 0 0 x 0 1 1 1 (23) 7 (0x17) 0x07 input ainx ainy komm0 0 0 x 1 0 0 0 (24) 8 (0x18) 0x08 Output/buffer komm komm ainx0 0 0 x 1 0 0 1 (25) 9 (0x19) 0x09 input komm komm ainx0 0 0 x 1 0 1 0 (26) 10 (0x1A) 0x0A Output/buffer ainx komm komm0 0 0 x 1 0 1 1 (27) 11 (0x1B) 0x0B input ainx komm komm0 0 0 x 1 1 0 0 (28) 12 (0x1C) 0x0C Output/buffer komm ainx komm0 0 0 x 1 1 0 1 (29) 13 (0x1D) 0x0D input komm ainx kommx x x 1 x x x x Digital inputs/outputs for operationTable 4: Operation modes5.1.2 Operation without a digital interfaceBesides parameter transmission through the serial interface, the input of the desiredvalues can also be carried out via the analogue inputs. The corresponding operationmode (Table 4) shall be selected for this purpose. The valued are thereby scaled asfollows:• Voltages: 0V ≙ min, 10V ≙ max• Electricity/currents: 0V ≙ -max, 5V ≙ 0, 10V ≙ +maxIt is also possible to operate the module via the digital inputs and outputs (Table 5).Hereto Bit 4 shall be set in the parameter mod_opmode (values in brackets in Table4).Interface/connection FunctionDA1 doutj State of operation L: off H: onError H:ErrorDA2 DoutkDA3 DoutlonDE1 dinaOn H:DE2 dinb Reset error H: Reset (Flank)DE3 dincTable 5: I/O-Special configurations5.1.3 Parallel connection of modules on the VS-sideFor the enhancement of the performance, it is possible to interconnect severalDC/DC-transformer modules on the VS side. However, this interconnection has thefollowing disadvantages: Due to the fact that PI-controllers are used, the outputvoltage is regulated at exactly the desired or obliged value. In case of two DC/DC-Transformers connected in parallel, there are constantly minor differences in thevoltage frequencies, such that a DC/DC-transformer always takes over the full loaduntil its current/electricity limit is attained. This is disadvantageous because thedegree of efficiency of the DC/DC-transformer merely lies in the average range ofperformance, i.e. the highest level it can achieve.This problem can be solved by a drop in the voltage/current characteristic. Principally,this is already existing through the resistances of the connecting cables, but just toosmall. The decreasing characteristic curve can be attained, by a simple means,through a P-controller for the output voltage. This is disadvantageous here due to thedigital control system, because high quantization skips/jumps of the obliged currentvalue will occur as a result of the high necessary amplifications. Therefore thefollowing configuration/arrangement is advantageous:A PI-controller shall be employed here as a control system. A multiplex of thecurrent/electricity value that has been smoothed beforehand by means of a PT1element with a relatively long time constant or delay time shall be added to theobliged voltage value. The structure then exhibits a similar characteristic similar tothat of a voltage source afflicted with internal resistance that is over pressed with abig capacitor. This functionality is already provided through the parameter vs_fkkpand vs_fkkt.capacitor5.1.4 VirtualWith the parameter setting for the functionality of the virtual capacitor, the module canthereby be parameterised that the output voltage can be represented or mapped todesired value of the DC-Link voltage. For instance, if one connects a double layercapacitor to the output of a module, the voltage of the capacitor changes with respectto the charging condition of this capacitor. This shall be detected by the module, andcan be furnished/endued with an offset (zk_vcko), will then be amplified (zk_vckp)and eventually filtered (zk_vckt) (Fig. 4).5.1.5 Safety disconnectionThe DC/DC transformer module possesses, beside the already mentioned cross-linked DC-Link voltage monitoring system, additional safety disconnections on theside of the hardware.Altogether the following are available:•Disconnection in case of excess temperature•Disconnection in case of under-voltage on the VS-side•Disconnection in case of over-voltage on the VS-side•Disconnection in case of over-current on the VS-side•Disconnection in case of over-voltage on the DC-LinkIn the case of disconnection due to excess temperature, the temperature of thecooling element and that of the transformer are monitored. Disconnection takes placeif the temperature of the cooling element or that of the transformer is more than 93°C.The output voltage is being monitored with respect to overstepping or undershootingof a limit value. Disconnection as a result of over-voltage serves the purpose ofprotecting the batteries or fuel cells in case of failure or malfunctioning of the controlsystem. Disconnection is activated at an overstepping or an undershooting of the limitvalue by approximately 3%.Over-current disconnection is also activated in case of failure or malfunctioning of the control system.The limit values for over-current or over-voltage disconnection are stores in an electronic potentiometer. However, these values are assumed or taken-over in this device only after the module has been switched off and switched on once more or re-started. The jumper JP1 must be set during this process.All the errors shall be deviated into the variable mod_state and must be acknowledged and therewith reset or re-initialised. This is implemented by setting err_quit to 1.Parameter: mod_stateBit DecHex State 7 6 5 4 3 2 1 0 Reaction of theSystemRestart, when erroris eradicated0 0 0 0 0 0 0 0 0 0x00 No error Disconnection, err_quit=0 err_quit=10 0 0 0 0 0 0 1 1 0x010 0 0 0 0 0 1 0 2 0x02 U_ZK too low Disconnection, err_quit=0 err_quit=10 0 0 0 0 1 0 0 4 0x04 Hardware error Disconnection, err_quit=0 err_quit=10 0 0 0 1 0 0 0 8 0x080 0 0 1 0 0 0 0 16 0x10 Excess temperature Disconnection, err_quit=0 err_quit=10 0 1 0 0 0 0 0 32 0x20 I_VS too big Disconnection, err_quit=0 err_quit=10 1 0 0 0 0 0 0 64 0x40 U_VS too small / big Disconnection, err_quit=0 err_quit=11 0 0 0 1 0 0 0 128 0x80 U_ZK too big Disconnection, err_quit=0 err_quit=1Table 6: Error codes5.1.6 MiscellaneouserrorsThe errors generated by the software in the variable mod_state shall be further onregistered. These are the errors 0x02 and 0x04. The error 0x04 occurs when thepower supply of the module is not secured or assured or if the connected or linkedDC-Link-over-voltage-disconnection has been activated.The error 0x02 shall be generated, if there is a breakdown of the DC-Link voltageduring operation.5.1.7 Reducing current during high variable voltageA linear reduction of the maximum output current takes place at voltages over 5/6 ofthe maximum variable voltage, such that the maximum current /electricity is availableat a maximum output voltage of 83.3%.5.1.8 EmptyDC-LinkIn case the DC-Link is empty, the module sets to an DC-Link charging mode, afterswitch on, and charges the DC-Link. It is only after completion of this process and。

NexStorDC操作手册(中文)目录第1章NEXSTORDC的基本操作 (5)1.1N EX S TOR DC的安装 (5)1.2存储池 (8)1.2.1基本概念 (8)1.2.2基本配置流程 (8)1.3识别物理设备 (8)1.4新建存储池 (10)1.5设置存储池 (12)1.6TVM透明卷管理 (13)1.6.1新建存储池 (13)1.6.2设置存储池 (14)1.6.3管理磁盘设备 (14)1.7新建存储卷 (15)1.7.1基本概念 (15)1.7.2操作如下 (15)第2章实现IP SAN 功能 (17)2.1基本概念 (17)2.1.1IP SAN (17)2.1.2通道 (17)2.2新建I SCSI连接 (17)2.3新建存储应用服务器 (17)2.4新建通道 (18)2.5映射卷 (20)2.5.1基本配置流程 (20)2.5.2映射卷的操作步骤如下 (20)2.6客户端扫描磁盘 (21)第3章实现FC SAN功能 (26)3.1新建存储应用服务器 (26)3.2新建通道 (26)3.3映射卷 (27)3.4客户端设置 (28)第4章实现SNAPSHOT功能 (29)4.1基本概念 (29)4.2基本配置流程 (29)4.3操作如下 (29)4.3.1新建快照 (29)4.3.2激活快照 (30)4.3.3CI操作 (31)4.3.4分离快照 (32)4.3.5删除快照 (32)4.3.6映射卷 (32)第5章实现REPLICATOR功能 (33)5.1基本概念 (33)5.2基本配置流程 (33)5.3操作如下 (33)5.3.1新建备份应用服务器 (33)5.3.2R EPLICATOR客户端的操作 (34)第6章实现CDP功能 (35)6.1基本概念 (35)6.2基本配置流程 (35)6.2.1服务端配置流程 (35)6.2.2客户端配置流程 (35)6.3CDP操作如下 (36)6.3.1服务端新建CDP快照 (36)6.3.2客户端新建CDP快照 (39)6.4删除快照 (39)6.5快照记录 (39)6.6快照恢复 (40)6.7新建回滚 (40)6.8删除回滚 (41)第7章实现DR(DISASTER RECOVERY)容灾功能 (43)7.1基本概念 (43)7.1.1DR (43)7.1.2备份模式 (43)7.2基本配置流程 (43)7.3操作如下 (43)7.3.1添加服务器 (43)7.3.2设置备份模式 (45)7.3.3新建备份组 (46)7.3.4删除备份组 (47)7.3.5备份状态 (47)7.3.6初始化 (48)7.3.7停止初始化 (48)7.3.8备份目标卷CDP快照 (48)7.3.9数据恢复 (49)第8章HA(HIGH AVAILABILITY)高可用性功能 (50)8.1基本概念 (50)8.2基本配置流程 (50)8.3操作如下 (50)8.3.1添加HA服务器 (50)8.3.2互建通道 (51)8.3.3新建镜像 (52)8.3.4镜像卷初始化 (53)8.3.5停止初始化 (55)第9章内部镜像(LUNMIRROR) (56)9.1基本概念 (56)9.2基本配置流程 (56)9.3操作说明 (56)第10章NAS (59)10.1基本概念 (59)10.2基本配置流程 (59)10.3操作如下 (59)10.3.1安装SFU (59)10.3.2新建存储池 (61)10.3.3设置存储池 (62)10.3.4新建卷 (64)10.3.5配置卷组 (65)10.3.6新建NAS (67)10.3.7删除NAS (68)10.3.8设置NAS共享属性 (69)10.3.9W INDOWS 平台客户端访问 (70)10.3.10U NIX 平台客户端访问 (71)第11章附录 (73)I SCSI INITIATOR设置 (73)1.M ICROSOFT I SCSI INITIATOR设置 (73)2.AIX ISCSI INITIATOR设置 (77)3.O PEN S OLARIS I SCSI INITIATOR设置(32B,64B一样) (78)4. LINUX ISCSI INITIATOR设置 (79)MPIO (81)1.安装MPIO (81)2.MPIO使用 (82)3.MPIO切换失败解疑 (83)第12章FAQ(常见问题解答) (86)12.1N EX S TOR DC专业术语 (86)12.2I SCSI连接注意事项 (87)12.3N EX S TOR DC注意事项 (87)12.4客户端R EPLICATOR注意事项 (89)12.5安装程序系统跳出的提示说明 (89)12.6CDP回滚注意事项 (90)12.7HA功能注意点 (90)第1章NexStorDC的基本操作1.1 NexStorDC的安装NexStorDC的安装非常方便简单,您只需要依据软件提示对话框点击即可,具体的步骤为:(1)双击运行安装程序。

多功能电力仪表用户手册一、概述该系列产品是一种具有可编程测量、显示、数字通讯和电能脉冲变送输出等多功能智能仪表,能够完成电量测量、电能计量、数据显示、采集及传输,可广泛应用变电站自动化、配电自动化、智能建筑、企业内部的电能测量、管理、考核。
测量精度为0.5级,实现LCD现场显示和远程RS-485数字接口通讯,采用MODBUS-RTU通讯协议。
二、技术参数性能参数输入测电压显示网络三相三线、三相四线电压额定值AC400V过负荷持续:1.2倍瞬时:2倍/10s功耗<1V A(每相)阻抗>300kΩ精度RMS测量,精度等级0.5电流额定值AC5A过负荷持续:1.2倍瞬时:2倍/10s功耗<0.4V A(每相)阻抗<20MΩ精度RMS测量,精度等级0.5 频率40~60Hz,精度0.1Hz功能有功、无功、视在功率,精度0.5级电能四相限计量,有功精度0.5级,无功精度1级显示可编程、切换、循环的LCD显示电源工作范围AC、DC 80~270V 功耗≦5V A输出数字接口RS-485、MODBUS-RTU协议脉冲输出2路电能脉冲输出,光耦隔离环境工作环境-10~55℃储存环境-20~75℃安全耐压输入和电源>2kV,输入和输出>2kV,电源和输出>1kV 绝缘输入、输出、电源对机壳>5MΩ外形尺寸120×120 96×96(长、宽、)重量0.6kg三、安装与接线1. 安装尺寸:2. 安装方法:1)在固定的配电柜上,选择合适的地方开一个开孔尺寸的安装孔。
2)取出DCE仪表,松开定位螺丝,取下固定夹。
3)将仪表安装插入配电柜的仪表孔中。
4)插入仪表的固定夹,固定定位螺丝。
3.端子接线:注:L-N为辅助电源具体接线及仪表参数(脉冲常数等)见仪表所带接线图。
3)辅助电源:DCE系列网络电力仪表具备通用的(AC/DC)开关电源输入接口,若不作特殊声明,提供的是220V(AC/DC)或110V(AC/DC)电源接口的标准产品,仪表极限的工作电源电压为AC/DC:80-270V,请保证所提供的电源适用于该系列产品,以上防止损坏产品。

DC系列伺服驱动器使用说明书DC s e r i e s ser v o d r i v er u s e n g m a n u a l深圳市欧诺克科技有限公司DC 系列伺服驱动器型号说明备注: 1.驱动器供电电压必须大于或者等于电机额定电压2.驱动器的额定电流必须大于或者等于电机的额定电流DCPC-09012- OP E B系列DC/DE/DE2/BC/BC2/DH/BH制动单元B:带制动单元反馈E:光电增量式A/B 正交C:磁电增量式A/B 正交 A17:光电绝对值17bit C17:磁电绝对值17bit R:旋转变压器 H:数字霍尔 S:模拟量正余弦输入指令P:脉冲Hp:高速脉冲A:模拟量R:RS485 C:CANopen E:EtherCAT特殊功能OP:脉冲输出 OA:模拟量输出R:轮切 F:追剪 Z:攻丝机专用额定电流16:16Amps(11Arms) 50:50Amps(35Arms) 150:150Amps(105Arms)供电电压090:18-90VDC 180:18-180VDC 135:18-135VDC 220:220VAC 380:380VAC A:单相B:三相DC 系列驱动器规格汇总表驱动器型号供电电压连续电流 Amps(Arms) 峰值电流 Amps(Arms)6S 反馈类型外形尺寸重量DCPC-09002-OPE 2A (1.4A ) 6A (4.2A )133*90*32mm0.35kgDCPC-09004-OPE 4A (2.8A ) 8A (5.6A )DCPC-09008-OPE 8A (5.6A ) 24A (16A )DCPC-09016-OPE 16A (11A ) 48A (33A )DCPC-09024-OPE 24A (16A ) 50A (35A )DCPC-09030-OPE 30A (21A ) 60A (42A )167*100*35mm0.45kgDCPC-09040-OPE 40A (28A ) 80A (56A )DCPC-09050-OPE 50A (35A ) 100A (70A )DCPC-09075-OPE 75A (52A ) 150A (105A )200*114*59mm 1.10kg DCPC-090100-OPE 100A (70A ) 200A (140A )DCPC-090125-OPE 125A(88A)250A(177.5A)DCPC-090150-OPE 150A (105A ) 250A (175A )221*140*59mm 1.45kg DCPC-090200-OPE 200A (140A ) 300A (210A )221*140*90mm 1.8kg DCPC-090300-OPE 300A (210A ) 420A (294A )DCPC-090300-OPE(新) 300A (210A ) 420A (294A )265*140*90mm 2kg DCPC-18024-OPE 18~180VDC 24A (16A ) 50A (35A )167*100*35mm 0.45kg DCPC-18050-OPE 50A (35A ) 100A (70A )200*114*59mm 1.10kg 75A (52A ) 150A (105A )DCPC-18075-OPE 100A (70A ) 200A (140A )221*140*59mm 1.45kg DCPC-180100-OPE DCPC-135100-OPE 18~13518~90VDC增量式DC 系列外形尺寸图L L 1WHH 3H2H1W1H4 HW2H4 HW 3W4型号L L 1W W1W2W3W4H H1H2H3H4DC-2A~24A 14113432/ 4.5/15.5895118 4.5134DC-30A~50A 16716035/2-4.5/19.510051224-4.5160DC-75A100A 200190594-5.0/25/1146032.54-4.8190DC-100AF 200190594-5.0/25/1146032.54-4.8190DC-150A 221211595/25/1406045 4.8211DC-150AF 221211595/25/1406045 4.8211DC-200A 221211905/25/140///211DC-300A 221211905/25/140///211DC-300A (新)265255905/25/140///255DC 系列端子定义J3J1 J2 J3S1J4 J5J6 J75 4 3 2 11、产品简介:1. 1 概述DC系列可编程智能伺服驱动器是一款通用、高性能、直流供电、结构紧凑的全数字伺服驱动器。
仪器操作说明书第 1 页共13 页sx仪器名称DC/DC自动测试仪仪器功能文件编号仪器型号8200电源供应器自动测试系统厂商中茂版本一﹑操作步骤﹕1.接通仪器电源﹐打开计算机﹐打开仪器﹔2.连治具与仪器﹔图一二﹑软件操作一﹕1).打开仪器电源,详细操作请参照<<仪器操作说明书> > ,2).开启主机和显示屏﹐启动Chroma 8200显示器键盘鼠标测试(63102 62006)治具连接线主机测试(63102 62006)第 2 页共13 页仪器名称DC/DC自动测试仪仪器功能文件编号仪器型号8200电源供应器自动测试系统厂商中茂版本B0图一3).点击桌面Chroma 8200图标再输入用户账号密码将出现如图24).选择所需测试产品型号并点击OK如图35).选择画面上Set Testlnfo模块进行设定程序值如图1图二图三设定产品并可定产品之前导字符与后序字符﹐及产品之起始数量码和长度此为自动累加产品序号自动测试次数利用条形码扫瞄仪的方式读入产品﹐以便按排码检查测试几个待测产品后开始计算不良率愈超报警产品型号工单号批号测试人名字测试温度产品测试重复次数第 3 页共13 页仪器名称DC/DC自动测试仪仪器功能文件编号仪器型号8200电源供应器自动测试系统厂商版本三﹑软件操作二﹕1).重新检查测试条件是否已设定好,用鼠标单击Go开始测试键或按键盘F10.详细操作请参照<仪器操作说明书>2).在测试过程中,如出现图1所示,则为良品。
取下良品时﹐作业员双手应戴白手套和静电环。
此时可以进行下一个产品测试。
3).如在测试过程中,出现图2所示,则为不良品此时先确认产品与治具接触是否良好或接线是否有问题,若没问题点击Go重新作测试。
第二次测试后为良品,则此产品为良品。
如复测后还是不良品,则把此产品重新用手动测一次电气。
测试通过后,再重新做一Chroma 8200仪器测试,通过则为良品;不通过则送去检修。
DC590+ Integrator Series 2 DC Drives 3 HP - 2000 HP (15A - 2400A)DC590+ DC Drive Integrator Series 2Digital DC Drives - 3 to 2000 HP (15A – 2400A)As part of the full DC drives product range, the DC590+ further confirms Parker SSD Drives’ position as the market leader in DC drive technology.The DC590+ Integrator Series 2 sees the next step in the development of DC drivetechnology, derived from over 30 years experience in designing DC drives. With its innovative 32-bit control architecture, the DC590+ has the flexibility and functionality to more than meet the requirementsof all applications, from basic motor installations through to the most demanding multi-motor systems.The DC590+ is also available as a “ready to install” drive package called the DRV. This is a single integrated module that includes all the associated power componentswithin the package. This innovative approach radically reduces design time, panel space, wiring time and cost. The DRV concept is unique and comes from the experiencegained from thousands of successful applications across a diverse range of industries.Product OverviewProduct Overview ChartBenefitting from the improved performance of a 32-bit RISC processor, the DC590+ Integrator Series 2 delivers enhanced functionality and increased flexibility, making it suitable for use in a wider range of more complex applications.• Faster drive response • Greater control capabilities • Increased math and logic function blocks• Enhanced diagnostic andprogramming functionality • Common programming tools with other SSD Drives modelsAdvanced Control ArchitectureThe DC590+ is easily integrated into new or existing systems, offering improved levels ofperformance and productivity.SpecificationFrame 1-4 have integral cooling fan assemblies where required. Optional ducting kit for cubicle roof external ventilation available for frame 4. Frame Size H has fan cooling assembly that can be cubicle roof mounted or drive mounted. Add 5.9” (150mm) to overall height for drive mounted option.FRAME 3FRAME 4DW HDWHFRAME HDWHRatings Power ConfigurationDC590+ Four Quadrant Regenerative;2 Fully Controlled Three Phase Thyristor Bridges DC591+ Two Quadrant Non-Regenerative; 1 Fully Controlled Three Phase Thyristor Bridge Thyristor Controlled Variable Field Supply Field Current (Amps DC)4A Frame 110A Frame 2 and 330A Frame 460A Frame 6 and H Field Voltage (VDC)AC Input x 0.9 maximumArmature Current Ratings (Amps DC)See table below for ratings.Overload 200% for 10 secs, 150% for 30 secs Higher ratings with reduced overloads availablePlease refer to manualArmature Voltage (VDC)AC Input x 1.2 maximumAC Supply Voltage (VAC)110 - 220V (±10%) All Sizes 220 - 500V (±10%) All Sizes500 - 600V (±10%) Frame 4, 6, and H 600 - 690V (±10%) Frame 6 and H 50/60Hz Three PhaseEnvironmentAmbient Operating Temperature 0°-45°C (32°-113°F) Frame 1 and 20°-40°C (32°-104°F) Frame 3, 4, 6 and HDerate 1% per °C above ambient to 55°C (131°F) maxOperating AltitudeUp to 1640 ft (500m) above sea levelDerate 1% per 656 ft (200m) above 1640 ft (500m) to maximum of 16,400 ft (5000m)Protection High Energy MOV’sHeatsink Overtemperature Instantaneous Overcurrent Thyristor Trigger Failure Inverse Time Overcurrent Interline Snubber Network Field FailureZero Speed Detection Speed Feedback Failure Standstill LogicMotor OvertemperatureInputs/OutputsAnalog Inputs (5 Total - 12 bit plus sign)1 – Speed Demand Setpoint (-10/0/+10V)4 – ConfigurableAnalog Outputs (3 Total - 11 bit plus sign)1 – Armature Current Output (-10/0/+10V or 0 - 10V)2 – ConfigurableDigital Inputs (9 Total - 24VDC max)1 – Program Stop 1 – Coast Stop 1 – External Trip 1 – Start/Run 5 – Configurable Thermistor Input 1 – IsolatedDigital Outputs (3 Total - 24V(max 30V) 100mA)Short circuit protected 3 – Configurable Reference Supplies 1 – +10VDC 1 – -10VDC 1 – +24VDCOptional Equipment6911 Operator/Programming Controller Feedback Boards • Tach generator • Encoder• Optical Fiber Microtach Encoder Communication Technology Box • LINK• Profibus DP • Devicenet • Controlnet • Ethernet • Canopen • Modbus +• EI Bisynch/Modbus/RS422/RS485Standards• The DC590+ series meets the following standards when installed in accordance with the relevant product manual:• CE Marked to EN50178 (Safety, Low Voltage Directive)• CE Marked to EN61800-3 (EMC Directive)• UL listed to safety standard UL508C through 500 HP • cUL listed to Canadian standard C22.2 #14 through 500 HPBlack product code indicates DRV package. Blue product code indicates chassis (controller only * First dimension is for non-regen, second is for regenFRAME 6FRAME 1FRAME 2DWHDWHValid at time of printDWHGray panels represent footprint ofDRV units for frames 3, 4, 6, and H.Note: Dimension table includes only the 230/460 volt ratings. Drives for a wide range of input voltages are available. For product codes, current ratings, and dimensional data on 110-220 volt, 575 volt, and 690 volt units, please consult factory. Drives of higher power ratings can also be provided upon request.Whatever the complexity of your control scheme, the DC590+ has the interface to suit. As standard there’s enough analog anddigital I/O for the most complex applications. Alternatively, add the relevant ‘technology box’ for immediate access to serial communications and Fieldbus networks. The DC590+ has been designed to fit seamlessly, and without compromise, into any control environment.Analog/Digital Control• 5 Analog Inputs (12 bit + sign) • 3 Analog Outputs• 9 Digital Inputs (5 configurable) • 3 Digital OutputsSerial Communications and Fieldbus Options• Profibus-DP • Ei Bisynch • Canopen • LINK• Modbus RTU • Devicenet • RS422/RS485 • Modbus+ • Controlnet• EthernetNext Generation TechnologyBuilding upon the highly successful DC590+ drive used in thousands of applications world-wide, the DC590+ Integrator Series 2 drive takes DC motor control to the next level. With its state-of-the-art advanced 32-bit control architecture, the DC590+ drive delivers highly functional and flexible control suited to a whole host of industrial applications.Providing control for some of the most demanding motorcontrol applications, Parker’s DC experience and technologies are some of the most advanced in the industrial marketplace. With drives from 1 Amp through to 2700 Amps, Parker can provide the optimum solution to suit any application.Typical Applications• Converting machinery • Plastics and rubber processing machinery • Wire and cable • Material handling • AutomotiveFunction Block ProgrammingFunction Block Programming is a tremendously flexible control structure that allows an almost infinite combination of userfunctions to be realized with ease. Each control function (an input, output, process PID for example) is represented as a software block that can be freely interconnected to all other blocks to provide any desired action.The drive is shipped with the function blocks pre-configured as a standard DC drive so you can operate it straight from the box without further adjustments. Alternatively you can create your own control strategy with DSE Lite software, often eliminating the need for an external PLC and its associated complexity and cost.Feedback OptionsThe DC590+ has a range of options which are compatible with the most common feedback devices enabling simple motor control through to the most sophisticated multi-motor system. Armature voltage feedback is standard without the need for any interface option.• Analog tach generator - AC or DC • Encoder - 5, 12, 15, or 24V • Optical fiber microtach encoderInterface OptionsDesigned with connectivity in mind, the DC590+ has a number of communications and I/Ooptions that allow the drive to take control of the application, or be integrated into a larger system. When combined with function programming, custom functions and control can be easily created offering the user a highly flexible and versatile platform for DC motor control.Programming/ Operator ControlsFeaturing an intuitive menu structure, the ergonomically designed operator panel allows quick and easy access to all parameters and functions of the drive via a bright, easy to read backlit display and tactile keypad. Additionally, it provides local control of start/stop, speed demand and rotation direction to greatly assist with machine commissioning.• Multi-Language alpha-numeric display• Customized parameter values and legends• On drive or remote mounting • Local control of start/stop, speed and direction • Quick set-up menuConnectivityStandard 6901 MMI/Programming Key-pad is easy to use, and may be remote mounted. It is compatible with other SSD Drives modelsAll DC590+ units are available as non-regenerative or full 4-Quadrant line regenerativemodelsProduct web page: /ssdusa/dc590plusDRV - PackagedDC Drive TechnologyThe DC590+ is available in either module, or alternatively ‘DRV’ format.The DRV version is a self-contained packaged drive that includes all the peripheral power components associated with a DC drive system, integrally fitted within the footprint area ofthe drive.DRV version includes:• AC line or DC armature contactor • AC line fuses• DC fuse(regenerative version)• Control/field fuses• Provision for optional motorblower starter• Provision for optional auxiliary control transformerSaving You:• Design time• Panel space• Component mounting and wiring • Component sourcing• Complexity• Time and cost DC590+ Designed for SystemsThe DC590+ Integrator Seriesis the ultimate system drive,designed to meet the exactingdemands of the most complexand sophisticated multi-driveapplications across a diverserange of industries. All thefollowing functions are availableas standard without the need forany additional hardware.• Function Block Programming• Software Configurable I/O• High Resolution (12 bit) AnalogInputs• Winder Control– Open loop with inertiacompensation– Closed loop speed or current– Load cell/dancer process PID• Math Functions• Logic Functions• Controlled Field Supply• ‘S’ Ramp and Digital RampDC590+ Designed ForA World MarketThe DC590+ is available with fullapplication and service supportin over fifty countries worldwide.So wherever you are, you canbe confident of full backup andsupport.• Support in over 50 countries• Multi-language menus• Input voltage ranges from 220-690V(Special voltages available)• CE marked• UL and cUL listed through 500 HP•50/60HzTraditional DC Drive Section DC590+ DRVequivalent, illustratingpanel space savingand simplification ofpanel wiringAC LineFusesDC FuseMotor BlowerStarterAC Line ContactorControl/Field FuseDC590+ DRV versionParker Hannifin Corporation SSD Drives Division9225 Forsyth Park Dr. Charlotte, NC 28273 USATel: (704) 588-3246 Fax: (704) 588-3249 **********************/ssdusaHA466595U001 Iss73/2013 ©2013 Parker Hannifin CorporationAE – UAE, DubaiTel: +971 4 8127100********************AR – Argentina, Buenos Aires Tel: +54 3327 44 4129AT – Austria, Wiener Neustadt Tel: +43 (0)2622 23501-0*************************AT – Eastern Europe,Wiener NeustadtTel: +43 (0)2622 23501 900**************************** AU – Australia, Castle Hill Tel: +61 (0)2-9634 7777AZ – Azerbaijan, BakuTel: +994 50 2233 458**************************** BE/LU – Belgium, Nivelles Tel: +32 (0)67 280 900*************************BR – Brazil, Cachoeirinha RS Tel: +55 51 3470 9144BY – Belarus, MinskTel: +375 17 209 9399*************************CA – Canada, Milton, Ontario Tel: +1 905 693 3000CH – Switzerland, EtoyTel: +41 (0)21 821 87 00***************************** CL – Chile, SantiagoTel: +56 2 623 1216CN – China, ShanghaiTel: +86 21 2899 5000CZ – Czech Republic, Klecany Tel: +420 284 083 111******************************* DE – Germany, KaarstTel: +49 (0)2131 4016 0*************************DK – Denmark, BallerupTel: +45 43 56 04 00*************************ES – Spain, MadridTel: +34 902 330 001***********************FI – Finland, VantaaTel: +358 (0)20 753 2500*************************FR – France, Contamine s/ArveTel: +33 (0)4 50 25 80 25************************GR – Greece, AthensTel: +30 210 933 6450************************HK – Hong KongTel: +852 2428 8008HU – Hungary, BudapestTel: +36 1 220 4155*************************IE – Ireland, DublinTel: +353 (0)1 466 6370*************************IN – India, MumbaiTel: +91 22 6513 7081-85IT – Italy, Corsico (MI)Tel: +39 02 45 19 21***********************JP – Japan, TokyoTel: +81 (0)3 6408 3901KR – South Korea, SeoulTel: +82 2 559 0400KZ – Kazakhstan, AlmatyTel: +7 7272 505 800****************************LV – Latvia, RigaTel: +371 6 745 2601************************MX – Mexico, ApodacaTel: +52 81 8156 6000MY – Malaysia, Shah AlamTel: +60 3 7849 0800NL – The Netherlands,OldenzaalTel: +31 (0)541 585 000********************NO – Norway, SkiTel: +47 64 91 10 00************************NZ – New Zealand, Mt WellingtonTel: +64 9 574 1744PL – Poland, WarsawTel: +48 (0)22 573 24 00************************PT – Portugal, Leca da PalmeiraTel: +351 22 999 7360**************************RO – Romania, BucharestTel: +40 21 252 1382*************************RU – Russia, MoscowTel: +7 495 645-2156************************SE – Sweden, SpångaTel: +46 (0)8 59 79 50 00************************SG – SingaporeTel: +65 6887 6300SK – Slovakia, Banská BystricaTel: +421 484 162 252**************************SL – Slovenia, Novo MestoTel: +386 7 337 6650**************************TH – Thailand, BangkokTel: +662 717 8140TR – Turkey, IstanbulTel: +90 216 4997081************************TW – Taiwan, TaipeiTel: +886 2 2298 8987UA – Ukraine, KievTel +380 44 494 2731*************************UK – United Kingdom,WarwickTel: +44 (0)1926 317 878********************US – USA, ClevelandTel: +1 216 896 3000VE – Venezuela, CaracasTel: +58 212 238 5422ZA – South Africa,Kempton ParkTel: +27 (0)11 961 0700*****************************Parker Worldwide。
在本产品使用说明书中,我们将尽力叙述各种与该产品使用相关的事项。
限于篇幅限制及产品具体使用等原因,不可能对产品中所有不必做和/或不能做的操作进行详细的叙述。
因此,本产品中没有特别指明的事项均视为“不可能”或“不允许”进行的操作。
本产品使用说明书的版权,归广州数控设备有限公司所有,任何单位与个人进行出版或复印均属于非法行为,广州数控设备有限公司将保留追究其法律责任的权利。
1DCY系列车床电主轴 使用说明书II前 言尊敬的客户:对您惠顾选用广州数控设备有限公司DCY系列车床电主轴(以下简称电主轴)产品,本公司深感荣幸与感谢!为了保证产品安全、正常与有效地运行,请您务必在安装、使用产品前仔细阅读本产品使用说明书。
安 全 警 告操作不当将引起意外事故,必须要具有相应资格的人员才能使用、操作本产品。
DCY 系列车床电主轴 使用说明书III安全警告及注意事项1 在正常气候条件下,用1000V 兆欧表(或绝缘电阻测试仪)测量内藏电机绕组对电主轴外壳的绝缘电阻,其值应不小于20 MΩ。
2 电主轴从零速至最高速空载运行应无异常噪声和振动时,方可接入负载运行。
3 只有具备相应资格的人员,才能加工、装配、维护电主轴。
4 在运输、贮存、装配时,务必注意保护电主轴不受外力冲击。
5 用户对产品的任何改动本公司将不承担任何责任,产品的保修单将因此作废。
所有规格和设计如有变化,本公司恕不另行通知。
连接及操作不当,将引起意外事故!请使用操作之前务必仔细阅读本使用说明书。
DCY系列车床电主轴 使用说明书IV安 全 责 任制造者的安全责任——制造者应对所提供的产品及随行供应的附件在设计和结构上已消除和/或控制的危险负责。
——制造者应对所提供的产品及随行供应的附件的安全负责。
——制造者应对提供给使用者的使用信息和建议负责。
使用者的安全责任——使用者应通过产品安全操作的学习和培训,并熟悉和掌握安全操作的内容。
——使用者应对自己增加、变换或修改原产品、附件后的安全及造成的危险负责。
低温恒温槽 (液晶版)
说
明
书
前言
祝贺您!
您已经做出了一个非常正确明智的选择。
首先,公司的所有员工感谢您给予我们的这份信任,这本手册阐述了低温恒温槽的操作及其基本工作原理,能够使您更好的使用这台机器的所有功能,所以我们也建议您在使用机器前能够完整的阅读本手册。
同时,为了您能更安全的使用我们的产品,提出以下一些注意事项:
1)在您安装或操作机器前,请确保阅读过我们的使用手册并能完全理
解手册中的内容和手册中列出的一些注意事项,如果在阅读手册中
遇到任何问题,请您联系我们
2)如果因非专业人员在安装、操作、或维修过程中造成机器的损坏,
不在本公司的保修范围之内。
3)机器在搬运的过程中,应轻拿轻放,否则易造成机器内部零件的松
动,导致故障。
4)请留心所有警示标签。
5)请勿移除警示标签。
6)在机器里面有金属或无也液体的情况下,请勿开启机器。
7)在维修或移动机器之前,请务必切断住电源线的电源。
8)仅限专业人员修理和维护。
由于产品的更新换代,手册的内容可能与您的最新产品有稍许差异,在您第一次使用时请咨询现场服务人员。
在你以后的使用中,如果发现问题,请及时与我公司联系,我们会竭诚为你服务。
另外,由于编写者水平有限,手册中难免有不足之处,欢迎指出。
产品介绍:
低温恒温槽是以冷却液(常用冷却液为水,低温常用合成冷却液,如乙二醇的水溶液等,以下简称冷却液或简称“水”)为传热介质,将其它需要冷却的仪器或设备产生的热量传递出来,通过制冷系统将热量散发到设备外部,从而保证设备在正常的温度范围内工作。
装置与仪器设备之间依靠装置内水泵压力形成封闭介质循环,由温度传感器检测介质温度,实施对制冷机的控制。
低温恒温槽广泛应用多种实验仪器设备如:旋转蒸发仪、X射线衍射仪、ICP 发射光谱仪、ICP质谱仪、石墨炉原子吸收光谱仪、荧光分析仪、电子显微镜、医用CT机、医用理疗设备、生产试验设备、精密磨床、数控机床、加工中心、激光设备等。
本机型为一体式装置,冷凝器-压缩机、蒸发器-循环水泵机组均安装于同一机箱内,该类机组一般安装在室内。
产品特点:
●置入美国进口最新一代温度控制程序,确保设备运行稳定。
●全封闭压缩机组制冷,制冷系统具有过热、过电流多重保护装置。
●循环泵可以把槽内被恒温液体外引,建立第二恒温场。
●槽内冷液可外引,冷却机外实验容器,也可在槽内直接进行低温、恒温实验。
●采用XMT模拟数字PID自动控制系统,温度数字显示。
●本系列仪器为立式,便于放置在操作台内。
●采用无氟环保制冷技术,节能降耗。
●具有断电保护功能,可自动延时三分钟。
●采用大屏幕显示,方便直观了解工作状态
●上下限温度报警可设定。
●内胆采用优质不锈钢材料
三、技术参数:
DC低温恒温槽系列仪器型号与参数对照表
型号
温度范
围(℃)
温度均匀度
(水平/垂直℃)
内槽尺寸(mm)
(长X宽X槽深度)
总容量
(L)
工作槽开口
(mm2)
制冷量(W)
20℃时纯水
外循环泵流量
(L/min)
DCW-1015 -10~100 ±0.05 300*250*200 15 235*160 1200 6
根据要求可以设计、安装磁力搅拌系统,可把放入恒温槽工作室内烧杯中的样品直接进行
磁力搅拌,无需外接立式搅拌机,减少冗繁操作,同时可以实现封闭处理,减少搅拌过程
产生的雾气损耗。
可选配电脑通讯485通讯。
四、操作步骤:
1.槽内加入液体介质,液体介质液面不能低于工作台板20㎜。
2.液体介质的选用:
A.工作温度低于5℃时,液体介质一般选用酒精。
B.工作温度5℃—80℃时,液体介质一般选用纯净水。
C.工作温度80℃—90℃时,液体介质一般选用水油混合液。
D、工作温度在90℃—100℃时,液体介质一般选用油。
3.循环泵的连接:
A.内循环泵的连接,将出液管与进液管用软管连接即可(随机配一根软管)。
B.外循环泵进行外循环连接,将出液管用软管连接在槽外容器进口,将进
液管接在槽外容器出口。
4.插上电源,开启后板盖“电源”开关,通电后按仪表说明操作。
5.仪表操作如上:
第一排显示测量温度,第二排显示设定温度,第三排显示剩余时间或设定时间。
按键功能分别如下:
(1)温度键
设定温度时按一下该键进入温度设定状态,使用▲、▼、<、>修改好设定温度后,按确认键将设定值写入内存。
(2)时间键设定时间时按一下该键进入时间设定状态,使用▲、▼、<、>修改好设定时间后,按确认键将设定值写入内存。
如果将时间设定为0则定时器不起作用,即连续运行。
(3)水泵键按住该键约2S,如果水泵是关闭状态的则打开水泵。
反之关闭水泵。
(4)制冷键按住该键约2S,如果制冷压缩机是关闭状态的则打开制冷压缩机。
反之关闭制冷压缩机。
注:压缩机延时时间为4分钟。
(5)确认键在设定状态下,按一下该键,功能是将设定值写入内存。
设定完毕,一直按住按设定键约5秒退出其他参数设定状态。
如设定了时间,上电后约4秒后,控制器进入运行状态,根据设定的温度,对系统进行温度控制,当测量温度到达设定温度时开始倒计时,同时时钟闪烁。
当计时值为零后,仪表结束运行,仪表显示oFF ,并有蜂鸣器输出,鸣叫约30秒钟。
用户若需再次运行,可按一下On/oFF键,仪表自动进入运行状态。
(6)▲键该键为加数键。
在设定参数时,数字中末位闪烁。
若按该键,则设定数值末位数加1。
(7)▼键该键为减数键。
在设定参数时,若按该键,则设定数值减1。
(8)< 、>键左右移位键。
(9)on/oFF键该键为运行停止键。
在oFF状态按住该键约2S则控制器开始运行,反之停止运行。
注:设定完参数后,一定要按一下设定键才能将设定值写入内存。
五、使用注意事项:
1.当槽体内温度高于40度时,请勿开启压缩机。
2.使用电源50Hz 220V,电源功率要大于或等于仪器的总功率,电源必须有良好的“接地”装置。
3.仪器应安置于通风干燥处,后背及两侧离开障碍物300㎜距离。
4. 使用前槽内应加入液体介质。
5.使用完毕,所有开关置关机状态,拔下电源插头。
装箱清单
1、主机1台
2、电源线1根
3、橡皮管1根
4、盖板1块
5、说明书1份
6、合格证1份
7、保修卡1份
合格证
保修卡
产品保修卡维修记录
1 您在正常操作使用情况下出现故障,未经拆修,至购买之日起一年内免费维修终身维护。
2 因使用者认为造成破坏,我公司负责修理,但酌情收取材料费。
3 若出现故障,请退回本公司维修,非专业人士请勿自行拆卸。
1 产品型号:DCW-0515
2 购机日期:
3 联系电话:
4 故障原因:
5 维修日期:
6 维修人签字:
产品合格证
产品名称低温恒温槽日
期
2013.8 型号DC-0510 检
验员05
编号130814
保修自购机之日起凭本卡及购货发票保修一年。