vcs官方培训文档
- 格式:ppt
- 大小:3.16 MB
- 文档页数:45
vcs用户手册一、概述本手册旨在为使用VCS(VersionControlSystem,版本控制系统)的用户提供全面的指南,帮助用户了解VCS的基本概念、功能和使用方法。
本手册适用于各种使用场景,包括软件开发、项目管理、文档管理等领域。
二、VCS基本概念VCS是一种用于跟踪和管理代码、文档、配置文件等版本信息的工具。
它可以帮助用户有效地管理多个版本的相同文件,并记录文件的变化历史。
通过VCS,用户可以轻松地回滚到以前的版本,比较不同版本的差异,以及协作开发。
三、VCS功能和使用方法1.安装和配置:介绍如何安装和配置VCS,包括选择合适的版本控制系统(如Git、SVN等)以及设置本地环境。
2.初始化仓库:介绍如何创建一个新的VCS仓库,并设置仓库的基本结构和权限。
3.添加文件:介绍如何将文件添加到VCS仓库中,包括添加单个文件和添加整个目录。
4.提交变更:介绍如何提交对文件的变更,包括添加注释和描述变更内容。
5.版本控制:介绍如何管理文件的版本,包括创建分支、合并分支、回滚变更等操作。
6.协作开发:介绍如何与他人协同开发,包括协同编辑文件、跟踪冲突等操作。
7.工具和插件:介绍常用的VCS工具和插件,以及如何使用它们提高效率。
8.安全性和最佳实践:强调在VCS使用中的安全性和最佳实践,包括隐私保护、备份数据、遵循版本控制规则等。
四、示例和操作指南提供一些实际操作示例,帮助用户更好地理解和掌握VCS的使用方法。
例如:1.如何使用Git进行版本控制,包括创建仓库、添加文件、提交变更、管理版本等操作。
2.如何与他人协同开发,包括协同编辑文件、解决冲突等操作。
3.如何使用Git的分支和合并功能,以及如何查看变更历史等。
五、常见问题和故障排除列举在使用VCS过程中可能遇到的问题和解决方法,例如:1.无法连接到远程仓库怎么办?2.提交变更时出现冲突如何解决?3.如何恢复到以前的版本?4.如何避免VCS的使用误区?六、附录和资源推荐提供一些有用的附录和资源推荐,包括:1.VCS的常见问题和故障排除技巧。
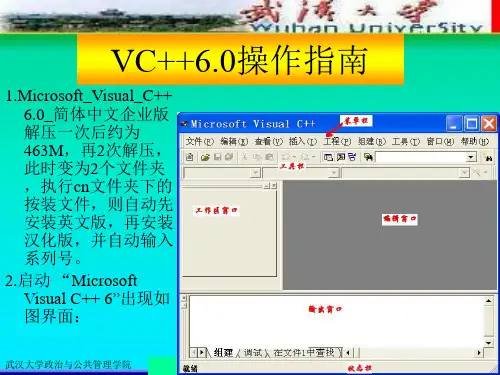
(培训体系)VSS简明培训教程1说明壹、本教程针对不同使用对象提供VisualSourceSafe6.0的若干使用指导,阅读对象包括VisualSourceSafe的管理员和普通用户,以及希望了解如何采用VisualSourceSafe进行软件版本控制的管理人员。
管理员或普通用户于使用VisualSourceSafe的过程中,如果遇到不知如何操作,或者对某些操作的注意事项不甚了解等类似情况时,能够查阅本教程。
二、本教程的"管理员部分"是管理员必读的,如果管理员于除履行其自身职责之外,仍兼任普通用户的角色,则能够参阅教程中的"普通用户部分"。
作为壹般的普通用户,只需阅读"普通用户部分"即可。
三、教程中列举的操作,加星号者,为高级用法(AdvancedUsage),其余为基本用法(BasicUsage)。
所谓基本用法是指壹些通常使用频繁的,或者是使用方法较为简单的操作。
所谓高级用法是指通常使用频率不多,或者较为重要的,或者用法复杂的操作。
四、本教程内容摘选且改编自VisualSourceSafe6.0英文版联机帮助,从中提取了诸多重要信息、容易忽略的内容以及若干注意事项。
壹些基本内容(主要指某些基本操作的使用方法)只简单列举了条目,欲了解这些条目的详细情况请查见联机帮助的关联部分,能够通过列于这些条目之后的英文说明于联机帮助中搜索到关联内容。
五、本教程不涉及VisualSourceSafe图形用户界面操作的解释说明,对指定功能的具体操作步骤请查见联机帮助的关联部分。
能够通过列于该功能之后的英文说明于联机帮助中搜索到关联内容。
六、于其他VisualStudio产品中(例如:VisualC++)能够集成VisualSourceSafe的功能,本教程不涉及有关于其他集成开发环境下如何使用VisualSourceSafe功能的内容,这部分内容主要针对普通用户。
VCS VirSim and VirSimTMTutorialVersion 4.4September 2003Copyright Notice and Proprietary InformationCopyright 2001 Synopsys, Inc. All rights reserved. This software and documentation are owned by Synopsys, Inc., and furnished under a license agreement. The software and documentation may be used or copied only in accordance with the terms of the license agreement. No part of the software and documentation may be repro-duced, transmitted, or translated, in any form or by any means, electronic, mechanical, manual, optical, or other-wise, without prior written permission of Synopsys, Inc., or as expressly provided by the license agreement. Right to Copy DocumentationThe license agreement with Synopsys permits licensee to make copies of the documentation for its in-ternal use only. Each copy shall include all copyrights, trademarks, service marks, and proprietary rights notices, if any. Licensee must assign sequential numbers to all copies. These copies shall con-tain the following legend on the cover page:“This document is duplicated with the permission of Synopsys, Inc. for the exclu-sive use of __________________________________________ and its employ-ees. This is copy number __________.”Destination Control StatementAll technical data contained in this publication is subject to the export control laws of the United States of America. Disclosure to nationals of other countries contrary to United States law is prohibited. It is the reader’s responsibility to determine the applicable regulations and to comply with them. DisclaimerSYNOPSYS, INC., AND ITS LICENSORS MAKE NO WARRANTY OF ANY KIND, EXPRESS OR IM-PLIED, WITH REGARD TO THIS MATERIAL, INCLUDING, BUT NOT LIMITED TO, THE IMPLIED WARRANTIES OF MERCHANTABILITY AND FITNESS FOR A PARTICULAR PURPOSE. TrademarksSynopsys, the Synopsys logo, Arcadia, BiNMOS-CBA, CMOS-CBA, COSSAP, DESIGN (ARROWS), DesignPower, DesignWare, dont_use, EPIC, ExpressModel, in-Sync, LM-1000, LM-1200, Logic Modeling, Logic Modeling (logo), Memory Architect, ModelAccess, ModelTools, PathMill, PL debug, RailMill, SmartLicense, SmartLogic, SmartModel, SmartModels, SNUG, SOLV-IT!, SourceModel Library, Stream Driven Simulator, Synopsys, Synopsys (logo), Synopsys VHDL Compiler, Synthetic Designs, Synthetic Libraries, TestBench Manager, and TimeMill are registered trademarks of Synopsys, Inc3-D Debugging, AMPS, Behavioral Compiler, CBA Design System, CBA-Frame, characterize, Chip Architect, Compiled Designs, Core Network, Core Store, Cyclone, Data Path Express, DataPath Architect, DC Expert, DC Expert Plus, DC Professional, DelayMill, Design Advisor, Design Analyzer, Design Compiler, DesignSource, DesignTime, DesignWare Developer, Direct RTL, Direct Silicon Access, dont_touch, dont_touch_network, ECL Compiler, ECO Compiler, Embedded System Prototype, Floorplan Manager, Formality, FoundryModel, FPGA Compiler, FPGA Express, Frame Compiler, General Purpose Post-Processor, GPP, HDL Advisor, HDL Compiler, Integrator, Interactive Waveform Viewer, Library Compiler, LM-1400, LM-700, LM-family, Logic Model, ModelSource, ModelWare, Module Compiler, MS-3200, MS-3400, Power Compiler, PowerArc, PowerGate, PowerMill, PrimeTime, RTL Analyzer, Shadow Debugger, Silicon Architects, SimuBus, SmartCircuit, SmartModel Windows, Source-Level Design, SourceModel, SWIFT, SWIFT Interface, Synopsys Graphical Environment, Test Compiler, Test Compiler Plus, Test Manager, TestSim, Timing Annotator, Trace-On-Demand, VCS, VCSi, VHDL System Simulator, VirSim, Visualyze, Vivace, VSS Expert, and VSS Professional are trademarks of Synopsys, Inc.All other product or company names may be trademarks of their respective owners.Printed in the U.S.A.Document Order Number 37569-000 KBVirSim Tutorial version 4.4Table of Contents Chapter 1 - Introduction . . . . . . . . . . . . . . . . . . . . . . . . . 1-1 Tutorial Objectives . . . . . . . . . . . . . . . . . . . . . . . . . . . . . . . . . . . 1-2Introducing Virsim . . . . . . . . . . . . . . . . . . . . . . . . . . . . . . . . . . . 1-2VirSim Windows . . . . . . . . . . . . . . . . . . . . . . . . . . . . . . . . . . . . . . . . 1-2Tool Bar. . . . . . . . . . . . . . . . . . . . . . . . . . . . . . . . . . . . . . . . . . . . . 1-4Getting Started with VCS VirSim or VirSim . . . . . . . . . . . . . . . . . . . . . . . 1-5Verilog Code Instrumentation and Simulation . . . . . . . . . . . . . . . . . . . . . . . . . 1-5Starting VCS VirSim or VirSim . . . . . . . . . . . . . . . . . . . . . . . . . . . . . . . . . 1-6 Chapter 2 - Delta Cycle Debugging . . . . . . . . . . . . . . . . . . . 2-1 Preparing for this Lesson . . . . . . . . . . . . . . . . . . . . . . . . . . . . . . . . 2-2Analyzing Data from Two Simulators . . . . . . . . . . . . . . . . . . . . . . . . . . 2-2Viewing Delta Cycles, Glitches and User-Defined Events . . . . . . . . . . . . . . . 2-4Determining Origins of Events . . . . . . . . . . . . . . . . . . . . . . . . . . . . . 2-6Editing Verilog Code . . . . . . . . . . . . . . . . . . . . . . . . . . . . . . . . . . 2-8 Chapter 3 - Debugging Functional Designs . . . . . . . . . . . . . . 3-1 Preparing for this Lesson . . . . . . . . . . . . . . . . . . . . . . . . . . . . . . . . 3-2Using the Hierarchy Browser Search Features . . . . . . . . . . . . . . . . . . . . . 3-3Searching for and Marking a Value of Interest . . . . . . . . . . . . . . . . . . . . 3-11Stepping Value Changes on Signals of Interest . . . . . . . . . . . . . . . . . . . 3-12Tracing a Signal Connection . . . . . . . . . . . . . . . . . . . . . . . . . . . . . 3-13Debugging with the Source Code . . . . . . . . . . . . . . . . . . . . . . . . . . 3-14Testing a Code Fix with Expressions . . . . . . . . . . . . . . . . . . . . . . . . . 3-15Zooming the Time Range . . . . . . . . . . . . . . . . . . . . . . . . . . . . . . . 3-15Using Vertical Zoom . . . . . . . . . . . . . . . . . . . . . . . . . . . . . . . . . 3-16Editing the Source Code . . . . . . . . . . . . . . . . . . . . . . . . . . . . . . . 3-16 Chapter 4 - Debugging a Bus Contention . . . . . . . . . . . . . . . . 4-1 Preparing for this Lesson . . . . . . . . . . . . . . . . . . . . . . . . . . . . . . . . 4-2SynopsysVerifying Verilog Code Fixes from Risc 1 . . . . . . . . . . . . . . . . . . . . . . . . 4-2 Tracing the Sources of an X Value . . . . . . . . . . . . . . . . . . . . . . . . . . . 4-2 Tracing the Signal Source . . . . . . . . . . . . . . . . . . . . . . . . . . . . . . . 4-3 Chapter 5 - Interactive Mode . . . . . . . . . . . . . . . . . . . . . . . 5-1 Preparing for this Lesson . . . . . . . . . . . . . . . . . . . . . . . . . . . . . . . . 5-2 Introducing the Interactive Window . . . . . . . . . . . . . . . . . . . . . . . . . . . 5-2 Checking Results of the Current Simulation . . . . . . . . . . . . . . . . . . . . . . 5-4 Editing the Source Code . . . . . . . . . . . . . . . . . . . . . . . . . . . . . . . . 5-9 Rebuilding and Re-executing the Simulation . . . . . . . . . . . . . . . . . . . . . . 5-9 Go To Next/Previous Change . . . . . . . . . . . . . . . . . . . . . . . . . . . . . 5-9 Chapter 6 - New Visibility Features . . . . . . . . . . . . . . . . . . . 6-1 Preparing for this Lesson . . . . . . . . . . . . . . . . . . . . . . . . . . . . . . . . 6-2 Viewing Contents of Memory . . . . . . . . . . . . . . . . . . . . . . . . . . . . . . 6-2 Tracing a Memory Data Path using the Multiple Net Display . . . . . . . . . . . . . . 6-5 Viewing Annotated Source code in the Source Window . . . . . . . . . . . . . . . . 6-7 Viewing and Creating Buses . . . . . . . . . . . . . . . . . . . . . . . . . . . . . . 6-7 Chapter 7 - Managing Large Amounts of Data . . . . . . . . . . . . . 7-1 Preparing for this Lesson . . . . . . . . . . . . . . . . . . . . . . . . . . . . . . . . 7-2 Open and Close VCD+ Files During Simulation . . . . . . . . . . . . . . . . . . . . 7-2 Loading a Partial VCD+ File into VirSim . . . . . . . . . . . . . . . . . . . . . . . . 7-5Chapter 1 IntroductionIn This ChapterTutorial ObjectivesIntroducing VirsimGetting Started with VCS VirSim or VirSim VCS VirSim and VirSim ships with a tutorial directory with six versions of a Verilog design to help you become familiar with VirSim features. The tutorial will guide you through debugging three errors in the example design.NOTE:In order to use this tutorial, thefollowing licenses are required:Synopsys VCS or Synopsys VirSimSynopsys VCS (for Chapter 5)SynopsysTutorial ObjectivesIn the tutorial, you accomplish the following objectives:Learn VirSim system tasks needed to collect signal data.Learn to use six of the VirSim windows.Become familiar with Virsim features.Debug Verilog simulation results in post-simulation mode. Post-simulation mode enables you to extract and analyze simulation data from VCD+ history files aftersimulation has been completed.Use a configuration file to quickly return to a window configuration of interest.Trace the cause of the errors and correct them in the Verilog source code.Run a Verilog simulation in Interactive Mode (VCS license required). Interactive Mode enables you to extract and analyze simulation data during simulation.View register memory contents, anotate source code signal values, and create buses of signals.Introducing VirsimThis section includes an overview of the VirSim windows and the command iconsused in the tutorial. The following topics are covered:VirSim WindowsTool BarVirSim WindowsVirSim contains graphic windows that present various views of your design. Thesewindows may be linked so that operations initiated in one view may affect other views.All VirSim windows have a Window menu which can be used to open other VirSimwindows. The VirSim tutorial demonstrates the use of the following windows:Hierarchy Browser The Hierarchy Browser displays the hierarchy of scopes used by the simulation. Scopes can consist of modules, tasks, functions, named forks, and named blocks. You use the Hierarchy Browser to navigate the scope hierarchy, search for scopes and signals, select scopes, display signals, and drag-and-drop scopes and signals to other windows for analysis.IntroductionWaveform Window The Waveform Window displays groups of signal waveforms, cur-sors, and markers. A time field shows the time range of signal events for the simulation and correlating signal values at specific points in time. You use the Waveform Window to view signal wave-forms, view unique events, create and search on expressions, cre-ate and view buses, and create and view user defined markers. Delta Cycle lets you see signal change within a single simulation time unit. Event origin takes you to the cause, or "origin," of a sig-nal transaction. Context sensitive menus are used to trace the source of event origins, expand simulation time into delta time, select radix, set drawing mode, set waveform height, and add blank lines.Register Window The Register Window can display text and block diagrams of simu-lation modules and signal events at specific times in the simulation. You use the Register Window to view input and output values and events at specific times. Values highlighted in pink indicate values that have changed at that time.Source Window The Source Window displays source code for selected instances. In the tutorial, the Verilog source code contains several errors. You use the Source Window to debug and correct these errors in post simulation mode. Several features help you to isolate problems in the code: Show Values annotates signal values in the source code, breakpoints let you stop execution at specific lines, and single step execution lets you execute one line at-a-time.Logic Browser The Logic Browser displays hierarchical schematics of net connec-tions between scopes. The net connectivity is extracted directly from the source files. You use the Logic Browser to trace net con-nectivity up and down the hierarchy by selecting module ports or primitive terminals.Interactive Window The Interactive Window provides an interactive control panel to control the running of a simulator. This window can be linked in time to other VirSim windows, providing complete debug with a live simulator.SynopsysTool BarTable 1-1, Command Icons, shows tool bar icons that are referenced in the tutorialand the windows in which they are found. If you do not recognize the icon by its iconname, refer to this table.Table 1-1. Command IconsIcon Icon Name VirSim WindowMarker Waveform Window, RegisterWindowSearch Expression Waveform WindowZoom Cursors Waveform WindowVertical Compress Waveform WindowLoad Value Changes Source WindowZoom Percent Waveform WindowNext Breakpoint Source WindowWindow Link All windows except the Hier-archy BrowserPrevious/Next value Change Register Window, LogicBrowserStep to Previous/Next Line Source WindowContinue Simulation Interactive WindowSelect Root Hierarchy WindowIntroductionGetting Started with VCS VirSim or VirSimVirSim is a tool used to present Verilog simulation results to a designer. To present these results using VirSim, the designer needs to instrument the Verilog source code prior to running the simulation. The simulator then creates the VCD+ history filecontaining design hierarchy, signal change data, and optional other simulation data.All VirSim documentattion is on line in PDF format. To access the documentation from the Main menu or any VirSim window, click "help." Acroread starts, and the VirSim context Sensitive Help Menu is displayed.Verilog Code Instrumentation and SimulationIn order to collect simulation data into a VCD+ history file, the $vcdpluson system task must be applied to your design. More system tasks may be added to save additional data of interest.In this tutorial we have included the following system tasks:To handle these $vcdplus system tasks, the VirSim pli must be linked to the simulator. In the tutorial, we used the following command line during VCS simulation:The -I option is the option that links these tasks and enables interactive/postprocessing debugging capabilities.See the Installation Notes for information on linking the VirSim PLI to the Cadence Verilog simulator. module instrument;Initial begin$vcdpluson;$vcdplusdeltacycleon;$vcdplustraceon;$vcdplusglitchon;$vcdplusevent(test.risc1.data[7:0],"Data is Unknown","IT");vcdplusevent(test.risc1.data[7:0],"Data is Unconnected","ED");$vcdplusmemorydump(memory,0,3);$vcdplusmemorydump(memory,25);$vcdplusmemorydump(test.risc1.mem1.memory);endCollect basic hierarchy and value change dataCollect signal change data within each simulation time Collect line trace data during a simulation. Automatically detect and record that a glitch is present Dump 4 locations of register memoryDump 1 location of register memoryDump all locations of register memory Creates a Green Triangle user defined event at time 0 which displays "Data is Unknown" when the cursor is pointed to it in an analysis window.Creates a Red Diamond user defined event at time 20 which displays "Data is Unconnected" when the cursor is pointed to it in an analysis window.vcs -line -R -I -f run_bad.f +simargs+"+vpdfile+vcs.vpd +vpddrivers +vpdports"SynopsysThe default VCD+ file name is vcdplus.vpd. We can override this by specifying a VCD+ file to create.On the VCS command line, we added:In addition, VCS requires the -line option to save line execution data. The+vpddrivers switch saves all net driver data, which helps resolve multiply driven nets. The +vpdports switch saves port direction data for display in the Hierarchy Window. On the Verilog-XL command line, we used:The +vpddrivers switch saves all net driver data, which helps resolve multiply driven nets. The +vpdports switch saves port direction data for display in the Hierarchy Window.We completed these preliminary steps and ran simulations that created VCD+ history files that will be read by VirSim.Starting VCS VirSim or VirSimThe following lesson explains how to start VirSim from the command line. After VirSim is installed, start VirSim with one of the virsim commands.1.To access the risc design, go to one of the following directories:For VCS VirSim:$VCS_HOME/virsimdir/examples/tutorial/verilog/risc For VirSim:$VIRSIMHOME/examples/tutorial/verilog/risc2.To start the tutorial, do one of the following:Enter the script file which contains the full VirSim command line:run_riscEnter one of the following full command lines:• For VCS VirSim :vcs -RPP -f run_bad.f +vpdfile+vcs.vpd +vpdfile+vxl.vpd \ +cfgfile+delta1.cfg &• For VirSim:virsim -f run_bad.f +vpdfile+vcs.vpd +vpdfile+vxl.vpd \ +cfgfile+delta1.cfg &Where:-f filename .f Contains a list of .v files to compilefor use with the Source Window and +vpdfile+vcs.vpd -line +simargs+"+vpdfile+vcs.vpd \+vpddrivers +vpdports"verilog -f run_bad.f +loadpli=$VIRSIMHOME/Solaris/vcdplus/vxl2_6/virsim:virsim_bootstrap +vpdfile+vxl.vpd +vpddrivers +vpdportsIntroductionVirSim Tutorial 1-7Logic Browser. It may also containother simulation arguments.+vpdfile+vpdfilename .vpd Specifies which .vpd file to open. Inthe tutorial we open the history filesfor both VCS and Verilog-XL.+cfgfile+cfgfilename .cfgSpecifies which VirSim configurationfile to load at start up. VirSim has thecapability to save a windowconfiguration so that the user canquickly return to a desired view ofthe design. We use this feature in allsix parts of the tutorial to jump todifferent points of the debugprocess.After entering this command, you will see two Hierarchy Browsers and two WaveformWindows. The upper Hierarchy Browser is displaying the vcs.vpd file. The lowerHierarchy Browser is displaying the vxl.vpd file. This is denoted in the HierarchyBrowser title bar. See Figure 1-1, Two Hierarchy Browsers .Figure 1-1. Two Hierarchy Browsers You will also notice a V1 and V2 next to the vpd file name. These file designatorsreference a single VCD+ file and are used by the configuration file. As shown here,Synopsysmultiple VCD+ files and multiple VirSim windows can be open simultaneously forviewing with a single VirSim license.Both Hierarchy Browsers are displaying the same design; however, we descended tothe risc1 module in the vxl.vpd file and saved the display to show part of theconfiguration capability.More detail regarding Hierarchy Browser features is given in the risc1 section of thetutorial.1-8VirSim TutorialVirSim Tutorial2-1Chapter 2Delta Cycle DebuggingIn This ChapterPreparing for this LessonAnalyzing Data from Two SimulatorsViewing Delta Cycles, Glitches and User-Defined EventsDetermining Origins of EventsEditing Verilog CodeIn this lesson you will use the knowledge based debug capabilities of VirSim to analyze data from two simulators. Because the design has a race condition bug, the two simulators produce different results. You will be guided to the cause of the race condition and directed to the source code file where it can be fixed.SynopsysPreparing for this LessonFiles for this lesson are located in the risc directory.1.To the access the risc design go to the following directory:For VCS VirSim:$VCS_HOME/virsimdir/examples/tutorial/verilog/riscFor VirSim:$VIRSIMHOME/examples/tutorial/verilog/risc2.Start the tutorial by doing one of the following:Enter the script file which contains the full VirSim command line:run_riscEnter one of the following full command lines:• For VCS VirSim:vcs -RPP -f run_bad.f +vpdfile+vcs.vpd +vpdfile+vxl.vpd \+cfgfile+delta1.cfg &• For VirSim:virsim -f run_bad.f +vpdfile+vcs.vpd +vpdfile+vxl.vpd \+cfgfile+delta1.cfg &Analyzing Data from Two Simulators1.To view the test risc1 signals in the risc design generated by the VCS simulator,use your middle mouse button to drag and drop the test.risc1 module from theupper Hierarchy Browser (V1) to the upper Waveform Window (WW1). Refer toFigure 2-1, Dragging Signals from the Hierarchy Browser to the WaveformWindow.NOTE:To drag-and-drop signals: With a three-button mouse, click and hold down the middle mouse button on a signal or a selection and drag-and-drop it to the destination. With a two-buttonmouse, first perform a selection, then click and hold down the left mouse on the item and drag-and-drop it. (If you are using Exceed and a two button mouse, click the right and left mousebuttons together to drag and drop.)2-2VirSim TutorialDelta Cycle DebuggingVirSim Tutorial 2-3Figure 2-1. Dragging Signals from the Hierarchy Browser to the Waveform Window2.To view the test risc1 signals generated by the Verilog-XL simulator, drag anddrop (using your middle mouse button) the test.risc1 module from the lower Hier-archy Browser (V2) to the lower Waveform Window (WW2).Synopsys2-4VirSim TutorialViewing Delta Cycles, Glitches and User-Defined EventsTo clarify the differences between the VCS and Verilog-XL data:1.In WW1, place your cursor over the yellow diamond at time 10 of the inc_pc sig-nal. You will notice the "multiple value changes" description in the status bardenoting a glitch. These glitch indicators appear because you added the $vcd-plusglitchon system task to the design. See Figure 2-2, Multiple Value Changes .Figure 2-2. Multiple Value Changes2.Right click and hold your mouse button down on time 10 in WW1; then selectExpand Time from the context sensitive menu (CSM) to expand it into delta time.This delta cycle information defines the sequence of signal changes within simula-tion time 10. Repeat this in WW2. Figure 2-3, Expanding Time .Yellow diamond indicating aglitch, along with "multiplevalue changes" description inthe status bar.Delta Cycle DebuggingVirSim Tutorial 2-5Figure 2-3. Expanding TimeYou are able to view the delta time because the $vcdplusdeltacycleon call was added to the design. For delta time, VirSim displays exactly what the simulators report. With this design we see that the two simulators behave differently. This delta time is non-determinate. The simulator reported multiple value changes in a given simulation time, and Virsim assigns an incremental delta cycle value to each change in the order it was received.The $vcdplusevent call was also used in the design to create two user-defined unique events. These can be placed anywhere in the code to help you quickly locate a signal of interest.Expanded time inVCS simulationExpanded time inVerilog-XL simulationNotice that theglitch in inc_pcshows up in theVCS simulation butnot the Verilog-XLsimulation.always @(negedge test.risc1.clockif(test.risc1.data==8’h00)$vcdplusevent(test.risc1.data[7:0], "Data is unknown","IT");always @(posedge test.risc1.fetch)if(test.risc1.alu1.opcode==3’h6)$vcdplusevent(test.risc.alu1.opcode, "Data is Unconnected","ED");Synopsys2-6VirSim Tutorial3.Data[7:0] shows two events indicated by a small green triangle at time 0 and a reddiamond at time 20. When you place your cursor over either indicator, a user defined description appears in the status bar. Figure 2-4, Unconnected Data in Status Bar .Figure 2-4. Unconnected Data in Status BarViewing the expanded inc_pc signal in the two Waveform Windows shows the glitch in the VCS inc_pc signal within time 10. The Verilog-XL simulator shows signal change from 0 to 1, i.e. no glitch.4.In both Waveform Windows, right click within simulation time 10, hold down yourmouse button, and select Collapse Time from the CSM.Determining Origins of EventsDebugging a design or a test bench generally starts with a number of signalsexhibiting less desirable values. Finding the cause of such problems has always been a challenge. VirSim can make this process easier. Here’s how.In this procedure we determine the Event Origin of the inc_pc signal glitch and the sequence of statement execution for the event.1.In WW1 right click the signal inc_pc at time 10, hold down your mouse, and selectEvent Origin>Automatically Select Window from the CSM.Since there is more than one driver on the inc_pc signal, the Multiple Drivers Dialog appears. The Bit Pane shows the inc_pc signal. If you did Event Origin on a vector with multiple drivers, you would see each changed bit in the Bit Pane . The drivers are in module decoder instance test.risc1.instdec. See Figure 2-5, Multiple Drivers Dialog.When you place the cursorover the red diamond, the user defined message"Data is Unconnected"appears in the status bar.Delta Cycle DebuggingVirSim Tutorial 2-7Figure 2-5. Multiple Drivers Dialog2.In the Multiple Drivers Dialog , double click on the secondtest.risc1.instdecinstance.A Source Window opens with the decoder.v file, and you see a large arrow point-ing to line 22, where @posedge fetch, inc_pc=1. See Figure 2-6, Source Win-dow .Figure 2-6. Source WindowSynopsys3.Double click on the first instance listed. The Source Window jumps to line 58where @posedge fetch, inc_pc=0. Both lines executed at time 10. This is thecause of the glitch. See Figure 2-7, Jump to Second Instance..Figure 2-7. Jump to Second InstanceEditing Verilog CodeTo resolve the race condition located in Determining Origins of Events, one of the"always" statements needs to be changed. Knowledge of the design indicates that theinc_pc signal should be a one at the end of time 10, so line 19 in the decoder.v fileshould be changed to "always @(negedge fetch)." We can do this from the SourceWindow via the Edit->Edit Source. We would then resimulate, create new VCD+ filesand reopen the VCD+ files. We have done this for you.To view the results of this change, close VirSim and reinvoke it by doing one of thefollowing:Enter the script file which contains the full VirSim command line:run_risc_goodEnter one of the following full command lines:• For VCS VirSim:vcs -RPP +vpdfile+vcs_good.vpd +vpdfile+vxl_good.vpd+cfgfile+delta2.cfg -f run_good.f &• For VirSim:virsim +vpdfile+vcs_good.vpd +vpdfile+vxl_good.vpd+cfgfile+delta2.cfg -f run_good.f &2-8VirSim TutorialVirSim Tutorial3-1Chapter 3Debugging Functional DesignsIn This ChapterPreparing for this LessonUsing the Hierarchy Browser Search FeaturesSearching for and Marking a Value of InterestStepping Value Changes on Signals of InterestTracing a Signal Connection Debugging with the Source Code Testing a Code Fix with Expressions Zooming the Time RangeEditing the Source CodeIn this lesson you will learn how to use VCS VirSim and VirSim to debug incorrect execution of one of the Risc ALU instructions.SynopsysPreparing for this LessonYou performed the lessons in the previous chapter in the risc directory. Files for thislesson are located in the risc1 directory.1.To access the risc1 directory go to the following directory:For VCS VirSim:$VCS_HOME/virsimdir/examples/tutorial/verilog/risc1For VirSim:$VIRSIMHOME/examples/tutorial/verilog/risc12.Start the tutorial by doing one of the following:Enter the script file which contains the VirSim command line:run_risc1Enter one of the following full command lines:• For VCS VirSim:vcs -RPP +vpdfile+risc1.vpd +cfgfile+risc1.cfg -f run.f• For VirSim:virsim -f run.f vpdfile+risc1.vpd +cfgfile+risc1.cfgThe following VirSim windows appear:Hierarchy BrowserWaveform WindowRegister WindowSource WindowWith all windows open at once, some windows might overlay other windows.The Register Window, named "VirSim - Register - A - Autoview0", displays theALU data flow for the RISC processor.3.Click left on the Register Window to bring it forward. See Figure 3-1, RegisterWindow.3-2VirSim Tutorial。
vcs 2020手册引言:随着科技的不断进步,版本控制系统(VCS)在软件开发领域扮演着重要角色。
本文将详细介绍VCS的概念、类型、应用以及使用VCS 的好处。
通过本手册,读者可以全面了解VCS的相关知识以及如何在2020年运用VCS提高软件开发流程的效率与质量。
第一部分:VCS概述VCS的定义:版本控制系统(Version Control System,VCS)是一种记录文件变化、协作处理以及追踪修改历史的软件工具。
它为开发团队提供了管理和控制软件开发过程中的版本和变更的能力。
VCS类型及功能:1. 集中式版本控制系统(Centralized Version Control System,CVCS):CVCS通过一个中央仓库存储文件,并允许开发者从中央仓库中取回最新版本。
CVCS可以追踪修改历史,但在团队协作方面存在一些限制。
2. 分布式版本控制系统(Distributed Version Control System,DVCS):DVCS将代码仓库完全复制到每个开发者的本地,使得开发者可以在本地存储、访问和编辑代码。
DVCS以分布式方式工作,可提供更好的团队协作和版本管理能力。
第二部分:VCS应用VCS在软件开发中的应用:1. 版本控制:VCS能够追踪文件的修改历史,包括添加、删除和修改操作。
通过版本控制,开发者可以回退到之前的版本,查看文件的演变过程,以及解决冲突。
2. 分支管理:VCS允许开发者创建和管理分支。
分支可以用来独立开发某个功能或修复问题,当完成后再合并到主分支。
分支管理有效地促进了团队协作和并行开发。
3. 团队协作:VCS提供了多人协作开发的能力。
开发者可以通过提交、获取和合并代码来实现团队之间的信息共享和协同工作。
第三部分:使用VCS的好处VCS带来的好处:1. 版本控制:VCS能够帮助开发者记录和追踪代码的修改历史,可以轻松回退到之前的版本,减少出错的可能性。
2. 团队协作:VCS提供了团队协作开发的环境,不同开发者可以独立工作并定期合并代码,减少了冲突和覆盖代码的风险。
VCS使用中文教程什么是VCS?VCS(Version Control System)是一种管理和追踪软件代码变更的工具。
它允许多个开发者在同一个项目中协同工作,并且记录和管理代码的变更历史。
通过使用VCS,开发者可以轻松地创建新的分支和合并已有的分支,方便团队合作和代码管理。
最常见的VCS工具是Git。
为什么要使用VCS?使用VCS有许多好处。
首先,VCS可以追踪和记录代码的变更历史,包括哪些文件被修改、何时被修改以及具体修改的内容。
这个功能很有用,可以帮助团队成员回顾和理解代码的演变过程,同时也方便排查代码错误。
其次,VCS可以支持并行开发。
多个开发者可以在同一个项目上并行工作,每个人都可以创建自己的分支,将自己的修改提交到主分支之前先合并。
这种并行开发的方式避免了多人同时修改同一个文件引发的冲突,提高了团队的工作效率。
此外,VCS也可以支持版本回滚。
如果在次代码提交后发现了问题,可以轻松地回退到之前的版本,修复问题后再次提交。
这样避免了错误代码的传播和部署。
VCS的基本操作使用VCS的第一步是在本地计算机上安装VCS工具,如Git。
安装完成后,可以通过以下几个基本操作来管理代码仓库:1. 创建代码仓库:在计算机中选择一个目录作为代码仓库的根目录,使用命令`git init`来初始化一个新的仓库。
2. 添加文件:将需要管理的文件复制到代码仓库中,使用命令`git add <file>`将文件添加到仓库的暂存区。
5. 创建分支:使用命令`git branch <branchname>`可以创建一个新的分支。
分支是用来开发新功能或修复错误的独立代码片段。
6. 切换分支:使用命令`git checkout <branchname>`可以切换到指定的分支上。
7. 合并分支:使用命令`git merge <branchname>`可以将指定分支的代码合并到当前分支上。
VCS简易教程1. 编译所有点v文件:vcs *.v -debug_all -R -gui -l top_log-debug_all表示调用UCLI和DVE,并为进一步的DVE调试建立必要的文档;-R表示编译之后立即运行仿真;-gui表示在仿真0时刻打开DVE界面;-l表示记录编译过程日志,后跟日志文件名2.在Hierarchy Browser窗口中选中module(左图),则其端口信号会显示在Data Pane窗口中(右图)在Data Pane窗口中选中要显示的信号,右击add to waves->new wave view (波形窗口打开)4.设置仿真时间在空格栏中输入仿真时间,点击左边的下箭头,开始仿真,右下角的2,1/2是波形放大缩小5.调试波形显示后,如果又添加了新的信号,则重新点restart图标,这时波形不显示(modelsim仍然保留),点击工具栏的加载波形,如下图的下拉箭头如果要调试内部某个模块的信号,先在Hierarchy Browser窗口选中module(上面的第3步),可以通过RTL 代码的例化名查找,如上例:例化了双口RAM 例化名为code_u,添加code_u的所有信号都波形窗口,信号很多,包括内部的很多wire,buffer等。
可在波形窗口中过滤这些信号,只留下输入输出端口,方法如下:点击上图中过滤信号下拉箭头,将不需要的信号过滤(把勾号去掉,默认为所有勾都选上)Wave窗口中只剩下输入输出信号。
然后进行仿真。
若要区分不同的信号组,以便观察,可以插入分割信号:菜单signale->Insert Divider后端网表仿真》后仿真,需在tb文件中加入sdf文件,如下:initialbegin$sdf_annotate("XXXX.sdf",top_module_name); // 例:(“xxx.sdf”,soc_i) end(sdf要在PT中生成,DC输出的sdf可能会有写warning)》标准单元库文件有两种,分别为tsmc18_neg 和tsmc18 ,前者支持neg_tchk负延迟检查,后者不支持。