加热型Flexi-Therm恒温金属浴
- 格式:docx
- 大小:157.63 KB
- 文档页数:4
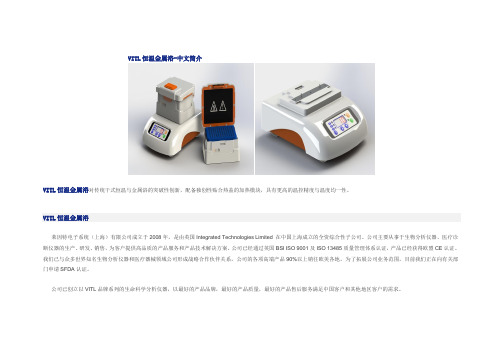
VITL恒温金属浴-中文简介VITL恒温金属浴对传统干式恒温与金属浴的突破性创新,配备独创性贴合热盖的加热模块,具有更高的温控精度与温度均一性。
VITL恒温金属浴莱因特电子系统(上海)有限公司成立于2008年,是由英国Integrated Technologies Limited 在中国上海成立的全资综合性子公司。
公司主要从事于生物分析仪器、医疗诊断仪器的生产、研发、销售,为客户提供高品质的产品服务和产品技术解决方案。
公司已经通过英国BSI ISO 9001及ISO 13485质量管理体系认证,产品已经获得欧盟CE认证。
我们已与众多世界知名生物分析仪器和医疗器械领域公司形成战略合作伙伴关系,公司的各项高端产品90%以上销往欧美各地。
为了拓展公司业务范围,目前我们正在向有关部门申请SFDA认证。
公司已创立以VITL品牌系列的生命科学分析仪器,以最好的产品品牌,最好的产品质量,最好的产品售后服务满足中国客户和其他地区客户的需求。
公司的产品销售业务不仅在欧美市场,我们更着眼于具有深厚发展潜力的中国市场,未来三年我们的专业团队将会在整个中国内陆地区、台湾地区、日本地区及东南亚市场建立成熟的营销网络,我们将把VITL系列产品从欧美更广泛的推广到全球范围。
VITL恒温金属浴产品特性:1. 精确温度控制。
2. 提供多种加热模块,一机多用。
3. 界面简单,便于快速操作。
4. 配有上盖加热功能的加热模块,与VITL Ther-Mix共用模块。
5. 加热模块记忆功能,支持将前一次操作程序贮存在所用的加热模块中。
6. 上下盖独立控温。
VITL恒温金属浴热盖优势:有效防止在管盖与管壁形成冷凝水。
提高加热模块温度的均一性,确保最佳反应温度和反应结果,从而提高实验重复性。
热盖与加热模块一体化设计,操作更方便。
热盖与耗材上盖紧密贴合,温度控制更加精确,有效防止爆管。
VITL恒温金属浴主要参数:。
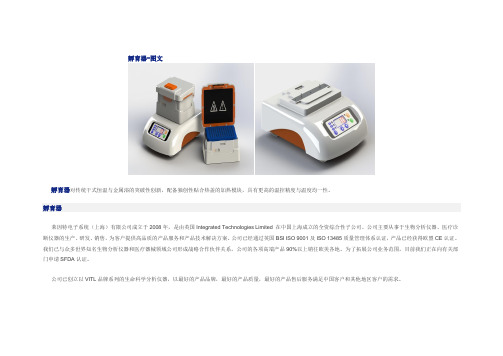
孵育器-图文孵育器对传统干式恒温与金属浴的突破性创新,配备独创性贴合热盖的加热模块,具有更高的温控精度与温度均一性。
孵育器莱因特电子系统(上海)有限公司成立于2008年,是由英国Integrated Technologies Limited 在中国上海成立的全资综合性子公司。
公司主要从事于生物分析仪器、医疗诊断仪器的生产、研发、销售,为客户提供高品质的产品服务和产品技术解决方案。
公司已经通过英国BSI ISO 9001及ISO 13485质量管理体系认证,产品已经获得欧盟CE认证。
我们已与众多世界知名生物分析仪器和医疗器械领域公司形成战略合作伙伴关系,公司的各项高端产品90%以上销往欧美各地。
为了拓展公司业务范围,目前我们正在向有关部门申请SFDA认证。
公司已创立以VITL品牌系列的生命科学分析仪器,以最好的产品品牌,最好的产品质量,最好的产品售后服务满足中国客户和其他地区客户的需求。
公司的产品销售业务不仅在欧美市场,我们更着眼于具有深厚发展潜力的中国市场,未来三年我们的专业团队将会在整个中国内陆地区、台湾地区、日本地区及东南亚市场建立成熟的营销网络,我们将把VITL系列产品从欧美更广泛的推广到全球范围。
孵育器产品特性:1. 精确温度控制。
2. 提供多种加热模块,一机多用。
3. 界面简单,便于快速操作。
4. 配有上盖加热功能的加热模块,与VITL Ther-Mix共用模块。
5. 加热模块记忆功能,支持将前一次操作程序贮存在所用的加热模块中。
6. 上下盖独立控温。
7.孵育器热盖优势:有效防止在管盖与管壁形成冷凝水。
提高加热模块温度的均一性,确保最佳反应温度和反应结果,从而提高实验重复性。
热盖与加热模块一体化设计,操作更方便。
热盖与耗材上盖紧密贴合,温度控制更加精确,有效防止爆管。
孵育器主要参数:。


英家皇室肠道水疗-英家皇室水疗仪-英家皇室肠道水疗仪器英家皇室肠道水疗,是纯自然的疗法,是解决便秘最好的方式。
英家皇室水疗仪就是用草本泡腾片将普通水转化为能量水,操作方法就像傻瓜相机一样简单,无需专业常识,无需专人协助即使80岁的老人也能轻松操作,只要将水疗头轻贴肛门口,不用插入,开启水疗开关,电脑就会自动将恒温的能量水导入肠道。
只要一分钟,整个肠道褶皱内,日久积存的干硬宿便、食物残渣、垃圾毒素即可被彻底软化分解。
一分钟解决多年老便秘,恢复肠道通畅!不疼不泻,无依赖,无副作用,长期使用,垃圾毒素彻底清除,可消除高血压、高血脂、高血糖、脂肪肝、大肚子及多种中老年慢性病,杜绝猝死及肠癌的发生!产品介绍:英家皇室肠道水疗仪获得中国国家二类医疗器械生产许可证,2010年10月份成为陕西卫视、天津卫视、河北卫视的黄金展位合作伙伴,也是此行业唯一成为央视网的品牌合作伙伴!英家皇室肠道水疗仪成为全球首创非插入式最快,最方便的、专业洁肠,祛毒设备,研发成果---体外洁肠水疗人体环保技术,已经注册美、日、韩等20多个发达国家知识产权专利,该产品产广泛运用家庭治疗便秘、痔疮、快速清理肠道内和身体体内垃圾;抗衰老保健,医院术前肠道清洁,美容院减肥,排毒理疗等。
在肠道清洁护理医疗技术方面处于国际领先地位。
有在中国人民解放军第一军医大学南方医院、深圳北大医院经四年临床验证报告;现正在该院使用。
功效:1、及时彻底(水疗方式)清除肠道内垃圾、体内垃圾、毒素、宿便,彻底治愈便秘、痔疮,治疗腹痛、腹涨、腹泻,全面改善肠胃功能,恢复肠胃蠕动机能;预防大肠溃疡、大肠癌.2、瘦身养颜;修复身材;能明显改善皮肤灰暗,对黑斑、痤疮、皮肤粗糙暗沉有显著效果。
针对啤酒肚效果显著能起到很好的治疗作用;改善头痛、失眠、口臭、体臭。
3、强化肝、肾功能:快速清除五脏六腑毒垢、清肝排石,舒解压力,增强机体免疫力;4、净化血液,深层排毒:明显降低血脂、血糖、尿酸,有效改善末梢血液循环;5、预防妇科病的保护伞:杀菌消炎,为女性外阴、肛门的清洁提供一体化方案;功能及原理:具备1分钟清肠排毒通便功能;治疗采用世界首创非插入式清体水疗法,使用过程极其舒适,只需将它特有的弧形水疗头贴附肛门口,经过仪器处理的草本清肠抑菌泡腾片转化成能量水,缓缓的自动进入大肠,快速润滑、分离宿便与大肠壁的连接面,挪开水疗头,宿便毒素垃圾等在人体自然机制下自动滑出体外,达到以上所有所说功效的作用。


一看就会Barkey Plasmatherm 无水复苏仪操作指南一看就会Barkey Plasmatherm 无水复苏仪操作指南Barkey(德国博科) Plasmatherm 无水复苏仪是怎么工作的呢?它能够利用不断加热的循环流体水,持续泵入两只可以耐受液氮的极薄水囊,水囊360°地包裹细胞袋或血袋,水在加热水囊中循环往复,是真正意义上的一款干热式复苏仪。
开机操作连接电源,打开开关→ Barkey Plasmatherm 无水复苏仪提示加水操作→ 旋开填充塞,加入约9L蒸馏水→ 显示屏出现“tank is full” 字样后按“OK” → 开盖后将血袋置于加热垫间,通过相应按钮选择程序→ 根据仪器提示进行后续操作仪器使用流程Step1 开机自检:打开Barkey Plasmatherm 无水复苏仪仪器开关并完成自检Step2 放置血袋:开盖把血袋放在加热垫之间(P.S.注意不要阻挡搅拌器)后关盖Step 3 一键启动:左侧按钮快速启动全加热程序;右侧按钮快速启动冰冻血浆加热程序Step 4 程序确认:程序完成后,打开袋子取出血袋,“OK”键确认程序结束保养维护小贴士蒸馏水:仪器每年换水一次即可加热垫:根据实际使用情况,进行加热垫更换工作细胞治疗的复苏神器Barkey Plasmatherm 无水复苏仪利用不断加热的循环流体水,持续泵入两只可以耐受液氮的极薄水囊,水囊360°地包裹细胞袋,水在加热水囊中循环往复,是真正意义上的干热式复苏仪。
适用于细胞治疗的所有环节:v 研发阶段全血或者PBMC的解冻v PD阶段细胞袋中CART,TCRT,CAR-NK以及TIL的复苏v QC阶段安全有效性检验前细胞的复苏v 临床注射前细胞样品的解冻复苏细胞治疗的复苏神器Barkey Plasmatherm 无水复苏仪利用不断加热的循环流体水,持续泵入两只可以耐受液氮的极薄水囊,水囊360°地包裹细胞袋,水在加热水囊中循环往复,是真正意义上的干热式复苏仪。
GHM SERIES(CERAMIC HEATERS)Operations & Service Manual GHM-8CGHM-4C GHM-6CGHM-5CCAUTION: Read instructions before using this appliance.Model: GFW Warmer Table Of ContentsSafety . . . . . . . . . . . . . . . . . . . . . . . . . . . . . . . . . . . . . . . . . . . . . . . . . . . . . . . . iii Safety Overview. . . . . . . . . . . . . . . . . . . . . . . . . . . . . . . . . . . . . . . . . . . . . . . . . . . . . . . . . . . . . . . . . . . iii Specific Safety Precautions. . . . . . . . . . . . . . . . . . . . . . . . . . . . . . . . . . . . . . . . . . . . . . . . . . . . . . . . . . . iv1.Introduction. . . . . . . . . . . . . . . . . . . . . . . . . . . . . . . . . . . . . . . . . . . . . . 11-1.Important Onwer Information. . . . . . . . . . . . . . . . . . . . . . . . . . . . . . . . . . . . . . . . . . . . . . . . . 11-2.Overview. . . . . . . . . . . . . . . . . . . . . . . . . . . . . . . . . . . . . . . . . . . . . . . . . . . . . . . . . . . . . . . . 11-3.Construction. . . . . . . . . . . . . . . . . . . . . . . . . . . . . . . . . . . . . . . . . . . . . . . . . . . . . . . . . . . . . . 21-4.Features. . . . . . . . . . . . . . . . . . . . . . . . . . . . . . . . . . . . . . . . . . . . . . . . . . . . . . . . . . . . . . . . . 21-5.Specifications. . . . . . . . . . . . . . . . . . . . . . . . . . . . . . . . . . . . . . . . . . . . . . . . . . . . . . . . . . . . . 21-5.1.Overall Dimensions. . . . . . . . . . . . . . . . . . . . . . . . . . . . . . . . . . . . . . . . . . . . . . . . . . . . . . . . . 21-5.2.Regulatory Listings. . . . . . . . . . . . . . . . . . . . . . . . . . . . . . . . . . . . . . . . . . . . . . . . . . . . . . . . . 31-5.3.Unit Weight. . . . . . . . . . . . . . . . . . . . . . . . . . . . . . . . . . . . . . . . . . . . . . . . . . . . . . . . . . . . . . . 31-5.4Electrical Specification. . . . . . . . . . . . . . . . . . . . . . . . . . . . . . . . . . . . . . . . . . . . . . . . . . . . . . 32.Installation. . . . . . . . . . . . . . . . . . . . . . . . . . . . . . . . . . . . . . . . . . . . . . . 52-1.Unpacking. . . . . . . . . . . . . . . . . . . . . . . . . . . . . . . . . . . . . . . . . . . . . . . . . . . . . . . . . . . . . . . . 52-2.Location. . . . . . . . . . . . . . . . . . . . . . . . . . . . . . . . . . . . . . . . . . . . . . . . . . . . . . . . . . . . . . . . . 52-3.Electrical Installation. . . . . . . . . . . . . . . . . . . . . . . . . . . . . . . . . . . . . . . . . . . . . . . . . . . . . . . . 52-4.Clearances. . . . . . . . . . . . . . . . . . . . . . . . . . . . . . . . . . . . . . . . . . . . . . . . . . . . . . . . . . . . . . . 62-5.Assembly. . . . . . . . . . . . . . . . . . . . . . . . . . . . . . . . . . . . . . . . . . . . . . . . . . . . . . . . . . . . . . . . 72-4.1.Installation of Glass & Lighting (Self Serve). . . . . . . . . . . . . . . . . . . . . . . . . . . . . . . . . . . . . 112-5.Electrical Requirements. . . . . . . . . . . . . . . . . . . . . . . . . . . . . . . . . . . . . . . . . . . . . . . . . . . . 122-6.Electrical Connections. . . . . . . . . . . . . . . . . . . . . . . . . . . . . . . . . . . . . . . . . . . . . . . . . . . . . 122-7.Ventilation. . . . . . . . . . . . . . . . . . . . . . . . . . . . . . . . . . . . . . . . . . . . . . . . . . . . . . . . . . . . . . . 133.Operation. . . . . . . . . . . . . . . . . . . . . . . . . . . . . . . . . . . . . . . . . . . . . . . . 93-1.Heating Element. . . . . . . . . . . . . . . . . . . . . . . . . . . . . . . . . . . . . . . . . . . . . . . . . . . . . . . . . . . 93-2.Cleaning. . . . . . . . . . . . . . . . . . . . . . . . . . . . . . . . . . . . . . . . . . . . . . . . . . . . . . . . . . . . . . . . 107.Parts List. . . . . . . . . . . . . . . . . . . . . . . . . . . . . . . . . . . . . . . . . . . . . . . 357-1.Parts Ordering and Service Information. . . . . . . . . . . . . . . . . . . . . . . . . . . . . . . . . . . . . . . . 357-2.Control Panel Assembly. . . . . . . . . . . . . . . . . . . . . . . . . . . . . . . . . . . . . . . . . . . . . . . . . . . . 367-3.Element Assembly - Lower Heater. . . . . . . . . . . . . . . . . . . . . . . . . . . . . . . . . . . . . . . . . . . . 387-4.Top Heater Assembly. . . . . . . . . . . . . . . . . . . . . . . . . . . . . . . . . . . . . . . . . . . . . . . . . . . . . . 407-5.Glass & Work Shelf Assemblies. . . . . . . . . . . . . . . . . . . . . . . . . . . . . . . . . . . . . . . . . . . . . . 42Safety Model: GHM SERIES Safety OverviewSafetyThe instructions contained in this manual have been prepared as an aid for learning the proper procedures for installing, operating and servicing your new unit.Throughout this manual, safety precautions are identified through the use of a safety alert symbol and three key words: DANGER, WARNING and CAUTION . All safety alert information precedes the activity or activities to which it applies. Suggested, recommended or other noteworthy information is identified through the use of NOTES . Additionally, certain words are used to indicate a specific meaning or to add emphasis.The following words are used as indicated throughout this manual:Shall -understood to be mandatory.Should - understood to be advisory.May - understood to be permissive.Will:-indicates the occurrence of a future event/condition.•Indicates an imminently hazardous situation which, if not avoided, will result in death or serious injury.••Indicates a potentially hazardous situation which, if not avoided, may result in minor or moderate injury.or(Safety Alert Symbol)These symbols are used in conjunction with key words (DANGER, WARNING or CAUTION ) to alert you to potential personal injury hazards. They are displayed immediately preceding the precautionary measures that pertain to a subsequent activity or activities. Obey all safety messages that follow these symbols to avoid possible injury or death. Failure to adhere to safety precautions identified by the safety alert symbol may also void the warranty.Safety•The unit must remain in a horizontal position.•Specific Safety PrecautionsModel: GHM SERIESSafety Model: GHM SERIESIntroductionModel: GHM SERIESThank you for choosing the Giles Heated Merchandiser (GHM) manufactured by Giles Enterprises, Inc.,Montgomery, Alabama (USA), hereafter referred to as "Giles". The unit is either a model GHM-4, GHM-5,GHM-6or GHM-8, with any one of several different configuration options: a). total full-serve unit, b). combi-nation unit (main full-serve section & a 2-foot “customer self-serve” section), c). total “customer self-serve”unit (GHM-4 or 5 only), and d). clear or tinted doors and side glass.The GHM can be installed into a base counter or stand alone on a counter-top by utilizing the adjustable legs provided. The GHM has been developed with flexibility in mind, designed to maximize the number of menu selections displayed while keeping food products fresh, maintaining them at the proper serving temperature awaiting your customers’ enjoyment.To help protect your investment in this equipment, we recommend taking a few moments to familiarize your-self with the installation, cleaning and maintenance procedures contained in this manual. Read these instruc-tions before installation and use. Adherence to these recommended procedures minimizes the potential for costly "down-time" and equipment repairs. With proper care and maintenance this unit will provide years of dependable, trouble-free service.Please retain this manual for future reference.1.Introduction1-1.Construction1-2.Standard FeaturesThe GHM is constructed primarily of Series-400 Stainless Steel. The unit features a tempered European-style glass cover.1-3.Optional FeaturesIntroductionModel: GHM SERIES 1-4.Specifications 1-4.1.Overall Dimensions for GHM4, GHM5, GHM6, GHM836 5/8930.7644 1/896 1/42444.770 5/161786.3457 3/81457.1544 7/161128.02INCHES [mm]IntroductionModel: GHM SERIESINCHES [mm]IntroductionModel: GHM SERIESIntroduction Model: GHM SERIESInstallation 2.Model: GHM Series2-1.LocationThis section explains the procedures necessary for proper installation of the unit. To help prevent personal injury or equipment damage, please ensure the following steps are followed.DO NOT ALTER, ADD ATTACHMENTS, OR OTHERWISE MODIFY THIS EQUIPMENT.While the selection of location is typically dependent on operational needs and site-specific factors, the following should be considered before finalizing installation plans for this equipment.●The appliance and surrounding area should be kept free and clear of combustible materials. Maintain a minimum clearance of 6” [154.2 mm] in front of the unit.●The appliance shall be electrically grounded in accordance with local electrical code, or in the absence of local code,with the current National Electrical Code (NEC),●Be sure that sufficient space is available for proper operation of the appliance, and that consideration is given for space required to perform future service, maintenance, or repair.●Be sure that adequate ventilation is provided in the operating area, as necessary.●Consult a qualified electrician, or other service technician, prior to installation to ensure that the power supply available at the intended location meets the electrical specifications stated on the unit’s rating label.●Make certain the unit is installed on a counter, or suitable base, that is stable and substantial enough to support the unit’s weight, plus weight of food it is to contain.●Be sure that the unit is secure in its location and cannot be inadvertently moved.The above considerations will help to ensure a safe and proper installation. If you have any questions concerning these procedures, please contact a Giles Manufacturer’s Representative or equipment Dealer, or contact Giles Services at 800.554.4537.Model: GHM SeriesInstallationThe unit is shipped on a wooden skid with a protective wooden framework; secured to the skid by means of high strength strapping. The entire skid is wrapped with machine-applied stretch wrap. Auxillary items, such as Side Glasses, Pan Dividers, Legs and Fluorescent Lights, are packed separately cartons in the pan well. Be certain to remove and retain.●The unit is heavy ... Exercise care when lifting or moving ... Use adequate manpower or handling equipment.1.Carefully cut and remove plastic wrap and strapping.e appropriate tools to remove wooden crate framework from around the unit.3.Remove items packed in the pan well, examine for damage and set aside.4.Carefully remove the unit from the shipping skid. The GHM unit is extremely heavy, see Section 1-4.4, Unit Weights. Use appropriate lifting equipment, or adequate manpower. Great care should be taken when lifting and moving the unit to prevent personal injury or equipment damage. Giles shall not be liable for personal injury or damage caused by improper handling, or use of poor work practices.2-3.Countertop Installation1.Four (4) Adjustable Legs are supplied with the unit ... two (2) Regular and two (2) Floor Plate.2.Install and secure the Adjustable Legs at each corner. Each style Leg should be installed on the opposite diagonal corners from one another.3.Place unit onto a suitable counter-top, or other base.4.Level unit by rotating the lower portion of the Legs to adjust the length as needed ... clockwise shortens leg, counter-clockwise lengthens legs. Unit should be stable and level; side-to-side, front-to-back and corner-to-corner.Regular Leg Floor Plate LegInstallation Model: GHM Series●Exercise care when lifting and moving unit onto counter.1.Secure the unit to the countertop by fastening Plate Mount Legs to the counter-top with appropriate screws (not supplied).Front Floor Plate Leg Rear Floor Plate Leg(2) Screws (suppliedby customer) for eachFloor Plate Leg.2-3.1Base Counter Installation1.The GHM may be installed on an appropriately sized custom or pre-fabricated base counter (Giles offers several different styles of stainless steel Bases, specificallydesigned for GHM Series Warmers). Prior to installing the unit ensure that the base counter is level and stable.2.The unit must be attached to the base counter in accordance with local building code and/or applicable health and sanitation codes. Some health codes require that cracks and cervices between the unit and base, and the base and floor must be sealed to eliminate potential harborage for pests. It is the responsibility of the purchaser and their contracted installer to ensure that all applicable code and regulation requirements are met.InstallationModel: GHM SeriesRear Sliding Doors are secured with tape for shipping ... Remove.3122InstallationModel: GHM Series3214456612InstallationModel: GHM SeriesThe unit must be adequately and properly grounded. Improper grounding may result in electrical The GHM Merchandiser is available with the various electrical specifications listed below. Check the rating label on the rear of the unit to determine correct power supply. Note that a wiring diagram has been provided with this appliance to aid with installation. Please verify that it corresponds with the unit’s electrical specifications.Table 2.5, Electrical Requirements2-6.Electrical Connections1.Install appropriate circuit breakers in the main breaker panel as needed, see Table 2-5. above.2.Connect appropriately sized power supply cable to the main breaker, allowing enough cable length so that unit may be moved as needed for cleaning, or service.3.Remove retaining screws and carefully lower the hinged Control Panel, see Figure 2-6.1.4.Install the provided Cable Strain Relief connector in the hole on the unit’s bottom. Route the cable through strain relief and tighten.5.Connect power wires to the Contactor terminals ... connect ground wire to the ground terminal block. Be sure that fuses are installed in the Fuse Holders. See Figure 2-6.1.6.Carefully close the Control Panel, reinstall retaining screws, and tighten securely.7.Turn on main power circuit breaker ... Place Power Switch in the ON position. The fluorescent lights will illuminate and the Control Box Cooling Fan will begin running.8.There is variable heat control for each well of the unit, see Figure 2-6.1. Rotate Top and Bottom Heater Control Knobs for each well clockwise to the full ON position. Confirm that the red indicator lights on each panel illuminate,and that the pan bottom and the upper ceramic heaters in each well begin heating ... return all Controls to OFF .13InstallationModel: GHM SeriesPower Cable Strain ReliefL1 L2GInside PanelPower SwitchVentilation requirements may vary from locale to locale. Always consult with local authorities having jurisdiction to ensure compliance with all local regulations and codes.Model: GHM Series Model: GHM Series1415Overview The following section provides a brief overview of the components, functions, and accessories of the GHM Series Hot Food Merchandisers. Please review this section carefully before proceeding.3.OverviewGHM-8GHM-4GHM-6GHM-5Model: GHM SERIESOverviewModel: GHM SERIES 163-01.Back and Side View*Not ShownOverviewModel: GHM SERIES*Not Shown1718OverviewModel: GHM SERIES 3-02.Accessories (Included)(2) - GHM 4,5 & 6OverviewModel: GHM SERIES19OverviewModel: GHM SERIES20Overview Model: GHM SERIES3-03.Accessories (Not Included)2223OperationModel: GHM SERIESThis section explains operation of the unit.4.Unit Operation GHM-8GHM-4GHM-6GHM-524Operation This section explains installation of pan dividers and warming pans.Lift the Front Curved Glass and/or open the rear Sliding Doors .Install the Long Pan Support Channels at each of the Channel alignment brackets .1DO NOT ADD WATER OR OTHER LIQUID 24-1.Installation of PansContinued next page23344Model: GHM SERIES25OperationModel: GHM SERIES 4.Install Steam Pans into the various spaces created by the grid of Support Channels. The above representtypical arrangements, but there are many different pan layouts that can be devised. 5.Close the Front Curved Glass and/or Rear Sliding Doors.4-1.Installation of Pans (continued from previous page)26Operation This section explains how to adjust temperature inside the warmer.The GHM and its parts become HOT! 4-2.Setting and Adjusting T emperatureContinued next pageModel: GHM SERIES27OperationModel: GHM SERIES 4-2.Setting and Adjusting T emperature (Continued)28Operation This section illustrates how to install and remove the Folding Work Shelf. This shelf is intented as a work support for temporarily holding fresh or empty pans while while attending Merchandiser. It is removable for easy cleaning.4-3.Work Shelf Installation & Removal4-3.2Shelf RemovalModel: GHM SERIES 4-3.1Shelf InstallationOperation4-4.Normal Shut-Down1.to the OFF position (fully counter-clockwise), Indicatorwill turn off.2.to the OFF will turn off.3.in the OFF position, fluorescent lighting will turn off.3.If required, disconnect power to the unit by turning off the appropriate circuit breaker at the main breakerpanel.4-5.Emergency Shut-Down29Model: GHM SERIES This section explains the process for normal shut-down.In case of an emergency, disconnect power to the unit by turning off the main circuit breaker.3031Cleaning Model: GHM SERIES5.Cleaning1.Perform a Normal Shut-Down as described in Section 4-4and allow the unit to adequately cool.2.Raise the Front Curved Glass to the fully open position.3.Wear appropriate hand protection, if necessary, and remove all Serving Pans and Pan Support Channels from the unit. Place items into sink or dishwasher for cleaning.4.If needed, remove the Sliding Glass Doors by lifting upward until clear of the lower track. Swing the bot-tom of the door outward, pull downward to remove. Set aside in a place suitable for cleaning.5.Clean the interior and exterior of the GHM with soap and hot water. For difficult areas, use a mild degradable non-toxic degreaser (such as Clear Magic or Simple Green).6.Clean the glass parts, including Side Glasses, Partition Glass, Sneeze Guard, etc. with an ordinary win-dow cleaner. These can be removed for easier cleaning. HANDLE WITH CARE!7.Polish all exterior stainless surfaces with a good stainless cleaner/polish.8.Clean the Serving Pans and Pan Support Channels with soap and hot water (may be placed in dishwash-er).9.After drying thoroughly, reinstall all glass pieces removed for cleaning. Reinstall Sliding Doors using reverse sequence of removal.10.Reinstall Pan Support Channels and Serving Pans as desired.11.Lower the Front Curved Glass to the closed position.This section explains recommended cleaning procedures. Not only is it important that food items appeal to the customer, but the cleanliness and sanitation of the unit in which they are displayed is also vital. The GHM is a showcase for your prepared menu items and should be cleaned dailyTroubleshootingModel: GHM SERIESThis section describes basic general troubleshooting procedures. Refer to the supplied wiring diagram for more detailed analysis.•6.T roubleshootingParts ListModel: GHM SERIES7.Parts ListThe goal of the Giles team of professionals is to provide the highest quality of service and assistance. Y ou can help us accomplish this by obtaining the following information and having it readily available when calling.The information is recorded on the Serial Plate Label attached to the rear panel of the unit.7-1.Parts Ordering and Service InformationThis section lists the various parts on the GHM unit that are generally field replaceable.If you require assistance or need repairs, please contact a Giles Manufacturer’s Representative to locate a service provider in your area. If further assistance is required, please contact Giles Foodservice Equipment at the following phone numbers:The area below may be helpful in recording information for use as a quick reference.Model:______________________________________Serial Number:______________________________________Phase:___________________________________________Voltage:___________________________________________Parts List7-2.Control Panel AssemblyModel: GHM SERIES1*348910* Includes Knob, Adapter & Faceplate111312GHM4 - 3 Controls GHM5 - 4 Controls GHM6 - 5 ControlsGHM8 - 7 Controls (2 Panel Sections)Parts List Model: GHM SERIES7-2.Control Panel AssemblyITEM NO.PART NO.QTY (MODEL)DESCRIPTION* Includes Knob, Adapter & FaceplateParts List7-3.Element Assembly - Lower HeaterModel: GHM SERIESParts List Model: GHM SERIES7-3.Parts List for Packaging T able AssemblyITEM NO.PART NO.QTY (MODEL)DESCRIPTIONParts ListModel: GHM SERIES 7-4.T op Heater Assembly1239Parts List Model: GHM SERIES7-4.T op Heater AssemblyITEM NO.PART NO.QTY (MODEL)DESCRIPTION。
30077NOT FOR PRODUCT SPECIFICATIONS.THE TECHNICAL DATA CONTAINED HEREIN ARE INTENDED AS REFERENCE ONLY.PLEASE CONTACT LOCTITE CORPORATION QUALITY DEPARTMENT FOR ASSISTANCE AND RECOMMENDATIONS ON SPECIFICATIONS FOR THIS PRODUCT.ROCKY HILL, CT FAX: +1 (860)-571-5473 DUBLIN, IRELAND FAX: +353-(1)-451 - 9959PRODUCT DESCRIPTIONLOCTITE ® Product 3880 is a silver filled, one-component,epoxy adhesive that can be cured by heat. It combines high tensile strength with good electrical and thermal conductivity.The product has particularly good syringe dispensing characteristics and can also be applied by stencil/screen printing.TYPICAL APPLICATIONSBonding of metals, ceramics and plastics as used in electronic parts, where good adhesion combined with electrical and thermal conductivity is required. Typical examples are bonding of surface mount devices to flexible or rigid substrates; bonding of semiconductor elements; joining EMI parts; bonding electrodes, lead wires or other connectors that require conductivity.PROPERTIES OF UNCURED MATERIALTypical ValueChemical Type Epoxy Appearance Smooth, Silver Paste Specific Gravity @ 25°C 2.12Viscosity @ 25°C, mPa.s (cP)125,000VOC (g/l)177Flash Point (TCC), °C 107Flow CurveThe following graph shows a typical flow curve (ascending) as measured using a Haake rotoviscometer PK100, M10/PK12°Cone system at 23°C.TYPICAL CURING PERFORMANCECure times at temperature as determined by DSC:@125ºC 10 min.@150ºC 6 min.@175ºC3 min.The above times give an indication of the time/temperature relation needed to cure the adhesive. Actual times needed will be longer since various part and board configurations heat at different rates depending on mass and types of ovens used.The adhesive itself needs to reach the indicated temperature for the indicated time to achieve full cure.TYPICAL PROPERTIES OF CURED MATERIAL Physical PropertiesTypical Value Coefficient of thermal expansion, ASTM D696, K -1 (-20 to 40ºC)110 x 10-6 (80 to 120ºC)188 x 10-6Glass Transition Temperature, Tg, ºC64Coefficient of Thermal Conductivity, W/mºC 1.5Modulus, MPa (psi)1,275(185,000)Tensile Strength @ peak, MPa (psi)25(3,700)Elongation @ peak, %3.4Weight Loss, 30 minute @ 200ºC, % 3.50Chloride content, ppm 20Sodium content, ppm 1Potassium content, ppm<1Electrical PropertiesVolume Resistivity, Mil 883D, ohm-cm< 0.0005PERFORMANCE OF CURED MATERIAL (cured for 15 minutes @ 130ºC)Lap Shear StrengthCopper, MPa (psi) 4.8(690)Epoxy (G-10), MPa (psi)3.4(490)Glass, MPa(psi) 3.1(450)Aluminum, MPa (psi)2.8(400)TDS 3880, October 1998Loctite is a Registered Trademark of Loctite Corporation, Hartford, CT 06106GENERAL INFORMATIONThis product is not recommended for use in pure oxygen and/or oxygen rich systems and should not be selected as a sealant for chlorine or other strong oxidizing materials.For safe handling information on this product, consult the Material Safety Data Sheets, (MSDS).Directions for useAllow material to reach room temperature before use. Product supplied in containers should be gently stirred before use.Clean parts are essential for proper adhesion. It is important to drive off all volatiles before applying adhesive. Fine pitch footprints down to 0.5mm (20 mil) are possible.Recommendations for Screen Printing:Thickness (wet) :0.10 - 0.13mm (0.004“ - 0.005“)Screen :Polyester (40-60 mesh)Stainless Steel (60-80 mesh)Emulsion Thickness:0.05mm (0.002“) solvent resistant Squeegee Hardness:60 (for polyester)70 (for Stainless steel)Recommendations for Syringe Dispensing:For air pressure/time systems a good dot profile for SMD attachment can be achieved by using a 0.4mm ID nozzle with 3bar pressure at 25°C and times ranging from 30 to 100msec depending on chip size (0603 to 1206 format). For smaller components such as 0402, a smaller 0.3mm nozzle is recommended. Beads can be formed in a similar way.For volumetric syringe systems special care is necessary and appropriate materials and valve design must be used. Supply pressure must be very low (1-3bar ) to accurately control dispense quantity.After dispensing, place the device on top of the wet adhesive and apply just enough pressure to allow the adhesive to wick onto the leads, but not to displace the adhesive onto adjacent conductive tracks. IR curing or optimised air flow will increase cure speed. Rework can be done by localised heating of the joint above its relatively low Tg.StorageProduct shall be ideally stored in refrigerated, dry location in unopened containers at a temperature between -20°C to 0°C,(4°F to 32°F), and preferably at the lower end of the range,unless otherwise labelled. Refrigerated packages shall be allowed to return to room temperature prior to use. To prevent contamination of unused product, do not return any material to its original container. For further specific shelf life information,contact your local Technical Service Centre.Data RangesThe data contained herein may be reported as a typical value and/or range. Values are based on actual test data and are verified on a periodic basis.NoteThe data contained herein are furnished for information only and are believed to be reliable. We cannot assume responsibility for the results obtained by others over whose methods we have no control. It is the user's responsibility to determine suitability for the user's purpose of any production methods mentioned herein and to adopt such precautions as may be advisable for the protection of property and of persons against any hazards that may be involved in the handling and use thereof. In light of the foregoing, Loctite Corporation specifically disclaims all warranties expressed or implied,including warranties of merchantability or fitness for a particular purpose, arising from sale or use of Loctite Corporation’s products. Loctite Corporation specifically disclaims any liability for consequential or incidental damages of any kind, including lost profits. The discussion herein of various processes or compositions is not to be interpreted as representation that they are free from domination of patents owned by others or as a license under any Loctite Corporation patents that may cover such processes or compositions. We recommend that each prospective user test his proposed application before repetitive use, using this data as a guide. This product may be covered by one or more United States or foreign patents or patent applications.30077。
OT-201OMEGATHERM®Thermally Conductive Silicone PasteIntroductionOMEGATHERM®201 is a thermally conductive, “Heat Sink”silicone grease. It has a very high thermal conductivity coupled with high insulation resistance and high dielectric strength. The term heat sink compound or thermal joint compound is used to describe this type of material. It does not harden on long exposure to elevated temperatures, but retains its past-like consistency. It is rated for continuous use between -40°F and +392°F (40°C and 200°C). OMEGATHERM®is available in four quantity sizes, from a 1⁄2oz. jar to a 2 lb. can, as outlined below.OMEGATHERM 201 provides an excellent means of conducting heat and expanding the heat-path area from a surface to a temperature measurement sensor, thus increasing the speed of response and improving accuracy. OMEGATHERM 201 improves the heat transfer between a solid state relay and its finned heat dissipating heat sink. Apply a thin layer of “201” thermal compound to the bottom of the solid state relay (SSR), then securely mount the SSR on the finned heat sink with the supplied screws.Instructions for UseAlthough OMEGATHERM 201 does not normally settle in its container, storage for long periods of time at elevated temperature may result in a slight separation of the conductive fillers from the silicone oil. If this condition is seen to exist, the fillers may be easily mixed by hand or mechanical mixing.OMEGATHERM 201 may be dispensed through a nozzle using any appropriate hand operated or automatic equipment. For some applications, it will be convenient to apply thin films with a stiff brush.To CLEAN OT-201 from surfaces, use a solvent containing Alcohol, MEK, or Xylene. Repeated use is required to completely clean silicon grease from surface.ApplicationsA. Surface Measurement Probes-dab a small amount on thesurface and push the thermocouple into this area.B. Temporary Temperature Monitoring of Surfaces and Bodies-For applications to 392°F (200°C). OT-201 workswell with insulated wire thermocouples. Simply dab this paste on the surface or into a cavity, put the sensor in the paste, and tape to hold.C. Thermocouple Wells (to 200°C)-improve the response timeof your thermowell assemblies. Simply put enoughOMEGATHERM 201 into the bottom of the wells to cover the active length of the sensor. This application holds for vertical wells or those canted down.D. NOT FOR USE IN A VACUUM. OT-201 will outgas if usedin a vacuum.HygieneMAY CAUSE IRRITATION.1. Avoid contact with skin and eyes.2. Wash thoroughly after handling.First Aid1.In case of contact, wash skin thoroughly with soap and water.2. For eyes, flush with water for 15 minutes and consult physician immediately.FOR INDUSTRIAL USE ONLY.Typical PropertiesColor:Off-whiteTemperature Range of Use:-40°to +392°F(40°to +200°C) Consistency:Thick, smooth pasteVolume Resistivity:1014ohm-cmDielectric Strength:500 volts/mil (19.7 kv/mm) Thermal Conductivity:16 (BTU) (in)/(hr) (ft2) (°F)0.0055 (cal)/(cm)/(sec)(cm2) (°C)Specific Gravity: 2.53 g/ccWeight Loss:0.2% (24 hours/100°CShelf life: 1 Year (Storage at 35°F orbelow will approximatelydouble the shelf life). Solvents:Alcohol or MEK or XyleneSolventsThis information is not a warranty and assumes no legal responsibility. Actual suitability for a particular purpose is to be determined by the user.M0066/1104It is the policy of OMEGA Engineering, Inc. to comply with all worldwide safety and EMC/EMI regulations that apply. OMEGA is constantly pursuing certification of its products to the European New Approach Directives. OMEGA will add the CE mark to every appropriate device upon certification.The information contained in this document is believed to be correct, but OMEGA accepts no liability for any errors it contains, and reserves the right to alter specifications without notice.WARNING: These products are not designed for use in, and should not be used for, human applications.WARRANTY/DISCLAIMEROMEGA ENGINEERING, INC. warrants this unit to be free of defects in materials and workmanship for a period of 13 months from date of purchase.OMEGA’s WARRANT Y adds an additional one (1) month grace period to the normal one (1) year product warranty to cover handling and shipping time. This ensures that OMEGA’s customers receive maximum coverage on each product.If the unit malfunctions, it must be returned to the factory for evaluation. OMEGA’s Customer Service Department will issue an Authorized Return (AR)number immediately upon phone or written request. Upon examination by OMEGA, if the unit is found to be defective, it will be repaired or replaced at no charge. OMEGA’s WARRANTY does not apply to defects resulting from any action of the purchaser, including but not limited to mishandling,improper interfacing, operation outside of design limits, improper repair, or unauthorized modification. This WARRANTY is VOID if the unit shows evidence of having been tampered with or shows evidence of having been damaged as a result of excessive corrosion; or current, heat, moisture orvibration; improper specification; misapplication; misuse or other operating conditions outside of OMEGA’s control. Components in which wear is not warranted, include but are not limited to contact points, fuses, and triacs.OMEGA is pleased to offer suggestions on the use of its various products. However, OMEGA neither assumes responsibility for any omissions or errors nor assumes liability for any damages that result from the use of its products in accordance with information provided by OMEGA, either verbal or written. OMEGA warrants only that the parts manufactured by the company will be as specified and free of defects. OMEGA MAKES NO OTHER WARRANTIES OR REPRESENTATIONS OF ANY KIND WHATSOEVER, EXPRESSED OR IMPLIED, EXCEPT THAT OF TITLE, AND ALL IMPLIED WARRANTIES INCLUDING ANY WARRANTY OF MERCHANTABILITY AND FITNESS FOR A PARTICULAR PURPOSE ARE HEREBY DISCLAIMED. LIMITATION OF LIABILITY : The remedies of purchaser set forth herein are exclusive, and the total liability of OMEGA with respect to this order, whether based on contract, warranty, negligence, indemnification, strict liability or otherwise,shall not exceed the purchase price of the component upon which liability is based. In no event shall OMEGA be liable for consequential,incidental or special damages.CONDITIONS: Equipment sold by OMEGA is not intended to be used, nor shall it be used: (1) as a “Basic Component” under 10 CFR 21 (NRC), used in or with any nuclear installation or activity; or (2) in medical applications or used on humans. Should any Product(s) be used in or with any nuclear installation or activity, medical application, used on humans, or misused in any way, OMEGA assumes no responsibility as set forth in our basic WARRANT Y/DISCLAIMER language, and, additionally, purchaser will indemnify OMEGA and hold OMEGA harmless from any liability or damage whatsoever arising out of the use of the Product(s) in such a manner.Servicing North America:U.S.A.:One Omega Drive, Box 4047ISO 9001 CertifiedStamford, CT 06907-0047Tel: (203) 359-1660FAX: (203) 359-7700e-mail:**************Canada:976 BergarLaval (Quebec) H7L 5A1, Canada Tel: (514) 856-6928FAX: (514) 856-6886e-mail:*************For immediate technical or application assistance:U.S.A. and Canada:Sales Service: 1-800-826-6342 / 1-800-TC-OMEGA ®Customer Service: 1-800-622-2378 / 1-800-622-BEST ®Engineering Service: 1-800-872-9436 / 1-800-USA-WHEN ®TELEX: 996404 EASYLINK: 62968934 CABLE: OMEGAMexico:En Espan ˜ol: (001) 203-359-7803e-mail:*****************FAX: (001) 203-359-7807**************.mxOMEGAnet ®Online Service Internet e-mail***********************Servicing Europe:Benelux:Postbus 8034, 1180 LA Amstelveen, The Netherlands Tel: +31 (0)20 3472121FAX: +31 (0)20 6434643Toll Free in Benelux: 0800 0993344e-mail:*****************Czech Republic:Frystatska 184, 733 01 Karviná, Czech Republic Tel: +420 (0)59 6311899FAX: +420 (0)59 6311114Toll Free: 0800-1-66342e-mail:*****************France:11, rue Jacques Cartier, 78280 Guyancourt, France Tel: +33 (0)1 61 37 2900FAX: +33 (0)1 30 57 5427Toll Free in France: 0800 466 342e-mail:**************Germany/Austria:Daimlerstrasse 26, D-75392 Deckenpfronn, GermanyTel: +49 (0)7056 9398-0FAX: +49 (0)7056 9398-29TollFreeinGermany************e-mail:*************United Kingdom:One Omega Drive, River Bend Technology CentreISO 9002 CertifiedNorthbank, Irlam, Manchester M44 5BD United Kingdom Tel: +44 (0)161 777 6611FAX: +44 (0)161 777 6622Toll Free in United Kingdom: 0800-488-488e-mail:**************.ukRETURN REQUESTS /INQUIRIESDirect all warranty and repair requests/inquiries to the OMEGA Customer Service Department. BEFORE RETURNING ANY PRODUCT (S) T OOMEGA, PURCHASER MUST OBTAIN AN AUTHORIZED RETURN (AR) NUMBER FROM OMEGA’S CUSTOMER SERVICE DEPARTMENT (IN ORDER T O AVOID PROCESSING DELAYS). T he assigned AR number should then be marked on the outside of the return package and on any correspondence.The purchaser is responsible for shipping charges, freight, insurance and proper packaging to prevent breakage in transit.FOR WARRANTY RETURNS, please have the following information available BEFORE contacting OMEGA:1.Purchase Order number under which the product was PURCHASED,2.Model and serial number of the product under warranty, and3.Repair instructions and/or specific problems relative to the product.FOR NON-WARRANTY REPAIRS,consult OMEGA for current repair charges.Have the following information available BEFORE contacting OMEGA:1. Purchase Order number to cover the COST of the repair,2.Model and serial number of the product, and3.Repair instructions and/or specific problems relative to the product.OMEGA’s policy is to make running changes, not model changes, whenever an improvement is possible. T his affords our customers the latest in technology and engineering.OMEGA is a registered trademark of OMEGA ENGINEERING, INC.© Copyright 2004 OMEGA ENGINEERING, INC. All rights reserved. This document may not be copied, photocopied, reproduced, translated, or reduced to any electronic medium or machine-readable form, in whole or in part, without the prior written consent of OMEGA ENGINEERING, INC.。
加热型Flexi-Therm恒温金属浴
加热型Flexi-Therm恒温金属浴对传统干式恒温与金属浴的突破性创新,配备独创性贴合热盖的加热模块,具有更高的温控精度与温度均一性。
加热型Flexi-Therm恒温金属浴
莱因特电子系统(上海)有限公司成立于2008年,是由英国Integrated Technologies Limited 在中国上海成立的全资综合性子公司。
公司主要从事于生物分析仪器、医疗诊断仪器的生产、研发、销售,为客户提供高品质的产品服务和产品技术解决方案。
公司已经通过英国BSI ISO 9001及ISO 13485质量管理体系认证,产品已经获得欧盟CE认证。
我们已与众多世界知名生物分析仪器和医疗器械领域公司形成战略合作伙伴关系,公司的各项高端产品90%以上销往欧美各地。
为了拓展公司业务范围,目前我们正在向有关部门申请SFDA认证。
公司已创立以VITL品牌系列的生命科学分析仪器,以最好的产品品牌,最好的产品质量,最好的产品售后服务满足中国客户和其他地区客户的需求。
公司的产品销售业务不仅在欧美市场,我们更着眼于具有深厚发展潜力的中国市场,未来三年我们的专业团队将会在整个中国内陆地区、台湾地区、日本地区及东南亚市场建立成熟的营销网络,我们将把VITL系列产品从欧美更广泛的推广到全球范围。
加热型Flexi-Therm恒温金属浴产品特性:
1. 精确温度控制。
2. 提供多种加热模块,一机多用。
3. 界面简单,便于快速操作。
4. 配有上盖加热功能的加热模块,与VITL Ther-Mix共用模块。
5. 加热模块记忆功能,支持将前一次操作程序贮存在所用的加热模块中。
6. 上下盖独立控温。
加热型Flexi-Therm恒温金属浴热盖优势:
有效防止在管盖与管壁形成冷凝水。
提高加热模块温度的均一性,确保最佳反应温度和反应结果,从而提高实验重复性。
热盖与加热模块一体化设计,操作更方便。
热盖与耗材上盖紧密贴合,温度控制更加精确,有效防止爆管。
加热型Flexi-Therm恒温金属浴主要参数:。