LCZ2850 28倍600线一体化摄像机
- 格式:doc
- 大小:47.00 KB
- 文档页数:2
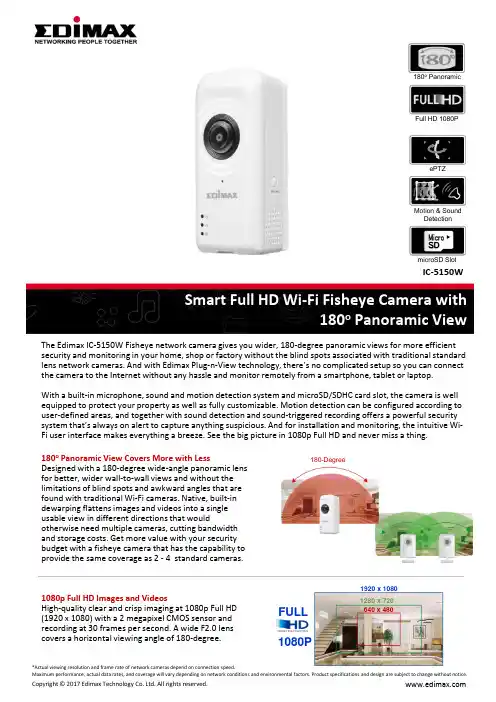
The Edimax IC-5150W Fisheye network camera gives you wider, 180-degree panoramic views for more efficient security and monitoring in your home, shop or factory without the blind spots associated with traditional standard lens network cameras. And with Edimax Plug-n-View technology, there’s no complicated setup so you can connect the camera to the Internet without any hassle and monitor remotely from a smartphone, tablet or laptop. With a built-in microphone, sound and motion detection system and microSD/SDHC card slot, the camera is well equipped to protect your property as well as fully customizable. Motion detection can be configured according to user-defined areas, and together with sound detection and sound-triggered recording offers a powerful security system that’s always on alert to capture anything suspicious. And for installation and monitoring, the intuitive Wi-Fi user interface makes everything a breeze. See the big picture in 1080p Full HD and never miss a thing.IC-5150W180o Panoramic View Covers More with LessDesigned with a 180-degree wide-angle panoramic lens for better, wider wall-to-wall views and without the limitations of blind spots and awkward angles that are found with traditional Wi-Fi cameras. Native, built-in dewarping flattens images and videos into a single usable view in different directions that wouldotherwise need multiple cameras, cutting bandwidth and storage costs. Get more value with your security budget with a fisheye camera that has the capability to provide the same coverage as 2 - 4 standard cameras.1080p Full HD Images and VideosHigh-quality clear and crisp imaging at 1080p Full HD (1920 x 1080) with a 2 megapixel CMOS sensor and recording at 30 frames per second. A wide F2.0 lens covers a horizontal viewing angle of 180-degree.FULL 1080P1920 x 10801280 x 720640 x 480180-Degree180o PanoramicFull HD 1080PePTZMotion & Sound DetectionmicroSD SlotIC-5150WNative Dewarping with “Normal" ViewBuilt-in dewarping and image distortion reduction toconvert images or videos to a "normal" view, forbetter usability and easy monitoring and playback. DewarpingePTZ Control for Rich DetailDigital pan, tilt & zoom on areas of interest for better focus and rich detail while still recording thebigger picture.Wide Dynamic Range (WDR)Equipped with a high-performance image sensor and Wide Dynamic Range (WDR) feature to enable high-quality imaging and recoding in more detail underlow and poor light or high contrast conditions. Fisheye Normal ViewePTZ (Digital Pan, Tilt & ZoomIC-5150WMotion Detection Triggered RecordingThe powerful built-in motion detection system withpre-defined detection regions offers peace of mindthat you will capture any suspicious activity. Whenmotion is detected, the network camera will producevideo footage of the event immediately – storing thedata on a microSD/SDH C card or sending itautomatically via email or ftp.Sound Detection Triggered RecordingFeaturing sound detection capabilities and built-inmicrophone. When sound is detected, the networkcamera will take video footage of the eventimmediately in the same manner as with motiondetection, and store the files locally on amicroSD/SDHC card or send via email or ftp.Integrated sound offers a further level of securitythan motion-detection and visual imaging alone,providing critical real-time or post-event informationabout a situation, particularly in scenarios whereevents occur outside the camera’s field of vision. Thesounds of breaking windows, doors or anything elsesuspicious can still be registered even in situationswhere the event can’t be seen.Push Notifications & Video AlertsPush notifications are triggered by motion or sound detection, and when a detection system is triggered, the camera additionally sends video alerts to email or microSD card. If the camera ever goes offline, push notifications are also sent when the camera comes back online to keep users informed about any unusual activity.Microphone forSound DetectionImage Sensor forKeep An Eye OnWhat You Care About The MostAnywhere & AnytimeBaby / ElderPetGarageOfficeHotelIn PublicSOFTWARE FEATURES•Easy remote monitoring via iPhone, iPad, Android, PC & Mac •High-speed H.264 & MJPEG video compression•Motion & sound detected video to microSD/SDHC card, ftp or email •Pre- & post-recording upon detected motion•Viewer software to access 16 network cameras simultaneously •Manual/scheduled/cycle recordingIC-5150WmicroSD/SDHC Card Slot for Local StorageA built-in microSD/SDHC card slot supports cards up to 64GB for local storage and backup.Plug-n-View for 24/7 Easy Remote Monitoring Edimax Plug-n-View technology makes it easy for you to keep an eye on your home, garage, shop, factory or other assets wherever you go. With Plug-n-View technology, you can connect your network camera in a few simple steps and access it remotely with a smartphone, tablet, orcomputer no matter where you are.Free EdiLife viewer appfor iPhone & Android phonesFree AppEdiLifeThree StepsPower on network camera.Download the EdiLife app from the App Store or Google Play.Pair the camera with your app & Wi-Fi and watch a live stream from anywhere!Function Management InterfaceEasy remote monitoring via iPhone, iPad, Android, PC 180206Supports dynamic Built-in microphoneMotion/sound detection recordingand alerts to email and FTPmicroSD/SDHC card slot for local storageMulti-view modeEdiView Finder (Windows/Mac) 16-channel viewer Web management interface Firmware upgradable iPhone & iPad viewer app Android viewer app Ethernet (RJ-45) port Power jackReset/WPS button Internal antennamicroSD/SDHC card slot Microphone USB 2.0 portLED indicators: Internet, LAN/Wi-Fi LNK/ACT, PowerVideoVideo SettingsSupported ProtocolsHigh-speed H.264 & MJPEG video compression19201280640320Resolution: Full HD (1920 x 1080), HD (1280 x QVGA Frame fpsIPv4, HTTP, TCP, ICMP, RTSP, RTP, UDP, RTCP, SMTP, SNTP, FTP, DHCP, StandardsRF Output Power PowerFast Ethernet IEEE 802.3/802.3u Wireless IEEE11b: 16dBm–18dBm 11g: 14dBm 11n: 11dBm12V DC x 1AMemory Operating Conditions Accessory8MB flash 64MB SDRAM 0–40Humidity: 20–80% RH (non-condensing)Flat wall-mount kit x 1 Tilt wall-mount kit DimensionsWeight Certifications 95 x 40 x 30 mm75gFCC,CEIC-5150WAPPLICATION DIAGRAMHARDWARE INTERFACE*Actual viewing resolution and frame rate of network cameras depend on connection speed.Maximum performance, actual data rates, and coverage will vary depending on network conditions and environmental factors. Product specifications and design are subject to change without notice.Copyright © 2017 Edimax Technology Co. Ltd. All rights reserved.12V DC Port microSD/SDHC card slotUSB PortMicrophoneImage SensorLED Indicators: Power, LAN/Wi-Fi LNK/ACT, InternetInternetWi-Fi RouterIC-5150WWi-Fi Network CameraFree AppEdiLife180 Degree Panoramic View。
ACV系列全线产品资料参数ACV-IR日夜两用系列热成像系统将先进的热成像能力和高清晰16倍,18倍,22倍,23倍,26倍,30倍,35倍,36倍.光学一体化摄象机及ACV高速云台精准结合在一起,制造了一个完全一体化,独一无二的日夜两用型热成像定位系统。
ACV-IR 的核心是一个非制冷微型热辐射测量计,长波红外(LWIR) 摄像机。
它可生成320 x 240 辨论率的热成像视频,每个像素大小为38 μm。
ACV-IR 系列提供杰出的低于40mK 的灵敏度。
它具有多种显示模式,包括热量呈白色,黑色,和彩色系列。
ACV-IR有三种不同的镜头配置14.25 mm, 35 mm 和50 mm 焦距为了更有效地在各种环境下应用。
产品特性:解码器集成了多种协议( RS-485Pelco D 协议和P 协议)一体化红外(IR) 摄像机防护罩变速范畴0.1-80°/ 秒360°连续水平转动垂直范畴+88°至-87°可在90 英里/ 小时风速下正常工作,能承担风速达到130 英里/ 小时在风速50英里/小时的水平预置速度为每秒80°,在90 英里/小时风速时为每秒60°符合IP66 标准—云台和防护罩变速扫描速度(0.1-60°/ 秒)译码卡支持其它品牌协议易于安装- 快速简捷的电气连接最少爱护设计,无需调整齿轮满负荷连续工作128 个可编程带标识预置位自动,和随机扫描可编程停止位可编程的手动云台限位( 水平)可编程的自动扫描限位( 水平)自动巡视模式一体化防护罩,预装配热成像摄像机遮阳罩,加热器,隔热衬垫均是标准配置AC 线性锁定NTSC/PAL电气指标输入电压AC 24V, 50/60 Hz .输入电压范畴±10%功耗最大70 V A加热器温控器操纵电气连接在安装位置有两芯电源连接头和一个地线端子;一个BNC 头和四芯接头用于RS-485 Pelco D 或P 协议;两芯接线端子用,于集电极开路输出.Aux 2 2 秒触发的电极开路输出;连接的继电器鼓舞线圈的电压不得超过32 VDC 和40 mA ;ACV-IR和继电器间的线长度必须小于100 英尺(30 m)视频同输电缆最大长度电缆型号RG59/U 750 英尺(229 m)RG6/U 1,000 英尺(305 m)RG11/U 1,500 英尺(457 m)最低线缆需求:75欧姆阻抗;全铜线芯;屏蔽层覆盖率95%机械构造参数水平转动360°连续的水平转动垂直移动+88°至-87°无阻碍变速云台速度水平0.1°至60°/ 秒变速操作,加速模式下80°/ 秒垂直每秒0.1°至40°变速操作预置位速度水平80°/ 秒垂直60°/ 秒摄像机安装一体化的摄像机安装组件热成像摄像机参数成像器非制冷微型热辐射测量计,氧化钒(VOx)辨论率320x240像素大小38 μm光谱响应7.5 至13.5 μm,长波红外(LWIR)视频输出NTSC/PAL标准化来源内部快门( 补偿) ,快门动作期间冻结视频0.7 秒成像时刻小于2 秒不带热电制冷器(TEC)串行命令兼容RS-232场景温度范畴( 取决于镜头) 150°C 标准;可选的自动增益模式扩展范畴到560°C镜头选项14.25 mm, F1.3 镜头35 mm, F1.4 镜头50 mm, F1.7 镜头目标像素(POT)以下性能值基于在正常大气环境下,安装在25 英尺(8m) 高的设备与一个单人大小的目标间的距离。
基本指南進階指南相機的基本操作自動模式/混合自動拍攝模式其他拍攝模式播放模式無線功能設定選單配件附錄索引P 模式Tv 、Av 、M 、C1及C2模式用前須知基本指南進階指南相機的基本操作自動模式/混合自動拍攝模式其他拍攝模式播放模式無線功能設定選單配件附錄索引P 模式Tv 、Av 、M 、C1及C2模式用前須知基本指南進階指南相機的基本操作自動模式/混合自動拍攝模式其他拍攝模式播放模式無線功能設定選單配件附錄索引P 模式Tv 、Av 、M 、C1及C2模式用前須知基本指南進階指南相機的基本操作自動模式/混合自動拍攝模式其他拍攝模式播放模式無線功能設定選單配件附錄索引P 模式Tv 、Av 、M 、C1及C2模式用前須知2223232424262728293131 (33)34 (37) (37)37基本指南進階指南相機的基本操作自動模式/混合自動拍攝模式其他拍攝模式播放模式無線功能設定選單配件附錄索引P 模式Tv 、Av 、M 、C1及C2模式用前須知5353 (53)5556) (56)) (57)5858) (58)) (59)) (59)) (59)) (60)(以1分鐘的短片為例) (60)) (61)61 (62)63636464656566) (66)在混合自動拍攝模式下拍攝 .播放短片摘要靜止影像/短片靜止影像短片場景圖示 .螢幕上的方框 ......................................................................................常用的便捷功能 ...............................................................................42使用自拍 ..............................................................................................使用自拍功能以避免相機震動 .....................................................自訂自拍 .........................................................................................輕觸螢幕進行拍攝(輕觸式快門) .......................................................連續拍攝 ..............................................................................................影像自訂功能 ...................................................................................45變更影像畫質 ......................................................................................拍攝RAW 格式的影像 ....................................................................使用選單 .........................................................................................變更長寬比 ..........................................................................................變更短片影像畫質 ..............................................................................實用的拍攝功能 ...............................................................................48使用雙軸電子水平儀 ..........................................................................使用自動程度 ......................................................................................自訂相機操作 ...................................................................................49避免自動對焦輔助光發光 ..................................................................關閉防紅眼燈 ......................................................................................變更拍攝後影像的顯示時間 ..............................................................其他拍攝模式.....................................................................使用您喜愛的設定進行拍攝(創意輔助儲存/載入設定.儲存設定載入設定基本指南進階指南相機的基本操作自動模式/混合自動拍攝模式其他拍攝模式播放模式無線功能設定選單配件附錄索引P 模式Tv 、Av 、M 、C1及C2模式用前須知8181818182828283 (83)84 (84)85858686 (87)8889) (89) (91)929292 (93).............................93調整影像亮度(曝光補償關閉曝光模擬鎖定影像亮度/曝光(自動曝光鎖變更測光方法 .變更ISO 感光度調整自動ISO 設定 .自動包圍曝光(自動包圍曝光拍攝) ...................................................自動校正亮度及對比度(自動亮度優化) ...........................................拍攝明亮主體(高光色調優先) ...........................................................影像色彩 ...........................................................................................71調整白平衡 ..........................................................................................自訂白平衡 .....................................................................................手動校正白平衡 .............................................................................手動設定白平衡色溫 .....................................................................自訂色彩(相片風格) ...........................................................................自訂相片風格 .................................................................................儲存自訂相片風格 .........................................................................對焦 ...................................................................................................75選擇自動對焦方式 ..............................................................................單點自動對焦 .................................................................................+追蹤............................................................................................流暢區域自動對焦 .........................................................................選擇要對焦的主體(觸控自動對焦使用自動對焦鎖拍攝 ..........................................................................使用伺服自動對焦拍攝 ......................................................................變更對焦設定 ......................................................................................微調焦點 ..............................................................................................使用手動對焦模式拍攝 .輕鬆辨識對焦區域(手動對焦突出輪廓) .閃光燈 ...............................................................................................80變更閃燈模式 .自動 .................................................................................................基本指南進階指南相機的基本操作自動模式/混合自動拍攝模式其他拍攝模式播放模式無線功能設定選單配件附錄索引P 模式Tv 、Av 、M 、C1及C2模式107108108109109110110110111111111111112112113113114115115116117117119120120將功能指定給按鈕及轉盤將功能指定給速控轉盤自訂快速設定選單 .選擇要包含在選單中的項目重新排列選單項目儲存拍攝設定 ......................................................................................可儲存的設定 .................................................................................儲存常用拍攝選單項目(我的選單) ...................................................重新命名我的選單設定頁 .............................................................刪除我的選單設定頁 .....................................................................將我的選單設定頁或項目全部刪除 .............................................自訂我的選單設定頁顯示 .............................................................播放模式..........................................................................檢視 .................................................................................................100輕觸式螢幕操作 ................................................................................切換顯示模式 ....................................................................................自訂顯示的拍攝資訊 ...................................................................過度曝光警告(影像的光亮部份) .顯示自動對焦點 ...........................................................................顯示格線 .......................................................................................亮度直方圖 ...................................................................................RGB 直方圖 ...................................................................................拍攝靜止影像時檢視建立的短片按日期檢視 ...................................................................................瀏覽及篩選影像 .............................................................................104使用索引搜尋影像 .輕觸式螢幕操作輕觸兩下放大尋找符合特定條件的影像 .使用主轉盤在影像之間跳轉 .輕觸式螢幕操作基本指南進階指南相機的基本操作自動模式/混合自動拍攝模式其他拍攝模式播放模式無線功能設定選單配件附錄索引P 模式Tv 、Av 、M 、C1及C2模式141141142142142143發送的影像 ........................143 .............................144 ................................................144144144145146146147 ...................................................147148 ............................................................148 ....................................................149150150150151151152152152縮減檔案大小 .編輯短片摘要 .無線功能.可用的無線功能使用Wi-Fi 功能使用藍牙®功能 ..................................................................................將影像傳輸至智能手機 .................................................................124將影像傳輸至具備藍牙功能的智能手機 ........................................將影像傳輸至兼容NFC 的智能手機 ................................................相機處於拍攝模式時透過NFC 連接............................................相機處於播放模式時透過NFC 連接............................................透過Wi-Fi 選單連接至智能手機.......................................................使用其他存取點 ................................................................................確認存取點的兼容性 ...................................................................使用兼容WPS 的存取點 ...............................................................連接至列出的存取點 ...................................................................以前使用過的存取點 ...................................................................發送影像至註冊的網絡服務 .........................................................132註冊網絡服務 ....................................................................................註冊CANON iMAGE GATEWAY ...............................................註冊其他網絡服務 .......................................................................上傳影像至網絡服務 ........................................................................使用媒體播放器檢視影像 .............................................................136從連接的打印機無線打印影像 .....................................................137發送影像至其他相機影像發送選項發送多張影像 .逐張選擇影像選擇範圍發送評分的影像基本指南進階指南相機的基本操作自動模式/混合自動拍攝模式其他拍攝模式播放模式無線功能設定選單配件附錄索引P 模式Tv 、Av 、M 、C1及C2模式用前須知164164165166166166167167 (169169169)170171171171171172173174 ...........................................174175175175176176176 ...........................................................177 ...........................................177 .. (177)使用省電模式 .省電調整 .螢幕亮度 .切換螢幕資訊顏色 .世界時鐘 .日期及時間 .顯示的語言 ........................................................................................關閉相機聲音 ....................................................................................開啟相機聲音 ....................................................................................隱藏提示 ............................................................................................按圖示列出拍攝模式 ........................................................................調整輕觸式螢幕面板 ........................................................................清潔影像感應器 ................................................................................關閉自動清潔 ...............................................................................啟動清潔感應器 ...........................................................................手動清潔感應器 ...........................................................................查看認證標誌 ....................................................................................設定要記錄在影像中的版權資訊 ....................................................刪除全部版權資訊 .......................................................................調整其他設定 ....................................................................................回復相機的預設設定 ........................................................................回復相機的所有預設值 ...............................................................回復個別功能的預設值 ...............................................................配件 .................................................................................系統圖 .............................................................................................161另購配件 .. (162)鏡頭 ....................................................................................................電源 ....................................................................................................閃光燈 ................................................................................................麥克風 ................................................................................................其他配件 ............................................................................................打印機 ................................................................................................基本指南進階指南相機的基本操作自動模式/混合自動拍攝模式其他拍攝模式播放模式無線功能設定選單配件附錄索引P 模式Tv 、Av 、M 、C1及C2模式用前須知清除打印清單的所有影像將影像加入相簿 .指定選擇的方法逐張加入影像將所有影像加入相簿移除相簿的所有影像附錄 .................................................................................疑難排解 .........................................................................................179螢幕提示 .........................................................................................183螢幕資訊 .. (185)拍攝時 ................................................................................................電量 ...............................................................................................播放時 ................................................................................................資訊顯示1 .....................................................................................資訊顯示2 .....................................................................................資訊顯示3 .....................................................................................資訊顯示4 .....................................................................................資訊顯示5 .....................................................................................資訊顯示6 .....................................................................................資訊顯示7 .....................................................................................資訊顯示8 .....................................................................................短片控制介面的總覽 ...................................................................功能及選單表 (188)各拍攝模式下的可用功能 ................................................................快速設定選單 ....................................................................................拍攝設定頁 .C.Fn 設定頁INFO.速控.設定設定頁 .我的選單設定頁 .播放設定頁 .播放模式下的快速設定選單 .206206206206206207207207207208209209210210210210210210211)的注意事項 ...............................214214214215 . (215215215)基本指南進階指南相機的基本操作自動模式/混合自動拍攝模式其他拍攝模式播放模式無線功能設定選單配件附錄索引P 模式Tv 、Av 、M 、C1及C2模式用前須知基本指南進階指南相機的基本操作自動模式/混合自動拍攝模式其他拍攝模式播放模式無線功能設定選單配件附錄索引P 模式Tv 、Av 、M 、C1及C2模式用前須知基本指南進階指南相機的基本操作自動模式/混合自動拍攝模式其他拍攝模式播放模式無線功能設定選單配件附錄索引P 模式Tv 、Av 、M 、C1及C2模式用前須知用前須知基本指南進階指南相機的基本操作自動模式/混合自動拍攝模式其他拍攝模式播放模式無線功能設定選單配件附錄索引P 模式Tv 、Av 、M 、C1及C2模式用前須知基本指南進階指南相機的基本操作自動模式/混合自動拍攝模式其他拍攝模式播放模式無線功能設定選單配件附錄索引P 模式Tv 、Av 、M 、C1及C2模式用前須知基本指南進階指南相機的基本操作自動模式/混合自動拍攝模式其他拍攝模式播放模式無線功能設定選單配件附錄索引P 模式Tv 、Av 、M 、C1及C2模式用前須知基本指南進階指南相機的基本操作自動模式/混合自動拍攝模式其他拍攝模式播放模式無線功能設定選單配件附錄索引P 模式Tv 、Av 、M 、C1及C2模式用前須知基本指南進階指南相機的基本操作自動模式/混合自動拍攝模式其他拍攝模式播放模式無線功能設定選單配件附錄索引P 模式Tv 、Av 、M 、C1及C2模式用前須知基本指南進階指南相機的基本操作自動模式/混合自動拍攝模式其他拍攝模式播放模式無線功能設定選單配件附錄索引P 模式Tv 、Av 、M 、C1及C2模式用前須知基本指南進階指南相機的基本操作自動模式/混合自動拍攝模式其他拍攝模式播放模式無線功能設定選單配件附錄索引P 模式Tv 、Av 、M 、C1及C2模式用前須知基本指南進階指南相機的基本操作自動模式/混合自動拍攝模式其他拍攝模式播放模式無線功能設定選單配件附錄索引P 模式Tv 、Av 、M 、C1及C2模式用前須知基本指南進階指南相機的基本操作自動模式/混合自動拍攝模式其他拍攝模式播放模式無線功能設定選單配件附錄索引P 模式Tv 、Av 、M 、C1及C2模式用前須知基本指南進階指南相機的基本操作自動模式/混合自動拍攝模式其他拍攝模式播放模式無線功能設定選單配件附錄索引P 模式Tv 、Av 、M 、C1及C2模式升起閃光燈],請按下起閃光燈。
目录第一章、系统概述 (3)第一节、系统概述 (3)第二节、需求分析 (3)第二章、系统设计目标 (5)第三章、系统设计原则、依据 (7)第一节、设计原则 (7)第二节、设计依据 (8)第四章、总体设计 (9)第一节、设计概述 (9)1、系统设计说明 (9)2、系统结构图 (10)第二节、深化设计 (10)1、点位设计及分布 (10)2、图像和控制信号传输部分 (14)3、图像控制存储部分 (14)4、施工管线设计 (14)第五章、本次设计中产品介绍 (15)第一节、嵌入式DVR (15)第二节、红外一体化摄像机(100M) (16)第三节、彩色红外一体摄像机(25M) (17)第四节、彩色红外一体摄像机(50M) (18)第五节、防暴半球型摄像机 (20)第六节、彩色一体化摄像机 (22)第七节、宽动态540线超高清晰枪式摄像机 (23)第八节、日夜型星光级感红外枪式摄像机 (24)第六章、售后服务 (27)第一节、故障处理服务 (27)第二节、技术支持服务 (27)第三节、远程接入支持服务 (29)第四节、现场技术支持服务 (29)七、设备清单(详见配置报价) (32)第一章、系统概述第一节、系统概述随着信息化的发展,传统的厂区周界安全防范——建立高高的围墙,铁栅栏等。
就无法满足现有的需求。
如果有非法入侵无法及时发现和处理,那么就需要有一套先进,科学,实用,性能稳定可靠的安全防范监控系统来实现,为了更好的保护财产及工厂的安全,根据企业用户实际的监控需要,一般都会在工厂周边、大门、办公楼、生产车间、仓库、料场、机房等重点部位安装摄像机。
监控系统将视频图像监控,实时监视显示,云台镜头控制等功能有机结合的新一代监控系统,同时监控主机自动将报警画面纪录,做到及时处理,提高了保卫人员的工作效率并能及时处理警情,能有效的保护工厂财产和工作人员的安全,最大程度的防范各种入侵,提高处理各种突发事件的反映速度,给保卫人员提供一个良好的工作环境,确保整个工厂的安全。

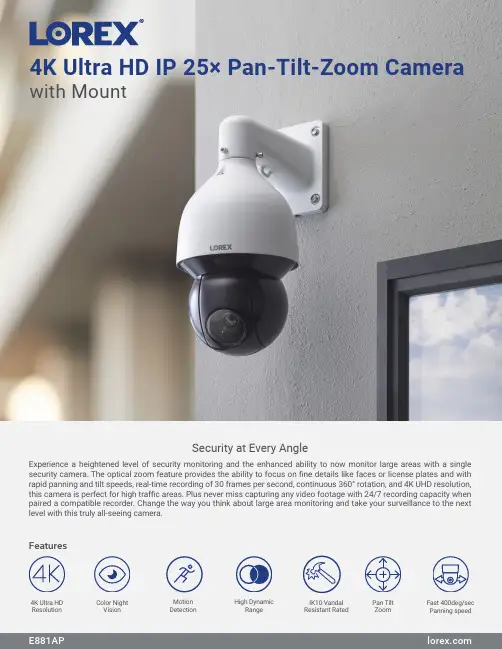
4K Ultra HD IP 25× Pan-Tilt-Zoom Camerawith MountExperience a heightened level of security monitoring and the enhanced ability to now monitor large areas with a single security camera. The optical zoom feature provides the ability to focus on fine details like faces or license plates and with rapid panning and tilt speeds, real-time recording of 30 frames per second, continuous 360° rotation, and 4K UHD resolution, this camera is perfect for high traffic areas. Plus never miss capturing any video footage with 24/7 recording capacity when paired a compatible recorder. Change the way you think about large area monitoring and take your surveillance to the next level with this truly all-seeing camera.Security at Every AngleFeatures4K Ultra HDResolution High DynamicRange Fast 400deg/sec Panning speedPan Tilt Zoom Color NightVision MotionDetection IK10 Vandal Resistant RatedPicture PerfectSee every detail with superior definitionColor Night VisionSee everything clear as day, even at nightNo Matter the WeatherMaximize coverage with cameras built for any climatePan. Tilt. Optical ZoomSee more, know more with Pan and Tilt Capabilities• 4K (8MP) Ultra HD resolution, ensuring clear and detailed footage• See more with a with up to 66° field of view, depending on the level ofzoom desired• Record at a real-time 30 frames-per-second, providing smooth andclearer footage• Experience enhanced nighttime clarity and better video evidencewith Color Night Vision²• Up to 150ft (46m) IR night vision in low light and 98ft (30m) in totaldarkness³• Weatherproof rated (IP67)• Operates in temperatures low as -40°F (-40°C) and high as 131˚F (55 ˚C)• Durable camera housing, designed to withstand harsh weather conditions• Be confident that this micro security camera is capable of looking afteritself. It is engineered with an IK10 vandal resistant rating - meaning itsresilient metal housing is made to withstand all types of violent impacts• Get the full picture with the endless 360° Pan range and• Fast 400°/sec panning speed and tilt capabilities allows the cameras tocover larger areas of your property• 25X Optical Zoom through the Lorex App, provides an added level of clarity• Program preset viewing points, patterns, scan cycles and tours whenconnected to a compatible NVRProduct SpecificationsSpecification Video Transmission Technology IPImage Sensor 8MP/4K 1/1.8" CMOS Video Format NTSCVideo Compression H.265/H.264H(Main Stream & Sub Stream)OpticalViewing Angle (Horizontal)61.6°– 3.6°Viewing Angle (Diagonal)66.6°– 4°Lens/Lens type 5.3-135mm F1.6- F4.0 / Zoom Module Optical Zoom 25×Digital Zoom Yes 5Pan/Tilt CapabilitiesPan / Tilt Range Pan: 0°–360° endless Tilt: -15° ~ 90°Auto Flip Yes, 180° Continous Rotation YesManual Speed (Maximum) Pan: 0.1°–300°/s Tilt: 0.1°–200°/s Preset Speed (Maximum) Pan: 400°/s; Tilt: 300°/s Presets 300Patterns 5Tours 8Other PTZ Functions Auto Scans, Auto Pan Camera OSD YesSpecial Features Motion DetectionYes Disclaimers:1. Compatible with select Lorex analog HD recorders. For a full list of compatible recorders visit: /compatibility2. Full color nighttime video typically switches to black & white IR night vision below 1 lux to ensure optimal low-light image quality.3. Stated IR illumination range is based on ideal conditions in typical outdoor night time ambient lighting and in total darkness. Actual range and image clarity depend on the installation location, viewing area, and light reflection/absorption level of an object. In low light, the camera will switch to black and white.4. Not intended for submersion in water. Installation in a sheltered area recommended.5. Digital zoom is a function controlled by the connected NVR. For a list of compatible NVRs visit: /compatibility6. A Cat5e cable is required to connect to a compatible NVR. Not included.*A microSD card can be inserted for independent recording. Data can be accessed through the camera using a web browser but will not upload to the NVR or to the cloud for mobile app viewing.Lorex products are designed for consumer and business use only and not for US federal governments, federally-funded projects or contractors subject to NDAA.Model InformationE881AP4K Ultra HD IP 25× PTZ Camera6-95529-02868-2DimensionsPackage Brown box Package Weight 15.6lb / 7.1kg Package Dimensions (W × D × H)10.6 × 10.6 × 25.6” / 270 × 270 × 650mm Package Cube1.67 cbf / 0.047cbmLorex Corporation10440 Little Patuxent Parkway, Ste, 300,Columbia, MD 21044, United States© 2022 Lorex CorporationAs our product is subject to continuous improvement, Lorex Technology & subsidiaries reserve the right to modifyE881AP 1 × Installation Kit What’s in the box1 × PTZ Camera 1 × Wall Mount 1 × Power Adapter 1 × Safety ChainQuick Setup GuideVideo Output Resolution/Frame rate Up to 4K (8MP) @ 30fps Effective Pixels H:3840 × V:2160HDR Yes Termination RJ45NightVision Night Vision Range 150ft (46m)/ 98ft (30m)Color Night Vision Yes GeneralBody MaterialAluminum Alloy Vandal Resistant Rating IK10SD Card Slot Yes*Power Requirements PoE Plus (Power over Ethernet Plus Class -802.3at)/24W Power Consumption (max)1A / 24W Camera Dimensions (W × H) 6.5 × 13" / 331 × 165mm Camera Weight 11.7lb / 5.3kgOperating Temperature -40°F ~ 158°F /-40°C ~ 70°C Humidity< 95% RH。
品牌简介XGE是深圳市麦虫科技有限公司旗下的主打汽车用品品牌,公司通过市场资源整合,与德国GE汽车用品公司深入合作,创立并创办了XGE品牌。
依托线下4S店和代理商渠道,并通过网络电商平台在线销售,打造线上线下品牌全方位销售模式,成为各大同行争相模仿的销售新模式。
通过市场反应,XGE系列产品获得市场一致青睐与好评,凭借优良的做工与良好的人机交互体验,XGE汽车行驶记录仪、云电子狗等产品一度成为行业销量领军产品。
在各类电子智能终端的设计、应用和创新方面一直处于业界领先地位,为多个行业创造了价值。
是我国较早进入导航通讯领域的私营股份制企业。
产品市场定位于为消费者提供商务与汽车安全用品,目前主要产品项目为GPS导航系统、云电子狗、Android系统智能车载设备、智能平板电脑导航仪、行车记录仪、汽车安全驾驶预警、移动通讯设备等。
公司背景企业名称:深圳市麦虫科技有限公司办公地址:深圳市龙岗区南联街道恒裕科技园T栋5楼核准日期:2014-04-14认缴注册资本总额(人民币)100.0000万元认缴实收资本总额(人民币)50.0000万元企业类型有限责任公司经营范围计算机网络的技术开发;计算机、通讯产品、电子产品、行车记录仪、计算机软硬件的技术开发、设计与购销;经营电子商务;国内贸易;货物及技术进出口。
产品描述XGE行车记录仪一直采用与德国GE汽车用品公司合资研发,结合中国消费者体验反馈,为广大消费者定制更加实用、便捷、人性化的高品质产品,在电商平台率先尝试新品1元体验,并收到众多体验者对产品改良改观的建设性意见及建议。
品牌立足于用户,公司创新型成立“梦想定制”团队,专门用于收集市场和用户对产品的期望与改善建议,同时打造出多款畅销产品,其中XGE的X1、S7、S8等产品一度数月蝉联电商爆款产品。
当今,在汽车销量激增的时代,XGE始终贴近消费者、关注车友们的行车安全。
产品采用目前最高端的德国进口GPS芯片、视频处理芯片和卡尔蔡司认证的摄像头,专业化设计理念,无按键触控式人性界面,高感定位路径规划,透射高清屏显;内置DDS驾驶安全预警,VCO全频段高感流动测速预警,3D路口实景显示及3D城市实景放大显示;实用资讯,影音娱乐,电子书等强大功能,细节之间彰显XGE产品的国际风尚潮流。
一、防爆通讯设备CHY-1型防爆扩音指令对讲电话机产品简介CHY-1型防爆扩音指令对讲电话机是组成CHY-Ⅰ、CHY-Ⅱ型扩音指令对讲系统的核心设备。
本产品防爆型式为隔爆兼本质安全型,与FHT-1配套使用构成电话站,两个或两个以上电话站通过总线电缆并联组成电话系统。
本机摘机后按住呼叫开关进行广播呼叫,松开呼叫开关进行对讲。
防爆标志:ExdibIIBT5防护等级:IP65产品特点◆外壳为铝合金材质铸造,抗撞击◆设置密封胶圈,防粉尘及抗潮湿◆手柄为ABS工程塑料注塑,抗撞击◆具有抗噪音功能,可在120dB噪声环境中使用◆机芯采用进口品牌元器件◆具有5话路选择工作方式,双向广播对讲◆具有动磁式摘机开关,使其性能稳定可靠◆双重呼叫开关◆具有摘挂机双色指示灯◆待机时话机脱离系统,省电节能◆输出功率0~25W可调,音质清晰,穿透力强◆电源输入及扬声器输出设有保护装置◆电源输入AC220V或AC120V◆具有与同类产品并网相互替换使用的能力◆通过GB3836-2000标准认证应用范围主要适用于工厂ⅡA、ⅡB等级、T5温度组别以下的爆炸性气体环境、高噪声环境、开阔地环境,是理想的调度通讯设备。
应用例子化工厂,电厂,钢厂,铁厂,焦化用厂等技术参数工作电压:AC220V或120V±10% 50Hz功率:30W频率特性:250~4000 Hz失真度:≤3%话路:5条呼叫线路:1条扩音输出功率:0~25W(连续可调)输出阻抗:8或16Ω传输信号幅度:0.3~1.5V(音频)安装方式:壁挂(室内、室外)进线口尺寸:G1"(2个)、G3/4"(1个)重量:约11kg外形尺寸:370×220×300(mm)使用环境环境温度:-30℃~+50℃相对湿度:≤95%RH(25℃)大气压力:80~110Kpa爆炸性气体混合物危险场所:1区、2区爆炸性气体混合物:ⅡA、ⅡB温度组别:T1~T5CHY-2型防爆扩音指令对讲电话机产品简介CHY-2型防爆扩音指令对讲电话机是组成CHY-Ⅰ、CHY-Ⅱ型扩音指令对讲系统的核心设备。
Marshall ElectronicsModel No.V-LCD56MDInput/Output5.6”Camera-Top Monitor with ModularOperating InstructionsEdition3Revision6W1This page intentionally left blank 2Table of ContentsInstallation and Initial Setup------------------------------------------------------------------------------------------------------5 Top and Front Panel Features----------------------------------------------------------------------------------------------------6 Rear Panel Features-----------------------------------------------------------------------------------------------------------------7 Compatible Input Formats---------------------------------------------------------------------------------------------------------8 MAIN MENU AND NAVIGATION--------------------------------------------------------------------------------------------------9 Using the menu buttons (9)Using the RotoMenu(BRIGHT)knob (9)Scaling Submenu (10)Color Submenu (13)Markers Submenu (15)Filters Submenu (17)Audio Submenu (22)Signal Analysis Submenu (23)User Settings Submenu (24)System Submenu (26)Specifications-----------------------------------------------------------------------------------------------------------------------28 Dimensions--------------------------------------------------------------------------------------------------------------------------29 Maintenance------------------------------------------------------------------------------------------------------------------------30 Warranty----------------------------------------------------------------------------------------------------------------------------303This page intentionally left blank 4Installation and Initial Setup■UnpackingCarefully unpack the V-LCD56MD monitor and verify that the following items are included:•V-LCD56MD Monitor•V-PS12V-2A-R/APower Supply•Operating InstructionsInspect the unit for any physical damage that may have occurred during shipping.Should there be any damage,immediately contact Marshall Electronics at(800)800-6608.If you are not located within the continental United States,call+1(310)333-0606.■Connections,Power-On and Initial SetupPlug the power supply into an AC power source(100-240V@50/60Hz).Attach the Power connector to the back of the monitor. Connect the required cables for video signal input and output.(Power must be applied to the V-LCD56MD for the active loop-though output to be activated.)The monitor defaults to‘ON’when power is supplied.Video will automatically be detected and displayed on the screen.56Top and Front PanelFeaturesInput Select ButtonUse the Input select button to switch between theon-boardMenu Navigation ButtonsUse the Menu, ↑, ↓, and Select buttons to display andnavigate the on-screen menu.See MAIN MENU AND NAVIGATION for details on using theMenu.User Control KnobThe USER control knob can be customized to control multiplefor moreinformation.7Rear PanelFeaturesPower SwitchThis power switch controls power to the monitor from the DC Power Connector or the custom Battery Adaptor.The monitor will always attempt to draw power from the DC connector first if both the DC Power Connector and a Battery are installedsimultaneously.Module SlotUs the Module slot to install any of the compatible MD Series modules.This will function as your second video input oroutput.Battery Adaptor MountUse this area to attach an optional battery mount.Severalpopular batteries are supported.Contact Marshall Electronicsfor a complete list of supportedmounts.Compatible Input FormatsMD-3GE525i/60,625i/50720p/25,29.97,30,50,59.94,601080p/23.98,23.98sF,24,24sF,25,29.97,301035i/59.94,601080i/50,59.94,603G–Level AYCbCr,RGB1080p/60,59.94,50MDO-3G(converted from HDMI to SDI)720p/50,59.94,601080p/23.98,24,25,29,301080p/50,59.94,601080i/50,59.94,60HDMI Input480p59.94,576p50720p/25,29.97,30,50,59.94,601080p/23.98,23.98sF,24,24sF,25,29.97,301080p/50,59.94,601035i/59.94,601080i/50,59.94,60*MDO-3G Module Output is converted from HDMI Input.HDCP protected content will not be looped through8MAIN MENU AND NAVIGATIONAccess and navigate the main menu using the4menu buttons or the RotoMenu™knob:Main MenuUsing the menu buttons•Press the MENU button to enter the main menu.•Use the↑and↓buttons to scroll through the main menu or each submenu.•Press the SELECT button to enter a submenu or choose a setting.•Press the MENU button to exit the main menu,or return to the main menu from a submenu.Using the RotoMenu(BRIGHT)knobThe Marshall Electronics RotoMenu concept has been brought to our line of camera top monitors to make navigating the Main Menu easier than ever.To RotoMenu functionality has been integrated into the BRIGHT knob,so that whenever the Main Menu is up,•Press the MENU button to enter the main menu.•Rotate the BRIGHT knob to scroll up or down in the main menu or each submenu.•Press the BRIGHT knob to enter a submenu or choose a setting.By default,the menu automatically times out after15seconds of being idle.910Scaling SubmenuUse the Scaling submenu to adjust various scaling options and to allow greater control of how your video signal is shown on thedisplay.■Input CropEnable the Input Crop function to select the area of active video that you would like shown on the image display.Select the desired Input by accessing the Adjust option below the main function:AdjustUse the BRIGHT knob to move the selection box LEFT and e the COLOR knob to move the selection box UP and DOWN.Use the CONTRAST knob to move the right border LEFT and RIGHT.Use the USER knob to move the bottom border UP andDOWN.Scaling SubmenuWhen you are satisfied with the position,press the SELECT button or press the BRIGHT knob to confirm your selection.The new cropped selection will be displayed on the screen.If your Aspect Ratio is set to AUTO,the monitor will select the closest aspect ratio to the dimensions of your customized Input.■Aspect RatioUse this menu option to switch between several aspect ratio settings.•In4:3mode,images are scaled up or down to fill the maximum4:3portion of the screen.•In16:9mode,images are scaled to fill the entire16:9screen.•In Full Screen,images are scaled to fill the entire screen.•In Custom mode,images scaling is adjusted to your selection in the Adjust portion of the menu:AdjustUse any of the rotary knobs to select your desired aspect ratio.Some of the more common aspect ratio settings are shown on the Aspect Ratio selection widget.As you move along the scale,your current aspect ratio will be displayed below the widget.Aspect Ratio selection widgetCustom Aspect Ratio selection■Pixel-to-PixelUse this setting to enable Pixel-to-Pixel mode.This mode bypasses the monitor’s internal scaling function and displays images in their native resolution and aspect ratio,with a one-to-one mapping of incoming image pixels to screen pixels:•For incoming formats smaller than the native resolution of the screen(or selected aspect ratio),the image will be displayed in the center of the screen using only the necessary LCD pixels.For example,720p images will occupy exactly1280x720 pixels in the center of the screen.The surrounding screen area will be black.To select a Custom Pixel to Pixel zone,enter the Adjust function:AdjustThe outer square represents the entire image and the inner grey box represents your current Pixel to Pixel selection. Use the COLOR knob to move your selection LEFT and e the CONTRAST knob to move your selection UP or DOWN. Press the SELECT button or the ROTOMENU knob to lock in your selection.■DSLR PresetUse the DSLR Preset option to reduce the visibility of on screen indicators shown with popular DSLR cameras.The available options are:•NK16:9•NK3:2•CN16:9•CN3:2SubmenuColorIMD Configuration Submenu■TemperatureUse this setting to choose one of three color temperature presets:•D55(5500K)•D65(6500K)•D93(9300K)•Custom(Adjustable Color Bias and Gain)•Linear(No processing is applied to the panel)■Bias&GainSelect this submenu to fine-tune the monitor’s color balance(R,G,B).This should only be done by someone experienced with video engineering,as this will alter the overall color shading of the screen.The purpose is to allow color matching to other types of monitors and/or displays.Note:The Color Temperature preset will automatically switch to Custom when Color Bias settings are adjusted.It is normal for color bias adjustments to be very subtle.When selecting the RGB Bias and Gain submenu,bias adjustment indicators will appear at the top of the screen,and gain adjustment indicators will appear at the bottom of thescreen:Use the ▲and ▼buttons to select each individual bias or gain control.Highlighting the BIAS or GAIN icons enables a groupchange of the Red,Green and Blue color components,respectively.Alternatively,you can use the BRIGHT knob to scroll through the different color components and settings.After selecting the color component to adjust,use the ▲and ▼buttons to increase or decrease the value.■GammaUse the Gamma setting to adjust the value of the gamma applied to incoming video signals.The default gamma value is 2.2.Gamma correction represents the relationship between the pixel levels from your incoming video and the luminance of your monitor.The lowest gamma level available,1.6,will cause the image to appear brighter.The highest gamma level available,2.4,will cause the image to appear darker.The chart below shows this on ascale.■Color SpaceUse this setting to automatically detect (Auto)or select the color space (RGB or YCrCb)of incoming HDMI video.This should match the color space of the video output settings on your playback device.Markers SubmenuUse the Markers submenu to select various types of markers and settings in 4:3,16:9,or Full Screenmode.■Marker EnableThe Marker Enable setting turns 16:9or 4:3screen markers On or Off.By default,this setting is On.■ Center MarkerUse this setting to display a center marker on the screen.Markers SubmenuCenterMarker■Marker SelectionUse this setting to adjust and view the settings of1of2available markers.■PresetsUse this setting to superimpose one of13markers on the screen or1custom setting.This setting is disabled when the Pixel-to-Pixel mode is enabled.•Off(No Marker)•4:3Aspect Ratio•13:9Aspect Ratio•14:9Aspect Ratio•16:9Aspect Ratio• 1.85:1Aspect Ratio• 2.35:1Aspect Ratio• 2.39:1Aspect Ratio•95%Safe Area•93%Safe Area•90%Safe Area•88%Safe Area•85%Safe Area•80%Safe Area•Custom■ CustomizeUse this setting to customize the screen markers by using the BRIGHT,COLOR,CONTRAST and USER knobs.Thesecontrol the LEFT,RIGHT,TOP and BOTTOM edges,respectively.Each Marker(1or2)can be fully customized in this fashion.■Line WidthUse this setting to choose the width of the marker lines,from1px(thinnest)to10px(widest).■Line ColorUse this setting to select a custom color for the Screen Markers.You can choose between White(default),Yellow,Red, Green and Blue.■TransparencyUse this setting to select the transparency of the marker background.Choose between0%(black),25%,50%,75%and 100%(see through)transparency.Filters SubmenuUse the Filters Submenu to enable various modes.■Check FieldUse the check field modes for monitor calibration or to analyze individual color components of an image.In Monochrome mode,all color is disabled and only a grayscale image is shown.In Blue,Green,and Red check field modes,only the selected color will be shown.Use the following procedure when calibrating the monitor to SMPTE color bars with the following procedure:1.Allow the monitor to warm up for at least5-10minutes.2.Display SMPTE split-field color bars on the monitor using an external source.3.Enable Monochrome mode.4.Locate the pluge pattern(super black,black,and gray bars)at the lower-right corner of the screen.Adjust theBrightness knob until there is no visible difference between the super black and black bars,but the gray bar is stillvisible.5.Adjust the Contrast knob until an even grayscale appears along the top bars.6.Disable Monochrome mode.7.Enable Blue Check Field mode and adjust the Color knob so that the outermost bars(white and blue)appear tomatch in brightness.8.Disable Blue Check Field mode.■False ColorThis monitor has a false color filter to aid in the setting of camera exposure.As the camera Iris is adjusted,elements of theimage will change color based on the luminance or brightness values.This enables proper exposure to be achieved withoutthe use of costly,complicated external equipment.To best utilize this feature,you must understand the color chart below and have a basic understanding of camera exposure.Normally,when shooting subjects like people,it is common practice toset exposure of faces to the equivalent of approximately56IRE.The false color filter will show this area as the color PINK onthe monitor.Therefore,as you increase exposure(open the IRIS),your subject will change color as indicated on the chart: PINK,then GREY,then a few shades of YELLOW.Over exposed subjects(above101IRE)on the monitor will be shown as RED.In addition,underexposed subjects will show as DEEP-BLUE to DARK–BLUE,with clipped-blacks indicated with a FUCHSIA-likestly,the color GREEN is used to indicate elements of the image that are approximately45IRE.This represents a‘neutral’or‘mid-level’exposure commonly used for objects(not people).False Color Key■Peaking(Focus assist)The Peaking Filter is used to aid the camera operator in obtaining the sharpest possible picture.You can turn the Peaking filter ON and adjust the Threshold and Color by accessing the Adjust e the BRIGHT knob to adjust the Threshold.Adjusting the Threshold to a higher value forces the Peaking algorithm to react quicker to objects that are in e COLOR knob to adjust the Color.Your choice is are Red(default),Yellow,Pink,Green and Blue.■ClipThe Clip function is used to visually filter data on the screen that is under a Lower Threshold or over an Upper Threshold.Data on either side of the filters can be filtered with a custom color.The Lower Threshold numerical value and color can be adjusted using the BRIGHT and COLOR knob,respectively.The Upper Threshold can be adjusted using the CONTRAST and USER knob,respectively.In the image above,the Lower Threshold has been set to20IRE(Red).This means that any part of the image UNDER20IRE will be“colored”in RED.Also,the Upper Threshold has been set to90IRE(Yellow).This means that any part of the image OVER90IRE will be“colored”in YELLOW.■InvertThe Clip function can also be inverted to filter the area between the Upper and Lower Threshold.The color selecteddata.for the Lower Threshold acts as the color for all inverted ClipIn the image above,the Lower Threshold is set to20IRE and the Upper Threshold is set to90IRE.The Clip Invert will filter all data in between20IRE and90IRE and color it RED.■MonochromeEnabling Monochrome in the Clip filter will convert all video to monochrome first,and then apply the Clip filter.This helps visually filtered data stand out from regular color video.■Apply To WaveformEnabling Monochrome in the Clip filter will convert all video to monochrome first,and then apply the Clip filter.This helps visually filtered data stand out from regular color video.21Audio SubmenuUse the Audio Submenu to enable and adjust the various Audio functionsavailable.■VolumeUse this function adjust the volume of the Headphone jack audio signal.■MuteUse this function to Mute(ON)or Unmute(OFF)the audio output from the Headphone jack.■ChannelsUse this function to select which stereo audio pair to route to the headphone jack.HDMI options are stereo pairs1-8.Modular options are stereo pairs1-16.22Signal Analysis SubmenuUse the Video Configuration submenu to select various video settings such as monochrome mode or blue-onlymode.Signal Analysis Submenu■EnableUse this setting to enable the signal analysis instruments selected in the Layout mode.■LayoutSelect which of the signal analysis instruments to display on screen.You can display an Audio Meter(Audio)ora Waveform monitor(VIDEO)or both simultaneously.■PositionSelect the location of the Signal Analysis instruments on the screen.Choose between Bottom-Right,Bottom-Left,Top-Left and Top-Right.■TransparencyAdjust the transparency of the Signal Analysis instruments on the screen.Choose between0%(completelyblocking video in background),25%(Default),50%and75%(show the most amount of video possible).23User Settings SubmenuUse the User Settings submenu to customize User Settings and Function buttons on the monitor’s keypad for easy access to features.frequently used■Save StateUse this setting to save the state of the monitor to1of6available slots.■Load StateUse this setting to load a previously configured monitor state.You can also load the Manufacturer Default state(MFG Settings)■User KnobUse this setting to select the function of the USER knob on the monitor’s rotary encoder section.Choose between Volume (default),Peaking Threshold(used with the Peaking function)and Backlight.■F1,F2,F3,F4Use this setting to select the functions to be activated by the F1-F4buttons on the monitor’s keypad.Choose between the following options:•Aspect Ratio Toggle through Aspect Ratio Settings•Pixel to Pixel Enable/disable Pixel to Pixel•DSLR Preset Toggle through DSLR Preset settings•Color Temperature Toggle through Color Temperature presets•Gamma Toggle through Gamma settings•Color Space Switch between YCbCr and RGB Color Space(HDMI ONLY)•Marker Enable Enable/disable On-Screen Markers•Center Marker Enable/disable the Center Marker•Marker Select Toggle between two different On-Screen Markers•Marker Preset Toggle through On-Screen Markers24•Marker Width Toggle through On-Screen Marker widths•Marker Color Toggle through On-Screen Marker colors•Marker Transparency Toggle through Marker Background Transparency settings•Check Field Toggle through Check Field options•False Color Enable/disable False Color filter•Peaking Filter Enable/disable Peaking filter•Clip Filter Enable/disable the Clip filter•Clip:Invert Enable/disable the Clip Invert feature•Clip:Monochrome Enable/disable the Clip Monochrome feature•Waveform Clip Enable/disable the Clip filter on the Waveform monitor•Audio Mute Enable/disable the Audio Mute feature•Audio Channels Toggle through the available Audio Channels•Signal Analysis Enable/disable the Signal Analysis feature•Analyzer Layout Toggle through Analyzer Layout setup(audio,video or both)•Analyzer Position Toggle through Analyzer on-screen locations•Analyzer Transparency Toggle through Analyzer transparency settings•Input Format OSD Toggle through Input Format OSD on-screen time•Freeze Image Enable/disable the Freeze Image feature•Splash Screen Enable/disable the Splash Screen on monitor startup•Curtain Color Toggle through different Curtain Colors•Menu Time Out Toggle through Menu Time-Out settings•Input Crop Enable/disable the Input Crop featureAll F(unction)buttons also act as Function Hot Keys,which makes it easy to assign functions to the available F(unction)keys. Simply highlight a function in the menu and press the desired“F”key to assign the function to that key,then press again to confirm the setting.If the function is not available for“F”Hot Key assignment,there will be notification on the screen.25System Submenusettings.Use the System Submenu Settings to modify general monitor■Input Format OSDUse this setting to modify the appearance of the Input Format OSD.Choose between OFF,ON(always on),or5Seconds.■Freeze ImageUse this function to Freeze the incoming image display.■BacklightUse this function to adjust the Backlight strength of the panel.Values range from0(lowest Backlight setting)to100(highest Backlight setting).Values increment by2.*Raising the backlight value will increase the amount of current used by the monitor,which will reduce battery time.■Splash ScreenUse this setting to save the enable(ON)or disable(OFF)the“Marshall Electronics,Inc.”splash screen on monitor power up.■Curtain ColorUse this setting to select between different Curtain Color settings for the monitor.Choose between Blue,Black or Green.26■Menu Time-OutUse this setting to set the Menu Time-Out length.Select between10-30seconds(5second increments)or Off to disable automatic Menu Time-Out.■VersionUse this function to view the current Firmware versions of all monitor components.27Specifications■PANELScreen Size 5.6”DiagonalDisplay Area(h x v)120.96x75.60mmPixels1280x RGB x800Viewing Angle(h x v)170°x170°Brightness300cd/m2Contrast Ratio500:1■VIDEO INPUT/OUTPUTHDMI Input/Output■CONNECTORSHDMI Video Input1x HDMI Female ReceptacleHDMI Video Output(Active Loop-Through)1x HDMI Female ReceptacleStereo Headphone Jack1/8”(3.5mm)Female JackPower InputDC Connector5.46x2.6mm(Outer Diameter x Inner Diameter)Optional Module Slot ■ELECTRICALPower Consumption 1.0A@12VDC(11W)Voltage Requirement12VDC■MECHANICALWeight(with rack ears):1lbsOperating Temperature32°F to104°F(0°C to40°C)Storage Temperature-4°F to120°F(-20°C to50°C)See Dimensions for exact specifications..2829DimensionsMaintenance■Screen CleaningPeriodically clean the screen surface using ammonia-free cleaning wipes(Marshall Part No.V-HWP-K).A clean micro-fiber cloth can also be used using only non-abrasive and ammonia-free cleaning agents.Do not use paper towels.Paper towel fibers are coarse and may scratch the surface of the polycarbonate faceplate or leave streaks on the surface.Antistatic and fingerprint resistant cleaning agents are recommended.Do not apply excessive pressure to the screen to avoid damaging the LCD.■Faceplate DustingDust the unit with a soft,damp cloth or chamois.Dry or abrasive cloths may cause electrostatic charge on the surface,attracting dust particles.Neutralize static electricity effects by using the recommended cleaning and polishing practice.WarrantyMarshall Electronics warranties to the first consumer that this V-LCD56MD LCD monitor will,under normal use,be free from defects in workmanship and materials,when received in its original container,for a period of one year from the purchase date. This warranty is extended to the first consumer only,and proof of purchase is necessary to honor the warranty.If there is no proof of purchase provided with a warranty claim,Marshall Electronics reserves the right not to honor the warranty set forth above.Therefore,labor and parts may be charged to the consumer.This warranty does not apply to the product exterior or cosmetics.Misuse,abnormal handling,alterations or modifications in design or construction void this warranty.It is considered normal for a minimal amount of pixels,not to exceed three,to fail on the periphery of the display active viewing area.Marshall Electronics reserves the option to refuse service for display pixel failure if deemed unobtrusive to effective use of the monitor by our technicians.No sales personnel of the seller or any other person is authorized to make any warranties other than those described above,or to extend the duration of any warranties on behalf of Marshall Electronics,beyond the time period described above.Due to constant effort to improve products and product features,specifications may change without notice.30This page intentionally left blank31Marshall Electronics,Inc.1910East Maple Ave.El Segundo,CA90245Tel:(800)800-6608/(310)333-0606•Fax:310-333-0688•******************32。
用户使用手册一体化智能高速球安全须知此内容的目的是确保用户正确使用本产品,以避免危险或财产损失。
如下所示,预防措施分为“警告”和“注意”两部分:警告:无视警告事项,可能会导致死亡或严重伤害。
注意:无视注意事项,可能会导致伤害或财产损失。
警告事项提醒用户防范潜在的死亡或严重伤害危险。
注意事项提醒用户防范潜在的伤害或财产损失危险。
警告1.请使用提供的电源适配器。
(使用其它电源适配器可能会导致火灾、电击或损坏设备。
)2.请不要将多个球机连接至同一电源适配器。
(超过适配器负载量,可能会产生过多热量或导致火灾。
)3.电源线插头插入电源插座时,请将插头插接牢靠。
4.在墙壁或天花板上安装本产品时,请牢固地固定住球机。
5.如该球机中出现冒烟现象,或产生恶臭,或发出杂音,请立即关掉电源并且将电源线拔掉,并同服务中心联系。
6.如果设备工作不正常,请联系购买设备的商店或最近的服务中心,不要以任何方式拆卸或修改设备。
(对未经认可的修改或维修所导致的问题,海康威视不承担责任。
)注意1.请不要使物体摔落到设备上或大力震动设备,并使设备远离存在磁场干扰的地点。
避免将设备安装到表面震动或容易受到冲击的地方。
(忽视此项可能会损坏设备)2.请不要在高温(超过60℃)或低温(低于-20℃)或高湿度地点安装设备。
(这可能会导致火灾或电击。
)3.在室内使用的球罩,不能暴露安装于可能淋到雨或非常潮湿的地方。
4.避免将设备放在阳光直射地点、或通风不良的地点,或如加热器或暖气等热源附近。
(忽视此项可能会导致火灾危险。
)目录第1章简介错误!未指定书签。
1.1产品说明 ....................................................................................错误!未指定书签。
1.2外观 ............................................................................................错误!未指定书签。
LCZ2850-DP
28倍600线高清日夜型一体机
产品概述:
LCZ2850-DP高清日夜型一体化摄像机,采用SONY 1/4" Super HAD II CCD,配合28倍光学变焦镜头和LG独有的XDI-II芯片技术,可以实现一体化摄像机领域中领先的600线高清晰监控,并具有超低照度、超级宽动态、超强光抑制、3D-DNR数码降噪、Sens-UP电子灵敏度、EIS数字防抖等诸多功能,加上其内部高智能化的控制系统,使其能适应各种复杂的环境监控需要。
LG作为世界上最早推出一体化摄像机的厂家,将使用户获得卓越的稳定性和高清图像感受。
产品特点:
✧LG自主研发的XDI-II芯片
✧1/4" Super HAD II CCD
✧水平清晰度600TVL(彩色)/700TVL(黑白)
✧28倍光学变焦[f=3.5mm~98mm,F1.5(广角),F3.4(远景)]
✧最低照度:0.00005 Lux
✧双滤光片日夜转换功能
✧XDI芯片独有的3D-DNR数码降噪功能
✧XDI芯片独有的EIS数字防抖功能
✧XDI芯片独有的HSBLC超强光抑制功能
✧8区域智能隐私遮挡功能
✧色彩选择模式:标准/冷色/暖色/鲜艳
✧数字特效功能
✧信噪比大于50dB
✧DC12V供电
型号:LCZ2850-DP
28倍600线高清日夜型一体机。