飞利浦剃须刀rq311充电指示灯说明
- 格式:docx
- 大小:11.12 KB
- 文档页数:4
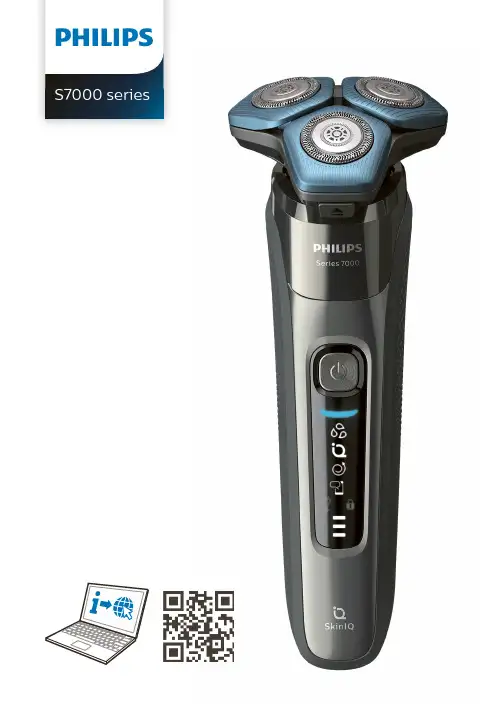
S7000 series6繁體中文內容簡介______________________________________________________6一般描述__________________________________________________6產品握柄上的圖示是什麼意思?______________________________7快速清潔匣上的圖示是什麼意思?____________________________8如何為產品充電?__________________________________________9如何使用產品和配件?______________________________________10如何清潔產品和配件?______________________________________17如何使用快速清潔匣?______________________________________21如何將電鬍刀連線到智慧型手機?____________________________24如何更換電鬍刀刀頭?______________________________________26訂購配件__________________________________________________27疑難排解__________________________________________________28簡介感謝您購買本產品。
歡迎來到飛利浦的世界! 為充分享受飛利浦為您提供的好處,請至/welcome 或透過應用程式註冊產品。
一般描述1彈出式修整刀2修整刀釋放滑鈕3除毛刀頭組4電鬍刀組釋放按鈕5開關按鈕6握柄7小插頭插座8充電座9電源供應裝置10小插頭11保護蓋12收納袋13飛利浦快速清潔匣濾心14快速清潔匣15清潔刷16長度設定17崁入式鬢角造型修容器配件18鬢角造型修容器配件梳具19配件固定座20崁入式潔面刷配件21崁入式鼻毛修容刀配件注意: 提供的配件可能隨產品而異。
电动剃须刀使用说明电动剃须刀是现代男性日常护理的重要工具之一。
它可以快速而干净地修剪胡须,让肌肤光滑舒适。
本文将为您详细介绍电动剃须刀的使用说明,以帮助您正确地操作和保养剃须刀,达到最佳的剃须效果。
一、准备工作1. 洗脸:在使用电动剃须刀之前,首先要彻底清洁面部。
使用温水洗脸,去除面部油脂和杂质,并且使胡须变软,方便剃须刀的刀头贴近皮肤。
2. 干燥面部:在洗脸后,使用毛巾轻轻擦干面部。
确保面部完全干燥,这可以提高剃须刀在皮肤上的滑动性,减少不适感。
二、电动剃须刀的使用1. 充电:首次使用电动剃须刀之前,应将其充满电。
根据剃须刀的型号,将充电插头连接到剃须刀的充电接口上。
在充电过程中,灯光指示器会显示充电状态,直到达到充满电的状态。
2. 操作开关:剃须刀通常有一个开关按钮,用于启动和关闭。
按下开关,剃须刀就可以工作。
如果剃须刀带有多档调节,您可以根据胡须的浓密程度选择适合的档位。
3. 剃须过程:将剃须刀刀头轻轻贴近面部皮肤,以画圆或直线的方式进行剃须。
不要用力推压剃须刀,只需轻轻滑动,让刀头自行切剃。
根据个人需要,您可以选择湿剃或干剃两种方式。
4. 清洁刀头:在使用剃须刀后,需要清洁刀头以保持刀片的锋利和卫生。
将刀头部分取下,并用清水冲洗。
使用小刷子清除刀头上的细小须发残留物。
确保在清洗刀头后将其完全晾干,然后再重新安装到剃须刀上。
三、电动剃须刀的保养1. 定期清洗:为了延长电动剃须刀的使用寿命,定期清洗是必要的。
将刀头从剃须刀上取下,用水冲洗刀头并清除残留物。
注意,切勿将整个剃须刀浸入水中,以免损坏内部电路。
2. 润滑刀片:在清洁后,涂抹少量剃须油或专用润滑油于刀片上,以保持刀片的灵敏和顺滑度。
3. 保持干燥:剃须刀应保存在干燥通风的地方,以免刀头生锈或电路受潮。
4. 更换刀片:电动剃须刀的刀片会随使用时间而磨损,影响剃须效果。
如果感觉剃须不再顺滑,应及时更换新的刀片。
四、安全使用须知1. 避免过度用力:使用电动剃须刀时,不要过度用力,以免引起皮肤刺激或刀片变形。
飞利浦剃须刀使用说明书产品简介感谢您的惠顾,欢迎光临飞利浦!为了您能充分享受飞利浦提供的支持,请在/welcome 上注册您的产品。
请阅读本用户手册,手册包含有关此剃须刀各种功能的信息以及一些使用技巧,让您的剃须体验更轻松更舒适。
一般说明(图1)A 剃须刀(RQ1290/RQ1280/RQ1260/RQ1250)1 修剪器2 修发器开/关滑块3 剃须刀头部件4 保护盖5 剃须刀6 剃须刀开/关按钮7 显示B 充电器C Jet Clean 高效能清洁系统(RQ1008/RQ1007)(仅限于特定型号)1 剃须刀支架2 “清洗仓已空”符号3 清洁符号4 干燥符号5 Jet Clean 高效能清洁系统开/关按钮(仅限于RQ1008:以及用于选择程序的向上/向下按钮)6 清洗仓释放按钮D 清洁刷E 清洁液F 精美软袋G 适配器重要信息使用本产品之前,请仔细阅读本使用说明书,并妥善保管以备日后参考。
注意:在本使用说明书中,术语“产品”指剃须刀和Jet Clean 高效能清洁系统。
如果您的剃须刀不随附Jet Clean 高效能清洁系统,则它专指剃须刀。
概述危险-- 确保电源适配器干燥。
(图2)警告-- 电源适配器内含有一个变压器。
切勿将其剪断,而用另一个插头代替,否则将导致严重后果。
-- 本产品不打算由肢体不健全、感觉或精神上有障碍或缺乏相关经验和知识的人(包括儿童)使用,除非有负责他们安全的人员对他们使用这些产品进行监督或指导。
-- 应照看好儿童,确保他们不会玩耍这些产品。
-- 清洁产品时要小心使用热水。
切记先检查水温是否太高,以防手被烫伤。
警告-- 切勿将Jet Clean 高效能清洁系统和充电器浸入水中,也不要放在水龙头下冲洗。
-- 产品和附件不可用洗碗机清洗。
-- 一定要在抗有机溶剂腐蚀的表面上放置和使用本产品。
-- 必须在5 摄氏度至35 摄氏度之间的温度下使用、存放和为本产品充电。
-- 只能使用随附的附件。
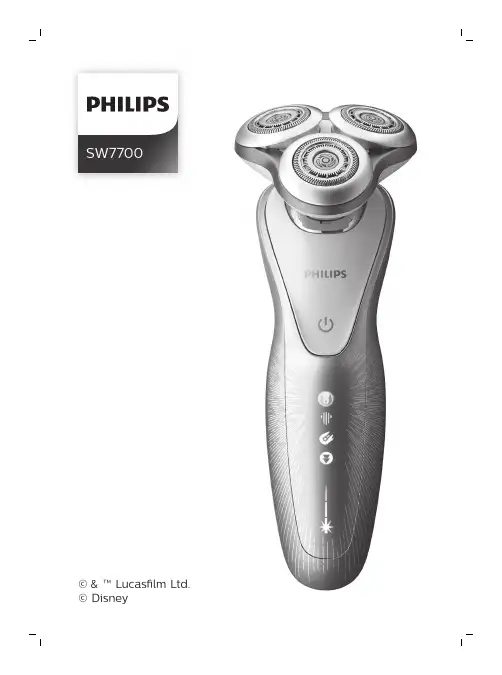
SW7700™ Lucas lm Ltd.English 6简体中文 25IntroductionCongratulations on your purchase and welcome to Philips! To fully benefit from the support that Philips offers, register your product at/welcome .Please read this user manual, as it contains information about the features of this shaver as well as some tips to make shaving easier and more enjoyable.General description (Fig. 1)1Shaving unit with hair chamber2On/off button3Replacement reminder4Cleaning reminder5Travel lock symbol6Unplug for use symbol7Battery status indicator8Socket for small plug9Click-on precision trimmer attachment 10Supply unit11Small plug12PouchImportant safety informationRead this important information carefully before you use the appliance and its accessories and save it for future reference. The accessories supplied may vary for different products.6EnglishDanger-Keep the supply unit dry.Warning -To charge the battery, only use the detachable supply unit (HQ8505) provided with theappliance.-The supply unit contains a transformer. Do not cut off the supply unit to replace it with another plug, as this causes a hazardous situation.-This appliance can be used by children aged from 8 years and above and persons withreduced physical, sensory or mental capabilities or lack of experience and knowledge if they have been given supervision or instruction concerning use of the appliance in a safe way and understand the hazards involved. Children shall not play with the appliance. Cleaning and user maintenance shall not be made bychildren without supervision.-Always unplug the shaver before you clean it under the tap.-Always check the appliance before you use it.Do not use the appliance if it is damaged, as this may cause injury. Always replace adamaged part with one of the original type.-Do not open the appliance to replace the rechargeable battery.7EnglishCaution-Never immerse the cleaning system or the charging stand in water and do not rinse it under the tap.-Never use water hotter than 60°C to rinse the shaver.-Only use this appliance for its intended purpose as shown in the user manual.-For hygienic reasons, the appliance should only be used by one person.-Never use compressed air, scouring pads,abrasive cleaning agents or aggressive liquids such as petrol or acetone to clean theappliance.-If your shaver comes with a cleaning system,always use the original Philips cleaning fluid (cartridge or bottle, depending on the type of cleaning system).-Always place the cleaning system on a stable,level and horizontal surface to prevent leakage.-If your cleaning system uses a cleaning cartridge, always make sure the cartridge compartment is closed before you use the cleaning system to clean or charge the shaver.-When the cleaning system is ready for use, do not move it to prevent leakage of cleaning fluid.-Water may drip from the socket at the bottom of the shaver when you rinse it. This is normal and not dangerous because all electronics are enclosed in a sealed power unit inside the shaver.-Do not use the supply unit in or near wallsockets that contain an electric air freshener to prevent irreparable damage to the supply unit.8EnglishElectromagnetic fields (EMF)-This Philips appliance complies with allapplicable standards and regulations regarding exposure to electromagnetic fields.General-This shaver is waterproof. It is suitable for use in the bath or shower and for cleaning under the tap. For safety reasons, the shaver cantherefore only be used without cord.-The supply unit is suitable for mains voltages ranging from 100 to 240 volts.-The supply unit transforms 100-240 volts to a safe low voltage of less than 24 volts.When you press the on/off button for the very first time, all display indications light up in sequence.Charge the shaver before use.Quick charge: When the battery is empty and you connect the shaver to a wall socket, the lights of the battery status indicator light up white one after the other repeatedly. When the battery contains enough energy for one shave, the bottom light of the battery status indicator starts flashing white slowly.9EnglishWhile the shaver continues to charge, first thebottom light of the battery status indicator flasheswhite and then lights up white continuously. Thenthe second light flashes and lights upcontinuously, and so on until the shaver is fullycharged.Battery fully chargedNote: This shaver can only be used without a cord.When the battery is fully charged, all lights of thethe battery status indicator light up whitecontinuously.Note: When you press the on/off button during orafter charging, the 'unplug for use' symbol lights upto indicate that the shaver is still connected to thewall socket.Note: When the battery is full, the display switchesoff automatically after 30 minutes.Battery lowWhen the battery is almost empty, the bottom lightof the battery status indicator flashes orange.Remaining battery chargeThe remaining battery charge is shown by thelights of the battery charge indicator that light upcontinuously.10EnglishClean the shaver after every shave for optimal performance (see 'Cleaning and maintenance'). When you switch off the shaver, the cleaning reminder flashes to remind you to clean the shaver.You can lock the shaver when you are going to travel. The travel lock prevents the shaver from being switched on by accident (see 'Activating the travel lock').For maximum shaving performance, replace the shaving heads every two years. The shaver is equipped with a replacement reminder which reminds you to replace the shaving heads. The replacement reminder flashes to indicate that you have to replace the shaving heads (see 'Replacing the shaving heads').Note: After replacing the shaving heads, you need to reset the replacement reminder by pressing theon/off button for 7 seconds.ChargingCharge the shaver before you use it for the firsttime and when the display indicates that thebattery is almost empty.Charging takes approx. 1 hour. A fully chargedshaver has a shaving time of up to 60 minutes.Note: You cannot use the shaver while it ischarging.Charging with the supply unit1Make sure the shaver is switched off.2Put the small plug in the shaver and put thesupply unit in the wall socket.The display of the shaver indicates that theshaver is charging.3After charging, remove the supply unit from thewall socket and pull the small plug out of theshaver.in the bath or shower.-Use this shaver for its intended household useas described in this manual.-For hygienic reasons, the shaver should only beused by one person.-Trimming is easier when the skin and hair aredry.Note: This shaver can only be used without a cord.1To switch the shaver on or off, press the on/off button once.The replacement symbol lights up continuously when the shaver is switched on.Skin adaptation periodYour first shaves may not bring you the result you expect and your skin may even become slightly irritated. This is normal. Your skin and beard need time to adapt to any new shaving system. To allow your skin to adapt to this new appliance, we advise you to shave regularly (at least 3 times a week) and exclusively with this appliance for a period of 3 weeks.For the best results on skin comfort, pre-trim your beard if you have not shaved for 3 days or longer. Dry shaving1Switch the shaver on.2Move the shaving heads over your skin in circular movements to catch all hairs growing in different directions. Exert gentle pressure for a close, comfortable shave.Note: Do not press too hard, this can cause skin irritation.3Switch off and clean the shaver after each use.The display lights up for a few seconds to show the battery status.Wet shavingFor a more comfortable shave, you can also use this shaver on a wet face with shaving foam or shaving gel.1Apply some water to your skin.2Apply shaving foam or shaving gel to your skin. 3Rinse the shaving unit under the tap to ensure that the shaving unit glides smoothly over your skin.4Switch the shaver on.5Move the shaving heads over your skin in circular movements to catch all hairs growing in different directions. Exert gentle pressure for a close, comfortable shave.Note: Do not press too hard, this can cause skin irritation.Note: Rinse the shaving unit regularly to ensure that it continues to glide smoothly over yourskin.6Dry your face.7Switch off the shaver and clean it after eachuse.Note: Make sure that you rinse all foam or shavinggel off the shaver.Using the click-on attachmentRemoving or attaching the click-on attachment1Make sure the shaver is switched off.3Hold the trimmer perpendicular to the skin and move it downwards while exerting gentlepressure.4Switch off and clean the trimmer after use.You can lock the shaver when you are going to travel. The travel lock prevents the shaver from being switched on by accident.1Press the on/off button for 3 seconds to enter the travel lock mode.While you activate the travel lock, theindications on the display light up briefly. When the travel lock is activated, the travel locksymbol flashes.1Press the on/off button for 3 seconds.While you deactivate the travel lock, the indications on the display light up briefly. When the travel lock is deactivated, the travel lock symbol flashes and goes out. The shaver switches on and is now ready for use again.Note: The shaver unlocks automatically when it is connected to wall socket.Cleaning and maintenance-Regular cleaning guarantees better shavingresults.-Never clean, remove or replace the shaving unitwhile the shaver is switched on.-Do not apply pressure to shaving head combs.-Do not touch shaving heads with hard objectsas this may dent or damage the precision-madeslotted combs.-Do not use abrasives, scourers or aggressiveliquids such as gasoline or acetone to clean theshaver.Cleaning the shaver under the tapClean the shaver after every shave for optimal5Rinse the shaving head holder under a warm tap.6Carefully shake off excess water and let the shaving head holder air dry completely.7Attach the shaving head holder to the bottompart of the shaving unit (‘click’).Clean the trimmer after each use.1Switch the shaver on.2Rinse the trimmer under a warm tap.3After cleaning, switch off the shaver.4Carefully shake off excess water and let the attachment air dry completely.Tip: For optimal performance, lubricate theteeth of the attachment with a drop of sewingmachine oil regularly.ReplacementReplacing the shaving headsSwitch the shaver off.Pull the shaving head holder off the bottompart of the shaving unit.Turn the retaining ring anticlockwise and lift itoff the shaving head.Repeat this process for the other retaining rings.Place them aside in a safe place.Remove the shaving heads from the shavinghead holder.Discard the used shaving heads immediately toavoid mixing them with the new shaving heads.8To reset the replacement reminder, press and hold the on/off button for approx. 7 seconds.Store the shaver in the pouch.Note: Always let the shaver dry before you store itin the pouch.Ordering accessoriesTo buy accessories or spare parts, visit/service or go to yourPhilips dealer. You can also contact the PhilipsConsumer Care Center in your country (see theinternational warranty leaflet for contact details).The following accessories are available:-SH70 Philips shaving heads-RQ111 Philips beard styler-RQ585 Philips cleansing brush-RQ560, RQ563 Philips cleansing brush heads-HQ8505 supply unitNote: The availability of the accessories may differby country.Recycling-Do not throw away the product with the normalhousehold waste at the end of its life, but handit in at an official collection point for recycling.By doing this, you help to preserve theenvironment.21English-This product contains a built-in rechargeablebattery which shall not be disposed of withnormal household waste. We strongly adviseyou to take your product to an official collectionpoint or a Philips service centre to have aprofessional remove the rechargeable battery.-Follow your country’s rules for the separatecollection of electrical and electronic productsand rechargeable batteries. Correct disposalhelps prevent negative consequences for theenvironment and human health.Removing the rechargeable shaver batteryfront and back panel in the bottom of theappliance. Remove the back panel.2Remove the front panel.3Unscrew the two screws at the top of the inner panel and remove the inner panel.4Remove the rechargeable battery with ascrewdriver.22EnglishWarranty and supportIf you need information or support, please visit/support or read theinternational warranty leaflet.Warranty restrictionsThe shaving heads (cutters and guards) are notcovered by the terms of the international warrantybecause they are subject to wear. TroubleshootingShaverProblem Possible cause SolutionThe appliance does not work when I press the on/off button.The appliance is stillattached to the wallsocket. For safetyreasons, theappliance can onlybe used withoutcord.Unplug the appliance andpress the on/off button toswitch on the appliance.The rechargeablebattery is empty.Recharge the battery.The travel lock isactivated.Press the on/off button for3 seconds to deactivate thetravel lock.The shaving unit issoiled or damagedto such an extentthat the motorcannot run.Clean the shaving headsthoroughly or replacethem. Also see 'Hairs or dirtobstruct the shaving heads'for a detailed description ofhow to clean the shavingheads thoroughly.The appliance does not shave as well as it used to.The shaving headsare damaged orworn.Replace the shaving heads.23EnglishProblem Possible cause SolutionHairs or dirt obstruct the shaving heads.Clean the shaving heads in the regular way or clean them thoroughly.To clean the shaving heads thoroughly, remove the shaving heads from the shaving head holder one by one (see 'Replacement'). Then separate the cutter from its guard and rinse each matching set under the tap.After rinsing, place the cutter back into its corresponding guard.Finally, put the shaving heads back into the shaving head holder (see 'Replacement').I replaced the shaving heads,but the replacement reminder is still showing.You have not resetthe replacement reminder.To reset the replacement reminder, press and hold the on/off button for approx. 7 seconds.Water is leaking from the bottom of the appliance.During cleaning,water may collect between the inner body and the outer shell of the appliance.This is normal and not dangerous because allelectronics are enclosed in a sealed power unit inside the appliance.24English介绍感谢您的惠顾,欢迎光临飞利浦! 为了让您能充分享受飞利浦提供的支持,请在 /welcome 上注册您的产品。
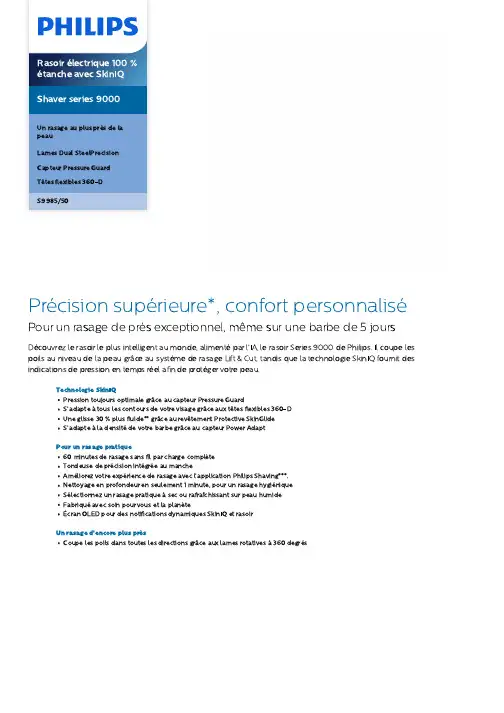
Précision supérieure*, confort personnaliséPour un rasage de près exceptionnel, même sur une barbe de 5 joursDécouvrez le rasoir le plus intelligent au monde, alimentépar l’I A, le rasoir Series 9000 de Philips. Il coupe les poils au niveau de la peau grâce au système de rasage Lift & Cut, tandis que la technologie SkinIQ fournit des indications de pression en temps réel afin de protéger votre peau.Technologie SkinIQPression toujours optimale grâce au capteur Pressure GuardS’adapteàtous les contours de votre visage grâce aux têtes flexibles 360-DUne glisse 30 % plus fluide** grâce au revêtement Protective SkinGlideS’adapteàla densitéde votre barbe grâce au capteur Power A daptPour un rasage pratique60 minutes de rasage sans fil par charge complèteTondeuse de précision intégrée au mancheA méliorez votre expérience de rasage avec l’application Philips Shaving***.Nettoyage en profondeur en seulement 1 minute, pour un rasage hygiéniqueSélectionnez un rasage pratiqueàsec ou rafraîchissant sur peau humideFabriquéavec soin pour vous et la planèteÉcran OLED pour des notifications dynamiques SkinIQ et rasoirUn rasage d'encore plus prèsCoupe les poils dans toutes les directions grâce aux lames rotativesà 360 degrésPoints fortsSystème Lift &CutNotre technologie rotative unique et brevetée Lift & Cut soulève délicatement le poil à la racine avant de le couper avec précision au plus près de la peau (jusqu ’à 0,00 mm de la peau ) sans même que les lames ne touchent votre peau .Lames DualSteelPrecisionLes rasoirs rotatifs Philips sont spécialement conçus pour s ’adapter à la pousse naturelle des poils et capturer tous les poils qui poussent dans n ’importe quelle direction ,grâce aux lames rotatives à 360 degrés . Les lames Dual SteelPrecision réalisent jusqu ’à150 000 coupes par minute , pour un rasage au plus près de la peau .Capteur PressureGuardIl est essentiel d 'exercer la bonne pression pour obtenir un rasage de près qui respecte la peau . Les capteurs avancés du rasoir détectent la pression que vous exercez et le voyant innovant vous indique lorsque vous appuyez trop fort ou trop peu . Pour un rasage personnalisé optimal .Têtes flexibles 360-DConçu pour suivre les contours de votre visage et même de votre cou , ce rasoir électrique Philips est doté de têtes entièrement flexibles qui pivotent à 360° pour un rasage impeccable et confortable .Revêtement protecteurSkinGlideUn revêtement de protection sépare les têtes de rasoir et votre peau . Composé de 250 000billes micro -tech par centimètre carré, le revêtement améliore la glisse de 30 %** a fin de réduire les irritations .Capteur Power AdaptCe rasoir électrique est doté d ’une technologie de détection intelligente de la pilosité faciale qui détecte la densité des poils 500 fois par seconde . Le capteur Power A dapt ajusteautomatiquement la puissance de coupe pour vous procurer un rasage en douceur et sans e ffort .Personnalisation via l 'applicationPerfectionnez votre rasage en appairant votre rasoir à l ’application Philips Shaving . Rasage après rasage , suivez la progression de votre peau , personnalisez votre rasage etperfectionnez votre technique , pour un rasage de près qui respecte la peau .Quick Clean Pod sanscâbleCe puissant module de nettoyage nettoie et lubri fie votre rasoir en seulement 1 minute ,pour un fonctionnement optimal pluslongtemps . Il est 10 fois plus e fficace qu 'unnettoyage à l 'eau .**** Ce module de nettoyage ultra -compact est facile à ranger et à utiliser en tout lieu .À sec ou avec de lamousseA daptez votre technique de rasage à vos besoins . A vec le système Wet & Dry , vous pouvez opter pour un rasage à secconfortable , ou pour un rasage rafraîchissant sur peau humide - avec du gel ou de la mousse - même sous la douche .CaractéristiquesA ccessoiresTrousse: Housse de voyageSmartClick: Brosse nettoyanteQuick Clean Pod: Oui, 1 cartouche incluse Tondeuse rétractable intégréeA limentationCharge: Charge complète en 1 heure, Recharge rapide en 5 minType de batterie: Li-ionA utonomie: 60 minutes DesignManche: Design ergonomique pour une bonneprise en mainCouleur: A rgent chroméFinition: Élégance intemporelleEntretienGarantie de 2 ansTête de rechange: Remplacer tous les 2 ansavec SH91Performance de rasageSystème de rasage: Système Lift&Cut, LamesDual SteelPrecisionSuivi des contours: Têtes flexibles 360-DTechnologie SkinIQ: Capteur Pressure Guard,Revêtement protecteur SkinGlide, CapteurMotion Control, Capteur Power A daptFacile d'utilisationNettoyage: Quick Clean Pod sans câble,Ouverture d'une simple pression, EntièrementlavableÀsec ou avec de la mousse: Utilisableàsec ouavec de la mousseAfficheur: Indicateur de niveau de charge en %SmartClickA daptéaux types de produits: Le produitRQ585/51 NE s’adapte P A S au type de têteangulaire* par rapport au modèle Philips Series 9000 précédent* * Par rapport au matériau sans revêtement* ** Basésur les utilisateurs du Philips Series S7000 et del’application Philips Shaving en 2019© 2023 Koninklijke Philips N.V. Tous droits réservés.Les caractéristiques sont sujettesàmodification sans préavis. Les marques commerciales sont la propriétéde Koninklijke Philips N.V. ou de leurs détenteurs respectifs.Date de publication 2023‑12‑17 Version: 12.12.1E A N: 87 10103 96482 7 。
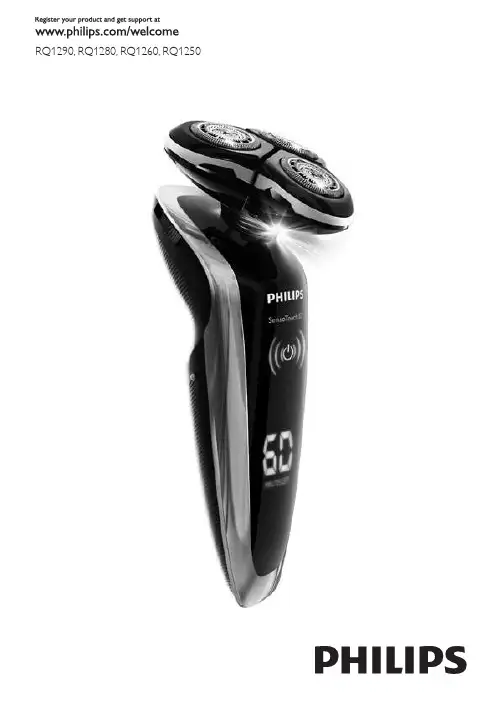
RQ1290,RQ1280,RQ1260,RQ125023感谢您的惠顾,欢迎光临飞利浦!为了您能充分享受飞利浦提供的支持,请在 /welcome 上注册您的产品。
请阅读本用户手册,手册包含有关此剃须刀各种功能的信息以及一些使用技巧,让您的剃须体验更轻松更舒适。
一般说明 (图 1)A 剃须刀 (RQ1290/RQ1280/RQ1260/RQ1250)1 修剪器2 修发器开/关滑块3 剃须刀头部件4 保护盖5 剃须刀6 剃须刀开/关按钮7 显示B 充电器C Jet Clean 高效能清洁系统 (RQ1008/RQ1007)(仅限于特定型号)1 剃须刀支架2 “清洗仓已空”符号3 清洁符号4 干燥符号5 Jet Clean 高效能清洁系统开/关按钮(仅限于 RQ1008:以及用于选择程序的向上/向下按钮)6 清洗仓释放按钮D 清洁刷E 清洁液F 精美软袋G 适配器重要信息使用本产品之前,请仔细阅读本使用说明书,并妥善保管以备日后参考。
注意: 在本使用说明书中,术语“产品”指剃须刀和 Jet Clean 高效能清洁系统。
如果您的剃须刀不随附 Jet Clean 高效能清洁系统,则它专指剃须刀。
概述危险-确保电源适配器干燥。
(图 2)警告-电源适配器内含有一个变压器。
切勿将其剪断,而用另一个插头代替,否则将导致严重后果。
-本产品不打算由肢体不健全、感觉或精神上有障碍或缺乏相关经验和知识的人(包括儿童)使用,除非有负责他们安全的人员对他们使用这些产品进行监督或指导。
-应照看好儿童,确保他们不会玩耍这些产品。
-清洁产品时要小心使用热水。
切记先检查水温是否太高,以防手被烫伤。
警告-切勿将 Jet Clean 高效能清洁系统和充电器浸入水中,也不要放在水龙头下冲洗。
-产品和附件不可用洗碗机清洗。
-一定要在抗有机溶剂腐蚀的表面上放置和使用本产品。
-必须在 5 摄氏度至 35 摄氏度之间的温度下使用、存放和为本产品充电。

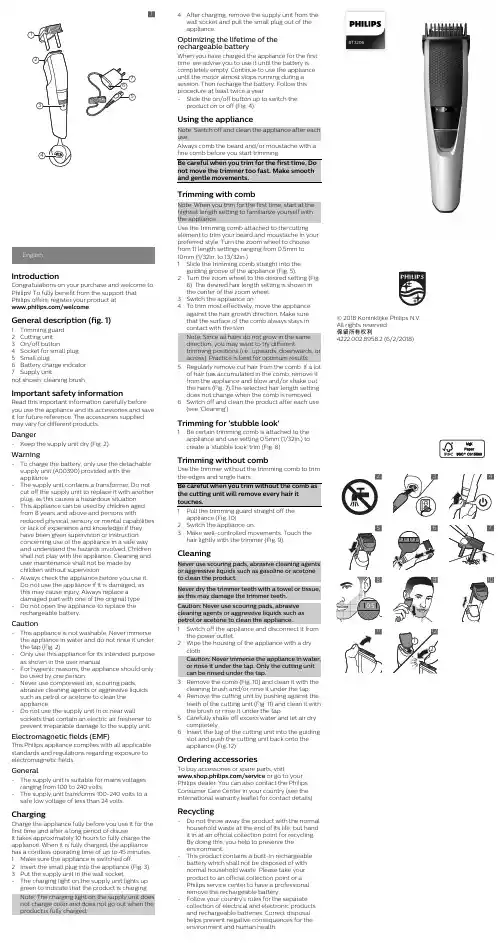
EnglishIntroductionCongratulations on your purchase and welcome to Philips! To fully benefit from the support that Philips offers, register your product at/welcome.General description (fig. 1)1Trimming guard2Cutting unit3On/off button4Socket for small plug5Small plug6Battery charge indcator7Supply unitnot shown: cleaning brushImportant safety informationRead this important information carefully before you use the appliance and its accessories and save it for future reference. The accessories supplied may vary for different products.Danger-Keep the supply unit dry (Fig. 2).Warning-To charge the battery, only use the detachable supply unit (A00390) provided with theappliance.-The supply unit contains a transformer. Do not cut off the supply unit to replace it with another plug, as this causes a hazardous situation.-This appliance can be used by children aged from 8 years and above and persons withreduced physical, sensory or mental capabilities or lack of experience and knowledge if theyhave been given supervision or instructionconcerning use of the appliance in a safe wayand understand the hazards involved. Children shall not play with the appliance. Cleaning and user maintenance shall not be made bychildren without supervision.-Always check the appliance before you use it.Do not use the appliance if it is damaged, asthis may cause injury. Always replace adamaged part with one of the original type.-Do not open the appliance to replace the rechargeable battery.Caution-This appliance is not washable. Never immerse the appliance in water and do not rinse it under the tap (Fig. 2).-Only use this appliance for its intended purpose as shown in the user manual.-For hygienic reasons, the appliance should only be used by one person.-Never use compressed air, scouring pads, abrasive cleaning agents or aggressive liquidssuch as petrol or acetone to clean theappliance.-Do not use the supply unit in or near wall sockets that contain an electric air freshener to prevent irreparable damage to the supply unit. Electromagnetic fields (EMF)This Philips appliance complies with all applicable standards and regulations regarding exposure to electromagnetic fields.General-The supply unit is suitable for mains voltages ranging from 100 to 240 volts.-The supply unit transforms 100-240 volts to a safe low voltage of less than 24 volts. ChargingCharge the appliance fully before you use it for the first time and after a long period of disuse.It takes approximately 10 hours to fully charge the appliance. When it is fully charged, the appliance has a cordless operating time of up to 45 minutes. 1Make sure the appliance is switched off.2Insert the small plug into the appliance (Fig. 3). 3Put the supply unit in the wall socket.-The charging light on the supply unit lights up green to indicate that the product is charging.Note: The charging light on the supply unit does not change color and does not go out when the product is fully charged.from 11 length settings ranging from 0.5mm to10mm (1/32in. to 13/32in.).1Slide the trimming comb straight into theguiding groove of the appliance (Fig. 5).2Turn the zoom wheel to the desired setting (Fig.6). The desired hair length setting is shown inthe center of the zoom wheel.3Switch the appliance on.4To trim most effectively, move the applianceagainst the hair growth direction. Make surethat the surface of the comb always stays inthe brush or rinse it under the tap.5Carefully shake off excess water and let air drycompletely.6Insert the lug of the cutting unit into the guidingslot and push the cutting unit back onto theappliance (Fig. 12).Ordering accessoriesTo buy accessories or spare parts, visit/service or go to yourPhilips dealer. You can also contact the PhilipsConsumer Care Center in your country (see theinternational warranty leaflet for contact details).Recycling-Do not throw away the product with the normalhousehold waste at the end of its life, but handit in at an official collection point for recycling.By doing this, you help to preserve theenvironment.-This product contains a built-in rechargeablebattery which shall not be disposed of withnormal household waste. Please take yourproduct to an official collection point or aPhilips service center to have a professionalremove the rechargeable battery.-Follow your country’s rules for the separatecollection of electrical and electronic productsand rechargeable batteries. Correct disposalhelps prevent negative consequences for theenvironment and human health.BT3206© 2018 Koninklijke Philips N.V.All rights reserved选择,长度范围在 0.5 毫米到 10 毫米(1/32 英寸到13/32 英寸)之间。


电动剃须刀使用说明电动剃须刀已经成为现代男士个护必备的工具,它的便捷性和效果受到广大男性用户的赞赏。
然而,对于一些初次使用电动剃须刀的人来说,可能会遇到一些问题。
因此,本文将为大家提供电动剃须刀的使用说明,以帮助大家更好地掌握使用电动剃须刀的技巧和注意事项。
一、充电和清洁1. 在使用电动剃须刀之前,确保其已经充满电。
使用电动剃须刀附带的充电器将其连接到电源,并等待直到充电指示灯显示电池已满。
通常充电时间为几个小时,具体时间可以根据剃须刀的型号而有所不同。
2. 定期清洁剃须刀刀头是保持其良好性能的必要步骤。
大多数电动剃须刀配备了清洁刷,使用清洁刷去除刀头上的剃须膏、毛发等杂质。
另外,一些电动剃须刀还具备自动清洁功能,可以通过清洁液自动清洁和消毒刀头。
二、剃须前的准备工作1. 在开始剃须之前,先确保脸部和剃须区域充分清洁。
洗脸可以软化毛发,并使剃须更加顺滑。
2. 如果您有长须或者胡须,建议使用剪刀或修容刀修整,确保毛发长度合适,以免造成不便。
3. 如有需要,可以涂抹须后水或者剃须胶,这样可以增加剃须的舒适感,并减少皮肤刺激。
三、正确使用电动剃须刀的技巧1. 一般来说,剃须时应该先从颈部开始,逐渐向上移动到脸部的其它部位。
这有助于确保剃须更加均匀,避免遗漏。
2. 在使用电动剃须刀时,应将其垂直于脸部,不需要过多施加压力。
电动剃须刀的刀头会自动旋转进行修剪,过多的压力反而会导致剃须刀的性能下降,并可能造成皮肤刮伤。
3. 沿着毛发生长的方向进行剃须,这样可以减少皮肤的刺激和不适感。
如果需要更加光滑的剃须效果,可以逆着毛发生长的方向再次修整。
四、剃须后的护理1. 剃须后应该使用温水彻底清洁剃须刀。
清洁刀头有助于保持其性能和延长使用寿命。
2. 使用温水洗净脸部剩余的剃须胶或者须后水,并轻轻拍干。
3. 使用须后乳液或者须后水进行肌肤护理。
这样可以防止皮肤干燥、紧绷,并有助于镇静剃须后的肌肤。
综上所述,正确使用电动剃须刀可以帮助您轻松达到理想的剃须效果。
RQ1180,RQ1160,RQ11503感谢您的惠顾,欢迎光临飞利浦!为了您能充分享受飞利浦提供的支持,请在 /welcome 上注册您的产品。
请阅读本用户手册,手册包含有关此剃须刀各种功能的信息以及一些使用技巧,让您的剃须体验更轻松更舒适。
一般说明 (图 1)a剃须刀 (RQ1180/RQ1160/RQ1150)1修剪器2保护盖3剃须刀头部件4剃须刀5剃须刀开/关按钮6显示B充电器c Jet Clean 高效能清洁系统(仅限于特定型号)1剃须刀支架2“清洗仓已空”符号3清洁符号4干燥符号5Jet Clean 高效能清洁系统开/关按钮6清洗仓释放按钮D清洁刷E清洁液F精美软袋(仅限于特定型号)g适配器重要信息使用本产品之前,请仔细阅读本使用说明书,并妥善保管以备日后参考。
注意: 在本使用说明书中,术语“产品”指剃须刀和 Jet Clean 高效能清洁系统。
如果您的剃须刀不随附 Jet Clean 高效能清洁系统,则它专指剃须刀。
概述危险-确保电源适配器干燥。
(图 2)警告-电源适配器内含有一个变压器。
切勿将其剪断,而用另一个插头代替,否则将导致严重后果。
-本产品不打算由肢体不健全、感觉或精神上有障碍或缺乏相关经验和知识的人(包括儿童)使用,除非有负责他们安全的人员对他们使用这些产品进行监督或指导。
-应照看好儿童,确保他们不会玩耍这些产品。
-清洁产品时要小心使用热水。
切记先检查水温是否太高,以防手被烫伤。
警告-切勿将 Jet Clean 高效能清洁系统和充电器浸入水中,也不要放在水龙头下冲洗。
-产品和附件不可用洗碗机清洗。
-一定要在抗有机溶剂腐蚀的表面上放置和使用本产品。
-必须在 5 摄氏度至 35 摄氏度之间的温度下使用、存放和为本产品充电。
-只能使用随附的附件。
-电源适配器可将 100-240 伏的电压转换为 24 伏以下的安全低电压。
-如果产品损坏,请勿使用本产品。
-如果适配器或任何其他附件损坏,必须用原装型号更换,以免发生危险。
电动剃须刀充电说明书亲爱的用户:感谢您购买本产品,本说明书将详细介绍电动剃须刀的充电方法和相关注意事项。
请您在使用前仔细阅读本手册,并按照说明进行操作,以确保您能够获得最佳的使用体验。
1. 充电前的准备工作在开始充电之前,请确保以下事项:a. 确认使用的充电器适配电压和频率与您所在地区的电源标准相符。
b. 确保存放电动剃须刀的环境干燥,并远离水源,以避免电气故障。
2. 充电器使用方法a. 将充电器插头插入电源插座,并将充电器的接口线与电动剃须刀底部的充电口对齐。
b. 插头连接电源后,充电指示灯将亮起,表示正常充电进行中。
c. 充电过程中,请确保充电器的连线没有被拉扯或扭曲,以免损坏。
d. 电动剃须刀充电完成后,拔出充电器插头并断开电源,以保证使用安全。
3. 充电时间和续航能力a. 充电时间会根据不同型号的电动剃须刀而有所差异,请参照产品说明书中的充电时间要求。
b. 若充电时间超过产品说明书中的建议时间,建议立即停止充电,以避免电池过度充电造成的损害。
c. 电动剃须刀的续航能力受多种因素影响,如使用频率、剃须时长等,请您根据个人使用情况及时进行充电。
4. 充电注意事项a. 请在干燥的环境中进行充电,避免暴露在水源附近或潮湿的环境中。
b. 请勿将充电器插头接触到金属物体,以免发生电触点短路。
c. 在充电期间,如果发现充电器异常发热、冒烟或其他异常情况,请立即停止使用,并联系售后服务中心进行检修。
d. 请勿使用损坏的充电器或充电线,以免发生电气危险。
e. 请勿将充电器暴露在高温或受潮湿的环境中。
5. 其他注意事项a. 为了确保剃须刀的性能和寿命,请定期清洁剃须刀头部的刀网和刀片。
b. 在未使用时,请关闭电动剃须刀的电源开关,以避免电池损耗。
c. 若电动剃须刀在使用过程中出现任何异常情况,如异响、电源突然中断等,请立即停止使用,并联系专业人员进行维修。
尊敬的用户,在使用电动剃须刀前,请阅读本充电说明书并严格按照要求操作,以确保您的个人安全和产品性能。
Mericle剃须刀充电说明
Mericle剃须刀充电说明:1、采用锂电池内置设计的电动剃须刀无需激活电池,只需要正常使用,没电或者将要没电的时候接入底座进行充电即可;剃须刀一般都是充电8小时,有的是有提示充电完成,而有的是没有提示的,但是8小时后建议拔掉;
2、由于不同电动剃须刀产品采用不同容量的电池,充电的功率也不同,建议根据具体的产品说明书或者是剃须刀上面的充电指示灯来判断是否充满电,在充电完成之后建议将电源及时拔掉,以防由于过度充电出现的安全隐患;
mericle剃须刀,旋转式紧凑设计,180度独特旋转翻盖在打开时能够很好的把握机身,在合上时够有效的保护刀头刀网同时便于携带。
是一个带有美须造型器的电动剃须刀系列,集剃须、塑型、修剪于一体的时尚装备。
采用人体工程学造型,三重独立浮动刀头,两重刀头和中间的长须修剪刀都可以自由浮动,最大程度贴合脸部曲线,剃须更贴面,更舒服。
mericle剃须动力:动力很强大外观做工:外观精美,大小合适剃须速度:试了一次剃的很快很干净,外观做工:有层塑料膜,干净卫生,这一点很贴心。
黑色简约型,背后带有修鬓刀,很实用。
剃须效果:浮动式的刀头很锋利,剃须快速而简单,效果不错,刮的很干净,没有出现,卡胡子的情况。
实惠靠谱的mericle剃须刀,赞!
1。
飞利浦剃须刀rq311充电指示灯说明
飞利浦剃须刀RQ311充电指示灯说明
概述
•飞利浦剃须刀RQ311是一款高品质的电动剃须刀,提供了方便快捷的剃须体验。
•充电指示灯是该剃须刀的一个重要功能,能够帮助用户了解剃须刀的充电状态。
充电指示灯说明
该剃须刀的充电指示灯位于剃须刀的手柄上方,通过不同的颜色和闪烁模式来显示充电状态。
充电指示灯颜色
•绿色:充电指示灯亮起绿色表示剃须刀正在正常充电。
•橙色:充电指示灯亮起橙色表示剃须刀的电池电量即将耗尽,建议尽快充电。
•红色:充电指示灯亮起红色表示剃须刀的电池电量非常低,需要立即充电。
充电指示灯闪烁模式
•快闪烁:在充电过程中,充电指示灯快速闪烁,表示剃须刀正在充电中。
•慢闪烁:在充电完成后,充电指示灯慢速闪烁,表示剃须刀已充满电。
充电注意事项
•在使用剃须刀之前,请确保充电指示灯亮起绿色,表示剃须刀已充满电量。
•如果充电指示灯亮起橙色或红色,建议尽快进行充电,以免影响使用体验。
•使用原装充电器进行充电,以确保安全和正常的充电效果。
•在充电完成后,及时拔掉充电器,避免长时间过充电造成电池损坏。
以上就是飞利浦剃须刀RQ311充电指示灯的说明,通过充电指示灯的颜色和闪烁模式,用户可以方便地了解剃须刀的充电状态,保证剃须刀的正常使用。
充电指示灯的使用方法
充电前的准备
1.确保剃须刀的电池电量较低,以便进行充电。
2.准备好飞利浦剃须刀RQ311的原装充电器,并将其插入电源插座。
充电过程
1.将充电器插入剃须刀的充电插口,确保连接稳固。
2.当开始充电时,充电指示灯会亮起绿色,表示剃须刀正在正常充
电。
3.在充电过程中,如果充电指示灯突然变为橙色,表示剃须刀的电
池电量即将耗尽,建议尽快进行充电。
4.如果充电指示灯变为红色,表示剃须刀的电池电量非常低,需要
立即进行充电,以免影响使用体验。
5.充电过程中,剃须刀的充电指示灯会快速闪烁,表示剃须刀正在
充电中。
充电完成
1.充电完成后,剃须刀的充电指示灯会慢速闪烁,表示剃须刀已充
满电。
2.拔掉充电器,断开剃须刀与电源的连接。
注意事项
•在充电过程中,请不要使用剃须刀进行剃须操作,以免发生意外。
•如果长时间未使用剃须刀,建议定期进行充电,以保证电池的健康使用。
•在清洁剃须刀时,确保充电器已拔掉,避免水和电相接。
以上就是飞利浦剃须刀RQ311充电指示灯的使用方法。
通过正确使用充电指示灯,用户可以轻松了解剃须刀的充电状态,保持剃须刀的正常使用。
记住遵守充电注意事项,以确保个人安全和剃须刀的长久使用。