飞利浦剃须刀s9161中文说明书
- 格式:docx
- 大小:11.58 KB
- 文档页数:2
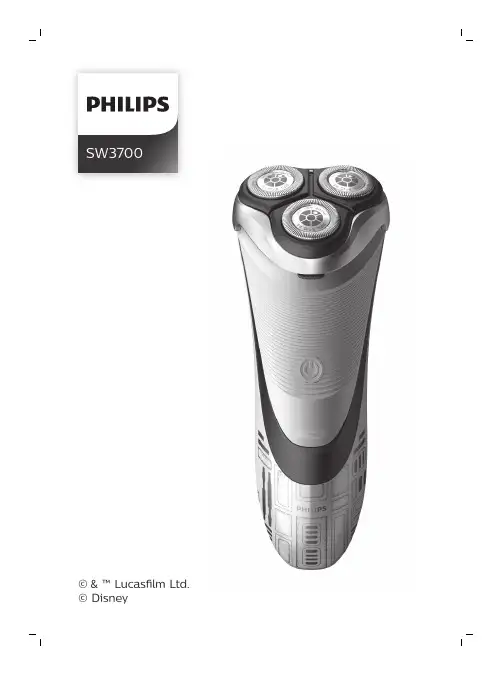
SW3700English 6简体中文 19IntroductionCongratulations on your purchase and welcome to Philips! To fully benefit from the support that Philips offers, register your product at/welcome .Please read this user manual, as it contains information about the features of this shaver as well as some tips to make shaving easier and more enjoyable.General description (Fig. 1)1Protective cap2Shaving unit3Shaving unit release button4On/off button5Charging light6Socket for small plug7Trimmer8Trimmer release slide switch9Supply unit10Small plugImportant safety informationRead this important information carefully before you use the appliance and its accessories and save it for future reference. The accessories supplied may vary for different products.Danger-Keep the supply unit dry.6EnglishWarning-To charge the battery, only use the detachable supply unit (HQ850) provided with the appliance.-The supply unit contains a transformer. Do not cut off the supply unit to replace it with another plug, as this causes a hazardous situation.-This appliance can be used by children aged from 8 years and above and persons with reduced physical, sensory or mental capabilities or lack of experience and knowledge if they have been given supervision or instruction concerning use of the appliance in a safe way and understand the hazards involved. Children shall not play with the appliance. Cleaning and user maintenance shall not be made by children without supervision.-Always unplug the shaver before you clean it under the tap.-Always check the appliance before you use it.Do not use the appliance if it is damaged, as this may cause injury. Always replace a damaged part with one of the original type.-Do not open the appliance to replace the rechargeable battery.Caution -Never immerse the cleaning system or the charging stand in water and do not rinse it under the tap.-Never immerse the shaver in water. Do not use the shaver in the bath or in the shower.-Never use water hotter than 60°C to rinse the shaver.-Only use this appliance for its intended purpose as shown in the user manual.-For hygienic reasons, the appliance should only be used by one person.7English-Never use compressed air, scouring pads,abrasive cleaning agents or aggressive liquids such as petrol or acetone to clean theappliance.-If your shaver comes with a cleaning system,always use the original Philips cleaning fluid (cartridge or bottle, depending on the type of cleaning system).-Always place the cleaning system on a stable,level and horizontal surface to prevent leakage.-If your cleaning system uses a cleaning cartridge, always make sure the cartridge compartment is closed before you use the cleaning system to clean or charge the shaver.-When the cleaning system is ready for use, do not move it to prevent leakage of cleaning fluid.-Water may drip from the socket at the bottom of the shaver when you rinse it. This is normal and not dangerous because all electronics are enclosed in a sealed power unit inside the shaver.-Do not use the supply unit in or near wallsockets that contain an electric air freshener to prevent irreparable damage to the supply unit.Electromagnetic fields (EMF)-This Philips appliance complies with allapplicable standards and regulations regarding exposure to electromagnetic fields.General-This shaver can be safely cleaned under the tap.-The supply unit is suitable for mains voltages ranging from 100 to 240 volts.-The supply unit transforms 100-240 volts to a safe low voltage of less than 24 volts.8EnglishChargingCharge the shaver before you use it for the firsttime and when the display indicates that thebattery is almost empty.Charging takes approx. 8 hours. A fully chargedshaver has a shaving time of up to 40 minutes.Note: You cannot use the shaver while it ischarging.Note: Depending on your shaving/styling behaviorand beard type, the operating time may vary overtime.Charging with the supply unit1Make sure the shaver is switched off.2Put the small plug in the shaver and put thesupply unit in the wall socket.-The charging light on the shaver indicates thecharging status (see 'Charge indications').3After charging, remove the supply unit from thewall socket and pull the small plug out of theshaver.Charge indicationsWhen the battery is almost empty, the charging light starts to flash red.When you switch off the shaver, the charging light continues to flash red for a few seconds.9EnglishWhen the shaver is charging, the charging light flashes green.When the battery is fully charged, the charging light lights up green continuously.Note: After approx. 30 minutes, the charging light goes out to save energy.rinsed under running tap water.-Use this shaver for its intended household use as described in this manual.-For hygienic reasons, the shaver should only be used by one person.-Trimming is easier when the skin and hair are dry.Note: This shaver can only be used without a cord.Skin adaptation period Your first shaves may not bring you the result you expect and your skin may even become slightly irritated. This is normal. Your skin and beard needtime to adapt to any new shaving system. To allow your skin to adapt to this new appliance, we advise you to shave regularly (at least 3 times a week) and exclusively with this appliance for a period of 3weeks.For the best results on skin comfort, pre-trim your beard if you have not shaved for 3 days or longer.When you press the on/off button for the very first time, the charging light flashes in an irregular pattern.Charge the shaver before use.1To switch the shaver on or off, press the on/off button once.1Switch the shaver on.2Move the shaving heads over your skin in both straight and circular movements to catch all hairs growing in different directions. Exertgentle pressure for a close comfortable shave.Note: Do not press too hard, this can cause skin irritation.3Switch off and clean the shaver after each use.4Put the protective cap on the shaver to protect shaving heads.11EnglishUsing the trimmerYou can use the trimmer to groom your sideburns and moustache.1Push the trimmer release slide switch downwards to open the trimmer.2Switch the shaver on.3Hold the trimmer perpendicular to the skin and move it downwards while exerting gentle pressure.4Switch off and clean the trimmer after each use.5Close the trimmer (‘click’).-Regular cleaning guarantees better shaving results.-Never clean, remove or replace the shaving unit while the shaver is switched on.-Do not apply pressure to shaving head combs.-Do not touch shaving heads with hard objects as this may dent or damage the precision-made slotted combs.-Do not use abrasives, scourers or aggressive liquids such as gasoline or acetone to clean the shaver.12EnglishCleaning the shaver under the tapClean the shaver after every shave for optimal2Rinse the shaving unit under a warm tap.3Press the unit release button to open the shaving unit.4Rinse the shaving unit and hair chamber undera warm tap.5Carefully shake off excess water and let the shaver air dry.6Close the shaving unit.Clean the trimmer after each use.1Switch the shaver off.13English2Push the trimmer release slide switch down to open the trimmer.3Switch the shaver on and rinse the trimmer under the tap.4Switch the shaver off after cleaning.5Carefully shake off excess water and let the trimmer air dry.6Close the trimmer (‘click’).Tip: For optimal performance, lubricate the teeth of the attachment with a drop of sewing machine oil regularly.For maximum shaving performance, we advise you to replace the shaving heads every two years.Replace damaged shaving heads immediately.Always replace the shaving heads with original Philips shaving heads.1Switch the shaver off and disconnect it from the wall socket.Press the shaving unit release button to open the shaving unit. Pull the shaving unit off the shaver.14EnglishPut the protective cap on the shaver to preventdamage.Note: Always let the shaver dry completely beforestoring.To buy accessories or spare parts, visit/service or go to yourPhilips dealer. You can also contact the PhilipsConsumer Care Center in your country (see theinternational warranty leaflet for contact details).The following accessories and spare parts areavailable:-SH30 Philips Shaving Heads.-HQ110 Philips shaving head cleaning spray Recycling-Do not throw away the product with the normalhousehold waste at the end of its life, but handit in at an official collection point for recycling.By doing this, you help to preserve theenvironment.-This product contains a built-in rechargeablebattery which shall not be disposed of withnormal household waste. We strongly adviseyou to take your product to an official collectionpoint or a Philips service centre to have aprofessional remove the rechargeable battery.-Follow your country’s rules for the separatecollection of electrical and electronic productsand rechargeable batteries. Correct disposalhelps prevent negative consequences for theenvironment and human health.16EnglishRemoving the rechargeable batteryshaver or in the hair chamber. If so, remove them.2Remove the outer panels of the shaver with a screwdriver or other tool. If necessary, alsoremove additional screws and/or parts until you see the printed circuit board with therechargeable battery.3Remove the rechargeable battery.Warranty and supportIf you need information or support, please visit /support or read theinternational warranty leaflet.Warranty restrictionsThe shaving heads (cutters and guards) are not covered by the terms of the international warranty because they are subject to wear.TroubleshootingThis chapter summarizes the most commonproblems you could encounter with the appliance.If you are unable to solve the problem with the information below, visit/support17Englishfor a list of frequently asked questions or contact the Consumer Care Center in your country.Problem Possible cause Solution The appliance do es not shave as well as it used to.The shaving heads are damaged or worn.Replace the shaving heads.Long hairs obstruct the shaving heads.Clean the shaving heads one by one.You have not inserted the shaving heads properly.Make sure that the projections of the shaving heads fit exactly into the recesses.The appliance does not work when I press the on/off button.The rechargeable battery is empty.Recharge the battery.The temperature of the appliance is too high. In this case,the appliance does not work.As soon as thetemperature of the appliance has dropped sufficiently, you can switchon the appliance again.18English介绍感谢您的惠顾,欢迎光临飞利浦! 为了让您能充分享受飞利浦提供的支持,请在 /welcome 上注册您的产品。

Beardtrimmer series1000Beard trimmerPro Skin Trimmmer4 built-in length settingsAA battery operatedUp to 2 months of usage*BT1000/15Pro Skin TrimmerLong lasting performance, no skin compromiseThe Philips Beardtrimmer Series 1000 delivers skin friendly trimming results timeafter time. Use the trimmer up to 2 months with one set of batteries.Skin-friendly trimmerSkin-friendly rounded tips for smooth skin contactLength settings from 1,5mm to 7mm, 0,5mm without the combContour following comb for a precise and even trimLong lasting performanceUp to 120 min cordless useBuilt to last2 year world wide warranty, no oil neededPop open head makes it easy to clean with the added brushBeard trimmer BT1000/15 Highlights SpecificationsSkin-friendly high-performanceBlades stay extra-sharp to always cut hairs neatly and effectively, but have rounded blade tips and combs to prevent irritation.4 built-in length settingsSlide the comb up to the desired length setting, from 1,5 to 7mm or use it without the comb for a 0,5mm stubble.Built to lastAll of our grooming products are built to last. They come with a 2 year worldwide warranty and they never need to be oiled.Easy to cleanSimply pop the trimmer head open and usethe cleaning brush included to sweep awayloose hairs.Long lasting battery lifeUp to 2 months of usage with one set ofbatteries, 120 minutes cordless power. (AAbatteries are not included)Contour following combFlexing guide comb that follows every curve ofyour face for getting an even trim in an easyand comfortable way.Cutting systemCutting element: Stainless steel bladesNon-scratching teeth: For more comfortAccessoriesMaintenance: Cleaning brushEase of useCleaning: Pop open headDesignColor: Aquatic bluePowerBattery Type: AA battery (not included)Service2-year warrantyNo oil needed* With Alkaline AA, LR6, 1.5V batteries© 2017 Koninklijke Philips N.V.All Rights reserved.Specifications are subject to change without notice. Trademarks are the property of Koninklijke Philips N.V. or their respective owners.Issue date 2017‑01‑16 Version: 1.3.1EAN: 08 71010 37240 56 。
电动刮胡刀使用说明使用电动刮胡刀前,请务必阅读以下说明以确保正确的使用方法,并获得最佳刮胡体验。
一、前言电动刮胡刀是一种方便快捷的刮胡工具,它能够提供干净、舒适的剃须效果。
本使用说明将为您介绍刮胡刀的基本组件、操作方法以及注意事项。
二、刮胡刀构造1. 刮刀头:刮刀头是用来剃须的主要部分。
请注意保持刮刀头的清洁,避免积聚细菌。
2. 电源开关:刮胡刀通常配有一个电源开关,用来控制刀头的旋转。
3. 充电插头:电动刮胡刀通常通过充电器进行充电,充电插头是与充电器插座相连接的部分。
三、使用方法1. 准备工作a. 确保刮胡刀已经充电完毕。
请根据所配充电器的说明进行充电,一般需要约1-2小时。
b. 清洁刮刀头,确保其表面没有残留物,并保持干燥。
2. 使用步骤a. 打开刮胡刀的电源开关,确保刮刀头旋转。
b. 用右手握住刮胡刀的手柄,将刮刀头轻轻贴近脸部的皮肤。
c. 沿着胡须生长的方向,轻轻地将刮刀头从上至下或者从下至上刮动。
避免用力过猛,以免造成皮肤刺激或伤口。
d. 在刮胡的过程中,可以用左手拉紧皮肤以提供更平滑的刮剃体验。
e. 刮胡完成后,关闭电源开关。
四、注意事项1. 刮胡前应将脸部清洁干净,使用洗面奶或者热毛巾敷脸能够软化胡须,减少刮胡时的不适感。
2. 刮胡刀仅适用于脸部和颈部的剃须,不可用于其他部位的剃毛。
3. 刮胡刀使用过程中应避免与水直接接触,以防水分进入电机造成损坏。
4. 保持刀头的清洁,并定期更换刮刀头,以保证刮胡效果和卫生安全。
5. 如果您对刮胡刀刀头的清洁和更换有任何疑问,请参照刮胡刀的说明书或者咨询专业人士。
五、总结电动刮胡刀是一种现代化的剃须工具,使用方便,刮胡效果出色。
在使用刮胡刀时,请确保按照正确的步骤进行操作,并保持刮刀头的清洁和更换。
祝您拥有一个清爽的剃须体验!以上就是电动刮胡刀的使用说明。
希望本文对您有所帮助,如果您还有其他问题或需要更多信息,请参考刮胡刀的专业说明书或向专业人士咨询。

开发研制的升级产品,造型独特美观,采用强劲有力低噪声电机,具有适用于不同长度的剪发调节功能及可更换卸式电池,可长时间反复充电使用。
技术参数充电电压:AC.220V-50HZ输出电压:3V DC.300mA最大功率:18W充电方法:1.首次使用时,应于使用前充电8-10小时,以激活内置充电式电池,以后充电时间为8个小时,不宜充电时间过长,否则会影响电池使用寿命2.在充电过程中,指示灯一直显示红灯3.充电时将开关推至OFF,充电完结应切断电源4.在充电过程中,电源外部及变压器有微热,属于正常现象使用说明:1.使用前,应在刀刃和刀片部位滴注1-2滴润滑油,然后开启开关,空运转几秒即可工作2.电推剪采用整付刀片可脱卸结构,使用一段时间后,如果要清理刀片或更换刀片,只要用手托住刀片往外推,刀片即自动脱离刀架座,然后可以清理,安装时用手抓紧刀片,调节圈调至2.0mm 位置,对准刀座内缺口向内用力推,直至喀嚓一声后即可3.本电推剪设计为交直两用,如果充电电池内的点用完,可将充电器插上220V~50HZ电源,带线使用效果不变。
4.该电推剪配有2组电池,轮换使用,均可脱机充电或带机充电1、机身时尚高雅,符合人体工程学设计2、强劲马达、低振动,超静音设计3、特殊合金钢、陶瓷刀片,锋利、耐磨,能剪切大量头发4、高容量镍氢充电池,充满电后可连续使用一个小时左右5、五档尺寸可调节刀片,剪发长度可从0.8-2.0毫米6、充电、插电两用,当电池不够时,可以直接连接充电器使用附件:电池2块、充电器1件、清洁刷1件、润滑油1件、卡齿梳(3mm6mm9mm12 mm4种规格)说明书1份使用建议:1、使用前滴1-2滴润滑油于刀片上,使用后清扫碎发滴1-2滴润滑油再收好2、在拆刀头或组装清洁时,一定要将调节环调到2.0mm处,才能开始拆卸或组装刀头3、充电时间不得超出6小时静音注释:静音不是说没有声音,而是相对来说声音很轻。
这款剪发器在对声音的处理上十分的完美,该剪发器的核定声音为30-60分贝,正常为35分贝左右。


Engineering 1281H & 1282HFundamentals of Engineering for HonorsFITEC Hacked Servo TutorialGuide to Hacking the FITEC High-Torque Servo for Continuous RotationIntroductionFollow this guide in order to allow the servo motor to rotate continuously. By hacking the servo, it loses its ability to set angles. This means once hacked, the servo no longer operates with commands from the servo library, but rather acts as the other motors provided in the FEH store. If you must retain accuracy with your servo, in order to set specific angles, do NOT hack it. Once a servo is hacked, it cannot be un-hacked.Materials1.FITEC Servo2.Wire strippers3.Motor wire4.Screw driver (Phillips head)5.File6.Solder7.Soldering Station8.Safety GlassesStep-by-step Guide1.Acquire materials. Your toolbag should have solder, a small screw driver, safety glasses, wirestrippers. A file can be retrieved from the store.Figure 1: Wire Stripers, File, Servo, Screw Driver, Motor Wire2.Unscrew the four screws from the back of the servo, as shown in Figure 2.Figure 2: Unscrewing the Back of the Servo3.Remove the back plate of the servo in order to reveal the circuit board inside. Figure 3 showswhat the inside of the servo will look like.Figure 3: The Inside of the Servoing the wire strippers, cut all five wires that connect the circuit board to the motor. See Figure4 for clarification. These wires and circuit board are part of the feedback control of the servo, butthese components do not work when continuous rotation is needed.Figure 4: Removal of Feedback Control Components5.Looking into the inside of the motor, one can see a small screw near the middle. Using the screwdriver, remove this screw. Its location is circled in Figure 5.Figure 5: Removal of the Small Screw6.Remove the front plate of the motor. Remove the two gears shown in Figure 6 from the assembly.Figure 6: Removal of Two of the Servo Gearse the screw driver to carefully remove the large, notched gear, as shown in Figure 7. Removalof the gear will reveal a ball bearing underneath, as shown in Figure 8.Figure 7: Use of the Screw Driver in Gear RemovalFigure 8: Removal of Large, Notched Gear8.By pushing from the frontside and pulling from the backside, carefully wiggle the shaft piece thatis located inside the ball bearing. See Figure 9 for clarification.Figure 9: Removal of the Shaft Piece9.File down the notch of the large, notched gear that was removed. Be careful not to file down theteeth of the gear. The filed surface should be fairly flat, as indicated by Figure 10.Figure 10: Filing of the Large, Notched Gear10.Place the three removed gears back on the gear assembly, as shown in Figure 11.Figure 11: Reassembly of the Gears11.Place the front plate back on the motor, like shown in Figure 12.Figure 12: Placing the Front Plate Back On12.Split the end of the motor wire about an inch, and strip the tips, as shown by Figure 13.Figure 13: Stripped Motor Wire13.Solder the red wire to the motor terminal indicated with a red dot. See Figure 14 for thecompleted soldering joints.Figure 14: Soldering Motor Terminals14.Place the back plate back onto the motor. Be careful that one side of the back place has a notch, inorder for the wires to properly thread out. See Figure 15 for clarification.Figure 15: Placement of the Back Plate Back onto the Motor15.The removed pieces (circuit board, small screw, and shaft piece) may be thrown away. See Figure16 for clarification on what components can be disposed of.Figure 16: Components to be Thrown Away16.Success! You have finished hacking the FITEC Servo for continuous rotation. The finishedproduct should look similar to Figure 17. To complete your motor, acquire a green motor terminaland screw the other end of your wires into it. Happy roboting!Figure 17: Completed Hacked Servo。
电动剃须刀产品说明书舒适剃须畅享男士护理一、产品描述感谢您购买舒适剃须畅享男士护理电动剃须刀。
本产品采用先进的技术和设计,为您提供高品质的剃须体验。
本说明书将为您详细介绍产品的特点、使用方法和注意事项,确保您能充分了解并正确使用该款电动剃须刀。
二、产品特点1. 先进的刀片技术:舒适剃须畅享电动剃须刀配备了先进的刀片,确保每一次剃须都能精确、迅速地切割须发,并获得干净、平顺的剃须效果。
2. 独特的剃须系统:本产品采用独特的剃须系统,包括多个刀头和刀网组合而成,能够适应不同部位的面部轮廓,并提供舒适的剃须体验。
3. 高效的电动驱动:搭载强劲的电动驱动系统,使刀片能够快速而持久地旋转,确保每一次剃须的效果都能达到最佳状态。
4. 全身水洗设计:本产品采用全身水洗设计,方便用户进行清洁和维护,保证产品的卫生和持久使用。
三、使用方法1. 准备:在使用之前,请确保电动剃须刀已经充分充电。
同时,确保刀头和刀网的安装牢固,并按照说明书上的指示正确安装。
2. 剃须准备:洗净面部,确保皮肤清洁干净。
为了获得更好的剃须效果,您可以在脸上涂抹适量的剃须泡沫或凝胶。
3. 开始剃须:长按电源按钮启动剃须刀。
在剃须过程中,将剃须刀沿着脸部的生长方向轻轻滑动,避免用力过度。
4. 剃须结束:剃须完毕后,关闭电源按钮,将剃须刀进行清洁。
强烈建议将刀头和刀网取下,用清水冲洗干净。
然后将它们晾干并重新安装到剃须刀上。
四、注意事项1. 本产品仅适用于面部剃须,不推荐用于剃须以外的部位。
请勿在头发、鬓角或其他部位使用该产品。
2. 在使用过程中,刀头会变热,请注意避免长时间连续使用,以免对皮肤造成过度刺激。
3. 请不要将该产品浸入水中或暴露在湿气较大的环境中,以免造成损坏。
4. 请确保在清洁剃须刀之前关闭电源按钮,以避免任何意外伤害。
5. 请妥善保管该产品,并避免让儿童接触到剃须刀,以防止意外发生。
五、维护保养1. 请避免将该产品受到强烈的撞击或摔落,以免造成损坏。
电动剃须刀产品说明书快速剃须拥有整洁外貌【电动剃须刀产品说明书】——快速剃须,拥有整洁外貌一、产品简介电动剃须刀是一种先进的剃须工具,专门设计用于男性胡须的修剪和整理。
其快速剃须功能可以帮助用户轻松达到整洁外貌的效果。
二、产品特点1. 智能剃须系统电动剃须刀采用高科技智能剃须系统,能够根据不同须型和皮肤特点,智能调整刀头的工作模式,实现更加舒适、高效的剃须体验。
2. 高速剃须刀头该剃须刀配备了高速剃须刀头,使刮胡更加迅捷。
刀头采用精密锋利的刀片,能够迅速而平滑地切割须发,减少不必要的牵拉和拉扯,避免不良刮痕。
3. 灵活多向刀头电动剃须刀的刀头具备灵活多向的刮胡能力,能够自由适应面部曲线,达到更加彻底的剃须效果。
用户可以轻松剃须,无需担心漏刮或重复刮过的问题。
4. 搭载清洁系统该产品配备了智能清洁系统,能够自动清洁剃须刀头,保证每次使用都能有一个干净卫生的剃须体验。
清洁系统还能够消毒刀头,有效减少细菌繁殖,保证用户的肌肤健康。
三、使用方法1. 准备工作在开始使用电动剃须刀之前,确保面部清洁干燥,并为刀头搭载清洁液或清水。
2. 打开电源按下电动剃须刀的电源开关,确保电源充足。
3. 剃须操作将电动剃须刀轻轻按压到脸颊,以逆着胡须生长的方向进行剃须。
切记不要用力按压,只需将刀头轻轻滑动即可。
4. 清洁保养剃须完成后,将剃须刀头放入清洁洗涤槽中进行清洁。
定期更换清洁液或清水,以保持清洁效果。
四、注意事项1. 使用时请不要强行移动刀头,以免损坏刀片和皮肤。
2. 如使用过程中感到皮肤不适或出现红斑,应立即停止使用,咨询医生。
3. 请勿将电动剃须刀浸入水中清洗。
4. 请定期更换刀头,以保持剃须效果和卫生状态。
五、售后服务我们为您提供全方位的售后服务,在购买电动剃须刀后,您将享受以下权益:1. 一年内免费维修及更换服务;2. 客服热线提供技术咨询和使用指导;3. 提供正品保证,免费赠送额外附件。
六、附录若您对使用方法有疑问或需要了解更多相关信息,请查看产品附带的使用说明书。
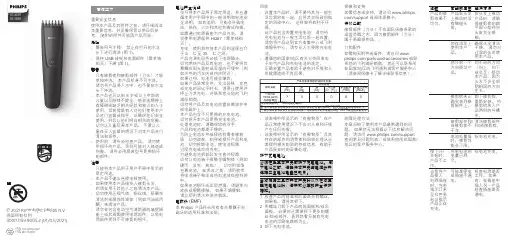
S586, S566© 2018 Koninklijke Philips N.V.All rights reserved4222.002.7320.2 (19/10/2018)>75 % recycled paper>75 % papier recycléEnglishCongratulations on your purchase and welcome to Philips! To fully benefit from the support thatPhilips offers, register your product at /welcome . General description (Fig.1)1Protection cap2Shaving head holder3Shaving unit connector 4Handle5Battery charge indicator 6On/off button7Socket for small plug8Cutter9Guard10Retaining frame11Supply unit12Small plugNot shown: cleaning brush Important safety informationRead this important information carefully before you use theappliance and its accessories and save it for future reference. The accessories supplied may vary for different products.Danger-Keep the supply unit dry (Fig. 2).Warning -To charge the battery, only usethe detachable supply unit (HQ8505) provided with the appliance.-The supply unit contains a transformer. Do not cut off the supply unit to replace it with another plug, as this causes a hazardous situation.-This appliance can be used by children aged from 8 years and above and persons withreduced physical, sensory or mental capabilities or lack of experience and knowledge if they have been givensupervision or instructionconcerning use of the appliance in a safe way and understand the hazards involved. Children shall not play with the appliance.Cleaning and user maintenance shall not be made by children without supervision.-Always unplug the shaver before you clean it under the tap.-Always check the appliancebefore you use it. Do not use the appliance if it is damaged, as this may cause injury. Always replace a damaged part with one of the original type.-Do not open the appliance to replace the rechargeablebattery.Caution -Never use water hotter than 60°C to rinse the shaver.-Only use this appliance for its intended purpose as shown in the user manual.-For hygienic reasons, theappliance should only be used by one person.-Never use compressed air,scouring pads, abrasive cleaning agents or aggressive liquids such as petrol or acetone to clean the appliance.1-Water may drip from the bottom of the shaver when you rinse it.This is normal and notdangerous because allelectronics are enclosed in asealed power unit inside theshaver.-Do not use the supply unit in or near wall sockets that containan electric air freshener toprevent irreparable damage tothe supply unit. Electromagnetic fields (EMF) This Philips appliance complies with all applicable standards and regulations regarding exposure to electromagnetic fields.General-This shaver is waterproof (Fig. 3).It is suitable for use in the bathor shower and for cleaningunder the tap. For safetyreasons, the shaver cantherefore only be used withoutcord.-The supply unit is suitable for mains voltages ranging from 100 to 240 volts.-The supply unit transforms100-240 volts to a safe lowvoltage of less than 24 volts. ChargingNote: This appliance can only be used without cord.Charge the appliance before first use and when the display indicates that the battery is almost empty. Charging takes approx. 1 hour. A fully charged shaver provides up to 45 minutes of shaving time. Charging with the supply unit 1Make sure the shaver isswitched off.2Put the small plug in the shaver and put the supply unit in thewall socket.The display of the shaverindicates that the shaver ischarging.3After charging, remove thesupply unit from the wall socketand pull the small plug out ofthe appliance.Charge indicationsBattery lowS586: When the battery is almost empty, the bottom light of the battery charge indicator flashes orange (Fig. 5).S566: When the battery is almost empty, the battery charge indicator flashes orange.Battery chargingS586: When the appliance is charging, the bottom light of the battery charge indicator first flashes and then lights up continuously (Fig. 6). After this the second light flashes and then lights up continuously, and so on until the appliance is fully charged.S566: When the appliance is charging, the battery charge indicator flashes white.Battery fullS586: When the battery is fully charged, all lights of the battery charge indicator light up white continuously (Fig. 7).S566: When the battery is fully charged, the battery charge indicator lights up white continuously.Note: This appliance can only be used without cord.'Unplug before use' reminderS586: All lights of the battery charge indicator flash 3 times to remind you to unplug the shaver first.S566: The battery charge indicator flashes fast briefly to remind you to unplug the shaver first.Using the appliance Removing or attaching the click-on attachments1Make sure the appliance isswitched off.2Insert the lug of the attachment into the slot in the top of theappliance. Then press down theattachment to attach it to theappliance (‘click’) (Fig. 8).3Pull the attachment straight off the appliance (Fig. 9).Note: Do not twist theattachment while you pull it offthe appliance.Switching the appliance on and off1To switch the appliance on or off, press the on/off button once (Fig. 10).Skin adaptation periodYour first shaves may not bring you the result you expect and your skin may even become slightly irritated. This is normal. Your skin and beard need time to adapt to any new shaving system. To allow your skin to adapt to this new appliance, we advise you to shave regularly (at least 3 times a week) and exclusively with this appliance for a period of 3 weeks.Note: This appliance can only be used without cord.ShavingDry shaving1Switch on the appliance.2Move the shaving heads over your skin in circular movementsto catch all hairs growing indifferent directions (Fig. 11). Make sure each shaving head is fully in contact with the skin. Exertgentle pressure for a close,comfortable shave.Note: Do not press too hard, asthis can cause skin irritation.3Clean the appliance after use (see 'Cleaning andmaintenance').Wet shavingFor a more comfortable shave, you can also use this appliance on a wet face with shaving foam or shaving gel.To shave with shaving foam or shaving gel, follow the steps below: 1Apply some water to your skin. 2Apply shaving foam or shaving gel to your skin.3Rinse the shaving unit under the tap to ensure that the shavingunit glides smoothly over yourskin.4Switch on the appliance.5Move the shaving heads over your skin in circular movementsto catch all hairs growing indifferent directions (Fig. 11). Make sure each shaving head is fully in contact with the skin. Exertgentle pressure for a close,comfortable shave.Note: Do not press too hard, thiscan cause skin irritation.Note: Rinse the shaving unitregularly to ensure that itcontinues to glide smoothly over your skin.6Dry your face.7Clean the appliance after use (see 'Cleaning andmaintenance').Note: Make sure you rinse allfoam or shaving gel off theappliance.Cleaning and maintenanceCleaning the shaver under the tapClean the shaver after every use for optimal performance (see 'Cleaning and maintenance'). Always unplug and switch off the shaver before you clean it.Never use compressed air, scouring pads, abrasive cleaning agents or aggressive liquids such as petrol or acetone to clean the appliance.Be careful with hot water. Always check if the water is not too hot, to prevent burning your hands. Never dry the shaving unit with a towel or tissue, as this may damage the shaving heads.1Rinse the shaving unit under a warm tap.Note: You can also clean theshaving unit with the cleaningbrush supplied (Fig. 12).2Turn the shaver up side down and rinse the openings in thebottom of the shaving headholders. Switch on the shaverbriefly during rinsing (Fig. 13).3Open both shaving head holders (Fig. 14).4Rinse the hair chambers and shaving head holders under thetap (Fig. 15).5Carefully shake off excess water and let air dry completely.6Close the shaving head holders (Fig. 16).Thorough cleaningThe shaving unit consists of two shaving heads. Clean one shavinghead at a time by following the steps below.1Open the shaving head holder (Fig. 14).2To unlock the retaining frame, gently squeeze both sides of the retaining frame and flip openthe frame (Fig. 17).3Remove the shaving head. Each shaving head consists of a cutter and a guard (Fig. 18).Note: Do not clean more thanone cutter and guard at a time,since they are all matching sets.If you accidentally mix up thecutters and guards, it may takeseveral weeks before optimalshaving performance is restored. 4Remove the cutter from the shaving guard (Fig. 19).5Rinse both parts with water.6After cleaning, place the cutter back into the guard with thecutter legs pointing downwards(Fig. 20).7Put the shaving head back into the shaving head holder (Fig. 21).Note: Make sure that theshaving heads with theprojections fit exactly onto thehooks of the shaving headholder when placing them (Fig.23). The shaving heads suppliedwith this appliance either havenotches or projections. Bothshaving systems are the same. 8Push the retaining frame back onto the shaving head holderuntil you hear a click (Fig. 22).9Close the shaving head holder (Fig. 16).ReplacementReplacing the shaving heads For maximum shaving performance, we advise you to replace the shaving heads every two years. Replace damaged shaving heads immediately. Always replace the shaving heads with original Philips shaving heads (see 'Ordering accessories').1Switch off the appliance.2Open the shaving unit byopening both shaving headholders (Fig. 14).3To unlock the retaining frames, gently squeeze both sides of the retaining frames and flip openthe shaving heads (Fig. 17).4Remove the shaving heads from the shaving head holders (Fig.18).Throw away the used shavingheads immediately to avoidmixing them with the newshaving heads.5Place the new shaving heads in the shaving head holders.Note: Make sure that theshaving heads with theprojections fit exactly onto thehooks of the shaving headholder when placing them (Fig.23). The shaving heads suppliedwith this appliance either havenotches or projections. Bothshaving systems are the same. 6Push the retaining frames back onto the shaving head holderuntil you hear a click (Fig. 22).7Close the shaving head holders (Fig. 16).StorageAlways slide the protection cap onto the shaving unit to protect the shaving unit from dirt or damage during traveling or storage (Fig. 24). We advise you to let the appliance dry before you store it. Ordering accessoriesTo buy accessories or spare parts, visit /parts-and-accessories or go to your Philipsdealer. You can also contact the Philips Consumer Care Center in your country (see the international warranty leaflet for contact details). Available partsThe following accessories and spare parts are available:-SH30 Philips shaving heads-RQ575 Philips cleansing brush attachment-RQ563 Philips cleansing brush attachment 3-pack-HQ110 Cleaning spray-HQ8505 supply unitNote: Availability of the accessories may differ by country.Recycling-Do not throw away the productwith the normal householdwaste at the end of its life, buthand it in at an official collectionpoint for recycling. By doing this,you help to preserve theenvironment.-This product contains a built-inrechargeable battery which shallnot be disposed of with normalhousehold waste. Please takeyour product to an officialcollection point or a Philipsservice center to have aprofessional remove therechargeable battery.-Follow your country’s rules forthe separate collection ofelectrical and electronicproducts and rechargeablebatteries. Correct disposal helpsprevent negative consequencesfor the environment and humanhealth.Removing thesharp.1Disconnect the appliance fromthe wall socket and let theappliance run until the motorstops.2Insert a screwdriver under theedge of the upper front paneland remove it (Fig. 25).3Undo the screws in the top partof the shaver (Fig. 26).4Remove the cover (Fig. 27).5Insert a screwdriver under theedge of the lower front panel toremove it (Fig. 28).6Remove the inner panel with ascrewdriver (Fig. 29).7Push the inner frame out of thehousing with the screwdriver(Fig. 30).8Cut the wires from the motorwith pliers (Fig. 31) and removethe printed circuit board (Fig. 32).9Break the battery tags andremove the batteries (Fig. 33). TroubleshootingThis chapter summarizes the mostcommon problems you couldencounter with the appliance. If youare unable to solve the problemwith the information below, visit /support for a list of frequently asked questions orcontact the Consumer Care Centershaver does not work as well as it used to.shavingheadsaredamaged orworn.shavingheads (see'Replacement').Theshavingheadsare dirty.Clean theshavingheads (see'Cleaningandmaintenance').Longhairsobstructtheshavingheads.Clean theshavingheads (see'Cleaningandmaintenance').Therechargeablebattery islow.Switch offthe shaverand rechargethe battery(see'Charging').The shaver does not work when I switch it on.Therechargeablebattery isempty.Switch offthe shaverand rechargethe battery(see'Charging').shaver is connect ed to the wall socket.appliance can only be used without cord. Remove the supply unit from the wall socket and pull the small plug out of the appliance.The shaving heads do not stay in place in the shaving unit.You didnot fixtheretainingframesproperly.The retainingframes arefixedproperly ifyou hear aclick whenyou push itback ontothe shavingheads.Theshavingheadswithprojections arenotplacedproperly.Make surethat theshavingheads withtheprojectionsfit exactlyonto thehooks of theshavinghead holderwhen placingthem (Fig.23).繁體中文感謝您購買本產品。
电动剃须刀用户手册2023欢迎使用我们最新推出的电动剃须刀2023款。
为了确保您能充分发挥该产品的优势和功能,我们特编写了本手册,希望能为您提供使用上的指导和帮助。
注意事项:1. 请在使用前仔细阅读本手册,并按照指引正确操作该产品。
2. 请务必将电动剃须刀保持干燥,避免接触水和其他液体。
3. 在使用电动剃须刀前,请确保剃须刀头已经安装到位,以防不必要的伤害。
4. 使用电动剃须刀时,请注意不要过度用力,以免对皮肤造成刺激和伤害。
5. 如果您有任何皮肤敏感或其他相关问题,请在使用前咨询医生建议。
充电和电池使用:1. 在首次使用前,请确保将电动剃须刀充电约8小时,以达到最佳性能和续航时间。
2. 手柄上的充电指示灯将会显示充电状态,当灯光变绿时表示充电已完成。
3. 请勿在使用过程中将充电器连接到电动剃须刀上,以免造成电器故障或安全隐患。
4. 为了延长电动剃须刀的使用寿命,请在电量耗尽前进行及时的充电。
5. 为了节省电量和确保安全,请在长时间不使用时将电动剃须刀关机或拔出电源适配器。
剃须过程:1. 打开电动剃须刀开关,确保刀头正常工作并运转。
2. 在使用之前,最好先将脸部的胡须水分擦干或进行热敷,以减少刮胡时的不适感。
3. 将电动剃须刀轻轻贴近脸部,通过顺着胡须生长方向剃须,避免反方向刮剃。
4. 轻轻滑过每个区域,避免在同一部位多次多次反复擦拭,防止皮肤受到摩擦和刺激。
5. 剃须完毕后,将电动剃须刀头部取下清洗,确保干净卫生。
清洁和维护:1. 在每次使用后,请关掉电动剃须刀并清洁刀头。
2. 用刷子轻轻刷去刀头上的残留胡须和毛发。
3. 可以将刀头用清水冲洗,但请注意不要将整个剃须刀浸入水中。
4. 可以通过轻轻晃动和拍打剃须刀将水分晾干。
5. 请定期更换刀头以确保剃须效果和卫生情况。
故障排除:1. 如果电动剃须刀无法正常工作,请检查是否已经彻底充电或连接适当的电源。
2. 如有需要,您可以按照说明书上的指引和图示来修理或更换电动剃须刀的零部件。
电动剃须刀产品说明书呵护男士的精致形象【产品说明书】一、产品概述电动剃须刀是一款专为男士设计的个人护理产品,旨在提供高品质的剃须体验,呵护男士的精致形象。
本产品采用先进的刀片技术和创新设计,具备快速、安全、舒适的剃须效果,帮助男士轻松打造整洁、精致的面部形象。
二、产品特点1. 刀片技术优势本产品采用高质量的刀片材料,经过精密加工和特殊处理,确保刀片的锋利度和耐用性。
刀片的微细切割设计,有效减少对肌肤的刺激,让剃须更加舒适。
2. 创新设计理念本产品以人性化的设计为出发点,配备符合人体工程学的握柄,手感舒适,使用更加稳定。
同时,独特的刀头旋转设计,能够贴合面部轮廓,提供更加精确的剃须效果。
3. 多功能操作本产品具备多个剃须模式,满足不同用户的个性化需求。
用户可根据自身面部情况和喜好选择恰当的模式,获得最佳剃须效果。
4. 湿剃与干剃两种选择本产品支持干剃和湿剃两种使用方式。
干剃适合简单快捷的剃须需求;而湿剃则可以在淋浴或使用剃须膏时使用,增加剃须的舒适感和肌肤保护。
三、使用步骤1. 准备确保剃须刀已充电或电池充足。
清洁面部,并涂抹适量的剃须膏或者湿润面部,以获得更好的剃须效果。
2. 打开剃须刀按下开关键,打开剃须刀开始工作。
3. 剃须将剃须刀沿着面部轮廓缓慢移动,确保刀头充分接触皮肤,获得更好的剃须效果。
注意不要用力过猛,避免对皮肤造成刺激。
4. 清洁剃须结束后,关闭剃须刀,拆下刀头进行清洁。
建议每次使用后清洗刀头,并定期清洗整个剃须刀,避免积存细菌和脏物,保持卫生。
四、注意事项1. 请确保剃须刀在正常工作状态下使用,并遵循产品操作手册中的使用要求和限制。
2. 请保持刀头的清洁和锋利度,以确保剃须质量和舒适度。
3. 使用过程中,请注意刀头和皮肤的接触,避免剃伤皮肤。
4. 如果有皮肤过敏或创伤,请避免使用剃须刀,以免加重不适。
5. 如发现任何异常情况,请立即停止使用并咨询专业人士。
五、售后服务我们为本产品提供一年的质保服务,质保期内对于非人为损坏的情况,我们将提供免费维修或更换服务。
高性能电动剃须刀剃须刀使用说明书高性能电动剃须刀使用说明书欢迎购买高性能电动剃须刀!我们为您准备了详细的使用说明,以确保您能充分利用其功能,并获得舒适且高效的剃须体验。
前言感谢您选择我们的高性能电动剃须刀。
本说明书将为您介绍该产品的使用方法、注意事项以及维护保养等内容。
在使用之前,请您务必仔细阅读并按照本手册的指示进行操作。
产品概述高性能电动剃须刀采用先进的刀片技术和创新设计,旨在为您提供舒适、快捷的剃须体验。
该产品具有以下主要特点:1. 高速电动马达:确保强劲的动力输出,提供高效而稳定的剃须体验。
2. 高质量刀片:利用先进材料制造,确保剃须刀的锋利与耐用。
3. 多功能设计:可适应不同长度的胡须和多种剃须需求。
4. 舒适手柄设计:人体工学形状,使您能在剃须过程中获得更好的握持感。
使用方法1. 充电:在首次使用之前,将剃须刀连接到电源适配器进行充电。
充电时间一般为X小时。
充电完成后,确保拔下电源适配器。
2. 清洁:在每次使用前后,使用清洁刷将剃须刀头上的剩余毛发清除干净。
刀头也可拆卸进行彻底清洁,但请不要将整个剃须刀完全浸入水中。
3. 干湿两用:该剃须刀可以在干燥皮肤或配合使用清水、剃须膏等剃须产品时使用。
确保皮肤干燥后再进行充电或放入充电器座。
4. 开关机:按下电源按钮,开启剃须刀。
剃须刀配有自动关闭功能,并在一段时间无操作后自动关闭以省电。
如果需要关闭剃须刀,请长按电源按钮。
注意事项1. 本产品仅适用于人体剃须,禁止用于其他用途。
2. 剃须刀头极为锋利,请避免用于其他身体部位以免造成伤害。
3. 在使用过程中,请避免剃须刀与净水直接接触,以免损坏电路。
4. 请勿将剃须刀置于极高或极低温度环境下,避免影响使用寿命。
5. 若长时间不使用,请及时将电源适配器拔下。
6. 请将剃须刀放置在儿童无法触及的地方,避免误伤。
维护保养1. 清洁刷清洁:在每次使用后,应使用清洁刷将剃须刀头的残余毛发等物清理干净。
2. 刀头清洁:根据需要,可以将刀头拆卸下来并用清水洗净。
飞利浦9161中文说明书
飞利浦9161充电:
将电源插头插入AC220Ⅳ电源之中,视充电指示灯亮、充电1216小时。
注意:充电时间不要过长,以免影响电池寿命。
飞利浦9161剃须:
将开关键上推至(o)开启位置,即可剃须。
为求最佳之刮须效果,请将皮肤拉紧,使胡子成直立状,然后以逆胡子生长的方向缓慢移动。
飞利浦9161修剪刀:
如有修剪刀功能的剃须刀,请在剃须前,先将修剪刀推出,修短胡须后再用网刀剃净。
飞利浦9161清洁:
剃须刀要经常清洁。
清洁前应先关上开关。
旋下网刀,用毛刷将胡须屑刷净。
清洁后轻轻放回刀头架、且到位。
清洁时应轻拿轻放,避免损坏任何部件。
飞利浦剃须刀s9161中文说明书充电:①将小插头插入剃须刀。
②将电源适配器插入电源插座。
③充电指示灯显示剃须刀的状态。
使用方法:①用水润湿一下皮肤。
②在皮肤上涂上剃须泡沫或剃须喱。
③在水龙头上冲洗一下剃须刀头部件,确保剃须刀头部件可以在您的皮肤上顺畅滑动。
④按一下开/关按钮以启动剃须刀。
⑤将剃须刀头在您的皮肤上作迂回运动。
⑥在水龙头下定期冲洗剃须刀,确保其能够继续在您的皮肤上砀滑动。
剃须后,按一下开/关按钮关闭剃须刀电源并把脸擦干。
清洁剃
须刀
⑦确保冲洗干净剃须刀上的泡沫或剃须喱。
注意:切勿使用温度高于80℃的热水冲洗剃须刀。
使用热水时一定要小心。
切记先检查水温是否太高,以防烫手。
剃须刀及其它配件不能用洗碗机清洗。
冲洗产品时,水可能从剃须刀底部的插口漏出。
这是正常的,而且没有危险,因为所有的电子线路都密封在剃须刀内的一个密封壳内。
如果剃须刀、适配器、充电座或任何其他部件损坏,请勿再使用,否则可能对人体造成伤害。
务必用原始型号更换损坏的适配器或充电
座。
必须在10c度至35°C之间的温度下使用、存放和为本产品充电。
—定要在抗有机溶剂腐蚀的表面上放置和使用剃须刀。
仅限于使用随附的适配器、充电座和附件。
旅行携带时,应确保将保护盖放在剃须刀上,以保护剃须刀头。
如果剃须刀的使用温度、气压或湿度方面改变较大,应在使用之前让产品适应30分钟。
不要将充电座浸入水中或其他液体中,也不要在水龙头下冲洗。
剃须刀不能连在电源上直接使用。
如果是第一次为剃须刀充电或是长时间未使用后充电,应让其连续充电,直到充电指示灯持续亮起。