飞利浦s7788说明书拆解
- 格式:docx
- 大小:14.54 KB
- 文档页数:5


飞利浦s5587说明书
外形外观:外观硬朗霸气,比之前两刀头飞利浦剃须刀好看多了。
手握有防滑材质,手感不错。
使用感受:这款是进口的,比同款国产多了背后的小铲刀,用于长腮胡须修剪。
声音不大,和之前使用的两刀头声音差不多。
充电大概一个小时充满。
剃须效果:说是干湿两用,但一直都是早上起床剃须后完去上班,剃须效率明显比两刀头的快,而且覆盖面积大,整体满意。
之前考虑换往复式剃须刀,但看大家的评论都是,往复式剃须刀声音大,而且使用刀头使用寿命比旋转式短。
还是选回飞利浦的三刀头。
产品包装:唯一不满意的地方,拆开快递发现包装盒是被拆过的,胶布是二次黏合的。
问过客服说是过关抽验。
但我还是很不爽,好在不是买来送人。

H-SERIES FUEL TRANSFER PUMPS FR1200, FR2400, FR4200, FR4400, FR600, SD1200, SD600Installation and Operation ManualTable of Contents Limited Warranty PolicyFill-Rite Company warrants the goods manufactured shall be free from defects of materials and workmanship. Specific warranty details for individualproducts can be found at .Thank You!Thank you for your loyalty to the Fill-Rite ® brand of fuel transfer pumps.Your safety is important, so please read and thoroughly understandthe procedures set forth in this manual. In addition, please save theseinstructions for future reference and record the model, serial number,and purchase date of your fuel transfer pump. Protect yourself as wellas those around you by observing all safety instructions and adhering toall danger, warning, and caution symbols. Please register your Fill-Rite ®product via /product_registration .IMPORTANT RETURN POLICYPlease do not return this product to the store . For all warranty and productquestions, please contact Fill-Rite Technical Support at 1 (800) 720-5192 or ***********************************(M-F,8AM–5PMET).Limited Warranty Policy .......................................................................2About This Manual ...............................................................................2Symbols and Definitions ......................................................................3Before You Begin .................................................................................3Safety Information ...............................................................................4Installation ..........................................................................................512V DC and 24V DC Wiring Instructions ...............................................7115V AC Wiring Instructions ................................................................10Operation Instructions .......................................................................12Security .............................................................................................12Troubleshooting Guide .. (12)Specifications and Models ..................................................................14Performance Curves ...........................................................................17Accessories ........................................................................................19Pump Service Kits (21)Certifications (22)Motor Tag (22)Before You BeginAbout This ManualFrom initial concept and design through final production, your Fill-Rite fuel transfer pump is built to provide years of trouble-free use. To ensure the safety of yourself and those around you, it is critical that this manual is read in its entirety prior to attempting to install or operate your new purchase. We strongly urge that any installer and operator become familiar with the terms, diagrams, and technical data in this manual and pay close attention to warningsymbols and definitions. At Fill-Rite, your satisfaction with our products is paramount. If you have questions or need assistance with your product, please contact Fill-Rite Technical Support at 1 (800) 720-5192 (M-F, 8am-5pm ET).• Adjustable Electrical Junction Box Rotates 180 degrees to provide ease of electrical wiring installation in tight quarters no matter the inlet bung location • Reliable, Heavy-Duty Power Switch Lever Features a cast metal stop that withstands heavy use in themost rugged environments • Locking Bar Defense Elongated bar simplifies the pad locking process to prevent theft • Focused Component Weight Reduction Preserves expected heavy-duty performance while improving installation ease • Premium Paint ShieldAn exemplary corrosion resistant barrier for long field life• Thermally Protected MotorPrevents overheating to ensure maximum motor life• Telescoping Inlet Metal Suction Pipe*Adjustable from 20 to 34 inches in length, allowing for universalinstallation on a multitude of tank sizes and shapes*Not included with SD models• Intake Strainer SafeguardProtects the pump by blocking particles created by contamination• Certifications – UL, cULFueling RequirementsThe Fill-Rite FR1200, FR2400, FR4200, FR4400, FR600 as well as SD1200 and SD600 models are designed and approved for use with the followingflammable and combustible fluids: gasoline and gasoline blends up to 15% or E15, diesel, biodiesel blends up to 20% or B20, kerosene, and mineral spirits. Please take all necessary precautions when handling flammable liquids.Power Source RequirementsDepending on the Fill-Rite model, supply line power will either be 12V DC, 24V DC, or 115V AC. The pump motor nameplate located next to the switch lever will provide detailed electrical information. Please refer to the appropriate electrical instructions found starting on Page 7 (DC power) or Page 10 (AC power).Items that may be needed for installation:Steel pipe wrench 14-24", open end wrench or socket (7/16", 11mm), T-25 Torx driver, utility knife, angle grinder or hacksaw (optional), wire cutters, wire stripper/crimper, and thread sealant (optional).NOTE : Fill-Rite provides Teflon ® tape for all models as listed on Page 16.H-Series Fuel Transfer Pumps Have the Following FeaturesSafety InformationTo ensure a safe installation and proper equipment operation, please read, understand, and adhere to all DANGER/WARNING/CAUTION and other NOTICES.Installation1-2"Min.1-2"Min.Stationary Tank For stationary fuel tanks, the pump mounts to the tank bung by way of the pump inlet flange. Given the different sizes of stationary fuel tanks, a custom suction or inlet pipe may be necessary. We recommend 1” NPTblack iron pipe that is extended to a length of at least 1-2” from the bottom of the tank, with the bottom of the pipe cut to an angle between 30-45 degrees for improved flow.A stationary tank must be equipped with a vent cap. (Diagram 1)Mobile TankFor mobile fuel tanks, the pump mounts to the tank bung by way of the pump inlet flange.For Telescoping Steel Suction PipeAllow telescoping tube to extend fully to the bottom of the tank. For Custom or PVC Suction PipeTo avoid penetrating the tank, we recommend leaving a minimum of 1-2”of the pipe off the bottom of tank. We further recommend cutting thesuction pipe to a 30-45 degree angle for improved flow.The mobile tank must be equipped with a vent cap. (Diagram 2)Vent CapVent CapInstallation ProcedureStep 1: (Optional) Inlet Flange RemovalLoosen (4) 1/4" bolts using 7/16" wrench or socket. Detach inlet bung from pump, retain bolts, screen, and gasket.Step 2: Using either included suction pipe or custom pipe, threadpipe into inlet bung 1.5 to 2.5 turns past hand tight with pipe wrench.Use appropriate sealant for fuel transfer.Step 3: Thread inlet bung with attached suction pipe onto tank 1.5 to2.5 turns past hand tight. Use appropriate sealant for fuel transfer.Step 4: (Only if Step 1 utilized) Place screen in screen pocket on the inletbung, mount gasket, then place pump on tank bung. Align holes and insert(4) 1/4" bolts and tighten with 7/16" wrench to 40 in.-lbs. minimum.Step 5: Remove junction box cover via (2) T-25 screws and locate wires.DC Voltage: 2 wires, Black and Red; AC Voltage: 3 wires, Black, White,and Green which is attached to internal ground screw. Ensure that gasket remains in place upon re-attachment of junction box.† opening into junction*. For AC models, attach40 in-lbs. The nozzle boot has two available position placements.* Black cable gland only included with DC models†1/2" NPT to cable gland, bronze fitting per ATEX on HE Models(2) T-25 SCREWS JUNCTION BOX CAP GASKETGASKETTANK BUNG SCREEN ½" NPTCONDUIT HOLE, THREADED JUNCTION BOX CAP (CAN BE ROTATED 180°)EARTH GROUNDSYMBOLHOLE POSITION POSTStep 712V DC and 24V DC Wiring InstructionsFR1200 / FR2400 / FR4200 / FR4400 / SD1200 Series DC Transfer PumpInstructions Before Proceeding with DC WiringThe pump needs to be electrically bonded to a vehicle frame for mobile tanks or a ground rod for stationary tanks. To electrically bond pump for mobile application, remove the external factory installed green bonding screw located on the junction box cover (Diagram 3). Insert this screw through eyelet of furnished green bonding wire assembly and refasten it securely to the junction box. The other end of the wire is to be stripped of insulation and the bare wire securely bonded to the vehicle or on/off road trailer frame for mobile tanks (Diagram 4). For bonding with stationary tanks, attach a ground wire to a ground rod and the tank itself (Diagram 5). The distance may be greater than the supplied grounding wire.DC Wiring Instructions Diagram 5ATTACH GROUND WIRE TO GROUND ROD1. Remove pump’s electrical junction box cover and straighten the red and black wire.2. Screw the furnished cable connector into 1/2" NPT conduit opening on the junction box.3. Strip 3" of the outer covering from one end of the furnished electrical supply cable.* Be careful not to damage the black and red wire insulation.4. Loosen cable connector nut and pass the stripped end of the furnished cable through the cable connector. Tighten the cable connector nut.5. Strip 1/2" of the insulation from the ends of the red and black cable wires. Using the furnished wire nuts, connect the cable wires to the pump wires matching the colors. IMPORTANT: Be sure no bare wire is exposed.6. Fold wires into junction box and replace, making sure the cover gasket is in place. Make sure all screws are seated so there is no space between the frame and the junction box (see Step 6 diagram on Page 6). *12 AWG cable not supplied with pump only models ATTACH GROUND WIRE TO VEHICLE BODY½" NPT CONDUIT HOLE, THREADED JUNCTION BOX CAP (CAN BE ROTATED 180°)EARTH GROUNDSYMBOLDiagram 4Mobile Tank Wiring to a Vehicle Electrical System1. Before electrical installation, place the switch lever into the OFF position to prevent accidental spillage once power is engaged to the motor.2. Pass the electrical wires to the source of the vehicle power system, supporting as necessary and protecting them from sharp edges, heat, or anything that could cause damage.3. To determine if the vehicle electrical system is negative (-) or positive (+) ground, check the battery marking of the terminal that is wired to the vehicle frame or motor block. The red wire from the pump will connect to positive battery post and the black wire from the pump will connect to negative battery post. These instructions focus on COMMON negative ground systems. UNCOMMON positive systems are a rare occurrence. Reference the drawing on Page 9 for information on positive ground systems.4. Fill-Rite requires installing a fuse holder and fuse (not provided) for protection of the purchased pump. Attach one end of the fuse holder to the end of the ungrounded wire, making a solid connection. The other end of the fuse holder is then attached to the ungrounded side of the battery, as close to the battery as possible. Make a solid electrical connection to the grounded side of the battery with the remaining wire. Utilizing a battery terminal connection (not provided by Fill-Rite) is required for completion of the electrical circuit.5. Check all connections to make sure they are connected per instructions and all electrical codes. Install fuse (30 amp fuse for 12V DC; 20 amp fuse for 24V DC) into the fuse holder. Installation is now complete.Stationary Tank Wiring1. Before electrical installation, place the switch lever into the OFF position to prevent accidental spillage once power is engaged to the motor.2. Fill-Rite requires installing a fuse holder and fuse (not provided) for the protection of the purchased pump.3. Attach one end of the fuse holder to the red pump wire, as close to the battery or power source as possible. Make a solid connection to the positive terminal of the power source with the other end of the fuse holder. Make a solid connection with the black pump wire to the negative terminal of the power source.4. Check all connections to make sure they are connected per instructions and all electric codes.5. Install fuse (30 amp fuse for 12V DC; 20 amp fuse for 24V DC) into the fuse holder.6. The installation is now complete.Positive Ground System (Uncommon)This electrical system is uncommon within most vehicles utilizing a 12V DC power source. The chassis of the vehicle is connected to the positive (+) terminal of the battery.Fuse to be located outside of hazardous area, as close to the power source as possible. If the wiring from the power source to the pump is greater than 18', refer to the applicable Electrical Code (national, international, or local) to ensure the wire is of the correct size for the application.Negative Ground System (Common) This electrical system is common within most vehicles utilizing a 12V DC power source. In this instance, the positive battery terminal supplies power to all devices such as the ignition system. The negative (-) terminal is connected to the vehicle’s frame. Fuse to be located outside of hazardous area, as close to the power source as possible. If the wiring from the power source to the pump is greater than 18', refer to the applicable Electrical Code (national, international, or local) to ensure the wire is of the correct size for the application.FUSE FUSECOMMON UNCOMMON30 amp fuse for 12V DC 20 amp fuse for 24V DC 30 amp fuse for 12V DC 20 amp fuse for 24V DC Mobile Tank Wiring to a Non-Vehicle SystemWhile rare, there are instances where a 12V or 24V DC Fill-Rite fuel pump does not operate from a vehicle’s electrical system. In these cases, we recommend calling Fill-Rite Technical Support at 1 (800) 720-5192 (M-F, 8am-5pm ET) to discuss your specific situation. Most of these applications will require equipment not supplied by Fill-Rite. In addition, we want to ensure that the circuit will be able to handle the necessary power requirements of the pump.115V AC Wiring Instructions for FR600 / SD600 AC Fuel Transfer Pumps115V AC Wiring Procedure1. Remove the junction box cover and straighten the wires to make sure the stripped wire ends are accessible outside the junction box.2. Install rigid conduit and appropriate wiring from power source to the junction box to maintain the explosion-proof integrity.3. Connect the pump wires to the power supply lines according to the wiring diagram. Be certain to properly insulate the connections with the appropriate wire nuts or other connectors. NOTE : The ground wire MUST be connected. Ground wire connection is inside the junction box (Diagram 6b).4. Fold the wires back into the junction box and replace the cover, making sure the cover gasket is in place.115V AC Pump Junction Box (FR/SD600 Series AC Fuel Transfer Pumps)115V AC Wiring Diagram for FR/SD600 AC Fuel Transfer Pumps.A ground wire must be included within the supply line power cable.This wire must be connected to the ground screw terminal on the inside of the junction box surface.Diagram 6a Diagram 6b115V AC Wiring Diagram INTERNAL GROUND SCREWSwitch Level Installation InstructionsEffective March 7, 2022, the fuel transfer pump on/off switch lever will need to be installed in the field. Please see Figure 1 for a visual guide on the proper installation of this lever.Figure 1Security1. If equipped, reset meter to “0” (do not reset while in use as this3. Move the switch lever to the “ON” position to power the pump (Diagram 7).4. Insert the dispensing nozzle into the container to be filled.5. Operate the nozzle to dispense fluid; release nozzle when thedesired amount of fluid has been dispensed.6. Move switch lever to the “OFF” position (Diagram 8) to turnoff the pump.7. Remove the dispensing nozzle from the container being filled andstore it in the nozzle boot.Operation InstructionsTroubleshooting The following troubleshooting guide is provided to offer basic diagnostic assistance in the event you encounter abnormal service from your Fill-Rite fuel transfer pump. If you have questions, please feel free to contact Fill-Rite Technical Support at 1 (800) 720-5192 (M-F, 8am-5pm ET) or byemail at *************************.Please disconnect all power supply sources from either your AC or DC pump prior to performing any service or maintenance,as well as relieve any pressure within either the suction tube or discharge hose. Failure to do so can result in damage to the "ON" Position "OFF" PositionYour Fill-Rite fuel transfer pump is equipped with a locking link located next to the switch lever for security. With the pumpturned off and the nozzle in the stored position, a padlock can be inserted throughthe locking link and the nozzle handle.Fill-Rite recommends a commercial gradelaminated steel padlock with an adjustableshackle (Diagram 9).Diagram 7Diagram 8Diagram 9SWITCH LEVERNOZZLE BOOT SWITCH LEVERNOZZLE BOOTTroubleshooting (continued)Specifications and Models† Warranty details can be found at *HE pump only models have BSPP outlets*Power cord not included in pump only modelsA series of fuel transfer pumps with UL/cUL, ATEX, IECEx, CE, EAC, and INMETRO certifications that are compatible with gasoline, diesel fuel, blended fuels such as biodiesel up to 20%, gasoline with up to 15% ethanol, mineral spirits, and kerosene.| H-SERIES FUEL TRANSFER PUMPS INSTALLATION AND OPERATION MANUALFR4200 (Dimensions displayed in inches)3.44.32.58.413.011.14.28.42.54.311.813.7FR1200, FR2400, FR4400, FR600, SD1200, and SD600 (Dimensions displayed in inches)H-Series Model Information: FR1200, FR2400, FR4200, FR4400, FR600, SD1200, SD600H-Series Model Information: FR1200, FR2400, FR4200, FR4400, FR600, SD1200, SD600 (continued)HE-Series Model Information: FR1200E, FR2400E, FR4200E, FR4400E2400 Series Performance Curve4400 Series Performance CurveMETER STRAIGHT PIPE FILTER HEADSTRAIGHT PIPEProper Accessory Configuration AccessoriesAccessories (continued)2122*KIT120BD not called out in diagram abovePump Service KitsFIL-MN-712v.3InstallationPump must be installed in compliance with EN 60079-14 or IEC 60079-14, as applicable.Material of ConstructionMaterials of construction of the external surface of the unit: painted steel, painted cast iron, painted aluminum, zinc plated steel.Materials of construction of the wetted parts: cast iron, zinc plated steel, 300 series stainless steel, bronze, carbon, ceramic, polyester, fiber, fluorocarbon, buna.Repair and MaintenanceContact the place of purchase for warranty repair and maintenance.Specific Conditions of Use1. Consult the manufacturer if dimensional information on the flameproof joints isnecessary.2. ISO Class 4.6, M5 hex-head screws (Yield Stress 240 MPa) shall be used to replacethe DC Motor terminal cover fasteners.3. ISO Class 8.8, M6 hex-head screws (Yield Stress 640 MPa) shall be used to replace the DC Motor motor tie-rod fasteners.4. An electrically conductive hose and nozzle must be used with flammable liquids.To minimize static electricity buildup, always keep the nozzle in contact with thecontainer being filled during the fueling process.Motor Tag InformationThe motor tag on your Fill-Rite pump contains important technical and performance information. Be certain this label remains affixed to the pump at all times.Safety Testing ApprovalsThe Fill-Rite line of pumps have been safety tested for regulatory compliance. This product family is approved by UL/cUL. For the “E” series products they are approved to ATEX, IECEx, INMETRO, EAC, and CE.2809The following standards were used to show compliance in the European Union:EN IEC 60079-0:2018, Ed 7 “Explosive atmospheres – Part 0: Equipment – General requirements”EN 60079-1:2014, Ed 7 “Explosive atmospheres – Part 1: Equipment protection by flameproof enclosures “d””EN ISO 80079-36:2016, Ed 1 “Explosive atmospheres – Part 36: Non-electrical equipment for explosive atmospheres – Basic method and requirements”EN ISO 80079-37:2016, Ed 1 “Explosive atmospheres – Part 37: Non-electrical equipment for explosive atmospheres – Non electrical type of protection constructional safety “c”, control of ignition source “b”, liquid immersion “k”” Directive 2014/34/EU – Equipment and protective systems intended for use in potentially explosive atmospheres.Directive 2011/65/EU – Restrictions of the use of certain hazardous substances in electrical and electronic equipment.The following standards were used to show compliance for IECEx certification:IEC 60079-0:2017, Ed 7 IEC 60079-1:2014, Ed 7Motor Tag InformationThe Motor Tag on your Fill-Rite pump contains important technical and performance information. Be certain this label remains affixed to the pumpat all times.II 2 G Ex db h IIA T5 or T6 Gb FM19ATEX0019X IECEx FMG19.0013XEx db IIA T5 or T6 GbFill-Rite Company 8825 Aviation Drive Fort Wayne, Indiana 46809 USAT 1 (800) 720-5192 1 (260) 747-7524 F 1 (800) 866-4681 | | 。

用户手册43PFS6808Register your product and get support at /TVsupport内容1 主屏幕概述42 获得支持5 2.1 识别和注册电视5 2.2 电视帮助和用户手册5 2.3 电视诊断和自诊断52.4 客户服务/维修53 快速指南6 3.1 遥控器6 3.2 红外传感器8 3.3 电池和清洁83.4 操纵器 - 本地控制84 设置9 4.1 阅读安全说明9 4.2 电视摆放94.3 打开电视95 连接11 5.1 连接指南11 5.2 天线11 5.3 卫星11 5.4 视频设备11 5.5 音频设备11 5.6 移动设备12 5.7 其他设备135.8 电脑146 切换信号源15 6.1 信号源列表156.2 重命名设备157 频道16 7.1 关于频道和频道切换16 7.2 安装频道16 7.3 频道列表20 7.4 收藏频道217.5 文本/图文电视228 电视指南23 8.1 您需要执行的操作238.2 使用电视指南239 Freeview Play(适用于英国型号)24 9.1 关于 Freeview Play24 9.2 使用 Freeview Play249.3 关于 Freeview Play 的电视指南2410 视频、照片和音乐25 10.1 来自 USB 连接25 10.2 来自电脑或 NAS25 10.3 照片25 10.4 360° 照片25 10.5 视频2610.6 音乐2711 打开电视设置菜单28 11.1 快捷菜单和常见设置2811.2 所有设置2812 无线和网络37 12.1 家庭网络37 12.2 连接至网络3712.3 无线和网络设置3713 Smart TV 和应用程序39 13.1 设置 Smart TV3913.2 应用程序存储3914 Netflix4015 Rakuten TV4116 Amazon Prime 视频4217 YouTube4318 Alexa44 18.1 关于 Alexa4418.2 使用 Alexa4419 Google Assistant4520 软件46 20.1 更新软件46 20.2 软件版本46 20.3 自动软件更新4620.4 查看软件更新历史记录4621 环境47 21.1 欧洲能源标签47 21.2 使用终止4721.3 UK 符合性声明4722 规格48 22.1 功率48 22.2 接收48 22.3 显示屏分辨率48 22.4 支持的输入分辨率48 22.5 声音48 22.6 多媒体4822.7 连接4823 故障检修50 23.1 使用提示50 23.2 打开50 23.3 遥控器50 23.4 频道50 23.5 卫星51 23.6 图片51 23.7 声音52 23.8 HDMI52 23.9 USB5223.10 Wi-Fi 和互联网5224 安全与保养53 24.1 安全5324.2 屏幕保养5425 使用条款5526 版权5626.1 HDMI56 26.2 HEVC 高级56 26.3 Dolby Audio56 26.4 Wi-Fi Alliance5626.5 其他商标5627 开放源57 27.1 开源软件57 27.2 开源许可证5760 28 关于第三方提供的服务和/或软件的免责声明索引611主屏幕概述要充分享受 Smart TV的益处,请将电视连接至互联网。
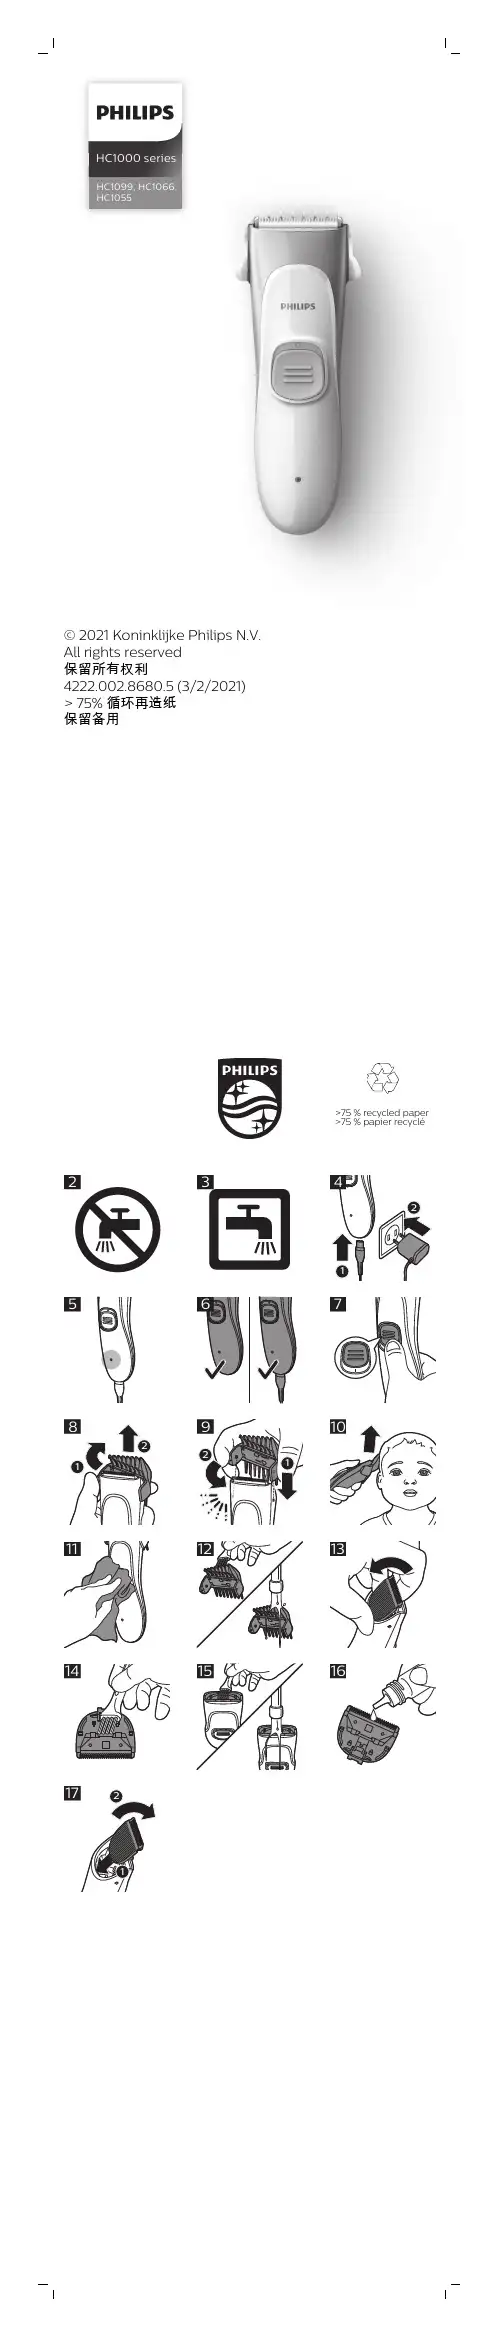
HC1000 seriesHC1099, HC1066,HC1055© 2021 Koninklijke Philips N.V.All rights reserved保留所有权利4222.002.8680.5 (3/2/2021)> 75% 循环再造纸保留备用312467>75 % recycled paper >75 % papier recycléEnglishGeneral description (Fig. 1)1Cutting unit2On/off button3Charging indicator4Socket for small plug5Ear contouring comb (1 mm/1-9 mm)6Hair comb (3 mm/6 mm)7Hair comb (9 mm/12 mm)8Hair comb (15 mm/18 mm)(HC1099 only)9Supply unit10Small plug11Cleaning brush12Bottle of oil13Pouch (HC1099 only)IntroductionCongratulations on your purchase and welcome to Philips! To fully benefit from the support that Philips offers, register your product at /welcome . Your new Philips kid hair clipper allows you to give your child a professional haircut in the comfort of your own home. The ultra-silent motor and child-safe, lightweight and waterproof design makes cutting hair a pain-free, easy experience for you and your child. The professional blade with the specially designed rounded tips combined with multiple-length combs, helps you to safely create a smooth, even cut, every time.Important safety informationRead this important information carefully before you use the appliance and its accessories and save it for future reference. The accessories supplied may vary for different products.Danger-Keep the supply unit dry (Fig. 2).Warning-The supply unit contains a transformer. Do not cut off the supply unit to replace it with another plug, as this causes a hazardous situation.-This appliance can be used by children aged from 8 years and above and persons withreduced physical, sensory or mental capabilities or lack of experience and knowledge if they have been given supervision or instruction concerning use of the appliance in a safe way and understand the hazards involved. Children shall not play with the appliance. Cleaning and user maintenance shall not be made bychildren without supervision.-Detach the hand-held part from the supply cord before cleaning it in water.-Always check the appliance before you use it.Do not use the appliance if it is damaged, as this may cause injury. Always replace adamaged part with one of the original type.Caution-Never immerse the appliance in water. Do not use the appliance in the bath or shower.-Never use water hotter than 60 °C to rinse the appliance.-If you use the appliance to clip the hair of more than one child, clean the appliance before you use it on another child.-Never use compressed air, scouring pads,abrasive cleaning agents or aggressive liquids such as petrol or acetone to clean theappliance.-Do not use the supply unit in or near wallsockets that contain an electric air freshener to prevent irreparable damage to the supply unit.Battery safety instructions-Only use this product for its intended purpose and follow the general and battery safety instructions as described in this user manual.Any misuse can cause electric shock, burns, fire and other hazards or injuries.-To charge the battery, only use the detachable supply unit (HQ8505) provided with theproduct. Do not use an extension cord.-Charge, use and store the product at a temperature between 5 °C and 35 °C.-Always unplug the product when it is fully charged.1-Do not burn products and their batteries and do not expose them to direct sunlight or to high temperatures (e.g. in hot cars or near hotstoves). Batteries may explode if overheated.-If the product becomes abnormally hot, gives off an abnormal smell, changes color or ifcharging takes much longer than usual, stopusing and charging the product and contactyour local Philips dealer.-Do not place products and their batteries in microwave ovens or on induction cookers.-This product contains a rechargeable battery that is non-replaceable. Do not open theproduct to replace the rechargeable battery.-When you handle batteries, make sure that your hands, the product and the batteries are dry.-To prevent batteries from heating up or releasing toxic or hazardous substances, do not modify, pierce or damage products andbatteries and do not disassemble, short-circuit, overcharge or reverse charge batteries.-To avoid accidental short-circuiting of batteries after removal, do not let battery terminals come into contact with metal objects (e.g. coins,hairpins, rings). Do not wrap batteries inaluminum foil. Tape battery terminals or putbatteries in a plastic bag before you discardthem.-If batteries are damaged or leaking, avoid contact with the skin or eyes. If this occurs,immediately rinse well with water and seekmedical care.Electromagnetic fields (EMF)This Philips appliance complies with all applicable standards and regulations regarding exposure to electromagnetic fields.General-This appliance can be safely cleaned under the tap (Fig. 3).-The supply unit is suitable for mains voltages ranging from 100 to 240 volts.-The supply unit transforms 100-240 volts to a safe low voltage of less than 24 volts. Preparing for useNote: For optimal performance, apply a drop of oil to the teeth of the cutting unit. For best results, we advise you to clean and lubricate the cutting unit regularly.ChargingCharge the appliance for at least 8 hours before you use it for the first time, after a long period of non-use or when the motor starts to run more slowly during hair clipping.When the appliance is fully charged, the appliance has a cordless operating time of up to 45 minutes. Note: Do not leave the appliance connected to the wall socket for more than 24 hours1Switch off the appliance.2Insert the small plug into the appliance and put the supply unit in the wall socket (Fig. 4).-After a few seconds, the charging indicator lights up green continuously to indicate that the appliance is charging (Fig. 5).3After charging (approx. 8 hours), remove the supply unit from the wall socket and pull thesmall plug out of the appliance.Charge indicationsBattery lowThe battery status is indicated by the performance of the appliance. When the appliance starts working more slowly, the battery is almost empty and needs to be charged for optimal performance. ChargingWhen you charge the appliance, the charging indicator lights up green continuously to indicate that the appliance is charging (Fig. 5).Using the applianceNote: This appliance can be used without cord or when it is connected to the wall socket (Fig. 6). Switching the appliance on and off-To switch on the appliance, push the on/off slide upwards (Fig. 7).-To switch off the appliance, push the on/off slide downwards.Removing or attaching combs1To remove the comb, push one lug backwards off the appliance until the comb detaches from the appliance (Fig. 8).2To attach the comb, make sure the side with the desired hair length points upwards. Fit one of the projections on the inside of the lug intothe small hole on the side of the appliance.Push the other lug of the comb into place('click') (Fig. 9).Note: Please make sure that the lugs of thecomb have been properly inserted into theholes on both sides of the appliance.Before use-For optimal performance, apply a drop of oil to the teeth of the cutting unit. For best results, we advise you to clean and lubricate the cuttingunit regularly.-For optimal safety, we advise you to always use the appliance with a comb.-This appliance is only intended for clipping human scalp hair. Do not use it for anotherpurpose.-When you clip hair for the first time, start with the comb with the highest length to familiarize yourself with the appliance.-Make sure the hair is clean and dry. Do not use the appliance on wet hair.-Make sure the head of the person whose hair you are cutting is at the same level as yourchest. This ensures that all parts of the head are clearly visible and within easy reach.Hair clipping with combThe appliance comes with different hair combs. Each side of each comb cuts to a different fixed hair length. The indication on the inside of each comb corresponds to the remaining hair length after clipping.Ear contouring comb1 mm/1-9 mmHair comb3 mm/6 mmHair comb9 mm/12 mm15 mm/18 mmHair comb (HC1099,HC1091)1Comb the hair in the direction of hair growth.2Attach the desired comb onto the appliance (see 'Removing or attaching combs').3To clip the hair move the appliance through the hair slowly. Make sure that the flat part of thecomb is in full contact with the scalp to obtainan even cutting result (Fig. 10).Hair clipping tips-To clip most effectively, move the appliance against the hair growth direction.-Move the appliance in different directions (upward, downward or across), because hairdoesn't all grow in the same direction.-Make overlapping passes over the head to ensure that the appliance catches all the hairsthat need to be cut.-Write down which comb(s) you use to create a certain hairstyle as a reminder for futureclipping sessions.-Regularly remove cut hair from the comb. If a lot of hair has accumulated in the comb, remove it from the appliance and blow and/or shake out the hairs (see 'Cleaning').CleaningNever dry the cutting unit with a towel or tissue, as this may damage the trimming teeth.Clean the appliance every time you have used it. Only clean the appliance with the cleaning brush supplied.Never use scouring pads, abrasive cleaning agents or aggressive liquids such as alcohol, petrol or acetone to clean the appliance.1Switch off the appliance and disconnect it from the wall socket.2Wipe the housing of the appliance with a dry cloth (Fig. 11).3Remove the comb and clean it with the cleaning brush and/or rinse it under the tap(Fig. 12).4Push the teeth of the cutting unit upwards to remove it from the appliance (Fig. 13).5Clean the cutting unit with the cleaning brush and/or rinse it under the tap (Fig. 14).6Clean the inside of the appliance with the brush and/or rinse it under the tap (Fig. 15).7Carefully shake off excess water and let all parts dry.8For optimal performance, lubricate the teeth of the cutting unit with the oil supplied with theproduct regularly (Fig. 16).9Insert the lug of the cutting unit into the guiding slot and push the cutting unit back onto theappliance.Note: If the appliance does not perform as well as it used to or if the operating time has decreased, the cutting unit might not be properly lubricated. ReplacementReplace damaged parts immediately. Always replace the cutting unit with the original Philips cutting unit.1Push the teeth of cutting unit upwards and pull the cutting unit off the appliance (Fig. 13).2Remove the used cutting unit.3Insert the lug of the new cutting unit into the guiding slot and push the cutting unit onto the appliance ('click') (Fig. 17).Recycling-Do not throw away the product with the normal household waste at the end of its life, but hand it in at an official collection point for recycling.By doing this, you help to preserve theenvironment.-This product contains a built-in rechargeable battery which shall not be disposed of withnormal household waste. Please take yourproduct to an official collection point or aPhilips service center to have a professionalremove the rechargeable battery.-Follow your country’s rules for the separate collection of electrical and electronic products and rechargeable batteries. Correct disposalhelps prevent negative consequences for theenvironment and human health.the appliance. If so, remove them.2Remove the back and/or front panel of the appliance with a screwdriver. If necessary, also remove additional screws and/or parts until you see the printed circuit board with therechargeable battery.3Remove the rechargeable battery. Warranty and supportIf you need information or support, please visit /support or read the international warranty leaflet.TroubleshootingThis chapter summarizes the most common problems you could encounter with the product. If you are unable to solve the problem with the information below, visit /support for a list of frequently asked questions or contact the Consumer Care Center in your country. Problem PossiblecauseSolutionThe appliance is not working or performing well.Some hairparticles ordust haveaccumulatedinside theappliance.This cancause theappliance tostop working,or to give apoor cuttingperformance.Clean theappliance regularly(see 'Cleaning').Remember to takeoff theattachments andclean themseparately. Alsoclean the inner partof the appliance,where usually a lotof hairaccumulates. Applya drop of oil to theteeth of the cuttingunit of your hairclipper. For bestresults, we adviseyou to clean andlubricate the teethof the cutting unitregularly. You canuse the oilprovided in thepackaging oralternativelysewing machine oil.The appliance produces an uneven cutting result.The combdoes nottouch thescalp whenyou move theappliancethrough thehair.Make sure that theflat part of thecomb is alwaysfully in contact withthe scalp when youmove theappliance throughthe hair.You used theappliance onwet hair.Make sure the hairis clean and dry. Donot use theappliance on wethair.You onlymove theappliance inone direction.Move theappliance indifferent directions(upward,downward oracross), becausehair doesn't allgrow in the samedirection.The comb isnot correctlyattached tothe cuttingunit.Remove the comband reattach it. Putthe comb into theslots on both sidesof the appliance('click').The cuttingunit and/orthe comb aredirty.Clean the cuttingunit and/or thecomb (see'Cleaning').The cuttingperformancedecreaseswhen thebatteryruns low.Charge the batteryor connect theappliance to thewall socket and usethe appliance withcord.The appliance does not work when I press the on/off button.Therechargeablebattery isempty.Charge the battery(see 'Preparing foruse').Theappliance isnotconnected tothe wallsocket.Insert the smallplug into theappliance and putthe supply unit inthe wall socket.You can also usethe appliancewhen it isconnected to thewall socket.The charging indicator does not light up green to indicate that the appliance is charging when I connect the appliance to the wall socket.There is apower failureor the wallsocket is notlive.Check if the powersupply is working. Ifit is, check whetherthe socket is live byplugging in anotherappliance.简体中文基本说明(图 1)1修剪部件2开/关按钮3充电指示灯4小插头插座5耳边梳(1 毫米/1-9 毫米)6定长梳齿(3 毫米/6 毫米)7定长梳齿(9 毫米/12 毫米)8定长梳齿(15 毫米/18 毫米)(仅限于 HC1099)9电源部件10小插头11清洁刷12油瓶13存储袋(仅 HC1099)简介感谢您的惠顾,很高兴您选择飞利浦!为了让您能充分享受飞利浦提供的支持,请在 /welcome 上注册您的产品。
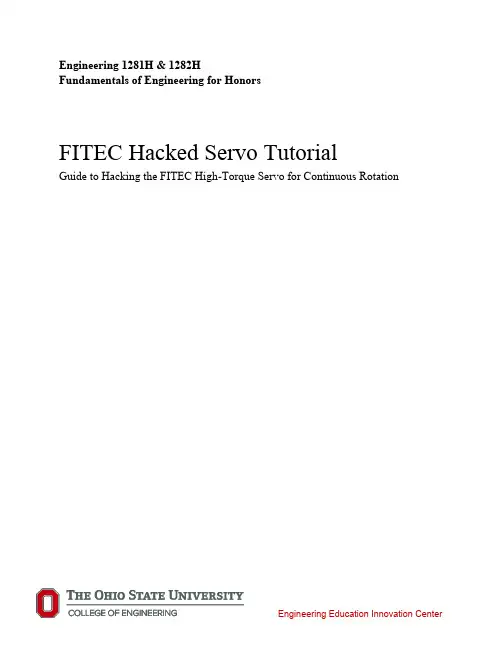
Engineering 1281H & 1282HFundamentals of Engineering for HonorsFITEC Hacked Servo TutorialGuide to Hacking the FITEC High-Torque Servo for Continuous RotationIntroductionFollow this guide in order to allow the servo motor to rotate continuously. By hacking the servo, it loses its ability to set angles. This means once hacked, the servo no longer operates with commands from the servo library, but rather acts as the other motors provided in the FEH store. If you must retain accuracy with your servo, in order to set specific angles, do NOT hack it. Once a servo is hacked, it cannot be un-hacked.Materials1.FITEC Servo2.Wire strippers3.Motor wire4.Screw driver (Phillips head)5.File6.Solder7.Soldering Station8.Safety GlassesStep-by-step Guide1.Acquire materials. Your toolbag should have solder, a small screw driver, safety glasses, wirestrippers. A file can be retrieved from the store.Figure 1: Wire Stripers, File, Servo, Screw Driver, Motor Wire2.Unscrew the four screws from the back of the servo, as shown in Figure 2.Figure 2: Unscrewing the Back of the Servo3.Remove the back plate of the servo in order to reveal the circuit board inside. Figure 3 showswhat the inside of the servo will look like.Figure 3: The Inside of the Servoing the wire strippers, cut all five wires that connect the circuit board to the motor. See Figure4 for clarification. These wires and circuit board are part of the feedback control of the servo, butthese components do not work when continuous rotation is needed.Figure 4: Removal of Feedback Control Components5.Looking into the inside of the motor, one can see a small screw near the middle. Using the screwdriver, remove this screw. Its location is circled in Figure 5.Figure 5: Removal of the Small Screw6.Remove the front plate of the motor. Remove the two gears shown in Figure 6 from the assembly.Figure 6: Removal of Two of the Servo Gearse the screw driver to carefully remove the large, notched gear, as shown in Figure 7. Removalof the gear will reveal a ball bearing underneath, as shown in Figure 8.Figure 7: Use of the Screw Driver in Gear RemovalFigure 8: Removal of Large, Notched Gear8.By pushing from the frontside and pulling from the backside, carefully wiggle the shaft piece thatis located inside the ball bearing. See Figure 9 for clarification.Figure 9: Removal of the Shaft Piece9.File down the notch of the large, notched gear that was removed. Be careful not to file down theteeth of the gear. The filed surface should be fairly flat, as indicated by Figure 10.Figure 10: Filing of the Large, Notched Gear10.Place the three removed gears back on the gear assembly, as shown in Figure 11.Figure 11: Reassembly of the Gears11.Place the front plate back on the motor, like shown in Figure 12.Figure 12: Placing the Front Plate Back On12.Split the end of the motor wire about an inch, and strip the tips, as shown by Figure 13.Figure 13: Stripped Motor Wire13.Solder the red wire to the motor terminal indicated with a red dot. See Figure 14 for thecompleted soldering joints.Figure 14: Soldering Motor Terminals14.Place the back plate back onto the motor. Be careful that one side of the back place has a notch, inorder for the wires to properly thread out. See Figure 15 for clarification.Figure 15: Placement of the Back Plate Back onto the Motor15.The removed pieces (circuit board, small screw, and shaft piece) may be thrown away. See Figure16 for clarification on what components can be disposed of.Figure 16: Components to be Thrown Away16.Success! You have finished hacking the FITEC Servo for continuous rotation. The finishedproduct should look similar to Figure 17. To complete your motor, acquire a green motor terminaland screw the other end of your wires into it. Happy roboting!Figure 17: Completed Hacked Servo。


电动剃须刀拆解在这个刮得干干净净的拆解中,我们正在庆祝父亲节,并着眼于两种不同的电动剃须刀——飞利浦 Norelco S9311 和博朗系列 7。
我们将两台剃须刀正面交锋,看看哪一个剃得最好。
然后我们把它们放在拆解台上,看看是什么让每一个都打勾。
我们发现要进行此拆解的感兴趣的特征是:1.使用的制造方法。
2. 每个剃须刀内的机构和组件的复杂性。
3. 用来让这些剃须刀感觉像抛光产品的小细节。
制造方法正如我们所料,飞利浦 Norelco S9311 电动剃须刀的大部分都是由注塑塑料制成,并带有一个 PCBA 和几个钣金组件。
IM 零件具有各种细节,包括各种材料和饰面。
有用于防水的包覆成型垫圈、用于电触点的嵌件成型销以及用于按钮的带有蒙面符号的涂漆部件。
正面的显示屏是使用白色薄壁IM 部件制成,顶部带有模切贴纸,位于 PCBA 上的 LED 和带有黑色窗口的透明塑料 IM 部件之间。
Norelco 中的少数金属部件是6 个螺钉;一些简单的薄型钣金零件,可以卡入到位;压缩弹簧;当然,还有用于实际剪发的刀片和箔片。
刀片是整个剃须刀中最复杂的部分,刀片很小,很锋利,有很多弯曲,还有一些小铆钉将整个东西固定在一起。
实际的切割动作由标准步进电机完成,就像您在CD 驱动器中找到的类型一样,由焊接到简单 PCBA 的锂离子电池供电。
在这次拆解的趋势中,博朗 Series 7 电动剃须刀与 Norelco 相似,只是涉及更多。
以注塑件为主,有包覆成型、嵌件成型、涂漆件、透明光学件等。
然而,Series 7 还利用热熔和胶水将自身固定在一起。
它还具有更广泛的材料组合,并更多地使用更硬但更难成型的玻璃填充塑料。
Series 7 还拥有更多的金属部件,包括更多的螺丝;铆接支架;压缩和定制扭力弹簧;以及一些相对较重的板和支架,为整个产品增加了一些重量。
除了所有的卡扣配合之外,剃须刀头部还有几个地方可以弯曲金属部件以实际捕捉塑料部件,从而形成一个独立但可移动的组件。
飞利浦S5588的中文说明书
1、Steel精密刀片:这款剃须刀具有 45 个强大的自动的刀片,每次切割更多毛发,每分钟高达90,000 次光滑切割,实现轻松和温和的剃须。
2、强力剃须:这款电动剃须刀采用 SkinIQ 技术,可识别您的毛发并适应它们,从而提高皮肤质感。
3、传感器功率适配器:智能面部毛发传感器可测量每秒 125 次的胡须,并相应
4、电动多功能剃须刀:弯曲头可以360旋转,可适应您的面部、颈部或松木的轮廓;使用 Philips k 的亲肤弹出式胡须、上肢胡须和胡须的轮廓。
5、供货范围包括:Philips 飞利浦剃须刀,可以用水冲洗,一个直观的三个电池指示灯,一个清洁器,一个旅行表,一个内置修剪器和一个旅行盒。

/support/ifuS8050, S5536, S5535English 3简体中文 13Important safety informationRead this important information carefully before you use the appliance and its accessories and save it for future reference. The accessories supplied may vary for different products. The box shows which accessories are supplied with your product and whether your product is bluetooth enabled.Danger-Keep the supply unit dry.Warning -To charge the battery, only use the detachablesupply unit (HQ8505) provided with theappliance.-The supply unit contains a transformer. Do notcut off the supply unit to replace it with anotherplug, as this causes a hazardous situation.-This appliance can be used by children agedfrom 8 years and above and persons withreduced physical, sensory or mental capabilitiesor lack of experience and knowledge if theyhave been given supervision or instructionconcerning use of the appliance in a safe wayand understand the hazards involved. Childrenshall not play with the appliance. Cleaningand user maintenance shall not be made bychildren without supervision.-Always unplug the appliance before you clean itunder the tap.3English4English-Always check the appliance before you useit. Do not use the appliance if it is damaged,as this may cause injury. Always replace adamaged part with one of the original type.Philips Quick Clean Pod cartridge fluid-Do not swallow.-Keep out of reach of children.Caution-Never immerse the charging stand in water anddo not rinse it under the tap.-Never use water hotter than 60°C to rinse theshaver.-Only use this appliance for its intended purposeas shown in the user manual.-For hygienic reasons, the appliance should onlybe used by one person.-Never use compressed air, scouring pads,abrasive cleaning agents or aggressiveliquids such as petrol or acetone to clean theappliance.-If your shaver comes with a cleaning system,always use the original Philips Quick Clean Podcartridge.-Always place the cleaning system on a stable,level and horizontal surface to prevent leakage.-Always make sure the cartridge compartment isclosed before you use the cleaning system.-When the cleaning system is ready for use, donot move it to prevent leakage of cleaning fluid.-Water may drip from the socket at the bottomof the shaver when you rinse it. This is normaland not dangerous because all electronicsare enclosed in a sealed power unit inside theshaver.-Do not use the supply unit in or near wallsockets that contain an electric air freshener toprevent irreparable damage to the supply unit.-Do not use the appliance on chapped skin,open wounds, healing wounds, skin recoveringfrom surgery or if you suffer from a skin diseaseor skin irritation, such as severe acne, sunburn,skin infection, skin cancer, inflammation,eczema, psoriasis, nylon allergy etc.-Do not use the cleansing brush attachment ifyou are taking steroid-based medication, as thismay cause irritation or injury.-If you wear piercings on your face, removethe piercings before you use the click-onattachments or make sure that you do not usethe appliance on or near the piercing.-If you wear jewelry, contact lenses or glasses,remove them before you use the click-onattachments, or make sure that you do not usethe appliance on or near jewelry or glasses.Battery safety instructions-Only use this product for its intended purposeand follow the general and battery safetyinstructions as described in this user manual.Any misuse can cause electric shock, burns, fireand other hazards or injuries.-To charge the battery, only use the detachablesupply unit (HQ8505) provided with theproduct. Do not use an extension cord.-Charge, use and store the product at atemperature between 5 °C and 35 °C.-Always unplug the product when it is fullycharged.5English6English-Do not burn products and their batteries anddo not expose them to direct sunlight or tohigh temperatures (e.g. in hot cars or near hotstoves). Batteries may explode if overheated.-If the product becomes abnormally hot, givesoff an abnormal smell, changes color or ifcharging takes much longer than usual, stopusing and charging the product and contactyour local Philips dealer.-Do not place products and their batteries inmicrowave ovens or on induction cookers.-This product contains a rechargeable batterythat is non-replaceable. Do not open theproduct to replace the rechargeable battery.-When you handle batteries, make sure that yourhands, the product and the batteries are dry.-To prevent batteries from heating up orreleasing toxic or hazardous substances, donot modify, pierce or damage products andbatteries and do not disassemble, short-circuit,overcharge or reverse charge batteries.-To avoid accidental short-circuiting of batteriesafter removal, do not let battery terminalscome into contact with metal object (e.g.coins, hairpins, rings). Do not wrap batteries inaluminum foil. Tape battery terminals or putbatteries in a plastic bag before you discardthem.-If batteries are damaged or leaking, avoidcontact with the skin or eye. If this occurs,immediately rinse well with water and seekmedical care.Electromagnetic fields (EMF)This Philips appliance complies with all applicablestandards and regulations regarding exposure toelectromagnetic fields.General-This shaver is waterproof. It is suitable for usein the bath or shower and for cleaning underthe tap. For safety reasons, the shaver cantherefore only be used without cord.-The supply unit is suitable for mains voltagesranging from 100 to 240 volts.-The supply unit transforms 100-240 volts to asafe low voltage of less than 24 volts. Recycling-Do not throw away the product with thenormal household waste at the end of its life,but hand it in at an official collection point forrecycling. By doing this, you help to preservethe environment.-This product contains a built-in rechargeablebattery which shall not be disposed of withnormal household waste. Please take yourproduct to an official collection point or aPhilips service center to have a professionalremove the rechargeable battery.-Follow your country’s rules for the separatecollection of electrical and electronic productsand rechargeable batteries. Correct disposalhelps prevent negative consequences for theenvironment and human health. Removing the rechargeable batteryOnly remove the rechargeable battery whenyou discard the appliance. Before you removethe battery, make sure that the appliance isdisconnected from the wall socket and that thebattery is completely empty.7English1 Twist the shaving head to remove it from thehandle.2 Insert a flat-head screwdriver under the rim ofthe panel and pry off.3 Remove the two screws from the top with a torxor flat-head screwdriver.4 Slide the front shell off.5 Break the bridge on top with a wire cutter.6 Insert a flat head screwdriver on either side ofthe shaver body to release the hooks.8English7 Slide the power unit out of the body.Warranty and supportIf you need information or support, pleasevisit /support or read theinternational warranty leaflet.Warranty restrictionsThe shaving heads (cutters and guards) are notcovered by the terms of the international warrantybecause they are subject to wear.9EnglishTroubleshootingThis chapter summarizes the most commonproblems you could encounter with the appliance.If you are unable to solve the problem with theinformation below, visit /supportfor a list of frequently asked questions or contactthe Consumer Care Center in your country. ShaverProblem Possible cause SolutionThe appliance does not work when I press the on/off button.The appliance isstill attached tothe wall socket. Forsafety reasons, theappliance can onlybe used withoutcord.Unplug the appliance andpress the on/off button toswitch on the appliance.The rechargeablebattery is empty.Recharge the battery.The travel lock isactivated.Press the on/off button for3 seconds to deactivate thetravel lock.The shaving unit issoiled or damagedto such an extentthat the motorcannot run.Clean the shaving headsthoroughly or replace them.The appliance does not shave as well as it used to.The shaving headsare damaged orworn.Replace the shaving heads.Hairs or dirtobstruct theshaving heads.Clean the shaving headsthoroughly.10EnglishProblem Possible cause SolutionWater is leaking from the bottom of the appliance.During cleaning,water may collectbetween the innerbody and theouter shell of theappliance.This is normal and notdangerous because allelectronics are enclosed in asealed power unit inside theappliance.Philips Quick Clean PodProblem Possible cause SolutionMy shaverisn't clean after using the Philips Quick Clean Pod.You removed theshaver before thecleaning programwas finished.Leave the shaver in thePhilips Quick Clean Pod forthe full cleaning program.Each cleaning programtakes approximately 1minute. The cleaning icongoes out when the cleaningprogram is finished.The Philips QuickClean Pod Cartridgeneeds to be replaced.Replace the Philips QuickClean Pod Cartridge.The Philips QuickClean Pod is tilted.Place the Philips QuickClean Pod on a flat surface.My Philips Quick Clean Pod does not switch on.The Philips QuickClean Pod ispowered by themotor of the shaver.Place the shaver into thePhilips Quick Clean Pod.Switch on the shaver.The shaver isconnected to the wallsocket.Disconnect the shaver fromthe supply unit.11EnglishProblem Possible cause SolutionThe shaver battery is empty.Charge the shaver before using the Philips Quick Clean Pod.My Philips Quick Clean Pod is overflowing.You regularly use thePhilips Quick CleanPod after rinsingthe shaver but notshaking off excesswater.Shake off excess water afterrinsing the shaving headseach time before puttingthe shaver into the PhilipsQuick Clean Pod.You shaved withshaving gel or foamand did not rinse theshaver before usingthe Philips QuickClean Pod.Rinse the shaving headsthoroughly before using thePhilips Quick Clean Pod.12English重要安全信息使用本产品及其附件之前,请仔细阅读本重要信息,并妥善保管以供日后参考。
S7980English 6简体中文 35IntroductionCongratulations on your purchase and welcome to Philips! To fully benefit from the support that Philips offers, register your product at/welcome or via the SkinAnalyst app.Introducing Philips’ first ever complete shaving and skincare system. Assess and measure thecondition of your skin, personalize your FaceSmart shaving and cleansing settings, and best of all,receive daily skincare advice tailored to you.General description (Fig. 1)1Protection cap for cleansing brush2Cleansing brush3Cleansing brush base4Shaving unit5On/off button6Handle7Socket for small plug8SkinAnalyst sensor9Notification symbol10Shaving unit detector11Cleansing brush detector12Cleaning reminder13Bluetooth® symbol14Travel lock symbol15Battery charge indicator16Pouch17Supply unit (adapter)6EnglishRead this important information carefully before you use the shaver, the Skinanalyst sensor and save it for future reference. The accessories supplied may vary for different products.Danger-Keep the supply unit dry.Warning -To charge the battery, only use the detachable supply unit (type HQ8505) provided with the shaver.-The supply unit contains a transformer. Do not cut off the supply unit to replace it with another plug, as this causes a hazardous situation.-The shaver and SkinAnalyst sensor can be used by children aged from 8 years and above and persons with reduced physical, sensory or mental capabilities or lack of experience and knowledge if they have been given supervision or instruction concerning use of bothappliances in a safe way and understand the hazards involved. Children shall not play with the shaver. Cleaning and user maintenance shall not be made by children without supervision.-Always unplug the shaver before you clean it under the tap.-Always check the shaver and SkinAnalyst sensor before you use it. Do not use it if it is damaged, as this may cause injury. Always replace a damaged part with one of the original type.7English-Do not open the shaver to replace the rechargeable battery.Caution -Never use water hotter than 80°C to rinse the shaver.-Never rinse the SkinAnalyst sensor under the tap.-Only use the shaver and the SkinAnalyst sensor for its intended purpose as shown in the user manual.-For hygienic reasons, the shaver should only be used by one person.-Never use compressed air, scouring pads,abrasive cleaning agents or aggressive liquids such as petrol or acetone to clean the shaver.-Water may drip from the socket at the bottom of the shaver when you rinse it. This is normal and not dangerous because all electronics are enclosed in a sealed power unit inside the shaver.-Do not use the supply unit in or near wallsockets that contain an electric air freshener to prevent irreparable damage to the supply unit.-Keep your iPhone away from water and moist environments.-The shortwave radio frequency signals of a Bluetooth shaver may impair the operation of other electronic and medical devices.8English-Do not use the shaver in medical facilities,aircraft, refuelling points, close to automatic doors, automatic fire alarms or otherautomatically controlled devices.-Switch off Bluetooth where it is prohibited.-Keep this shaver at least 20 cm frompacemakers and other medical devices. Radio waves may impair the operation of pacemakers and other medical devices.Electromagnetic fields (EMF)-This Philips shaver complies with all shaver standards and regulations regarding exposure to electromagnetic fields.General-This shaver is waterproof. It is suitable for use in the bath or shower and for cleaning under the tap. For safety reasons, the shaver cantherefore only be used without cord.-The shaver is suitable for mains voltages ranging from 100 to 240 volts.-The supply unit transforms 100-240 volts to a safe low voltage of less than 24 volts.-The frequency band in which the shaver operates is 2.4 GHz.-The maximum radio frequency power radiated in the frequency band in which the shaver operates is <10dBm.9EnglishThe displayThe shaver is equipped with a notification symbol.This symbol lights up when important advice isavailable in the app. Go to the app to obtain thisadvice. It reminds you to unplug the shaver beforeyou switch it on and to clean it for optimalperformance. It also reminds you to replace theshaving heads every two years or the cleansingbrush every three months.Attachment detection featureWhen you have paired your iPhone with theshaver, the attachment detection feature isactivated. Every time you switch on the shaver, thisfeature automatically recognizes the attachment(shaving unit/cleansing brush) that is attached tothe shaver handle and adapts the settingsaccordingly. Unpairing of your iPhone and theshaver deactivates this feature.Make sure your shaver is connected to youriPhone. The SkinAnalyst app also offers thepossibility to (de)activate the Attachmentdetection feature. You can do this by going to Myprofile, My shaver and switching off the Autoattachment detection. You can then manuallyselect the brush attachment, by switching on theshaver and press and hold the on/off button forone second.10EnglishShaving unit detectorThe shaving unit detector lights up to indicate thatthe shaving unit has been attached to the handle.Cleansing brush detectorThe cleansing brush detector lights up to indicatethat the cleansing brush has been detected.When you switch off the shaver, the cleaningreminder flashes to remind you to clean theshaver. Clean the shaver and the attachments aftereach use for optimal performance.The shaver is equipped with Bluetooth 4.0 toconnect your shaver to the app on your iPhone.Bluetooth is automatically activated when youswitch on the shaver for the first time. You can onlydeactivate it by switching on the travel lock. Travel lockYou can lock the shaver when you are going totravel. The travel lock prevents the shaver frombeing switched on by accident. The travel lock alsodeactivates Bluetooth.Activating the travel lock1Press the on/off button for 3 seconds to enterthe travel lock mode.While you activate the travel lock, the travel locksymbol flashes. When the travel lock is activated,the travel lock symbol lights up continuously.Deactivating the travel lock1Press the on/off button for 3 seconds.The travel lock symbol flashes and then goes out.The shaver is now ready for use and Bluetooth isactivated again.ChargingBattery charge indicatorCharging takes approx. 1 hour.Quick charge: When the battery is empty and youconnect the shaver to the wall socket, the batterycharge indicator flashes quickly. When the shavercontains enough energy for one shaving orcleansing session, the battery charge indicatorstarts flashing slowly..While the shaver continues to charge, the battery charge indicator flashes slowly until the battery is fully charged.When the battery is fully charged, the batterycharge indicator lights up blue continuously.Note: The shaver can only be used without cord.Note: When the battery is full, the display switchesoff automatically after 30 minutes. If you press theon/off button during charging, the notificationsymbol lights up blue to remind you that you haveto disconnect the shaver from the wall socket.When the battery is almost empty, the batterycharge indicator flashes orange.When the battery is completely empty, the batterycharge indicator flashes orange quickly. ChargingCharging takes approx. 1 hour.Charge the shaver before first use and when thedisplay indicates that the battery is almost empty.Note: You can charge the shaver after every use.This will not harm the battery.Charging with the supply unit1Make sure the shaver is switched off.2Insert the small plug into the shaver and put the supply unit in the wall socket.3After charging, remove the supply unit from the wall socket and pull the small plug out of theshaver.Preparing for usePairing the shaver and your iPhoneFor this shaver a special app is available. You candownload the SkinAnalyst app from the App store.By using the app, your skincare and shavingroutine will be personalized. The app gives youexpert advice based on your skin, shaving method,local weather conditions, etc. to support your dailyskincare and shaving routine.Note: The app is available for iPhone 6, iPhone 6Plus, iPhone 6S and iPhone 6S Plus equipped withiOS9 or higher.To create a secure and safe connection, first theshaver and your iPhone need to be paired once.1Download the SkinAnalyst app from the Appstore.2Make sure Bluetooth on your iPhone isswitched on.Open the app on your iPhone.Follow the instructions in the app. After youhave filled in the skin assessment, the app asksyou to pair your iPhone with the shaver.Switch on the shaver. Bluetooth is activatedautomatically.6In the app, the pop-up message 'press pair'appears. When your iPhone and the shaverhave been paired successfully, the Bluetoothsymbol flashes briefly and then goes out. If thisdoes not happen, please see 'Troubleshooting'.7Once the shaver and the app have been paired,the shaver automatically selects the rightpersonal settings depending on the attachmentyou have clicked on. During shaving orcleansing, you can open the app to see thesettings you are using and the duration of theshaving or cleansing session.Note: When you use the shaver, keep youriPhone and shaver within transmission range(no more than 5 meters from each other, in thesame room).Using the shaverUsing the SkinAnalyst sensor1Open the app before measuring your skin.2If you have an iPhone case, first remove the case from your iPhone.3Pull the clamp of the SkinAnalyst sensor outwards and gently place your iPhone into the holder with its camera pointing towards theopening on the inside of the holder. Be careful when you attach or remove the SkinAnalystsensor to prevent scratches on your iPhone.Note: The SkinAnalyst sensor can only be used on iPhone 6, iPhone 6 Plus, iPhone 6S andiPhone 6S Plus equipped with iOS9 or higher.4Insert the jack plug of the SkinAnalyst sensorinto your iPhone.Note: Keep the SkinAnalyst sensor placed onthe skin during measurement to avoid flashinginto your eyes.-Do not look into the sensor before and afterskin measurement.-When you take a picture of the skin, pleaseposition the sensor flat onto your skin so toensure it can take a clear picture of your skin. Connecting with the shaver1Make sure Bluetooth on your iPhone isswitched on.5Keep your iPhone and shaver close to each other in order to stay connected.Caution: Do not use your iPhone in moistsurroundings. Moisture and water can damage your iPhone.1To switch on the shaver, press the on/off button once.2To switch off the shaver, press the on/off button once.In order to benefit optimally from the treatments, you have to synchronize your treatments regularly. The shaver can store up to 15 shaves and/or cleansing treatments, so make sure you synchronize the shaver at least once after every 15 treatments. As an extra reminder, the notification symbol flashes every 9 treatments, without a connection between the shaver and the app, to tell you to connect with the app.1Open the app and make sure you are close to the shaver.2The app connects with the shaver automaticallyand synchronizes your last shaves or cleansing treatments.Using the attachmentsNote: Attach the cleansing brush on the cleansingbrush base first, before you place it on the shaver.Removing or attaching the attachments1Make sure the shaver is switched off.directly after shaving to prevent skin irritation. Forbetter shaving results, use the cleansing brushTracker and change the cleansing brush settings. You can adjust the settings and choose between four settings depending on your personal cleansing needs: sensitive, dry, normal or oily. Using the shaving unitNote: This shaver can only be used without cord. Skin adaptation periodYour first shaves may not bring you the result you expect and your skin may even become slightly irritated. This is normal. Your skin and beard need time to adapt to any new shaving system. We advise you to follow the advice provided by the app and shave regularly (at least 3 times a week) with this shaver for a period of 4 weeks to allow your skin to adapt to the new shaver.Dry shaving1Switch on the shaver.2Move the shaving heads over your skin in circular movements to catch all hairs growing in different directions. Make sure each shavinghead is fully in contact with the skin. Exertgentle pressure for a close, comfortable shave.Note: Do not press too hard, this can cause skin irritation.3Clean the shaver after use.Wet shavingYou can also use this shaver on a wet face with shaving foam or shaving gel.To shave with shaving foam or shaving gel, follow the steps below:1Apply some water to your skin.2Apply shaving foam or shaving gel to your skin.3Rinse the shaving unit under the tap to ensure that the shaving unit glides smoothly over your skin.4Switch on the shaver.5Move the shaving heads over your skin in circular movements to catch all hairs growing in different directions. Make sure each shavinghead is fully in contact with the skin. Exertgentle pressure for a close, comfortable shave.Note: Do not press too hard, this can cause skin irritation.Note: Rinse the shaving unit regularly to ensure that it continues to glide smoothly over yourskin.6Dry your face.7Clean the shaver after use.Note: Make sure you rinse all foam or shavinggel off the shaver.Shave settingsThe app has a feature that allows you topersonalize your shave settings. Go to the UsageTracker and change the shaving settings. You canadjust the settings and choose between threesettings depending on your personal shavingneeds: extra sensitive (xs), sensitive (s) and normal(n).Unpairing your shaver and iPhonePairing allows a connection between 1 shaver and 1iPhone. To remove this connection (e.g. when youhave a new iPhone 6, 6 Plus, 6S or 6S Plusequipped with iOS9 or higher), follow the stepsbelow:1Remove pairing from the app: open the app ->Go to the menu in the app -> Select 'Appsettings' and press 'Remove pairing from app'.2Unpair the shaver: press and hold the on/offbutton on the handle for approx. 10 seconds toremove the bond between shaver and app.Note: The unpairing of the shaver is successfulwhen the Bluetooth and notification symbolflash simultaneously (approx. 4 seconds).3Unpair your iPhone: choose Settings -> General-> Bluetooth -> Select the device by pressing (i)-> and press 'forget devices'.Cleaning and maintenanceIf the shaver and the app are paired, the cleaningreminder on the shaver lights up after each shaveas an extra reminder to tell you to clean theshaver.Cleaning the shaving unit under the tapClean the shaving unit after every shave for7Attach the shaving head holder to the bottom part of the shaving unit (‘click’).Clean the cleansing brush every time you have used it.1Switch off the shaver.2Detach the brush head from the attachment holder.3Clean the parts thoroughly with warm water and soap.4Dry the cleansing brush with a towel.Detach your iPhone from the SkinAnalystsensor.-Put the protection cap on the cleansing brushPut the protection cap on the SkinAnalystsensor to protect it from dirt accumulation.Replacement Replacing the shaving headsAs an extra reminder, the notification symbol also lights up when the shaving heads should be replaced. This advice is also available in the app. For maximum shaving performance, we advise you to replace the shaving heads every two years. Replace damaged shaving heads immediately. Always replace the shaving heads with original Philips shaving heads (see 'Ordering accessories'). 1Switch off the shaver.2Pull the shaving head holder off the bottompart of the shaving unit.3Turn the retaining rings anticlockwise and remove them. Place them aside in a safe place. 4Remove the shaving heads from the shavinghead holder.Discard the used shaving heads immediately to avoid mixing them with the new shaving heads.The brush head should be replaced every 3months or earlier if the brush hairs are deformed or damaged. As an extra reminder, the notification symbol also lights up when the brush head should be replaced. This advice is also available in theapp.Ordering accessoriesTo buy accessories or spare parts, visit/service or go to yourPhilips dealer. You can also contact the PhilipsConsumer Care Center in your country (see theinternational warranty leaflet for contact details).The following accessories and spare parts areavailable:-SH70 Philips shaving heads-HQ110 Philips shaving head cleaning spray-RQ560/RQ563 Philips cleansing brush-HQ8505 supply unitNote: The availability of the accessories may differby country.Recycling-Do not throw away the product with the normalhousehold waste at the end of its life, but handit in at an official collection point for recycling.By doing this, you help to preserve theenvironment.-This product contains a built-in rechargeablebattery which shall not be disposed of withnormal household waste. Please take yourproduct to an official collection point or aPhilips service center to have a professionalremove the rechargeable battery.-Follow your country’s rules for the separatecollection of electrical and electronic productsand rechargeable batteries. Correct disposalhelps prevent negative consequences for theenvironment and human health. Removing the rechargeable batteryBend the hooks aside and remove the powerunit.Warranty and supportIf you need information or support, please visit/support or read theinternational warranty leaflet. TroubleshootingThis chapter summarizes the most commonproblems you could encounter with the shaver,SkinAnalyst sensor and its accessories. If you areunable to solve the problem with the informationbelow, visit /support for a list offrequently asked questions or contact theConsumer Care Center in your country. Problem Possible cause SolutionI cannot connect the shaver to the app.You have notdownloaded the app.Download theSkinAnalyst app.The app is availablefor iPhone 6, iPhone6 Plus, iPhone 6Sand iPhone 6S Plusequipped with iOS9or higher.Your shaver is notswitched on.Make sure the shaveris switched on.You have not openedthe app.Make sure you openthe app.your iPhone cannotfind the shaver.The shaver isavailable for iPhone6, iPhone 6 Plus,iPhone 6S andiPhone 6S Plusequipped with iOS9or higher.Problem Possible cause SolutionBluetooth is not switched on.Make sure Bluetooth is enabled on the shaver and your iPhone.The shaver is not charged.Make sure the shaver is charged.I want to use the shaver without the app.You can also use the shaver without the app. However, only when you use the app together with the shaver, the app is able to provide tips and advice based on your usage. With the app you can set your shave settings. The app also reminds you when you need to replace the shaving heads, to clean the shaver, etc.I cannot change the shavesettings/cleansing brush settings on the shaver.Make sure there is a good connection between the shaver and your iPhone.You can select the attachment (shaving unit/cleansing brush) on the shaver. In the app, you can change the settings per attachment (shaving unit:normal/sensitive/extra sensitive, cleansing brush: dry skin/normal skin/oily skin/sensitive skin).31EnglishProblem Possible cause Solution The shaver does not shave as well as it used to.The shaving headsare damaged or worn.Replace the shaving heads (see 'Replacing the shaving heads').Hairs or dirt obstruct the shaving heads.Clean the shaving heads in the regular way or clean them thoroughly.To clean the shaving heads thoroughly,remove the shaving heads from the shaving head holder one by one (see 'Replacing the shaving heads'). Then separate the cutter from its guard and rinse each matching set under the tap.After rinsing, place the cutter back into its corresponding guard. Finally, put the shaving heads back into the shaving head holder (see 'Replacing the shaving heads').The cleansing brush does not clean as well as it used to.The cleansing brush is damaged or worn.Replace the cleansing brush (see 'Replacing the cleansing brush').32EnglishProblem Possible cause SolutionThe shaver doesn't detect the right attachment.The attachment isheavily polluted ordamaged.Try to clean theattachment (see'Cleaning andmaintenance'); if theissue persists, switchoff the detectionfeature from the appand select theattachment manuallyby pressing theon/off button for onesecond while theshaver is switchedon.The shaver does not work when I press the on/off button.The shaver is stillattached to the wallsocket. For safetyreasons, the shavercan only be usedwithout cord.Unplug the shaverand press the on/offbutton to switch onthe shaver.The rechargeablebattery is empty.Recharge the battery.The travel lock isactivated.Press the on/offbutton for 3 secondsto deactivate thetravel lock.The shaving unit issoiled or damaged tosuch an extent thatthe motor cannot run.Clean the shavingheads thoroughly orreplace them. Alsosee 'Hairs or dirtobstruct the shavingheads' for a detaileddescription of how toclean the shavingheads thoroughly.The shaver switches off when I select a different brush program.You cannot changethe brush programduring cleansing.Switch off the shaverbefore you select adifferent brushprogram.33EnglishProblem Possible cause Solution I get an error in the app during skin measurement.You did not place the SkinAnalyst sensor flat on your skin.Place the SkinAnalyst sensor flat on your skin.You did not insert the plug of the SkinAnalyst sensor into your phone properly.Remove the plug ofthe SkinAnalystsensor from yourphone and insert the plug into your phone again.Your phone did not recognize the SkinAnalyst sensor.Make sure that:-the cover/case of your iPhone is detached.-the camera lens of your iPhone is clean-the SkinAnalyst sensor is correctly attached to your iPhoneYour phone did not recognize the SkinAnalyst sensor.Make sure that yourvolume limit settings are reset to default settings (go to Settings > Music >Volume limit > slide to the max).Water is leaking from the bottom of the shaver.During cleaning,water may collect between the inner body and the outer shell of the shaver.This is normal and not dangerousbecause allelectronics are enclosed in a sealed power unit inside the shaver.34English说明感谢您的惠顾,欢迎光临飞利浦! 为了让您能充分享受飞利浦提供的支持,请在 /welcome 上或通过 SkinAnalyst 应用程序注册您的产品。
飞利浦剃须刀刀头更换说明书亲爱的用户,感谢您选择飞利浦剃须刀。
为了让您始终享受高效、舒适的剃须体验,正确更换刀头是非常重要的。
以下是详细的飞利浦剃须刀刀头更换说明,希望能对您有所帮助。
一、准备工作在更换刀头之前,请确保您已经准备好以下物品:1、新的飞利浦剃须刀刀头,确保其与您的剃须刀型号相匹配。
2、一块干净的柔软布,用于清洁剃须刀。
二、关闭剃须刀电源在进行任何操作之前,请务必先关闭剃须刀的电源,以防止意外启动造成伤害。
三、拆卸旧刀头1、按照您的剃须刀型号,找到刀头拆卸的按钮或部件。
通常,这个按钮位于刀头与机身的连接处。
2、轻轻按下拆卸按钮,同时将旧刀头从剃须刀机身上向外拔出。
四、清洁剃须刀机身在安装新刀头之前,使用准备好的干净柔软布擦拭剃须刀机身,去除残留的胡渣和污垢,以确保新刀头安装后的良好性能。
五、安装新刀头1、将新刀头的接口与剃须刀机身的接口对齐。
2、轻轻插入新刀头,直到听到“咔哒”一声,表示刀头已正确安装到位。
六、检查安装是否牢固轻轻晃动刀头,检查其是否安装牢固。
如果刀头有松动的迹象,请重新安装。
七、开启剃须刀试用安装完成后,打开剃须刀电源,进行短暂的试用,检查刀头的工作是否正常,剃须效果是否满意。
八、注意事项1、在更换刀头过程中,请避免用力过猛,以免损坏剃须刀机身或刀头。
2、请务必使用与您的剃须刀型号相匹配的刀头,否则可能会影响剃须效果和剃须刀的使用寿命。
3、定期更换刀头可以保持良好的剃须效果和卫生状况。
建议根据您的使用频率和胡须生长情况,每隔 1 2 年更换一次刀头。
4、如果在更换刀头后遇到任何问题,如剃须刀无法正常工作、剃须效果不佳等,请停止使用,并联系飞利浦售后服务中心寻求帮助。
通过以上步骤,您就可以成功更换飞利浦剃须刀的刀头了。
希望您每次使用都能感受到舒适和便捷。
祝您生活愉快,剃须顺心!。
飞利浦榨汁机1885型号拆解方案
1、先用双手将榨汁机上的两边搭扣攀出,就可以取出上盖了;
2、上盖取出后,就可以将整个集汁腔向上提,或者一边向上提,一边用手压住主机,就可以取出集汁腔了;
3、集汁腔取出后,滤网也会在集汁腔上了;这时可拆洗零件均拆出了;这些零件均可以放入水槽中清洗的,用刷子简单地刷几下就可以,只是清洗滤网时会比较费时;
4、清洗的时候,如果机身沾染果汁,可以使用软布擦拭干净,但是要注意刀网下面的连接器不要进水,以防损坏机器或者下次使用的时候漏电。
飞利浦s7788说明书拆解
某剃须刀使用说明:
在下剃须使用两种工具,剃刀和电动剃须刀。
剃刀使用前要用剃须膏,从袋中挤出一些,均匀涂在有须部位,片刻后开剃。
剃完,用毛巾擦干净后,涂爽肤水,可以缓解皮肤不适,还有一种类似松节油的味道,很好闻。
某利浦电动剃须刀怎么保养
分以下几个方面:1.电池保养:如果是充电式须刀,最好让里边的电池用完时,再充电。
也就是用完一次充电一次。
初次充电时,要在满电时间的基础上,多充电3到4个小时。
(1小时满电充4小时,8小时满电充12小时)如果是用电池的须刀,要注意电池的更换。
最好能在每次使用后把电池取出,防止电池漏液。
平时最好使用碱性电池。
2.须刀保养:主要是刀头部分,每次使用后把里边的胡须清理干净。
使用一到两个月后,把刀头打开,分享刀片刀网,然后用毛刷对刀头接触胡须和所有地方进行清刷,做到没有胡须为止。
这样能延长刀头的使用寿命,并保证使用效果。
3.其它最好要注意不要让刀头受到任何外部的挤压和受力,以免刀头变形。
平时不用时,要把刀头保护盖盖好。
不要摔打须刀,避免机身电线松掉或短路。
某利浦剃须刀充电完毕后有什么提示?
声音提示。
一、某利浦电动剃须刀使用方法:1、按一下开关按钮启动剃须刀,剃须刀的显示按钮将会亮起几秒钟的时间。
2、剃须刀启动之后,将剃须刀的刀头在皮肤上来回的做迂回运动。
3、剃须完成以后按下开关按钮关闭剃须刀的电源,显示屏将会亮起来几秒钟的时间,显示出剩余的电量。
二、使用剃须刀进行湿剃(用剃须泡沫或是剃须啫喱剃须)1、用水湿润一下皮肤。
2、在皮肤上涂上剃须泡沫或是剃须啫喱。
3、在水龙头上冲洗剃须刀头,保证剃须刀头能在你的面部顺畅滑动。
4、按下开关按钮启动剃须刀。
5、让剃须刀在你的面部做迂回运动。
6、使用完毕之后擦干你的脸,将剃须刀进行深层的清洁。
三、某利浦电动剃须刀使用注意事项:1、某利浦电动剃须刀头不转的话,先将刀头盖打开,启动后如果转动轮可以转动,就说明电机和传动基本没问题,一般是刀头没安装好而已。
2、重新试着安装一下刀头就好了。
多数是刀头没安装好时会出现这种情况。
某利浦剃须刀操作时间十分钟和三十分钟是什么意思?
操作时间指的是在面部剃须的时间。
一般来说,PHILIPS电须刀一次完成剃须的时间是二至三分钟左右,当然胡须特别多的人除外。
而如果是操作时间30分钟的须刀,一次充电后就可以用10次。
不过,准确来讲,说明书上写的操作时间一般都比30分钟长。
再加上个人的胡须状态和剃须习惯(有男士两三天剃一次)甚至有人充电一次可以使用两个月以上。
电动剃须刀由不锈钢网罩、内刀片、微型电动机和壳体组成。
网罩即固定的外刀片,上面有许多孔眼,
胡须可以伸入孔中。
微型电动机靠电能驱动,带动内刀片动作,利用剪切原理,将伸入孔中的胡须切断。
电动剃须刀可按内刀片的动作特点,分为旋转式和往复式两种。
所用电源有干电池、蓄电池和交流充电等。
某利浦剃须刀清洗器的清洗剂怎么使用?
首先要按下清洗仓释放钮,然后将高效能清洁系统从清洗仓上提起留下清洗仓,再把清洗液倒进清洗仓里面,同时卡如果首次使用的话先将清洁液注满清洗仓,不用加水,再把清洗仓插回原来的清洁器内,连上线插上电源,将剃须刀倒置放入清洁器再扣上就可以了。
【注意事项】1、剃须刀不使用时一定要罩刀头防护罩,这样可以避免尖锐的东西划伤刀网,也能在很大程度上避免跌落摔坏刀头。
所以说东西耐不耐用有时和使用习惯有很大关系。
2、从道理上讲,定时在刀网内表面涂抹少许润滑油,对于刀片保养是绝对有好处的。
关键还是要注意刀头和刀网一对一,别装反了最重要。
润滑的方法是:将一小滴油滴棉签上,然后用油棉签涂抹刀网内表面,需要注意的是油量不要过多,不流不干就行了。
3、定期清洗刀头组件,某利浦电动剃须刀,一般有全身水洗和不能水洗之分。
但无论全身水洗和是不能水洗的机子,刀头都是可以单独拆下来清洗的。
对于全身水洗的产品,不建议大家整机泡在水中清洗、热水冲洗,毕竟机身密封性随着使用年限增加会变差,有可能有轻微渗水的情况。
而是要在水龙头下冲洗。
4、建议经常清洗刀头,这样能防止刀头滋生螨虫,也能避免不必要的交叉感染,因为再贵再好的剃须刀也
避免不了在局部皮肤留下微小的伤口,而这些伤口很可能成为皮肤病菌入侵的方便之门,这也是为什么不建议多人共用剃须刀的原因。
5、无论干电池还是充电电池都存在自行放点的情况,干电池式剃须刀一般一周以上不适用时建议取出电池,以免电池电量流失后漏液;充电式剃须刀的蓄电池,在放置超过三个月以上时,要记得充电保养。
6、对于没有条件充电保养得,在长期放置以后,首次使用时一定要先充电再使用。
连续充电要按照产品上的充电时间充电,最长不得超过两天时间,不然会降低电池使用寿命。
电力不足时一定不要勉强使用,不然可能导致马达受损。
【刀头清洁小技巧】1、关于刀头拆卸。
一种是卡扣式的,没有按钮,直接卡住两边一用力就可以拔下来,某利浦两头的剃须刀大多数是这种结构。
2、另一种是插拔式的,有按钮,按钮按下去可以弹开刀头,露出胡渣仓,拆刀头时是需把折叠扣插入机身的簧片拔出。
某利浦全身水洗基本都是这种结构。
3、二是关于刀头组件分离,把中间旋钮逆时针旋转即可,三刀头和两刀头的原理一样。
4、组件拆开以后,刀片刀网一套一套放好,不乱装,定期把每套位置换一换以便均衡使用。
【组装注意事项】1、清洗晾干后,刀网内要上润滑油;然后就是组装了。
一是刀框的组装。
由于活动件是交叠在一起的,所以组装时要注意交叠处的正确咬合。
2、装刀片刀网。
首先是刀片刀网一对一,不乱装,其实是要注意:两头刀网上的边缘缺口要和刀框的凹槽对齐,以便刀架上的凸起卡住刀网,防止刀网旋转。
3、那么没对齐会有什么危害,对不齐虽然不影响刀架的安装,但刀网要与
刀片一起旋转半圈或者在惯性作用下旋转好多圈,一次没对齐没事,刀网转到一定位置会自己不转,但次次不对齐,一旦磨损了刀架的凸起,刀网旋转无法停止,只有换刀架了。
某利浦剃须刀充电完毕后有什么提示?
声音提示。
一、某利浦电动剃须刀使用方法:1、按一下开关按钮启动剃须刀,剃须刀的显示按钮将会亮起几秒钟的时间。
2、剃须刀启动之后,将剃须刀的刀头在皮肤上来回的做迂回运动。
3、剃须完成以后按下开关按钮关闭剃须刀的电源,显示屏将会亮起来几秒钟的时间,显示出剩余的电量。
二、使用剃须刀进行湿剃(用剃须泡沫或是剃须啫喱剃须)1、用水湿润一下皮肤。
2、在皮肤上涂上剃须泡沫或是剃须啫喱。
3、在水龙头上冲洗剃须刀头,保证剃须刀头能在你的面部顺畅滑动。
4、按下开关按钮启动剃须刀。
5、让剃须刀在你的面部做迂回运动。
6、使用完毕之后擦干你的脸,将剃须刀进行深层的清洁。
三、某利浦电动剃须刀使用注意事项:1、某利浦电动剃须刀头不转的话,先将刀头盖打开,启动后如果转动轮可以转动,就说明电机和传动基本没问题,一般是刀头没安装好而已。
2、重新试着安装一下刀头就好了。
多数是刀头没安装好时会出现这种情况。