MEGA5使用说明
- 格式:docx
- 大小:1.45 MB
- 文档页数:11

Rule your gaming empirewith minimalist styleMAG Codex X5 series gaming desktop is designed for entrygamers, features Intel processor and the latest NVIDIA RTXseries graphics card, providing the best gaming experience.Exclusive thermal solution with the best air cooling, promisethe longer system performance, RGB lighting effect designwith tempered glass, show off your personally gaming style,MSI MAG Codex 5 series will lead the players to conquer thewonderful battles.Selling PointsWindows 10 Pro FREE Upgrade to Windows 11*Up to Intel Core i9-11900K processorUp to MSI GeForce® RTX 3090 graphics cardBest air flow design to keep them at peak performanceDual side panel optional, choose your personal styleMystic Light RGB LED design to customize yourGaming PCEasy to upgrade - designed to upgrade yourcomponents with an easeHigh speed M.2 SSD, loading game in secondStandard component inside, keeping the system in thelatest statusUSB 3.2 Gen 2x2 with type C reversible designPicture and logosSystem I/O-Ports1.1x Headphones / 1x Microphone1x USB 3.2 Gen 1 Type C / 2x USB 3.2 Gen 1 Type A2.3.Flash BIOS button4.2x USB 2.0 Type A / 1x PS/2 Combo port5.1x HDMI out / 1x Display Port out6.2x USB 3.2 Gen 1 Type A / 2x USB 2.0 Type A7.1x USB 3.2 Gen 2x2 Type C / 1x USB 3.2 Gen 2 Type A/ RJ45 (2.5G LAN)8.2x WiFi Antenna9.6x Audio jacksSpecificationOperating Systems Windows Windows 10 Homeอัปเกรดเป็น Windows 11*Processor CPU model Intel Core i7-11700KF CPU Clock 3.6GHzCPU Cores8CPU TDP125WCPU Cache16 MB Intel® Smart Cache CPU Threads16CPU Cooling Liquid cooling 150WChipset Motherboard Chipset Z590Discrete Graphics VGA I/O Port HDMIx1, Display Portx3 Graphics Card GeForce RTX 3070 VENTUS 2X OC Graphics Card VRAM8GMemory Memory Capacity32GB(16GB*2) Memory Type DDR4 SDRAM Memory Speed1600(3200)MHz Memory Module Form Factor U-DIMM Memory Slot (Total/Free)4/2Memory Max Capacity Max 128GBStorage Total SSD Storage Capacity1TBTotal HDD Storage Capacity N/AM.2 Slot (1) Installed SSD1TB*1M.2 Slot (1) Interface PCIe GEN4x4 NVMe M.2 Slot (1) Form Factor M.2-2280 M-KEY M.2 slots (Total/Free)3/2HDD (1) RPM N/AHDD (1) Form Factor N/AHDD (1) Interface N/A3.5" Drive Bays (Total/Free)2/22.5" Drive Bays (Total/Free)2/2ODD(Type)N/AODD Height N/AODD Type N/ACommunications LAN Controller Intel I225-VWireless LAN Controller INTEL/AX210.NGWG.NV Wireless LAN standard802.11a/b/g/n/ac 2x2+BT Bluetooth Version 5.2Audio Audio Codec Realtek ALC897 Audio Support7.1 Channel HD AudioI/O Ports (Front)Thunderbolt N/A USB 5Gbps (USB 3.2 Gen 1 Type-A)2 USB 5Gbps (USB 3.2 Gen 1 Type-C)1 Audio Mic-In (Front)1 Audio-Out (Front)1I/O Ports (Rear)USB 20Gbps (USB 3.2 Gen 2x2 Type-C)1USB 20Gbps (USB 3.2 Gen 2x2 Type-A)1USB 5Gbps (USB 3.2 Gen 1 Type-A)2USB 480Mbps (USB 2.0 Type A)4LAN Ports (RJ45)1WiFi Antenna N/A HDMI™1x (v2.0) DP out1x (v1.4) PS/21Audio Jack Total (Rear)6Flash BIOS Button N/APower Rated Wattage750WEfficiency Rating80PLUS GOLD Form factor ATXPower Supply Type POWER SUPPLYIn The Box Keyboard Interface USBMouse Interface USBPower Cord1AC Adaptor N/A Warranty Card1Quick Guide4User Manual N/AVESA Mount kit N/A Keyboard Vigor GK30 US Mouse Clutch GM11Regulatory Compliance Storage Operating Temperature Range0° C ~ 35° C ; -20° C ~ 60° C Storage Operating Humidity Range0% ~ 85%;0% ~ 90%CertificationsFCC(Class B)CB/CEUL(CUL)BSMIVCCIRCM(C-Tick)Dimension & Weight Product Dimensions (WxDxH) (mm)195 x 514.8 x 466 Product Dimensions (WxDxH) (inch)7.68 x 20.27 x 18.35 Inside Carton Dimensions (WxDxH) (mm)N/AInside Carton Dimensions (WxDxH) (inch)N/AOuter Carton Dimensions Standard (WxDxH)(mm)611 x 351 x 645 Outer Carton Dimensions Standard (WxDxH)(inch)24.06 x 13.82 x 25.39 Weight (Net kg)TBDWeight (Gross kg)TBDProduct Volume (Liters)40Warranty Warranty36months Barcode Info EAN4719072807207。

Mega Video® G5 Installation Manual Models:1.2 Megapixel1080p•AV2215PM-S•AV2216PM-S3 Megapixel•AV3215PM-S•AV3216PM-S5 Megapixel•AV5215PM-S10 Megapixel•AV10215PM-S1. Do not attempt to service a damaged unit yourself. Refer all servicing to qualifiedservice personnel.2. Wiring methods shall be in accordance with the National Electrical Code/NFPA 70/ANSI, andwith all local codes and authorities having jurisdiction. Wiring should be UL ListedImage 1Image 2Compatible Remote Focus / Remote Zoom Lenses Lens DescriptionMPL2.8-8.5MPI 2.8-8.5mm, 1/3", f1.2 CS-mount, IR corrected, P-Iris, Motorized Zoom and Focus (for use with 1.2MP-3MP Arecont Vision cameras)3.3-8.5mm, 1/2.5", f1.3 CS-mount,Image 4Camera Power UpThis product should be installed by a qualified service technician in accordance withthe National Electrical Code (NEC 800 CEC Section 60) or applicable local code.1. Connect the camera to a PoE port on 100Mbps network PoE switch using an Ethernet cable asshown in Image 5.Image 52. Connect the PoE switch to your computer s network port using an Ethernet cable.NOTE: A yellow LED on the rear of the camera illuminates after a few seconds.•The flashing yellow LED indicates that a link to your computer has been established.• A green LED will blink when the camera has been accessed.LED Status DescriptionYellow Flashing Link has been established.Solid Normal Operation.None No connection.Green Flashing Camera has been accessed. Normal operation.Solid N/ANone No Connection.*************************Image 6Auxiliary PowerIf the camera is powered by a separate outside AC or DC power source, run the supplied power cable through the access hole on the camera housing and connect the power cable to the 2-position connector on the main camera board. The approximate location of the 2-position connector is circled in red below.Image 7*************************IPv4 – The IPv4 (IP version 4) is enabled by default and obtains the IP address automatically. Theaddress can be used to allow or block network traffic that matches a specified address or protocol. The IP address must be valid for the network. For more information, contact your network administrator orcall the Arecont Vision technical support hotline.IPv6 – A typical IPv6 (IP version 6) node address consists of a prefix and an interface identifier (total128 bits). The prefix is the part of the address where the bits have fixed values or are the bits thatdefine a subnet. A typical IPv6 address may resemble the following example: 2001:db8: :52:1:1. The IP address must be valid for the network. Before making changes to the IPv6 address, consult with yournetwork administrator or call the Arecont Vision technical support hotline.SD Card Set-up via Web InterfaceTo set-up the SD card via the web interface, open your preferred web browser and type the camera sIP address.NOTE: For supporting H.264 streaming on a webpage, the recommended browsers are InternetExplorer and Firefox.Image 8Scroll to the SD Card section as shown here:Image 9Page | 13Select one of the recording methods:•Continuous Recording to start continuously recording.•Stop Continuous Recording AND Enable Event-triggered Recording to enable events recording for network failure, motion alarm and/or I/O alarm trigger.The Start and End times are visible once the camera starts recording (see image below). The starttime represents the beginning time of the oldest recording.Image 10To playback recorded video:•Input the date and time of the desired video (must be set between the Start and End time).•Check the Playback SD card video checkbox to play the video.Playback tips:Video recorded to an SD card from an Arecont Vision camera can only be played back via anArecont Vision camera that has the same or lower resolution. Playback can not be viewed with anyother device. For example, video recorded to an SD card via a 10MP camera can be played backon a 3MP camera but a 3MP can not be played back on a 10MP model.•SD card must be inserted to any AV camera.Image 11Page | 14Image 12To enable recording to the SD card, select the desired camera and drag it to the workspace to open a view. From the window, select the SD card drop down menu. Choose:Image 13To launch the SD card playback window, click on theImage 14•Set play range to full span sets the playback range to the maximum available on the SD card.•Set playback range allows the user to input the playback date and time manually.•Export play exports an .avi file for playback on most media players.Page | 16 *************************Image 11Image 8Scroll to the Focus Tab section. Image 9。
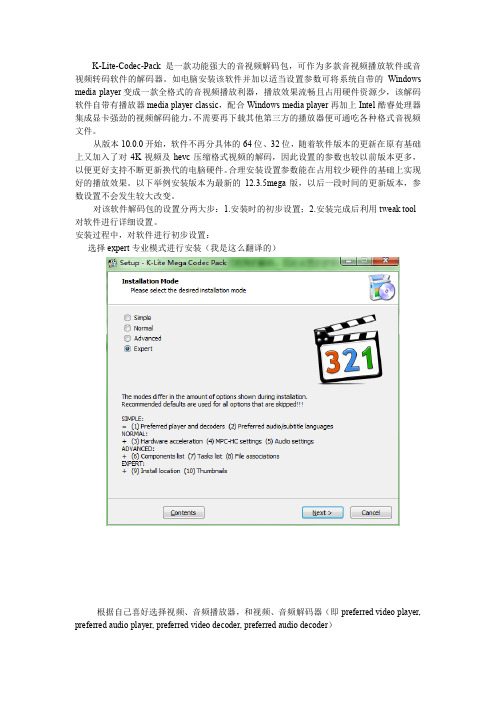
K-Lite-Codec-Pack是一款功能强大的音视频解码包,可作为多款音视频播放软件或音视频转码软件的解码器。
如电脑安装该软件并加以适当设置参数可将系统自带的Windows media player变成一款全格式的音视频播放利器,播放效果流畅且占用硬件资源少,该解码软件自带有播放器media player classic,配合Windows media player再加上Intel酷睿处理器集成显卡强劲的视频解码能力,不需要再下载其他第三方的播放器便可通吃各种格式音视频文件。
从版本10.0.0开始,软件不再分具体的64位、32位,随着软件版本的更新在原有基础上又加入了对4K视频及hevc压缩格式视频的解码,因此设置的参数也较以前版本更多,以便更好支持不断更新换代的电脑硬件。
合理安装设置参数能在占用较少硬件的基础上实现好的播放效果。
以下举例安装版本为最新的12.3.5mega版,以后一段时间的更新版本,参数设置不会发生较大改变。
对该软件解码包的设置分两大步:1.安装时的初步设置;2.安装完成后利用tweak tool 对软件进行详细设置。
安装过程中,对软件进行初步设置:选择expert专业模式进行安装(我是这么翻译的)根据自己喜好选择视频、音频播放器,和视频、音频解码器(即preferred video player, preferred audio player, preferred video decoder, preferred audio decoder)设置软件的安装位置(我选择安装在E盘)对软件自带播放器MPC—HC的初步设置(选择安装32位还是64位,也可以两者都安装)以及对一些格式音视频文件使用何种解码器的初步设置。
以上步骤完成后,点击next。
设置额外的选项,某些选项稍作改动。
然后点击next,进入解码策略选择页面,选择软件解码或是硬件解码。
笔者的本本是双显卡,用哪个显卡去进行硬件解码就由软件根据不同情况自己决定,虽然集成显卡玩游戏比较鸡肋,但对影音的解码能力还是不错的。

如何用MEGA和Clustalx构建进化树MEGA是一个关于序列分析以与比较统计的工具包,从3.1版本到后来的4.0版本一直都广为大家熟悉,现在推出了Mega5.0版本。
功能比以前多有改进。
现主要介绍使用Mega 5.0构建系统进化树的方法。
供大家参考。
用MEGA构建进化树有以下步骤:1、测序:将克隆扩增测序得到的16S rDNA序列进行测序。
2、NCBI上做Blast/blast/Blast.cgi找到相似度最高的几个序列,确定一下你分离的细菌大约属于哪个科哪个属,如果相似度达到百分之百那基本可以确定你分离得到的就是Blast到的那个,然后寻找相似性最高的细菌,通常把该属的序列(Fasta格式文件)下载下来,或点击GenBank登录号,复制FSATA 格式,整合在一个*.txt文档中(单独建立一个文件夹存放,后面的很多文件会自动装入该文件夹),如>#### AGGCTTAACACATGCAAGTCGAGCGGAGCGAGGGTGCTTGCACCTTAGCTTAGCGGCGGACGGGTGAGTAATGCTTAGG AATCTGCCTATTAGTGGGGGACAACATTCCGAAAGGAATGCTAATACCGCATACGCCCTACGGGGGAAAGCAGGGGATC TTCGGACCTTGCGCTAATAGATGAGCCTAAGTCGGATTAGCTAGTTGGTGGG>gi|289469964|gb|GU388381.1| Acinetobacter tandoii strain DSM 14970 16S ribosomal RNA gene, partial sequence ACTTAGCGGCGGACGGGTGAGTAATGCTTAGGAATCTGCCTATTAGTGGGGGACAACATTCCGAAAGGGATGCTAATAC CGCATACGCCCTACGGGGGAAAGCAGGGGATCTTCGGACCTTGCGCTAATAGATGAGCCTAAGTCGGATTAGCTAGTTG GTGGGGTAAAGGCCTACCAAGGCGACGATCTGTAGCGGGTCTGAGAGGATGA………………………….参考序列选择须知:1、不选非培养(unclutured)微生物为参比;2、不选未定分类地位的微生物,最相近的仅作参考;c,在保证同属的前提下,优先选择16S rDNA全长测序或全基因组测序的种;d,每个种属选择一个参考序列,如果自己的序列中同一属的较多,可适当选择两个参考序列。

MEGA软件的使用Mega是一款操作十分简便的遗传学分析软件,其界面十分友好,即使初学者也很易上手。
1、数据的录入及编辑Mega软件能够接受多种数据格式,如FASTA格式、Phylip格式、PAUP数据格式等等。
而且Mega软件专门提供了把其他格式的数据转换位Mega数据格式的程序。
首先,打开Mega程序,有如下图所示的操作界面:单击工具栏中的“File”按钮,会出现如下图所示的菜单:从上图可以看出,下拉菜单有“Open Data”(打开数据)、“Reopen Data”(打开曾经打开的数据,一般会保留新近打开的几个数据)、“Close Data”(关闭数据)、“Export Data”(导出数据)、“Conver To MEGA Format”(将数据转化为MEGA 格式)、“Text Editor”(数据文本编辑)、“Printer Setup”(启动打印)、“Exit”(退出MEGA程序)。
单击“Open Data”选项,会弹出如下菜单:浏览文件,选择要分析的数据打开,单击“打开”按钮,会弹出如下操作界面:此程序操作界面,提供了三种选择数据选择:Nucleotide Sequences(核苷酸序列)、Protein Sequences(蛋白质序列)、Pairwise Distance(遗传距离矩阵)。
根据输入数据的类型,选择一种,点击“OK”即可。
如果选择“Pairwise Distance”,则操作界面有所不同;如下图所示:根据遗传距离矩阵的类型,如果是下三角矩阵,选择“Lower Left Matrix”即可;如果是上三角矩阵,选择“Upper Right Matrix”即可。
点击“OK”按钮,即可导入数据。
如果是核苷酸数据,则读完之后,会弹出如下对话框:如上图,如果是编码蛋白质的核苷酸序列,则选择“Yes”按钮;如果是不编码蛋白质的核苷酸序列,则点击“No”按钮。
之后,会弹出如下操作窗口:此作界面的名称是“Sequence Data Explorer”,在其最上方是工具栏“Data”、“Display”、“Highlight”等,然后是一些数据处理方式的快捷按钮,在操作界面的左下方是每个序列的名称。

1MEGA软件——系统发育树构建方法(图文讲解)22012年12月02日⁄Evolution⁄字号小中大⁄评论 3 条⁄阅读 3,872 3次[点击加入在线收藏夹]4一、序列文本的准备5构树之前先将目标基因序列都分别保存为txt文本文件中(或者把所有序列6保存在同一个txt文本中,可以用“>基因名称”作为第一行,然后重起一行编7辑基因序列),序列只包含序列字母(ATCG或氨基酸简写字母)。
文件名名称8可以已经您的想法随意编辑。
910111213二、序列导入到Mega 5软件14(1)打开Mega 5软件,界面如下151617(2)导入需要构建系统发育树的目的序列1819202122OK23选择分析序列类型(如果是DNA序列,点击DNA,如果是蛋白序列,点击24Protein)252627出现新的对话框,创建新的数据文件282930选择序列类型313233导入序列34353637383940导入序列成功。
41(3)序列比对分析424344点击工具栏中“W”工具,进行比对分析,比对结束后删除两端不能够完全对45齐碱基464748(4)系统发育分析495051关闭窗口,选择保存文件路径,自定义文件名称525354三、系统发育树构建555657根据不同分析目的,选择相应的分析算法,本例子以N—J算法为例585960Bootstrap 选择1000,点击Compute,开始计算616263计算完毕后,生成系统发育树。
646566根据不同目的,导出分析结果,进行简单的修饰,保存67本方法来自网络,经小编microibs编辑,修改补充,如果转载请注明PLoB 68出处。
69。
MEGA5: Molecular Evolutionary Genetics Analysis西北农林科技大学生物信息学中心 Maoyuanhui@1. 序列格式序列格式指的是序列存储是所遵循的规范。
生物信息学常见的用于进化分析的序列格式有:FASTA, PAUP, PHYLIP, GCG, PIR 等。
其中前三种最为常用。
FASTA 格式(文件名一般用fa, fasta, fas 等后缀名标示):PAUP 格式(文件名一般用nexus, nex 等标示):其中ntax指明了五种的数量,nchar表示比对后序列的长度,missin指的是如果序列中存在位置位点,用?表示,symbols(本行可以没有)指的是序列中包含的字符,interleave表示序列是否换行,如果写成interleave=no 则表示每个物种的序列都只占一行而不换行。
Datatype表示序列的类型,gap表示序列中插入缺失位点用‘-’表示。
整个文件末尾以分号(”;”)结束。
PHYLIP格式(后缀名一遍用phy标示)第一行指明物种数量和序列长度,序列可分行或者不分行输出。
需要注意的是PHYLIP格式物种名不能超过十个字符,超出部分将被自动舍弃。
2.使用MEGA进行进化分析进化分析的核心观念是:决定结果好坏的不是软件或者分析使用的方法,而是序列的质量。
1)准备数据从数据库上下载一组同源序列,要求序列长度(核酸)在500-1500之间,物种数目在10-20之间,比对后序列插入缺失比例不超过20%。
把数据保存为FASTA格式。
MEGA可以识别多种序列格式。
其中如果是没有比对的序列,最好使用FASTA格式。
如果是必读后的序列,可以使用PHYLIP或者FASTA,MEGA 会自动转换序列格式。
另外需要说明的是MEGA分析需要的序列格式是MAS或者MEG,其他的格式会提示自动转换。
2)序列比对(如果是已经比对好的序列可跳过次步骤)点击Align->Edit/Build a Alignment,出现对话框有三个选项,如果你手头有比对好的mas格式的文件,选择第二个选项,Open a saved alignment session,否则,选择1(创建新的比对)或3(从文件输入序列)。
前言谢谢您购买这款相机。
它可以满足您所有的数码照片处理需要。
本相机具有多种拍照、电影及音频功能供您运用;同时有可程序曝光,光圈先决,快门先决,手动曝光等模式可供您对光圈或快门进行调整后拍照。
这款多功能相机设计精美,可以提供536万像素的优质图像以及24倍的精确变焦(3倍光学变焦和8倍数码变焦)。
内置的32 MB内部存储器可以存储图像、视频剪辑和音频文件;它采用自动对焦镜头, 支持10cm到50cm的微距模式。
一般情况下, 它可以在50cm到无穷远的范围内拍照. 通过USB线连接, 可以方便地将照片从相机传送到计算机。
它还具有TV-输出功能, 通过A V线, 可以利用电视显示对相机进行操作。
为充分发挥本相机的性能, 我们强烈建议您在操作相机之前仔细阅读本手册。
- 1 -目录前言 (1)目录设置 (3)打开相机包装 (3)相机部件 (4)装入电池和SD卡 (5)基本设置 (6)格式化内部存储器 / SD卡 (6)基本操作步骤 (7)开机/关机 (7)基本拍摄 (7)自动对焦功能 (8)放大 / 缩小 (8)查看照片 (8)快速删除照片 (8)基本功能按钮 (9)主要模式与使说明 (11)拍照模式 (12)播放模式 (15)PASM模式 (18)连拍模式 (21)电影模式 (22)音频模式 (23)设置模式 (24)连线操作 (29)安装软件 (29)通过USB来连接 (30)通过电视输出连接 (30)附录 (31)- 2 -- 3 -设置本数字相机的设置快速又简单。
请按照以下步骤操作, 你便可迈上无限想象的数字摄影之旅.打开相机包装1. 取出包装盒里面的所有物品。
(建议你妥善保存包装盒与包装材料, 以备将来需要。
2. 请仔细检查是否包含下列物品:光盘 相机袋 Mini USB 线相机A V 线电池挂绳手提带入门指南- 4 -相机部件麦克风对焦辅助 / 自拍LED闪光灯镜头放大/缩小按钮 对焦模式按钮删除 / 闪光灯按钮 状态LED 4向键 菜单按钮快门模式表盘 扬声器电池门 (电池和SD 卡)连接口 (USB 和TV-输出) 设置- 5 -装入电池和SD 卡本相机共使用两颗AA 碱性电池。
MEGA软件——系统发育树构建方法(图文讲解)
2012年12月02日⁄Evolution⁄字号小中大⁄评论 3 条⁄阅读 3,872 次[点击加入在线收藏夹]
一、序列文本的准备
构树之前先将目标基因序列都分别保存为txt文本文件中(或者把所有序列保存在同一个txt文本中,可以用“>基因名称”作为第一行,然后重起一行编辑基因序列),序列只包含序列字母(ATCG或氨基酸简写字母)。
文件名名称可以已经您的想法随意编辑。
二、序列导入到Mega 5软件
(1)打开Mega 5软件,界面如下
(2)导入需要构建系统发育树的目的序列
OK
选择分析序列类型(如果是DNA序列,点击DNA,如果是蛋白序列,点击Protein)
出现新的对话框,创建新的数据文件
选择序列类型
导入序列
导入序列成功。
(3)序列比对分析
点击工具栏中“W”工具,进行比对分析,比对结束后删除两端不能够完全对齐碱基
(4)系统发育分析
关闭窗口,选择保存文件路径,自定义文件名称
三、系统发育树构建
根据不同分析目的,选择相应的分析算法,本例子以N—J算法为例
Bootstrap 选择1000,点击Compute,开始计算
计算完毕后,生成系统发育树。
根据不同目的,导出分析结果,进行简单的修饰,保存
本方法来自网络,经小编microibs编辑,修改补充,如果转载请注明PLoB出处。