JLK65-70Z使用说明书
- 格式:doc
- 大小:46.00 KB
- 文档页数:4
ZH系列一体机用户手册(ZH-HMI70)在安装、运行、维护、检查可编程控制器之前,请务必熟读该使用说明书以及相关的所有附带资料,正确使用。
请在熟悉了所有设备的相关知识、安全信息,以及注意事项后使用。
在该说明书中,用【危险】和【注意】对安全注意事项进行等级区分。
此外,即使是【注意】中记载的事项,因具体情况不同,也可能带来严重的后果。
由于记载的都是重要的内容,所以务必遵守。
此外,请妥善保管好产品中附带的使用说明书,以便需要时可以取出阅读,并且必须将其交至最终使用者手中。
1.设计方面的注意事项【危险】:错误使用时,会引起危险,有可能导致死亡,或是受到重伤的情况下。
【注意】:错误使用时,会引起危险,有可能受到中度的伤害或受轻伤的情况下,以及可能产生物质损失的情况下。
2.在安装方面的注意事项3.接线方面的注意事项4.启动、维护时的注意事项5.废弃时注意事项目录1.概述 (7)1.1.基本构造 (7)1.2.安装尺寸图 (8)1.3.型号命名 (8)1.4.编程软件 (9)1.4.1.HMI编程软件 (9)1.4.2.PLC编程软件 (10)1.5.规格参数 (11)1.5.1.一般规格 (11)1.5.2.HMI性能规格 (12)1.5.3.PLC性能规格 (12)2.单元端子和外部布线 (15)2.1.单元端子排列 (15)2.2.输入规格和外部布线 (15)2.3.输出规格和外部布线 (18)2.4.选件规格和外部布线 (19)2.4.1.模拟量输入 (19)2.4.2.模拟量输出 (20)2.4.3.温度模块 (21)2.4.4.RS485模块 (22)3.特殊软元件 (22)4.指令一览表 (32)1.概述ZH系列一体机是一款性价比超值的一体机。
其中的PLC部分,它兼容FX2N的全部基本指令和常用功能指令,还兼容三菱FX1N/1S的定位指令,完全可以替代三菱FX2N/FX1N/FX1S。
1.1.基本构造A:输入端X B:温度和模拟量C:输出端Y D:USB从站口,HMI下载用E:USB主站口,传输程序用F:COM0,PLC编程用G:COM1,PLC扩展通讯口H:电源输入I:模拟量输出J:指示灯1.2.安装尺寸图单位:毫米产品尺寸:正面:211x143 背面:190x136 厚度:52(未包含接线厚度) 开孔尺寸:192x138固定栓孔:上下左右各2个固定栓孔1.3.型号命名●型号名称构成中①~④表示一下的规格,括号内代表选装。

嘉陵jh70型摩托车(一)技术规格1.尺寸及重量全长 1800mm 全宽 750mm 全高 1010mm 轴距 1175mm 最小离地间隙 135mm 自重 79kg 2.发动机型式风冷四冲程顶置式汽油机气缸排列型式单缸倾斜80°缸径×行程 47mm×41.4mm 总排量 71.8ml 压缩比8.8:1 润滑油容量 0.8l 3.传动装置离合器湿式多片式变速器 4档变速初级减速比 3.722 传动比一档 3.272 二档 1.937 三档 1.350 四档 1.043 末级减速比 2.9284.车体车架型式背脊式前悬挂装置可伸缩式前叉(可移动行程87.5mm) 后悬挂装置摇臂式(可移动行程66mm)前轮胎规格/压力 2.25一17—4pr/180kpa 后轮胎规格/压力 2.50一17—6pr/220kpa 双人乘骑274kpa 前制动内胀式后制动内胀式油箱容量 8.4l 备用油量 1.4l 5.电气系统点火系统飞轮磁电机电子点火蓄电池容量 6v 4a·h 保险丝 7a 火花塞日本型号 ngk g7hsa nd u22fs-u 中国型号1136或1137 篇二:lr70使用说明书lr-70激光探测器使用说明书***电子有限公司非常感谢您使用lr-70激光探测器。
在操作之前请仔细阅读此说明书,以便正确使用。
目录1.仪器概述 (1)2.技术规格 (2)3.操作指南 (3)4.标准配件 (6)5.联系方式 (7)1.仪器概述1.1 仪器特征-中文名称:激光投线仪专用探测器 (接收器)-英文名称:line laser detector -主机型号:lr-701 104(1)水平标示水泡 (8)上指示灯 (13)划线槽(2)探测窗 (9)中间指示灯 (14)垂直标示水泡(3)零位指示红线 (10)下指示灯(4)电源指示灯 (11)固定螺纹孔(5)开机/关机键 (12)电池盖(6)声音选择键(7)蜂鸣器1.2 主要用途当激光投线仪器在室外或远距离工作时,人眼不能清楚的观察到激光信号。

CODE 50071ASSEMBLY M a c h i n e A s s e m b l y a s s e m b l y (r e a r s i d e )PAGE NAMECODE NO.: K NO.: FIGURE NO.:A B 50068 K14013-1 POWERTEC 280C PRO 1 1 50069 K14014-1 POWERTEC 350C PRO 2 1 50070 K14015-1A POWERTEC 420C PRO 3 2 50071K14015-1WPOWERTEC 420C PRO W43FIGURE A: Machine assemblyItem Description part numberQTY1 2 3 4 1 MAIN TRANSFORMER T1 B-4247-486-2R 1 X - - - 2 MAIN TRANSFORMER T1 B-4247-484-2R 1 - X - - 3 MAIN TRANSFORMER T1 B-4247-485-2R 1 - - X X 4 CHOKE L1 C-4244-383-2R 1 X - - - 5 CHOKE L1 C-4244-383-4R 1 - X X X 6 RECTIFIER SET V1 1156-112-069R 1 X - - - 7 RECTIFIER SET V1 1156-112-070R 1 - X - - 8RECTIFIER SET V1 1156-112-071R1--XX9 FAN M1 1111-311-081R 1 X X - -10 FAN M1 0874-111-002R 1 - - X X11 AUXILIARY TRANSFORMER T2 C-4244-384-1R 1 X X X X12 CONTROL P.C BOARD G4560 C-3731-399-2R 1 X X X X13 CONTROL P.C BOARD US-67 0918-432-068R 1 X X X X14 CONTROL P.C BOARD PD-5 0918-432-073R 1 X X X X15 RECTIFIER SET V2 1156-112-044R 1 X X X X16 CONTACTOR K1 1115-212-177R 1 X - - -17 CONTACTOR K1 1115-212-178R 1 - X - -18 CONTACTOR K1 1115-212-179R 1 - - X X19 GAS VALVE K2 0972-423-012R 1 X X X X20 CAPACITORS C1,C2,C3 1158-121-010R 3 X X X X21 CAPACITOR C4 1158-121-045R 1 X X - -22 CAPACITOR C4 1158-121-001R 1 - - X X23 VOLTAGE SWITCH S2 1115-260-166R 1 X - - -24 VOLTAGE SWITCH S2 1115-260-073R 1 - X X X25 VOLTAGE SWITCH S1 1115-260-167R 1 X - - -26 VOLTAGE SWITCH S1 1115-260-074R 1 - X - -27 MAIN SWITCH S3 1115-270-019R 1 X X X X28 SWITCH S7 1158-650-021R 1 X X X X29 SWITCH S6 1158-650-022R 1 X X X X30 LAMP H1 0917-421-024R 1 X X X X31 SWITCH S4,S5 1115-299-052R 2 X X X X32 POTENTIOMETERS R11,R12 1158-113-304R 2 X X X X33 KNOB 9ET10491R 1 X X X X34 KNOB 9ET13639-3R 4 X X X X35 FEEDING UNIT (complete) C-6713-007-1R 1 X X X X36 EURO SOCKET (outlet guide) C-2985-006-1R 1 X X X X37 SLEEVE 0744-000-192R 1 X X X X38 SOCKET X2,X3 C-2986-001-2R 2 X X X X39 SHUNT B1 0941-712-026R 1 X X X X40 FERRITE TUBE 1158-290-036R 1 X X X X41 FUSE F1 1158-660-006R 1 X X X X42 TURNING WHEEL 1029-660-127R 2 X X X X43 WHEEL 1029-660-250R 2 X X X X44 HINGE 0654-610-004R 5 X X X X45 EDGE SHIELD 1362-212-010R 1 X X X X46 LEFT HOLDER 1362-212-002R 1 X X X X47 RIGHT HOLDER 1362-212-003R 1 X X X X48 EURO SOCKET (insulator) 1362-212-009R 1 X X X X49 CAP 1362-212-004R 2 X X X X50 LEFT SIDE HANDLE ASSEMBLY 1362-212-006R 1 X X X X51 RIGHT SIDE HANDLE ASSEMBLY 1362-212-007R 1 X X X X52 SMALL FLAP 1362-212-001R 1 X X X X53 GAS HOSE -2m D-5578-174-1R 1 X X X X54 GROUND CABLE with WORK CLAMP -3m K14011-1 1 X - - -55 GROUND CABLE with WORK CLAMP -3m K14018-1 1 - X - -56 GROUND CABLE with WORK CLAMP -3m K14019-1 1 - - X X57 QUICK CONNECT COUPLING (ONLYWATER)0744-000-151R 4 - - - X58 FRONT PANEL C-3721-828-1/08R 1 - X X X59 FRONT PANEL C-3721-828-2/08R 1 X - - -60 LEFT SIDE PANEL WITH LABELS C-3721-836-1R 1 X - - -61 LEFT SIDE PANEL WITH LABELS C-3721-836-2R 1 - X - -62 LEFT SIDE PANEL WITH LABELS C-3721-836-3R 1 - - X -63 LEFT SIDE PANEL WITH LABELS C-3721-836-4R 1 - - - X64 RIGHT SIDE PANEL WITH LABEL D-3721-392-4R 1 X - - -65 RIGHT SIDE PANEL WITH LABEL D-3721-392-5R 1 - X - -66 RIGHT SIDE PANEL WITH LABEL D-3721-392-6R 1 - - X X67 LEFT SIDE PANEL D-3721-401-1/33R 1 X X X X68 RIGHT SIDE PANEL C-3721-814-2/33R 1 X X X X69 REAR PANEL C-3721-827-1/08R 1 X X X X70 TOP PANEL D-3773-044-2R 1 X X X X71 FRONT LABEL 2719-107-086R 1 X - - -72 FRONT LABEL 2719-107-087R - X X X73 POWER RESISTOR R1 1158-112-012R X - - -74 POWER RESISTOR R1 1158-112-008R - X X XFIGURE B: Machine assembly (rear side)Item Description part number QTY 1 2 31 HANDLE 0562-230-005R 1 X X X2 GAS INLET SOCKET D-1891-135-1R 1 X X X3 MAINS CORD whitout PLUG -5m (4x4mm²) D-5578-171-2R 1 X - -3 MAINS CORD whitout PLUG -5m (4x6mm²) D-5578-171-3R 1 - X X4 CIRCUIT BREAKER Q1 (ONLY WATER) 1115-299-027R 1 - - X5 SOCKET X16 (ONLY WATER) 1131-222-004R 1 - - X6 WATER COOLER (ONLY WATER) K10329 1 - - X7 COOLER BRACKET (ONLY WATER) D-2632-641-1/33R 1 - - XFigure C: Feeding Unit AssemblyItem Description part number QTY 1 WIRE FEEDER COMPL. 0744-000-165R 1 X1 FEED PLATE 0646-233-002R 1 X2 FIXING ARM COMPL. 0646-233-015R 2 X3 INLET GUIDE 0646-233-025R 1 X4 AXIS PRESSURE ARM 0646-233-003R 2 X5 SPRING PRESSURE ARM 0646-233-013R 2 X6 PRESSURE ARM COMPL.L 0646-233-007R 1 X7 INTERMEDIATE GUIDE 0646-233-023R 1 X8 AXIS DRIVE ROLL 0646-233-020R 2 X9 GEAR WHEEL ROLL 0646-231-090R 2 X10 GEAR WHEEL MOTOR 0646-233-028R 1 X11 FIXING CAP 0744-000-190R 2 X12 METAL COVER 0646-233-027R 1 X13 PRESSURE ARM COMPL.R 0646-233-005R 1 X14 MOTOR -28V 1111-722-047R 1 X15 WOODRUFF KEY 0646-231-102R 1 X。
清洗机使用说明书 自动清洗机说明书All rights reserved未经可,不得翻印Page 1 of 16 自动清洗机使 用说明书纳金 Nanometals 使用说明书 Operrating InstructionsNJ-QXJ-001 自动清洗机(工业用途) Automatic Cleaning Machine (Industial)感使用纳金科技清洗机产品 在安装、使用与维修前请仔细阅读本手册以期发挥最佳性能并维护安全All rights reserved未经可,不得翻印Page 2 of 16 自动清洗机使 用说明书目录●安全注意事项 ●重要信息●清洗机主要规格参数 ●零部件名称和附图说明 ●显示屏附图说明及含义 ∙主界面 ∙手动画面 ∙参数设置 ●使用步骤 ∙触膜屏的设置 ∙锥形瓶的固定 ∙启动程序 ∙其他面 ●维护及保养All rights reserved未经可,不得翻印Page 3 of 16 自动清洗机使 用说明书安全注意事项●启动机器前,必须穿实验服,戴手套,带口罩,带上护目眼镜 (否则可能会导致轻微中毒,灼伤皮肤和眼睛) ●禁止将头伸入,通风橱里的机器中,以免发生意外 (否则可能会导致轻微中毒,或者头部会被夹伤) ●启动机器前,必须将通风橱的开关打开(否则可能会导致有害气体不能够及时排出,人体接触会轻微 腐蚀和中毒)●请把放锥形瓶的槽格都装满,装满后务必把固定盖板合上 (否则可能会导致部分强酸强碱,溅出水槽以外,腐蚀部分零 件,机器寿命变短)●禁不戴手套直接用手触碰固定盖板 (否则可能会导致触碰的部位被轻微腐蚀) ●在机器运行时禁将通风橱中的开关断开(否则可能会导致清洗中的有害气体不能及时排出实验室外) ●在机器运行时,出现紧急情况,立即断开电源 (否则可能会导致冒烟、起火、触电或腐蚀)All rights reserved未经可,不得翻印Page 4 of 16 自动清洗机使 用说明书若工作中出现以下异常或故障 ∙喷头结构没有正常的上或下移动 ∙长形喷头没有正常的喷出液体 ∙旋转放置机构没有正常的左右翻转 ∙排液时电磁阀没有按照设定次序打开排液管 ∙电磁阀出现异常,不能止水或同时打开 ∙光电感应器异常亮起 ∙存在其他异常情况或故障请立即按掉显示屏上的“停止”开关,上述任一情况若依 然存在异常则立即按掉总电源,并与客户咨询服务中心联系进 行检查和修理。
®Model 65Infrared ThermometerOhjevihko JohdantoFluke Model 65 Infrared Thermometer (“lämpömittari”) on laserosoittimella varustettu kosketukseton lämpömittari.Lämpömittari määrittää lämpötilan mittaamalla kohteen pinnansäteilemän infrapunaenergian määrän.Kosketuksetonta lämpömittaria voidaan käyttää pintalämpötilojen mittaamiseen kohteissa, joiden lämpötilamittaukset eivät onnistu tavanomaisilla, pintaa koskettavilla mittaustavoilla (esimerkiksi liikkuvat osat, jännitteelliset pinnat ja vaikeasti luokse päästävät kohteet).Pakkauksen sisältöLämpömittari, kantokotelo, kantolaukku, 2 AA-alkaliparistoa (ei asennettu), Pikaohjekortti, Rekisteröintikortti, takuutiedot ja CD-ROM-levy, joka sisältää käyttäjän täydellisen dokumentaation. Yhteydenotto FlukeenOta yhteys Flukeen soittamalla:U.S.A.: 1-888-99-FLUKE (1-888-993-5853)Kanada: 1-800-36-FLUKE (1-800-363-5853)Eurooppa: +31 402-675-200Japani: +81-3-3434-0181Singapore: +65-738-5655Missä tahansa maailmassa: +1-425-446-5500Tai vieraile Fluken webbisivuilla osoitteessa: .(Finnish) January 1999, Rev.1, 9/02© 1998,2002 Fluke Corporation, All rights reserved.W VaroitusVältä henkilövahingot:Vaara – muut kuin tässä ohjevihossa mainituttoimintatavat saattavat johtaa altistumiseenvaaralliselle valosäteille.Älä katso lasersäteeseen tai kohdista sädettäsilmiin.V aaraVältä mittarin vaurioituminen ja väärät mittaustulokset:Älä pudota lämpömittaria äläkä altista sitävoimakkaille iskuille.Älä käytä lämpömittaria vahvojen sähkö- taimagneettikenttien läheisyydessä.Älä kosketa mitattavaa kohdetta lämpömittarilla.Jos mitattavan kohteen säteilykerroin ei ole0.95, lämpömittari saattaa ilmoittaatodellisuudesta poikkeavan lämpötilan. (Katsokohtaa “Säteilykerroin”.)Pidä lämpömittari käytön ja varastoinnin aikana loitolla suorasta auringonvalosta tai muistavoimakkaista valonlähteistä, kuumista esineistä(70 o C / 158 o F), korkeista lämpötiloista,suuresta kosteudesta tai pölyisistä oloista.Älä altista lämpömittaria äkillisillelämpötilavaihteluille. Anna lämpömittarinpalautua vakaaseen lämpötilaan ennenmittausten tekemistä.Älä kosketa lämpömittarin linssiä.Lämpömittarin linssi saattaa huurtuasiirrettäessä mittaria nopeasti kylmästälämpimään ympäristöön. Anna huurteen kuivua ennen mittausten tekemistä.PainikkeetPainike Kuvaus/Pidä / painettuna näyttääksesi mitattavan kohteenpintalämpötilan. Lämpömittari nollaa mahdollisettaltioidut maksimi- ja minimilukemat. Laserosoitinkytkeytyy päälle ainoastaan, jos laserin kytkin onpäällä.Painettaessa / näyttöön tulee 00000.Vapauta / lopettaaksesi lämpötilamittauksen jakytkeäksesi laserin pois päältä. Näyttöön jää tuoreinlämpötila-arvo ja + 20 sekunnin ajaksi. Tämänjälkeen näyttö sammuu..Paina . näyttääksesi lämpötilan maksimiarvon.Näyttöön tulee teksti MAX.Paina . toistamiseen näyttääksesi lämpötilanminimiarvon. Näyttöön tulee teksti MIN.Paina . kolmannen kerran kytkeäksesi tämäntoiminnon pois päältä.-Pidä - painettuna 1 sekunnin ajantaltioidaksesi näytössä olevan lämpötila-arvon.Näytöllä vilkkuu TEMP MEM 5 kertaa – tälläilmoitetaan, että taltiointi onnistui.Paina - näyttääksesi taltioidun lämpötilan.Näyttöön tulee teksti TEMP MEM. Paina -uudelleen kytkeäksesi tämän toiminnon pois päältä. ,Paina , vaihtaaksesi o C ja o F välillä.Lämpömittari herää mittausvalmiuteen mitä tahansakolmea ylintä painiketta painamalla.Mittaustarkkuuden varmistaminenSäteilykerroinSäteilykerroin on 0 ja 1 välillä oleva arvo, joka osoittaa kohteen kykyä heijastaa infrapunaenergiaa. Säteilykertoimeen vaikuttavat etupäässä kohteen koostumus ja pinnan viimeistely. Kiillotetun, hapettumattoman metallipinnan säteilykerroin on lähes 0; himmeän, mustan pinnan säteilykerroin on taas lähes 1. (Katso lukua “Yleisimpien materiaalien säteilykertoimet”.)Lämpömittarin herkkyys on tehtaalla asetettu säteilykertoimen arvoon 0.95. Jos mitattavan kohteen säteilykerroin ei ole 0.95, mittarin näyttöön tuleva lämpötila saattaa poiketa todellisesta pintalämpötilasta. Voit vähentää tätä virhettä tummentamalla mitattavan kohteen pintaa mustalla teipillä, mustalla mattamaalilla tai mustalla huopakynällä (jos tämä on turvallista tehdä) ja mittaamalla sitten lämpötila tästä tummennetusta pinnasta.Optinen resoluutioOptinen resoluutio (jota kutsutaan myös “näkökentäksi” tai “mittausalueen etäisyyssuhteeksi”) on lämpömittarin etäisyyden (mitattavan kohteen pinnasta) ja mittausalueen (mittausympyrän koon) suhde. Mitä lähempänä lämpömittari on mitattavan kohteen pintaa, sitä pienempi on mittausympyrän koko. Laserin “jälki” ei ola sama kuin mittausympyrän koko. (Katso kohtaa “Laserin suuntaus”.)Lämpömittarin optinen resoluutio on 8:1:Mittausalueen minimikoko on 25 mm (1 tuumaa) – tätä vastaava etäisyys mitattavasta kohteesta on 200 mm (8 tuumaa).Siirtämällä mittaria lähemmäksi ei voi enää mitata tätäpienempää aluetta.Näyttöön tuleva lämpötila on mittausalueen lämpötilojen keskiarvo. Kuumat pisteet saattavat hukkua mittauksessa, jos mittausalue on liian suuri. Tuo mittari niin lähelle kuin mahdollista, mutta ei kuitenkaan lähemmäksikuin 200 mm (8 tuumaa).Laserin suuntausLasersäde on 18 mm (0.75 tuumaa) sivussa linssistä. Valitse tarpeeksi suuri mittausalue ottaen huomioon tämä mitta.PintalämpötilatLämpömittari mittaa lämpötilan ensimmäisestä edessään olevasta pinnasta, olipa se sitten lasikehys, pölyä taisumuhöyryä. Varmista, että mitattavan kohteen pinta ei ole peitossa.Lämpötilojen mittaaminenLue luku “Mittaustarkkuuden varmistaminen” ennen mittausten aloittamista. Tarkasta, että paristot on asennettu ja että laserin kytkin on päällä. (Katso lukuja “Paristojen asentaminen” ja “Kytkimien asetukset”.)Tee mittaukset seuraavasti:1. Jos mitattavan kohteen säteilykerroin poikkeaa arvosta 0.95,tummenna pintaa mustalla teipillä, mustalla mattamaalilla tai mustalla huopakynällä, jos tämä on turvallista tehdä. (Katso lukua “Yleisimpien materiaalien säteilykertoimet”.)2. Suuntaa lämpömittari mitattavaan kohteeseen.3. Paina /ja suuntaa lasersäde mitattavan alueenkeskipisteeseen. Mitattu lämpötila tulee lämpömittarinnäyttöön.Mittausalueen ylittävät lämpötilatNäyttöön tulee ilmoitus, jos mitattava lämpötila ylittäälämpömittarin mittausalueen. Kun tuot näyttöön mittausalueen ylittävän lämpötilan, näyttöön tulee teksti “Lo” ja “Hi” rajoilla “---”.HuoltoParistojen asentaminenIrrota kotelo ennen paristojen vaihtoa tai kytkimien asettelua.VaaraAseta pariston + ja − napaisuus paristokoteloavastaavasti.Älä yritä ladata paristoja.Älä heitä paristoja tuleen.Hävitä paristot paikallisia lakeja tai määräyksiänoudattaen.Näyttö * ilmoittaa pariston jäljellä olevan jännitteen. Vaihda kummatkin paristot 1 alkaessa vilkkua.Linssin puhdistusÄlä puhdista linssiä liuottimilla. Puhalla irtolika pois puhtaalla paineilmalla. Harjaa muu lika hellävaraisesti kamelinkarvaisella harjalla tai korkealaatuisella linssinpuhdistuspyyhkeellä. Voit kostuttaa pyyhkeen puhtaaseen veteen.Kotelon ja kantolaukun puhdistusKäytä saippuaa ja vettä tai mietoa puhdistusainetta. Pyyhi kostealla sienellä tai pehmeällä rievulla.Kytkimien asetuksetKytkimien avulla kytketään päälle lasersäde ja mittarin taustavalo. Kytke lasersäde päälle painamalla /. Tehtaalla asetettu oletusarvo on “on” (päällä). Tämä asento on oikealle;“off” (pois) asento on vasemmalle.VianetsintäOire KorjausLaser ei kytkeydy päälle.Jos näyttö ei kytkeydy päälle taisiihen tulee merkki 1, vaihdaparisto.Jos näytössä ei ole merkkiä ),kytke laserin kytkin päälle.Lämpömittari tuntuu antavan vääriä mittauslukemia.Tarkasta, että toimit lukujen “Mittaustarkkuuden varmistaminen”ja “Linssin puhdistaminen”opastamalla tavalla.Näytölle tuleva lämpötila heiluu (mutta mitattavan pinnan lämpötila pysyy vakiona).Anna mittarin olla päällä, kunnes näytöllä oleva lämpötila vakiintuu. (Näyttö heiluu yleensä aina jonkin verran – erityisesti desimaaleissa.)KalibrointiFluke suosittelee lämpömittarin palauttamista Fluken huoltopajaan aina vuosittain oltuaan käytössä yhden vuoden ajan.Yleisimpien materiaalien säteilykertoimet Materiaali Säteilykerroin Ihmisen iho0.98Jää0.96–0.98Sementti0.96Asfaltti, terva, pihka0.95–1.00Betoni0.94Vesi0.92–0.96Muovi0.90–1.00Raakaravinto (hedelmät, öljyt, jne.)0.85–1.00Lasi0.85–1.00Maali0.80–0.97Keramiikka0.80–0.94Laasti0.80–0.90Puu0.80–0.90Teräs, hapettunut0.80Rauta, hapettunut0.78–0.84Kupari, hapettunut0.78Messinki, hapettunut0.56–0.64Ruostumaton pelti0.45Alumiini, hapettunut0.40Sinkki, galvanoitu0.28Kupari, himmeä0.22Messinki, kiillotettu0.05Rauta, hapettumaton0.05Kupari, kiillotettu0.02–0.07ErittelyMittausasteikko−40 o C - +500 o C (−40 o F - +932 o F)Käyttölämpötila(ympäröivä)0 o C - +50 o C (+32 o F - +122 o F)Varastointilämpötila−20 o C - +70 o C (−4 o F - +158 o F),ilman paristoaNäytön resoluutio Alle 200 o: 0.1 oYli 200 o: 1 oMittaustarkkuus Alle 0 o C: ± 5 o C (32 o F: ±9 o F)Yli 0 o C: ± 2 o C (32 o F: ±4 o F)Yli 100 o C: ± 2 % lukemasta[Ympäröivä ilma: 25 o C ± 3 o C (77 o F ± 5 o F)] Lämpötilavakio> 400 o C (752 o F): ±0.06 % lukemasta≤ 400 o C (752 o F): ±0.24 % lukemasta[Ympäröivä ilma:< 22 o C (72 o F);> 28 o C (82 o F)]Vasteaika0.8 sekuntia (95 % vasteelle)Spektrivaste8 µm - 14 µm nimellinenNäkökenttä/mittaus -alueen koko 8:1; minimi mittausalueen koko 25 mm (1 tuumaa)Lasersäteenhajonta< 0,01 radiaaniaToistotarkkuus± 1 % lukemasta tai ±1 o, kumpi on suurempi Säteilykerroin Kiinteä, 0.95Kosteus10 % - 90 % suhteellista, ei-tiivistyvääkosteuttaKorkeus Varastointi: 0 km - 12 km (40,000 ft)Käyttö: 0 km - 3 km (10,000 ft)Anturin elementti ThermopileTeholähde 2 AA alkaliparistoa, eivät asennettuja Pariston käyttöikä> 15 tuntia laser ja taustavalo päällä(> 4000 yksittäistä mittausta normaalioloissa) Taustavalo Automaattisesti päällä huonossavalaistuksessa.Mittausarvon pito Mittausarvo pidetään näytöllä 20 sekunninajan.Mitat38.1 mm K × 63.5 mm L × 185.4 mm P(1.5 tuumaa K × 2.5 tuumaa L × 7.3 tuumaa P) Paino283.5 g (10 unssia)Turvallisuus/ Vastaa-vuudet P Sertifiointi$ HyväksyntäUS 21 CFR Subchapter J Part 1040.10 IEC 60825-1 (1998-01) Julkaisu 1.1 EN 60825-1:1994/A11:1996Laserin turvavaroitusSeuraava laserin turvavaroitus on kiinnitetty lämpömittarin jaaab05f.eps TakuuRAJOITETTU TAKUU & VALMISTAJAN VASTUUN RAJOITUKSET Valmistaja takaa yhden vuoden ajan ostopäivästä, että tässä Fluke-tuotteessa ei ole materiaali- tai valmistusvirheitä. Tämä takuu ei kata vaihdettavia paristoja, tai onnettomuuksista, huolimattomuudesta,väärinkäytöstä tai epänormaalista käytöstä tai käsittelystä johtuvia vahinkoja. Jälleenmyyjät eivät ole valtuutettuja antamaan Fluken puolesta mitään muita takuita. Takuun aikaista huoltoa varten voit lähettääviallisen mittalaitteesi lähimpään Fluken valtuuttamaan huoltokorjaamoon. Liitä lähetyksen mukaan kuvaus ongelmasta.TÄMÄ TAKUU ON OSTAJAN AINOA JA YKSINOMAINEN KEINO. EI OLE OLEMASSA MITÄÄN MUITA VÄLITTÖMIÄ TAI VÄLILLISIÄTAKUITA, KUTEN TAKUITA KAUPATTAVUUDESTA TAI SOPIVUUDESTA TIETTYYN TARKOITUKSEEN. FLUKE EI OLE KORVAUSVELVOLLINEN MISTÄÄN ERITYISISTÄ, EPÄSUORISTA, SATUNNAISISTA TAI SEURAAMUKSELLISISTA VAHINGOISTA TAI TAPPIOISTA, PERUSTUIVAT NE SITTEN MIHIN TAHANSA SYYHYN TAI TEORIAAN.Joissain maissa välillisten takuiden rajoitus tai evääminen sekä välillisien tai johdannaisten vahinkojen korvausvelvollisuuden evääminen ei ole sallittua. Nämä valmistajan vastuun rajoitukset eivät siis välttämättäkoske Sinua.Fluke CorporationP.O. Box 9090Everett WA 98206-9090 USA Fluke Europe B.V. P.O. Box 11865602 B.D. Eindhoven The Netherlands11/99。
OLED65W7P OLED77W7PPlease read this manual carefully before operating your set and retain it for future reference.Safety and ReferenceP/NO : MFL69707607 (1701-REV00)*MFL69707607*5ENGLISH•When attaching the stand to the TV set, place the screen facing down on a cushioned table or flat surface to protect the screen from scratches. (Depending upon model)•Make sure that the screws are fastened tightly. (If they are not fastened securely enough, the TV may tilt forward after being installed.)•Do not fasten the screws with excessive force otherwise they may be worn out and become loose.•Make sure to wring any excess water or cleaner from the cloth.•Do not spray water or cleaner directly onto the TV screen.•Make sure to spray just enough of water or cleaner onto a dry cloth to wipe the screen.Lifting and Moving the TVWhen moving or lifting the TV, read the following to prevent the TV from being scratched ordamaged and for safe transportation regardless of its type and size.•It is recommended to move the TV in the box or packing material that the TV originally came in. •Before moving or lifting the TV, disconnect the power cord and all cables. •When holding the TV, the screen should face away from you to avoid damage.•Hold the top and bottom of the TV frame firmly. Make sure not to hold the transparent part, speaker, or speaker grille area.•Use at least two people to move a large TV.•When transporting the TV byhand, hold the TV as shown in the following illustration.•When transporting the TV, do not expose the TV to jolts or excessive vibration.•When transporting the TV, keep the TV upright; never turn the TV on its side or tilt towards the left or right.•When handling the TV, be careful not to damage the protruding buttons.•Avoid touching the screen at all times, as this may result in damage to the screen. •Do not place the product on the floor with its front facing down without padding.Failure to do so may result in damage to the screen.•Do not move the TV by holding the cable holders, as the cable holders may break, and injuries and damage to the TV may occur. (Depending upon model)Using the Button(Depending upon model)You can operate the TV by pressing the button or moving the joystick left, right, up, or down.Punching GuideWall mounting anchorPhillips head + driver (manual or motorized) / Ø 8 mm (0.3 inches) Drill bit / Level / Stud finder7ENGLISH4 Set the wall mount on the wall by aligning to the location of the hole. And, set the angle adjusting part to face upward.5 Align the wall mounting screw to the hole and tighten it. Then, fasten the screws at torque of 45 kgf/cm (39.06 ibf/in) to 60 kgf/cm (52.08 ibf/in).Wall mountingscrew•Check the material of the wall and the thickness of the finishing.•Use the Wall mount anchor for wall material of concrete, light concrete, strong natural stone, soft natural stone masonry brick and hallow block that do not crack.Wall Material ToolsWall WidthConcrete Wall mounting anchor, Wall mounting screw, Drill bit (Ø 3 / 6 / 8)45 mm (1.7 inches)Brick Natural stone Metal Panel Plywood Wall mounting screw, Drill bit (Ø 3 / 6 / 8)30 mm (1.1 inches) EPS Panel Penetrate the wall Plasterboard + Plywood30 mm (1.1 inches)•Do not mount the device on the walls madefrom plasterboard or medium density fiberboard (MDF). In this case, the anchor and screws must be inserted into the concrete behind the finish surface. If there is no concrete on the other side, then you must first install a separate hanger to securely install the anchors and screws.•When installing the product on wall material not designated, install the product so that each location can withstand the pull out load of 70 kgf (686 N) and shear load of 100 kgf (980 N) or above.•Use the Ø 8 mm (0.3 inches) drill bit for concrete and hammer (Impact) drill.•Make sure that children do not climb on or hang on the TV.•Use a platform or cabinet that is strong and large enough to support the TV securely. •When installing the product, first check that the wall is strong enough. Use the anchors and screws provided.-If you use anchors and screws that are not specified by the manufacturer, they may not hold the weight of the product, causing safety issues.•Be sure to use the accessory cable provided. Otherwise, friction between the product and the wall may cause damage to the connector. •When drilling holes into the wall, make sure you use a drill and drill bit with the specified diameter. Ensure that you also follow the instructions regarding the depth of the holes. -Otherwise, the product may be installed incorrectly and cause safety issues. •Wear safety gloves when installing the product. Do not use your bare hands. -Otherwise, it may cause personal injury. •If some parts of the wall mount do not touch the wall after it is attached, in addition to the other mounting hardware, add the double sided tape included with the accessories to stick the mount to the wall.•If you want to connect the TV Cable isconnected to the back panel partition, please use the enclosed Punching Guide.ENGLISHUsing the kensington securitysystem (optional)(For OLED65W7P)The Kensington security system connector islocated at the rear of the Companion Box (AV Box).For more information of installation and using,refer to the manual provided with the Kensingtonsecurity system or visit .Connections (Notifications)You can connect various external devices to the TV.Supported external devices are: HD receivers, DVDplayers, VCRs, audio systems, USB storage devices,PC, gaming devices, and other external devices. Formore information on external device’s connection,refer to the manual provided with each device.•If you record a TV program on a DVD recorder orVCR, make sure to connect the TV signal inputcable to the TV through a DVD recorder or VCR.For more information about recording, refer tothe manual provided with the connected device.•The external device connections shown maydiffer slightly from illustrations in a manual.•Connect external devices to the TV regardlessabout the order of the TV port.•If you connect a gaming device to the TV, use thecable supplied with the gaming device.•Refer to the external equipment’s manual foroperating instructions.•In PC mode, there may be noise associatedwith the resolution, vertical pattern, contrastor brightness. If noise is present, change the PCoutput to another resolution, change the refreshrate to another rate or adjust the brightnessand contrast on the PICTURE menu until thepicture is clear. Depending upon the graphicscard, some resolution settings may not allow theimage to be positioned on the screen properly.•Some USB Hubs may not work. If a USB deviceconnected through a USB Hub is not detected,connect it directly to the USB port on the TV.•The TV may be capable of operating withouta set-top-box from a multichannel videoprogramming distributor (MVPD).•When connecting via a wired LAN, it isrecommended to use a CAT 7 cable.Connecting to an Antenna or CableConnect an antenna, cable, or cable box to watchTV while referring to the following. The illustrationsmay differ from the actual items and an RF cable isoptional.•Make sure not to bend the copper wire of the RFcable.Copper wire•Complete all connections between devices, andthen connect the power cord to the power outletto prevent damage to your TV.•Use a signal splitter to use 2 TVs or more.•DTV Audio Supported Codec: MPEG,Dolby Digital•This TV cannot receive ULTRA HD (3840 x 2160pixels) broadcasts directly because the relatedstandards have not been confirmed.(Depending upon model)89ENGLISHOther ConnectionsConnect your TV to external devices. For the best picture and audio quality, connect the external device and the TV with the HDMI cable. • > > > General > HDMI ULTRA HD Deep Color :-On : Support 4K @ 60 Hz (4:4:4, 4:2:2, 4:2:0) -Off : Support 4K @ 60 Hz 8bit (4:2:0)•If the device connected to Input Port also supports ULTRA HD Deep Color, your picture may be clearer. However, if the device doesn’t support it, it may not work properly. In that case, connect the device to a different HDMI port or change the TV’s HDMI ULTRA HD Deep Color setting to Off.•HDMI Audio Supported Format: DTS (44.1 kHz / 48 kHz),Dolby Digital / Dolby Digital Plus (32 kHz / 44.1 kHz / 48 kHz),PCM (32 kHz / 44.1 kHz / 48 kHz / 96 kHz / 192 kHz) (Depending upon model)Slim Remote Control(Depending upon model)The descriptions in this manual are based on the buttons on the remote control. Please read this manual carefully and use the TV correctly. To replace coin batteries, turn the battery cover counterclockwise by using a coin. Then, pull the battery container out. Insert and fix the batteries (CR2032) with the facing upward. Then, slide the battery container back into the remote control (+ side up) and using a coin, turn the lock clockwise to close. To remove the coin batteries, perform the installation actions in reverse. When in use, it should be pointed in the direction of the TV’s remote sensor.ABA(Power) Turns the TV on or off.You can turn your set-top box on or off by adding the set-top box to the universal remote control for your TV. Adjusts the volume level. (MUTE) Mutes all sounds.Scrolls through the saved channels.BReturns to the previous screen.* Clears all on-screen displays and returns to TV viewing.(Home) Accesses the Home menu. (Input) Changes the input source. * P ressing and holding the (Input) button displays all the lists of external inputs.(Navigation buttons) Scrolls through menus or options. (up/down/left/right)Selects menus or options and confirms your input.* : T o use the button, press and hold for more than 3 seconds.The model and serial numbers of the TV are located MODELLG Customer Information Center For inquires or comments, visit or call;1-800-984-6306USA 1-888-542-2623CANADA Register your product Online!on the back and on one side of the TV. Record them below should you ever need service.SERIAL Declaration of Conformity Trade Name: LG Model: OLED65W7P-U, OLED77W7P-U Responsible Party: LG Electronics Inc.Address: 1000 Sylvan Ave. Englewood Cliffs NJ 07632 U.S.A TEL: 201-266-25342ac a b g13124d。
技术细节1.要件速览 42.尺寸图 6 2.1DMK 39GX265-Z20 带三脚架适配器的变焦相机 (6)2.2DMK 39GX265-Z20 不带三脚架适配器的变焦相机 (7)3.I/O 连接器 8 3.16-pin I/O 连接器 (8)3.1.1TRIGGER_IN (8)3.1.2STROBE_OUT (9)4.光谱特征 104.1光谱灵敏度 - IMX265LLR-C (10)5.相机控制 11 5.1传感器读出控制 (11)5.1.1像素格式 (11)5.1.1.18-Bit Monochrome (11)5.1.1.212-Bit Packed Monochrome (11)5.1.1.316-Bit Monochrome (12)5.1.2分辨率 (12)5.1.3读出模式 (12)5.1.4帧速率 (13)5.1.5局部扫描偏移 (14)5.1.6图像翻转 (15)5.2图像传感器控制 (15)5.2.1曝光时间 (15)5.2.2增益 (15)5.2.3黑电平 (16)5.3自动曝光及增益控制 (16)5.3.1自动曝光 (17)自动增益 (17)5.3.25.3.3自动参考值 (17)5.3.4强光缩减 (17)5.3.5自动曝光限制 (18)5.3.6自动增益限制 (18)5.4镜头控制 (19)5.4.1变焦 (19)对焦 (19)5.4.25.4.3光圈 (20)5.4.4红外截止滤波器 (20)5.4.5自动对焦 (21)5.4.6自动对焦ROI (21)5.4.7自动光圈 (22)5.5触发 (22)5.5.1触发模式 (22)5.5.2触发极性 (23)5.5.3软件触发 (23)触发脉冲计数 (23)5.5.45.5.5触发源 (23)5.5.6触发重叠 (24)5.5.7IM X低延迟模式 (24)5.6触发定时参数 (24)5.6.1触发延迟 (25)5.6.2触发去抖时间 (25)5.6.3触发遮罩时间 (25)5.6.4触发噪声抑制时间 (25)5.7数字I/O (26)5.7.1通用输入 (26)通用输出 (26)5.7.25.8频闪 (27)5.8.1频闪启用 (27)5.8.2频闪极性 (27)5.8.3频闪操作 (27)频闪时间 (28)5.8.45.8.5頻閃延遲 (28)5.9图像处理 (28)5.9.1伽玛 (28)5.9.2查找表 (28)5.10自动功能感兴趣的区域 (29)5.10.1自动功能ROI启用 (29)5.10.2自动功能ROI预设 (30)5.10.3自动功能ROI自定义矩形 (30)5.11用户设置 (31)5.11.1用户设置选择器 (31)5.11.2加载用户设置 (31)5.11.3保存用户设置 (32)5.11.4默认用户配置 (32)6.变焦镜头信息 33 6.1最小物距 (33)6.2变焦倍数 (34)7.R ev i s i o n H i story 351要件速览2尺寸图2.1DMK 39GX265-Z20 带三脚架适配器的变焦相机2.2DMK 39GX265-Z20 不带三脚架适配器的变焦相机3I/O 连接器3.16-pin I/O 连接器相机后视图1开极闸M OSF E T最大限制0.2A(ID)!2启动电流最低条件3.5 m A!3 G:地O:输出I:输入3.1.1T RIGG E R_I NTRIGGER_IN线可用于将曝光时间的开始与外部事件同步。

全自动静重式力标准机使用说明书吉林大学地址:长春市人民大街142号吉林大学机械工程学院130025E-mail: zxche@一、概述静重式力标准机具有其他种类设备无法比拟的精度高的优点,在力值计量检测领域中得到了广泛的应用。
独立加码式力标准机,是我们开发研制的一种新型高效率、低成本、高精度全自动静重式力标准机。
这是一种采用了新结构和新工作方式的全自动静重式力标准机,它利用优化组合的砝码加载,每块砝码由独立的电动马达驱动机构实现快速平稳加卸;由PC机自动控制砝码和各个工作机构的动作;运用专门编写的软件使设备工作过程通过动画方式实现全自动形象化监控功能;对被检测力仪的检测试验按照设定要求,自动完成加载、卸载、数据采集、数据处理的全部工作。
适合于在力值计量检测领域,以及在各种测力与称重传感器的生产中作为一种实用的工艺和标准与基准设备应用。
1.设备的显著特点1.效率高:完全满足国际六十号建议OIMLR60关于传感器试验加载时间的要求,任何载荷加卸载时间均可以不大于10秒。
2..价格低、可靠性高:简洁合理的机械结构和独特的控制技术方法使设备的造价低于任何同类的设备,加之精良的制造和完善的软件与监控功能使设备运行无故障和免维护。
3.操作使用方便:小型设备无需专门地基;对于任何规格的设备,操作者仅需简单培训或者参考使用说明书即可自行操作。
4.设备的规格: 100N ,200N,500N, 1kN,2kN,5kN,10kN,20kN,50kN,100kN,200kN,500kN,1MN,2MN。
2.设备技术性能指标∙ 1.采用砝码优化组合,利用最少数量的砝码,实现尽量大的测量范围。
∙ 2.力值准确度: 0.01%。
∙ 3.力值施加和稳定时间:完全符合国家标准和OIML R60的规定,并可以缩短时间。
∙ 4.工作全部自动化:工作效率高于任何传统的静重机;操作使用极为方便。
包括自动施加载荷,自动控制和稳定力值的大小,自动采集和处理数据,并打印输出。
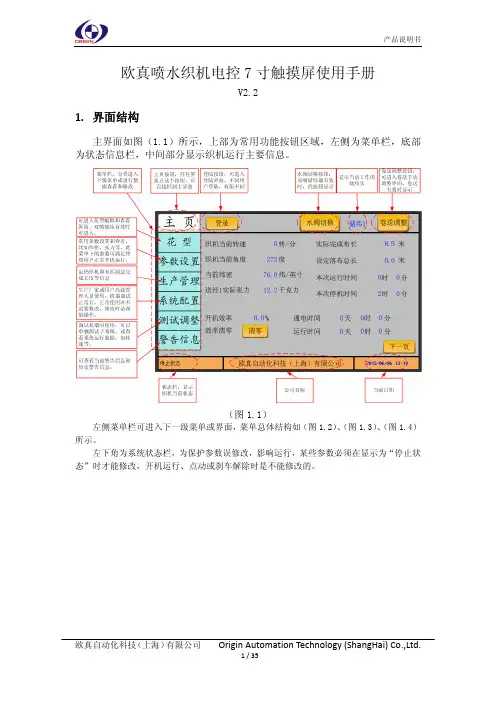
欧真喷水织机电控7寸触摸屏使用手册V2.21.界面结构主界面如图(1.1)所示,上部为常用功能按钮区域,左侧为菜单栏,底部为状态信息栏,中间部分显示织机运行主要信息。
(图1.1)左侧菜单栏可进入下一级菜单或界面,菜单总体结构如(图1.2)、(图1.3)、(图1.4)所示。
左下角为系统状态栏,为保护参数误修改,影响运行,某些参数必须在显示为“停止状态”时才能修改,开机运行、点动或刹车解除时是不能修改的。
(图1.2)主编码器方向等主编码器方向、电机方向、卷取减速比等主编码器方向、电机方向、送经减速比等主编码器方向、电机方向、送经减速比等恢复织机电控数据为出厂默认值。
恢复储纬主控数据为出厂默认值。
恢复储纬头数据为出厂默认值。
恢复卷取和送经数据为出厂默认值。
主编码器方向、慢速反转定位、自动反向寻纬功能等(图1.3)(图1.4)2. 登录和HMI 配置(图2.1)主页点“登陆”按钮进入登陆界面。
此界面可以设置显示使用语言。
(图2.2)系统权限分三级:初级用户级、调机人员用户级、专业人员用户级。
初级用户级:不需要登陆,供挡车工使用,只可查看主界面数据、停机信息、生产管理数据、警告信息等基本信息。
当前用户为“无”时,即为初级用户级。
调机人员用户级:需要输入密码登陆。
调机人员用户级可以设置除系统配置菜单下的其他所有数据,供调试工、一般维修人员使用。
专业人员用户级:需要输入密码登陆。
专业人员用户级可设置修改所有数据,包括系统配置数据,供电控厂家、主机厂或终端用户专业人员使用。
专业人员用户级还可以设置默认用户级别,即重新上电或退出专业人员登陆后,系统可自动以设定的默认用户级别登陆,以供厂家管理人员设定开放权限。
默认用户级别选择“无”,则默认为初级用户级。
专业人员用户进入登录页面后选择“专业人员”用户,输入密码后点“登录”,注意当前用户显示为“专业人员”才表示登录成功;(图2.3)以专业人员用户登录后,进入“系统配置”项,选择“HMI配置”来设定系统实际配置,要根据实际配置来设定,否则可能会报通讯错误或者相关参数没有显示。
JabraA third-party certification according to ISO 14024Toward sustainable IT productsSay helloto a more sustainable productIT products are associated with a wide range of sustainability risksthroughout their life cycle. Human rights violations are common in thefactories. Harmful substances are used both in products and theirmanufacture. Products can often have a short lifespan because of poorergonomics, low quality and when they are not able to be repaired orupgraded.This product is a better choice. It meets all the criteria in TCO Certified,the world’s most comprehensive sustainability certification for ITproducts. Thank you for making a responsible product choice, that helpdrive progress towards a more sustainable future!Criteria in TCO Certified have a life-cycle perspective and balanceenvironmental and social responsibility. Conformity is verified byindependent and approved verifiers that specialize in IT products, socialresponsibility or other sustainability issues. Verification is done bothbefore and after the certificate is issued, covering the entire validityperiod. The process also includes ensuring that corrective actions areimplemented in all cases of factory non-conformities. And last but notleast, to make sure that the certification and independent verification isaccurate, both TCO Certified and the verifiers are reviewed regularly.Want to know more?Read information about TCO Certified, full criteria documents, news andupdates at . On the website you’ll also find our ProductFinder, which presents a complete, searchable listing of certifiedproducts.© 2018 GN Audio A/S. All rights reserved. Jabra® is a trademark of GN Audio A/S.Made in ChinaMODEL: Model:W HB051BSWHB050HSWHB051HSE1. Welcome (6)2. What’s in the box (7)2.1 Stereo variant2.2 Mono variant2.3 Convertible variant3. How to wear (10)3.1 Stereo/Mono headset3.2 Convertible headset3.3 How to change the convertible headsetEarGel3.4 How to change the convertible headsetEarHook3.5 How to change the convertible headsetwearing style4. How to charge (14)4.1 Connect to power4.2 Charge the headset4.3 Headset PowerNap5. How to connect (17)5.1 Connect to a desk phone with a headset port5.2 Connect to a desk phone without a headsetport5.3 Connect to a computer5.4 Connect headset to a computer6. How to use (21)6.1 Stereo/Mono headset overview6.2 Convertible headset overview6.3 Base overview6.4 Base status LEDs6.5 How to change voice prompt language6.6 How to adjust the microphone volume fordesk phone calls6.7 How to find a dial tone for desk phones6.8 How to add a new primary headset6.9 How to reset7. How to make calls (29)7.1 Basic call usage7.2 Merge calls7.3 Conference calls7.4 Transfer a call from desk phone to headset7.5 Transfer a call from headset to desk phone7.6 Multiple call handling8. How to change settings (38)9. Jabra Direct (40)9.1 Firmware update10. S upport (41)10.1 FAQ10.2 How to care for your device10.3 Replacement accessories1. WelcomeThank you for using the Jabra Engage 65. We hope you will enjoy it!Jabra Engage 65 features• Flexible connectivityConnect to desk phone and computer• World’s lightest DECT headset18 grams (convertible)• Avoid disturbancesBuilt-in Busylight• Use all day longUp to 13 hours talk time (stereo/mono)Up to 9 hours talk time (convertible)• Take calls anywhere in the officeUp to 150 meters/490 feet range (stereo/mono)Up to 100 meters/325 feet range (convertible)• Secure confidential callsDECT AES 256 bit encryption2. What’s in the box The Jabra Engage 65 comes with one of three different headset styles: stereo, mono, and convertible. 2.1 Stereo variantStereo headset BaseMicro-USB cable Power cable Telephone cable2.2 Mono variantMonoheadsetBaseMicro-USBcablePower cable Telephonecable2.3 Convertible variantConvertible headsetBaseHeadband EarGelsEarHook Micro-USB cable Power cable Telephone cable3. How to wear3.1 Stereo/Mono headsetThe headset can be worn with the microphone on the left or the right.3.2 Convertible headsetThe headset can be worn on the left or the right ear.3.3 How to change the convertible3.4 How to change the convertible headset EarHookThe EarHooks are flexible, and can be bent to suit your ear for a secure and comfortable fit.3.5 How to change the convertibleheadset wearing style4. How to charge4.1 Connect to powerPlug the base into a power supply using the supplied power cable.It is recommended to connect the telephone or computer cables before connecting the base to a power supply (see Chapter 5 for more information).4.2 Charge the headsetThe stereo/mono headsets have up to 13 hours of battery, and the convertible headset has up to 9 hours of battery.All headsets take approx. 1.5 hours to fast charge to full. 40% of the battery will charge in approx. 30 minutes.4.3 Headset PowerNapTo conserve battery, the headset will automatically power off when it has not been docked for 30 minutes, has not been moved, and is not in use.To end PowerNap, either move the headset (the headset has a built-in motion sensor), press any button on the headset (must be configured in Jabra Direct), or dock the headset in the base.PowerNap can be permanently turned off using Jabra Direct.5. How to connect5.1 Connect to a desk phone with aheadset portThis type of desk phone has a dedicated headset port. These phones typically have a button on the front panel for switching between the desk phone handset and the headset.1. Plug the supplied telephone cable into the port marked on the base, and into the headset port on the desk phone.2. Plug the base into a power supply using the supplied power cable.Note: For more assistance with your specific desk phone, visit /compatibilityguide.5.2 Connect to a desk phone without aheadset portThis type of desk phone does not have a dedicated headset port.1. Unplug the handset cable from the handset port on the desk phone, and plug it into the port on the base.2. Plug the supplied telephone cable into the port marked on the base, and into the handset port on the desk phone.3. Plug the base into a power supply using the supplied power cable.Note: For more assistance with your specific desk phone, visit /compatibilityguide.5.3 Connect to a computer1. Plug the supplied micro-USB cable into the port marked on the base, and into an available USB port on your computer.2. Plug the base into a power supply using the supplied power cable.3. Ensure the Jabra Engage 65 is set as the default playback device and recording device in your operating system’s sound settings, and/or your preferred softphone (e.g. Skype for Business). It is recommended to download and install Jabra Direct from /direct.5.4 Connect headset to a computer1. Plug the supplied micro-USB cable into an available USB port on your computer.2. Press and hold either the Volume up, or Volume down, or Mute button on the headset while plugging the other end of the micro-USB cable into the headset. Once the LED on the headset stops flashing green, release the button.3. The headset can now be selected as as audio playback device on the computer.6. How to use6.1 Stereo/Mono headset overviewVolumebutton6.2 Convertible headset overviewVolumebutton6.3 Base overviewComputer statuscall6.4 Base status LEDsIncoming call on desk phone (flashing)Active call on desk phone Incoming call on computer (flashing)Active call on computer6.5 How to change voice promptlanguageThere are 5 available languages for the headset voice prompts: English, German, French, Japanese, and Spanish.To change language:1. When not on a call, hold both volume buttons (2 secs) on the headset to accessthe voice-guided settings menu. The first available setting is the voice prompt language.2. Press the Volume buttons to cycle through the available languages.3. Press the Call button to accept the language.4. Hold both volume buttons (2 secs) on the headset to exit the voice-guided settings menu. The base will reboot and the new setting will be saved.6.6 How to adjust the microphonevolume for desk phone calls6.7 How to find a dial tone for deskphonesThe dial tone switch is located on the bottom of the base. Use a pointed object to rotate the switch between the different settings, until you do hear a dial tone in the headset. The default setting is A.6.8 How to add a new primary headset There are three methods for adding a new primary headset to the base:A) If the current primary headset is not within range of the base or is turned off, simply dock the new headset in the base. It will become the primary headset. The conference and headset status LED on the base will flash to indicate the new headset is now the primary headset.B) If the current primary headset is within range of the base and is turned on, and the base is not on a call, dock the new headset in the base and hold the Call button (1 sec) on the headset until the conference and headset status LED on the base flashes, indicating that it is now the primary headset.C) If Easy pairing has been enabled in Jabra Direct, and the current primary headset is not on a call, simply dock the new headset in the base. It will become the primary headset. The conference and headset status LED on the base will flash to indicate the new headset is now the primary headset.6.9 How to resetResetting the headset and the base resets all settings.their default values.The base and headset can also be reset using7. How to make calls7.1 Basic call usagePower onPress the Call button onthe headset, or undock theheadset from the basePower off Hold the Call button for 4secondsAnswer callPress the Call button,undock the headset,or tap on the base End callPress the Call button, dockthe headset, or tap onthe baseReject callDouble-press theCall button, or tap onthe baseSwitch targetphoneUndock the headset andhold the Call button for 1secondAlternatively, hold onthe base for 1 secondAdjust volumePress the Volume buttons.The convertible headsetuses a motion sensor todetect which button isvolume up and which isvolume down, dependingon the headset orientationToggleBusylightPress both Volume buttonsat the same timeAccess theVoice-guidedsettings menuHold (3 secs) both Volumebuttons at the same time7.2 Merge callsIt is possible to merge an incoming call with a current call.To merge calls:1. Hold the Call button (2 secs) on the headset, or press on the base to accept the incoming call. This will place the current call on hold.2. Hold (2 secs) to merge the calls.To unmerge the calls, hold (2 secs) on the base.To end the merged call, dock the headset or press the Call button on the headset.7.3 Conference callsAdd headset(s) to a conference callUp to three additional headsets can beconnected to one base for conferencing.1. Undock the primary headset.2. Dock an additional headset in the base. It will attempt to pair to the base.3. A voice prompt will play in the primary headset. Press the Call button on theprimary headset to accept the additional headset to the conference. The audio will now be shared between headsets.By default, the additional headset will be muted.Note: It is possible to use Jabra Engage 75 headsets for conference calls. See section Add headset(s) to aAdd headset(s) to a conference call without dockingUp to three additional headsets can be connected to one base, without the need to dock the headsets.1. Undock the primary headset.2. Power off the additional headset by holding the Call button for 4 seconds.3. Hold (3 secs) on the base. The conference LED on the base will flash.4. Put the additional headset into pairing mode by holding the Call button for 5 seconds until the status LED on the headset flashes blue.5. A voice prompt will play in the primary headset. Press the Call button on the primary headset to accept the additional headset to the conference. The audio will now be shared between headsets.By default, the additional headset will be muted.Note: It is possible to use Jabra Engage 75 headsets for conference calls.End or leave a conference callTo end the call for all headsets, press the Call button on the primary headset, or dock the primary headset in the base.Additional headsets can leave the conference by pressing the Call button on the headset, or by docking the additional headset in the primary headset’s base (not the additional headset’s base). The conference call will continue for all other headsets.Permanent conference modeBy default, the conference will end automatically for all additional headsets when the call ends.It is possible to continue the conference with the additional headsets until the primary headset is docked, by changing this setting in Jabra Direct.7.4 Transfer a call from desk phone toheadset1. Select the desk phone as the target phone on the base.2. Lift the headset from the base, or tap the Call button on the headset. The call audio will transfer from the desk phone handset to the headset. If necessary, press the headset button on the desk phone and do not hang up the handset until the call is finished.7.5 Transfer a call from headset todesk phoneTo transfer a call from the headset to a desk phone, lift the desk phone handset and then dock the headset in the base.The call audio will transfer from the headset to the desk phone if the base is plugged into the handset port on the desk phone, otherwise press the headset button on the desk phone.7.6 Multiple call handlingThe headset and base can accept and handle multiple calls at the same time.Answer incoming call and putcurrent call on hold Tap on the baseSwitch between held call andactive call Tap on the baseReject incoming call, while on acurrent call Tap on the base8. How to changesettingsHeadset and phone settings can be changed using the voice-guided settings menu.Alternatively, all settings can be changed using Jabra Direct on your computer. DownloadJabra Direct at /direct.Access theVoice-guidedsettings menuHold (3 secs) both theVolume up and theVolume down button atthe same timeCycle throughsetting optionsPress the Volume up or theVolume down buttonExit theVoice-guidedsettings menuHold (2 secs) both theVolume up and theVolume down button atthe same timeVoice prompt language Select the headset voice language from a list of 5 languagesVoice prompts Select to enable voice promptsMute reminder tone Select to use a periodic audio reminder when the microphone is mutedDesk phoneringtone Select a ringtone for desk phonesDesk phone ringtone volume Select the ringtone volume for desk phonesSoftphoneringtone Select a ringtone for softphonesSoftphone ringtone volume Select the ringtone volume for softphonesRange or density Select if the base should be optimized for improved range, or improved densityHook lifter type Select the hook lifter typeDefault phone Select which phone type is the default9. Jabra DirectJabra Direct is computer software designed to support, manage, and enable optimal functionality for your Jabra devices.9.1 Firmware updateJabra Direct will notify you when there is a firmware update available.10. Support10.1 FAQView the FAQs at /engage.10.2 How to care for your device• It is recommended to keep the headset between -5°C and 45°C (23°F and 113°F).• Do not store the headset for extendedperiods of time without recharging thebattery (max. three months).• If the headset or base becomes dirty, it is recommended to clean them with a soft,lint-free cloth that has been dampened with clean water.10.3 Replacement accessories Replacement or additional accessories can be purchased online at /accessories.41。