静电测试仪使用说明书
- 格式:pdf
- 大小:180.02 KB
- 文档页数:2
静电测试仪操作方法
静电测试仪主要用于检测物体表面的静电电荷。
其操作步骤如下:
1. 准备工作:将静电测试仪放置在平稳无震动的工作台面上,确保仪器与电源连接良好。
2. 开机:将电源插头插入电源插座,并打开电源开关,仪器将开始自检。
待显示屏上显示正常后,进入待机状态。
3. 校准:在进行测试之前,首先需要进行仪器的校准。
通常会提供校准板,将校准板放在测试区域上,并按下校准按钮,等待仪器完成校准。
4. 测试:将待测物体放置在测试区域上,确保与测试仪有良好的接触。
按下测试按钮,测试仪将对物体的静电电荷进行检测。
待测量稳定后,读取显示屏上的测试结果。
5. 结果处理:根据测试结果,判断物体是否存在静电电荷,并进行相应的处理。
如物体存在静电电荷,则可以通过接地等方法进行放电处理。
6. 关机:在使用完毕后,将电源开关关闭,并拔出电源插头。
将仪器放置在干燥清洁的环境中。
操作时需要注意以下事项:
- 操作人员应具备一定的静电知识和操作技能,避免操作不当导致意外事故。
- 仪器应放置在无尘、无湿、无强磁场等环境中,以确保测试结果的准确性。
- 在进行测试时,应注意避免物体与仪器发生碰撞,以免影响测试数据的准确性。
- 测试仪的使用和维护应按照相关的说明书进行,避免误操作和损坏仪器。
- 对于不熟悉操作的人员,建议请专业人士进行操作或提供指导。
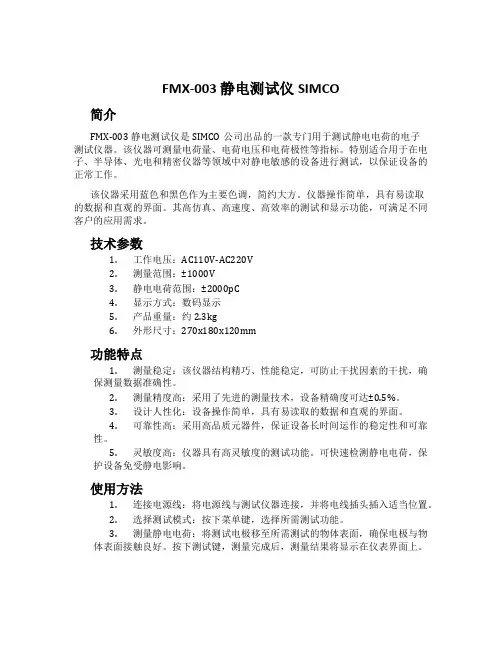
FMX-003 静电测试仪SIMCO简介FMX-003 静电测试仪是SIMCO公司出品的一款专门用于测试静电电荷的电子测试仪器。
该仪器可测量电荷量、电荷电压和电荷极性等指标。
特别适合用于在电子、半导体、光电和精密仪器等领域中对静电敏感的设备进行测试,以保证设备的正常工作。
该仪器采用蓝色和黑色作为主要色调,简约大方。
仪器操作简单,具有易读取的数据和直观的界面。
其高仿真、高速度、高效率的测试和显示功能,可满足不同客户的应用需求。
技术参数1.工作电压:AC110V-AC220V2.测量范围:±1000V3.静电电荷范围:±2000pC4.显示方式:数码显示5.产品重量:约2.3kg6.外形尺寸:270x180x120mm功能特点1.测量稳定:该仪器结构精巧、性能稳定,可防止干扰因素的干扰,确保测量数据准确性。
2.测量精度高:采用了先进的测量技术,设备精确度可达±0.5%。
3.设计人性化:设备操作简单,具有易读取的数据和直观的界面。
4.可靠性高:采用高品质元器件,保证设备长时间运作的稳定性和可靠性。
5.灵敏度高:仪器具有高灵敏度的测试功能。
可快速检测静电电荷,保护设备免受静电影响。
使用方法1.连接电源线:将电源线与测试仪器连接,并将电线插头插入适当位置。
2.选择测试模式:按下菜单键,选择所需测试功能。
3.测量静电电荷:将测试电极移至所需测试的物体表面,确保电极与物体表面接触良好。
按下测试键,测量完成后,测量结果将显示在仪表界面上。
应用范围FMX-003 静电测试仪是一种精密的电气仪器,广泛应用于电子、半导体、光电和精密仪器等领域中对静电敏感的设备进行测试。
主要应用于以下领域:1.电子生产线:测试电子元器件在制造过程中的静电电荷,以避免影响元器件正常工作。
2.半导体生产线:测试半导体芯片的静电电荷,以确保其在后续生产过程中的品质和可靠性。
3.光电生产线:测试光电器件在制造过程中的静电电荷,以保证设备能正常工作,同时避免影响设备的寿命和稳定性。
思美高SIMCO FMX-004静电场测试仪使用说明书思美高SIMCO FMX-004静电场测试仪使用说明书是一种手持式静电测试仪器,采用先进的震动电容感应技术,使仪器体积小,重量轻。
采用四个按钮结构,操作简便,容易掌握。
本静电测试仪zui大量程为±30KV(30,000)测试结果为2时,显示一条竖条,POWER开/关机;ZERO调仪器归零;MODE为测试模式选择;HOLT按钮锁定读数,并保持测试结果在LCD上。
仪器前端设有两个LED,用来帮助测试人员保持测试仪器跟测试目标之间的距离。
但当测试空气中离子的平衡度时,这两个灯是不亮的。
由于本仪器采用导电材料制作,所以有很强的抗干扰的能力思美高SIMCO FMX-004静电场测试仪使用说明书功能特点:*容易读数,操作简便*轻巧的设计*测试范围宽,重复测试精度高*自动量程转换±30KV(30,000)(距离25mm)*数字和竖条同时显示*五分种自动关机功能*四种测量模式(AUTO(自动),Hi(高量程),Low(低量程),Ionblance (离子平衡))具体参数测范围:0.00--±3.00kV(Low低量程)±0.0--±30.0KV(Hi高量程)0--300V(Ion离子平衡度测试)0—30KV(AUTO自动模式)测量距离:25mm±0.5mm两LED作为测量参考。
距离为仪器到测试目标之间的距离。
响应时间:,<1s测量精度:±10%LCD刷新速度:5次/秒工作条件:10Cº-40Cº,0-60%RH显示特性:两边竖条显示。
蓝的是显示负电,红的显示正电。
竖条显示精度:低测量范围时±0.1KV,高测量范围时±1.5KV,测量离子平衡时±15V。
数显读数:AUTO(自动模式)X.XX=0.00±1.49KV(低量程)XX.X=±1.0KV-±30.0KV(高量程)Hi(高量程)X.X=0.0-±30.0kVLow(低量程) X.XX=0.00-±3.00kV离子平衡模式时显示(IB)XXX=0-±300V模拟电压输出:AUTO ±3.00V(2.0KV=0.2V)HI ±3.00V(1.0KV=0.10V)LOW ±3.00V(2.0KV=0.2V)Ionblance ±3.00V(200KV=2.00V)蜂鸣器响声特点:在下列情况下能听到蜂鸣器响声开机:滴一声响自动关机:无任何操作时五分钟自动关机响三次,每次两声超出测量范围时:发出连续的叫声自动关机功能:本机无操作时,五分钟自动关机,节省电池使用电源:9V方型电池电池寿命:30小时外型尺寸:123(MM)×73(MM)×25(MM)重量:170g思美高SIMCO FMX-004静电场测试仪使用说明书各功能的操作,使用FMX-004使用9V方型电池,电池寿命大概30小时,当机器打开的时候,会有电池电量指示(如下图所示)注*图中黑色部分表示电量电池的更换:1,打开机器后面的电池盖。
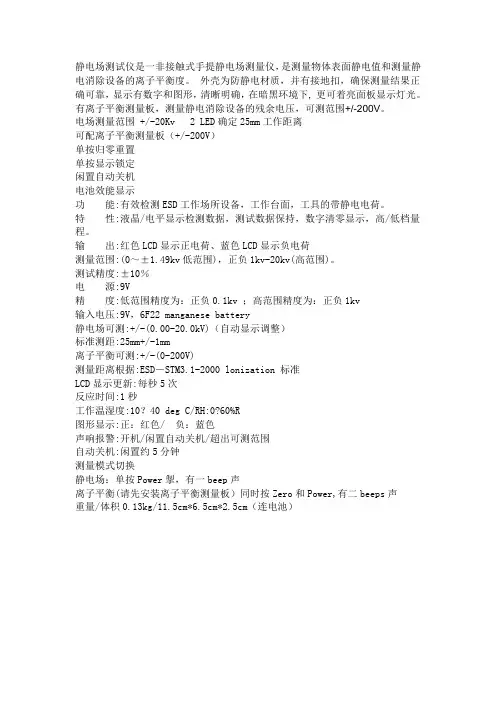
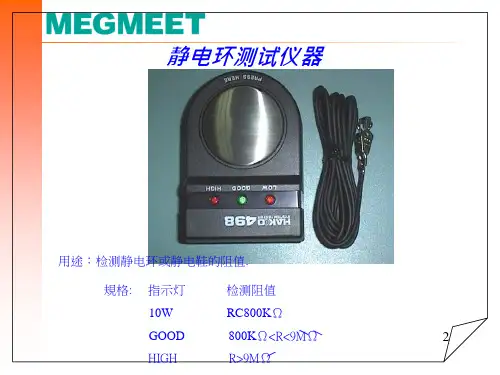
静电场测试仪是一非接触式手提静电场测量仪,是测量物体表面静电值和测量静电消除设备的离子平衡度。
外壳为防静电材质,并有接地扣,确保测量结果正确可靠,显示有数字和图形,清晰明确,在暗黑环境下, 更可着亮面板显示灯光。
有离子平衡测量板,测量静电消除设备的残余电压,可测范围+/-200V。
电场测量范围 +/-20Kv 2 LED确定25mm工作距离可配离子平衡测量板(+/-200V)单按归零重置单按显示锁定闲置自动关机电池效能显示功能:有效检测ESD工作场所设备,工作台面,工具的带静电电荷。
特性:液晶/电平显示检测数据,测试数据保持,数字清零显示,高/低档量程。
输出:红色LCD显示正电荷、蓝色LCD显示负电荷测量范围:(0~±1.49kv低范围),正负1kv-20kv(高范围)。
测试精度:±10%电源:9V精度:低范围精度为:正负0.1kv ;高范围精度为:正负1kv输入电压:9V,6F22 manganese battery静电场可测:+/-(0.00-20.0kV)(自动显示调整)标准测距:25mm+/-1mm离子平衡可测:+/-(0-200V)测量距离根据:ESD-STM3.1-2000 lonization 标准LCD显示更新:每秒5次反应时间:1秒工作温湿度:10?40 deg C/RH:0?60%R图形显示:正:红色/ 负:蓝色声响报警:开机/闲置自动关机/超出可测范围自动关机:闲置约5分钟测量模式切换静电场:单按Power掣,有一beep声离子平衡(请先安装离子平衡测量板)同时按Zero和Power,有二beeps声重量/体积0.13kg/11.5cm*6.5cm*2.5cm(连电池)(注:素材和资料部分来自网络,供参考。
请预览后才下载,期待你的好评与关注!)。
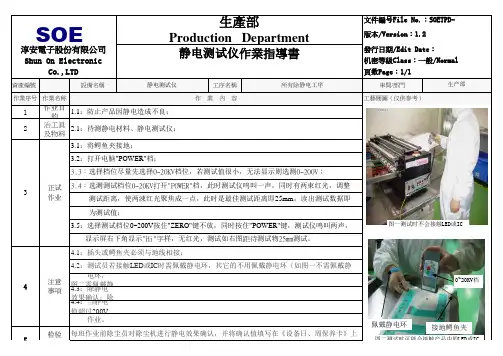
文件制修订记录
1.0目的
确保使用时得到正确数据,保证使用者有一致操作方法。
2.0范围
适用本厂用来检测使用的FMX-003静电测试仪。
3.0操作使用规范内容
3.1使用之前首先要确认静电测试仪是否在校正期限内;超出期限不可使用,必需送校正合格后方可使用。
3.2首先将静电测试仪的导线夹夹到静电线上,并确认接触牢固。
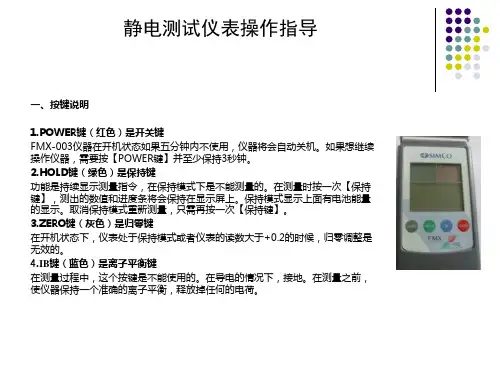
3.3取出静电测试仪顶部的平行板,单击机器上的POWER键打开静电测试仪,显示屏上方带(+)(-)的符号表示正负极,在测被测物的时候该物体是带正电的时候就在(+)的方格里面显示,在测被测物的时候该物体是带负电的时候就在(-)的方格里面显示。
3.4静电测试仪开启的时候其正前方的两个LED灯同时也会亮,这两个灯就是控制机体与被测物体的距离,他们的最佳距离是25毫米(也就是前方两个LED灯聚焦为一个点的距离)。
3.5根据被测物体电压不同则可以用单位转换键(IB)来转换单位,如果需要保持最大读数的时候单击HOLD键就可以保持,显示屏上会出现HOLD字样;如取消保持,则再单击HOLD键,显示屏上的HOLD字样会消失.如要归零则单击ZERO键。
3.6该机有一个特点在打开机子8分钟的时候它有一个节约电池的模式会自动关机.如果你不需要他在一定时间内关机的时候,就要在开机的时候按住开关键POWER3秒钟显示屏里面出现A.OFF就可以了。
4.0使用静电测试仪时按照被测静电的要求去按各按键的功能,读出显示数值。
5.0测试完毕后,关掉静电测试仪电源开关,静电测试仪为精密测量仪器,各按键不可随意乱按,不可撞击及跌落。

静电测试仪操作指引
(ISO9001-2015)
1.0目的
确保使用时得到正确数据,保证使用者有一致操作方法。
2.0范围
适用本厂用来检测使用的FMX-003静电测试仪。
3.0操作使用规范内容
3.1使用之前首先要确认静电测试仪是否在校正期限内;超出期限不可使用,必需送校正合格后方可使用。
3.2首先将静电测试仪的导线夹夹到静电线上,并确认接触牢固。
3.3取出静电测试仪顶部的平行板,单击机器上的POWER键打开静电测试仪,显示屏上方带(+)(-)的符号表示正负极,在测被测物的时候该物体是带正电的时候就在(+)的方格里面显示,在测被测物的时候该物体是带负电的时候就在(-)的方格里面显示。
3.4静电测试仪开启的时候其正前方的两个LED灯同时也会亮,这两个灯就是控制机体与被测物体的距离,他们的最佳距离是25毫米(也就是前方两个LED灯聚焦为一个点的距离)。
3.5根据被测物体电压不同则可以用单位转换键(IB)来转换单位,如果需要保持最大读数的时候单击HOLD键就可以保持,显示屏上会出现HOLD字样;如取消保持,则再单击HOLD键,显示屏上的HOLD字样会消失.如要归零则单击ZERO键。
3.6该机有一个特点在打开机子8分钟的时候它有一个节约电池的模式会自动关机.如果你不需要他在一定时间内关机的时候,就要在开机的时候按住开关键
POWER3秒钟显示屏里面出现A.OFF就可以了。
4.0使用静电测试仪时按照被测静电的要求去按各按键的功能,读出显示数值。
5.0测试完毕后,关掉静电测试仪电源开关,静电测试仪为精密测量仪器,各按键不可随意乱按,不可撞击及跌落。
Figure 1. (Left to right) SCS 718 Static Sensor and SCS 718A Air Ionizer Test Kit.718 is a portable handheld instrument used for locating and measuring electrostatic charges. It can be used to locate ESD trouble-areas, and is a valuable tool for the ESD-control engineer. Used in conjunction with the SCS Air Ionizer Test Kit 718A (sold separately), it can be used for verification and auditing of air ionizers. The Static Sensor 718 is battery-powered and has several measurement features:measurements can be taken in a 0 to ±1.999 kVThe SCS Static Sensor 718 has a Low Batteryindicator. Once the battery is depleted toapproximately 6.5 volts, the instrument will showBAT in the display. At this time, the Static Sensor718 will not produce accurate results and the batteryOperation of the Static Sensor 718For accurate measurements during usage, it is recommended that the outside housing of the Static Sensor 718 be connected to an electrical ground.This can be accomplished by having the user holding Figure 2. SCS 718 and 718A Battery Replacementand Indicators.Made in theUnited States of AmericaTo shut off the Static Sensor 718, momentarily press down on the membrane switch labeled POWER. Determining that the power is off can be verified by seeing that the liquid-crystal display (LCD) is off. Making Electrostatic Voltage Measurements: hold the instrument 1-inch (2.54 cm) away from the object being measured. The display will update with the voltage measurement in kilovolts. If the measured voltage is greater than the measurement range of the instrument, a -1. Will be displayed. At this time, switch to a greater range. If over-ranging occurs even with the high range activated, the static charge on the object cannot be measured with the Static Sensor 718.Measurement Range: all measurements are in kilovolts (kV) as stated on the front label of the unit. The StaticSensor 718 has two measurement ranges: 0 to ±1.999kV and 0 to ±19.99 kV. The unit’s current measurementrange mode can be verified by checking the display.Three digits following the decimal point indicate that theunit is in 0 to ±1.999 kV range. Two digits following thedecimal point indicate that the sensor is in 0 to ±19.99kV range. To change between measurement ranges, press the RANGE/HOLD button once, momentarily.HOLD Function: in the event that the user wishes to freeze the current measurement, the HOLD function of the Static Sensor 718 may be used. Simply press the HOLD switch momentarily and the currently displayed voltage will be frozen. A HOLD notice will also bedisplayed to alert the user that the instrument is currently in HOLD status. To unfreeze the display and return tofloating measurement, momentarily press the HOLDswitch once again.Note: During HOLD condition the distance indicatingLED’s are turned off.Zero Adjustment: the SCS Static Sensor 718 has azero adjustment function, which sets a zero referencepoint for all subsequent measurements. This zeroreference can be set by pointing the instrument at aknown zero-voltage surface, and holding down the RANGE/ZERO button for longer than 3 seconds. After 3 seconds, the display will flash and adjust to zero. Repeat this step for both the low and the high ranges. The zero adjustment should be performed every time the unit is turned on.Measurement Accuracy: Distance Indicator: theStatic Sensor 718 is factory calibrated to give accurate measurements when it is placed one inch (2.54 cm) away from the object to be measured. To assist the user in gauging this distance, two light-emitting diodes (LED’s) are present on the front face of the instrument. These LED’s emit two red, bull’s-eye targets on thesurface of the object being measured. As the instrument gets closer to the one inch measurement distance, the bull’s-eyes begin to converge. When they converge and become one, the instrument is approximately one inch away, and the measurement can be made. For more accurate measurements, it is recommended that the user manually measure the distance between the front housing of the instrument and the object being measured.Accuracy and Size of Object to be Measured: the minimum surface area on an electrostatically chargedobject which can be accurately measured is a 5 squareinch (32.3 cm 2) area.Measurements from Greater than One Inch (2.54 cm) Away: in the event that a one inch separation between object-to-be measured and the Static Sensor 718 cannot be achieved, it is possible to get approximate readings.Continuous Output: an output jack is provided on the front of the SCS Static Sensor 718. This output can be used to feed a continuous signal into a data storage device for continuous monitoring of measured voltages. Please use a 3/32 inch (2.5 mm) mono-phone plug to connect into the output jack. The output signal is dependent on the measurement range currently selected. For the low range, the output signal is 1/1000 of the measured electrostatic voltage. For the high range, the output signal is 1/10,000 of the measured voltage.Figure 4. 718 Static Sensor showing hold function and Figure 5. 718 Static Sensor has a continuos output range.Figure 3. Using 718 Static Sensor to take measurements.Automatic Shut-Off: the Static Sensor 718 willautomatically shut-off 20 minutes after the last switch activity. This is done in order to conserve battery power. In the event that the user needs to have the unit stay ON continuously, when turning the unit on press the POWER AND RANGE switches simultaneously. This deactivates the Automatic Shut-Off feature. The BAT indicator will then flash three times to indicate that the automatic shut-off features has been disabled. The Automatic Shut-Off feature will reset itself the next time the instrument is turned on.Operation and Use of SCS Air Ionizer Kit 718A It is recommended that the user be familiar with ionizer test standards ANSI/ESD S3.1 and draft standard ANSI/ESD SP3.3 if the Air Ionizer Test Kit 718A is used to perform verification testing on ionizer performance.Assembly: slide the charge plate over the Static Sensor 718 until it stops. The charge plate slides onto the lower groove, on the sides of the Static Sensor 718.Charging the Plate: holding the Static Sensor 718 (with charge plate attached) in one hand, use the other handto touch the probe of the SCS Air Ionizer Test Kit 718Ato the charge plate. Press either the + button (for apositive voltage) or the – button (for a negative voltage), then remove the probe from the charge plate. Be sureto keep the button pressed while removing the probefrom the charge plate. The display on the Static Sensor 718 will indicate a positive or negative charging voltage (1.1kV minimum). If a voltage of less than ±1.1kV is displayed, check to see if the low battery indicator on the SCS Charger 718A is illuminated. If illuminated, replace the battery in the charger. If the unit continues to supply an incorrect voltage to the charge plate, please contact SCS for additional instructions.Testing ionizer discharge time: after charging the plate, hold the SCS Static Sensor 718 approximately one foot (30.5 cm) away from the ionizer. Monitor the display to see how quickly the 1.1 kV charge is dissipated to 0.1 kV. The speed at which this occurs (the discharge time) indicates how well the ionizer is operating. Please referto the specific ionizer’s operating manual or consultwith the ionizer manufacturer to determine what thisdischarge time should be. Repeat this procedure for both a positively and a negatively charged plate.Testing Ionizer Discharge Time: after charging theplate, hold the SCS Static Sensor 718 approximately onefoot (30.5 cm) away from the ionizer. Monitor the displayto see how quickly the 1.1 kV charge is dissipated to 0.1 kV. The speed at which this occurs (the discharge time) indicates how well the ionizer is operating. Please refer to the specific ionizer’s operating manual or consult with the ionizer manufacturer to determine what thisdischarge time should be. Repeat this procedure for botha positively and a negatively charged plate.Testing ionizer offset balance: zero the charge plateby touching it with a grounded object. This can either be the finger of a grounded person or some other item which is connected to electrical ground. In either case, zeroing the charge plate should make the display on the Static Sensor 718 read zero. Hold the Static Sensor 718 approximately one foot (30.5 cm) in front of the ionizer. Monitor the display. The value displayed is the offset balance of the ionizer, which is the difference between the number of positive and negative ions being emitted. Please refer to the specific ionizer’s operating manual or consult with the ionizer manufacturer to determine what this offset balance should be.Service/Calibration Service and Repair: in the event that you believe the Static Sensor 718 or the SCS Air Ionizer Test Kit 718Ais in need of repair, please contact your local SCS representative for troubleshooting help, and, as needed, repair information. There are no user-serviceable parts on either product. Figure 6. 718 Static Sensor charging plate in use.Figure 7. Testing Ionizer Offset Balance.Figure 8. 718 Static Sensor on test fixture.Static Sensor adjustable screw for display.。
环境静电检测仪使用说明书购买前须知1.在购买环境静电检测仪之前,请确认您对静电和相关安全知识已经有一定的了解。
2.使用环境静电检测仪时,请遵守相关安全操作规范,以保证您的人身安全和设备正常运行。
产品概述环境静电检测仪是一款用于检测环境中静电水平的高精度仪器。
它具有以下主要优点:1.高精度:能够精确测量环境的静电水平,并对异常值进行报警。
2.便携式设计:小巧轻便,方便携带和使用。
3.简单操作:操作界面简洁明了,易于上手。
4.多功能:除了静电检测外,还可显示当前温度和湿度。
使用说明1.开机与关机在使用环境静电检测仪前,请确保已插入可靠的电源线并接通电源。
按下电源按钮,屏幕将显示相关信息,表示仪器已成功开机。
长按电源按钮,屏幕将自动关闭,仪器即为关机状态。
2.测量环境静电水平a.确保环境静电检测仪已开机并处于正常工作状态。
b.将环境静电检测仪保持垂直放置,使其与地面保持一定距离。
c.观察屏幕上显示的数值,即为当前环境的静电水平。
3.报警功能当检测到环境静电水平超过设定的安全值时,仪器将进行报警提示。
具体操作如下:a.确保仪器已开机,并设置了合适的报警阈值。
b.当环境静电水平超过阈值时,仪器将发出声音和闪烁的亮光以示警告。
c.在消除异常静电后,即可使报警停止。
4.显示环境温度和湿度除了静电水平的检测,环境静电检测仪还可以显示当前环境的温度和湿度。
具体操作如下:a.在仪器开机状态下,观察屏幕上的数值,即可显示当前的温度和湿度。
5.维护与保养为了确保环境静电检测仪的正常工作和延长使用寿命,请注意以下维护与保养事项:a.定期清洁仪器表面,使用干净柔软的布进行擦拭。
b.确保仪器工作环境通风良好,并避免灰尘、水汽等外部物质对其影响。
c.在存放仪器时,应避免与尖锐物品相接触,以防损坏。
免责声明本环境静电检测仪使用说明书旨在为用户提供正确的操作指南,但不对因不当使用或操作不当造成的任何损害承担责任。
结论通过使用环境静电检测仪,您可以方便地了解环境中的静电水平,及时采取措施来防止静电对设备和人身的潜在危害。
Hand-held static sensor locates and meas-ures static voltages, tests air ionizers.New from 3M,the 718 Static Sensor can help companies competing in the global high-tech marketplace prevent cost-ly losses due to electro static discharge (ESD) damage by playing a vital and valuable role in their own ESD control program. Easy to use,the hand-held 3M ™718 Static Sensor is designed to measure static voltages on objects and sur-faces arising from electrostatic charge buildups,and can help identify ESD trouble-spots — ensuring product relia-bility and customer satisfaction which translates into com-pany profits. As a bonus,when used in conjunction with the 3M TM Model 718A Air Ionizer Test Kit,the 718 can also be used to verify the operation of air ionizers.718 Static Sensor Features
• Small-size,lightweight,conductive plastic housing • Membrane switches for Power,Range/Zero,and Hold functions.
• Digital,LCD (liquid-crystal) display is easy to read and updates quickly.
• Ranging system assists user in making quick and easy measurements
• Measurements accurate to 5%
• Output jack available for continuous measurements Convenient Size/Low Power Requirements The 718 is small enough to be carried in a pocket and
weighs less than 5 oz. (142 g),including battery. The light-weight plastic housing is conductive,allowing a properly-grounded user to dissipate all electrostatic charges from the surface of the meter.Meter Functions
The meter is equipped with three membrane switches which control different functions. The POWER switch turns the instrument on and off. The RANGE/ZERO button performs
two functions; when pressed momentarily it switches
between the two measurement ranges of 0-2,000 volts and 0-20,000 volts,and if held for longer than 3 seconds,it resets the voltage display to 0 volts. The HOLD button allows the user to freeze a measurement on the LCD for later review.Ranging System
Included with the 3M 718 Static Sensor is a ranging system consisting of two light-emitting diodes (LEDs) which each emit a circular red light onto the surface being measured for static. When the two lights intersect and form a single focused light,the measurement distance is the prescribed 1 inch (2.54 cm).
Accuracy
The Model 718 Static Sensor is accurate to within ±5% of the displayed measurement,at a distance of one inch (2.54 cm) from the target. Accuracy will vary as the dis-tance between measured object and instrument changes from the one inch (2.54 cm) specification.Analog Output Jack
The analog output jack located in the front of the unit pro-vides a convenient hook-up,via a 3/32 inch (2.5 mm)monophone jack,to a recorder/data acquisition console. The 3M 718 Static Sensor may then be used for remote monitoring or permanent recording of electrostatic voltage readings.
3M 718 Static Sensor Specifications
Dimensions 0.85" (H) x 2.4" (W) x 4.15" (L)
2.2 cm (H) x 6.1 cm (W) x 10.5 cm (L)Weight
4.5 oz. (128 g) with battery Power Requirements One 9-volt alkaline battery Measurement Ranges
0 – 2 kV Low Range 0 - 20 kV High Range V oltage Display 3) digit liquid crystal display V oltage Output
1/1000 of measured voltage @ low range
1/10,000 of measured voltage @ high range
Distance Indicator
LED targets. Aligned targets indicate 1 in. (2.54 cm) measurement distance Measurement Accuracy Within 5% of actual voltage Certifications UL,C-UL,CE,CB-scheme,NOM
3
718 Static Sensor
718A Air Ionizer Test Kit
718 Range Finder Unfocused
718 Range Finder at 1" away
3M 718 Static Sensor
1
2
3。