劲炫ASX说明手册(全)
- 格式:pdf
- 大小:1.88 MB
- 文档页数:73

AS系列快速入门手冊绵密网络 专业服务中达电通已建立了70余个分支机构及服务网点,并塑建训练有素的专业团队,提供客户最满意的服务,公司技术人员能在2小时内回应您的问题,并在48小时内提供所需服务。
中达电通公司版权所有如有改动,恕不另行通知400 - 820 - 9595扫一扫,关注官方微信沈阳电话:(024)2334-1160哈尔滨电话:(0451)5366-5568长春电话:(0431)8892-5060呼和浩特电话:(0471)6297-808北京电话:(010)8225-3225天津电话:(022)2301-5082济南电话:(0531)8690-6277太原电话:(0351)4039-485郑州电话:(0371)6384-2772石家庄电话:(0311)8666-7337上海电话:(021)6301-2827南京电话:(025)8334-6585杭州电话:(0571)8882-0610合肥电话 :(0551)6281-6777武汉电话:(027)8544-8475南昌电话:(0791)8625-5010成都电话:(028)8434-2075长沙电话:(0731)8549-9156重庆电话:(023)8806-0306 昆明电话:(0871)6313-7362广州电话:(020)3879-2175厦门电话:(0592)5313-601南宁电话:(0771)2621-501乌鲁木齐电话:(0991)4678-141兰州电话:(0931)6406-725西安电话:(029)8836-0780贵阳电话:(0851)8690-1374福州电话:(0591)8755-1305地址:上海市浦东新区民夏路238号邮编:201209电话:( 021 )5863-5678传真:( 021 )5863-0003网址: AS-0249310-032022/06/13AS系列快速入门手册版本修订一览表版本变更内容发行日期第一版第一版发行2016/07/15第二版1.第2.2.1节增加挡板安装说明2.第2.3.1节更新电源模块配线说明3.第2.8节更新”新增功能块”软件画面4.第2.9节更新”新增程序”软件画面5.第3.3.1节更新”新增装置监控表”软件画面2017/01/20第三版1.由于AS系列硬件手册及AS系列操作手册已合并为AS系列硬件及操作手册,故更新其相关信息2.增加DIADes igner软件相关信息及第3章DIADes igner程序规划撰写与下载监视3.第1.2节更新AS系统架构最大限制信息4.原第2章及第3章合并为第2章5.第2.1.3.1节更电源端配线信息6.第2.1.5节更新ISPSoft软件开启路径7.第2.2.1.1节更新CO MMG R软件开启路径2022/06/13AS系列快速入门手册目录第1章简介1.1 手册内容简介......................................................................... 1-2 1.2 系统架构简介......................................................................... 1-3 1.3 主机运作介绍......................................................................... 1-4第2章ISPSoft程序规划撰写与下载监视2.1 程序规划编写......................................................................... 2-32.1.1 准备工作........................................................................ 2-32.1.1.1 硬件......................................................................... 2-32.1.1.2 软件......................................................................... 2-42.1.1.3 工具与材料 ................................................................ 2-42.1.2 安装.............................................................................. 2-52.1.2.1 安装模块................................................................... 2-52.1.2.2 安装脱落式端子........................................................... 2-72.1.3 配线.............................................................................. 2-82.1.3.1 电源模块配线.............................................................. 2-82.1.3.2 数字输入模块配线........................................................ 2-92.1.3.3 数字输出模块配线........................................................ 2-92.1.3.4 模拟输入与输出模块配线.............................................. 2-102.1.3.5 送电....................................................................... 2-112.1.4 范例说明...................................................................... 2-112.1.5 建立项目...................................................................... 2-122.1.6 规划硬件架构 ................................................................ 2-152.1.7 建立全局符号 ................................................................ 2-202.1.8 建立功能块 ................................................................... 2-222.1.9 建立主要程序 ................................................................ 2-29 2.2 程序下载与监视.................................................................... 2-352.2.1 COMMGR设定.............................................................. 2-382.2.1.1 启动COMMGR ......................................................... 2-38i2.2.1.2 开启COMMGR ......................................................... 2-382.2.1.3 设定COMMGR ......................................................... 2-382.2.2 专案下载...................................................................... 2-402.2.2.1 设定项目通讯........................................................... 2-402.2.2.2 下载硬件配置........................................................... 2-412.2.2.3 下载程序内容........................................................... 2-422.2.3 程序监视与除错 ............................................................. 2-442.2.3.1 程序监视................................................................. 2-442.2.3.2 程序与系统除错 ........................................................ 2-48第3章DIADesigner程序规划撰写与下载监视3.1 程序规划编写 ........................................................................ 3-33.1.1 准备工作........................................................................ 3-33.1.1.1 硬件 ........................................................................ 3-33.1.1.2 软件 ........................................................................ 3-43.1.1.3 工具与材料................................................................ 3-43.1.2 安装............................................................................. 3-53.1.2.1 安装模块................................................................... 3-53.1.2.2 安装脱落式端子 .......................................................... 3-73.1.3 配线............................................................................. 3-83.1.3.1 电源模块配线............................................................. 3-83.1.3.2 数字输入模块配线........................................................ 3-93.1.3.3 数字输出模块配线........................................................ 3-93.1.3.4 模拟输入与输出模块配线 ............................................. 3-103.1.3.5 送电 ...................................................................... 3-113.1.4 范例说明...................................................................... 3-113.1.5 建立项目...................................................................... 3-133.1.6 规划硬件架构................................................................ 3-153.1.7 建立全局变量................................................................ 3-193.1.8 建立功能块................................................................... 3-213.1.9 建立主要程序................................................................ 3-293.2 程序下载与监视.................................................................... 3-343.2.1 COMMGR设定.............................................................. 3-34 ii3.2.1.1 启动COMMGR ......................................................... 3-34 3.2.1.2 开启COMMGR ......................................................... 3-34 3.2.1.3 设定COMMGR ......................................................... 3-35 3.2.2 专案下载...................................................................... 3-36 3.2.2.1 设定项目通讯............................................................ 3-36 3.2.2.2 下载项目-硬件配置与程序 ............................................ 3-37 3.2.3 程序监视与除错.............................................................. 3-38 3.2.3.1 程序监视................................................................. 3-38 3.2.3.2 程序与系统除错......................................................... 3-43 3.2.4 既有ISPSoft项目转移..................................................... 3-44iiiMEMO iv1第1章简介目录1.1 手册内容简介 .................................................................................. 1-2 1.2 系统架构简介 .................................................................................. 1-3 1.3 主机运行介绍 .................................................................................. 1-41-1AS系列快速入门手册1.1手册内容简介针对AS系列PLC的产品,台达依照不同的应用需求,分别为用户准备了不同的说明手册。

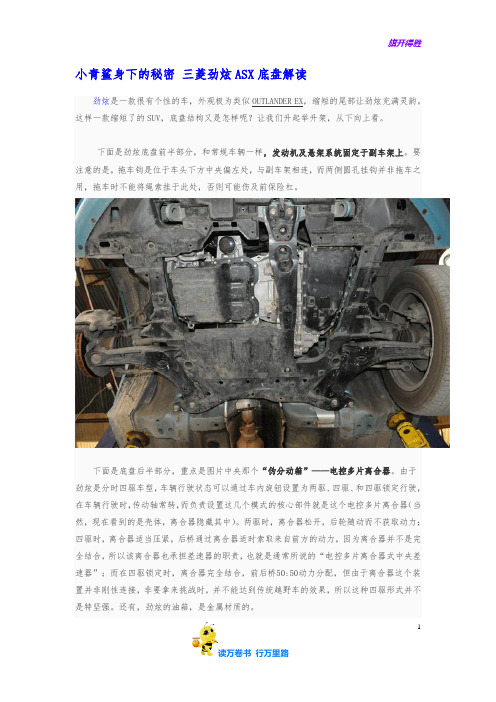
小青鲨身下的秘密三菱劲炫ASX底盘解读劲炫是一款很有个性的车,外观极为类似OUTLANDER EX,缩短的尾部让劲炫充满灵韵。
这样一款缩短了的SUV,底盘结构又是怎样呢?让我们升起举升架,从下向上看。
下面是劲炫底盘前半部分,和常规车辆一样,发动机及悬架系统固定于副车架上。
要注意的是,拖车钩是位于车头下方中央偏左处,与副车架相连,而两侧圆孔挂钩并非拖车之用,拖车时不能将绳索挂于此处,否则可能伤及前保险杠。
下面是底盘后半部分,重点是图片中央那个“伪分动箱”——电控多片离合器。
由于劲炫是分时四驱车型,车辆行驶状态可以通过车内旋钮设置为两驱、四驱、和四驱锁定行驶,在车辆行驶时,传动轴常转,而负责设置这几个模式的核心部件就是这个电控多片离合器(当然,现在看到的是壳体,离合器隐藏其中)。
两驱时,离合器松开,后轮随动而不获取动力;四驱时,离合器适当压紧,后桥通过离合器适时索取来自前方的动力,因为离合器并不是完全结合,所以该离合器也承担差速器的职责,也就是通常所说的“电控多片离合器式中央差速器”;而在四驱锁定时,离合器完全结合,前后桥50:50动力分配,但由于离合器这个装置并非刚性连接,非要拿来挑战时,并不能达到传统越野车的效果,所以这种四驱形式并不是特坚强。
还有,劲炫的油箱,是金属材质的。
1讲完底盘部件,再来说说前后悬架,点击下页,我们来看看各种连杆和弹簧避震。
劲炫为前麦弗逊后多连杆的悬架结构。
先来看看前悬。
2劲炫前悬使用麦弗逊结构,这种结构由弹簧避震和下摆臂作为主要受力的两个部件,由于下摆臂位置时刻变化,所以部分力道交给避震筒承担,我们可以看到,劲炫避震上方的弹簧簧径非常粗,这样可以对避震筒很好的支撑,提高稳定性。
上图为悬架前方视角,拥有这个结构特征便是标准的麦弗逊悬架,下图后方视角为一般悬架附属部件及劲炫的特征,轮拱后方有涂层,可有一定程度的降噪作用,但是副车架却直接装在车身之上,没有橡胶垫过渡,震动和噪声难免传向驾驶舱,其实加几个橡胶垫也多不了几个钱,这种情况,相信厂方有他自己的道理吧。

EXCEED ALL EXPECTATIONS 8,000 /6,990 /6,780LB TOWING CAPACITY4(PREMIUM / LUXURY / LUXURY+)8,000LB TOWING CAPACITY4GX550 OVERTRAIL4WDFULL-TIME4WDFULL-TIME349HORSEPOWER13.4-LITER V6 TWIN-TURBO ENGINE349HORSEPOWER13.4-LITER V6 TWIN-TURBO ENGINE 479LB-FT TORQUE1479LB-FT TORQUE1GX550 PREMIUM /GX550 LUXURY26° / 23° / 23° (PREMIUM)26° / 23° / 21° (LUXURY)APPROACH / BREAKOVER / DEPARTUREANGLE26° / 24° / 22°APPROACH / BREAKOVER / DEPARTUREANGLE10-SPEEDDIRECT-SHIFTAUTOMATIC TRANSMISSION10-SPEEDDIRECT-SHIFTAUTOMATIC TRANSMISSIONDIMENSIONSOVERALL LENGTH 197.04 IN / WHEELBASE 112.2 IN / WIDTH 83.22 IN (+ MIRRORS) / HEIGHT 75.59 IN (PREMIUM), 75.39 IN (LUXURY), 76.18 IN (OVERTRAIL)This is luxury that refuses to quit. Introducing the all-new 2024 GX. A bold new take on the iconic SUV. Where capability and refinement intersect to take you beyond everything you once thought possible. Take control of every drive with a 349-horsepower1 engine and proven four-wheel drive system. Indulge in up to three rows of finely appointed seating and the advanced Lexus Interface2 system. And for those who find exhilaration in pushing every limit, the first-ever GX Overtrail is designed to take on any challenge. In addition to the optimized visibility provided by the GX’s enthusiast-inspired flat dash, the Overtrail features trail-ready exterior appointments, increased ground clearance, a robust suite of off-road3 technologies and 33-inch all-terrain tires—the largest standard tires ever fitted to a Lexus. It’s time to amplify every adventure. It’s time to experience the new GX.FEATURESINDIVIDUAL OPTIONS GX PREMIUMStandard features:Mechanical & Performance8,000-lb towing capacity 4349-horsepower 1 3.4L V6 twin-turbo engine10-speed automatic transmissionFull-time 4WDTorsen ®5limited-slip center differentialwith locking feature Exterior20-in alloy wheelsPremium T riple-Beam LED headlampsPower-folding outside mirrorsRunning boardsPower rear doorPower tilt-and-slide moonroof with roof railsTow hitch 4InteriorSeating for sevenNuLuxe ®-trimmed, 8-way power-adjustable,heated and ventilated front seats with adjustable headrestsLeather-trimmed steering wheelSix USB-C ports 6120V /400-watt AC power outlet 7 in cargo area12.3-in multi-information displayInterior ambient illumination10-speaker Lexus Premium Sound SystemSafety / A dvanced TechnologiesLexus Safety System+ 3.08Intuitive Parking Assist with Auto Braking 9Blind Spot Monitor 10 with Rear Cross-T raffic Alert 11Connected TechnologiesLexus Interface 2 with 14-in touchscreen displaySafety Connect 2 with up to 10-year trial*Service Connect 2 with up to 10-year trial*Remote Connect 2 3-year trial*Wi-Fi Connect 2(AT&T hotspot ) with up to30-day/3GB trial* Drive Connect 2with Cloud Navigation, IntelligentAssistant and Destination Assist 3-year trial* Wireless Apple CarPlay ®12 integrationWireless Android Auto™13 compatibilityOptionsCold Area Package: Heated leather-trimmedsteering wheel, windshield wiper de-icer, headlamp washer, fast-response interior heaterGX PREMIUM+Includes Premium features, and adds or replaces:Exterior Power Rear Door with Kick Sensor 14LED foglamps Interior Power tilt-and-telescoping steering wheel Heated leather-trimmed steering wheel Thematic Ambient Illumination Lexus Memory System for driver’s seat, outside mirrors and steering wheel Heated second-row outboard seats Wireless phone charger 15 Panoramic View Monitor 16Power-folding third-row seat Safety / A dvanced Technologies Intuitive Parking Assist with Auto Braking and Rear Pedestrian Detection 17 Options Digital Key 18 (requires Remote Connect 2 subscription, 3-year trial included )* Heated second-row captain’s chairs (seating for six )Cold Area Package: Windshield wiper de-icer, headlamp washer, fast-response interior heater GX LUXURY Includes Premium+ features, and adds or replaces:Mechanical & Performance 6,990-lb towing capacity 4Exterior 22-in alloy wheels Outside mirrors with puddle lamps Interior 10-way heated and ventilated power driver’s seat Front massaging seats Semi-aniline leather–trimmed interior 4-way adjustable front headrests Second-row manual sunshade Illuminated door sills Options Digital Key 18 (requires Remote Connect 2 subscription, 3-year trial included )* Heated second-row captain’s chairs (seating for six )Mark Levinson ®19 21-speaker, 1,800-watt Surround Sound Cold Area Package: Windshield wiper de-icer, headlamp washer, fast-response interior heater GX LUXURY+Includes Luxury features, and adds or replaces:Mechanical & Performance 6,780-lb towing capacity 4Adaptive Variable Suspension Exterior Automatic power-extending running boards Dynamic Sky panorama glass roof Interior Mark Levinson 21-speaker, 1,800-watt Surround Sound Digital Rearview Mirror Cool box Options Digital Key 18 (requires Remote Connect 2 subscription, 3-year trial included )* Heated second-row captain’s chairs (seating for six )Cold Area Package: Windshield wiper de-icer, headlamp washer, fast-response interior heater GX OVERTRAIL Includes Premium features, and adds or replaces:Mechanical & Performance Electronic Kinetic Dynamic Suspension System (E-KDSS ) Adaptive Variable Suspension Electronically controlled locking rear differential Crawl Control 20 with T urn Assist Downhill Assist Control 21 Multi-Terrain Select Exterior 18-in alloy wheels 33-in all-terrain tires Black utility roof rails Headlamp washers LED foglamps Windshield wiper de-icer Interior Seating for five Heated leather-trimmed steering wheel Four USB-C ports 6 Safety / A dvanced Technologies Panoramic View Monitor 16 with Multi-T errain Monitor Options Cool box GX OVERTRAIL+Includes Overtrail features, and adds or replaces:Exterior Power Rear Door with Kick Sensor 14Outside mirrors with puddle lamps Interior Power tilt-and-telescoping steering wheel Thematic Ambient Illumination Lexus Memory System for driver’s seat, outside mirrors and steering wheel Heated second-row outboard seats Wireless phone charger 1510-way heated and ventilated power driver’s seat Front massaging seats 4-way adjustable front headrests Second-row manual sunshade Illuminated door sills Safety / A dvanced Technologies Intuitive Parking Assist with Auto Braking and Rear Pedestrian Detection 17 Options Digital Key 18 (requires Remote Connect 2 subscription, 3-year trial included)*Cool box Mark Levinson 21-speaker, 1,800-watt Surround Sound Available on all models:T raffic Jam Assist 22 (requires Drive Connect 2 subscription, 3-year trial included )*Head-Up Display Tonneau cover*4G network dependentEXTERIOR COLORSINTERIOR COLORS INTERIOR TRIMS *Additional chargeEMINENT WHITE PEARL*Eminent White Pearl *Nebula Gray Pearl Caviar Nightfall Mica Atomic Silver Incognito Nori Green Pearl Earth *Dapple Gray Dapple Gray Black Black Saddle Tan Saddle Tan GX OVERTRAIL / GX OVERTRAIL+Material NuLuxe NuLuxe / Ultrasuede Semi-aniline leather INTERIOR COLOR GX LUXURY / GX LUXURY+GX PREMIUM / GX PREMIUM+Color INTERIOR TRIM Black Grained T rim / Brown Grained Trim Black Grained Trim / Brown Grained Trim Black Grained Trim Black/Olive Chateau/Olive EXTERIOR COLOR • • • • • • • • • • • • • • • • • • • • • •• • • • • • • • • • • • • • • • • • • • • • • • • • • • • •WITH BLACK ONYX ROOF WITH BLACK ONYX ROOF OPTIONAL BLACK ONYX ROOF*OPTIONAL BLACK ONYX ROOF*OPTIONAL BLACK ONYX ROOF*OPTIONAL BLACK ONYX ROOF*OPTIONAL BLACK ONYX ROOF*OPTIONAL BLACK ONYX ROOF* • •GX Overtrail+ prototype shown.1. Ratings achieved using required premium unleaded gasoline w/ an octane rating of 91 or higher. If premium fuel is not used, performance will decrease.2. Lexus Interface services depend on factors outside of Lexus’ control in order to operate, including 4G network availability, a cellular connection and GPS signal. Without any one or more of these things, operability may be limited or precluded, including access to response center and emergency support. Services vary by vehicle and are subject to change at any time without notice. Requires app download/registration and subscription after trial (if applicable). Terms of Use apply. Data charges may apply. See Owner’s Manual and https:///lexusdrivers/technology/interface for additional limitations and details. To learn about Lexus’ Interface data collection, use, sharing and retention practices, please visit https:///privacy. All trials begin on original purchase or lease date of new vehicle, with the exception of Wi-Fi for which trial begins at time of activation. Paid subscription required after trial (if applicable). For Safety Connect, stolen vehicle police report required to use Stolen Vehicle Locator. Automatic Collision Notification activates only in limited circumstances. For Remote Connect, use only if aware of circumstances surrounding vehicle and it is legal and safe to do so (e.g., do not remotely start a gas engine vehicle in an enclosed space or if vehicle is occupied by a child). Drive Connect service not available in every city or roadway. For Service Connect, information provided is based on the last time data was collected from vehicle and is not real-time data. Wi-Fi Connect service not available everywhere or in every vehicle. Valid in contiguous U.S. and Alaska. Up to 5 devices supported. Integrated Streaming requires subscription for third-party provider services. Wi-Fi Connect trial (if applicable) begins at time of enrollment and expires the earlier of: 3GB of data is used or 30 days after enrollment.3. The Lexus GX is designed to meet most off-road driving requirements, but off-roading is inherently dangerous and may result in personal injury or vehicle damage. Lexus encourages responsible operation to help protect you, your vehicle and the environment.4. Never tow beyond a vehicle’s published towing capacities.5. Torsen® is a registered trademark of JTEKT Torsen, Inc.6. Charging may not be compatible with all mobile phones, smart devices, tablets, e-readers, MP3/WMA players and like models.7. Rated for 400 watts for a single two-prong outlet. See Owner’s Manual for additional limitations and details.8. Lexus Safety System+ effectiveness depends on many factors including road, weather and vehicle conditions. Drivers responsible for paying attention to their surroundings and driving safely. See Owner’s Manual for limitations. 9. Intuitive Parking Assist (IPA) may warn drivers of front and rear collisions with certain objects when traveling at low speeds. Drivers should visually confirm clearance during use. See Owner’s Manual for limitations. 10. Do not rely exclusively on Blind Spot Monitor. Look over shoulder and use turn signal. See Owner’s Manual for limitations. 11. Do not rely exclusively on the Rear Cross-T raffic Alert. Visually confirm clearance during use. See Owner’s Manual for limitations. 12. Requires compatible smartphone. Operability depends on network availability, a cellular connection and GPS signal. Services subject to change at any time without notice. Data charges may apply. To learn more, go to https:///lexus/home. To learn more about Lexus’ connected services data collection, use, sharing and retention practices, please visit https:///privacy. Apple CarPlay and iPhone are registered trademarks of Apple Inc. 13. To wirelessly use Android Auto on your car display, you need a compatible Android smartphone with an active data plan. Y ou can check which smartphones are compatible at g.co/androidauto/requirements. Operability depends on network availability, a cellular connection and GPS signal. Services subject to change at any time without notice. Data charges may apply. To learn more, go to https:///lexus/home. To learn more about Lexus’ connected services data collection, use, sharing and retention practices, please visit https:///privacy. Android and Android Auto are trademarks of Google LLC. 14. Installation of a tow hitch receiver or other accessories located near the rear bumper may require disabling or removing the kick sensor, and the sensor operation setting in your vehicle should be turned off. See Owner’s Manual for limitations. 15. Wireless charging may not be compatible with all mobile phones, smart devices, tablets, e-readers, MP3/WMA players and like products. 16. The Panoramic View Monitor does not provide a comprehensive view of the area surrounding your vehicle. Look around to confirm clearance. See Owner’s Manual for limitations. 17. Intuitive Parking Assist may warn drivers of, and potentially brake for, rear collisions with certain objects when traveling at low speeds. Drivers should visually confirm clearance during use. See Owner’s Manual for limitations. 18. Digital Key requires active Remote Connect trial or subscription. Use only if aware of circumstances surrounding vehicle and it is legal and safe to do so (e.g., do not remotely start a gas-engine vehicle in an enclosed space or if vehicle is occupied by a child). Remote Connect depends on certain factors outside of Lexus’ control in order to operate, including 4G network availability, a cellular connection and GPS signal. Without any one or more of these things, operability may be limited or precluded. Services subject to change at any time without notice. Digital Key also requires Bluetooth connectivity. Remote Connect is included with select paid Connected Services packages. See your Lexus dealer for details. Terms of Use apply. Data charges may apply. See Owner’s Manual and https:///lexusdrivers/technology/interface for additional details. To learn about Lexus Interface’s connected services data collection, use, sharing and retention practices, please visit https:///privacy. Trial period begins on original purchase or lease date of new vehicle. Paid subscription required after trial (if applicable). Terms of Use apply. 19. Mark Levinson is a registered trademark of Harman International Industries, Inc. 20. Crawl Control is designed for driving on difficult terrain at low speeds and assists the driver by controlling acceleration and braking, allowing the driver to focus on steering. See Owner’s Manual for additional limitations. 21. Downhill Assist Control is designed to help the driver maintain vehicle control and speed on steep downhill descents, and is not a substitute for safe driving judgment and practices. Factors including speed, grade, surface conditions and driver input can all affect the ability of DAC to prevent a loss of control. See Owner’s Manual for additional limitations. 22. T raffic Jam Assist requires an active trial or subscription to Drive Connect. Traffic Jam Assist is not an automated driving system, requires driver supervision at all times, and is designed to function on controlled access freeways at speeds of 25 mph or less. Use this system in accordance with applicable laws. Before operating, refer to Owner’s Manual for additional instructions and limitations. 23. Ultrasuede is a registered trademark of Toray Industries, Inc.Lexus strives to build vehicles to match customer interest, and thus they typically are built with popular options and option packages. Not all options/packages are available separately, and some may not be available in all regions of the country. Lexus Interface display shown may not reflect most recent over-the-air enhancements. See for information about options/packages commonly available in your area. If you would prefer a vehicle without any or with different options, contact your dealer to check for current availability or the possibility of placing a special order. Specifications, features, equipment, technical data, performance figures, options, and color and trim are based upon information available at time of publishing, are subject to change without notice, and are for mainland U.S.A. vehicles only. Vehicles shown may be prototypes, shown using visual effects and/or shown with options. Actual models may vary. Colors depicted may vary based on multiple factors, including ambient lighting and the format in which they are being viewed (e.g., computer, mobile device, or print). See your Lexus dealer for details. Lexus reminds you to wear seatbelts, secure children in rear seat, obey all traffic laws and drive responsibly. For more information, call 800-USA-LEXUS (872-5398) or visit . To learn more about your financing options, contact your Lexus dealer or call Lexus Financial Services at 800-874-7050. ©2023 Lexus, a Division of Toyota Motor Sales, U.S.A., Inc.P4-7665 (06/23)。

Instrument PanelDriver Information InterfaceThe driver information interface shows information such as the estimated travelable distance and fuel economy of the vehicle. It also displays messages such as warnings and other helpful information.■Accessing contents in the main displayPress the (home) button, then roll the left selector wheel to scroll to the content you want to see. Press the left selector wheel to see detailed information.■Switching the Display1Switching the DisplayTo go back to the previous screen, press the (back) button.You can edit, add, or delete the meter contents using the audio/information screen.2Customizing the Meter P.272Instrument Panel(Home) Button Left Selector WheelRoll the left selectorwheel.WarningsP.Safety SupportP.MaintenanceP.Rear Seat BeltsP.Driver AttentionP.Driving SupportP.Traffic SignP.NavigationP.Power/ChargeP.Eco DriveP.Power FlowP.Range & FuelP.Fuel EconomyP.Speed & Time P.AudioP.PhoneP.Instrument Panel■Sub displayPress the TRIP button to change the display.Shows the total number of miles or kilometers that your vehicle has accumulated.■OdometerOdometerOutside TemperatureTrip A Trip BTRIP ButtonInstrument Panel Shows the total number of miles or kilometers driven since the last reset. Meters Aand B can be used to measure two separate trips.■Resetting a trip meterTo reset a trip meter, display it, then press and hold the TRIP Button. The trip meteris reset to 0.0.Shows the outside temperature in Fahrenheit (U.S.) or Celsius (Canada).■Adjusting the outside temperature displayAdjust the temperature reading by up to ±5°F or ±3°C if the temperature readingseems incorrect.■Trip Meter■Outside Temperature1Trip MeterSwitch between trip meter A and trip meter B bypressing the TRIP Button.1Outside TemperatureThe temperature sensor is in the front bumper.Road heat and exhaust from another vehicle canaffect the temperature reading when your vehiclespeed is less than 19 mph (30 km/h).It may take several minutes for the display to beupdated after the temperature reading has stabilized.You can adjust the temperature reading.2Customized Features P.357Instrument PanelRoll the left selector wheel to switch between trip computer A and trip computer B.■Range & FuelLeft Selector WheelRollInstrument Panel ■Trip meterShows the total number of miles or kilometers driven since the last reset. Meters Aand B can be used to measure two separate trips.Resetting a trip meterTo reset the trip meter, display it, then press the left selector wheel and then selectReset.u The trip meter is reset to 0.0.■Average fuel economy (Avg. Fuel)Shows the estimated average fuel economy of each trip meter in mpg or l/100 km.The display is updated at set intervals. When a trip meter is reset, the average fueleconomy is also reset.■Instant fuel economyShows the instant fuel economy as a bar graph in mpg or l/100 km.■RangeShows the estimated distance you can travel on the remaining power and fuel. Thisestimated distance is based on the vehicle’s current fuel economy.1Trip meterSwitch between trip meter A and trip meter B byrolling the left selector wheel.When resetting the trip meter in the Range & Fuel,the trip meter in the sub display resets at the sametime.1Average fuel economy (Avg. Fuel)You can change when to reset the average fueleconomy.2Customized Features P.357Instrument PanelRoll the left selector wheel to switch between trip computer A and trip computer B.■Speed & TimeRollLeft Selector WheelInstrument Panel ■Trip meter2Trip meter P.148■Elapsed timeShows the time elapsed since Trip A or Trip B was reset.■Average speed (Avg. Speed)Shows the average speed in mph or km/h since Trip A or Trip B was reset.1Elapsed timeYou can change when to reset the elapsed time.2Customized Features P.3571Average speed (Avg. Speed)You can change when to reset the average speed.2Customized Features P.357Instrument Panel■CompassShows the compass screen.■Turn-by-Turn DirectionsWhen driving guidance is provided by the navigation system *, Android Auto or Apple CarPlay, turn-by-turn directions to your destination appear.2Refer to the Navigation System Manual 2Android Auto P.3262Apple CarPlay P.320■Navigation1NavigationYou can select whether to have the turn-by-turn display come on or not during the route guidance.2Customized Features P.357Turn-by-turn directions may not be available for all apps.When the compass or turn-by-turn directions are displayed, you can control some navigation system functions on the driver information interface by scrolling the left selector wheel.2Refer to the navigation systemModels with navigation systemCompassTurn-By-Turn Driving Directions*Not available on all modelsInstrument Panel2Driver Information Interface Warning andInformation Messages P.115Shows the remaining oil life and MaintenanceMinder TM.2Maintenance Minder TM P.533■Warnings1WarningsIf there are no Warnings, None message appears onthe driver information interface.If there are multiple warnings, you can roll the leftselector wheel to see other warnings.(Example)■MaintenanceInstrument PanelShows the current phone information.2Bluetooth ® HandsFreeLink ® P.381■PhoneInstrument Panel■Electric motorThe degree to which the electric motor isbeing powered is displayed by the readings onthe POWER side.■Battery charge in progressThe degree to which the High Voltage batteryis being charged is displayed by the readingson the CHARGE side.■Speed/Distance UnitsEnables you to show another unit on thedriver information interface, head-up display*and audio/information screen and set thedisplayed measurements to read in eithermiles and mph or km and km/h.Press and hold the left selector wheel whenyou select Power/Charge on the driverinformation interface. Each time you do this,the unit will change from miles, mph to km,km/h or vice versa. After this, a confirmationscreen will appear for a few seconds.■POWER/CHARGE Gauge*Not available on all modelsInstrument PanelShows the current audio information.2Audio System Basic Operation P.257Shows the traffic sign recognition system.2Traffic Sign Recognition System P.493■Audio■Traffic Sign Recognition SystemInstrument PanelAppears when any of the rear seat belts arelatched or unlatched.2Seat Belt Reminder P.46■Rear Seat Belt ReminderInstrument PanelThe Driver Attention Monitor analyzes steering inputs to determine if the vehicle is being driven in a manner consistent with drowsy or inattentive driving. If it determines that the vehicle is being driven in such a manner, it will display the degree of the driver’s attention on the driver information interface.When you select Driver Attention on thedriver information interface, bars on it light upin white to indicate the degree of the driver’sattention.2Accessing contents in the main displayP.143■Driver Attention Monitor 1Driver Attention Monitor The Driver Attention Monitor cannot always detect if the driver is tired or inattentive.Regardless of the system’s feedback, if you arefeeling tired, stop in a safe location and rest for as long as needed.Driver InformationInterfaceLeft Selector Wheel(Home) Button LevelInstrument Panel If two bars light up, the Driver Attention Level Low message will appear.If one bar lights up, the Driver Attention Level Low. Time For A Break message will appear, a beep will sound, and the steering wheel will vibrate.If this message appears, stop in a safe location and rest for as long as needed.The message will disappear when the left selector wheel is pressed or when the system has determined that the driver is driving normally.If the driver does not take a break and the monitor continues to detect that the driver is very tired, the message will appear again after approximately 15 minutes, accompanied by a beep and steering wheel vibrations.The message does not appear when thetraveling time is 30 minutes or less.Instrument Panel■The Driver Attention Monitor resets when:•The power system is turned off.•The driver unfastens the seat belt and opens the door while the vehicle is stopped.■For the Driver Attention Monitor to function:•The vehicle must be traveling above 25 mph (40 km/h).•The electric power steering (EPS) system indicator must be off.■Depending on driving conditions or other factors, the Driver Attention Monitor may not function in the following circumstances:•The steering assist function of the Lane Keeping Assist System (LKAS) is active.2Lane Keeping Assist System (LKAS) P.480•The condition of the road is poor, e.g. the surface is unpaved or bumpy.•It is windy.•The driver is frequently operating the vehicle in an assertive manner such as changing lanes or accelerating.■CustomizingYou can change the Driver Attention Monitor settings. Select Tactile And Audible Alert , Tactile Alert , or OFF .2Customized Features P.3571For the Driver Attention Monitor to function:The bars on the driver information interface remain grayed out unless the Driver Attention Monitor isfunctioning.Instrument PanelShows the distance between your vehicle andthe vehicle detected ahead.Informs you whether ACC with Low SpeedFollow and/or LKAS is activated or not. If ACCwith Low Speed Follow is activated, the setfollowing interval is displayed. If LKAS isactivated, the displayed lane marks change toindicate that LKAS is activated.2Adaptive Cruise Control (ACC) with LowSpeed Follow P.4642Lane Keeping Assist System (LKAS) P.480■Driving Support Information1Driving Support InformationIn case ACC with Low Speed Follow is not activated,when the distance between your vehicle and thevehicle ahead becomes too small, the section behindthe vehicle icon turns amber and alerts you.Amber gradation Icon of vehicle aheadDistance to vehicle aheadWhen ACC with Low Speed Follow andLKAS are OnSet Vehicle IntervalACC with Low Speed Follow on: The section behind the vehicle icon turns green.LKAS on: The lane outlines appear on the display.LKAS starts: The lane lines change to solid ones.LKAS suspend: The lane lines change to dotted ones.Instrument PanelIndicates the status of RDM, Low Speed Braking Control *, CMBS TM , and blind spot information system *, such as On, Off, or Failure, by color and letters.The following colors indicate the status of any of the above mentioned systems:•Green: The system is on.•Gray: The system is off.•Amber: There is a problem with the system.■Safety Support 1Safety Support If a system is indicated by the color amber, have your vehicle checked by a dealer immediately.To turn on or off each system, first rotate the leftselector wheel to switch displays. From the next display you can select which system to turn on or off.2RDM On and Off P.4912CMBS TM On and Off P.4532Blind spot information system on and offP.4452System On and Off P.461You can also confirm the status of each function bythe color of the safety support indicator.2Safety Support Indicator (Amber) P.1112Safety Support Indicator (Green/Gray)P.114Even when the Low Speed Braking Control icon is green, if the parking sensor is turned off for the rearonly, the brake assist will not operate when reversing.2Turning off All Rear Sensors P.518Models with Low Speed Braking ControlBraking Control Icon and Status *Not available on all modelsInstrument PanelShows the average fuel economy for the lastthree driving cycles (1-3), and the currentdriving cycle (0) in mpg or l/100 km.Each time you set the power mode to ON, thedisplay is updated, and the oldest record isdeleted.■Average Fuel Economy Recordsuu Gauges and Displays u Driver Information Interface Instrument Panel■Eco Drive Display The vehicle icon on the display moves forward or backward while driving.The more aggressive the acceleration is, the further the icon moves forward.The more aggressive the deceleration is, the further the icon moves backward.Keep the icon near the center of the circle for better fuel economy while driving.■Eco Drive Display/Drive Cycle Score/Lifetime Points 1Eco Drive Display Switch between the average fuel economy A and average fuel economy B by rolling the left selector wheel.Decelerationuu Gauges and Displays u Driver Information InterfaceInstrument Panel ■Drive Cycle Score/Lifetime PointsAppear for a few seconds when you set the power mode to VEHICLE OFF. Each has three stages. Depending on your driving style, the leaf icon(s) and the gauge increase or decrease to indicate that you have reached a different stage of fuel economy.■Resetting the Drive Cycle Score1.Make sure the shift position is in P. Turn the power mode to ON.2.If ECON mode is on, press the ECON button to turn it off.3.Turn the power mode to VEHICLE OFF.4.Turn the power mode to ON again.u Make sure to complete steps from 4 through 6 within 30 seconds.5.Depress the brake pedal twice.6.Press the ECON button twice.u The color of the ambient meter will turn to monochrome.7.Turn the power mode to VEHICLE OFF.Lifetime PointsAdvancinguu Gauges and Displays u Driver Information Interface Instrument Panel Displays the power flow of the motor and engine, indicating the vehicle’s power source and whether the battery is being charged.■Power Flow Monitor 1Power Flow Monitor While the vehicle is stationary with the engine running, the following may appear on the driverinformation interface.Power is supplied by the motor and the engine.Hybrid (HV)The engine is running and the motor is charging the HighVoltage battery.Power is being supplied by the engine only.Engine ONEngine OFFPower is supplied by the motor.Electric Vehicle (EV)The engine is running and the motor is charging the HighVoltage battery.Engine (Direct Drive)The motor is charging the High Voltage battery.Regeneration。
Quick start user manualSection 1The warnings in this manual must be observed together with the "USER MANUAL - Section 2".Le avvertenze nel presente manuale devono essere osservate congiuntamente al “MANUALE D’USO – Sezione 2”.Die Warnungen in diesem Handbuch müssen in Verbindung mit der "BEDIENUNGSANLEITUNG - Abschnitt 2" beobachtet werden”.Les avertissements specifiés dans ce manuel doivent être respectés ainsi que les "CARACTERISTIQUES TECHNIQUES -Section 2"Las advertencias del presente manual se deben tener en cuenta conjuntamente con las del “MANUAL DEL USUARIO” - Sección 2”.A.E.B. Industriale Srl Via Brodolini, 8 Località Crespellano 40053 VALSAMOGGIA BOLOGNA (ITALIA)Thank you for choosing a dBTechnologies Product!VIO S118 is an active horn loaded subwoofer, designed for professional use, easy to fly, equipped with one 18” woofer (voice coil: 4”). The powerful DIGIPRO® G4 amplifier section, capable of handling up to 1600 W (RMS power), is controlled by a DSP, which can perform a detailed customization of the output sound of the subwoofer. In particular, thanks to the complete control interface, it is possible to accurately tune various types of configurations, like cardioid or end-fire. The RDnet connections allow in-depth remote control, thanks also to free available software (dBTechnologies Network, dBTechnologies Composer). WPD (wireless position detection) is a new feature which allows recognizing the placement of the subwoofer in line-array (in the real use). Professional accessories (like FSA-VIOL210 flown adapter, GSA-VIOL210 stack adapter, DRK-210 fly-bar, DO-VIOS118 dolly) ensure easy set-up to create different configurations, completing live installations with VIO-L210 line-arrays.Check the site for the complete user manual!1) UnpackingThe box contains:No. VIO S118No. 1 Mains cable with Neutrik® powerCON TRUE1connectorNo. 1 FuseThis quick start and warranty documentation2) Easy installationThe quick assembly in line-array is guaranteed by:UPPER SIDEfront retractable brackets (A), for anchoring to ahigher subwoofer or DRK-210 fly-bar (flowninstallation)rear retractable brackets(B), for anchoring to ahigher subwoofer, to DRK-210 fly-bar (flowninstallation) or to GSA-VIOL210 (stacked installation)quick-release pins (C) for securing the retractablebracketsLOWER SIDEfront anchorage system(D), for anchoring to alower subwoofer or to VIO-L210 module (flowninstallation)rear anchorage system (E), for anchoring to alower subwoofer or to FSA-VIOL210 (flowninstallation)TOP AND LATERAL SIDESpick points forDRK- 210 fly-bar (F)(stacked mounting)pole-mount adapter (G)(M20 threaded hole)handles (H) (2 for eachside)The use of main accessories for each type ofinstallation is illustrated in the pictures below. Pleaserefer to the related instructions and complete manualsfor further information.The product and accessories must be handled bytrained personnel only! The user is required tofollow regulations and mandatory laws onsafety of the country in which the product is used. Don’tuse handles and/or roping points to suspend VIO S118!3) First switch-onThe DIGIPRO G4 amplifier of VIO S118 is controlled by a powerful DSP. All the connections and controls are in the rear amplifier control panel:The subwoofer is supplied with a mounted fuse for operation within the 220-240V~ range. If you need to operate in the 100-120V~ voltage range:▪ Disconnect all connections, including the powersupply▪ Wait 5 minutes▪ Replace the fuse with the one provided in thepackage for the 100-120V~ range1 – Input (balanced) connector2 – Link/Xover Out (balanced) connector3 – Subwoofer attenuation rotary control4 – Delay rotary controls5 – Polarity switch6 – Cardioid preset switch7 – Link/Xover Out switch8 – Xover LPF9 – Status LEDs (Limiter, Signal, Mute/Protection, Ready)10 – RDNet Data In 11 – RDNet Data Out 12 – RDNet status LEDs 13 – System test switch14 – USB Data Service (USB-standard Type B) 15 – Full Range Mains input connector 16 – Mains Link connector 17 – Mains Fusea) Once you have properly set up the desiredconfiguration (see also the VIO S118 complete user manual and accessories instructions for further information), connect the audio input (1). Set the Subwoofer attenuation (3) to 0 dB.b) Connect the possible output direct link (2), and set the Link/Xover Out switch (7). If your choice is Xover, you can choose the LPF frequency with (8) Xover rotary. This filter does not affect the “Link” output, if selected with (7).c) Choose the Subwoofer Setup (Delay 4, Polarity 5) In cardioid configuration, please note that thecardioid preset switch (6), when active, bypass these controls.d) In case of remote control, connect the Data Input (10) to the hardware remote controller (RDNetControl 2 or RDNet Control 8) with cables equipped with etherCON connectors. Then connect the Data Output (11) to the Data Input (10) of a possiblesecond device, and so on. When the RDNet network is on and it has recognized the connected device, the LED “Link” (12) is on. The other LEDs (12) “Active” start blinking at the presence of data transmission, the “Remote Preset Active” advise that all the local controls set on the amplifier panel (level, DSPpresets, etc.) are by-passed and controlled remotely by RDNet. In remote control it is essential the use of free dBTechnologies software:∙ dBTechnologies Network,useful for an in-depth control of different devices in remote connection;∙ dBTechnologies Composer,useful for the complete sound system design for various professional needs, particularly developed for VIO series.e) Connect the power supply (15). Link the power to other subwoofer or modules (see Technical Data for further information) using mains link connector (16).For further information, download the complete user manual and the free software:/EN/Downloads.aspx or scan the QR code.Technical DataSpeaker Type: Active horn-loaded subwooferAcoustical dataFrequency Response [-6 dB]:36 Hz – Cut frequency(crossover - dependent)Frequency Response [-10 dB (HPF)]:33 HzMax SPL (1 m): 139 dBLF: 1 x 18”LF Voice Coil: 4”Crossover freq.: 60 to 110 Hz + full-rangeDirectivity: (omnidirectional) Cardioid with DSPAmplifierAmp Technology: Digipro® G4Power supply: Full range with PFCAmp Class: Class-DRMS Power: 1600 WPeak Power: 3200 WCooling: Passive (convection)Operating voltage:100-240V~ 50-60 Hz (Full Range)Wireless position recognition: WPD technologyProcessorController: DSP, 64 bit 96 kHzLimiter: Peak, RMS, ThermalControls: Rotary Delay Control (0-9.9 ms, steps: 0.1 ms),switches (Link/Xover, Cardioid Preset, System test,Phase), Subwoofer level, Xover LPFInputMains connections: PowerCON® TRUE1 In/linkMaximum number of subwoofer for each daisy chainpower connection [mains input + mains link]: 1+3 VIOS118** (220-240V~), 1+1 VIO S118** (100-120V~)Signal Input: (Balanced)1x IN (female)Signal Out: (Balanced) Link OUT (male)RDNET connectors:Data In / Data OutUSB connector: standard USB B-type (for SERVICE DATA)MechanicsHousing: Wooden box/black polyurea finishGrille: Full metal (CNC machining)Handles: 2 per sideRigging points: 4 in the upper side, 4 in the lower sidePick points (stack mode): yes (on top for DRK210)Width: 720 mm (28.34 in)Height: 520 mm (20.47 in)Depth: 695 mm (27.36 in)Weight: 45.1 kg (99.42 lbs.)Download the complete user manual on:/EN/Downloads.aspxEMI CLASSIFICATIONAccording to the standards EN 55103 this equipment is designed and suitable to operate in E5 Electromagnetic environments.FCC CLASS A STATEMENT ACCORDING TO TITLE 47, PART 15, SUBPART B, §15.105This equipment has been tested and found to comply with the limits for a Class A digital device, pursuant to part 15 of the FCC Rules.These limits are designed to provide reasonable protection against harmful interference when the equipment is operated in a commercial environment.This equipment generates, uses and can radiate radio frequency energy and, if not installed and used in accordance with the instructions, may cause harmful interference to radio communications.Operation of this equipment in a residential area is likely to cause harmful interference in which case the user will be required to correct the interference at his own expense.Changes or modifications not expressly approved by the party responsible for compliance could void the user’s authority to operate the equipment.WARNING: This equipment is compliant with Class A of CISPR 32. In a residential environment this equipment may cause radio interference. WARNING: Make sure that the loudspeaker is securely installed in a stable position to avoid any injuries or damages to persons or properties. For safety reasons do not place one loudspeaker on top of another without proper fastening systems. Before hanging the loudspeaker check all the components for damages, deformations, missing or damaged parts that may compromise safety during installation. If you use the loudspeakers outdoor avoid spots exposed to bad weather conditions.Contact dB Technologies for accessories to be used with speakers. dBTechnologies will not accept any responsibility for damages caused by inappropriate accessories or additional devices.Features, specification and appearance of products are subject to change without notice.dBTechnologies reserves the right to make changes or improvements in design or manufacturing without assuming any obligation to change or improve products previously manufactured.Scan withyour QRReader App todownload thecomplete UserManual。