显示屏使用说明书
- 格式:pdf
- 大小:2.76 MB
- 文档页数:30

监控显示器用户手册目 录1. 责任声明 ...........................................................................................i 3. 第1章 产品简介 ................................................................................14. 第2章 设备接口................................................................................25. 第3章 面板按键................................................................................36. 第4章 遥控器 ................................................................................47. 第5章 基本操作 ................................................................................5...........................................................................................8. 保修服务 109. 限制物质或元素标识表 (11)...........................................................................................2. 前 言 i i 用户手册监控显示器版权所有©杭州海康威视数字技术股份有限公司2021。
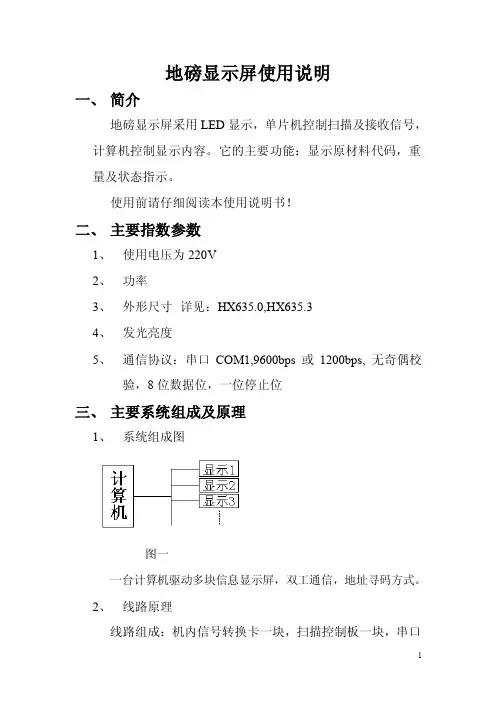
地磅显示屏使用说明一、简介地磅显示屏采用LED显示,单片机控制扫描及接收信号,计算机控制显示内容。
它的主要功能:显示原材料代码,重量及状态指示。
使用前请仔细阅读本使用说明书!二、主要指数参数1、使用电压为220V2、功率3、外形尺寸详见:HX635.0,HX635.34、发光亮度5、通信协议:串口COM1,9600bps或1200bps, 无奇偶校验,8位数据位,一位停止位三、主要系统组成及原理1、系统组成图图一一台计算机驱动多块信息显示屏,双工通信,地址寻码方式。
2、线路原理线路组成:机内信号转换卡一块,扫描控制板一块,串口到机内卡的信号线一根(由三心电源线及两串行口接头组成),机内卡到扫描控制板的信号线一根(由航空插头、串行口接头和多心双绞线组成)。
接线图如下:图二3、软件驱动原理软件系统可分为两大部分:单片机接收扫描部分和计算机发送信息部分。
下面分别介绍:单片机接收扫描部分单片机通信是通过串口协议进行的,波特率有两种选择9600bps和1200bps,可通过扫描控制板上的4号拨动开关控制:“ON”时为9600bps,反之为1200bps,无奇偶校验,8位数据位,一位停止位。
接收字节个数为13,分别为:1,2,3为屏选地址(e01为一号屏,e02为二号屏,依次类推);4,5为原材料代码;6…11为原材料重量;12为重量状态指示(0表示关闭,1表示绿灯亮,2表示红灯亮);13为清屏标志位(0表示清屏,2表示显示)。
计算机发送信息部分计算机发送软件应用VB语言完成,通信协议同上。
特别注意的是发送原材料重量时位数不足时前面要不零,例如:重量为“25000”千克,不足6位,发送时要不成“025000”形式。
两次信息发送时要有一定的时间间隔。
四、结构及各部分作用五、操作说明六、安装及注意事项1、必须有良好的接地。
2、线缆之间的连接关系要清楚。
3、安装条件要符合如下规定防水设施良好220v,50hz交流电等4、。
触摸显示器用户手册TOUCH MONITOR USER’S MANUAL(适用型号:WTM系列)(Applicable models: WTM Series)版本:2014修订版A重要请仔细阅读用户手册,掌握如何安全、有效地使用本产品。
尽管本公司已经尽最大努力使本手册提供最新信息,但是请注意本公司显示器规格仍会未经通知即进行变更,恕不另目录第1章 介绍 2 第2章 安装 3 第3章 装配 6 第4章 操作7 第5章 技术支持10 第6章 安全与维护11 第7章 联系我们13产品说明新的触摸显示器集anytouch触摸产品的可靠性能和触摸技术与显示屏设计领域的最新进展于一身。
这种性能组合可在用户与触摸显示屏之间提供自然的信息流动。
此触摸显示器带有一个 16.7M 彩色有源矩阵薄膜晶体管 LCD 面板,提供了优异的显示性能。
其它旨在增强此 LCD 显示器性能的功能包括:即插即用兼容性、屏幕显示 (OSD) 控件。
预防措施为了最大限度延长设备的使用寿命、确保用户安全以及预防风险,请采纳本用户手册中的所有警告、预防措施和维护建议。
有关更多信息,请参见“安全与维护”一章。
本手册包含正确设置和保养该设备的重要信息。
设置和开启新触摸显示器电源之前,请务必先通读本手册,特别是“安装”、“装配”和“操作”这几章。
产品特点1.即插即用触摸显示器,连接使用100~240V,50/60赫兹的通用的交流电源2.提供高清晰度分辨率3.全金属结构, 典雅大方且低调的外观设计,使内容更加脱颖而出4.提供背面VESA壁挂安装,四周侧孔安装,可调节支架安装,及定制支架安装等多种方式5.Windows XP /7 /8, Android , Linux, Mac OS X操作系统的完美支持技术参数型号WTM120 WTM150 WTM170 WTM190 WTM215 WTM270 VGA显示分1024 x 768 1024 x 768 1280 x 1024 1280 x 1024 1920 x 1080 1920 x 1080 辨率DVI显示分1024 x 768 1024 x 768 1280 x 1024 1280 x 1024 1920 x 1080 1920 x 1080 辨率VESA FDMI VESA,MIS-D,75,C VESA,MIS-D,100,C VESA,MIS-D,100,C VESA,MIS-D,100,C VESA,MIS-D,100,C VESA,MIS-E,C工作电压AC100V -240V (50/60Hz)输入电压DC12V*注:具体参数见相应的规格书打开触摸显示器的包装验证是否有以下项目VGA线*1、DVI线*1、电源适配器(12V)*1、电源线*1、USB连接线*1、安装支架*4、螺丝包*2、相应的驱动光盘、合格证、桌面支架(选配件)连接器面板与接口触摸显示器的连接1.用VGA视频电缆分别连接显示器的VGA输入连接器与VGA视频源;或用DVI视频电缆分别连接显示器的DVI输入连接器与DVI视频源。
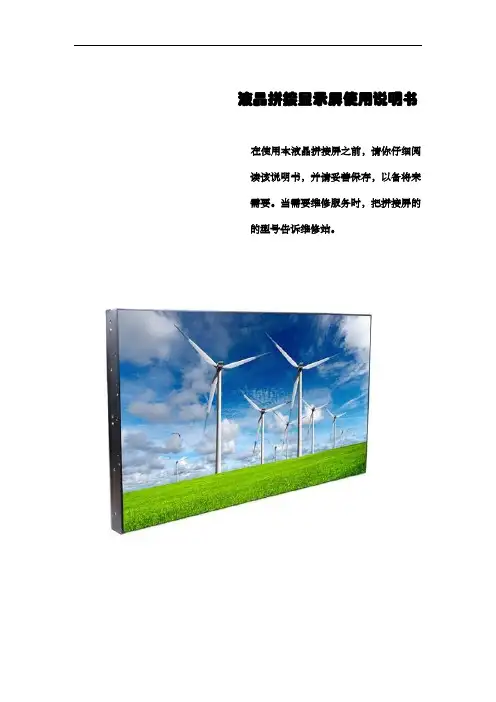
液晶拼接显示屏使用说明书在使用本液晶拼接屏之前,请你仔细阅读该说明书,并请妥善保存,以备将来需要。
当需要维修服务时,把拼接屏的的型号告诉维修站。
目录重要安全说明 (3)准备工作 (3)附件 (4)简介 (4)外部设备的安装 (12)整机外围接口示意图 (12)系统组成原理 (12)大屏幕墙组成框图 (12)DVD的安装 (12)连接S-Video线缆时 (12)Video设备的安装 (13)HDMI信号输入的安装 (13)PC的安装 (13)地址开关的设定 (13)外接控制设备的安装 (14)液晶拼接屏拼接软件控制系统(标准) (16)软件概述 (16)软件安装 (16)运行环境 (16)软件安装 (17)软件操作 (17)控制软件操作 (17)软件界面 (17)屏幕设置区功能及操作 (18)屏幕选择区功能及操作 (19)通道选择区功能及操作 (19)调节控制区功能及操作 (20)注意事项 (22)附录 (23)问题处理指南 (23)维护保养 (24)重要安全说明1、在使用此产品前请仔细阅读此说明书。
2、请将此说明书妥善保管。
3、请遵守所有警告。
4、请遵守所有说明。
5、不要让此产品靠近有水的地方。
为了避免火灾或电击的危险,请不要将此产品暴露在雨中或潮湿的环境中。
6、请使用柔软的干布清洁此产品。
如果需要进一步清洁,请参见此说明书中的“清洁液晶拼接屏”获取详细信息。
7、不要挡住通风孔。
按照制造商的说明安装此产品。
8、不要在靠近热源如散热器、加热器、炉子或其他能够产生热量的设备附近安装此产品。
9、保护好电源线,不要挤压电源线,尤其是电源插头以及电源线与产品的连接部位10、确保电源插座位于产品附近,这样使用更加方便。
11、请确保所有的地线已经连接,以防止潜在的危险。
如果无法正确接地,则请专业电气技师安装单独的电路断路器。
切勿尝试以下接地方式,例如将拼接屏连接至电话线、导雷线或煤气管道上。
12、如果此产品长期不用,请拔下其电源插座。

LED FOR WINDOWS LED电子显示屏使用说明书北京金特维技术有限公司目录一、异步显示屏系统构成及安装 (2)二、软件的安装 (3)三、软件使用 (4)四、常见问题回答 (21)五、功能键说明......... ......... (22)一、异步显示屏系统构成及安装本系统由 LED 电子显示屏屏体、上位计算机、与计算机和控制器串口通讯线缆组成。
用户主要完成串口通讯线缆的制作。
线缆两头为两 DB9插孔头(如图 1.1所示 ,制作时 2对 2(主机信号接收可不连 , 3对 3(主机信号发送 , 5对 5(地线即可。
使用时,将线缆一头与计算机的一个串口相连,另一头与 LED 电子屏屏体相连。
DB9插头 DB9插孔图 1.11 2 3 4 5 5 4 3 2 19 8 7 6二、软件的安装1、 1 安装:对于像文件名后面的后缀是 .EXE 的软件直接将其复制到您的计算机中既可使用 , 如果是 setup 的安装文件 , 打开它 , 按照提示进行安装即可 .1、 2 卸载:如果您需要进行对此软件的卸载 , 只要找到此软件的卸载程序启动即可 . 如果是直接复制到您计算机的软件 , 它将不会有卸载程序 . 而您只要将其删除就可以啦 .1、 3 运行环境:◆操作系统中文 Windows95/98/ME(不建议使用 XP 系统◆最低配置CPU :奔腾 100MHz 以上内存:32M显卡:SVGA 16位色显示模式以上其它:RS232口◆建议配置CPU :奔腾 233MHz 或更高内存:64M 以上显卡:SVGA 24位色以上显示模式其它:RS232口 USB口 ( 需要 USB 对 COM 口的数据转换线三、软件的使用安装完成后,可在“开始”的“程序”菜单中找到 LED 电子显示屏目录,点击 LED 电子显示屏图标,启动软件,或通过直接在软件安装目录下,点击 LED.EXE 文件 ,来启动软件。
如果是直接将软件复制到您计算机中的话,则您可以将其复制到桌面上,启动的时候直接到桌面上双击其图标即可启动。
![Smart_700_IE 触摸屏说明书[4]](https://uimg.taocdn.com/5e0c331d0622192e453610661ed9ad51f01d5404.webp)
Smart_700_IE 触摸屏说明书一、产品概述采用7英寸TFT液晶显示屏,分辨率为800×480,支持16.7M色彩,显示效果清晰、鲜艳。
采用电容式触摸屏,支持多点触控,操作灵敏、方便。
采用ARM Cortex-A9四核处理器,运行速度快,支持多任务处理。
内置256MB DDR3内存和4GBeMMC闪存,存储空间充足,数据安全。
支持以太网、RS232/RS485/RS422、USBHost/Device等多种通讯接口,方便与外部设备连接和数据交换。
支持Windows CE 7.0操作系统,兼容各种工业软件和协议。
支持VNC远程控制功能,可以通过PC或移动设备远程监控和操作触摸屏。
支持RTC实时时钟功能,可以记录系统时间和事件。
支持SD卡扩展功能,可以增加存储空间和备份数据。
具有IP65防护等级,防尘、防水、防震、抗干扰能力强。
具有CE、FCC、RoHS等认证,符合国际标准和要求。
二、产品规格----项目----规格--------:------:----------型号----Smart_700_IE--------显示屏----7英寸TFT液晶显示屏--------分辨率----800×480--------色彩----16.7M--------亮度----400 cd/m²--------对比度----500:1--------触摸屏----电容式触摸屏--------处理器----ARM Cortex-A9四核处理器--------主频----1.2GHz--------内存----256MB DDR3--------闪存----4GB eMMC--------操作系统----Windows CE 7.0--------通讯接口----以太网×1, RS232×1, RS485×1, RS422×1, USB Host×2, USB Device×1--------扩展接口----SD卡槽×1--------电源输入----DC 24V±15%--------功耗----10W--------工作温度-----10℃~60℃--------存储温度-----20℃~70℃--------工作湿度----10%~90% RH(无凝露)--------外形尺寸(mm)----200×146×34--------开孔尺寸(mm)----192×138--------重量(kg)----0.8----三、产品安装3.1 安装前准备螺丝刀钻头螺丝垫圈螺母电源线通讯线SD卡(可选)3.2 安装步骤1.在安装位置上按照开孔尺寸(192×138mm)钻孔,并清理孔边的碎屑。
大屏使用说明书第一章产品操作说明2.1遥控器说明MODE 信号类型,通道切换可选择常用的HDMI/DVI/VGAMENU 菜单键确定键,上下左右键EXIT 退出键NEXT 切换下一个2.2通道切换遥控器按MODE键,按“UP/DOWN”选择所要切换的通道。
选定后按“ENTER”进入。
2.3工厂菜单地址设置说明遥控器MODE+AUTO进入工厂菜单,进入拼接设置项。
第3456行按“LEFT/RIGHT”调节数字,使得3456行分别为序列号的对应的每一位,在按“LEFT/RIGHT”调节单个屏的行列地址,按menu键逐级退出保存,最后按EXIT键退出工厂菜单2.4控制软件操作说明打开KRD控制软件.exe,选择传统液晶拼接系统2.41串口设置点击“功能配置”下的“通讯配置”,点击刷新,选择自己所接串口,点击确定。
点击“串口通讯”下的“连接串口”。
(使用USB转RS232转接线的客户,第一次使用的时候需要安装驱动,DB9转RJ45黄色转接头一定要用厂家配的,其他家的不通用)2.42拼接地址设置点击获取序列号,大屏上会出现各自的序列号,逐个在控制软件上输入大屏显示的序列号,填写对应序列号的地址,点击设置地址,设置结束后,全部选中,点击锁定地址。
根据项目的大小设置拼接方格的大小,点击确认关闭。
2.43色彩设置管理员密码输入12345,在控制软件中间点击右键选择图像调整。
前面的“VIDEO/VGA/DVI/HDMI/色温”,都是针对整个信号源的调整,只有后面的“一致性调整”才是针对后面的屏的调整,可单独针对某块屏调整色差。
2.44信号选择选择要调取信号的屏幕地址,点击鼠标右键,信号选择,选择拼接的范围,点击拼接,信号切过来后可以对调取的子信号(VIDEO,VGA,DVI,HDMI,MEDIA)进行切换。
点击分屏模式,单屏显示各路独立的信号。
北京融视科技发展有限公司 P10单红异步控制版LED显示屏使用说明书前言感谢您选择北京融视科技发展有限公司LED显示屏产品,本说明书适用于P10单元板异步U盘控制显示屏。
北京融视LED显示屏控制软件无需安装,直接拷贝在任意目录即可。
运行软件打开LED显示屏控制软件文件夹,看到如下文件:单击LedNewWindow.exe 文件,进入运行界面。
注:对于U盘控制卡来说软件运行时会弹出对话框,这是由于软件没有发现串口连接造成的,点击确定即出现软件运行界面显示屏的硬件设置注:融视光电在给客户发送软件时已经进行了硬件设置,如果您无需改动可跳过此步。
·点击菜单栏按钮,出现密码输入窗口:初始默认管理员登录密码为168。
输入正确密码,即进入硬件配置窗口:对于P10单红系列产品显示屏来说您只需设置即可。
注:显示屏尺寸不同,高度、宽度的设置参数也不一样,您的显示屏尺寸参数在给您提供软件之前已经设置完毕,请您妥善保管。
如果遗失,您只需提供给我们您的显示屏尺寸,我们即可给提供正确的显示屏高度、宽度参数。
设置完显示屏高度、宽度参数后,点击后,再点击关闭即可。
输入一行走字文字新建节目·点击文件菜单,选择新建,在软件左侧的“节目管理”窗口中即出现新建的节目信息。
·在“节目管理”窗口中选择,开始对节目以进行设置。
·点击节目管理中的“分区”按钮,并选择单行文本。
现在您就有了一个可以输入文本的条目。
3.2输入一行LED显示屏上要显示的文本·选择,在属性编辑窗体中输入“北京融视科技发展有限公司”:·设置文字的高度,本例为·设置分区的尺寸在软件界面的右下角的“分区属性”窗口中设置分区尺寸,分区尺寸不能超过上面硬件设置中的显示屏尺寸。
本例为高度32,宽度288。
好,现在一个可显示的走字文本已经录入成功。
·将您的节目保存到U盘。
注:您必须使用纯粹的U盘,而不是mp3、录音笔等有存储功能的电子产品代替,否则控制卡无法分别哪个文件保存的是节目信息。

奥普液位显示器说明书一、产品介绍奥普液位显示器是一种用于显示液体或固体物料的液位高度的仪器设备。
它采用先进的传感技术和数字显示技术,能够准确地测量液体或固体物料的高度,并将其以数字形式显示在显示屏上,方便用户直观地了解液位情况。
二、产品特点1. 高精度测量:奥普液位显示器采用高精度传感器,能够实时准确地测量液位高度,误差范围小,可靠性高。
2. 多种显示方式:奥普液位显示器支持多种显示方式,如数字显示、图形显示等,用户可根据需要选择合适的显示方式。
3. 广泛适用:奥普液位显示器适用于各种液体或固体物料的液位测量,可广泛应用于化工、石油、食品、制药等行业。
4. 易于安装和操作:奥普液位显示器采用简单的安装方式,操作简便,用户无需专业知识即可完成安装和操作。
5. 高耐用性:奥普液位显示器采用高品质材料制造,具有良好的耐腐蚀性和耐高温性能,能够在恶劣环境中长时间稳定运行。
三、安装步骤1. 安装支架:将奥普液位显示器的支架固定在需要测量液位的容器上,确保支架稳固。
2. 连接传感器:将奥普液位显示器的传感器与容器内部的液位连接,确保连接牢固,信号传输畅通。
3. 连接电源:将奥普液位显示器的电源线连接到电源插座上,确保电源供应稳定。
4. 调试设置:按照奥普液位显示器的使用说明书,进行调试设置,确保显示器能够正常工作。
四、使用方法1. 开机:将奥普液位显示器的电源打开,显示屏会显示当前液位的数值。
2. 操作设置:根据需要,可以通过操作按钮进行液位单位的切换、报警值的设定等操作。
3. 实时监测:奥普液位显示器会实时监测液位的变化,并将其以数字形式显示在屏幕上,用户可以随时了解液位的高度。
4. 报警功能:当液位超过或低于设定的报警值时,奥普液位显示器会发出声音或灯光报警,提醒用户及时采取措施。
五、注意事项1. 定期维护:奥普液位显示器需要定期进行维护保养,清洁传感器和显示屏,确保其正常工作。
2. 防止冲击:在使用过程中,要避免对奥普液位显示器产生冲击,防止损坏。
LED显示屏组装及应用说明书介绍本文档旨在向用户提供关于LED显示屏组装和应用的详细说明。
在本文档中,您将了解到如何组装和安装LED显示屏,并且学习到如何使用和维护它。
目录1.材料准备2.组装步骤3.安装步骤4.使用说明5.维护与注意事项1. 材料准备在开始组装之前,请确保您已经准备好以下材料:•LED显示屏模块 xN•控制器•电缆•电源适配器请确保所有材料都是兼容的,并且在开始组装前已经进行了检查和测试。
2. 组装步骤在组装之前,请仔细阅读并遵守以下步骤:1.将LED显示屏模块按照需要的尺寸进行排列,并确保它们的边缘对齐。
2.使用提供的电缆将每个模块连接在一起,确保连接牢固。
3.将控制器与最后一个模块连接,确保连接稳定。
4.检查所有连接并确保没有松动或损坏的部分。
3. 安装步骤一旦组装完成,您可以按照以下步骤安装LED显示屏:1.选择一个适当的位置来安装显示屏,确保它能够被观众方便地看到。
2.使用提供的支架或壁挂装置将显示屏安装在所选择的位置上。
3.将电源适配器连接到显示屏模块和控制器。
请确保显示屏被正确地安装和连接,并且能够正常运行。
4. 使用说明使用LED显示屏非常简单,并且具有灵活的操作方式。
以下是一些常见的使用说明:1.使用控制器或遥控器可以对显示内容进行设置和更改。
2.可以选择不同的显示模式,如文字滚动、静态画面或动态影像。
3.调整亮度和对比度以适应环境光照条件。
4.使用预设模板或自定义设计来创建个性化的显示内容。
请遵循提供的使用说明手册,并按照需要进行操作。
如果遇到问题,请查阅故障排除部分或联系制造商的技术支持。
5. 维护与注意事项为了确保LED显示屏的正常运行和延长其使用寿命,请注意以下几点:1.定期清洁显示屏表面,并使用柔软的布进行清洁,避免使用化学溶液。
2.定期检查连接线和电源适配器,确保它们没有损坏或松动。
3.避免将显示屏暴露在过高或过低的温度环境中。
4.在长时间不使用时,请将显示屏断电并保持干燥。
* L G LED Monitor applies LCD screen with LED backlights. Please read this manual carefully before operating your set and retain it for future reference.22BL450Y24BL450Y 27BL450Y Copyright © 2018 LG Electronics Inc. all rights reserved.2LICENSEEach model has different licenses. Visit for more information on the license.The terms HDMI and HDMI High-Definition Multimedia Interface, and the HDMI Logo are trademarks or registered trademarks of HDMI Licensing administrator, Inc. in the united states and other countries.TabLE of CoNTENTSLICEnsE ......................................................2OPEn sOurCE sOfTwarE nOTICEInfOrMaTIOn ............................................3assEMBLInG anD PrEParInG ..................3usInG THE MOnITOr ................................10usEr sETTInGs ........................................12TrOuBLEsHOOTInG .................................19PrODuCT sPECIfICaTIOn . (21)opEN SourCE SofTwarE NoTICE INformaTIoNTo obtain the source code under GPL, LGPL, MPL, and other open source licenses, that is contained in this product, please visit .In addition to the source code, all referred license terms, warranty disclaimers and copyright notices are available for download.LG Electronics will also provide open source code to you on CD-rOM for a charge covering the cost of performing such distribution (such as the cost of media, shipping, and handling) upon email request to ******************. This offer is valid for a period of three years after our last shipment of this product. This offer is valid to anyone in receipt of this information.aSSEmbLING aND prEparINGCauTIoN•always use genuine LG components to ensure safety and product performance.•The product warranty will not cover damage or injury caused by the use of unauthorized components.•It is recommended to use the supplied components.•If you use generic cables not certified by LG, the screen may not display or there may be image problems.•Illustrations in this document represent typical procedures, so they may look different from the actual product.•Do not apply foreign substances (oils, lubricants, etc.) to the screw parts when assembling the product. (Doing so may damage the product.)•applying excessive force when tightening screws may cause damage to the monitor. Damage caused in this way will not be covered by the product warranty.•Do not carry the monitor upside down by just holding the base. This may cause the monitor to fall off the stand and could result in personal injury.•when lifting or moving the monitor, do not touch the monitor screen. The force applied to the monitor screen may cause damage to it.NoTE•The components may look different from those illustrated here.•without prior notice, all product information and specifications contained in this manual are subject to changeto improve the performance of the product.•To purchase optional accessories, visit an electronics store or an online shopping site, or contact the retailerfrom which you purchased the product.•The power cord provided may differ depending upon the region.Supported Drivers and SoftwareYou can download and install the latest version from the LGE website ().34How to use the Joystick buttonYou can easily control the functions of the monitor by pressing the joystick button or moving it left/right/up/down with your finger.basic functionsNoTE•The joystick button is located at the bottom of the monitor.moving and Lifting the monitorwhen moving or lifting the monitor, follow these instructions to prevent the monitor from being scratched or damaged and to ensure safe transportation, regardless of its shape or size.•Place the monitor in the original box or packing material before attempting to move it. •Before moving or lifting the monitor, disconnect the power cord and all other cables. •Hold the bottom and side of the monitor frame firmly. Do not hold the panel itself.•when holding the monitor, the screen should face away from you to prevent it from being scratched. •when transporting the monitor, do not expose the monitor to shock or excessive vibration.•when moving the monitor, keep it upright and never turn the monitor on its side or tilt it sideways.CauTIoN•avoid touching the monitor screen as much as possible.-This may result in damage to the screen or some of the pixels used to create images.•If you use the monitor panel without the stand base, its joystick button may cause the monitor to become unstable and fall, resulting in damage to the monitor or human injury. In addition, this may cause the joystick button to malfunction.5ENGLISHInstalling on a Table•Lift the monitor and place it on the table in an upright position. Place the monitor at least 100 mm (3.94 inches) away from the wall to ensure sufficient ventilation.CauTIoN•unplug the power cord before moving or installing the monitor. There is risk of electric shock.•Make sure to use the power cord that is provided in the product package and connect it to a grounded power outlet.•If you need another power cord, please contact your local dealer or the nearest retail store.adjusting the Stand Height12warNING•adjusting the angle1 2 adjust the angle of the screen.experience. warNING•To avoid injury to the fingers when adjusting the screen, do not hold the lower part of the monitor’s frame as illustrated below.•Be careful not to touch or press the screen area when adjusting the angle of the monitor.67Swivel stand•Image shown may differ from your Monitor set.1swivel 355 degrees and adjust the angle of the Monitor set to suit your view.using the cable holderarrange the cables using the cable holder as shown in the illustration.orusing the Kensington LockThe Kensington security system connector is located at the back of the Monitor set.for more information on installation and usage, refer to the Kensington lock owner’s manual or visit the website at .Connect the monitor to a table using the Kensington security system cable.NoTE•The Kensington security system is optional. You can obtain optional accessories from most electronics stores.•The left or right side of the monitor head can be slightly rotated up or down (up to 3°). adjust the horizontal level of the monitor head.Installing the wall mount plateThis monitor meets the specifications for the wall mount plate or other compatible devices.NoTE•The wall mount plate is sold separately.•for more information on installation, refer to the wall mount plate’s installation guide.•Be careful not to apply too much force while mounting the wall mount plate as it may cause damage to the screen.•remove the stand before installing the monitor on a wall mount by performing the stand attachment in reverse.Installing on the wallInstall the monitor at least 100 mm (3.94 inches) away from the wall and leave about 100 mm (3.94 inches) of space at each side of the monitor to ensure sufficient ventilation. Detailed installation instructions can be obtained from your local retail store. alternatively, please refer to the manual for how to install and set up a tilting wall mounting bracket.89CauTIoN•unplug the power cord before moving or installing the monitor to avoid electric shock.•Installing the monitor on the ceiling or on a slanted wall may result in the monitor falling off, which could lead to injury. use an authorized LG wall mount and contact the local dealer or qualified personnel.•applying excessive force when tightening screws may cause damage to the monitor. Damage caused in this way will not be covered by the product warranty.•use the wall mounting bracket and screws that conform to VEsa standards. Damage caused by the use or misuse of inappropriate components will not be covered by the product warranty.•when measured from the back of the monitor, the length of each installed screw must be 8 mm(0.3 inches) or less.To install the monitor to a wall, attach a wall mounting bracket (optional) to the back of the monitor.Make sure that the wall mounting bracket is securely fixed to the monitor and to the wall.wall mount (mm)100 x 100Standard screw M4 x L10Number of screws4wall mount plate (optional)Lsw 149NoTE•a non-VEsa standard screw may damage the product and cause the monitor to fall. LG Electronics is not liable for any accidents relating to the use of non-standard screws.•The wall mount kit includes the installation guide and all necessary parts.•The wall mounting bracket is optional. You can obtain optional accessories from your local dealer.•The length of the screw may differ for each wall mounting bracket. If you use screws longer than the standard length, it may damage the inside of the product.•for more information, please refer to the user manual for the wall mounting bracket.uSING THE moNITor•Illustrations in this manual may differ from the actual product.CauTIoN•Do not press the screen for a prolonged time. This may cause image distortion.•Do not display a still image on the screen for a prolonged time. This may cause image retention. use a PC screensaver if possible.•when connecting the power cord to the outlet, use a grounded (3-hole) power strip or a grounded power outlet.•The monitor may flicker when turned on in an area where the temperature is low. This is normal.•sometimes red, green, or blue spots may appear on the screen. This is normal. Connecting to a pC•This monitor supports the *Plug and Play feature.* Plug and Play: a feature that allows you to add a device to your computer without having to reconfigure anything or install any manual drivers.HDmI ConnectionTransmits digital video and audio signals from your PC to the monitor.CauTIoN•using a DVI to HDMI / DP (DisplayPort) to HDMI cable may cause compatibility issues.•use a certified cable with the HDMI logo attached. If you do not use a certified HDMI cable, the screen may not display or a connection error may occur.•recommended HDMI cable types-High-speed HDMI®/TM cable-High-speed HDMI®/TM cable with EthernetDisplayport ConnectionTransmits digital video and audio signals from your PC to the monitor.NoTE•There may be no video or audio output depending on the DP (DisplayPort) version of the PC.•Make sure to use the supplied DisplayPort cable of the product. Otherwise, this may cause the device to malfunction.•If you are using a Mini DisplayPort output graphics card, use a Mini DP to DP (Mini DisplayPort to DisplayPort) cable or gender that supports DisplayPort1.2. (sold separately)10Connecting aV DevicesHDmI ConnectionHDMI transmits digital video and audio signals from your aV device to the monitor.NoTE•using a DVI to HDMI / DP (DisplayPort) to HDMI cable may cause compatibility issues.•use a certified cable with the HDMI logo attached. If you do not use a certified HDMI cable, the screen may not display or a connection error may occur.•recommended HDMI cable types-High-speed HDMI®/TM cable-High-speed HDMI®/TM cable with EthernetConnecting peripheralsuSb Device connectionThe usB port on the product functions as a usB hub.NoTE•It is recommended you install all windows updates to keep your windows up-to-date before connecting to the product for use.•Peripheral devices are sold separately.•a keyboard, mouse, or usB device can be connected to the usB port.•The charging speed may vary depending on the device.CauTIoN•Cautions when using a usB Device-a usB device with an automatic recognition program installed, or that uses its own driver, may not berecognized.-some usB devices may not be supported or may not work properly.-It is recommended to use a usB hub or hard disk drive with power supplied. (If the power supply is not adequate, the usB device may not be recognized properly.)Headphones ConnectionConnect peripherals to the monitor via the headphones port.NoTE•Peripheral devices are sold separately.•Depending on the audio settings of the PC and external device, headphones and speaker functions may be limited.•If you use angled earphones, it may cause a problem with connecting another external device to the monitor.Therefore, it is recommended to use straight earphones.111213ENGLISHCustomizing settingsQuick SettingsInputpictureNoTE•If the picture mode is changed, the screen may flicker or the resolution of your PC screen may be affected. 14ENGLISH1516ENGLISH NoTE•This is subsidiary for color weakness user. Therefore if you feel uncomfortable with the screen, please turn off this function.•This function can’t distinguish some colors in some images.Sound17GeneralNoTE•saving Data depends on the Panel. so,those values should be different from each panel and panel vendor.If option of sMarT EnErGY saVInG is High or Low, monitor luminance become higher or lower depend on source. 18TroubLESHooTINGCheck the following before calling for service.CauTIoN•Check Control panel►Display►Settings and see if the frequency or the resolution were changed. If yes, readjust the video card to the recommend resolution.•If the recommended resolution (optimal resolution) is not selected, letters may be blurred and the screen may be dimmed, truncated or biased. Make sure to select the recommend resolution.•The setting method can differ by computer and O/s (Operation system), and resolution mentioned above may not be supported by the video card performance. In this case, please ask to the computer or the video card manufacturer.192021ENGLISHproDuCT SpECIfICaTIoN22BL450YThe specifications are subject to change without notice.* The power consumption level can be different by operating condition and monitor setting.* The On mode power consumption is measured with EnErGY sTar® test standard.** The On mode power consumption is measured with LGE test standard (full white pattern , Maximum resolution). 2223ENGLISHproDuCT SpECIfICaTIoN24BL450YThe specifications are subject to change without notice.* The power consumption level can be different by operating condition and monitor setting.* The On mode power consumption is measured with EnErGY sTar® test standard.** The On mode power consumption is measured with LGE test standard (full white pattern , Maximum resolution). 2425ENGLISHproDuCT SpECIfICaTIoN27BL450YThe specifications are subject to change without notice.* The power consumption level can be different by operating condition and monitor setting.* The On mode power consumption is measured with EnErGY sTar® test standard.** The On mode power consumption is measured with LGE test standard (full white pattern , Maximum resolution). 26factory Support mode (preset mode, pC)HDmI/Dp(Displayport)27HDmI Timing (Video)28This device meets the EMC requirements for home appliances (Class B) and is intended for home usage.The model and serial number of the product are located on the back and on one side of the product. record them below in case you ever need service.Modelserial no.EnErGY sTar is a set of power-saving guidelines issued by the u.s.Environmental Protection agency(EPa).refer to EnErGY for more information on the EnErGY sTar program.as an EnErGY sTar Partner LGE u. s. a.,Inc. has determinedthat this product meets the EnErGY sTar guidelines for energyefficiency.Supplier’s Declaration of Conformity Trade name LGresponsible Party LG Electronics usa, Inc. address 1000 sylvan ave Englewood Cliffs, nJ 07632Telephone (201)266-2215。
LED显示屏使用说明一、安装前的准备工作1.确保您拥有一个适当的安装空间,要保证LED显示屏有足够的空间进行安装和运行,以免影响正常使用和影响显示效果。
2.购买适当的支架或支撑结构,以确保LED显示屏能够牢固地安装在墙壁、天花板或其他所需的位置上。
3.确定电源供应,LED显示屏需要接入电源才能正常运行。
请确保有一个稳定的电源供应,并按照所提供的电源要求连接。
二、安装步骤1.将LED显示屏支架或支撑结构按照相关说明进行组装,确保其牢固稳定。
2.将LED显示屏安装在支架或支撑结构上,注意保持水平和垂直方向的准确位置。
3.使用提供的螺丝或其他固定装置将LED显示屏牢固地固定在支架或支撑结构上,确保其不会晃动或掉落。
4.连接电源线,确保电源线牢固地连接在LED显示屏的电源接口上,并将另一端插入稳定的电源插座。
5.连接视频信号源,根据所提供的接口类型,将视频信号线连接到LED显示屏的视频输入接口上。
6.打开电源开关,确认电源线和视频信号线连接正确后,轻按电源开关,使LED显示屏进入工作状态。
三、使用和控制方式1.远程控制器:大部分LED显示屏配备了遥控器,可以使用遥控器对LED显示屏进行开关、亮度调节、画面切换等操作。
请阅读遥控器的使用说明并按照说明进行操作。
2.本地控制:部分LED显示屏具备本地控制功能,可以通过面板上的按键或旋钮进行开关、亮度调节、画面切换等操作。
请阅读显示屏的说明书并按照说明进行操作。
3.电脑控制:一些高级LED显示屏可以通过电脑软件进行远程控制和管理。
请安装和使用相关的软件,并按照软件的说明进行操作。
四、注意事项1.避免长时间高亮度显示:长时间高亮度显示可能导致LED显示屏出现亮度不均匀或者出现亮点、暗点等问题。
请尽量避免长时间高亮度显示,定期进行屏幕清理和保养。
2.避免高温环境:不要将LED显示屏暴露在高温环境中,以免影响其正常工作和寿命。
请将LED显示屏安装在通风良好的地方,并注意室内温度的控制。
戴尔E1920H/E2020H/E2220H/ E2420H/E2420HS/E2720H/E2720HSDell Display manager用户手册显示器型号:E1920H/E2020H/E2220H/E2420H/E2420HS/E2720H/E2720HS管制型号:E920Hf, E2020Hb,E2220Hf, E2220Ho, E2420Hf, E2420Ho, E2420HSf, E2720Hb, E2720HSb2 |注意:“注意”所含的信息是可以帮助您更好地使用产品的重要信息。
©版权归戴尔公司或其子公司所有,2019年。
保留所有权利。
Dell 、EMC 和其他商标均归属于戴尔公司或其子公司。
其他商标可能归属于其各自的所有者。
2020年1月修订版A01目录概述 (4)使用快速设置对话框 (5)设置基本显示功能 (6)为应用程序分配预设模式 (7)用“轻松排列”管理窗口 (8)管理多个视频输入 (10)恢复应用程序的位置 (12)应用节能功能 (14)故障排除 (15)目录 | 34 | 概述概述戴尔显示管理器是用于管理一个或一组显示器的微软Windows 系统的应用程序。
它可以让用户在选定的戴尔显示器上手动调整显示的图像,指定自动设置,管理电源,管理窗口,旋转图像并进行其他操作。
在完成安装后,戴尔显示管理器会在系统每次启动后运行,其图标会被放入通知栏。
将鼠标悬停在通知栏的图标上时,可以显示与连接至系统显示器有关的信息。
注意:戴尔显示管理器使用DDC/CI 通道与您的显示器进行通信。
请确保在菜单中启用了DDC/CI (如下所示)。
E1920H/E2020H/E2220H/E2420H/E2720HE2420HS/E2720HS Dell XX MonitorAuto Adjust Display Info DDC/CI LCD Conditioning Service T ag Reset Others Factory Reset Others OnOff使用快速设置对话框单击通知栏中的戴尔显示管理器的图标以打开“快速设置”对话框。
DMG48480C040_06WTC基于T5L ASIC的4.0英寸480×480图形点阵,16.7M色,IPS屏,电容触摸屏,标准指令集(TA)/DGUSⅡ系统Based on T5L ASIC4.0Inches,480xRGBx480,16.7M Colors,IPS screen CTP,Standard instruction set(TA)/DGUSⅡsystem修订记录Recordof Revision日期Revise Date描述Content2020-09-02编制数据手册First EditionCraft Data LimitedTel: 01296 332000Web: 参数Item数据Parameter说明Description颜色Color16.7M(16777216)colors24bit color8R8G8B液晶类型Panel Type IPS IPS工艺TFT显示屏,宽视角IPS process TFT LCM,wide viewing angle可视角度Viewing Angle85/85/85/85(L/R/U/D)最佳视角:上下左右对称Best View:symmetrical显示尺寸Active Area(A.A.)67.96mm(W)×67.96mm(H)480×480Pixel分辨率Resolution480×480Pixel 可以设置成0°/90°/180°/270°显示模式Support0°/90°/180°/270°rotated display背光模式Backlight LED 不低于20000H(以最高亮度连续工作,亮度减半时间)≥20000H(Continuous working with maximum brightness,time of the brightness decays to50%)亮度Brightness250nit 可进行100级亮度调节(当亮度调节至最高亮度的1%~30%时,可能出现闪烁现象,不建议在此范围使用)。