
《Goldwave教程》课件
- 格式:ppt
- 大小:1.24 MB
- 文档页数:24


GoldWave教程Play a huge role in the synthesis and editing of audio and video multimedia audio production late music sound processing and so on, it is the main way for the modification of sound material, can directly influence on sound quality. Every need and deal with the audio operation users are eager to find a simple and practical audio editing solutions, but the use of the similar software or is too complex and difficult to use (such as Sound Forge), or a single use, function is too weak. The most annoying, or they are mostly English software, which is filled with a large number of professional terminology words, which makes the original puzzled beginners more confused. Is there a compromise solution - a simple, functional and practical Chinese audio editing software? The answer is yes, today I will introduce the protagonist was such a "versatile" guy, it is the best choice of your audio GoldWave-. The GoldWave audio editing software by Chris Craig in 1997 began to develop, after several upgrades we use today was launched in 2000 4.16 edition, both in function and interface than previous versions are a huge improvement, now really can be said to be a mature and excellent audio editing software. Exciting is the domestic teapot Chinese website () for the localization of this version, you can download it for trial in there, we will explain below to the Chinese version as the example. Now you can leave E's worries behind you and put into the use of our great native language, and follow me into the GoldWave's audio editing world!A. quick get startGoldWave is the standard green software, no installation andsmall volume (compression only 0.7M), any directory several file compression package released to the hard disk, click GoldWave.exe started running. Since it is audio editing software, we have to use audio files to operate"! Select the open command for the file menu, specify a file to edit, and press enter. In the absence of waiting time, GoldWave immediately shows the waveform state of the file and the software's main interface (Figure 1), which surprised us at the speed at which it was run. The main interface from top to bottom is divided into 3 major parts, the top menu commands and shortcut toolbar, in the middle of the waveform display, the following is the file properties. Our main operations are concentrated in the waveform display area where the screen is the largest. If it is a stereo file, it can be divided into two channels, which can be operated separately or uniformly.1. select audio eventsBefore you can process various audio files, you must select a paragraph from it (the selected part is called an audio event). The selection of GoldWave system is very simple, make full use of the left and right mouse button with, in a location on the left click the mouse will determine the selected part of the starting point, right click in another position to determine the end point selection part, so choose audio events will be highlighted (Figure 2),All of our operations now only focus on this high brightness area, and the rest of the shadows are not affected. Figure 2: part of the high brightness display of course if you choose the right place or replace the selected area can use the edit menuselection command (or press Ctrl+W), and then re audio event selection.2. cut, copy, paste, deleteAudio editing and other Windows application software, its operation is widely used in cutting, copy, paste, delete and other basic commands, so firmly grasp the command to contribute more to our quick start. These common commands for GoldWave are very easy to implement. Besides using the command menu under the edit menu, the shortcut keys are similar to those of other Windows applications. Shear to an audio event, first of all to be part of the shear, and then press Ctrl+X on the line, take a wait after this period of high brightness part disappeared, leaving only the other non selected shadow. Use the option to check the commands and reset the pointer to the point where it will be pasted. Using Ctrl+V can restore the part you just cut. It's so convenient, it's the same as the common software! Similarly, copy with Ctrl+C and delete with Del. If there is a fault in the deletion or other operations, Ctrl+Z can be used to restore, so in the operation can be assured that the use of bold, any errors can be redeemed!3. time scale and display zoomIn the waveform display area below an indication of audio file length scale (Figure 3), it in seconds, showing time any position clear, it makes us understand the audio processing is of great help in time, audio editing length, so we must develop the reference scale used in the actual operation, you will find that it will bring great convenience to you. Figure 3: timescale can display actually open an audio file, immediately on the scale below shows the format of the audio file and the length of time, it gives us time quantitative parameters accurately, according to the length of time to plan for a variety of audio processing, can reduce a lot of unnecessary operation process. Some audio files are too long for a screen to be displayed, one way is to drag and drop display using horizontal scroll bars, and the other is to change the display ratio. In GoldWave, we change the display proportion is very simple, use the View menu under the zoom commands can be completed, it is more convenient to use the shortcut Shift+ up with Shift+ amplification and narrow down. If you want to change the more detailed observation of the waveform amplitude, it can increase the display scale vertical, horizontal method, use the View menu under the vertical magnification, vertical reduction or using the Ctrl+ and Ctrl+ down arrow on the line, then you will see the vertical scroll bar, drag it carefully observed.4. channel selectionFor stereo audio files, the display in GoldWave is done in parallel and horizontal form.Sometimes the editor just wants to process one of the channels, and the other channel remains the same. How do you choose? Using the edit menu's channel command, select the channel that will be in effect (the upper left, the lower right). At this point, you will find that all of your actions will only work on the selected sound channel, while the other will be in dark color, without any impact (see Figure 4).5. insert blank spaceInsert a certain time in the specified location of the blank area is commonly used in audio editing a processing method, only need to select the edit menu insert mute command, input into the time in the pop-up dialog box, and then press the OK key, then you can see the empty area in the pointer place. Very convenient.Two. Audio effects productionThe effect of GoldWave on the menu provides 10 audio effects of a variety of commonly used commands, from compression to delay and echo, each kind of daily audio application effects are the most widely used effect, grasp their use can be more convenient for us to operate in the multimedia production, sound synthesis, obtained satisfactory the effect of. It should be noted that the translation of certain commands in the effect menu in this Chinese version is not appropriate, so we'll explain the wording in more precise terms.1. echo effectEcho, as the name suggests, refers to the sound coming out after a certain period of time to return to be heard by us, just like in the wilderness on the face of the mountain shouting, in many film editing, dubbing widely used. GoldWave's echo effect is very simple. Select the echo command under the menu, enter the delay time, the volume size and the opening reverb box in the pop-up dialog box (Figure 5). The greater the delay time, the longer the duration of the sound, the more times the echo echoes,the more obvious the effect. The volume control refers to the volume of the sound returned, this value should not be too large, otherwise the echo effect is not true. After opening the reverb effect, you can make the sounds sound and more sense of space, so it is generally recommended.2. compression effectIn the recording of singing, the effect is often not so satisfactory. The reason is largely due to the improper control of the breath and intensity of singing. Some sentences pronunciation is too strong, too much force, almost causing overload distortion; some "whisper", the statement has caused the weak signal. If you use compression effects on the audio data after the recording, you will greatly reduce this. The compression effect uses the principle of "high pressure down, low lifting" to play a balanced role in the intensity of sound. In GoldWave, we can find this command in the enlargement / compression of the effect menu, and select the pop-up dialog box as shown in figure 6. Figure 6: the expansion / compression effect in three sets the most important parameters in it is the determination of the threshold value, it is the critical compression at the beginning, the part is higher than this value ratio (%) of the compression ratio. Smoothness indicates the degree of sound,The voice of the larger the transition more natural, but it sounds more fuzzy; the value of the smaller sound more stiff, but more clear, so we should choose a suitable smoothness in the compression process, in order to obtain the best effect.3. border effectUsing the border effect gives the sound a unique "edge" to make it sound more interesting and varied. Select the edge (Flange) command under the GoldWave effect menu to see the settings interface shown in figure 7. Figure 7: border effect setting edge, the effect depends mainly on the depth and frequency of two parameters, try to change their different values, you can get a lot of unexpected strange results. If you want to strengthen the effect of the ratio of the effect, then the mixing volume will increase.4. Change PitchSince audio files are analog signals, it's hard to change the pitch of the audio files, and the changes aren't always ideal. GoldWave can reasonably improve this problem by simply using the pitch changes that it provides to make it easy to implement. Select the Pitch in the Effects menu to enter the change pitch settings dialog box (Figure 8). The proportion of said pitch change to now 0.52.0 times, is a multiple of the set. But a glance, said the number of chromatic pitch change. We know that 12 semitones is a eight degree, so 12 or 12 to increase or decrease a eight degree. Good tone below it (Fine Tune) is a fine, 100 units a semitone. Figure 8: pitch change inherent attribute set audio format to tell us, general tone audio file length also changes, but in GoldWave we can achieve the dream of "tone length unchanged" function, but will remain in the dialog box to select the length of the line, now playing was originally the length of the file.5. equalizerThe balanced adjustment is also a very important method in audio editing. It can reasonably improve the frequency structure of audio files and achieve our ideal sound effects. Select the filter of the effect menu (Filter) - variable EQ (parameter equalizer) to open the 10 segment parameter equalizer dialog box of GoldWave (Figure 9). Figure 9:10 digital ID parameters eqchanges adjustment method is the most simple and quick drive directly represent different band to a specified size and position, pay attention to gain the sound of each section (Gain) can not be too large, so as to avoid overload distortion.6. volume effectsThe GoldWave volume effects submenu contains commands to change selection, volume size, fade out, fade in, volume up, volume envelope, and so forth to meet our various volume changes. Changing the volume command is to increase or decrease the volume directly as a percentage, and the value should not be too large. If you do not want to appear overloaded and want to increase the volume at the maximum range, then you are advised to use the volume maximize command. It is one of the most convenient and practical commands GoldWave provides for us,Generally, the volume is maximized before the song is written to the CD. It's also easy to fade out the fade effect. Just select the corresponding command and enter a start (or end) volume percentage. Now listen to the effect again. The volume changes are quite natural. If you want to make different volume change on different positions of the audio events must use thevolume envelope, open the envelope dialog box with the mouse directly add and adjust the volume point position (Figure 10), then press OK.7. Sound phase effectSound phase effect is to control the sound position of the left and right sound channel, and to make changes, so as to achieve the purpose of editing the sound phase. In the acoustic phase effect of GoldWave, the exchange of vocal tract positions and the harmonic phase envelope are most useful. The exchange of sound track position is to exchange the data of the left and right channels, and the stereo exchange can be completed only by selecting the effect menu. The sound envelope is very similar to the volume envelope, so it is very convenient to control different sound phase changes in different places more flexibly. Of course, in addition to the above several effects introduced, GoldWave also provides back, mute, reverse, offset and other effects, and their use is simpler, use one can know the meaning.Three. Other practical functionsIn addition to providing a wealth of audio production commands, GoldWave also provides us with very practical functions such as CD capture tracks, batch format conversion, and multiple media format support.1.CD grab tracksIf you want to edit the audio material in a CD, now do not need to use other ripping Software Guide to guide to in a varietyof formats between the direct selection of GoldWave Tools menu under the CD voice out orders can be completed in one step (Figure 11). Figure 11:CD grab the track dialog box, select the track, press the Save button, then type a saved file name and path. It really saves us a lot of trouble!2. batch format conversionIt is also a very useful function in GoldWave batch format conversion, it can also open multiple it supports file format and converted to various other audio formats, fast running speed, the transformation effect is good, so that many of its users this feature has been fond of! Select the batch change command under the file menu, add multiple files to convert in the dialog box in Figure 12, and select the converted format and path, then press the start button. Take a wait, you will find the new generation of audio files in the path just set down.3. support multi media formatsIn GoldWave, open a command dialog box, we can find that in addition to supporting the most basic wav format, it also can directly edit the MP3 format, apple AIF format or even video audio files in mpg format. This brings too much convenience to our operations, and no longer have to go back and forth between various formats, GoldWave multimedia format support will bring you more work efficiency.GoldWave there are many other functional commands that are limited to space and cannot be described one by one. Based on the above content, more methods and techniques are summarizedin practical application,We can achieve all kinds of audio editing purposes. In short, with GoldWave, audio editing is no longer a problem, and everything becomes easy. No more hesitation. GoldWave is the best choice for your audio editing software!。
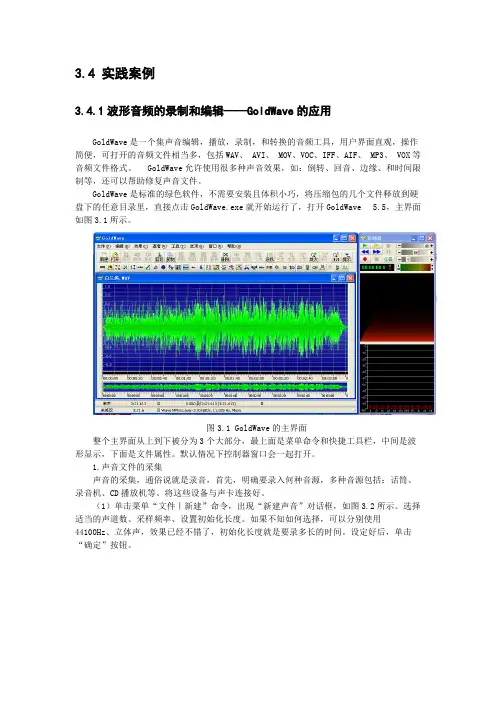
3.4 实践案例3.4.1波形音频的录制和编辑——GoldWave的应用GoldWave是一个集声音编辑,播放,录制,和转换的音频工具,用户界面直观,操作简便,可打开的音频文件相当多,包括WAV、 AVI、 MOV、VOC、IFF、AIF、 MP3、 VOX等音频文件格式。
GoldWave允许使用很多种声音效果,如:倒转、回音、边缘、和时间限制等,还可以帮助修复声音文件。
GoldWave是标准的绿色软件,不需要安装且体积小巧,将压缩包的几个文件释放到硬盘下的任意目录里,直接点击GoldWave.exe就开始运行了,打开GoldWave 5.5,主界面如图3.1所示。
图3.1 GoldWave的主界面整个主界面从上到下被分为3个大部分,最上面是菜单命令和快捷工具栏,中间是波形显示,下面是文件属性。
默认情况下控制器窗口会一起打开。
1.声音文件的采集声音的采集,通俗说就是录音,首先,明确要录入何种音源,多种音源包括:话筒、录音机、CD播放机等。
将这些设备与声卡连接好。
(1)单击菜单“文件|新建”命令,出现“新建声音”对话框,如图3.2所示。
选择适当的声道数、采样频率、设置初始化长度。
如果不知如何选择,可以分别使用44100Hz、立体声,效果已经不错了,初始化长度就是要录多长的时间。
设定好后,单击“确定”按钮。
图3.2 “新建声音”对话框图(2)点击控制器窗口中的红色录音按钮,开始录音。
可看到一条垂直线从左向右移动,指示录音进程。
(3)要结束录音,点击停止按钮。
窗口中将出现刚录制文件的波形图。
要聆听录音效果,可以单击绿色播放按钮。
播放按钮有两个,一个绿色,一个黄色,功能可以自行设定。
单击工具栏中的按钮,或选择“选项|控制器属性”菜单,打开“控制属性”对话框,如图3.3所示,可以设定播放选项,并可以设定循环播放的次数。
图3.3 “控制属性”对话框(4)选择菜单“文件|保存”命令,指定路径、文件名和格式,保存文件。

GOLDWAVE使用教程各位好!想必,大家一定都很想把自己的声音和音乐完美地搭配起来,成为一首不输原唱的歌吧!所以今天,为大家讲解介绍使用GOLDWAVE录出你最美妙声音的方法!(注:初级教程而已,更多的内容……路痴我本人也不是很清楚……汗!所以,作为抛砖引玉好了,希望各位在使用过程中探究出更多用法……)我比较懒……所以就不截图了……最开始要确认的是:有话筒(这个……我家用的是10元钱一个的那种……最好是好一些的啦,声音比较干净……);话筒插在了话筒插孔里;有声卡(巨汗……别打我);有友好的邻居(这个是最重要的一环!免得家里可以开烂番茄烂菜帮店……)。
第一步:下载GOLDWAVE软件。
GOLDWAVE软件现在已经有中文版下载了,在各大软件下载站都有下载,如http:另外,由于GOLDWAVE使用的保存格式是WAV格式,相当大,所以请各位大人再下载一个音乐格式转换软件:Advanced WMA Workshop,同样在PCHOME有下载,搜索即可,需要说明的是请下载中文版,这个版本不需要注册就可以使用。
GOLDWAVE软件不需要安装就可以使用了。
第二步:准备好你要录制的歌的原版。
使用WMA转换软件将一首MP3格式、WMA格式的歌转换成WAV格式的歌。
第三步:制作卡拉OK版本。
打开GOLDWAVE,选择“OPEN(打开)”,选中你要的歌曲。
这时主区域会显示这首歌的波形图,为了之后的微制作方便,请选择“VIEW(视图)”菜单中的“ZOOM1:1000(缩放1:1000)”将波形图放大,这样看起来就方便一点。
如果没有“DEVICECON TROLS(设备控制)”栏的话,请选择“TOOLS(工具)”菜单下的“DEVICECONTROLS(设备控制)”,这样就可以播放音乐了。
现在要去掉原有的人声。
如果整个曲子一起去的话,做出来的效果会很难听,所以请大家播放曲子,把你要去掉人声的地方选出来。
选的方法就是在波形图开始处点鼠标左键在结尾处点鼠标右键。
开奇学堂免费教程声音处理软件GoldWave-音调的改变要熟悉声音音调的调整,我们先认识一下音调。
我们从小学时学的音乐讲起吧。
我们小学音乐课中学的三度音“低音、中音、高音”还记得它们的概念吗!那可不是音量的高低,用我们中学时学的物理知识来说,那是声波的“频率”高低,频率高的声音叫高音,频率低的声音叫低音。
在简谱中我们知道高音“1”比中音“1”高八度,中音“1”比低音“1”高八度,下面我们与物理频率结合起来看一下。
音乐中用作定音标准的音,其频率为440Hz(周/秒)。
也就是C大调“6”这个音,那么中音“6”的频率就是880Hz,高音“6”是1760Hz。
就是说每高八度频率高一倍,从中可以看出乐谱中的音阶不是等差数列而是等比数列。
我们知道从“1”到“7”这七个音中还有5个半音,也就是共12个台阶,每个台阶称做一个“半音”。
很显然,每二个半之比是2的12次方根(约1.059463),从中我们可算出中音“6”升半音是932Hz,中音“7”是988Hz……今天讲的变调就是改变声音的这个“频率”。
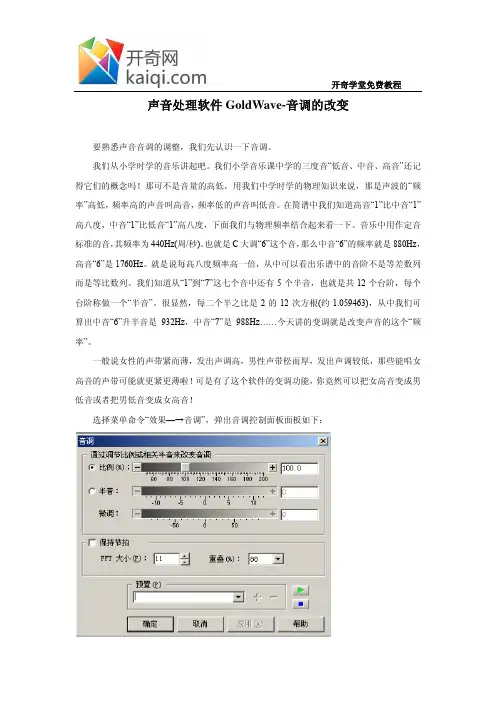
一般说女性的声带紧而薄,发出声调高,男性声带松而厚,发出声调较低,那些能唱女高音的声带可能就更紧更薄啦!可是有了这个软件的变调功能,你竟然可以把女高音变成男低音或者把男低音变成女高音!选择菜单命令“效果—→音调”,弹出音调控制面板面板如下:开奇学堂免费教程面板中最上行改变“比例”,横条中有一滑块,左右移动可让音调按比例降低或升高。
也可在右边框中输入数字,里面的“100”表示100%,就是还没改变,如果要升高10%可输入110,确定后,整个声音的频率都变成原来的110%了。
如果对于乐曲变调,你用比例就不知道该变百分之几了,当然你要通过数学计算也行,不过很麻烦的,所以面板中还提供了“半音”改变,譬如你弹琴用1=C调,想把弹好的曲子改变为1=#C升高半音,如果在比例里改变,要输入105.9463,你能记得住这个值吗,那就选择第二项“半音”。