快速夹
- 格式:doc
- 大小:27.50 KB
- 文档页数:2
快速夹具是指带有手柄或弹簧锁的锁扣。
快速夹具与普通的锁扣不同。
在正常情况下,快速夹具的手柄扣的尺寸较大且重量较重,在操作期间需要更大的强度。
因此,不可能像普通带扣一样设计手柄。
它必须具有特定的手柄操作部分。
例如,下面的手柄的一个快速夹具。
其次,为什么快速夹具的手柄应该被覆盖?
用过把手搭扣的客户都明白为什么把手搭扣手柄需要包胶,由于其制作工艺的问题,不能像合金搭扣一样设计复杂的结构,它是由于冲压模具冲压出来的,手柄部件偏薄,边缘或多或少有冲压的毛刺,如果不做包胶处理很容易在使用过程中伤到手。
在某种程度上,快速夹具仍然是一个通用术语,因为某些类型的搭扣锁或箱锁是快速夹具的一部分。

推拉式快速夹手柄和手摇杆固定方式结构设计说明书
结构设计说明书
推拉式快速夹手柄和手摇杆的固定方式是通过使用螺旋垫圈和螺纹钉来实现的。
该结构设计说明书将详细描述快速夹手柄和手摇杆的具体构造和固定方式。
1. 快速夹手柄构造:
快速夹手柄由以下部件组成:
- 主体:采用高强度金属材料制成,具有耐腐蚀和耐磨损的特性。
主体上部有一个圆形凹槽用于安装手摇杆。
- 手柄:采用耐用的塑料材料制成,具有抓握舒适的特性。
手柄连接到主体上部的凹槽中。
- 推杆:安装在主体下部的凹槽中,用于推动夹手的开合。
- 夹手:位于推杆的末端,用于夹取工件。
夹手采用可调节的设计,以适应不同尺寸的工件。
2. 手摇杆构造:
手摇杆由以下部件组成:
- 主体:采用金属材料制成,具有耐腐蚀和耐磨损的特性。
主体上部有一个圆形突起,用于安装在快速夹手柄的凹槽中。
- 手柄:采用塑料材料制成,具有抓握舒适的特性。
手柄连接到主体的上部。
3. 固定方式:
为了固定手摇杆在快速夹手柄上,采用以下结构:
- 螺旋垫圈:位于快速夹手柄主体凹槽上部的内侧。
垫圈材料选用耐磨损的金属材料,通过外径嵌入凹槽内,以增加摩擦力
和稳定性。
- 螺纹钉:通过手摇杆的主体和快速夹手柄主体凹槽的上部连接。
螺纹钉通过手摇杆主体上的孔,并旋入凹槽中的螺纹孔,以固定手摇杆在快速夹手柄上。
该固定方式结构设计简单且可靠,使快速夹手柄和手摇杆能够稳定连接并实现可靠的操作。
设计使用耐磨损的材料,提高了固定件的使用寿命,并增加了操作的安全性和稳定性。
两种定位夹紧机构工作原理分析摘要:在生产中,我们时常会遇到需要夹紧工件的情况,对于不同形状的工件,我们需要不同类型的夹紧机构。
本文主要介绍两类比较常用的快速夹紧机构,即斜楔式夹紧机构和偏心轮式夹紧机构的受力分析和自锁条件关键词:夹紧力、自锁、升角、偏心轮快速夹紧机构是指以快速简便的动作就能实现对物体施加某种形式的作用力,使之夹紧固定、夹持移位或夹紧制动的机构。
①根据其作用,分为定位夹紧机构、夹持位移机构和制动夹紧机构。
其中,定位夹紧机构是将工件定位夹紧后,能承受一定的外力作用而不松动的机构。
如机床加工夹具和各种测试夹具等。
本文介绍的两种快速夹紧机构即为定位夹紧机构。
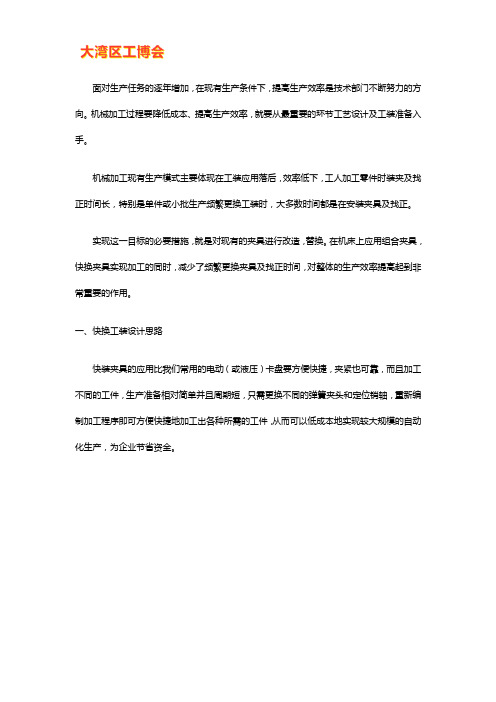
一.斜块式斜楔夹紧机构(斜楔机构)1.受力分析斜楔夹紧机构的受力图如图1所示,作用力Q 推动楔块,顶块沿斜面向上的夹紧力为P ,法向力N 与沿接触面的摩擦力f 合成一个反力R 。
顶块在Q 、P 和R 的作用下处于平衡状态,由里的封闭三角形可知,顶块的夹紧力为tan()Q P =α+ϕ 式中α———楔块斜面升角φ———反力R 作用线与法向反力N 作用线之间的夹角,成为摩擦角。
αQ RN fPαφQ RPαφ图1αR f P αφN Q P Q RφαγL e h P O 1O 2工件AFα图2 图32.自锁条件夹紧后。
顶块保持在夹紧状态,楔块不会自动松脱的现象,成为自锁。
②如图2所示,若顶块沿斜面向下相对滑动时,楔块将被推出。
这时,P 为主动力,Q 为支持力,摩擦力f 向上。
F 和法向力N 合成反力R 。
可得tan()Q P =ϕ-α由上式可知,若α>ϕ,则Q<0,即力Q 的方向与图中所示相反。
这时,只要存在力Q 就能使楔块松脱。
若α<ϕ,则力Q 与图示相同。
这时,顶块对楔块无论多大的反力也不会使楔块自动退出。
可见。
斜楔夹紧机构的自锁条件是:楔块斜面升角α小于摩擦角ϕ,即α<ϕ。
二.偏心轮式夹紧机构偏心轮夹紧机构的夹紧原理如图3所示,O 1是偏心轮的几何中心;O 2是偏心轮的转动中心;偏心轮半径为R ;A 是偏心轮夹紧支点,e 为偏心距。
面对生产任务的逐年增加,在现有生产条件下,提高生产效率是技术部门不断努力的方向。
机械加工过程要降低成本、提高生产效率,就要从最重要的环节工艺设计及工装准备入手。
机械加工现有生产模式主要体现在工装应用落后,效率低下,工人加工零件时装夹及找正时间长,特别是单件或小批生产频繁更换工装时,大多数时间都是在安装夹具及找正。
实现这一目标的必要措施,就是对现有的夹具进行改造,替换。
在机床上应用组合夹具,快换夹具实现加工的同时,减少了频繁更换夹具及找正时间,对整体的生产效率提高起到非常重要的作用。
一、快换工装设计思路快装夹具的应用比我们常用的电动(或液压)卡盘要方便快捷,夹紧也可靠,而且加工不同的工件,生产准备相对简单并且周期短,只需更换不同的弹簧夹头和定位销轴,重新编制加工程序即可方便快捷地加工出各种所需的工件,从而可以低成本地实现较大规模的自动化生产,为企业节省资金。
图1 快换夹具系统下面本文将介绍经济型数控车床快速安装夹具的设计原理与思路:1、夹紧机构在数控车床的床头箱前端增加快装夹紧机构(见图2),其工作原理:拨叉13在齿条轴的推动下由右向左移动,通过瓦6带动活动套8向左移动,钢球12在活动套8的作用下沿夹具体5的斜面向中心移动,同时钢球12向左挤压夹紧套7,使夹紧套7和锁紧挡圈11向左移动,从而使弹簧夹头10向左移动锁紧工件,工件的轴向定位由定位销9来实现。
当工件加工完后,拨叉13在齿条轴的推动下向右移动,通过瓦6带动活动套8向右移动,从而使弹簧夹头10松开工件,这样工件的加工就完成了。
用户可根据所加工工件的不同来更换不同的弹簧夹头和定位销就可以实现不同工件的加工。
图2 夹紧机构图1-锥套2-定位套3-主轴4-过渡盘5-夹具体6-瓦7-夹紧套8-活动套9-定位销10-弹簧夹头11-锁紧档圈12-钢球13-拨叉14-传动链15-插销螺栓16-带肩螺母2、夹具动力部分夹具动力部分机构见图3:由固定块7和支架3将传动轴2、齿条轴6和回转气缸4等零件固定在车床床头箱前端,与夹紧机构通过拨叉8相连接。

1645 Lemonwood Dr.Santa Paula, CA 93060 USA Array Toll Free: (888) 262-3880Tel: (805) 421-5114 Motorcycle and ATV/Motorcycle Lift Adapter Kits Installation and Operation Manual Manual P/N 5900054 — Manual Revision B — April 2019Motorcycle Lift Adapter Kit shown. QuickJack, Ranger RML-1100 Motorcycle Jack, technician, and motorcycle not included. QuickJack is designed and engineered by BendPak Inc. in Southern California, USA. Made in China. ⚠DANGER I MPORTANT S AFETY I NSTRUCTIONS,S AVE T HESE I NSTRUCTIONS!Read the entire contents of this manual before installing, operating,servicing, or maintaining this lift. Failure to follow the instructions andsafety precautions in this manual can result in serious injury or death.Make sure all other operators also read this manual. Keep the manualnear the product for future reference. By proceeding with installation andoperation, you agree you fully understand the contents of this manual.Manual. QuickJack Motorcycle and ATV/Motorcycle Adapter Kits, Installation and Operation Manual, ManualP/N 5900054, Manual Revision B, Released April 2019.Copyright. Copyright © 2019 by BendPak Inc. All rights reserved. You may make copies of this document if you agree that: you will give full attribution to BendPak Inc., you will not make changes to the content, you do not gain any rights to this content, and you will not use the copies for commercial purposes.Trademarks. BendPak and the BendPak logo are registered trademarks of BendPak Inc. QuickJack is a trademark of BendPak Inc. All other company, product, and service names are used for identification only. All trademarks and registered trademarks mentioned in this manual are the property of their respective owners. Limitations. Every effort has been made to ensure complete and accurate instructions are included in this manual. However, product updates, revisions, and/or changes may have occurred since this manual was published. BendPak reserves the right to change any information in this manual without incurring any obligation for equipment previously or subsequently sold. BendPak is not responsible for typographical errors in this manual. Warranty. The QuickJack warranty is more than a commitment to you: it is also a commitment to the value of your new product. For full warranty details, visit /warranty. To register your QuickJack, visit / register-quickjack (be sure to click Submit).Safety. Your new product was designed and manufactured with safety in mind. Your safety also depends on proper training and thoughtful operation. Do not set up, operate, maintain, or repair the unit without reading and understanding this manual and the labels on the unit.Owner Responsibility. In order to maintain your product properly and to ensure operator safety, it is the responsibility of the product owner to read and follow these instructions:• Follow all setup, operation, and maintenance instructions.• Make sure product setup conforms to all applicable local, state, and federal codes, rules, and regulations, such as state and federal OSHA regulations and electrical codes.• Read and follow all safety instructions. Keep them readily available for operators.• Make sure all operators are trained, know how to safely operate the unit, and are properly supervised.• Do not operate the product until you are certain that all parts are in place and operating correctly.• Carefully inspect the product on a regular basis and perform all maintenance as required.• Service and maintain the unit only with approved replacement parts.• Keep all instructions permanently with the product and make sure all labels are clean and visible.• Only use this product if it can be used safely!Table of ContentsIntroduction 3System Components 7Shipping Information 4Setup 9Safety Considerations 4Operation 10Specifications 6Maintenance 11IntroductionThis manual describes the:•Motorcycle Lift Adapter Kit. Holds your motorcycle in place while you service or repair it.Requires a working QuickJack. Not compatible with the BL-6000XLT model.•ATV/Motorcycle Lift Adapter Kit. Holds your ATV or motorcycle in place while you service or repair it. Platform is wider than the Motorcycle Lift Adapter Kit. Requires a working QuickJack. Notcompatible with the BL-6000XLT model.Both Lift Adapter Kits support up to 1,000 lbs (453 kg).If you want to perform wheel service, consider getting the Ranger RML-1100 Motorcycle Jack; moreinformation is available at /accessories.More information about the full line of QuickJack products and accessories is available at.This manual is mandatory reading for all users of the QuickJack Lift Adapter Kits, including anyonewho sets up, operates, maintains, or repairs them.⚠ DANGER Be very careful when setting up, operating, maintaining, or repairing yourequipment; failure to do so could result in property damage, product damage,injury, or (in very rare cases) death. Make sure only authorized personnel operatethis equipment. All repairs must be performed by an authorized technician. Do notmake modifications to the unit; this voids the warranty and increases the chancesof injury or property damage. Make sure to read and follow the instructions on thelabels on the unit.Keep this manual on or near the equipment so that anyone who uses or services it can read it.Technical support for your product is available directly from your distributor or you can contactQuickJack at or *********************. You can also ask forreplacement parts (please have the serial number and model number of your unit available).Shipping InformationYour equipment was carefully checked before shipping. Nevertheless, you should thoroughly inspectthe shipment before you sign to acknowledge that you received it.When you sign the bill of lading, it tells the carrier that the items on the invoice were received in goodcondition. Do not sign the bill of lading until after you have inspected the shipment. Ifany of the items listed on the bill of lading are missing or are damaged, do not accept the shipmentuntil the carrier makes a notation on the bill of lading that lists the missing and/or damaged goods.If you discover missing or damaged goods after you receive the shipment and have signed the bill oflading, notify the carrier at once and request the carrier to make an inspection. If the carrier will notmake an inspection, prepare a signed statement to the effect that you have notified the carrier (on aspecific date) and that the carrier has failed to comply with your request.It is difficult to collect for loss or damage after you have given the carrier a signed bill of lading. If thishappens to you, file a claim with the carrier promptly. Support your claim with copies of the bill oflading, freight bill, invoice, and photographs, if available. Our willingness to assist in helping youprocess your claim does not make us responsible for collection of claims or replacement of lost ordamaged materials.Safety ConsiderationsRead this manual carefully before using your new product. Do not set up or operate theproduct until you are familiar with all operating instructions and warnings. Do not allow anyone else tooperate the product until they are also familiar with all operating instructions and warnings.General Safety InformationPlease note the following:•The product is a Motorcycle or ATV/Motorcycle Lift Adapter Kit. Use it only for its intended purpose.•The Lift Adapter Kit requires a working QuickJack. Make sure to follow all QuickJack safety requirements in addition to the safety requirements listed here.•The product must only be operated by authorized personnel.•Always wear appropriate protective clothing when using the product.•Keep loads centered and balanced on the Platform.•When the product is in use, keep all body parts away from it.•Do not make any modifications to the product. If you make modifications to the product, you may void your warranty and increase the chances that an accident could occur.•Make sure all operators read and understand the Installation and Operation Manual. Keep the manual near the device at all times.•Make a visual inspection of the product before using it. Check for damage or missing parts. Do not use the product if you find any of these issues. Instead, take it out of service, then contact anauthorized repair facility, your distributor, or QuickJack at or*********************.•QuickJack recommends making a thorough inspection of the product at least once a year.Replace any damaged or severely worn parts, decals, or warning labels.SymbolsFollowing are the symbols used in this manual:⚠DANGER Calls attention to an immediate hazard that will result in injury or death.⚠WARNING Calls attention to a hazard or unsafe practice that could result in injury or death. ⚠CAUTION Calls attention to a hazard or unsafe practice that could result in minor personal injury, product, or property damage.Tip Calls attention to information that can help you use your product better.Liability InformationBendPak assumes no liability for damage resulting from:• Use of the equipment for purposes other than those described in this manual.• Modifications to the equipment without prior, written permission from BendPak.• Damage to the equipment from external influences.• Incorrect operation of the equipment.SpecificationsModel MotorcycleAdapter Kit ATV/Motorcycle Adapter KitPlatform width 28.5" / 725 mm 47.25" / 1200 mm Platform length 88" / 2,236 mm 88" / 2,236 mm Platform height 3" / 76 mm 3" / 76 mmRamp length 6.25" / 159 mm 6.25" / 159 mmWeight of Platform plus clamp assembly 104 lbs (47 kg) 124 lbs (56.25 kg) Maximum supported weight 1,000 lbs (453 kg) 1,000 lbs (453 kg)⚠ WARNING Do not put a vehicle weighing more than 1,000 lbs (453 kg) on the Platform. Specifications are subject to change without notice.System ComponentsSystem components include the Platform (with Clamp Assembly) and your QuickJack.The PlatformThe QuickJackThe Lift Adapter Kit requires a QuickJack; the platform sits on top of your QuickJack frames.Tip This manual assumes your QuickJack is already set up and working. If it is not, you need to set it up so you can use your Lift Adapter Kit. Refer to the QuickJackInstallation and Operation manual for more information about setting up and using yourQuickJack. The latest version of the QuickJack Setup and Operation Manual canalways be found on the QuickJack website: /downloads.html.The Ranger RML-1100 Motorcycle JackThe Ranger RML-1100 Motorcycle Jack sits on the Lift Adapter Kit platform and allows you to raise your vehicle even higher, providing additional access for service and repair.Setup⚠ WARNING Do not use the Lift Adapter Kit where the slope of the floor is greater than 3degrees; this makes it much more likely that the load on the platform will becomeoff balance and fall, potentially damaging the platform, the QuickJack, or anypeople in the vicinity. Make sure to wear appropriate work clothing while setting upthe Lift Adapter Kit, including gloves and steel-toed work boots.To set up your Lift Adapter Kit:1.Unpack. The platform and the clamp assembly come in separate boxes. Open them in the areawhere you plan to assemble the unit.2.Attach the clamp assembly to the platform. Use the provided nuts and bolts to attach theclamp assembly to the platform. Refer to the graphic in the System Components section to seewhere the clamp assembly attaches to the platform.We recommend attaching the right side (the non-handle side) of the clamp assembly first.3.Attach the tie-downs. If you plan on using the provided tie-downs to help secure your vehicle,attach them to the platform.4.Put the platform on your QuickJack frames. If you are going to use your Lift Adapter Kitright away, move your QuickJack frames together and position the platform on top of the frames.Be sure the lock bars on the QuickJack frames are on the outside.Important:Orient the platform so that the ramp is over the large square labels on theQuickJack frames. The platform does not fit correctly if you put the clamp end overthe labels.You can put the Lift Adapter Kit onto the QuickJack frames when the QuickJack frames are on theground or in the first locked position. If you are having trouble putting on the platform with theQuickJack frames on the ground, try raising the frames to the first locked position. If you do put theplatform on with the QuickJack frames in the first locked position, make sure to lower them beforetrying to put a vehicle on the platform.⚠ WARNING The platform must fit securely on the QuickJack frames. Do not use theLift Adapter Kit until the platform fits securely on the QuickJack frames; if it doesnot, your load could become unstable and fall, potentially damaging your vehicle,the platform, or people in the area.•Connect the platform to the QuickJack frames. Push the rod through the holes in the side of the platform and through the QuickJack frames. Secure the rod at both ends. OperationTo operate your Lift Adapter Kit:1.Make sure the QuickJack frames are on the ground. If the QuickJack frames are raised,you must move them to the ground so that the platform’s ramp is accessible.2.Move a vehicle onto the platform. Make sure the vehicle is centered and balanced on theplatform.3.Secure the vehicle using the clamp assembly. Turn the handle on the clamp assemblyuntil it is securely holding the vehicle. The clamp assembly is designed to securely hold your vehiclein place without causing any damage.e the tie-down rings. The provided tie-down rings can be used, if desired, to further securethe vehicle.5.Make a visual inspection. Do not use the Lift Adapter Kit until you have made sure that allcomponents are in place and working correctly.If something is not working correctly, contact an authorized repair facility, your distributor, orQuickJack at or *********************.⚠ WARNING Do not use the Lift Adapter Kit unless all components are in place and workingnormally. To do otherwise endangers your vehicle, the platform, and any people inthe area.6.Raise the QuickJack frames to the desired position. Make sure to secure the QuickJackin one of its two locking positions.7.Begin your service or repair. Your Lift Adapter Kit is ready to go.Maintenance⚠ WARNING Before performing any maintenance on your Lift Adapter Kit, make sure theQuickJack’s power unit is disconnected from the power source and cannot bereconnected until the maintenance is complete.To maintain your Lift Adapter Kit:•Cleanliness. Always keep your Lift Adapter Kit clean. Make sure to wipe it down after each use;remove any grease, dirt, or other debris. You can use cleaning materials on the platform, but keepthem away from the QuickJack frames.•Storage. Store your Lift Adapter Kit in a cool, dry location when not in use.•Clamp assembly. Be careful not to bump or bend the clamp assembly; if bent, it may not work correctly.Motorcycle and ATV/Motorcycle Lift Adapter Kits11P/N 5900054 —Rev. B — April 2019Santa Paula, CA 93060 USA© 2019 BendPak Inc. All rights reserved. 。
快速夹锁扣,就是搭扣的一种,可以起到快速开启和关闭的搭扣锁,快速夹锁扣有调节螺杆,可以调节锁扣的迫紧对。
在上面我们简单说到什么是快速夹锁扣快速夹锁扣,同时我们也要了解快速夹锁扣是一种非
常方便操作的搭扣锁,它大大的提升了工作效率。
因此,快速夹锁扣广泛应用于各种工业设备、箱体设备及试验设备中。
快速夹锁扣的出现可
以使工业设备快速的开启和关闭,又可以保证备的密封、隔音等要求。
大部分快速夹锁扣可以采用螺丝钻孔进行安装,也可以采用焊接安装,称之为焊接搭扣锁。
但是焊接需要是两个物品都是同一种材质,例如两个都不是不锈钢,两者之间才可以进行焊接安装。
关于安装快速夹锁扣的相关知识,本篇文章暂时就介绍到这里了。
双向运动快速夹钳的原理
双向运动快速夹钳的原理是利用齿轮机构和压力机构实现的。
齿轮机构:双向运动快速夹钳内部设置了两个齿轮,一个为主动齿轮,另一个为从动齿轮。
主动齿轮通过手柄等外部力量来驱动,从动齿轮通过与主动齿轮啮合的方式受到驱动。
主动齿轮和从动齿轮的齿轮比例确定了从动齿轮的运动速度。
压力机构:双向运动快速夹钳内部还设置了一个压力机构,用来控制夹钳的夹持力。
压力机构通常包括一个弹簧和一个压盘。
当手柄操作主动齿轮时,齿轮的运动会带动压盘向下移动,使弹簧被压缩,从而产生夹持力。
当手柄释放时,弹簧会恢复原状,压盘也会随之抬起,释放夹持力。
通过齿轮机构和压力机构的协同作用,双向运动快速夹钳可以快速夹持或释放工件。
当操作者通过手柄驱动主动齿轮时,从动齿轮会以一定的速度运动,带动压力机构使工件被夹持。
当操作者停止驱动主动齿轮时,压力机构会释放夹持力,工件即可被放开。
推拉式快速夹手柄和手摇杆固定方式结构设计说明书1. 引言本文旨在对推拉式快速夹手柄和手摇杆的固定方式进行结构设计说明。
推拉式快速夹手柄和手摇杆是一种常用于机械设备中的控制装置,用于固定和操作工件。
本文将详细介绍设计的原理、结构及其优势。
2. 设计原理推拉式快速夹手柄和手摇杆的固定方式设计基于以下原理:2.1 快速夹紧推拉式快速夹手柄采用了一种特殊的机械结构,能够实现快速而稳定地夹紧工件。
通过推动或拉动夹手柄,内部机械装置会迅速固定住工件,并保持牢固的连接。
这种设计可以提高生产效率,并减少操作人员的劳动强度。
2.2 手摇控制手摇杆作为操作控制装置,通过旋转或移动来实现对工件的控制。
它具有灵活性好、操作简单等优点,适用于各种不同类型的机械设备。
手摇杆的固定方式需要保证其稳定性和可靠性,以确保操作的准确性和安全性。
3. 结构设计推拉式快速夹手柄和手摇杆的固定方式结构设计如下:3.1 推拉式快速夹手柄固定方式推拉式快速夹手柄的固定方式采用了螺栓连接结构。
具体设计如下:•手柄底部设计有一个孔,用于安装螺栓。
•螺栓通过孔穿过手柄,并与底座上的螺母相连。
•底座上预留了与手柄孔对应的孔,以便螺栓穿过并与螺母相连。
这种固定方式简单、易于操作,并且能够提供足够的稳定性和牢固度,确保工件在操作过程中不会松动或脱落。
3.2 手摇杆固定方式手摇杆的固定方式采用了多点支撑结构。
具体设计如下:•手摇杆底部设计有多个支撑点,分布在不同位置。
•支撑点通过螺钉或焊接与机械设备的支架相连。
•支架上预留了与手摇杆支撑点对应的孔或焊接接口。
这种固定方式能够提供多个支撑点,增加了手摇杆的稳定性和可靠性。
同时,可以根据实际需求进行调整和改变,以适应不同类型的机械设备。
4. 优势推拉式快速夹手柄和手摇杆的固定方式设计具有以下优势:•简单易用:固定方式结构设计简单,易于操作和安装。
•稳定可靠:采用螺栓连接和多点支撑结构,提供了足够的稳定性和牢固度。
垂直式 快速夹钳101A 夹持力;48KG 自重;70G 快速夹钳101B 夹持力;100KG 自重;132G 快速夹钳102B 夹持力;100KG 自重;118G 快速夹钳101H 夹持力;450KG 自重;1220G 快速夹钳101B 夹持力;100KG 自重;132G 水平式
快速夹钳201A
夹持力;27KG
自重;28G
快速夹钳201B
夹持力;90KG
自重;123G