Bosch_CAN用户手册中文版.
- 格式:pdf
- 大小:468.97 KB
- 文档页数:21

2 | 中文1 609 92A 3F6 | (21.10.16)Bosch Power Tools中文电动工具通用安全警告阅读所有警告和所有说明! 不遵照以下警告和说明会导致电击、着火和/或严重伤害。
保存所有警告和说明书以备查阅。
在所有下列的警告中术语"电动工具"指市电驱动(有线)电动工具或电池驱动(无线)电动工具。
工作场地的安全④保持工作场地清洁和明亮。
混乱和黑暗的场地会引发事故。
④不要在易爆环境,如有易燃液体、气体或粉尘的环境下操作电动工具。
电动工具产生的火花会点燃粉尘或气体。
④让儿童和旁观者离开后操作电动工具。
注意力不集中会使操作者失去对工具的控制。
电气安全④电动工具插头必须与插座相配。
绝不能以任何方式改装插头。
需接地的电动工具不能使用任何转换插头。
未经改装的插头和相配的插座将减少电击危险。
④避免人体接触接地表面,如管道、散热片和冰箱。
如果你身体接地会增加电击危险。
④不得将电动工具暴露在雨中或潮湿环境中。
水进入电动工具将增加电击危险。
④不得滥用电线。
绝不能用电线搬运、拉动电动工具或拔出其插头。
使电线远离热源、油、锐边或运动部件。
受损或缠绕的软线会增加电击危险。
④当在户外使用电动工具时,使用适合户外使用的外接软线。
适合户外使用的软线将减少电击危险。
④如果在潮湿环境下操作电动工具是不可避免的,应使用剩余电流动作保护器(RCD)。
使用RCD 可减小电击危险。
人身安全④保持警觉,当操作电动工具时关注所从事的操作并保持清醒。
当你感到疲倦,或在有药物、酒精或治疗反应时,不要操作电动工具。
在操作电动工具时瞬间的疏忽会导致严重人身伤害。
④使用个人防护装置。
始终佩戴护目镜。
安全装置,诸如适当条件下使用防尘面具、防滑安全鞋、安全帽、听力防护等装置能减少人身伤害。
④防止意外起动。
确保开关在连接电源和/或电池盒、拿起或搬运工具时处于关断位置。
手指放在已接通电源的开关上或开关处于接通时插入插头可能会导致危险。
Serie 2, Forno da incasso, 60 x 60cm, AcciaioHBA171BS1Accessori integrati1 x Griglia combinata, 1 x Leccarda universale smaltataAccessori opzionaliHEZ317000 Teglia per pizza, HEZ327000 Pietra per pane e pizza, HEZ333001 Coperchio per leccarda extra profonda, HEZ530000 2 leccarde slim 455x188x39 mm (LxPxA), HEZ531000 Leccarda bassa 455x375x30 mm (LxPxA), HEZ531010 Leccarda antiaderen455x375x30mm (LxPxA), HEZ532000 Leccarda profonda 455x375x38 mm (LxPxA), HEZ532010 Leccarda antiaderen 455x400x38mm (LxPxA), HEZ533000 Leccarda profonda 455x375x81 mm (LxPxA), HEZ538000 Guide telescopiche clip a 1 livello, HEZ629070 Teglia per grigliare adatta a pirolisi, HEZ633001 Coperchio per tegame professionale, HEZ633070 Tegame professionale, HEZ634000 Griglia combinata 455x375x31 mm (LxPxA), HEZ636000 Leccarda in vetro 455x364x30 mm (LxPxA), HEZ660050 Accessory, HEZ664000 Griglia combinata 455x375x59 mm (LxPxA), HEZ915003 Pirofila in vetro con coperchio 5,4 l., HEZG0AS00 Cavo di collegamento 3m • Programmi automatici di cottura: cucinare sarà semplicissimo grazie ai programmi con impostazioni già preselezionate.• Autopulizia pirolitica: pulizia del forno senza sforzo• Aria Calda 3D: distribuisce uniformemente il calore fino a tre ilivelli per risultati sempre perfetti.Dati tecniciTipologia costruttiva del prodotto: .....................................Da incasso Sistema di pulizia: .......................................................Pirolisi+Idrolisi Dimensioni del vano per l'installazione (AxLxP): 585-595 x 560-568 x 550 mmDimensioni (AxLxP): ............................................595 x 594 x 548 mm Dimensioni del prodotto imballato (AxLxP): .......675 x 660 x 690 mm Materiale del cruscotto: ...................................................acciaio inox Materiale porta: ..........................................................................vetro Peso netto: ..............................................................................37.4 kg Volume utile: .................................................................................71 l Metodo di cottura: .Grill a superficie grande, Aria calda delicata, aria calda, Riscaldamento statico, grill ventilatoMateriale della cavità: .................................................................Altro Regolazione della temperatura: .........................................elettronica Numero di luci interne: (1)Lunghezza del cavo di alimentazione elettrica: .....................120.0 cm Codice EAN: (4242005356492)Numero di vani - (2010/30/CE): (1)Classe di efficienza energetica: .........................................................A Energy consumption per cycle conventional (2010/30/EC): ........0.99 kWh/cycleEnergy consumption per cycle forced air convection (2010/30/EC):0.81 kWh/cycleIndice di efficienza energetica (2010/30/CE): ..........................95.3 % Potenza: ..................................................................................3600 W Corrente: .....................................................................................16 A Tensione: .............................................................................220-240 V Frequenza: ...........................................................................50; 60 Hz Tipo di spina: ..........................................................................Schuko Accessori inclusi: .......1 x Griglia combinata, 1 x Leccarda universale smaltataSerie 2, Forno da incasso, 60 x 60cm, AcciaioHBA171BS1- 5 programmi di cottura: MultiCottura HotAir 3D, Riscaldamento superiore e inferiore, Grill ventilato, Grill a superficie grande- Forno multi 60cm- HBA171BS1- Programmi automatici: 10- Temperatura porta max. 30 °CCaratteristiche principali- Sistema di cottura assistita: Programmi automatici- Illuminazione interna alogena, Illuminazione disinseribile- Riscaldamento rapido- Forno con ampia cavità e supporto teglie- Orologio elettronico con impostazione inizio e fine cottura- Volume cavità: 71 l- Accessori: 1 griglia combinata, 1 leccarda universale profonda smaltata- Regolazione della temperatura da 30 °C a 275 °CPulizia- Autopulizia pirolitica- Cleaning Assistance- Ventola tangenziale di raffreddamentoAltre caratteristicheInformazioni tecniche- Numero di livelli: 5 pezzo- Si prega di fare riferimento alle quote d'installazione mostrate nel disegno tecnicoEtichetta energetica- Assorbimento massimo elettrico: 3.6 kW- Lungh. cavo alimentazione: 120 cmSistema di controllo- TouchControlGriglie / GuideAccessori- Tensione: 220 - 240 VDimensioni- Dimensioni apparecchio (AxLxP): 595 mm x 594 mm x 548 mm- Dimensioni nicchia (AxLxP): 560 mm - 568 mm x 585 mm - 595 mm x 550 mm- Temperatura suggerita- Raggiungimento temperaturaSerie 2, Forno da incasso, 60 x 60cm, Acciaio HBA171BS1。

u Detection and display of OMNEO and Dante devices u Controlling audio connectionsu Support for single- and multi-subnetsu Automatic selection of unicast and multicastu Store and reload scenario presetsOMNEO Control is an easy‑to‑use application to configure and manage audio connections in a network. The application runs on a standard Windows PC, without the need of a dedicated controller device. System overviewOMNEO Control allows users to:•Display OMNEO and Dante devices and their status ina clear routing matrix.•Create and remove audio connections betweenOMNEO and/or Dante devices.•Configure audio- and IP-settings for each OMNEOdevice.•Create, save and load multiple Link Presets fordifferent scenarios.FunctionsOMNEO Control is a Windows desktop application. All its functionalities can be grouped into two categories: audio routing and settings.Audio routingOMNEO Control gives a clear overview of all OMNEO devices in a network, which can span multiple subnets. Devices are automatically detected and displayed alphabetically in the OMNEO Routing Matrix.Devices with transmit channels are shown horizontally, devices with receive channels are shown vertically. Icons in the cross points indicate audio connections between transmit channels and receive channels.The audio routing functionalities are:•Overview of all OMNEO devices in all subnets of thenetwork.•Overview of all Dante devices in the subnet of the PC that is running the OMNEO Control software.•Overview of devices which are transmitting and/orreceiving.•Devices in different subnets and/or VLANs canexchange audio.•Create and remove connections between devices.•Smart automatic switching between unicast andmulticast audio streams.•Filter on full or partial device names in device lists.•Store and load multiple routing presets for differentscenarios.•Failure recovery by restoration of last routing status. SettingsOMNEO and Dante devices are fully plug and play, and do not need manual configuration on a device level. With OMNEO Control users can check or override the settings of OMNEO devices manually.Possible settings are:•Assign a unique alphanumeric name to each audiodevice.•Set device network topology mode to Daisy Chain,RSTP (loop), or Glitch-free.•Manage device settings (latency and sample rate).•IP settings for each device.OMNEO Control is free of charge available in 32- and64‑bit versions. The software can be downloaded (zipfile) from the Bosch Security Systems download area:https:///software/Ordering informationOMNEO Control 32-bitThe software can be downloaded (zip file) from theBosch Security Systems download area: https:///software/Order number None. Free of charge.OMNEO Control 64-bitThe software can be downloaded (zip file) from theBosch Security Systems download area: https:///software/Order number None. Free of charge.2Represented by:Europe, Middle East, Africa:Germany:North America:Asia-Pacific:Bosch Security Systems B.V.P.O. Box 800025600 JB Eindhoven, The Netherlands Phone: + 31 40 2577 284****************************** Bosch Sicherheitssysteme GmbHRobert-Bosch-Ring 585630 GrasbrunnGermanyBosch Security Systems, Inc.130 Perinton ParkwayFairport, New York, 14450, USAPhone: +1 800 289 0096Fax: +1 585 223 9180*******************.comRobert Bosch (SEA) Pte Ltd, Security Systems11 Bishan Street 21Singapore 573943Phone: +65 6571 2808Fax: +65 6571 2699*****************************© Bosch Security Systems 2017 | Data subject to change without notice 24850400779 | en, V1, 15. Sep 2017。


1VG4 AutoDome® 自动监控系列1.1VG4 系列用户手册补遗:安装和更新所需的软件要在 Microsoft® Internet Explorer 中观看来自启用 IP 的 VG4 AutoDome 的实况视频,或者要更改VG4 AutoDome 配置,您必须在此文件夹中安装下列软件:1.Sun® Java2.Microsoft® .NET 2.x3.Microsoft® DirectX 9.0c4.MPEG-ActiveX 4.245.ConfigManager 01.60.0074.0您可以在博世安防系统网站上获得所需软件的最新版本。
要查找软件,请按以下说明执行:1.启动 Web 浏览器访问 网站。
2.在 Web 页面的左侧窗格中单击“CCTV”或“产品”链接。
图 1.1 中文主页3.在左窗格中的该部分下方,单击“点击查阅简体中文版产品目录”链接。
图 1.2 产品目录链接4.在左窗格中的“下载库”部分下方,单击“软件”链接。
图 1.3 软件链接5.单击“确定”同意遵守“博世软件许可协议”。
图 1.4 博世最终用户许可协议6.在中间框内的“软件”标题下方,单击“闭路监控系统”链接。
图 1.5 主软件框7.单击“自动监控系统”链接访问博世云台摄像机的软件。
图 1.6 云台摄像机链接在单击“云台摄像机”后,浏览器会打开用于 VG4 和 VEZ AutoDomes 的软件下载页面。
图 1.7 VG4 软件下载页面8.向下滚动页面至“AutoDome® TCP/IP 通信模块”部分。
图 1.8 所需的软件9.右键单击“EN 选择”,然后从下列软件包的弹出菜单中选择“目标另存为”:-Sun® Java-Microsoft® .NET 2.x-Microsoft® DirectX 9.0c-MPEG-ActiveX 4.24-ConfigManager 01.60.0074.010.将每个软件包保存到装有 Microsoft Internet Explorer 的计算机。
QUICK START& SAFETY GUIDEDISHWASHER:300 seriesTABLE OF CONTENTSSAFETY INSTRUCTIONS . . . . . . . . . . . . . . . . . . .2GETTING STARTED . . . . . . . . . . . . . . . . . . . . . . .4CYCLES AND OPTIONS . . . . . . . . . . . . . . . . . . . .6FAQs . . . . . . . . . . . . . . . . . . . . . . . . . . . . . . . . . . . .8TIPS . . . . . . . . . . . . . . . . . . . . . . . . . . . . . . . . . . . .9STATEMENT OF LIMITED WARRANTY . . . . . .10m A Connected ApplianceD C B K M1 . Download the HomeConnect TM(America) app2 . Scan the QR code3 . Follow the instructions in the app .Connect Your Dishwasher::Cancer and Reproductive Harm - STATE OF CALIFORNIA PROPOSITION 65 WARNING:WARNINGProposition 65 Warning:This product may contain a chemical known to the State of California, which can cause cancer or reproductive harm. Therefore, the packaging of your product may bear the following label as required by California:ANY WARRANTY IMPLIED BY LAW, WHETHER FOR MERCHANTABILITY OR FITNESS FOR A PARTICULAR PURPOSE, OR OTHERWISE, SHALL BE EFFECTIVE ONLYFOR THE PERIOD THAT THIS EXPRESS LIMITED WARRANTY IS EFFECTIVE . IN NO EVENT WILL THE MANUFACTURER BE LIABLE FOR CONSEQUENTIAL, SPECIAL, INCIDENTAL, INDIRECT, “BUSINESS LOSS”, AND/OR PUNITIVE DAMAGES, LOSSES, OR EXPENSES, INCLUDING WITHOUT LIMITATION TIME AWAY FROM WORK, HOTELS AND/OR RESTAURANT MEALS, REMODELING EXPENSES IN EXCESS OF DIRECTDAMAGES WHICH ARE DEFINITIVELY CAUSED EXCLUSIVELY BY BSH, OR OTHERWISE. SOME STATES DO NOT ALLOW THE EXCLUSION OR LIMITATION OF INCIDENTAL OR CONSEQUENTIAL DAMAGES, AND SOME STATES DO NOT ALLOW LIMITATIONS ON HOW LONG AN IMPLIED WARRANTY LASTS, SO THE ABOVE EXCLUSIONS OR LIMITATIONS MAY NOT APPLY TO YOU . THIS WARRANTY GIVES YOU SPECIFIC LEGAL RIGHTS, AND YOU MAY ALSO HAVE OTHER RIGHTS WHICH VARY FROM STATE TO STATE .No attempt to alter, modify or amend this warranty shall be effective unless authorized in writing by an officer of BSH.How to Obtain Warranty ServiceTo obtain warranty service for your product, you should contact Bosch Customer Service at 1-800-944-2904.1901 MAIN STREET, SUITE 600 IRVINE, CA 92614 // © 2022 B SH H O M E A P P L I A N C E S C O R P O R AT I O N。
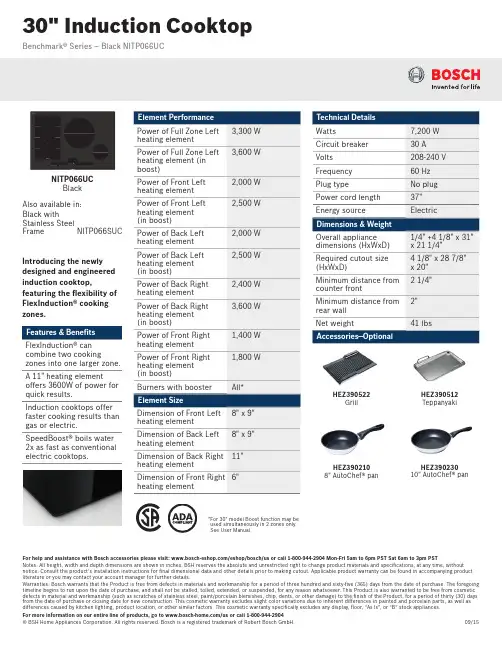
For help and assistance with Bosch accessories please visit: /eshop/bosch/us or call 1-800-944-2904 Mon-Fri 5am to 6pm PST Sat 6am to 3pm PSTNotes: All height, width and depth dimensions are shown in inches. BSH reserves the absolute and unrestricted right to change product materials and specifications, at any time, without notice. Consult the product’s installation instructions for final dimensional data and other details prior to making cutout. Applicable product warranty can be found in accompanying product literature or you may contact your account manager for further details.Warranties: Bosch warrants that the Product is free from defects in materials and workmanship for a period of three hundred and sixty-five (365) days from the date of purchase. The foregoingHEZ39023010" AutoChef® panHEZ3902108" AutoChef® pan Benchmark® Series – Black NITP066UC30" Induction CooktopNITP066UCBlackIntroducing the newly designed and engineered induction cooktop,featuring the flexibility of FlexInduction® cooking zones.FlexInduction® can combine two cookingzones into one larger zone.A 11" heating elementoffers 3600W of power for quick results.Induction cooktops offer faster cooking results than gas or electric.SpeedBoost® boils water 2x as fast as conventional electric cooktops.HEZ390512TeppanyakiHEZ390522Grill Also available in:Black withStainless Steel Frame NITP066SUC* F or 30" model Boost function may be used simultaneously in 2 zones only. See User Manual.For help and assistance with Bosch accessories please visit: /eshop/bosch/us or call 1-800-944-2904 Mon-Fri 5am to 6pm PST Sat 6am to 3pm PSTNotes: All height, width and depth dimensions are shown in inches. BSH reserves the absolute and unrestricted right to change product materials and specifications, at any time, without notice. Consult the product’s installation instructions for final dimensional data and other details prior to making cutout. Applicable product warranty can be found in accompanying product literature or you may contact your account manager for further details.Warranties: Bosch warrants that the Product is free from defects in materials and workmanship for a period of three hundred and sixty-five (365) days from the date of purchase. The foregoingInstallation Detailsair clearance 36" (~900)" (79) + fitting/conduit 1" (23)Benchmark® Series – Black NITP066UC30" Induction Cooktop。
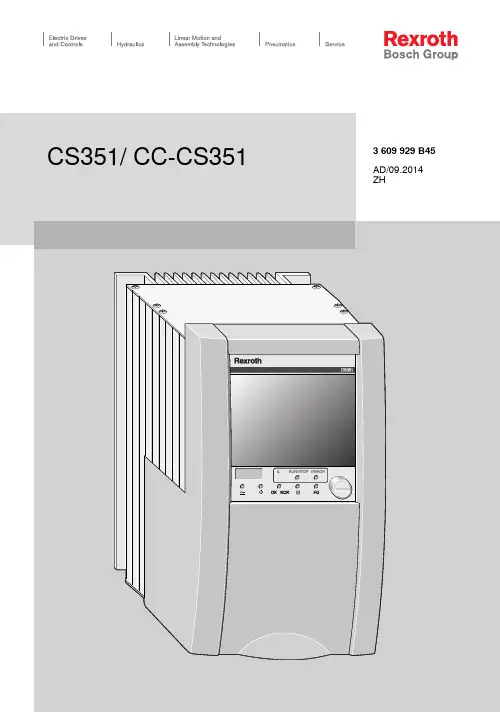
2/52博世力士乐股份公司CS351/CC-CS351|3609929B45/2014-09CS351 | 3609929B45/2014-09博世力士乐股份公司3/54目录1关于本文档 (05)2一般安全说明 (06)3交付范围 (09)4产品说明 (10)5运输和存储 (31)6装配 (32)7调试 (34)8操作 (38)9维护和修理 (40)10废弃 (46)11拆卸和更换 (47)12处置 (48)13扩展和转换 (48)14故障诊断 (48)15技术数据 (49)16服务与销售 (52)语英4/54 博世力士乐股份公司CS351 | 3609929B45/2014-09以上所列数据仅用于对产品进行说明。
我们提供的信息不能作为对某种条件或某种应用适用性的声明。
所提供的信息不能免除用户自行判断和验证的义务。
请注意,我们的产品会经受自然磨损和老化。
© 本文档及其中所列的数据、规格和其它信息为博世力士乐股份公司独家所有。
未经许可,不得将其翻印或提供给第三方。
本文档以 PDF 文件的形式提供。
原始操作说明的翻译。
原始说明以德语制作。
CS351 | 3609929B45/2014-09 博世力士乐股份公司5/54关于本文档英语1关于本文档本手册包含有关 CS351/CC-CS351 紧凑型系统的安全和适当装配、运输、调试、操作、维护、拆卸以及简单故障诊断的重要信息。
有关紧凑型系统中使用的软件说明并不包含在这些说明中。
有关您可能需要的软件和操作的任何信息,请参阅 BS350 操作程序的联机帮助以及随附的 USB 系统记忆棒中的系统文档。
在使用紧凑型系统之前,请完整阅读这些说明,尤其是第 6 页的“一般安全说明”一章。
文档的范围此文档适用于 CS351 和 CC-CS351 紧凑型系统。
需要符合 VDI/VDE 2862 类别 A 文档的拧紧操作可以使用由 ErgoSpin 手持式拧紧机和 CS351E... 紧凑型系统组成的拧紧系统来执行。
立即在M y B o s c h上为您的电器注册,免费获得以下福利:b o sc h-h o m e.c n/m y b o s c h 附件 (手持式搅拌棒)[zh]使用说明书[en]Instruction manual 附件 (手持式搅拌棒) 5 Accessories (Hand blender) 71. 2. 3.4. 5. 6.7.8.9.10.123C20 xzh安全说明安全说明本附件用于手持式搅拌机 。
请遵循手持式搅拌机的操作说明。
附件仅适用于这些说明中描述的用途。
W锋利的刀片容易引发受伤危险!切勿触碰万能切碎器的刀片。
只能通过塑料把手来抓住万能切碎器的刀片。
请勿赤手触碰万能切碎器的刀片。
请用刷子清洁刀片。
万能切碎器必须完全组装好才能使用!重要信息!请勿在电器未完全停止前安装或拆卸附件。
切勿在万能切碎器上使用手持式搅拌器/搅拌器脚。
万能切碎器不适合放入微波炉中。
必须等待电器静止后,才能安装或拆卸万能切碎器附件。
切勿将万能切碎器的顶盖浸入液体中,也不能在流水下冲洗或放入洗碗机清洗。
切勿在未安装齿轮附件的情况下将搅拌器插入底座装置。
切勿将齿轮附件浸入液体中,也不能在流水下冲洗或放入洗碗机清洗。
原产地:斯洛文尼亚总经销商:博西家用电器(中国)有限公司中国江苏省南京市鼓楼区清江南路18号3幢全国统一客户服务热线:400 885 5888客户服务电子邮箱:***********************公司网站: 万能切碎器X 图 A1 万能切碎器2 刀片3 附件4 上盖若手持式搅拌器未随附万能切碎器,则可向客服订购 (订购号 12023789)。
配合万能切碎器可在全功率下使用本电器 (按照菜谱)。
X 图 D操作用于切肉、硬质奶酪、洋葱、香料、大蒜、水果、蔬菜、坚果和杏仁。
务必遵循表格中的最大加工量。
X 图 D警告!■在切肉之前,请剔除软骨、骨头和肌腱。
zh打发桨■万能切碎器不适用于切非常硬的物品 (咖啡豆、萝卜、肉豆蔻) 以及冰冻食材 (水果等)。
Register your new Bosch now: /welcomeMCM3...AU MultiTalent 3en Instruction manualenFor your safetyFor your safetyBefore use, read these instructions carefully in order to become familiar with important safety and operating instructions for this appliance. If the instructions for correct use of the appliance are not observed, the manufacturer’s liability for any resulting damage will be excluded.This appliance is designed for processing normal household quan-tities in the home or similar quantities in non-industrial applications. Non-industrial applications include e.g. use in employee kitchensin shops, offices, agricultural and other commercial businesses, as well as use by guests in boarding houses, small hotels and similar dwellings.Use the appliance for processing normal amounts of food for the household; see “Recipe examples” section.This appliance is suitable for mixing, kneading, beating, cutting and shredding food. Other applications are possible if the accessories approved by the manufacturer are used. It must not be used for processing other objects or substances. Use the appliance with orig-inal accessories only. Please keep the operating instructions in a safe place. If passing on the appliance to a third party, always include the operating instructions.General safety instructionsW Risk of electric shockThe appliance must not be used by children.The appliance and its power cord must be kept away from children. Appliances can be used by persons with reduced physical, sensory or mental capabilities or lack of experience and knowledge if they have been given supervision or instruction concerning use of the appliance in a safe way and if they understand the hazards involved. Children shall not play with the appliance.Connect and operate the appliance only in accordance with the specifications on the rating plate. Only use the appliance indoors at room temperature and up to 2000 m above sea level. Do not use the appliance if the power cord and/or appliance are damaged.Before replacing accessories or additional parts, which move during operation, switch off the appliance and disconnect from the power supply. Always disconnect the appliance from the supply if it is left unattended and before assembling, disassembling or cleaning.Do not place the power cord over sharp edges or hot surfaces.T o prevent injury, a damaged power cord must be replaced by the manufacturer or his customer service or a similarly qualified person. Only our customer service may repair the appliance.3en For your safetySafety instructions for this applianceW Risk of injuryW Risk of electric shockIf the power is interrupted, the appliance remains switched on and restarts when the power is restored.Never immerse the base unit in liquids or place under running water and do not clean in the dishwasher.Before rectifying a fault, pull out the mains plug.W Risk of injury from the rotating tools!While the appliance is operating, never place fingers in the mixing bowl. Always use the pusher for adding ingredients.After switching off, the drive continues running for a short time. Change tools only when the drive is at a standstill.W Risk of injury from sharp blades/rotating drive!Never reach into the attached blender jug!Do not remove/attach the blender jug until the drive has stopped. Do not remove/attach the universal cutter jug until the drive has stopped. W Risk of injury from sharp blades!Do not touch blades of the universal blade with bare hands. When not in use, always store the universal blade in the blade guard. Clean them with a brush.Do not grip the sharp blades or edges of the cutting discs. Grip the discs by the plastic part in the centre only!Do not place fingers in the feed tube. Only use the pusher when adding more ingredients. Do not touch blades of the blade insert with bare hands. Clean them with a brush.W Risk of scalding!If processing hot liquids, steam escapes through the funnel in the lid. Add a max. 0,4 litres of hot or frothing liquid.W Risk of injury!Never assemble accessories on the base unit.45enFor your safety Contents For your safety .............................................3Overview (5)Operation (6)Cleaning and servicing (8)Troubleshooting (9)Storage (9)Disposal (9)Guarantee (9)Recipes / Ingredients / Processing ...........10Congratulations on the purchase ofyour new Bosch appliance. You can find further information about our products on our website.Explanation of the symbols on the appliance or accessoryWCaution! Rotating tools.Do not place fingers in the feed tube.o Lock blade insert in the blender or universal cutter jug.n Remove blade insert from the blender or universal cutter jug.p Blade insert with blender/cutting blade qBlade insert with grinding bladeOverviewThe instructions describe different features ofthe appliance. Figure I shows an overviewof the model.Please fold out the illustrated pages.Fig. A Base unit1 Rotary switchP = StopM = Instantaneous switching atmaximum speed, hold switch for required blending duration.Settings 1–2, Operating speed: 1 = low speed – slow, 2 = high speed – fast.2 Drive3 Cord store4 Bowl5 Tool holder 6Tools*a Universal blade with blade guardb Kneading hookc Chopping disc 7 Cutting discs*a Slicing reversible disc – thick/thinb Shredding reversible disc – coarse/fine c Reversible slicing/shredding disc 8 Lid a Filler opening b Pusher Accessories*9 Blade insert with blender/cuttingblade and seal10 Blade insert with grinding blade and seal11 Universal cutter jug12 Blender jug13 Lid for blendera Filler openingb Funnel-shaped stopper * for some models:With the universal cutter use the appliance at full power (according to the recipe). You can find the recipe on the illustrated pages(Fig. F ).If the universal cutter is not included with the hand blender, it can be ordered from customer service (order no. 12005833).Risk of injury from sharp blades! ingredients that ought not be cut (e.g. raisinsen Cleaning and servicing■Attach the blender jug (match arrow on the jug to the arrow on the appliance) and rotate as far as possible in a clockwise direction.■Add ingredients.Maximum capacity, liquid = 1.0 litres (frothing or hot liquids max. 0.4 litres). Optimal processing capacity –solids = 80 g.■Attach lid and press firmly. Hold lid while working.■Insert the mains plug.■Set the rotary switch to the desired setting.■T o add more ingredients, set the rotary switch to P.■Remove the lid and add ingredientsor■remove the funnel and gradually add solid ingredients through the refill openingor■pour liquid ingredients through the funnel. After using the appliance■Set the rotary switch to P.■Remove mains plug.■Rotate the blender in an anti-clockwise direction and remove.■Remove lid.■Loosen blade insert clockwise (l) and remove from the blender jug.■Clean all parts, see “Cleaning and servicing”.Universal cutterUse (depending on model):–With the blade insert with blender/cutting blade p for cutting and chopping meat, hard cheese, onions, herbs, garlic, fruit, vegetables.–With the blade insert with grinding blade q for grinding and cutting fairly small quantities of spices (e.g. pepper, cumin, juniper, cinnamon, dried anise, saffron), grain (e.g. wheat, millet, linseeds), coffee and sugar.W Risk of injury from sharp blades / rotating drive!Do not remove/attach the universal cutter until the drive has stopped.Do not touch blades of the blade insert with bare hands. Clean them with a brush.Fig. F shows guide values for the maximum quantities and processing times when working with the universal cutter.Fig. E■Put down universal cutter jug with the opening face up.■Add food, which is to be cut, in the jug. Note MAX mark on the jug!■Place seal on the blade insert. Ensure that the seal is positioned correctly. Important informationIf the seal is damaged or not correctlyp ositioned, liquid may run out.■Insert blade insert (p/q) intothe universal cutter jug and lockanti-clockwise (m).■Turn universal cutter over (blade insert face down).■Attach the universal cutter (arrow on jug on dot on the appliance) and rotate all the way clockwise.■Insert the mains plug.■Set the rotary switch to the desired setting. Note: The longer the appliance remains switched on, the finer the ingredients are cut. Recommendations on using the accessories can be found in the section “Recipes/ Ingredients/Processing”.After using the appliance■Set the rotary switch to P.■Remove mains plug.■Rotate universal cutter anti-clockwise and remove.■Turn universal cutter over (blade insert face up).■Loosen blade insert clockwise (l) and remove from the universal cutter jug.■Empty jug.■Clean all parts, see “Cleaning and servicing”.Cleaning and servicingThe appliance requires no maintenance. Thorough cleaning protects the appliance from damage and keeps it functional.An overview of cleaning the individual parts can be found in Fig. G.8en TroubleshootingWarning!Surfaces may be damaged. Do not use abrasive cleaning agents.Note: If processing e.g. carrots and red cabbage, the plastic parts will become discoloured by a red film which can be removed with a few drops of cooking oil. Cleaning the base unit■Remove mains plug.■Wipe the base unit with a damp cloth. If required, use a little detergent.■Then dry the base unit.Cleaning the bowl and accessoriesW Risk of injury from sharp blades!Do not touch blades of the universal blade with bare hands. Clean them with a brush. Do not grip the sharp blades or edges of the cutting discs. T ake hold of discs by the edge only!All parts are dishwasher-proof. Do not wedge plastic parts in the dishwasher as they could warp.Cleaning the blender / universal cutterW Risk of injury from sharp blades!Do not touch blades of the blade insert with bare hands. When not in use, always store the universal blade in the blade guard. Clean them with a brush.The blender jug (without blade insert), lid and funnel are dishwasher-proof.Do not clean the blade insert in the dish-washer, but under running water (do not soak in water). Remove seal for cleaning. TroubleshootingW Risk of injury!Before rectifying a fault, pull out themains plug.Fault:Appliance does not start or appliance switches off during operation.Possible cause:Bowl or lid or the accessory has not been attached correctly or has become detached. Remedial action:■Set the rotary switch to P.■Correctly attach bowl/lid or accessory and screw on all the way.■Switch the appliance on again. Important informationIf the fault cannot be eliminated, please contact customer service (see customer service addresses at the end of this booklet).StorageFig. HThe tools can be stored in the bowl to save space.DisposalJ Dispose of packaging in an environ-mentally-friendly manner. Thisa ppliance is labelled in accordancewith European Directive 2012/19/EUconcerning used electrical ande lectronic appliances (waste electricaland electronic equipment – WEEE).The guideline determines the frame-work for the return and recyclingof used appliances as applicablethroughout the EU. Please ask yourspecialist retailer about currentd isposal facilities. GuaranteeThe guarantee conditions for this appliance are as defi ned by our representative in the country in which it is sold. Details regarding these conditions can be obtained fromthe dealer from whom the appliance was purchased. The bill of sale or receipt must be produced when making any claim under the terms of this guarantee.Changes reserved.9or11AE United Arab Emirates, SH Home Appliances FZE Round About 13,Plot Nr MO-0532AJebel Ali Free Zone – Dubai Tel.: 04 881 4401mailto:******************** /aeRepublika e Shqiperise,AlbaniaELEKTRO-SERVIS sh.p.k Rr. Shkelqim Fusha, Selite, Pallati "Matrix Konstruksion",www.bosch-home.co.ilrat,BSH Household AppliancesArena House, 2nd Floor, Main Bldg, Plot No. 103, Road No. 12, MIDC,Toll Free 1800 266 1880/in。
2en Overview Note:Fitting jar:Place the jar on the top socket of the main unit, ensuring that the locks fit properly in the jar locking grooves of the top socket.Jar Lid: Ensure that the lid gasket is properly fitted. Place the lid on top of thejar, gently press down and lock the lid onto the jar using the lid lock clamps. Hold the lid gently while operating.Speed control: Turn the speed selector knob clockwise for speed 1, 2 or 3, asdesired.Pulse: Turn the speed selector knob anti-clockwise for a few seconds andrelease for momentary operation. Pulse is especially useful for applications such as grinding chutneys, crushing ice, etc.Overview3en Overview 4en Safety and important instructionsSafety and important instructionsRead and follow the instruction manual carefully and keep for later reference! Enclose these instructions when you give this appliance to someone else. If the instructions for correct use of the appliance are not observed, the manufacturer’s liability for any resulting damage will be excluded.1. This mixer grinder is strictly for household use and not applicable for non-domestic and/or commercial use.2. Please only use official Bosch parts and accessories with the Mixer Grinder. Never usethese parts and accessories with any other appliances.3. Check if the voltage indicated on the base of the mixer grinder corresponds to the localelectrical mains voltage before you connect the appliance.4. This appliance can be used by persons with reduced physical, sensory or mentalcapabilities or lack of experience and/or knowledge if they have been given supervision or instruction concerning use of the appliance in a safe manner and if they understand the hazards involved.5. Keep children away from the appliance and connecting cable and do not allow themto use the appliance. Do not let children play with the appliance. Cleaning and user maintenance must not be performed by children.6. Do not use the mixer grinder if the power cord and/or appliance are damaged. Only ourcustomer service may repair the appliance, e.g. by replacing a damaged power cord, in order to avoid hazards.7. Do not use the mixer grinder on a wet surface.8. Keep the mixer grinder away from hot gas burners, electric hot plates or similar appliances.9. The power cord must not come into contact with hot parts or be pulled across sharp edges.10. Always ensure that speed selector knob is in the OFF position and the applianceunplugged before you remove or attach jars or accessories.11. Blades should be fitted properly before running the mixer grinder.12. Do not operate the mixer grinder without locking the dome or lid in place or with an empty jar.13. Always unplug the mixer grinder before reaching into the jar with your fingers or anyother object (such as a spatula).14. Do not open the lid or dome when the mixer grinder is running.15. Do not add solid ingredients when the mixer grinder is running.16. Do not grind hot ingredients or sugar in the mixer grinder.17. Do not overload the mixer grinder.18. Do not leave the main unit unattended while in operation.19. Always unplug the mixer grinder after use, or whenever the appliance is unsupervisedor in the event of an error.20. In dry grinding, the jar may become hot due to friction. This is quite normal and hasnothing to do with the motor. The jar will cool down with time. If the motor is getting too hot and you can feel hot air coming out of the side vent or bottom, switch off the mixer grinder and restart after 10 minutes.21. Do not run the mixer grinder for more than 5 minutes continuously. Wait for 2 minutes ifyou need to use it for longer.22. Switch off the appliance if the motor stalls or smoke emanates from the appliance. Ifthis continues, call the Bosch service center.23. Never immerse the main unit in water or any other liquid. Do not rinse or wash in adishwasher.24. Handle the blades carefully, wash them under running water and do not rub with yourhands.5 en Safety and important instructions Congratulations on the purchase of your new Bosch TrueMixx Style/Pro Mixer Grinder. In doing so, you have opted for a modern, high-qualitydomestic appliance. You can find further information about our products on our web page.Know your mixer grinderMinimum capacity for all the above jars is at least up to blade level.ContentsOverview.....................................................2Safety and important instructions ...............4Know your mixer grinder.............................5Jar capacity ................................................5Using the product .......................................6Safety systems ...........................................7Operating your mixer grinder ......................7Cleaning ....................................................8Troubleshooting ..........................................8Blade changing procedure .........................9Blade selection .........................................10Dry grinding applications withPoundingBlade (11)25. It is normal for the mixer grinder to become a little discoloured, especially when usedwith ingredients like turmeric. To avoid this, make sure that the ingredients do not come into contact with the mixer grinder body.26. Do not drop the main unit or jars.27. Do not use the jars as storage containers.6 en Using the product3. H ow to fit/remove active flow breakerYour Bosch TrueMixx Style/Pro Mixer Grinder has an active flow breaker which improves the quality of your wet grinding applications. To fit the active flow breaker, insert the active flow Using the product1. How to fit/remove blades(big jar, medium jar, blender jar)Hold the coupler on the underside of the jar and with the spatula, tighten by rotating in an anti-clockwise direction to fit and clockwise to remove until the the blade, please refer to X “Blade changing procedure” see page 9. 2. How to fit jar to main unitCarefully insert the jar on top of themain unit. Ensure that the lock of the jar fits into the slot of the main unit. Rotate the jar clockwise until it locks and use en Operating your mixer grinderIf this happens, switch off your mixergrinder and remove the excess ingredients. Add sufficient water if dealing with thick paste and wait for 2-3 minutes. Press the red reset button and start the mixer grinder again.■You may observe some minor oilspillage in the Jars and Jar sockets during first two to three operations. This is normal. Thoroughly clean the minor oil spillages with water and wipe dry with soft cloth.Preparation of ingredientsImportant!■Cool down any hot ingredients beforeputting in the jar.■Cut large ingredients into small piecesapprox. 2 cm in size before mixing/grinding.Regular use and operation■For blending/liquidising/puréeing use‘Pulse’ on the speed selector knob. This will activate Pulse until you release the button. Use position 1-3 for continuous operation.1 = Lowest operating speed 3 = Highest operating speedHold down the jar lid gently while your mixer grinder is in operation.■After switching off the mixer grinder, waituntil the blade stops rotating completely and only then remove the lid or insert ■disconnected.■Avoid using your hand to fill or cleanjars. It is safer and more hygienic to use the spatula.■Avoid storing food in the jar.8To keep your Bosch mixer grinder sparkling clean, just follow these steps.1. First remove the mains plug from theelectrical socket.2. Clean the main unit using a damp/wetcloth. Do not use abrasive cleaning agents.3. Hold the jar under running water for aminute after each use to remove the residue.4. Please remove active flow breaker whilecleaning the jar. For instructions how to remove it, please refer to X “How to fit/remove active flow breaker” see page 6.5. Remove the jars after each use andwash in soapy water. Then rinse with clean water.6. Dry the parts thoroughly with a cleansoft cloth.7. Always keep/store the jars upside down.8. We recommend you clean your Boschmixer grinder immediately after use for easier removal of residue.9. Do not immerse the main unit in wateror any other liquid or pour liquid over it.10. Regularly clean the jars and gasketsafter each use for proper hygiene and performance of the Mixer Grinder. 11. After every use of the Mixer Grinder,pour small amounts of hot water into the jars to remove the leftover or sticky substances.Troubleshooting1011Puliyodharai masalaIngredients–Sesame seeds – 4 tsp (16 g)–Bengal gram (chana dal) – 4 tbsp (72 g) –Urad dal – 2 tbsp (36 g) –Dried red chillies – 8-10 –Black pepper – 2 tsp (9 g)–Coriander seeds – 4 tsp (10 g) –Fenugreek seeds – ¹⁄3 tsp (3 g)■Dry-roast the sesame seeds, chana daland urad dal in a pre-heated pan on a low/medium heat until there is enough aroma from the ingredients. Then add black pepper, dried red chillies, coriander seeds and fenugreek, one by one, in this order and roast the entire mixture for a bit longer.■After roasting, allow the ingredients tocool to room temperature.■Pour the roasted ingredients intothe medium jar fitted with thePoundingBlade and grind as per the 12en Dry grinding applications with PoundingBlade Rasam powder Ingredients–Coriander seeds – 2 cups (50 g) –Tur dal – ²/3 cup (50 g) –Dried red chillies – 6-8–Black pepper – ½ cup (30 g)–Cumin seeds (jeera) – 3 tsp (15 g) ■Dry-roast the coriander seeds andtur dal in a pre-heated pan on a low/medium heat until the mixture of ingredients turns brown/slightly dark. Then add black pepper, dried red chillies and cumin, one by one, in this order and roast the entire mixture for a bit longer. ■After roasting, allow the ingredients tocool to room temperature.■Pour the roasted ingredients intothe medium jar fitted with thePoundingBlade and grind as per the Idli podiIngredients–Sesame seeds – ½ tsp (2 g)–Bengal gram (chana dal) – ½ cup(100 g)–Urad dal – ½ cup (100 g) –Dry red chillies – 4-5 nos –Peeled garlic cloves – 5 nos –Spring curry leaf – 1 nos –Asafoetida – 1 pinch –Salt as per taste■Dry-roast the above ingredients in apre-heated pan on a low/medium heat until there is enough aroma from the ingredients.■After roasting, allow the ingredients tocool to room temperature.■Pour the roasted ingredients intothe medium jar fitted with thePoundingBlade and grind as per the 13en DisposalGaram masalaIngredients–Cloves – 16 (9 g)–Cumin seeds (shahi jeera) – 1 tbsp(27 g)–Bay leaf – 4-5 (3 g)–Green cardamom – 1 tsp (5 g) –Black cardamom – ½ tsp (5 g) –Star anise – 2 tbsp (6 g) –Mace 8 (3 g)–Cinnamon – 15-16 leaves (9 g) –Black pepper – 7 g–Lichen (pathar ka phool) – 2 g■Dry-roast the above ingredients in apre-heated pan on a low/medium heat until there is enough aroma from the ingredients. Add cumin seeds (shahi jeera) and bay leaves at the end.■After roasting, allow the ingredients tocool to room temperature.■Pour the roasted ingredients intothe Medium Jar fitted with thePoundingBlade and grind as per the Dane ki chutneyIngredients–Peanuts roasted – 120 g –Red chilli powder – 6 g –Salt to taste – 3 g –Cumin seeds – 4 g –Coriander seed – 5 g –Oil – 2.5 ml–Asafoetida powder – 2 pinch (0.5 g) ■Dry-roast the above ingredients in apre-heated pan on a low/medium heat until there is enough aroma from the ingredients.■After roasting, allow the ingredients tocool to room temperature.■Pour all the roasted ingredients (exceptthe peanuts) into the medium jar fitted with the PoundingBlade and grind as ■Then add the roasted peanuts to themixture and grind again as per following Note: The timings in all the above recipes are indicative to obtain the desired level of fineness/coarseness close to the traditional grinding method. However, you may adjust the timings as per your requirements.DisposalJ Save the environ m ent - dispose your e-waste in an environ m entally friendly manner by contacting designated e-waste collection centers. Please check our websitehttps://www.bosch-home.in/ for more details.Changes reserved.。
Controller23Dear customer,Congratulations on purchasing your BoschSmart Home Controller. It is the basic compo-nent for making your home smarter.With the Bosch Smart Home Controller, you will be able to network all of your Bosch Smart Home products digitally. And, thanks to the Bosch Smart Home App, you will be able to control them conveniently from anywhere. For greater convenience, reliability and energy savings.We hope you enjoy your new product. Yours, the Bosch Smart Home TeamTABLE OF CONTENTS1.0 PRODUCT DESCRIPTION ...............................41.1 Intended use 42.0 IN THE BOX .....................................................53.0 WARNING NOTICES ........................................63.1 Explanation of symbols 63.2 Safety instructions 64.0 INDICATORS AND CONTROLS ........................74.1 Product overview 75.0 INSTALLATION AND SETUP .............................85.1 Downloading the app 85.2 Installing the controller 95.3 Configuring the controller 106.0 FIXING ..........................................................126.1 Wall mounting 125.4 Adding further devices 127.0 MAINTENANCE AND CARE ...........................138.0 PRODUCT DETAILS .......................................148.1 Technical data 148.2 Declaration of conformity 158.3 Faults in radio operation 158.4 Open-Source-Software 158.5 Environmental protection and disposal 159.0 FURTHER INFORMATION (15)1.0 PRODUCT DESCRIPTIONWith the Bosch Smart Home Controller, you will be able to network all of your Bosch Smart Home components digitally. And, thanks to the Bosch Smart Home App, you will be able to control them conveniently from anywhere. Your controller is updated automatically so that it remains up to date at all times. All system data is saved locally in the device, thus ensuring that your data remains secure.1.1 Intended useThe product may only be used together with original Bosch Smart Home components, and is for indoor use only▶ F ollow the safety instructions and the direc-tions in this manual and the Bosch Smart Home App to ensure that the product is set up correctly▶ P lease note the details in the Technical Data section (see p. 14)▶ A void installing in areas prone to high amounts of dust, direct sunshine or heatD o not modify the product in any way. Anyother use is considered unintended use. Wewill not assume liability for any resultingdamage.45T o operate the controller and, therefore,network all Bosch Smart Home products, youwill need the app, an internet connection anda standard WLAN router with a free LAN port.2.0 IN THE BOXController Wall mount 2 plugs,2 screwsPower cable Network cable3.0 WARNING NOTICES3.1 Explanation of symbolsW arning.This alerts you to danger.I nfo.Indicates important information.3.2 Safety instructionsF ire risk.There is a risk of fire if the product isused with a different power cable to thatsupplied.▶ O nly use the product with the originalpower cable.T he device may only be connected to aneasily accessible mains socket. In case ofdanger, the mains plug must be pulled outof the socket.Due to external circumstances such as a breakin radio communication with the Smart Home Controller, it cannot always be guaranteed during remote or automated appliance control that commands are actually executed or the correct appliance status is displayed in the app and on other Smart Home display devices (e.g. a Twist). This may result in damage to property and/or injury.In this case:▶ P lease ensure as far as possible that no-one is at risk during remote operation or automated control.▶ P lease exercise particular caution when setting up or adjusting a remote or automated control and regularly check the desired operation mode.674.0 INDICATORS AND CONTROLS4.1 Product overviewFront sideRear side85.0 INSTALLATION AND SETUP5.1 Downloading the appB efore you startMake sure that you download the BoschSmart Home App. You will need it for theentire installation, configuration and control.F or assistance with installing your BoschSmart Home Controller, you may also referto the explanatory video on our website:/installation W LAN access requiredTo set up the controller, you must have theBosch Smart Home App on your mobiledevices and be within range of the WLANnetwork router.9www1)After initialization, the cloud LED flashes when data is being exchanged via the tunnel connection.Insert the network cable into the controller and into a free LAN port on your WLAN router. Now use the power cable to connect the controller to the plug socket. After the device starts, the LEDs show the initialization status using flash codes (see table).W hen you connect the controller to the internet for the first time, it will automat-ically search for software updates. If an update is required, it will be downloaded automatically by the controller and installed. This process may take up to 30 minutes. con-troller setup cannot begin until this process is complete.10The controller must be the first device inyour system that you connect with the app.A fterwards, you can connect additional BoschSmart Home products and expand your system.Start the app and wait until it has detected thecontroller.F rom this point, the app guides you throughthe installation process. You will find a briefdescription in the following pages of thisinstruction manual.The app will prompt you to scan the QR code onthe product. You will find the QR code on therear side of the Plug.11The following steps in the app are:▶ R egistrationRegistration: set your system password you want to register with your smart home control-ler. You will need the system password later if you want to integrate more mobile devices into your Smart Home system, or to reset the Smart Home Controller to factory settings.)▶ R emote access configurationThe app will inform you when the controller is completely set up. All controller LEDs will also light up white.Next, the app will prompt you to press and hold the function button on the controller for approxi-mately 3 seconds.126.0 FIXINGThe controller can be used lying flat or mounted on the wall.6.1 Wall mountingW hen choosing a mounting location and when drilling, pay attention to potential electrical lines and/or supply lines that could be behind the wall.To mount your controller on the wall, use the wall mount provided. The plugs and screws required are also included in the box.5.4 Adding further devicesOnce the controller has been completelyinstalled, you can add further products to your Bosch Smart Home network through the app. To do this, follow the instruction manual for the relevant device.13▶ H old the wall mount at the required location on your wall, and mark the positions for the drill holes ▶ D rill the holes and place the plugs in the holes ▶ F it the wall mount and screw it tight ▶ N ow attach the controller to the wall mount so that you hear it click in place7.0 MAINTENANCE AND CAREThe product is maintenance-free. Repairsshould only be performed by qualified persons. Clean the product with a soft clean dry and lint-free cloth. Do not use cleaning agents containing solvents.I ncorrect handling (see notes on intended use) or non-observance of hazard warnings may compromise the protection afforded by the device.8.0 PRODUCT DETAILS8.1 Technical dataDevice type name Home Controller AAArtikelnummer8-750-000-163Power input Typical: 400 mAMax.: 1,2 AReceiver category SRD category 2Radio frequency868.3 MHz/869.525 MHz/2.4 GHzMax. transmission power10 mWRadio range in free-field conditions> 100 mDuty Cycle At 868,3 MHz < 1 % per hAt 869,525 MHz < 10 % per h Connections Power supply, USB, LAN (Ethernet, RJ45) Protection class IP30Ambient temperature+5 °C to +40 °CHumidity15 % to 85 %Software class Class ADimensions (W × H × D)135 mm x 120 mm x 35 mmWeight190 g148.2 Declaration of conformityHereby, Robert Bosch Smart Home GmbH declares that the radio equipment type Bosch Smart Home Controller is in compliance with Directive 2014/53/EU. The full text of the EU declaration of conformity is available at the following internet address: /EU-declarations-of-conformity8.3 Faults in radio operationFaults in radio operation (e.g. dueto electric motors or defective electrical devices) cannot be ruled out. The radio range inside buildings may differ greatly from the radio range in free-field conditions. Apart from the trans-mission power and the receiver characteristics, environmental influences such as humidity and structural characteristics may also influence radio operation.8.4 Open-Source-SoftwareBosch Smart Home relies on open-source software in order to control the products. You have two means of obtaining the comprehensive license information:▶D irectly from the controller: Insert an empty USB stick in the port on the rear side of the device. The licence information, as well as other product information, will be saved to the stick automatically.▶O nline at /open-source software 8.5 Environmental protection and disposal Electrical and electronic equipment that is nolonger usable must be separated from otherwaste and recycled in an environmentally friendly manner (European Directive on waste electri-cal and electronic equipment). To dispose of electrical and electronic equipment, use yourcountry-specific return and collection systems.9.0 FURTHER INFORMATIONYou can find more detailed informa t ion on oper-ating and maintaining the controller in the online FAQs at /faqYou will also find all contact details on the rearside of this document.S ale and transferBefore you transfer or sell your device,delete your personal information. To do this,reset the device to its factory settings (seeonline FAQs).15Robert Bosch Smart Home GmbH Schockenriedstraße 1770565 Stuttgart, GermanyFree customer helpline00800 8437 6278** F ree, however, depending on the opera-tor, charges may apply.Mon–Fri 7:00 am – 8:00 pmSat/Sun 8:00 am – 6:00 pm***************************。
AB C13Safety en71 SafetyPlease read the safety information to ensure that you use your ac-cessories safely.1.1 General informationYou can find general information for this instruction manual here.¡Read this instruction manual carefully. Only this will ensure that you operate accessories safely and efficiently.¡Observe the instructions for the base unit.¡Follow the safety instructions and warnings.¡Keep the manual and the product information in a safe place for future reference or for the next owner.1.2 Intended useOnly use the accessories:¡with a food processor from the same series MUMS2, MUM5.¡With genuine parts and accessories.¡for cutting up, shredding and grating food.1.3 Safety instructionsObserve the safety instructions.WARNING ‒ Risk of cutting!The cutting discs have sharp blades and edges.▶Only take hold of the cutting discs by the edge.▶Never touch the sharp blades and edges with bare hands.WARNING ‒ Risk of injury!Rotating drives, tools or accessory parts may cause injury.▶Do not reach into the filling shaft.▶Only use the pusher to push down ingredients.Improper use may cause injuries.▶Never assemble the accessories on the base unit.▶Only attach and remove accessories once the drive has stopped and the appliance has been unplugged.▶Only use the accessories once fully assembled.en Safety8▶The accessories should only be used in the intended operatingposition.WARNING ‒ Risk of harm to health!Soiling on surfaces may be harmful to health.▶Follow the cleaning instructions.▶Clean surfaces which come in contact with food before each use.Avoiding material damage en92 Avoiding material dam-ageATTENTION!Improper use may cause material damage.▶Do not process food that contains hard components, e.g. bones.▶Do not insert objects into the filling shaft or housing, e.g. wooden spoons.▶Before use, check the filling shaft and housing for foreign objects.▶Do not apply great force with the pusher.3 Unpacking and check-ingFind out here what you need to note when unpacking the appliance.3.1 Unpacking the accessor-ies and parts1.Take the accessories out of thepackaging.2.Take all other parts and the ac-companying documents out of the packaging and place them to hand.3.Remove any packaging material.4.Remove any stickers or film.3.2 Contents of packageAfter unpacking all parts, check for any damage in transit and complete-ness of the delivery.→ Fig.11Depending on the appliance spe-cificationscifications3.3 Cleaning the accessoriesbefore using for the first time1.Take the assembled accessoriesapart.→ "Dismantling the continuous feed shredder", Page 122.Clean all parts that come into con-tact with food before using for the first time.→ "Cleaning and servicing",Page 123.Put the cleaned and dried parts out ready for use.4 Familiarising yourself with the accessories4.1 ComponentsYou can find an overview of the parts of your accessories here.→ Fig. 21Depending on the appliance spe-cificationsen Familiarising yourself with the accessories10cifications4.2 SymbolsYou can find an overview of the sym-bols used on your accessories here.4.3 Overview of cutting discsYou can find an overview of the cut-ting discs and their purposes here.Designa-tion UseRevers-ible cut-ting disc,thick/thinCutting food into thick or thin slices, e.g. fruit and vegetables.Marking:¡ 1 = thick slices ¡ 3 = thin slicesNote: Not suitable for processing hard cheese,bread, rolls or chocolate.Tip: Only cut up cooked potatoes once they have cooled down.1Depending on the appliance spe-cificationsDesigna-tion UseRevers-ibleshredding disc,coarse/fineShredding food coarsely or finely, e.g. fruit, veget-ables or cheese as Gouda or Edam.Marking:¡ 2 = coarse side ¡ 4 = fine sideNote: Not suitable for processing nuts or hard cheese, e.g. Parmesan.Tip: Shred soft cheese with the coarse side only.Fine grat-ing disc Shredding food medium-fine, e.g. raw potatoes orhard cheese such as Parmesan.Note: Not suitable for processing soft cheese and cheese slices.Revers-ible sli-cing /shredding disc1Grating raw potatoes orcutting into slices.Note: Not suitable for processing very fibrous foods, e.g. leek or ve-getables disc1For cutting food into thin strips, e.g. fruit and ve-getables.1Depending on the appliance spe-cifications4.4 Overload protectionThe overload protection system pre-vents the motor and other compon-ents from being damaged through being overloaded.Before using the appliance enIf the continuous feed shredder is overloaded or blocked, the disc holder shaft will break at the prede-termined breaking point.Note: Spare parts with a predeter-mined breaking point are not covered by our warranty obligations. A new disc holder is available from cus-tomer service under order number 00630760.5 Before using the appli-ancePrepare the base unit and the ac-cessories for use.5.1 Overview of base units You can prepare your kitchen ma-chine as shown.→ Fig.35.2 Assembling the continu-ous feed shredder1.Grip the disc holder level with thewings.→ Fig. 4The two plastic tips must point up.2.Take hold of the required cuttingdisc by the edge and fit onto thedisc holder with the side you re-quire facing up.‒Fit single-sided discs with the blades or serrations facing up.‒Fit reversible discs with the re-quired marking facing up.→ Fig. 53.Insert the disc holder with the cut-ting disc into the housing.→ Fig. 64.Place the lid on the housing.→ Fig. 7Markings and must matchup.5.Rotate the lid clockwise until it en-gages.→ Fig. 8Markings and must matchup.5.3 Fitting continuous feedshredder onto the baseunit1.Place the continuous feed shred-der on drive 2 as shown.→ Fig. 92.Push the continuous feed shredderdown and rotate clockwise until itengages.→ Fig. 10The continuous feed shreddermust be securely connected to the base unit.6 Basic operation6.1 Processing food with thecontinuous feed shredder Note: Take note of the recommended speeds.→ "Application examples", Page 13 Tip: For optimum results, process thin ingredients in bunches.1.Prepare your food.Cut large items of food into pieces so they fit into the filling shaft.2.Insert the mains plug.→ Fig. 11en Cleaning and servicing3.Set the rotary switch to the recom-mended speed.→ Fig. 124.Insert the food into the filling shaftand press down with the pusher,applying light pressure.→ Fig. 135.Stop processing when‒all food has been processed.‒the food in the bowl almostreaches the outlet opening ofthe continuous feed shredder. 6.Set the rotary switch to .→ Fig. 14Wait until the appliance stops.7.Unplug the mains plug.6.2 Emptying the bowlTip: You can empty the bowl during processing without removing the con-tinuous feed shredder.1.Set the rotary switch to .Wait until the appliance stops.2.Unplug the mains plug.→ Fig. 153.Press the release button and raisethe swivel arm until it engages.→ Fig. 164.Remove and empty the bowl.→ Fig. 176.3 Removing the continuousfeed shredder1.Rotate the continuous feed shred-der anticlockwise until it releases.→ Fig. 182.Remove the continuous feedshredder from the base unit.→ Fig. 196.4 Dismantling the continu-ous feed shredder1.Rotate the lid anticlockwise.→ Fig. 20Markings and must matchup.2.Remove the lid.→ Fig. 213.Take hold of the disc holder by theshaft and take out of the housingwith the cutting disc.→ Fig. 224.Take hold of the cutting disc bythe edge and remove.→ Fig. 23Tip: Clean all parts immediately after use so that residues do not dry on.7 Cleaning and servicing 7.1 Cleaning productsFind out here what cleaning agents are suitable for your accessories. ATTENTION!Using unsuitable cleaning agents or incorrect cleaning may damage the accessories.▶Do not use cleaning agents con-taining alcohol or spirits.▶Do not use sharp, pointed or metal objects.▶Do not use abrasive cloths or cleaning agents.7.2 Overview of cleaningHere you will find a overview of the best way to clean the individual com-ponents.→ Fig. 24Application examples en Tip: When processing food such ascarrots, plastic parts may becomediscoloured. Remove discolourationwith a soft cloth and a few drops ofcooking oil.8 Application examplesObserve the comments and figuresin the table.→ Fig. 25en Troubleshooting9 TroubleshootingYou can rectify minor faults on your appliance yourself. Read the troubleshoot-ing information before contacting our after-sales service. This will avoid unne-cessary costs.Fault Cause and troubleshootingProcessed food does not fall into the bowl.Outlet opening or housing is blocked.1.Finish processing and unplug from the mains.2.Remove the accessory.3.Take the accessory apart and remove the block-age.Cutting disc does not rotate although the base unit is running.Lid is not fitted and engaged properly.▶Check whether the lid is fitted properly.→ "Assembling the continuous feed shredder",Page 11Accessory has been overloaded and the disc holder shaft has broken at the predetermined breaking point.▶You can order a new disc holder from customer service under order number 00630760.Keselamatan ms1 KeselamatanSila perhatikan maklumat untuk keselamatan untuk memastikan aksesori digunakan secara selamat.1.1 Maklumat umumDi sini, terdapat maklumat umum mengenai panduan ini.¡Baca panduan ini dengan teliti. Barulah anda boleh menggunakan aksesori dengan selamat dan cekap.¡Ikuti arahan untuk peranti asas.¡Perhatikan panduan keselamatan dan panduan amaran.¡Simpan panduan dan juga maklumat produk untuk penggunaan atau pengguna seterusnya.1.2 Pengendalian mengikut peraturanGunakan aksesori hanya:¡dengan mesin dapur siri ini MUMS2, MUM5.¡dengan alat ganti dan aksesori tulen.¡Untuk memotong dan sagat dari memarut makanan.1.3 Arahan keselamatanPerhatikan arahan keselamatan.AMARAN ‒ Risiko terpotong!Kepipis pencincang mempunyai pisau dann bucu tajam.▶Pegang kepipis pencincang pada pinggirnya sahaja.▶Jangan sekali-kali menyentuh pisau dan tepinya tajam dengan tangan kosong.AMARAN ‒ Risiko kecederaan!Pemacu, alat atau bahagian aksesori yang berputar boleh menyebabkan kecederaan.▶Jangan pegang di dalam bahagian suapan.▶Hanya gunakan penghentak untuk menambahkan bahan. Penggunaan yang tidak betul boleh menyebabkan kecederaan.▶Jangan sesekali pasang aksesori pada unit asas.ms Keselamatan▶Hanya pasang dan tanggalkan aksesori semasa pemacu berhenti dan peranti tidak terpasang.▶Gunakan aksesori hanya apabila dipasang sepenuhnya.▶Hanya gunakan aksesori pada kedudukan kerja yang dimaksudkan.AMARAN ‒ Risiko bahaya kepada kesihatan!Kotoran pada permukaan boleh membahayakan kesihatan.▶Patuhi arahan pembersihan.▶Bersihkan permukaan yang bersentuhan dengan makanan sebelum setiap penggunaan.Elakkan kerosakan harta benda ms2 Elakkan kerosakanharta bendaPERHATIAN!Penggunaan yang tidak betul boleh menyebabkan kerosakan harta benda.▶Jangan proses makanan yang mengandungi komponen keras,contohnya tulang.▶Jangan masukkan objek ke dalam bahagian suapan atau perumah,contohnya sudu kayu.▶Periksa benda asing di bahagian suapan dan perumah sebelumdigunakan.▶Jangan kenakan tekanan yang tinggi ke atas penghentak.3 Buka pembungkusan dan periksaAnda ketahui di sini perkara yang perlu diperhatikan semasa membuka pembungkusan.3.1 Buka pembungkusanaksesori dan komponen1.Keluarkan aksesori daripadabungkusan.2.Keluarkan semua komponen laindan dokumen yang disertakan dari bungkusan dan sediakan.3.Tanggalkan bahan pembungkusanyang sedia ada.4.Tanggalkan pelekat dan kerajangyang sedia ada.3.2 PenghantaranPeriksa kerosakan semasa penghantaran pada semua komponen dan kelengkapan penghantaran selepas membuka pembungkusan.→ Raj. 11Mengikut kelengkapan peranti 3.3 Sebelum penggunaanpertama basuh semuabahagian aksesoridengan teliti dankeringkan.1.Buka aksesori yang dipasang.→ "Keluarkan mesin pencincangberterusan", Halaman 202.Bersihkan semua komponen yangbersentuhan dengan makanansebelum penggunaan pertama.→ "Pembersihan dan penjagaan",Halaman 213.Sediakan komponen yangdibersihkan dan dikeringkan untuk digunakan.4 Pengenalan aksesori 4.1 KomponenDi sini, terdapat gambaran keseluruhan komponen aksesori anda.→ Raj. 2ms Pengenalan aksesori1Mengikut kelengkapan peranti4.2 SimbolDi sini, anda akan mendapatgambaran keseluruhan simbol pada peralatan anda.4.3 Gambaran keseluruhanCakera pencincangDi sini anda akan mendapat gambaran keseluruhan cakera pengurangan saiz dan tujuannya.Penentua nPenggunaanPemoton g kepipis,tebal /nipisPotong makananmenjadi kepingan tebal atau nipis, mis. B. buah-buahan dan bel:¡ 1 = kepingan tebal ¡ 3 = Kepingan nipis1Mengikut kelengkapan perantiPenentua nPenggunaan Nota: Tidak sesuai untuk memproses keju keras,roti, ban atau coklat.Petua: Sila potong kentang rebus hanya apabila kentang itu telah sejuk.Kepipis pemarut kasar/halus Parut makanan menjadi kepingan kasar atau halus, mis. B. buah,sayur-sayuran atau keju,seperti Gouda atau bel:¡ 2 = bahagian kasar ¡ 4 = bahagian halus Nota: Tidak sesuai untuk memproses kacang atau keju keras, contoh Parmesan.Petua: Parut keju lembut pada bahagian kasar.Kepipis pencincang halus.Makanan parut halus-halus, contoh kentang mentah atau keju kerasseperti parmesan.Nota: Tidak sesuai untuk memproses keju lembut dan kepingan keju.Cakera pemoton g dan pemarut1Parut atau potong kentang mentah.Nota: Tidak sesuai untuk memproses makananyang sangat berserat,contoh daun bawang atau mangga.Potongan sayur-Asia1Potong makanan menjadi kepingan halus,contoh buah-buahan dansayur-sayuran.1Mengikut kelengkapan perantiSebelum penggunaan ms4.4 Pelindung bebanberlebihanPelindung beban lebih menghalang motor dan komponen lain daripada rosak akibat beban berlebihan. Sekiranya mesin mengisar secara berlebihan atau tersumbat, paksi pemmbaa kepipis pecah pada titik putus yang dimaksudkan.Nota: Bahagian alat ganti dengan titik pecah adalah bukan sebahagian daripada kewajipan waranti kami. Pembawa cakera baru boleh didapati dari perkhidmatan pelanggan menggunakan nomborpesanan.006307605 Sebelum penggunaanSediakan unit asas dan aksesori untuk digunakan.5.1 Gambaran keseluruhanunit asasSediakan pemproses makanan, seperti yang ditunjukkan.→ Raj.35.2 Pasang pencincangberterusan1.Pegang pembawa cakera padaketinggian sayap.→ Raj. 4Kedua-dua hujung plastik mestimenunjuk ke atas.2.Pegang kepipis pencincang yangdiingini di tepi dan letakkan padapembawa cakera denganbahagian yang diperlukanmenghadap ke atas.‒Letakkan mesin basuh satu sisi dengan pisau atau kawasanyang dinaikkan menghadap keatas.‒Letakkan cakera terbalik dengan tanda yang dikehendakimenghadap ke atas.→ Raj. 53.Letakkan pembawa cakera dengancakera pencincang di dalamtempat.→ Raj. 64.Letakkan penutup pada perumah.→ Raj. 7Penandaan dan mestidiselaraskan.5.Putar penutup sitrus mengikut arahjam sehingga ia masuk ketempatnya.→ Raj. 8Penandaan dan mestidiselaraskan.5.3 Pasang mesinpencincang berterusan keperanti asas1.Letakkan mesin pencincangberterusan pada pemacu sepertiyang ditunjukkan.2→ Raj. 92.Tekan mesin pemotong berterusanke bawah dan putar mengikut arah jam sehingga terkunci padatempatnya.→ Raj. 10Mesin pencincang berterusanmesti disambungkan dengan kuat ke peranti asas.ms Operasi asas6 Operasi asas6.1 Memproses makanandengan mesinpencincang berterusan Nota: Hati-hati cadangan kelajuan. → "Contoh penggunaan",Halaman 21Petua: Untuk hasil terbaik, gunakan keratan nipis dalam kumpulan.1.Sediakan makanan.Potong makanan besar menjadikepingan sehingga masuk kedalam tabung makanan.2.Pasangkan palam kuasa.→ Raj. 113.Tetapkan suis putar ke kelajuanyang dicadangkan.→ Raj. 124.Letak makanan yang hendakdiproses dalam tiub suapan dan tolak dengan perlahan ke bawah dengan penolak.→ Raj. 135.Berhenti memproses apabila‒semua makanan diproses.‒makanan di dalam mangkuk hampir sampai ke saluranpencincang berterusan.6.Tetapkan suis putar ke .→ Raj. 14Tunggu perkakas berhenti.7.Tanggalkan plag.6.2 Kosongkan mangkuk Petua: Anda boleh mengosongkan mangkuk semasa diproses tanpa mengeluarkan mesin pencincang berterusan.1.Tetapkan suis putar ke .Tunggu perkakas berhenti.2.Tanggalkan plag.→ Raj. 153.Tekan butang pelepas dan tekanlengan pemutar hingga terkuncipada tempatnya.→ Raj. 164.Keluarkan dan kosongkanmangkuk.→ Raj. 176.3 Keluarkan mesinpecincang berterusan1.Putar mesin pencincangberterusan arah lawan jamsehingga melonggarkan.→ Raj. 182.Keluarkan mesin pencincangberterusan dari peranti asas.→ Raj. 196.4 Keluarkan mesinpencincang berterusan1.Putar penutup arah awan jam.→ Raj. 20Penandaan dan mestidiselaraskan.2.Tanggalkan penutup.→ Raj. 213.Pegang pembawa cakera dengangandar dan lepaskan daripelindung dengan cakerapencincang.→ Raj. 224.Pegang pemotong tepi kepipis danlepaskan.→ Raj. 23Petua: Bersihkan semua bahagian sebaik sahaja digunakan sehingga sisa tidak kering.Pembersihan dan penjagaan ms 7 Pembersihan danpenjagaan7.1 Agen pembersihKetahui agen pembersih yang sesuaiuntuk aksesori anda.PERHATIAN!Agen pembersih yang tidak sesuaiatau pembersihan yang tidak betulboleh merosakkan aksesori.▶Jangan gunakan agen pembersihyang mengandungi alkohol.▶Jangan gunakan objek tajam,berbucu atau logam.▶Jangan gunakan kain atau agenpembersih yang melelas.7.2 Gambaran keseluruhanpembersihanBerikut adalah gambarankeseluruhan mengenai cara terbaikmembersihkan komponen masing-masing.→ Raj. 24Petua: Perubahan warna bolehberlaku pada bahagian plastik,contoh semasa memproses lobakmerah. Keluarkan perubahan warnadengan kain lembut dan beberapatitisan minyak masak.8 Contoh penggunaanPerhatikan maklumat dan nilai dalamjadual.→ Raj. 25ms Selesaikan gangguan9 Selesaikan gangguanGangguan kecil pada aksesori anda boleh diselesaikan oleh anda sendiri. Gunakan maklumat untuk penyelesaian gangguan sebelum anda menghubungi khidmat pelanggan. Dengan ini, anda dapat mengelakkan kos yang tidak perlu. Kerosakan Sebab dan pencarisilapanMakanan yang diproses tidak jatuh ke dalam mangkuk.Saluran keluar atau perumahan tersumbat.1.Selesaikan proses dan cabut kabel kuasa.2.Tanggalkan aksesori.3.Keluarkan aksesori dan hilangkan penyumbatan.Cakera pencincang tidak berpusing walaupun peranti asas sedang berjalan Tudung tidak diletakkan dengan betul dan terkunci di tempatnya.▶Periksa sama ada penutup telah dipasang dengan betul.→ "Pasang pencincang berterusan", Halaman 19 Aksesori telah dilebih-lebihkan dan sumbu pembawa cakera telah pecah pada titik putus yang telah ditentukan.▶Anda boleh memesan pembawa cakera baru dari perkhidmatan pelanggan menggunakan nombor pesanan 00630760安全性 zh-tw1 安全性請注意有關安全的資訊,以確保配件的使用安全。
1.C_CAN用户手册1术语和缩写TermsandAbbreviationsThisdocumentusesthefollowingtermsandabbreviations.这个文档使用到以下的术语和缩写。TermMeaningCANControllerAreaNetwork控制器局域网
BSPBitStreamProcessor位流处理器
BTLBitTimingLogic位时间机制
CRCCyclicRedundancyCheckRegister循环冗余码校验冗余
DLCDataLengthCode数据长度编码
EMLErrorManagementLogic错误管理机制
FSMFiniteStateMachine有限动作状态TTCANTimeTriggeredCAN时间触发通讯的控制器局域网2.C_CAN用户手册2
FunctionalDescription功能简介
C_CAN是可以作为单独或集成ASIC一部分的CAN总线模块。用硬件描述语言描述C_CAN综合到逻辑器件。它包含CAN内核、消息RAM、消息处理状态机、控制寄存器和模块接口。
CAN内核通信符合CAN协议规范2.0A和2.0B。在使用中位速率可以编程达到1M/S。硬件连接物理层需在接收发射器。
在CAN网络中通信,每个消息目标需要设定,接收的消息目标和识别符掩码存储到消息RAM中。
所有关于消息处理是在消息处理状态器中完成。这些功能包括消息过滤、CAN内核与消息RAM之间的通信和消息发送中断请求并产生中断模块。C_CAN中的寄存器组可以通过接口模块被外器CPU访问。这些寄存器用于控制或配置CAN内核和消息处理状态机,并存储到消息RAM。
在C_CAN模块中的接口模块可以定制成适合于用户使用的模块接口。
C_CAN具有以下的功能特性:
支持CAN协议怎版本2.0A和版本2.0B位速度达到1M/S32个消息目标(在消息RAM中有32个可以自定义接收或发送的消息目标)每个消息目标有自己的识别符掩码可编程的FIFO模式(消息目标在FIFO中连续存放)可屏蔽中断对于时间触发的CAN应用可以取消自动重传模式在自己测试操作可以设计成循环模式(重复发关这一个消息)兼容摩托罗拉公司HC08的8位单处理模块接口对ARM内核有2个16位的接口模式给AMBAABB总路线3.C_CAN用户手册3模式结构BlockDiagram
CANCoreCAN内核
CAN协议控制器和接收与发送移位寄存器完成消息的并行或串行转换
MessageRAM消息RAN
存储消息目标和识别符掩码
Registers寄存器
所有寄存器用于控制和配置C_CAN模块
MessageHandler消息状态处理机控制数据在CAN内核接收与发送移位寄存器与消息RAM
之间的传送,也在控制和配置寄存器中产生中断
ModuleInterface模块接口到目前为止,C_CAN模块被分成3种不同的接口。一种是对于摩托罗拉HC08控制器的8位接口,和二种来自ARM的AMBAAPB总线的16位接口4.C_CAN用户手册4操作模式OperatingModes1、初始化程序SoftwareInitialization初始化程序开始前必须置CAN控制器中的控制寄存器中的Init位,或者由软件或硬件复位还是总线关闭。
当Init被置位,所有与CAN传送的消息被停止。CAN总线的CAN_TX状态为隐性(HIGH),错误处理寄存器状态不变,Init置位不会改变任何配置寄存器。
初始化CAN控制器时,处理器(CPU)必须设置位定时寄存器和每个消息对象。如何一个消息对象不需要,设置此消息的MsgVal没有效(0)即可。否则初始化全部消息对象。
当CAN控制寄存器中的Init和CCE两者都置位时,配置位定时的位定时寄存器和位扩展定时寄存器才被激活。
仅由处理器(CPU)复位Init才完成软件初始化。然后,在得到使用总线权和发送消息之前等待总线空闲时(产生11个连续隐性位),位流处理器(BSP)同步传数据。初始化消息对象时不需要将Init置位,可以在CAN控制器不工作的时候进行。在位流处理器(BSP)开始消息传输之前,所有消息对像需要初始化一个单独的识别符或初始消息无效。在正常工作期间改变消息对象的配置时,处理器(CPU)修改配置前先设置消息对象的MsgVal无效(0)。修改配置完成,MsgVal由处理器(CPU)l置位,消息才有效。
2、CAN报文传送CANMessageTransfer一旦初始化C_CAN和Init复位(设置为0),C_CAN的CAN内核同时自我检测总线和在总线上开始传送消息。
如果接收到的消息符合本节点过虑的要求(通过消息状态处理机过滤),存储到相应的消息目标对象。整个消息包括仲裁识别位、数据长度(DLC)和8个字节数据都存储到消息目标对象。如果使用识别符(ID)掩码(屏蔽码),消息目标对象中的仲裁位可以被屏蔽(不仲裁相应被屏蔽的识别符位)。
不管什么时候,处理器(CPU)可以通过CAN接口寄存器读或写每一条消息(报文)。在并发操作中,消息状态处理机保证数据可靠性。
传送的消息(报文)由处理器(CPU)更新。如果永久性的消息目标对象(仲裁位和控制位在初始化配置时被设定)存在消息(报文),仅数据位被处理器更新,然后将TxRqst和NewDat位置位,消息即开始传送。如几个(个别)传送的消息配置成相同的消息对象目标(消息对象的编码值无效),这些消息传送请求前必须以对全部消息进行初始化设置。很多消息对象目标传送可以在同一时间请求,消息对象对像的先后顺序由自身的优级确定,消息可以随时更新或设置为无效,甚于在发送请求还在等待时候。消息未发送而被更新则旧的数据将丢弃。依照消息对象的配置,传送消息被自动请求,由接收带匹配识别符的远程帧。3、取消自动重传DisabledAutomaticRetransmission依据CAN规范,在传送期间仲裁已经丢失或干拢错误时,C_CAN提供了自动重传帧的机制。在帧传送成功之前,帧传送服务不能被使用都证实。传送失败意味自动重传机制使能。当C_CAN工作在时间触发CAN环境时,自动重传机制也可以取消。
编程CAN控制器中的DAR置位(1)取消自动重传机制。在这种操作模式中,程序必须考虑在消息缓冲控制寄存器中TxRqst和NewDat不同的情况。
当每个消息报缓冲发送请求开始位(TxRqst)被复位(0),,然而NewDat位依然置位(1).
当传送成功后NewDat位复位,当传送失败(仲裁丢失或传送错误)NewDat依然不变(置位1),重新传送由处理器(CPU)置位TxRqst为1。
4、测试模式TestMode由处理器(CPU)设置CAN控制寄存器中的Test位置1,进入测试模式。在测试模式中,测试寄存器中的Tx1、Tx0、Lback、Silent和Basic需在写。Rx监听CAN_RX引能脚的状态,并且仅读。当测试模式位TEST复位为0,所有测试寄存器中的功能全部取消。
5、无负载模式/只听模式SilentMode
CAN内核可以通过编程设置测试寄存器中的Silent置1,运行于无负载模式。在无负载模式中,C_CAN能接收有效数帧和有远程帧,但它仅发送确定接收位在CAN总线上,以及它不能发送。如CAB内核需要发送一个显性位(ACK应答位,超载标志,激活错误标志),此位在内部自动更改以至CAN内核监听这个显性位(0),尽管CAN总是出现在隐性状态。无负载模式可以用于分析CAN总线运行情况,在没有使用总线时通过传送一个显性位(应答位、错误帧)。
在ISO11898-1,无负载模式被叫做总线监听模式。只听模式成功接收到消息也不会作应答,错误计数器停止,不传送消息,所以可以作位定时波特率软件自区配设置。
6、循环模式/自检测模式LoopBackMode由编程测试寄存器位Lback置位(1),CAN内核进入测试循环模式(控制寄存器中的TEST=1)。在循环模式中,CAN内核自我协商传送消息同时接收消息和存储通过过虑的消息到接收缓冲区。此模式提供了自我测试的功能,不受外部干拢影响。在循环模式中,CAN内核忽略应答信号错误(接收位采样在数据帧或远程帧应答场内)。在这个模式中,CAN内核从自己的Tx输出执行一个反馈信号到Rx输入。实际上CAN内核把CAN_RX输入引脚断开。传送消息时监听CAN_TX引脚。自检测模式检测所有节点,没有任何活动的节点使用自接收命令,即使没有应答,CAN也可会成功发送。
7、循环结合无负载模式LoopBackcombinedwithSilentMode
编程Lback和Silent同时置位(1),CAN运行在在循环无负载模式。这种模式使用于自我测试(HotSelftes),意味着C_CAN能在没有正常的CAN系统连接到CAN_Tx和CAN_Rx引脚上时,自测试运。在这个模式中,CAN_RX引脚被断开和CAN_TX引脚输出隐性(1)。8、Basic模式BasicMode编程测试寄存器中的Basic位置位(1),内核工作于Basic模式。在这个模式中C_CAN模块工作是没有消息RAM。IF1使用作发送缓冲区。IF1寄存器中的内容请求发送,由写IF1命令请求寄存器中的Busy位置位(1)。当Busy位置位时IF1寄存器锁定。Busy位指示发送状态。
一旦CAN总线空闲,CAN内核移位处理器载入IF1寄存器中的内容并始传送。当成功发送,Busy位复位(0),并释放IF1寄存器。
在任何时候,未成功发送可以被中止,通过设置IF1命令请求寄存器中的Busy位复位(0)。如果处理器对Busy进行复位,以防仲裁丢失或产生错误取消,可能需要重传消息。
IF2使用作接收缓冲区。从位移寄存器接收的消息内容存储到IF2寄存器,没有经过过滤。
除些之外,移位寄存器中的内容在发送消息时被监听,每次读消息目标对象都初始化写IF2命令请求寄存器的Busy位为1。移位寄存器的内容存储到IF2寄存器。
在Basic模式中,所有消息对象目标相关的控制、状态位和Ifx命令掩码寄存器控制位的赋值都被关闭。消息命令请求寄存器数值是无效。IF2消息控制寄存器中的NewDat和MsgLst位依然保留他们的功能。DLC3-0显示接收数据长度(DLC),其他控制位读出为0。
在Basic模式中CAN_WAIT_B输出准备功能取消(总是为1)。