Fisher DVC2000系列数字式阀门控制器-中文详细说明书
- 格式:pdf
- 大小:1.22 MB
- 文档页数:36

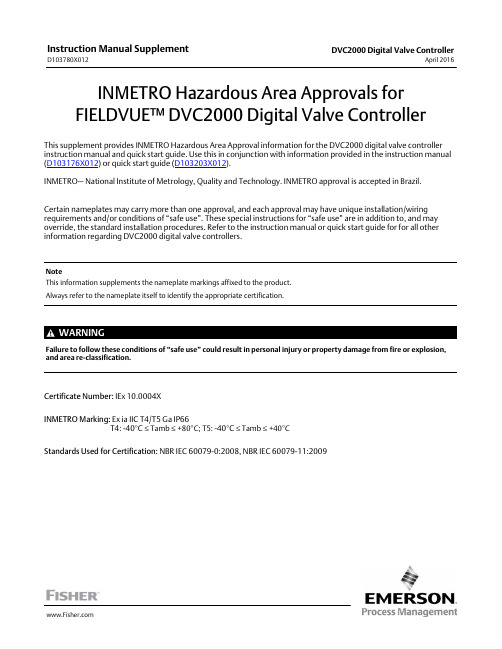
INMETRO Hazardous Area Approvals for FIELDVUE™ DVC2000 Digital Valve ControllerThis supplement provides INMETRO Hazardous Area Approval information for the DVC2000 digital valve controller instruction manual and quick start guide. Use this in conjunction with information provided in the instruction manual (D103176X012) or quick start guide (D103203X012).INMETRO— National Institute of Metrology, Quality and Technology. INMETRO approval is accepted in Brazil. Certain nameplates may carry more than one approval, and each approval may have unique installation/wiring requirements and/or conditions of “safe use”. These special instructions for “safe use” are in addition to, and may override, the standard installation procedures. Refer to the instruction manual or quick start guide for for all other information regarding DVC2000 digital valve controllers.NoteThis information supplements the nameplate markings affixed to the product.Always refer to the nameplate itself to identify the appropriate certification.WARNINGFailure to follow these conditions of “safe use” could result in personal injury or property damage from fire or explosion, and area re‐classification.Certificate Number: IEx 10.0004XINMETRO Marking: Ex ia IIC T4/T5 Ga IP66T4: -40°C ≤Tamb ≤+80°C; T5: -40°C ≤Tamb ≤+40°CStandards Used for Certification: NBR IEC 600790:2008, NBR IEC 6007911:2009Instruction Manual Supplement D103780X012DVC2000 Digital Valve ControllerApril 20162Special conditions for safe use (X):- The equipment shall be connected in accordance with the manufacturer’s installation instructions to intrinsic safety barriers that satisfy the following parameters for each set of terminals;- For Zone 0 (EPL Ga), due to the fact that the equipment housing is aluminum, precautions must be taken to prevent ignition caused by impact or friction; The acrylic display can only be cleaned with a damp cloth to prevent accumulation of electrostatic charges.Electrical Paramameters:Main 4-20 mA Ui = 30 V, Ii = 130 mA, Pi = 1 W, Li = 0.55 mH, Ci = 10.5 nFXMTR circuit Ui = 28 V, Ii = 100 mA, Pi = 1 W, Li = 0 mH, Ci = 5 nFLimit Switch 1 (LS1)Ui = 16 V, Ii = 76 mA, Pi = 1 W, Li = 0 mH, Ci = 5 nFLimit Switch 2 (LS2)Ui = 16 V, Ii = 76 mA, Pi = 1 W, Li = 0 mH, Ci = 5 nFFigure 1. Typical INMETRO Approval NameplateEmerson Process ManagementMarshalltown, Iowa 50158 USASorocaba, 18087 BrazilCernay, 68700 FranceDubai, United Arab EmiratesSingapore 128461 SingaporeThe contents of this publication are presented for informational purposes only, and while every effort has been made to ensure their accuracy, they are not to be construed as warranties or guarantees, express or implied, regarding the products or services described herein or their use or applicability. All sales are governed by our terms and conditions, which are available upon request. We reserve the right to modify or improve the designs or specifications of such products at any time without notice.E 2013, 2016 Fisher Controls International LLC. All rights reserved.Fisher and FIELDVUE are marks owned by one of the companies in the Emerson Process Management business unit of Emerson Electric Co. Emerson Process Management, Emerson, and the Emerson logo are trademarks and service marks of Emerson Electric Co. All other marks are the property of their respective owners.Neither Emerson, Emerson Process Management, nor any of their affiliated entities assumes responsibility for the selection, use or maintenance of any product. Responsibility for proper selection, use, and maintenance of any product remains solely with the purchaser and end user.。

费希尔fisher定位器DVC2000调试简易说明书今天我们举例来讲讲如何快速调试DVC2000的参数,费希尔fisherDVC2000数字式阀门控制器的大体部件组成(从外到里依次y):带玻璃窗的外壳,EMI保护罩,主板带LCD和触摸式按钮,放大器主键,集成块组件,I/P转换器,接线端子与传感器组件,排气孔,壳体。
fisher阀门定位器DVC2000参数设置方法:1、先拆下外壳,再进行接线,接着打开电流发生器电源送入4mA~20mA电流信号,使LCD显示屏打开,然后进行语言选择。
操作方法:上下左右四键同时按住3秒,再用上下键在七种语言中选择您所需要的语种。
之后,按一下向右键以确认。
2、然后根据阀体的执行机构是气开式还是气闭式进行对参数设置。
操作方法:按向下键找到“详细设置”选项,再按右键确认进入如果阀体的执行机构是:气开式(FC):按右键查找“零控制信号”项,再按上下键选择“阀关”按右键确认。
再按右键查找“行程变送器输出4mA”项,按上下键选择“阀关”按右键确认气闭式(FO):按右键查找“零控制信号”项,再按上下键选择“阀开”按右键确认。
再按右键查找“行程变送器输出4mA”项,按上下键选择“阀关”按右键确认3、行程自动标定设置:操作方法:按向下键找到“行程标定”项,按右键确认进入,再按上下键选择“自动”按右键确认,LCD显示“按右键3秒钟阀门将动作”然后按照它的提示操作,它便可以自动搜索走完整个行程0%、100%、50%。
完成后按右键确认。
注:搜索途中不可退出,按任何键都不起作用,必须等走完整个行程才可以。
整定设置增益代码(C~M),C时阀门动作最慢,M时阀门动作最快。
选择合适的,一般设置为“L”,以阀门不振荡为准。
操作方法:按向下键找到“整定”项,按右键确认进入,再按上下键选择“自动”按右键确认,LCD显示“按右键3秒钟阀门将动作”然后按照它的提示操作,进入自动整定,接着等待,完成后按右键确认。

DVC2000数字式高级监控诊断功能阀门控制器高级监控诊断功能阀门控制器DVC 更好的控制性能0805%(008mA 信号改变时-0.5% (0.080.5% (0.08mA mA))输入输入信号改变时信号改变时,,控制性能对比DVC2000其它厂家定位器不能跟踪阶跃改变满足0.5%可控性[File Name or Event]基本诊断功能–及时掌握DVC与阀门的工作与健康状况•199个状态参数与报警•阀门状态参数趋势记录•11组报警记录在DVC里面[File Name or Event]高级诊断-最完整的阀门诊断技术高级诊断最完整的阀门诊断技术阀门特性曲线•检测并提供压力-全行程(-5%-105%)的曲线与分析数据,•执行机构弹簧弹性系数,•弹簧预紧力实际值,•阀座情况分析,•实际填料摩擦力以及理想的摩擦力范围,•实际阀座关紧力,•曲线有8000个采样点,不同曲线可以叠加比较.带来的好处•提供最完整的阀门诊断信息,以评估阀门组件的故障/问题,为阀门检修作出科学决策,帮助客户减少阀门维护成本.[File Name or Event]高级诊断-最完整的阀门诊断技术动态误差带高级诊断最完整的阀门诊断技术•提供全行程(-5%-105%)-输入信号的曲线,有8000个采样点,•带分析数据.带来的带来的好处•提供对阀门的滞后,死区以及动态误差的图形化与数据分析[File Name or Event]高级诊断-最完整的阀门诊断技术阶跃响应高级诊断最完整的阀门诊断技术•提供30个阶跃响应,•带分析数据.带来的好处•评估阀门如何对DSC 信号作出响应,•获得阀门超调,滞后,死区,t63,和t86的数据分析.[File Name or Event]z 故障发现:工厂位号为21FV40428B 阀门在线诊断应用阀门在线诊断应用实例实例在PE 工厂,位号为21FV40-428B 的冷水控制阀门用来控制反应器温度. 在线PD 测试表明阀门行程偏差非常大,DVC 的I/P 驱动信号过高。

Digital Setpoint Control for Fisher ® FIELDVUE™DVC6200, DVC2000, and DVC6000 Digital Valve Controllers1. Digital Valve Controller SetupA. Electrical PowerSet the digital valve controller to PT-PT or MULTI-DROP.For example, figure 1 shows the PT-PT/MULTI-DROP switch, which is located on the main electronics board, for the DVC6200 HW2 digital valve controller.Voltage ‐- ensure the switch is set in the “MULTI-DROP” position. The current will be fixed around 8.3 mA with a 24 V power source.Milliamp current ‐- ensure the switch is set in the “PT-PT” position. Milliamp signal power to the instrument should be set to a value between 6 and 20 mA.NotesD Factory default is switch set to PT-PT.D For Multi-Drop and 24 V power a LC340 Line Conditioner may be required to ensure quality HART ® communications.D For Point-to-Point and a milliamp powered system a HF340 HART filter may be required to ensure quality HART communications.D The DVC2000 does not have a PT-PT / MULTI-DROP switch; it only uses a milliamp current.PT-PT/MULTI-DROPSELECTIONFigure 1. PT-PT or MULTI-DROP Selection2Using a Field Communicator or AMS Device Manager verify or set the following:B. Control Mode set to “Digital” C. Restart Control Mode set to “Digital”D. Instrument mode set to “In Service”If additional product information is needed refer to Related Documents on page 5.2. 775 THUM™ SetupA. ElectricalWiring diagrams are shown in figure 2.NotesD This configuration is only appropriate for one digital valve controller and one THUM adapter.D The THUM adapter requires up to 2.5 VDC additional compliance voltage above and beyond the digital valve controllerrequirements.Figure 2. Wiring DiagramsPWB SET TO MultiPWB SET TO PT-PTDIGITAL VALVE CONTROLLERDIGITAL VALVE CONTROLLERPWB— PT-PT/MULTI SWITCH LOCATION24 V POWER SOURCEMILLIAMP SIGNAL POWERB. ConfigurationUsing a 775 THUM Wireless HART r adapter, map either “PV, SV, TV, QV” or “Process Variable with STATUS”; this allows the Gateway to see TRAVEL_SETPOINT.3. Wireless Gateway SetupA. Map TRAVEL_SETPOINTSee figure 3 and 4 for Gateway settings.NotesD Requires a Rosemount r 1410 or 1420 Smart Wireless Gateway version 4.5 or later.D Best practice is to use the latest available software or firmware version for all products.D Do not map to the THUM adapter.D If TRAVEL_SETPOINT does not show up in the drop-down selection box in Modbus or OPC select Run Command Configuration on the THUM and reset update rates.Refer to Annex B of the appropriate HART Field Device Specification supplement for additional information on joining a digital valve controller to a wireless network using the THUM adapter. See Related Documents on page 5.34Figure 3. Mapping TRAVEL_SETPOINT in Modbus Figure 4. Mapping TRAVEL_SETPOINT in OPCRelated DocumentsDVC6200D DVC6200 Series Digital Valve Controller Quick Start Guide (D103556X012)D DVC6200 HW2 Digital Valve Controller Instruction Manual (D103605X012)D HART r Field Device Specification for DVC6200 Digital Valve Controller (D103639X012)D DVC6200 HW1 Digital Valve Controller Instruction Manual (D103409X012)D HART Field Device Specification for DVC6000 and DVC6200 HW1 Digital Valve Controller (D103649X012)DVC6000 HW2D DVC6005 Series Remote Mount Digital Valve Controllers Quick Start Guide (D103784X012)D DVC6000 HW2 Digital Valve Controller Instruction Manual (D103785X012)D HART Field Device Specification for DVC6000 HW2 Digital Valve Controller (D103782X012)DVC2000D DVC2000 Digital Valve Controller Quick Start Guide (D103203X012)D DVC2000 Digital Valve Controller Instruction Manual (D103176X012)D HART Field Device Specification for DVC2000 Digital Valve Controller (D103783X012)DVC6000 (Supported)D DVC6000 Digital Valve Controllers Instruction Manual (D102794X012)D HART Field Device Specification for DVC6000 and DVC6200 HW1 Digital Valve Controller (D103649X012) MiscellaneousD HF340 Filter Instruction Manual (D102796X012)D LC340 Line Conditioner instruction manual (D102797X012) ArrayDocuments are available from your Emerson Process Management sales officeor at 5Emerson Process ManagementMarshalltown, Iowa 50158 USA Sorocaba, 18087 BrazilChatham, Kent ME4 4QZ UK Dubai, United Arab Emirates Singapore 128461 SingaporeThe contents of this publication are presented for informational purposes only, and while every effort has been made to ensure their accuracy, they are not to be construed as warranties or guarantees, express or implied, regarding the products or services described herein or their use or applicability. All sales are governed by our terms and conditions, which are available upon request. We reserve the right to modify or improve the designs or specifications of such products at any time without notice.Fisher, FIELDVUE, THUM, and Rosemount are marks owned by one of the companies in the Emerson Process Management business unit of Emerson Electric Co. Emerson Process Management, Emerson, and the Emerson logo are trademarks and service marks of Emerson Electric Co. HART and Wireless HART are registered trademarks of the FieldComm Group. All other marks are the property of their respective owners.Neither Emerson, Emerson Process Management, nor any of their affiliated entities assumes responsibility for the selection, use or maintenance of any product. Responsibility for proper selection, use, and maintenance of any product remains solely with the purchaser and end user.。

DVC2000 基本设置及初始校验
上图为DVC2000打开前盖的视图.
1.按键↓,显示面板依次显示”快速设置”;”行程校验”;”整定”;”详细设
置",按→进入.
2.显示”零信号阀门关或开”按↑↓键选择,按→确认.”零信号"是指输入信
号为零时,阀门的自然位置,对于气开阀为关,对于气关阀则为开. 按→确认.
3.压力单位:可选bar,psi或kpa, 按↑↓键选择,按→确认.
4.输入信号低值:4-19mA可选,按↑↓键选择,按→确认.正常调节选4mA.
5.输入信号高值:5-20mA可选,按↑↓键选择,按→确认.正常调节选20mA.
6.特性选线性. 按→确认.
7.保存并退出? 按→确认.
8.按↑↓键选择,进入”行程校验”. 按→确认.
9.校验→选自动,按→确认.
10.按→3秒钟阀门会动作,按→3秒后放开,则定位器驱动阀门走100%,0%,
50%,完成后显示“校验完成”按→确认.
11.此时输入不同信号值,检查阀门定位是否准确,稳定。
12.若不稳定,则按按↑↓键选择”整定”按→确认.
13.整定→自动,按→确认. 按→3秒钟阀门会动作,按→3秒后放开,显示”自
动整定进行中”
14.完成后显示"自动整定完成”按→确认.
15.说明:在任意分菜单下,同时按下←→3-10秒钟会返回图中显示画面.。
Supplement to HART r Communicating Fisherr FIELDVUE t Digital Valve Controller InstructionManualsFIELDVUE Digital Valve Controller Split RangingProcesses requiring extended rangeability may use two or more control valves. The first valve operates over the firstportion of the range. When the first valve is nearly 100% open, the control action begins to open the second valve. This is called split ranging. When split ranging is performed a single signal from the control system is supplied to the valve actuators. This single signal is split among the positioning devices on each valve. The positioning devices are used to achieve full valve travel over the reduced input range. Most applications need a predictable overlap region in the middle of the signal range to avoid a zone of no control. Positioning devices provide accuracy to ensure the correct overlap exists.When split ranging FIELDVUE digital valve controllers, each device requires a minimum voltage available at the instrument terminals of at least 12 volts (See the appropriate instruction manual for details). Many control systems provide a compliance voltage that is less than the minimum requirement of 24 volts for two instruments wired inseries. This supplement describes two methods to address the potential discrepancy between the compliance voltage and the requirements of FIELDVUE instruments.Limitations of Split Ranging FIELDVUE Digital Valve ControllersSplit ranging FIELDVUE digital valve controllers provides the following limitations:D Most control systems cannot provide the 24 volt compliance voltage. A device to boost the compliance voltage may be required, such as the Action Instruments Action Pak R AP4380-2000.D To communicate with multiple HART instruments on one pair of wires may require the polling addresses for the instruments be nonzero. This means the instrument polling addresses must be reset and the HART devices (either the 475/375 Field Communicator or ValveLink software with a HART modem) must be programmed to poll for instruments at polling addresses other than zero.D Use of the HART Tri‐Loop t is limited to communication with only one instrument.D The instrument polling addresses may be nonzero, thus limiting communication with a HART multiplexer.Guidelines for Split Ranging FIELDVUE Instruments1. Check the voltage available at the instrument terminals using the method in the instrument instruction manual.2. Verify that the control system compliance voltage is at least 24 volts DC at 20 mA output. If the compliance voltage is less than 24 volts DC, add a device to boost the compliance voltage (such as the Action Instruments ModelAP4380‐2000). (Note: the AP4380‐2000 does not have any hazardous area approvals. Appropriate non‐hazardous installations should be selected.)3. Verify that cable length will not limit HART communication. See the instruction manual for details.4. For intrinsically safe installations, install approved intrinsic safety barriers between the non‐hazardous andhazardous areas.Methods of Split RangingTwo methods are available for split ranging FIELDVUE instruments: the traditional method and an alternate method.Traditional MethodThe traditional method uses the traditional split‐range wiring where the two instruments are connected in series to a single pair of wires from the control system, as shown in figure 1. With the traditional method:D The device used to boost the compliance voltage may be required to operate beyond its specifications.D To communicate with multiple HART instruments on one pair of wires requires the polling addresses for the instruments be nonzero. This means the instrument polling addresses must be reset and the HART devices (either the 375 Field Communicator or ValveLink Software with a HART modem) must be programmed to poll forinstruments at polling addresses other than zero.D Because the instrument polling address for one of the instruments must be nonzero, communication with a HART multiplexer is not possible.D Use of the HART Tri‐Loop is limited to communication with only one instrument. In addition, because the default polling address for the Tri‐Loop is one (1), the instrument polling addresses must be set in the range of 2 to 15.Alternate MethodThe alternate method requires more field wiring, but this method:D Allows the device used to boost the compliance voltage to operate within its specifications because it supplies a single instrument.D The polling addresses can remain at zero (0) because the two instruments are not on the same HART loop.D Allows communicating over a HART multiplexer network.D Multiple Tri‐Loops may be used allowing multiple instruments to operate in burst mode.D Split ranging with more than two FIELDVUE digital valve controllers is possible. Installation—Traditional MethodWhen connecting two instruments in series for a split range application, the compliance voltage must equal at least 24 volts DC. This is generally impractical with most DCS controllers, but quite possible with older analog controllers. For example, a Fisher TL108 controller with 45 volt DC power supply provides a compliance voltage of 27 volts DC at 20 mA output and a C master of 10,000 pF. For other controllers or DCS systems, an Action Instruments AP4380-2000 isolator or other similar device may be used to increase the compliance voltage.The published compliance voltage of the AP4380‐2000 is less than 24 volts DC. However, typical compliance voltage for this isolator is much higher. To ensure sufficient compliance voltage, the Action Instruments distributor can check2compliance voltage of the AP4380-2000 prior to shipment. This should be done using the technique described in the instrument instruction manual. Generally, a compliance voltage of 25 volts DC at 20 mA output with a guaranteed line voltage of 120 volts AC is adequate for normal lengths of field wiring.Wiring Hook‐UpThe Action Instruments product bulletin describes the product details and limitations (available on the web at ). These should be read and observed. Before installation, configure each instrument with different HART polling addresses (example HART polling addresses 2 and 3). The connections are shown in figure 1. A typical installation has the control system 4‐20 mA DC output signal connected to the AP4380-2000 input terminals. The isolator can be installed in the rack room. Connect the 4‐20 mA DC output from the AP4380‐2000 to the field wiring. In the field, connect the AP4380‐2000 positive (+) output terminal to the first FIELDVUE instrument LOOP + terminal. Connect the first FIELDVUE instrument LOOP - terminal to the second FIELDVUE instrument LOOP + terminal. Connect the second FIELDVUE instrument LOOP - terminal to the AP4380-2000 negative (-) output terminal.Figure 1. Typical Installation Schematic, Traditional MethodConfigurationCurrent flowing through the input terminals of the isolator is regenerated at the output terminals of the isolator (at a higher voltage) and flows through both FIELDVUE instruments. Input ranging of the FIELDVUE instruments is easily changed without recalibrating. This is done by configuring the Input Range Low and the Input Range High to the desired values. A typical configuration would be:FIELDVUE Instrument Input Range Low Input Range High Polling Address#1 #24 mA12 mA12 mA20 mA233Installation—Alternate MethodWhen connecting two instruments in series for this split range application, the compliance voltage requirement from the DCS controller is much lower. This is because the Action Instruments AP4380‐2000 is in series with the first FIELDVUE instrument and requires minimum voltage (0.3 volts). The isolator powers only the second FIELDVUE instrument and therefore provides adequate voltage.Wiring Hook‐UpThe Action Instruments product bulletin describes the product details and limitations (available on the web at ). These should be read and observed. The connections are shown in figure 2. For a typical installation, connect the control system positive (+) output terminal to the AP4380‐2000 positive (+) input terminal. Connect the AP4380‐2000 input negative (-) terminal to the first FIELDVUE instrument LOOP + terminal. Connect the first FIELDVUE instrument LOOP - terminal to the control system negative (-) terminal. Connect the AP4380‐2000 positive (+) output terminal to the second FIELDVUE instrument LOOP + terminal. Connect the AP4380‐2000 negative (-) output terminal to the second FIELDVUE instrument LOOP - terminal.Figure 2. Typical Installation Schematic, Alternate MethodInput Range: 4-12 mA FIELDVUE Instrument #2 Input Range: 12-20 mAHART Polling Address 0HART Polling Address 04ConfigurationCurrent flowing through the input terminal of the isolator is regenerated at the output terminals of the isolator (at a higher voltage) and flows through the second FIELDVUE instrument only. Input ranging of the FIELDVUE instruments is easily changed without recalibrating. This is done by configuring the Input Range Low and the Input Range High to the desired values. A typical configuration would be:FIELDVUE Instrument Input Range Low Input Range High Polling Address#1 #24 mA12 mA12 mA20 mAMultiple Split RangeThe installation described for the alternate method can be extended to multiple instruments, as shown in figure 3. This architecture allows up to four units to be split ranged. Due to an increase in the signal to noise ratio as the input span decreases, the minimum input span should be limited to 4 mA. Be aware that as the number of units to be split ranged increases, the accuracy of each unit is affected.Figure 3. Typical Multiple Split Range InstallationFIELDVUE Instrument #1 Input Range: 4-8 mA FIELDVUE Instrument #2Input Range: 8-12 mAFIELDVUE Instrument #3Input Range: 12-16mAFIELDVUE Instrument #4Input Range: 16-20 mAHART Polling Address 0HART Polling Address 0HART Polling Address 0HART Polling Address 056Related Fisher DocumentsD FIELDVUE DVC5000 Series Digital Valve Controllers Instruction ManualNoteThe DVC5000 digital valve controller is obsolete. Contact your Emerson Process Management sales office if a copy of this instruction manual is needed.D FIELDVUE DVC6200 Digital Valve Controller Instruction Manual (D103409X012)D FIELDVUE DVC6200 Digital Valve Controller Quick Start Guide (D103410X012)D FIELDVUE DVC6000 Digital Valve Controllers Instruction Manual (D102794X012)D FIELDVUE DVC6000 Digital Valve Controllers Quick Start Guide (D102762X012)D FIELDVUE DVC2000 Digital Valve Controllers Instruction Manual (D103176X012)D FIELDVUE DVC2000 Digital Valve Controllers Quick Start Guide (D103203X012)NoteNeither Emerson, Emerson Process Management, nor any of their affiliated entities assumes responsibility for the selection, use, or maintenance of any product. Responsibility for the selection, use, and maintenance of any product remains with the purchaser and end‐user.Emerson Process Management Marshalltown, Iowa 50158 USA Sorocaba, 18087 BrazilChatham, Kent ME4 4QZ UK Dubai, United Arab Emirates Singapore 128461 SingaporeThe contents of this publication are presented for informational purposes only, and while every effort has been made to ensure their accuracy, they are not to be construed as warranties or guarantees, express or implied, regarding the products or services described herein or their use or applicability. All sales are governed by our terms and conditions, which are available upon request. We reserve the right to modify or improve the designs or specifications of such products at any time without notice. Neither Emerson, Emerson Process Management, nor any of their affiliated entities assumes responsibility for the selection, use or maintenance of any product. Responsibility for proper selection, use, and maintenance of any product remains solely with the purchaser and end user.EFisher Controls International LLC 2006, 2011; All Rights Reserved Fisher, FIELDVUE, ValveLink, and Tri‐Loop are marks owned by one of the companies in the Emerson Process Management business division of Emerson Electric Co. Emerson Process Management, Emerson, and the Emerson logo are trademarks and service marks of Emerson Electric Co. HART is a mark owned by the HART Communication Foundation. All other marks are the property of their respective owners.。
根据贵厂定位器2000出现的问题,做出以下总结、调试方法以及建议
故障:DVC2000显示:“仪表被HART锁定”,
解决方法:通过475手操器通讯,进入online→setup&diag→按“»»”键进入Insrument Mode →将out of SERVICE改为IN SERVICE→按Enter确认返回,
再到DVC2000本机上进行快速设置→按右键3秒以上→阀门会自动进行效验→完成后按右键回到初始界面。
正常来讲,只要能自动效验过,定位器就能正常工作。
不要轻易更改定位器里面的参数,尤其是控制模式,控制模式永远都是模拟控制。
如果快速设置不能够效验完成,请进入详细设置,一直按右键走一遍,直到提示“保存并退出按右键”结束,其目的是让定位器重新记忆一遍详细设置的参数;再进入到模拟输入效验→按右键3秒以上→提示“输入4MA”,就给个4MA信号,按右键→提示“输入20MA”,就给个20MA信号,按右键→保存并退出按右键即可,再次返回到快速设置进行自动效验。
通过这次在现场效验,发现0位时,DVC2000上显示的电流值为3.1MA,根据DVC2000的输入信号要求中:最小控制电流:不低于3.8MA,低于3.8MA可能会引起微处理器重新启动,也就是死机状态,需要断电后再给电,并需要快速设置一遍,才能够正常工作,也就是贵单位所反应的老死机,不动作等现象。
快速使用指南资料号57892005年1月DVC2000系列FIELDVUE® DVC2000系列数字式阀门控制器手册简介安装基本设置和校验技术规格和相关资料注意该手册提供了DVC2000系列数字式阀门控制器的安装、初始设置和校验、以及维护信息。
获得更多的信息,你可以阅读从Fisher销售商那里获得的FIELDVUE®DVC2000系列数字式阀门控制器使用手册——资料号 5772,或者直接访问我们的网址:DVC2000系列展开这一页以查看“现场液晶界面流程图”DVC2000系列现场液晶界面流程图主屏TRAVEL=66.8% 14.6 MA 0.92 BAR停止仪表动作行程偏差检查装配检查输入气源检查I/P(输入/输出)转换器在预设屏幕上以下项目是用警告图标进行确认的12 3 4 5 6 7 8快速设置阀门会移动3秒种定位0%...定位100%...定位0%...定位50%...行程校验校验阀门会移动3秒种自动手动调整调整阀门会移动3秒种阀门会移动3秒种自动手动详细设置零控制信号阀压力单位BAR自动手动关开BARPSIKPA阀门会移动3秒种模拟输入校验输入4 mAmA(输入会改变)3秒种阀位变送器校验送4 mA或送20 mA保存并退出?按保存并退出不保存退出控制现场控制手动SP=xxx控制=xxx模拟式或数字式手动式定位100%...定位0%...定位50%...定位50%...移动阀门至100%行程处自动手动移动阀门至0%行程处自动整定进行中...自动整定完成自动整定失败使用手动整定整定C衰减保存并退出不保存退出保存并退出?按+5不确定-5专家C,D,E,F,GHI,J,K,L,M输入范围下限 4 mA输入范围上限 20 mA特性曲线线形4 mA...19 mA5 mA...20 mA快开线形等百分比用户设置输入20 mA保存并退出?按保存并退出不保存退出只有在安装了变送器硬件的情况下才有用11111DVC2000系列更换主板SWITCH1=打开SWITCH2=关闭FW:1,HW1:1TUNING=C 保护 OFF关开只有在安装了限位开关的情况下才有用快速设置完成校准完成校准失败保存并退出?按保存并退出不保存退出英语法语西班牙语德语意大利语日语汉语语言 取消(返回主屏幕)注意:按住 + 3到10秒种+ + +语言选择 + + +3到10秒种变送器4 mA 限位开关1 90%限位开关1关闭 90%限位开关2 10%限位开关2关闭 10%关开125%...-25%高于低于无效125%...-25%低于高于无效保存并退出?按阀门可能移动 3秒种不保存退出?按只有在安装了变送器硬件的情况下才有用只有在安装了限位开关硬件的情况下才有用1111111DVC2000系列安装□ 正确地把用于阀门的仪表安装到执行机构上。
请参阅随安装套件提供的安装指南。
□ 正确地安装磁铁条。
请参阅随安装套件提供的安装指南。
气动连接和气源□ 接上气源并使气压大小适当。
气源连接线路参照2-5页,也可参照5-1页的技术规格。
□ 将输出仪表连接到执行机构上。
如何连接输出设备请参看2-5页。
电源连接□ 回路连线正确地接到接线盒中的“+”和“-”端子。
参照2-5页的介绍。
□ 将限位开关和阀位变送器(如果有的话)线路正确地连接到接线盒中的相应端子。
参照2-6页。
基本设置和校验□ 完成所有基本设置。
执行3-3页上的快速设置程序以起动自动校验和对设备进行整定。
□ 最终控制元件正确地响应设定点的变化,并且是稳定的。
如果需要,执行3-5页的手动整定。
最终控制元件准备就绪,可安装到管线上。
该产品是用于一个特定的技术规范范围。
不正确的组态仪表可能会导致产品工作不正常、引起财产损失或人员伤害。
安装和基本设置核对表安装警 告DVC2000系列2005年1月1-1手册简介产品介绍DVC2000系列数字式阀门控制器(图1-1)是可以通讯的、基于微处理器的电-气阀门定位器。
除将电流输入信号(4-20 mA )转换为气压输出信号的传统功能外,DVC2000系列数字式阀门控制器通过一个本地显示液晶屏和(或)HART ®协议进行通讯。
除此之外它还提供了一个选项,可为2个集成的限制开关(用于阀门开/关指示器)提供了单独的线路,并有一个阀位变送器(用于独立的阀位置反馈)。
DVC2000系列数字式阀门控制器设计用于替代标准气动和电-气阀门定位器。
本手册的使用本手册介绍了如何安装、设置和校验DVC2000系列数字式阀门控制器。
可以从第4-2页到上所列出的相关文件中获得更多的关于安装、操作和校验DVC2000系列数字式阀门控制器的信息。
本手册介绍了通过使用DVC2000本地操作界面进行的基本设备设置和校验。
该界面包含一个液晶显示屏(LCD ),四个按钮和一个针对位置变送器设置的开关。
界面支持七种语言,包括英语、法语、德语、意大利语、西班牙语、汉语和日语。
可以按照Basic Setup (基本设置)一章中的介绍设定语言类型。
设备需要在不低于8.5 V 电压和3.5 mA 电流下运行。
在执行某些程序时需要最高达20 mA 的直流电。
同样可以使用一个现场通讯设备,一台安装了A M SValveLink 软件或AMS TM 软件的个人电脑来设置和校验这些设备。
需要有关FIELDVUE 仪表与软件的使用信息,可以参照相关用户指南。
图1-1. DVC2000系列数字式阀门控制器注意除了在阀门、执行机构和附件的安装、操作和维护方面受过良好训练和仔细阅读并理解本手册内容的人员外,其他人不得安装、操作、或维护DVC2000系列数字式阀门控制器。
如果有任何关于这些使用说明的问题,请在操作之前联系Fisher 销售办事处。
注意Fisher 公司并不为任何产品的选择、使用或维护承担责任。
选择、使用或维护任何Fisher 产品的责任要由零售商和最终用户单独承担。
DVC2000系列1-22005年1月警 告一般而言,进行全行程测量。
当磁铁组件逐渐远离测量范围时,其性能就会逐渐降低。
一些其它厂家的执行机构采用了不带防转导向的结构,这会引起阀杆明显的旋转,DVC2000图2-1. DVC2000外壳的变化小 心用于把DVC2000安装到不同执行机构上的安装支架和组件种类繁多。
不过,除去紧固件、支架和连接件的一些微小差别外,安装的程序可归入以下类别:●气开式直行程(线性)执行机构●气关式直行程(线性)执行机构●气开式费希尔GX 型执行机构●气关式费希尔GX 型执行机构●最大转角为90度的旋转式执行机构图2-3所示为不同行程的反馈磁铁件。
气开式直行程(线性)执行机构(如费希尔667型)1. 将安装支架安装到执行机构上。
2. 将反馈件和磁铁组件安装在阀杆联接件上。
不要拧紧,因为还需要进行调准。
用于直行程和旋转式执行机构的壳体用于费希尔GX 型执行机构的壳体可用连接:● M20电气接口和G1/4气路接口●1/2英寸NPT 电气接口和1/4英寸NPT 气路接口可用连接:● M20电气接口和G1/4气路接口●1/2英寸NPT 电气接口和1/4英寸NPT气路接口M8旋转式NAMUR ,M6气路接口电气接口图2-2.行程范围(固定在阀杆上)安装的磁铁组件长度不得小于执行机构的物理行程。
否则设备将会由于磁铁移出DVC2000反馈刻度指示范围而导致失控。
标志定位工具箭头背向接口=输出箭头指向接口=输入1/4气路接口定位工具名义行程标志O 安装组件中)不用于这种执行机构。
注意当GX型执行机构在故障开启与故障关闭两种模式之间现场进行转换时,需要改变DVC2000壳体内的气路接口上的管塞。
●如要转换到故障关闭模式,需拆除DVC2000壳体背部的R1/8气孔管塞,装上一个O形圈。
并将外部气路出口用一个1/4NPT或G1/4管塞堵上。
见图2-10。
●如要转换到故障开启模式,需拆除外部气路出口上的管塞。
在DVC2000背部的气口装上一个R1/8管塞。
并用气管连接DVC2000的气路出口与执行机构气腔顶部的气口。
在90°旋转式执行机构上安装DVC2000的步骤DVC2000数字式阀门控制器可以安装在90°旋转式的执行机构上,也可安装在任何符合NAMUR标准的旋转式执行机构上。
安装需要一个安装支架和相关硬件。
见图2-11。
1. 将磁铁组件安装到执行机构驱动轴上,在行程中点时,磁铁组件上的平面必须与DVC2000壳体背面的槽道平行,如图2-12所示。
2. 把安装支架安装在执行机构上。
3. 用4个安装螺栓把数字式阀门控制器固定到安装支架上,如图2-13所示。
4. 检查磁铁组件与定位器反馈槽之间的间隙。
5. 安装气管,连接执行机构气腔和定位器输出口(有向外的指示箭头)。
见图2-7。
电路和气路连接数字式阀门控制器上的电路和气路连接可采用以下组合方式:●气源输入输出为1/4英寸NPT接口,电气为1/2英寸NPT接口●气源输入输出为G1/4接口,电气为M20接口图2-11.对旋转式执行机构(图中带有典型的安装支架)紧固螺栓,M8装上或G1/4管塞在安装到GX执行机构上之前放上O形圈拆除R1/8管塞图2-10. 针对气开式结构的费希尔GX执行机构的修改M6警 告ATEX为气源介质。
将最近处的合适气源连接到箭头所指向的气路连接端口源的。
屏蔽电缆的使用保证了系统在电力干扰环境下的正常操作。
电缆要求为最大14AWG,最小26AWG。
在将现场布线连接到回路端子和限位开关以及变送器端子时,确保其符合相应的I.S.电路指导原则。
按如下步骤连接数字式阀门控制器:1. 卸下定位器的盖子。
2. 将现场导线穿过电气接口连接到接线盒中的端子上。
导线安装应按相应的国家和地方电气标准来进行。
3. 把控制系统输出卡上的正极“输出电流”端连接到标号为“+11”的接线端。
再将负极“输出电流”(或叫返回)端接到标号为“-12”的接线端。
当有易燃或危险气体存在时,所产生的静电释放可能会导致人员伤害和设备损伤。
应在数字式阀门控制器与大地间连接一根14AWG(2.08 mm2)的接地导线。
对所用接地导线的要求请参考国家和地方的规范和标准。
4. 仪表上有两个接地螺丝,用于安全地线、接大地或排水线的连接。
这些接地端在电气上是没有区别的。
保证所用接地连接符合国家和地方规范以及工厂标准。
5. 如果不用本地界面进行设置或校验,应将定位器盖子重新装好。
可选电路板共三个可供选择的电路(阀位变送器、开关1和开关2)控制电流来自外部电源类似于一个两线制阀位变送器的工作。
限位开关对一个集成式提供限位开关的定位器,附加接线端为现场配线提供了连接点。
限位开关之间是相互独立的,并且与数字式阀门控制器的初级反馈也是互相独立的。