优品课件之汽车灯泡更换方法(二)
- 格式:docx
- 大小:20.51 KB
- 文档页数:2

汽车大灯总成的更换方法步骤一:准备工作在进行大灯总成更换之前,首先要确保车辆处于停放状态,关闭电气系统以防止触电。
然后打开前车盖,找到大灯总成所在位置。
根据汽车品牌和型号的不同,大灯总成的位置和拆卸方式可能会有所差异,建议事先查阅汽车的使用手册获取具体信息。
步骤二:拆除旧的大灯总成在开始拆除旧的大灯总成之前,可能需要拆下部分前脸饰件或保险杠。
使用合适的工具,解除连接大灯总成的螺栓或固定卡扣,然后仔细移除旧的大灯总成。
在拆除过程中,要小心不要碰撞到车身或其他零件,以免造成二次损坏。
步骤三:连接新的大灯总成将新的大灯总成放置到正确的位置,并确保与车身的连接处对齐。
根据具体的安装方式,可能需要使用螺栓或固定卡扣将大灯总成固定在车身上。
在连接过程中,需要小心操作,确保大灯总成稳固且牢固地安装在车身上。
步骤四:调整大灯光源安装完成后,使用工具调整大灯光源的水平和垂直角度,以确保其照射灯光的范围和亮度符合法律要求。
这一步骤非常重要,因为正确的大灯调整可以提供良好的照明效果,避免对其他驾驶员产生的干扰或不必要的安全隐患。
步骤五:测试和确认安装和调整完成后,关闭前车盖,重新连接电气系统,并进行测试。
打开车辆的大灯开关,检查新安装的大灯总成是否正常工作。
确保大灯的远近光切换、调光和灯光投射范围等功能正常运行。
同时,还要注意观察大灯总成周围是否有漏光或异常现象。
步骤六:装回前脸饰件或保险杠在确认大灯总成正常工作后,可以开始装回之前拆卸的前脸饰件或保险杠。
根据具体的位置和安装方式,使用合适的工具将它们固定在正确的位置。
在装回过程中,需要注意线束的正确连接和固定,以确保整体安装的稳定性和合理性。
总结:汽车大灯总成的更换是一项技术性较高的任务,需要具备一定的专业知识和技能。
如果不熟悉汽车维修和电器系统的人士,建议寻求专业的汽车技师或汽车维修店的帮助。
此外,大灯总成的更换和调试需要细致耐心,一定要按照制造商的指导或相关技术手册进行操作。


大灯灯泡拆装步骤及注意事项
1、打开汽车引擎盖,找到车灯泡。
2、用力拔出蓝色线圈的灯泡电源线,蓝色圈内是灯座,这个灯座,稍微用力。
直接拔下来,露出灯尾,红圈内金属手柄就是松开灯泡金属卡子的手柄。
3、要先拔出灯座,再松开灯泡金属卡子的手柄。
然后按蓝色箭头方向按下去,不放手,再往右边推动,就可以把车灯卡子松动出来,松开之后直接拔出灯泡。
4、拆开新买的灯泡盒子,注意:一定要戴手套拿灯泡,不能在灯泡上留下指纹,留下指纹后,灯泡发热会不均匀,影响灯泡寿命。
5、把新的灯泡安装进去,然后卡上灯泡卡子,插上灯泡电源线,即安装成功。

氙气大灯更换灯泡教程
步骤1: 切断电源
在更换氙气大灯灯泡之前,首先确保切断车辆的电源。
这是为了避免发生电击或其他潜在的危险。
步骤2: 打开引擎盖
打开车辆引擎盖,找到需要更换灯泡的灯组。
通常,氙气大灯位于车辆的前部。
步骤3: 取下灯罩
轻轻转动或拧下灯组的灯罩,以暴露出灯泡和电线连接。
步骤4: 卸下灯泡
找到连接灯泡的插槽或固定夹,并小心地将其打开。
然后,用手轻轻旋转灯泡,直到它松开并可以从插槽中取出。
步骤5: 插入新灯泡
拿起新的氙气大灯灯泡,确认与旧灯泡相匹配。
然后,将新灯泡的插头插入插槽中,轻轻旋转以确保它安全固定。
步骤6: 固定灯泡
使用插槽或固定夹,将新灯泡固定在原位。
确保插槽牢固地锁定,并且灯泡不会松动。
步骤7: 盖上灯罩
将灯罩重新安装到灯组上,确保正确对准并旋转固定。
步骤8: 恢复电源
在确保所有部件正确安装后,重新连接车辆的电源。
关闭引擎盖。
完成以上步骤后,你已经成功更换了氙气大灯灯泡。
记住在进行任何汽车维修操作前,检查车辆的说明手册以获得特定的指示和建议。
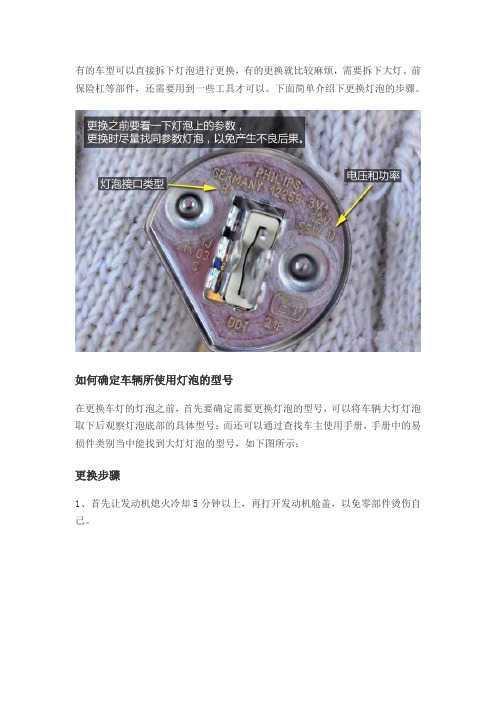
有的车型可以直接拆下灯泡进行更换,有的更换就比较麻烦,需要拆下大灯、前保险杠等部件,还需要用到一些工具才可以。
下面简单介绍下更换灯泡的步骤。
如何确定车辆所使用灯泡的型号
在更换车灯的灯泡之前,首先要确定需要更换灯泡的型号,可以将车辆大灯灯泡取下后观察灯泡底部的具体型号;而还可以通过查找车主使用手册,手册中的易损件类别当中能找到大灯灯泡的型号,如下图所示:
更换步骤
1、首先让发动机熄火冷却5分钟以上,再打开发动机舱盖,以免零部件烫伤自己。
2、通过车辆大灯的位置寻找到大灯总成,而在大灯总成的尾部一般会有防尘罩,防尘罩顺着螺口方向直接拧下来即可。
3、拿开防尘罩后,就能看到大灯总成里的灯泡底座,捏住底座旁边的钢丝卡簧,待卡子松开之后就可以拿出灯泡了。

汽车大灯更换安装方法*这是一篇关于汽车大灯更换安装方法的指南。
在本文中,我们将提供详细的步骤和注意事项,帮助您正确更换和安装汽车大灯。
*准备工作在开始更换汽车大灯之前,您需要准备以下工具和材料:- 新的汽车大灯(确保购买与您车辆相匹配的型号)- 手套- 螺丝刀(根据车辆型号可能需要不同尺寸的螺丝刀)- 电源(如果需要拆卸电气连接)- 车辆使用手册(用于查找具体更换方法)步骤以下是更换和安装汽车大灯的步骤:1. 停车并断开电源首先,确保您的车辆停在平坦的地面上,并关闭引擎。
如果需要更换的是前灯,务必断开电池的负极。
2. 查找大灯安装位置使用车辆使用手册或互联网资源,找到大灯安装位置并确保您了解如何访问大灯组件。
3. 拆卸旧的大灯根据您车辆的具体型号和设计,可能需要打开引擎盖或底部前保险杠来访问大灯组件。
使用螺丝刀和其他工具,轻轻拆卸旧的大灯。
确保小心处理大灯组件,避免损坏。
4. 断开电气连接(如果需要)一些汽车大灯可能连接到车辆的电器系统中。
如果您的汽车大灯需要通过电气连接,请按照使用手册或相关指南的指示,谨慎断开电气连接。
5. 安装新的大灯在确认电气连接已断开(如果适用)后,用手轻轻安装新的大灯。
确保大灯已正确对准安装插槽,并且全部安装到位。
对于汽车大灯组件的不同设计,请仔细阅读使用手册,确保正确安装。
6. 重连电气连接(如果需要)如果您的新汽车大灯需要重新连接到电器系统,请将电气连接插入到相应插槽中。
确保连接牢固,避免松动和断开。
小心不要损坏电气连接器。
7. 复位并测试完成安装后,关闭汽车引擎盖或前保险杠,并重新连接电池(如果适用)。
启动引擎,点亮大灯并测试其功能。
确保大灯正常工作,并进行必要的调整以确保照射角度正确。
8. 清理和保养在完成大灯更换和安装后,请清洁大灯表面。
使用合适的清洁剂和柔软布擦拭大灯表面,以去除污垢和指纹。
注意事项在更换和安装汽车大灯时,请注意以下事项:- 确保购买与您的车辆型号和要更换的灯泡相匹配的汽车大灯。
LightsReplacing a Headlight BulbYour car has two bulbs on each side,four in total. Make sure you arereplacing the bulb that is burned out.Your car uses halogen headlightbulbs. When replacing a bulb, handle it by its plastic case and protect the glass from contact with your skin or hard objects. If you touch the glass,clean it with denatured alcohol and a clean cloth.Halogen headlight bulbs get very hot when lit. Oil, perspiration, or a scratch on the glass can cause the bulb to overheat and shatter.1. Open the hood.If you need to change the high beam headlight bulb on the passenger's side, remove the radiator reserve tank by pulling it straight up.2. To disconnect the bulb from the electrical harness, push on the end of the lock tab to release the connector then push the connec-tor straight down.3. Turn the bulb about one-eighth turn counterclockwise to unlock it from the headlight assembly.4. Remove the bulb by pulling it straight out of its recess.5. Align the tabs on the new bulb with the slots in the headlight assembly and push it into place.6. Turn the bulb clockwise to lock it in place. Do not force it. Check the seating of the bulb's tabs in the slots if the bulb will not return to its original position.7. Reinstall the harness connector on the bulb connector. Make sure it locks in place.Turn on the headlights to test the new bulb.8. (Passenger's side)Reinstall the radiator reserve tank.MaintenanceNOTICELightsReplacing Front Turn Signal/Parking and Side Marker LightBulbs1. Use a Phillips-head screwdriver toloosen the light assembly'smounting screw.2. Remove the light assembly fromthe bumper.3. Remove the socket of the burned-out bulb from the light assemblyby turning it one-quarter turncounterclockwise.4. To remove the front bulb, push itin slightly and turn it counterclock-wise. To remove the side bulb, pullit straight out of its socket.5. Install the new bulb in the socket.6. Insert the socket back into thelight assembly. Turn it clockwiseto lock it in place.7. Test the lights to make sure thenew bulb is working.8. Put the light assembly into thebumper. Make sure the tab on thelight assembly fits into the bumperslot. Tighten the mounting screw.MaintenanceSCREWLightsReplacing a High-mount Brake Light Bulb1. Undo the cover fasteners by pushing on the center of each fastener's head until it pops in.Remove the cover.2. Determine which bulb is burned out.3. Pull the bulb straight out of its socket.Push the new bulb straight into the socket until it bottoms.4. Test the lights to make sure the new bulb is working.5. Reset each fastener by pushing on the pointed end until it pops back almost flush with the fingers on the housing.6. Reinstall the cover. Secure each fastener by pushing on the center until it locks (the center is flush with the head).MaintenanceLightsReplacing Rear Turn Signal and Side Marker Light Bulbs1. Open the hatch and remove the light assembly cover by pulling the edge.2. Remove the socket from the light assembly by turning it one-quarter turn counterclockwise.3. If the turn signal light bulb is burned out, remove it by pushing it in and turning counterclockwise.If the side marker light bulb is burned out, remove it by pulling it straight out of its socket.4. Install the new bulb in the reverse order of removal.5. Push the socket into the light assembly and turn it clockwise until it locks.6. Test the lights to make sure the new bulb is working.7. Install the light assembly cover.Make sure it locks in place.Replacing Tail/Stoplight and Back-up Light Bulbs1. Open the hatch. Undo the seven cover fasteners by pushing on the center of each fastener's head until it pops in. Remove the taillight cover panel.MaintenanceLights 2. Remove the socket by turning itone-quarter turn counterclockwise.3. Try the tail/stoplights and back-uplight to verify which bulb needsreplacing. Remove the bulb byturning it counterclockwise.4. Install the new bulb in the socket.Test it to make sure it works.5. Reinstall the socket into the lightassembly.6. Reset each fastener by pushing onthe pointed end until it pops backalmost flush with the fingers onthe housing.7. Reinstall the cover. Secure eachfastener by pushing on the centeruntil it locks (the center is flushwith the head).MaintenanceLightsReplacing a Rear License Bulb1. Remove the two screws andremove the license light assembly.2. Remove the socket from the light assembly by turning it one-quarter turn counterclockwise.3. Pull the bulb straight out of its socket. Push the new bulb in until it bottoms in the socket.4. Turn on the parking lights and check that the new bulb is working.5. Reinstall the license light assem-bly. Install the two screws and tighten them securely.Replacing Ceiling, Spot and Cargo Area Light BulbsThe ceiling, spot and cargo area lights come apart the same way.They do not all use the same bulb.CEILING LIGHT1. Remove the lens by carefullyprying on the edge of the lens with a fingernail file or a small flat-tip screwdriver. Do not pry on the edge of the housing around the lens.MaintenanceLights2. Remove the bulb by pulling it straight out of its metal tabs.3. Push the new bulb into the metal tabs. Snap the lens back in place.On LS, GS and GS-R modelsSPOTLIGHTSMaintenanceCARGO AREA LIGHTStoring Your CarIf you need to park your car for an extended period (more than one month), there are several things you should do to prepare it for storage.Proper preparation helps prevent deterioration and makes it easier to get your car back on the road. Ifpossible, store your car indoors.Fill the fuel tank.Change the engine oil and filter (see page 137).Wash and dry the exteriorcompletely.Clean the interior. Make sure the carpeting, floor mats, etc. arecompletely dry.Leave the parking brake off. Put the transmission in Reverse (5-speed manual) or Park(automatic).Block the rear wheels.If the car is to be stored for a longer period, it should besupported on jackstands so the tires are off the ground.Leave one window open slightly (ifthe car is being stored indoors).Disconnect the battery.Support the front and rear wiper blade arms with a folded towel or rag so they do not touch the windshield.To minimize sticking, apply asilicone spray lubricant to all door and hatch seals. Also, apply a car body wax to the painted surfaces that mate with the door and hatchseals.Cover the car with a "breathable"car cover, one made from a porous material such as cotton.Nonporous materials, such as plastic sheeting, trap moisture,which can damage the paint.If possible, run the engine for a while periodically (preferably once a month).If you store your car for 12 months or longer, have your Acura dealer perform the inspections called for in the 24 months/30,000 miles (48,000km) maintenance schedule (Normal Conditions) as soon as you take it out of storage (see page 128). The replacements called for in the maintenance schedule are not needed unless the car has actually reached that time or mileage.Maintenance。
1898年哥伦比亚号电动汽车把电用于前灯和尾灯开启了汽车车灯的历史,经历了100多年的不断发展,汽车车灯已经形成了完整的体系,除了基本的照明还有信号指示作用。
另外随着技术的进步,汽车车灯已经形成了卤素、氙气、LED 的格局,下面就来介绍下各自灯光的特点以及维护保养技巧。
汽车大灯主要包括卤素、氙气和LED,其中中低端汽车主要使用卤素大灯,氙气大灯常见于一些中高端车辆,而LED大灯只在极少数的新型车辆上使用。
卤素大灯卤素灯其实就是一类特殊的白炽灯,其原理就是电阻上有电流通过时会发热,当温度足够高时时发出波长在可见光频段的黑体辐射。
卤素灯一般有两种:碘钨灯和溴钨灯,白炽灯点亮时,虽然其灯丝温度不超过钨的熔点和沸点,但是仍然会有少量的钨在高温下挥发。
当挥发出来的钨原子遇到较冷的灯泡外壳时,就会凝结沉淀,久而久之灯泡外壳就会堆积一层发黑的钨膜。
普通白炽灯用久了外壳发黑就是这个缘故。
如果在灯泡里充入一些碘,当灯泡点亮时,碘会挥发成气体,碘蒸气遇到较冷的钨,就会与其反应,生成低沸点的化合物——碘化钨,从而使灯泡外壳沉淀的钨挥发。
碘化钨气体遇高温会分解。
当碘化钨气体遇到灯丝时,就分解,将钨留在灯丝上,而碘则继续以气体形式在灯丝与外壳之间游离,当它再次来到灯泡外壳时,它又会与外壳上的钨反应,这样一方面灯丝不停地将钨挥发到灯泡外壳上,另一方面碘又不停地把钨搬运回灯丝,这样灯丝挥发消耗的速度大大降低了,灯泡寿命得以延长。
于是可以用碘钨灯制造功率很大的白炽灯,如果不加卤素,普通白炽灯如果做到这么大功率,寿命将会很短,难以实用。
卤素灯已广泛应用于汽车照明领域。
氙气大灯氙气大灯的全称是HID(High Intensity Discharge Lamp)气体放电灯,它利用配套电子镇流器,将汽车电池12V电压瞬间提升到23KV以上的触发电压,将氙气大灯中的氙气电离形成电弧放电并使之稳定发光,提供稳定的汽车大灯照明系统。
与普通卤素灯泡相比,氙气灯泡有两个显著的优点:一方面氙气灯泡拥有比普通卤素灯泡高三倍的光照强度,耗能却仅为其三分之二;另一方面氙气灯泡采用与日光近乎相同的光色,为驾驶者创造出更佳的视觉条件。
汽车实用手册(10) 自己动手换大灯灯泡2013年06月07日 00:07 来源:汽车之家类型:原创编辑:沈诚评论:89条[汽车之家用车养车] 如果没有汽车大灯,我们驾驶着汽车在夜间会寸步难行,而有了优质的光源之后,我们的夜间行驶之路会更有保障,所以随时让爱车的大灯处于良好的状态非常重要。
翻开车辆的保养手册,里面的易损件列表中就有大灯一项,随着长时间的频繁使用,大灯灯泡突然熄灭或者光照度降低是时有发生的事情,这时候我们就需要更换大灯灯泡,下面我们就来说一下自己动手更换灯泡的流程。
●在哪儿购买大灯灯泡?大灯灯泡和车辆的其他养护配件一样,都非常容易购买到,比如本地的汽配市场和无孔不入的电商,不过这里头的玄机还是挺多的,听我一一道来。
1、汽配市场汽配市场的产品照理来说是比较有保障的,有着实体店铺看着就让人放心,就算产品出了什么问题都可以拿回来,不过需要提醒的是我们普通人基本上没有分辨正品和高仿品的能力,所以一定要选择信誉较好的商家,一些灯泡生产厂家会在官方网站上标注各地经销商联系方式,这种店铺基本上错不了,记得在购买后索取正规发票哦。
2、电商网站在国内比较著名的电商网站,基本上都有种类繁多的汽车灯泡销售,其中口碑比较好的有京东商城、亚马逊、苏宁易购等,淘宝当然有更丰富的产品,不过相对来说品质无法保证,如果非要在淘宝购买,那么在淘宝天猫商城里购买的产品还比较让人放心。
●我需要买什么型号的灯泡?在购买灯泡的时候,商家会问你的车型是用什么型号的灯泡,这时候我们可以从几个方面了解到:一是察看自己车上取下的灯泡,在灯泡底部会有具体的型号标注;第二是翻看车辆保养手册,大部分车型保养手册的易损件列表里都有注明;还有一个方法属于实在没办法的,那就是上汽车之家的相关车型论坛,看看网友的帖子或者咨询更换过的网友就知道了。
当今汽车的大灯以卤素灯和氙气灯HID为主,也有一些新车型开始采用LED 灯,由于后装氙气大灯的不稳定性和价格原因,本文只针对采用卤素大灯的中低档车型。
汽车灯泡更换方法(二)
汽车灯泡更换方法(二)首先要搞清汽车前大灯灯泡的几个问题,
那就是亮度、寿命、色温、寿命、型号等。
首先是灯泡亮度,这是车主比较关心的,但是很多厂家都不标明有意做成一笔糊涂账,都在宣传增亮100%那么达到多少lm却没标出,博世车灯在这点上做的不错,基本都标明亮度是多少lm。
一般汽车前大灯的灯泡寿命200-400小时左右,如果是小厂出的寿命会更短。
大多数品牌的灯泡并不注明使用寿命,见到比较实在的还是“博世”,各系列的都标注寿命。
飞利浦的车灯寿命标的不明不白,等于没标,例如一款H7的车灯寿命在
横轴上标的比例竟然不一致,无法判明究竟是多少小时。
色温是把
双刃剑,色温高灯光颜色偏白看着漂亮,感觉很亮,实际穿透力就差了并不能照的更远。
色温低在3000K左右会照的更远些。
平衡一下,可以选购色温在3500K左右的,这样大灯的颜色也稍偏白点视线也好。
灯泡的型号很多,不能买错了,最好查阅车辆的用户手册,上面都会标明各个车灯的灯泡型号。
一般来说,近光远光分开的多是H7,功
率55W;近光远光在一个灯罩里的大多是H4的双丝灯泡,双丝分别
给近光、远光使用。
汽车大灯在使用中,用的比较多的是近光灯。
这是因为在市区行车禁用远光灯,只有在没有路灯照明的情况下才用到远光灯,例如在郊区或高速上行驶。
开了远光灯的时候,近光灯依然会亮着,所以近光灯的灯泡会先坏。
车子跑了5万多公里,左近
光灯坏了,仪表上有显示,每次启动都会提示。
1 拆下坏掉的近光灯,发现奔驰使用的是照明大鳄飞利浦的灯泡。
2 车灯型号不能搞
错的,使用手册上都能找到。
3 4 考虑车子远光灯用的次数很少,
估计只有近光灯的1/10,所以决定把一对远光灯泡换给近光灯使用,买一对好点的灯泡给远光灯使用。
原车配的飞利浦灯泡现在只要19元,标称亮度增加了30%,升级版的灯泡一对都在150元以上,决定还是买好点的飞利浦新极劲光,一对169元。
如果要都换新的,建
议近光灯不要买所谓增亮多少多少的,可以买不到30元一只但是有
4倍寿命的恒劲光系列。
5 6 上图就是亮度增加100%的升级灯泡,
色温3350K,寿命不详。
为了对比远光灯的效果,先把新灯泡换到右侧,惊奇的发现打到对面
墙壁的光斑没有觉得更明亮,不知增亮100%是怎么测试的。
感觉多花了100多元没有什么明显效果,至于投射光束多了35米更无法目测。
飞利浦的灯泡亮度和寿命都不明晰特别是寿命在时间轴上0h到1000h比例多变灯泡的更换方法。
可以先看书上的操作方法,为了保证拆的下装的上,要用手机先拍照,一是为了看清结构,二是为了换好后对照,防止出错。
首先要找个便于调整灯光的地方。
地库最好,光线暗能看清灯光效果。
车库也不错,车头向里面壁,留着3米左右距离。
原车的灯光比较标准,要留有标记便于灯泡换上后调整偏差。
停好车后,分别打开近光灯和远光灯,在灯光打到的墙壁上做标记。
标记可用胶带粘贴报纸在墙上,再用笔把大灯的光斑中心划在报纸上。
换灯泡前要把大灯上方三角形的黑色塑料挡板移开以利拆装。
以左大灯为例,可以在下图左手中指处向上扳,挡板右侧即可从下面车架上脱开,挡板左侧不需拆卸,设计中就有一条折叠槽,左手顺势把挡板掀起就能看到下面的大灯。
优品课件,意犹未尽,知识共享,共创未来!!!。