5-半导体制造中的化学品(自学为主)
- 格式:ppt
- 大小:1.15 MB
- 文档页数:50
半导体化学原料半导体是一种重要的电子材料,它被广泛应用于微电子、光电子、信息技术等领域。
半导体的制备过程中,需要用到各种化学原料。
本文将介绍一些常用的半导体化学原料。
1. 硅(Si)硅是半导体制备中最重要的原料之一。
它是一种广泛存在于地壳的化学元素,占地球壳中总质量的27.7%。
在半导体工业中,硅的纯度要达到99.9999%以上,通常使用化学气相淀积(CVD)、分子束外延(MBE)等技术制备高纯度晶体硅和硅薄膜。
2. 氨(NH3)氨是一种无色气体,具有较强的还原性,易于与氧化物反应生成亚硝基和氮氧化物。
在半导体制备中,氨通常用作化学气相淀积的氮源,也用于制备硝酸铝等其它化学物品。
3. 氧化铝(Al2O3)氧化铝是一种重要的半导体化学原料,它具有良好的绝缘能力、化学稳定性和耐高温性。
在半导体制备中,氧化铝通常用于制备氮化铝(AlN)薄膜。
此外,氧化铝还可以用于制备铝电解电容器、玻璃陶瓷、陶瓷填料等。
5. 氯(Cl2)氯是一种有毒气体,具有强烈的腐蚀性。
在半导体制备中,氯主要用于刻蚀、清洗和沉积等过程。
例如,高纯度的氧化硅可以通过氯化硅封口法得到。
氯还可以用于制备氯离子等其它化学物品。
6. 磷(P)磷是一种重要的半导体化学原料,它可以用于掺杂硅获得n型半导体。
在半导体制备中,掺杂磷的方法通常是将气相的磷化氢(PH3)注入石英管中,在高温下进行化学气相淀积。
除此之外,磷还可以用于制备荧光剂、农药等。
7. 硼(B)硼是一种轻金属,通常用于掺杂硅获得p型半导体。
在半导体制备中,掺杂硼的方法通常是将三氯化硼(BCl3)气体和氢气反应,或使用卤化物还原法将硼挥发物分别与氢气或异丙醇反应。
除此之外,硼还可以用于制备陶瓷、热水瓶涂层、马蹄铁等材料。


半导体主要材料介绍
半导体作为一种重要的材料,在电子行业中扮演着至关重要的角色。
它的特性使得半导体在电子学、光电子学、计算机科学等领域中有着广泛的应用。
本文将介绍半导体的主要材料种类,以便更好地了解半导体材料的特性和应用。
硅(Silicon)
硅是最常见且应用最广泛的半导体材料之一。
它具有良好的半导体特性,化学稳定性高,且价格相对较低。
硅半导体广泛应用于集成电路、太阳能电池等领域。
硒化镉(Cadmium Selenide)
硒化镉是一种II-VI族半导体材料,具有优良的光电特性。
它在红外探测、半导体激光器等领域有着重要的应用。
砷化镓(Gallium Arsenide)
砷化镓是一种III-V族半导体材料,其电子迁移率高,适用于高频器件和微波器件。
砷化镓在通信领域和光电子领域中具有广泛的应用。
硒化铟(Indium Selenide)
硒化铟是一种III-VI族半导体材料,具有光电性能优异的特点。
硒化铟在太阳能电池、红外探测等领域有着重要的应用。
氧化锌(Zinc Oxide)
氧化锌是一种广泛应用的半导体材料,具有优良的透明导电性能,适用于透明电子器件、柔性显示屏等领域。
以上介绍了几种常见的半导体材料,每种材料都具有独特的性能和应用特点。
随着科学技术的不断发展,半导体材料的研究和应用也将不断深化,为现代电子科技的发展提供有力支撑。


半导体工厂使用的化学品清单Chemical UseStandard Operating Procedure1.0PurposeThis document provides detailed instructions on chemical use at the wet benches at WashingtonTechnology Center.2.0Equipment and Materials2.1Equipment2.1.1Wet bench2.1.2Spin rinse dryer2.1.3Face shield2.1.4Apron2.1.5Chemical gloves2.1.6Timer2.1.7Tweezers2.1.8Teflon cassettes2.1.9Teflon cassette handles2.1.10Teflon single wafer holders2.2ChemicalsThe chemicals available in the lab are as followsName Composition Purpose Acetic acid 100% acetic acid Wafer cleanAcetone 99-100%acetone SolventAluminum etch 71-73% Phosphoric acid5-15% water9-11% nitric acid1-3% acetic acidEtch aluminumAmmonium fluoride 40% ammonium fluoride60% waterOxide etchAmmonium hydroxide 29% ammonium hydroxidewaterWafer cleanAZ300T 4% Tetramethylammonium hydroxide41% N-methylpyrrolidone, NMP, 1-methyl-2-pyrrolidinone55% Propylene glycol, 1, 2-propane-diolremove photoresistAZ 351 <10% sodium borates>90% water Developer for 1512 and 1518AZ 400K <15% Potassium borates>85% water Developer for 4620 and 9260AZ 1512 75% 1-methoxy-2-propanol acetate Thin Photoresist<25% Cresol novolak resin<10% diazonapthoquinonesulfoniestersAZ 1518 71% 1-methoxy-2-propanol acetate<30% Cresol novolak resin<10% diazonapthoquinonesulfoniestersThin (~2um) PhotoresistAZ 4620 62% 1-methoxy-2-propanol acetate<35% Cresol novolak resin<5% diazonaphthoquinonesulfoniestersThick photoresistAZ 9260 57% 1-methoxy-2-propanol acetate <40% Cresol-novolak resin<5% DiazonaphthoquinonesulfonicestersThick photoresist10:1 BOE 40% ammonium fluoride5% hydrogen fluoride55% water0.2% surfactantetch oxideChromium etch (TFD) 5-10% Ceric Sulfate5-10% Nitric Acid1-5% Sulfuric Acid75-89% WaterEtch chromiumCopper etch (Type 100/200) 30% ferric chloride 3-4% hydrochloric acidwaterEtch copperEKC 830 50-60% 2-(2-Aminoethoxy) Ethanol 40-50% N-Methyl PyrrolidoneRemove photoresistFuturrex 2.27% tetramethyl ammonium hydroxidewaterNegative resist developerGold Etch (TFA) 1-10% iodine complex20-40% potassium iodide50-79% waterEtch goldHMDS 100% Hexamethyl disilazane Adhesion promoter Hydrocholoric acid 37% hydrogen chloridewaterremove metalsHydrofluoric acid 49% HFwateretch oxide, nitrideHydrogen peroxide 30% hydrogen peroxidewaterOxidizerIsopropyl alcohol 100% 2-propanol solventNanostrip 90% sulfuric acid5% peroxymonosulfuric acid<1% hydrogen proxideRemoves organics, metals Nickel etch TFB 10 to 20% nitric acid Electroless plating<1% Potassium PerfluoroalkylSulfonate80 to 90% waterNitric acid 70% nitric acid etchantP-20 20% Hexamethyl disilazane80% 1-methoxy-2-propyl acetateAdhesion promoterPad etch 1 31-35% acetic acid12-16% ammonium fluoride51-55% waterOxide etchPad etch 4 30-34% acetic acid11-15% ammonium fluoride4-8% glycol47-51% waterOxide etchPalladium Etch (TFP) 30% ferric chloride3-4% hydrogen chloride66-67% water**this is the same as copper etch 100*Etch palladiumPhosphoric acid 74-95%waterEtch nitridePolyimide Coating 30-60% n-methyl-2-pyrollidone5-10% tetraethylene glycol diacrylate30-60% photosensitive polimide resin1-5% proprietary ingredientsPlanarization “oxide”Polyimide Developer (HD Microsystems) >60% cyclohexanone30-40% 4-butyrolactoneDeveloperPolyimide Rinse 10-30% cyclohexanone>60% butyl acetaterinsePotassium hydroxide 45% potassium hydroxidewater Etch silicon with nitride maskQZ3501 polyimide developer 60-80% dihydrofuranone20-40% butyl acetatedeveloperR19180 polyimide developer 10-30% cyclohexanone>60% butyl acetatedeveloperRD6 Negative Resist Developer 97-98% water2-3% tetramethyl ammoniumhydroxidedeveloperSilver Etch (TFS) 3-10% iodine complex18-42% potassium iodide48-79% waterEtch silverSPR 220 30-52% Ethyl lactate15-25% anisole1-10% diazo photoactive compound14-40% Cresol Novolak Resin1-5% 2-Methyl Butyl Acetate2-7% n-amyl acetateThick resistSTR 1075 48-53% Ethyl lactate1-5% n-butyl acetate1-10% diazo photoactive compound30-40% Cresol Novolak Resin1-5% xylene<1% organic siloxane surfactantThick resistSU8 developer 100% methoxy-2propyl acetate developerSulfuric acid 98% sulfuric acid remove organics, metalsSylgard silicone elastomer curing agent 59% Dimethyl, methyl hydrogensiloxane13% Dimethyl vinylated andtrimethylated silicaCuring agentXP SU-8 10 40-45% Gamma butyrolactone55-60% Mixed triarylsulfonium/hexafluoroantimonate saltNegative photoresistXP SU-8 developer 98-100% 1-methoxy-2-propyl acetate DeveloperTMAH 25% tetramethylammonium hydroxide75% waterAnisotropic etch3.0SafetyA buddy system applies to the use of chemicals after normal working hours: anotherknowledgeable user should be in the clean room, aware of your situation, and closeenough to be of assistance if you have an accident.3.1 Heat3.1.1 Hot plates used for heating chemicals must be attended. You must be in the cleanroom and near the hot plate when it is on.3.1.2Check that each container you use on a hotplate is approved for hotplate use.3.1.3 The wafer baking hot plates are not to be used with chemicals.3.2 Chemical Vapor3.2.1 When working with chemicals, always use the vented chemical hoods.3.2.2 Wear appropriate personal protective equipment.3.2.3 Keep your head above the Plexiglas especially whenmixing, pouring, andheating.3.2.4 Pour only approved chemical mixtures.3.2.5 If you can smell chemicals while you are processing wafers, find out why. Youmay have chemicals on your lab coat or gloves. Fresh gloves are available on topof the resist cabinet. Fresh lab coats are available in the gowning room. Theremay also be contaminated trash in the unvented waste basket. Be sure to worktoward the back of the fume hood. Clean the outside of bottles thoroughly, beforeputting them back in the chemical cabinet.3.3 Fire3.3.1 When working with chemicals, always use the vented chemical hoods.3.3.2 Check chemical flashpoints before heating. Do not heat chemicals to temperaturesnear their flashpoints. Do not heat solvents above 120 degrees C.3.3.3 Chemicals on hotplates must be attended.3.3.4 Be particularly careful with solvents like acetone around heat sources or oxidizers(peroxide or nitric acid).3.4 Contact burns3.4.1 Wear appropriate personal protective equipment.3.4.2 Keep work area clean and dry.3.4.3 Add acid to water. Do not add water to acid.3.4.4 Add peroxide to sulphuric, when pouring pirahna.3.4.5 Pour only approved chemical mixtures.3.5 Reproductive effectsUsers who are pregnant should discuss laboratory use with the lab manager assoon as possible. This need not severely restrict laboratory use but shouldnonetheless be discussed (see MSDS of photoresist). Be aware that there aremany different names for the same photoresist solvents4.0Supplies4.1Personal Protective EquipmentAprons, orange chemical resistant gloves, and face shields are available for use at thechemical hoods. Select an appropriate size orange glove. Check gloves for holes before each use; discard them if they have holes. Wear gloves to open cabinets, sign the log.Wash gloves when they become contaminated. Do not touch door knobs, notebooks,phone or microscope with gloves on. Wash and dry gloves when you are done; hangthem up on the rack. Wipe off aprons as needed and return them to the rack.4.2LabwareClean glassware and plastic ware are available for lab users. To prevent crosscontamination, many dishes are labeled. When you are done with your glassware, please empty it into the appropriate container, clean it, rinse three times, dry it and leave it upside down on the glassware shelf. Do not store WTC supplies on your own shelf.You may bring in your own labware labeled with your name; glassware not labeled with anyone’s name belongs to WTC.4.3ChemicalsThe lab stocks and supplies the chemicals commonly required for processing in thefacility. As we have limited storage, please get staff approval to store custom solutions.Mix only enough to use each day. In most cases, the shelf life of these chemicals is very short anyway. All special chemicals and solutions must be labeled with the arrival dateand the owner's name and phone number. Expired chemicals or chemicals older than 1year will be periodically disposed of.The exception is with photoresist, where each group may have a few private smallbottles of resist; these are kept in several small plastic boxes in the yellow vented cabinet next to the spinners. Before you decide to use your own bottles, consider that positive resist has a very limited life at room temperature. Those people using the WTC bottlesare getting much fresher resist than those who use their own bottles to store a six-month supply. Please clean the outside of all resist bottles thoroughly after each use tominimize solvent odor in the resist cabinet.Working stocks of chemicals are kept in the chemical cabinets near each chemical area.Extra stock is kept in several chemical bunkers outside the lab. When a chemical hasbeen used up, write it on the white board in the gowning room, so staff can replenish the clean room stock from the bunker.4.4Emergency Response Equipment4.4.1Phone systemPhones are located at the entrance to the laboratory, as well as severalplaces within the laboratory. These are part of the university phonesystem. In an emergency, dial 9-911. You may request help for largechemical spills, accidents, medical emergencies, injuries, etc. For minoremergencies, staff contact information is available next to each phone.4.4.2Chemical spill cartSpill control pads are available on the spill cart for absorbing liquidchemical spills. Bottles of neutralization liquid are available for use onacid spills. Gloves, full protective coveralls, a squeegee, scoop pan,calcium gluconate gel and other useful items are located in or near thechemical spill cart. It is located in the grey area. A vacuum cleaner is alsoavailable for cleaning up powdered residue from neutralized chemicalspills.4.4.3Emergency showersEmergency showers and eye washes are located in each room of thelaboratory. Most chemical burns, particularly in the eyes,should bewashed for 15 minutes before seeking further medical attention.4.4.4First aid kitA first aid kit is available on the wall of the gowning room. Tubes ofcalcium gluconate gel are available at the HF wet bench and on thechemical spill cart for application to HF burns. This should be appliedpromptly, but is not a substitute for medical attention.5.0Operating Procedures5.1 Set up5.1.1 Get approval for any new chemicalIf your exact chemical is not currently in use in the lab, you must get approvalfrom the lab manager before bringing the chemical into the lab. You will beexpected to supply the appropriate MSDS, a reason why this chemical should beused in the lab, and an explanation of how it is compatible with lab usage.5.1.2 Read the MSDS for each chemical you plan to use.PPEappropriate5.1.3 SelectSafety glasses should be worn at all times in the laboratory. When pouringchemicals, wear face shield, orange gloves, acid apron. When moving wafersfrom acids to dump rinsers, operators should wear orange gloves and acid apron.stationappropriate5.1.4 SelectAcids are used at wet bench #3. Bases and acids are used at wet benches #4Solvents may only be used at the solvent station (bench #12) and resist coatingstations, never at the acid station. Log in to workbench as necessary.5.1.5 Decide whether it is necessary for you to pour your own chemicals, or whetheryou can safely use chemicals maintained by staff for lab users. In general, it issafer to use lab solutions than to pour your own. If you are concerned about theage of the solution or potential cross-contamination, you may be able to scheduleyour work, so that you use the lab chemicals immediately after they are poured(every two weeks). If you see obvious contamination in the chemical, notify labstaff, so that fresh chemicals can be poured.5.1.6 Select appropriate containerSelect a dish labeled with the specific chemical name you will be using. Do notput chemicals in a dish that is labeled with another chemical name. If there is nodish for your chemical, use an unlabeled, compatible dish. Toconserve onchemicals, select the smallest dish that is appropriate for the job. Do not pour HFinto glass or metal dishes. Dishes for heated solutions must be hotplate-compatible.5.1.7 Label containerLabel dish with a Sharpie (your name, chemical name, concentration, date, andphone number)5.1.8Select chemical bottleWhen selecting a bottle to pour, finish any open bottles before opening new ones.Be sure the concentration of the chemical is correct.5.1.9Pour solutionbottle. Replace chemical bottles in the appropriate place in the cabinet. Coverany chemical not immediately in use.5.1.10 Wash bottles that you have emptied.Cross out the label on any chemical bottle you have emptied, rinse three times,and write “rinsed” with a Sharpie at the top of the bottle. Place rinsed bottles onthe bottom shelf of the waste chemical cabinet.5.1.11 Prepare hotplateHot plate controllers are located above the Plexiglass shield. Set temperature. Putchemical solution on the hotplate. Use an appropriate thermometer to monitor thetemperature. Do not leave the lab when the hotplate is on.5.2 Dip—Acid or Base5.2.1 Select appropriate sample holderParts to be dipped in chemicals should be in a holder. When immersing wafers inchemicals, 3” and 4” Teflon cassettes are available. Attach a Teflon handle to thecassettes. Single wafer Teflon carriers can also be used. For parts that are notwhole wafers, there are perforated T eflon ladles, as well as a small Teflon rack for tiny parts. Tweezers may be sufficient for immersing single wafers in a smallamount of developer, but are not appropriate for use in acids.5.2.2 Ensure proper PPEWhen moving wafers from acids to dump rinsers, operators should wear safetyglasses, orange gloves and an apron.5.2.3 Determine appropriate dip timeYou can determine proper time by checking in reference material, checkingprevious entries in the log book, or doing an etch rate check. To do an etch ratecheck, use a silicon wafer with the same film you are trying to etch. Measure film thickness with the Nanospec. Etch the wafer for a specified time (say, 1 minute).Then re-measure the wafer on the Nanospec. You can then calculate etch rate inAngstroms/minute. Calculate etch time by dividing film thickness on yoursample by etch rate.5.2.4 Dip sampleSet timer for the proper time, then start timer as you lower sample into thesolution. Do not sit down at the hood while processing wafers, as this positiondoes not protect your face from fume exposure.5.2.5 Remove sample from solution5.2.6 Place sample still in its container into dump rinser or cascade rinserControllers are located in the control panel above the Plexiglass. Set dump rinser for at least three cycles by pushing “cycle count” until the display reads thenumber of cycles you want (at least 3). Push “start.” When wafers are doneprocessing, push “stop,” and remove the wafers.Cascade rinser can be started by pushing “run.” When carrying wafers from onebench to another, put the wafer container in a tub to avoid dripping. If wafers areespecially fragile, you can manually rinse them in tubs of water. Use at least fivechanges of water.5.2.7 Dry sample in spin rinse dryer or under nitrogen gun.After a complete rinse, whole wafers can be put in the spin rinse dryer. Do notput unrinsed wafers in the spin rinse dryer. Substrates other than whole waferscan be dried with a nitrogen gun. Check the pressure coming out of the nitrogengun before using it on your substrate, as some have a gentle flow, and others areforceful. Fragile wafers can be dried in the vacuum oven located under theBranson barrel asher.5.3 Dip—solvent5.3.1 Use heated EKC830 and AZ 300T to strip positive photoresist. Temperatureshould be set at 75 degrees for the EKC and 90 degrees for the AZ300T.5.3.2 Allowed materials in this tank are silicon, quartz, aluminum, and positivephotoresist. Materials not allowed in this tank are water, negative photoresist andother polymers like polyimide. Water will form hydroxyls that will pit aluminum,creating a problem for some users.5.3.3 Typical strip times are 10 minutes in EKC, and 10minutes in AZ300T.5.3.4 If you would like to use EKC, but your wafer has a material not allowed, you maypour up your own batch in a separate container, but you may not use the generaltank.5.3.5 Be sure to use Teflon cassettes.5.3.6 Bring a tub of plain water over to the station to use to carry your wafers to thedump rinser.5.4 Clean up5.4.1 Squirt wet deck with DI water, and wipe down with squeegee, then towel5.4.2 Dispose of solutionPlease dispose of chemicals as soon as you are finished. Chemicals left in thehood for more than 24 hours are subject to disposal. Hot or reacting mixtures maybe left a reasonable amount of time to settle down.5.4.2.1 Aspirate acids and basesAspirator is located in the Microvision wet bench. Put the aspirator tubein the solution, and step on the pedal on the floor. Aspirator will suck upchemical into the acid neutralization system. Do NOT aspirate solvents,as they are an explosion hazard in the acid neutralization system.5.4.2.2 Put solvents in designated carboysPut the carboy in the dishwashing sink, or the ventedchemical cabinet topour. Use a funnel. Wipe sides of container. Return it to the properstorage area. The acetone/IPA waste is located on the bottom shelf of theyellow, ventilated cabinet next to the spinners.5.4.2.3 Put other chemicals into labeled containers in waste chemical storage.5.4.2.3.1.1Using the bottle labeled for your chemical.Carry the waste bottle to the appropriate sink, and use afunnel to transfer your waste. Leave two inches at the topfor thermal expansion, and put the cap on. Do not put solid caps on any bottle containing hydrogen peroxide (H2O2). It continues to decompose for months and must be stored in avented container. Wash any residue from the outside of the container. Return waste container to the waste cabinet. Ifyou have filled the existing waste bottle, make a new one.5.4.2.3.1.2Making a new waste chemical bottle.If there is no bottle with the proper chemical name, get aclean, dry bottle from the bottom shelf of the chemical waste cabinet, get an EH&S label, and label the bottle properly. Be sure that the bottle type is compatible with the chemical you are disposing; if in doubt, ask! Chemicals left withoutproperly labeling will be assayed by Environmental Health and Safety, and your budget number will be billed.5.4.2.4 Do not pour anything except rinse water and AZ developer down thedrain.5.4.3 Wash and dry lab ware and return it to the proper shelf5.4.4 Final checkRemove beakers, towels, chemical and liquid residue from the wet decks. Thework surface should be clean and dry when you leave.5.5 Accidents5.5.1 Spills5.5.1.1 You are primarily responsible for cleaning up any minor chemical spillyou cause, using safe and approved procedures. Do not dispose ofcontaminated rags and broken chemically laden glass in the normal wastebaskets. You should rinse the waste articles and bag them. Bags arelocated in the gowning room in the large cabinet. Label the bags, leavethem in a ventilated area and seek assistance from a staff member onfurther disposal.5.5.1.2 Request assistance from staff for any significant spill. We will assist you,using the materials on the chemical spill cart located in the grey area nextto the tool box, which has supplies like tape to block off spill area, spillcontrol pads, and neutralizers.5.5.2.3 For major chemical spills and for any unanticipated chemical reaction,evacuate the area, and call the staff. You must remain available to provideinformation. Any user may call for an evacuation of the laboratory at anytime. These "requests" must be honored by all users until such time as thesituation is evaluated. Alternatively, you may evacuate the laboratoryusing the fire alarm in justified instances. You must first exit thelaboratory to find an alarm pull box next to the building exits.5.5.3.4 Significant events must be reported in writing, so that corrective actioncan be taken to prevent future problems, on a time scale appropriate to theseverity of the event.5.5.2 Chemical Exposure5.5.2.1 Flush affected area immediately with large quantities of water for at leastfifteen minutes. Use the sink, the safety shower, or the eyewash station asappropriate.5.5.2.2 Remove any contaminated clothing immediately.5.5.2.3 For HF exposures only, after flushing the area for a couple of minutes withwater, spread affected area liberally with calcium gluconate gel, located atthe HF wet bench and on the chemical spill cart. Wear clean gloves whenapplying the gel to prevent secondary HF burns to the hands.All HFburns, no matter how seemingly trivial, should be consideredserious andproper medical treatment sought. Note: BOE is a dilute solution of HF.5.5.2.4 Minor medical treatment is available from Hall Health occupational healthand safety staff. Major medical treatment is available from HarborviewMedical Center. If you go for medical treatment, take the MSDS of therelevant chemicals from the gowning room to the medical staff to aid inprompt, appropriate medical treatment. Paramedic services are availableby dialing 9-911 from the lab phone.5.5.2.5 Notify lab staff immediately about any chemical exposures, and providewritten documentation as necessary, so that proper follow up can be done.6.0 Chemical Mixtures Approved for Lab UseDo not mix solvents with acids (potentially flammable). Do not mix organicswith peroxides (potentially explosive). You may not arbitrarily mix chemicalstogether. Only specifically approved solutions can be made. Solutions not on thischart should be checked with the lab manager.Name CompositionTemperature(°C)Removes Silicon etch 6parts acetic acid19 parts nitric acid1 part hydrofluoricacidRoom temperature silicon Piranha 4 part sulphuric acid 1 parts hydrogen peroxide Reaction is exothermic will raisetemp to 110-140°organicsSC1 1 part ammonium hydroxide1 parts hydrogen peroxide5 parts DI water 70 particles, organics(Makes surface hydrophilic)SC2 1 part hydrochloric acid1 part Hydrogenperoxide5 parts DI water70 metallicsAqua regia 3.896 parts HCl (37%)1 part nitric acid(70%) etchesgold,platinumTitanium etch 20 parts DI water1 part H2O21 part HFRoom Temp Etches titanium7.0 Processes Approved for Lab Use7.0.1Prefurnace clean: Nanostrip (5 min), BOE (10 sec), SCI (5 min) and SC2 (5 min)8.0RevisionsRevision Initials Date PurposeA ACT 8/28/2003 format, waste chemical procedure, chemical contents,mixtures, revisionsB ACT 1/20/2004 Add wet strip criteriaC MEH 8/31/2005 Updated chemical list。
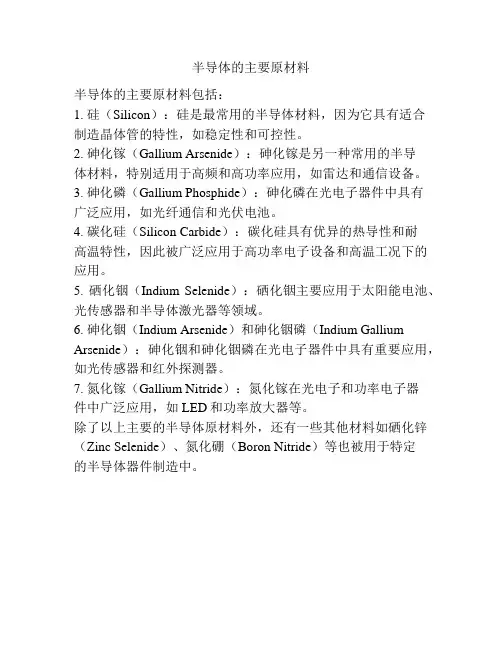
半导体的主要原材料
半导体的主要原材料包括:
1. 硅(Silicon):硅是最常用的半导体材料,因为它具有适合
制造晶体管的特性,如稳定性和可控性。
2. 砷化镓(Gallium Arsenide):砷化镓是另一种常用的半导
体材料,特别适用于高频和高功率应用,如雷达和通信设备。
3. 砷化磷(Gallium Phosphide):砷化磷在光电子器件中具有
广泛应用,如光纤通信和光伏电池。
4. 碳化硅(Silicon Carbide):碳化硅具有优异的热导性和耐
高温特性,因此被广泛应用于高功率电子设备和高温工况下的应用。
5. 硒化铟(Indium Selenide):硒化铟主要应用于太阳能电池、光传感器和半导体激光器等领域。
6. 砷化铟(Indium Arsenide)和砷化铟磷(Indium Gallium Arsenide):砷化铟和砷化铟磷在光电子器件中具有重要应用,如光传感器和红外探测器。
7. 氮化镓(Gallium Nitride):氮化镓在光电子和功率电子器
件中广泛应用,如LED和功率放大器等。
除了以上主要的半导体原材料外,还有一些其他材料如硒化锌(Zinc Selenide)、氮化硼(Boron Nitride)等也被用于特定
的半导体器件制造中。


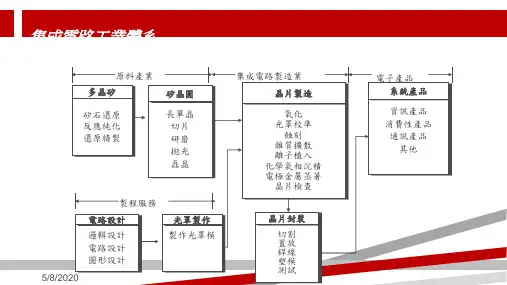
半导体工艺及芯片制造复习资料简答题与答案第一章、半导体产业介绍1 .什么叫集成电路?写出集成电路发展的五个时代及晶体管的数量?(15分)集成电路:将多个电子元件集成在一块衬底上,完成一定的电路或系统功能。
集成电路芯片/元件数 无集成1 小规模(SSI )2到50 中规模(MSI )50到5000 大规模(LSI )5000到10万 超大规模(VLSI ) 10万至U100万 甚大规模(ULSI ) 大于100万 产业周期1960年前 20世纪60年代前期 20世纪60年代到70年代前期 20世纪70年代前期到后期 20世纪70年代后期到80年代后期 20世纪90年代后期到现在2 .写出IC 制造的5个步骤?(15分)Wafer preparation (硅片准备)Wafer fabrication (硅片制造)Wafer test/sort (硅片测试和拣选)Assembly and packaging (装配和封装)Final test (终测)3 .写出半导体产业发展方向?什么是摩尔定律?(15分)发展方向:提高芯片性能一提升速度(关键尺寸降低,集成度提高,研发采用新材料),降低功耗。
提高芯片可靠性一严格控制污染。
降低成本——线宽降低、晶片直径增加。
摩尔定律指:IC 的集成度将每隔一年翻一番。
1975年被修改为:IC 的集成度将每隔一年半翻一番。
4 .什么是特征尺寸CD ? (10分)最小特征尺寸,称为关键尺寸(Critical Dimension, CD ) CD 常用于衡量工艺难易的标志。
5.什么是 More moore 定律和 More than Moore 定律?(10 分)“More Moore”指的是芯片特征尺寸的不断缩小。
从几何学角度指的是为了提高密度、性能和可靠性在晶圆水平和垂直方向上的特征尺寸的继续缩小。
与此关联的3D结构改善等非几何学工艺技术和新材料的运用来影响晶圆的电性能。
半导体工艺常用材料
半导体工艺常用的材料有硅(Si)、锗(Ge)、砷化镓(GaAs)、磷化铟(InP)、氮化镓(GaN)等。
这些材料具有特殊的电子特性,可以用于制
造各种半导体器件,如晶体管、集成电路、光电子器件等。
其中,硅是最常用的半导体材料,因为它在地壳中丰度高、成本低,并且具有优良的物理和化学性质。
此外,其他材料如锗、砷化镓、磷化铟等也常用于特殊领域。
在半导体工艺中,除了半导体材料本身外,还需要使用各种掺杂剂、胶体二氧化硅等辅助材料。
掺杂剂是用来改变半导体材料的电学特性,使其具有更优良的导电性能。
胶体二氧化硅则常用于制备光子晶体、微处理器、电容器等器件,其制备基于流体催化技术,通过高温氧化硅沉淀在基底表面制成。
总之,半导体工艺中需要使用多种材料,每种材料都具有独特的特性和用途。
随着科技的不断进步,新的半导体材料和工艺技术也不断涌现,为未来的电子工业发展提供了更多可能性。
半导体化学原料
半导体化学原料是指用于半导体制造中的各种化学物质。
半导体材料通常由单晶硅和其他元素组成。
在制备半导体材料过程中,需要使用各种化学原料,例如气相沉积法中使用的气体,溶液中使用的溶剂和溶质。
这些化学原料的质量和纯度对最终产品的性质和性能有着至关重要的影响。
半导体化学原料的种类繁多,包括气体、液体和固体三种状态的物质。
其中比较常见的化学原料有:氯化硅、三氯化铝、氟化氢、氯化氢、溴化氢、二甲基硅烷、磷酸二乙酯、磷酸三甲酯等。
半导体化学原料在半导体工业中的应用非常广泛。
例如,气相沉积法中的SiH4和NH3可用于生产硅和氮化硅材料;氯化硅、三氯化铝和氯化氢等可用于化学气相沉积法和物理气相沉积法中生产硅和金属氧化物等材料;磷酸三甲酯和磷酸二乙酯可用于生产磷化硅等半导体材料。
半导体化学原料的纯度和质量对半导体产品的性能和品质有着很大的影响。
因此,在半导体制造过程中必须严格控制化学原料的纯度,以确保最终产品的稳定性和可靠性。
同时,半导体化学原料的使用也需要遵循严格的安全措施,以避免化学物质对人体的伤害和环境的污染。
- 1 -。
半导体用化学品1. 引言半导体材料在现代电子技术中起着至关重要的作用。
半导体器件的制造过程需要使用各种化学品,这些化学品在半导体工业中被称为半导体用化学品。
半导体用化学品的质量和纯度对于半导体器件的性能和可靠性有着重要的影响。
本文将介绍半导体用化学品的种类、应用以及其在半导体制造过程中的重要性。
2. 半导体用化学品的种类半导体用化学品的种类繁多,根据其应用和功能可以分为以下几类:2.1 清洗剂清洗剂是半导体用化学品中最常见的一类。
它们用于去除半导体表面的杂质和污染物,以确保器件的性能和可靠性。
常见的清洗剂包括有机溶剂、酸碱溶液和超纯水等。
有机溶剂可溶解有机污染物,酸碱溶液可中和表面的酸碱物质,而超纯水则用于冲洗和去除残留物。
2.2 蚀刻剂蚀刻剂用于在半导体材料表面进行选择性腐蚀,以形成特定的结构和图案。
常见的蚀刻剂包括氢氟酸、氯化氢和硝酸等。
不同材料需要使用不同的蚀刻剂,以实现所需的蚀刻效果。
2.3 沉积剂沉积剂用于在半导体表面沉积薄膜,以改变材料的性能和结构。
常见的沉积剂包括化学气相沉积(CVD)和物理气相沉积(PVD)等。
CVD使用气体反应产生沉积物,而PVD使用物理方法将材料蒸发或溅射到表面。
2.4 阻挡剂阻挡剂用于在半导体制造过程中保护某些区域不受化学反应的影响。
常见的阻挡剂包括光刻胶和电子束曝光胶等。
它们在暴露后可以形成图案,以控制材料的沉积、蚀刻和清洗等过程。
3. 半导体用化学品的应用半导体用化学品在半导体工业中扮演着重要的角色。
它们的应用涵盖了半导体器件制造的各个方面。
3.1 清洗和预处理在半导体器件的制造过程中,清洗和预处理是不可或缺的步骤。
清洗剂用于去除器件表面的有机和无机杂质,以提高器件的可靠性和性能。
预处理化学品用于改变器件表面的化学性质,以便于后续的蚀刻、沉积和阻挡等工艺步骤。
3.2 蚀刻和沉积蚀刻剂和沉积剂在半导体制造过程中起着至关重要的作用。
蚀刻剂可用于制造微细结构和图案,如通道、电极和孔洞等。