TB351-RU、TB351-RU(B)使用手册
- 格式:pdf
- 大小:93.52 KB
- 文档页数:3
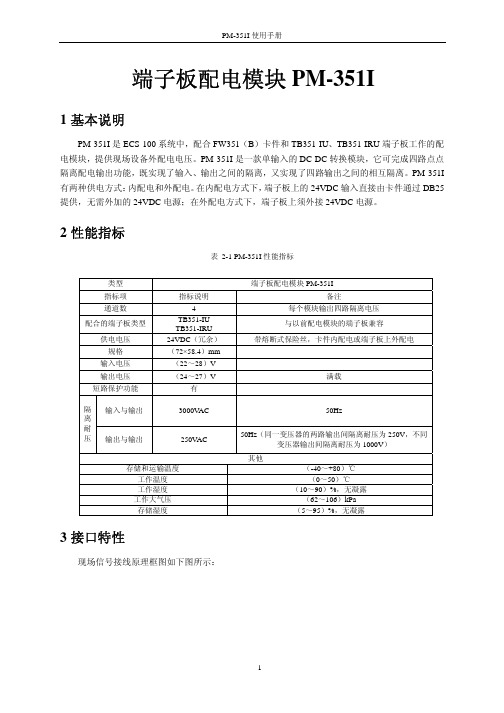
端子板配电模块PM-351I1 基本说明PM-351I 是ECS-100系统中,配合FW351(B )卡件和TB351-IU 、TB351-IRU 端子板工作的配电模块,提供现场设备外配电电压。
PM-351I 是一款单输入的DC-DC 转换模块,它可完成四路点点隔离配电输出功能,既实现了输入、输出之间的隔离,又实现了四路输出之间的相互隔离。
PM-351I 有两种供电方式:内配电和外配电。
在内配电方式下,端子板上的24VDC 输入直接由卡件通过DB25提供,无需外加的24VDC 电源;在外配电方式下,端子板上须外接24VDC 电源。
2 性能指标表 2-1 PM-351I 性能指标3 接口特性现场信号接线原理框图如下图所示:类型 端子板配电模块PM-351I指标项 指标说明备注通道数4每个模块输出四路隔离电压 配合的端子板类型TB351-IUTB351-IRU与以前配电模块的端子板兼容供电电压 24VDC (冗余)带熔断式保险丝,卡件内配电或端子板上外配电规格 (72×58.4)mm 输入电压 (22~28)V 输出电压 (24~27)V满载 短路保护功能 有输入与输出3000V AC 50Hz隔离耐压输出与输出 250V AC50Hz (同一变压器的两路输出间隔离耐压为250V ,不同变压器输出间隔离耐压为1000V ) 其他存储和运输温度 (-40~+80)℃ 工作温度 (0~50)℃工作湿度 (10~90)%,无凝露 工作大气压 (62~106)kPa 存储湿度(5~95)%,无凝露图 3-1配电模块接口特性图(以TB351-IRU为例)如上图所示,配电模块PM-351I和端子板上的接插件连接,通过端子板上的端子给外接变送器提供电压。
现场的电流信号通过采样电阻转换为电压信号后,通过DB25返送到卡件。
TB351-IU、TB351-IRU和现场信号的连接请分别参见《TB351-IU接线端子板使用手册》和《TB351-IRU接线端子板使用手册》。
SEL-351方向过电流继电器重合闸继电器故障定位器使用手册1998年5月8日SCHWEITZER ENGINEERING LABORATORIES, INC.2350 NE HOPKINS COURTPULLMAN, WA USA 99163-5603TEL:(509)332-1890 FAX:(509)334-8280本中文翻译本手册是在英文版的SEL-321-5使用手册(1998年5月29日)基础上翻译而成,作为中国用户的使用参考。
使用手册含义的准确性以SEL公司出版的英文版使用手册为准。
本使用手册涉及的所有软件版本、系统接线图、继电器命令控制字和继电器报文均受到美国版权法律和国际间协议条款的保护。
保留所有的版权。
本手册涉及的软件不可以被复制、改变、分离或反演设计,而且也不可以向第三者提供。
SELogic是SEL公司的注册商标,不准翻录。
目录第一部分:简介和特性................................................................................ 1-1 SEL-351继电器型号 ....................................................................................................................... 1-1使用手册章节概述........................................................................................................................... 1-2 应用................................................................................................................................................... 1-4 硬件连接特性................................................................................................................................... 1-5 通讯连接........................................................................................................................................... 1-8 基本特性........................................................................................................................................... 1-9 信号处理参数.......................................................................................................................... 1-11 保护元件整定范围和精度...................................................................................................... 1-11 瞬时/定时限过流元件...................................................................................................... 1-11 反时限过流元件............................................................................................................... 1-11 低电压(27)/过电压(59)元件 ............................................................................................ 1-12 同期检测元件................................................................................................................... 1-12 低频/高频元件......................................................................................................................... 1-12 计时器...................................................................................................................................... 1-12 变电站电源电压监视.............................................................................................................. 1-12 表计精度.................................................................................................................................. 1-12 功率元件精度.......................................................................................................................... 1-13表格表格1.1:SEL-351继电器型号 ..................................................................................................... 1-1图形图1.1:SEL-351继电器在电力系统中的应用 ............................................................................. 1-4 图1.2:SEL-351继电器输入、输出和通讯串口(型号0351xM)........................................... 1-5 图1.3:SEL-351继电器的输入、输出和通讯串口(型号0351x0,0351x1和0351xJ;型号0351x1和0351xJ具有附加I/O板-见下图)................................................................................ 1-6 图1.4:SEL-351继电器附加I/O板(型号0351x1和0351xJ;主板显示在上图)................ 1-7 图1.5:SEL-351继电器通讯连接举例 ......................................................................................... 1-8第一部分:简介和特性本部分包括下面的SEL-351继电器概述:SEL-351继电器型号使用手册章节应用硬件连接特性通讯连接基本特性SEL-351继电器型号本使用手册包括下面的SEL-351继电器型号:表格1.1:SEL-351继电器型号型号来自SEL-351继电器定货信息清单。

BlueParrottB350-XTUser Manual BPB-35020© 2019 GN Audio A/S. All rights reserved. BlueParrott® is a trademark of GN Audio A/S. The Bluetooth® word mark and logos are registered trademarks owned by the Bluetooth SIG, Inc. and any use of such marks by GN Audio A/S is under license.Made in ChinaMODEL: OTE9211. Welcome (4)2. BlueParrott B350-XT overview .52.1 Included accessories3. How to wear (6)4.1 Adjust headband tension4. How to charge (8)5. How to connect (10)5.1 Power on/off5.2 Pair to your smartphone5.3 Connect to your smartphone using NFC6. How to use (13)6.1 Calls6.2 The Parrott Button TM6.3 Multiple call handling6.4 Voice commands6.5 Multipoint mode6.6 How to reset7. BlueParrott app (18)8. Support (19)8.1 FAQ8.2 How to care for your headset1. WelcomeThank you for using the BlueParrott B350-XT. We hope you will enjoy it!BlueParrott B350-XT features• Blocks out 96% of background noise• Up to 24 hours of talk time• Customizable Parrott Button TM• Tough, IP54-rated design• Improved, more comfortable headband• VoiceControl TM• Large, easy-to-press buttons• Wireless range of up to 300 feet/100 meters2. BlueParrott B350-XToverview2.1 Included accessories3.How to wear3.1 Adjust headband tensionIf the headband feels too tight or too loose, it is possible to reshape the metal part of the headband for a more comfortable fit.To adjust the tension of the headband, firmly grip the headset and stretch out, or squeeze in, the metal to reshape it to your preference. You may need to use considerable force to adjust the shape of the headband.4. How to chargeTo charge the headset, connect the USB charging cable to the headset’s USB charging port. It is recommended to charge the headphones using the supplied charging cable, however it is possible to use a compatible charger. It takes approx. 3.5 hours to fully charge the battery.While charging, the LED indicator shows the charging status. Red indicates the headset is charging. Blue indicates the headset is fully charged.Charging Fully charged5. How to connect5.1 Power on/offPress and hold the Multifunction button until the LED flashes red and you hear “Power on” orPower on Power off5.2 Pair to your smartphone1. Ensure the headset is powered off.2. Press and hold the Multifunction button until you hear “Power on”. Continue to hold the button for approx. 6 more seconds until the LED flashes alternating blue and red and you hear “Pair mode”. The headset is now ready to pair.3. Go to the Bluetooth menu on your25.3 Connect to your smartphone usingNFC1. Ensure your headset is powered on, and that NFC is enabled on your smartphone.2. Place the NFC zone of your smartphone against the NFC zone of the headset until your smartphone confirms the connection.6.Assistant (i.e. Siri, Press theMultifunction buttonbuttons simultaneouslyRedial last number button until you hearAlternatively, press andhold(2 sec) the6.2 The Parrott Button TMBy default, the Parrott Button activates your voice commands when not on a call, or mutes the microphone when you are on a call. However, the button can be configured for other functions, such as speed dial.To change the Parrott Button functionality, download and use the BlueParrott app for Android or iOS.6.3 Multiple call handlingThe headset can accept and handle multiple calls at the same time.and answer an incoming call Multifunction button twice6.4 Voice commandsTo use voice commands, press the Parrott button and issue a command. Alternatively, say “What can I say?” for a list of commands.What can I say?Provides a list of available voicecommandsPhone Command Activates the voice assistant on the connected smartphone (Siri or Google Assistant)Answer Accepts an incoming callIgnore Rejects an incoming call and forwardsit to voicemail (if available)Pair mode Puts the headset into pairing modeAm I connected?Verifies if the headset is connected to a smartphone, and will also announce the signal strength (phone dependent)Check battery Announces the battery level of the headset and the paired smartphone (if applicable)Redial Redials the last outgoing callCallback Dials the last incoming call (if # isavailable)6.5 Multipoint modeThe headset can be paired to 8 smartphones and can be connected to two at once (Multipoint mode).To connect to two smartphones, use the normal pairing process separately for each smartphone (refer to section 5).The BlueParrott B350-XT will monitor both smartphones and enable you to answer a call on either one using the headset.If you are on a call and the other smartphone receives a call, you will hear a notification in the headset.6.6 How to resetResetting the headset clears the list of paired devices.1. Ensure the headset is powered on.2. Press and hold (6 sec) both the Volume up and Volume down buttons until you hear two beeps followed by “Pair mode”, or until the LED flashes alternating red and blue.You will need to re-pair the headset to your7. BlueParrott appBlueParrott appProgram your Parrott Button TM anywhere, anytime.Push-to-talk to your contacts on Dial2Do’s MySay network.Easily access full user guidefor your headset.BlueParrott app Program your Parrott Button TManywhere, anytime.Push-to-talk to your contacts onDial2Do’s MySay network.8. Support8.1 FAQView the FAQs on /help/b350xt-BPB350208.2 How to care for your headset• To prevent the depletion of the battery lifetime or capacity, avoid storing the headset in hot or cold environments, such as a closed truck in summer or in winter conditions.• If the headset becomes dirty, it is recommended to clean it with a soft, lint-free cloth that has been dampened with clean water.• Do not store the headset for extended periods of time without recharging them (max. three months).。

多串口多协议通讯端子板TB248-RU1基本说明TB248-RU端子板为FW248R系列专用端子板,具有四路串行通道接线端子,均可支持RS-485接线及RS-232接线方式。
TB248-RU端子板支持FW248R通讯卡串行通道冗余及双卡冗余,配合通讯卡组态设置,可完成多种冗余方案。
2使用说明2.1端子板外观图TB248-RU端子板结构外形如图 2-1所示。
图 2-1 TB248-RU端子板结构外形图2.2接线端子说明TB248-RU端子板接线端子说明如表 2-1所示。
表 2-1 TB248-RU节点端子说明COM3 COM2 COM1 COM0 485+ 485- GND TX RX 485+ 485- GND TX RX 485+ 485- GND TX RX 485+ 485- GND TX RX2.3原理及接线说明TB248-RU端子板支持FW248R系列卡件4路串行通道,同时可支持FW248R卡件冗余配置和非冗余配置。
如图 2-1所示,端子板上两个DB25完全相同,对应相同信号到同一个端子,以COM0为例,原理如下:图 2-2 TB248-RU原理图单卡工作模式:将FW248R卡件的信号线所在槽位对应的DB25接口连接于TB248-RU端子板上。
对于FW248R,信号线所在DB25接口为背板所在槽位(2n+1槽位)对应的DB25。
双卡冗余模式:将TB248-RU的两个DB25接口分别连接于互为冗余的两个FW248R卡件信号线所在DB25接口,对于FW248R,信号线所在DB25接口为背板所在槽位对应的DB25接口。
接线方式如图 2-3所示。
图 2-3 双卡通道冗余模式接线示意图3资料版本说明表 3-1版本升级更改一览表资料版本号输出时间更改说明TB248-RU使用手册(V1.0)2011-07-28适用模块:TB248-RU V10.00.00。
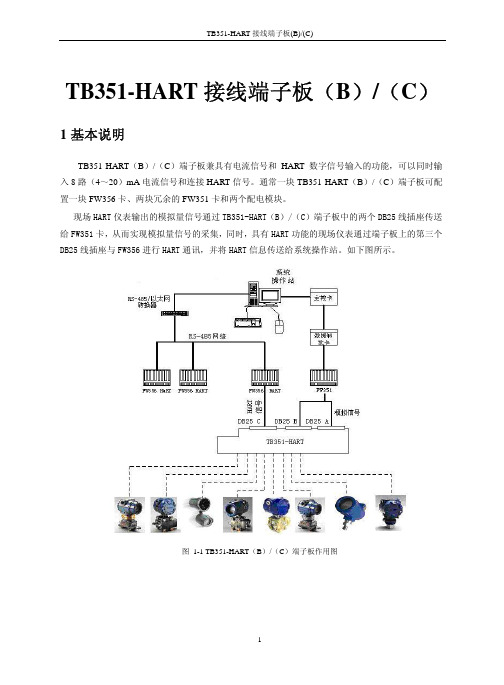
TB351-HART接线端子板(B)/(C)1基本说明TB351-HART(B)/(C)端子板兼具有电流信号和HART数字信号输入的功能,可以同时输入8路(4~20)mA电流信号和连接HART信号。
通常一块TB351-HART(B)/(C)端子板可配置一块FW356卡、两块冗余的FW351卡和两个配电模块。
现场HART仪表输出的模拟量信号通过TB351-HART(B)/(C)端子板中的两个DB25线插座传送给FW351卡,从而实现模拟量信号的采集,同时,具有HART功能的现场仪表通过端子板上的第三个DB25线插座与FW356进行HART通讯,并将HART信息传送给系统操作站。
如下图所示。
图 1-1 TB351-HART(B)/(C)端子板作用图2使用说明2.1端子板结构图TB351-HART(B)/(C)端子板结构外形如下图 2-1所示:图 2-1 TB351-HART(B)/(C)端子板外形图2.2接线原理TB351-HART(B)/(C)端子板原理图如图 2-2所示:图 2-2 TB351-HART(B)/(C)接线原理图2.3接插件说明TB351-HART(B)/(C)端子板接插件说明如表2-1所示:端子上DB1、DB2、DB3为三个DB25线插座,DB1、DB2用于FW351,DB3用于FW356。
J4、J5为配电模块插槽。
J1、J2、J3为三个接线端子排,其中J1用于HART信号,J2用于24V电源输入,J3用于RS485信号和扩展功能。
2.4跳线说明表 2-1 TB351-HART(B)/(C)端子板跳线说明标号说明使用JP1 第1路仪表配电跳线跳1-2:配电;跳2-3:不配电JP2 第2路仪表配电跳线跳1-2:配电;跳2-3:不配电JP3 第3路仪表配电跳线跳1-2:配电;跳2-3:不配电JP4 第4路仪表配电跳线跳1-2:配电;跳2-3:不配电JP5 第5路仪表配电跳线跳1-2:配电;跳2-3:不配电JP6 第6路仪表配电跳线跳1-2:配电;跳2-3:不配电JP7 第7路仪表配电跳线跳1-2:配电;跳2-3:不配电JP8 第8路仪表配电跳线跳1-2:配电;跳2-3:不配电JP9-JP14端子板电源输入跳线跳1-2:FW351供电;跳2-3:外部供电JP15 JP16配电输出24V/25.5V选择跳线跳1-2:配电输出24V;跳2-3:配电输出25.5VJP17 FW351冗余工作跳线 FW351冗余工作时插上跳线(短接)“跳1-2”表示“1-2”插上跳线。

BackBeat FIT serie 350 Guida dell'utenteSommarioPanoramica dell'auricolare3Sicurezza3Installare l'app4Associazione5Procedura di associazione5Modalità di associazione5Ricarica e montaggio6Ricarica6Ricarica rapida6Regolazione6Predisposizione del dispositivo7Informazioni di base8Accensione o spegnimento8Regolare il volume8Musica e altro8Riconnessione8Risposta e termine di una chiamata8Ripetere l'ultimo numero8Esclusione del microfono8Caratteristiche della cuffia9Assistente vocale9Risposta alle chiamate da un secondo dispositivo9Comandi vocali9Modalità DeepSleep9Supporto10Porta di ricarica Potenza Spento Comandi di aumento del volume Ricerca traccia in avanti Esclusione microfono Riproduzione/Pausa Siri, Google Now ™Assistente vocale Associazione Bluetooth ®Tasto di risposta/fine chiamata Comandi di diminuzione del volume Ricerca della traccia indietro Prima di utilizzare l'auricolare, consultare il documento "Tutela della sicurezza" per importantiindicazioni relative alla sicurezza, alla ricarica, alla batteria e alle norme vigenti.Panoramica dell'auricolareSicurezzaInstallare l'appPer ottenere il massimo dall'auricolare, scaricare la nostra app gratuita, BackBeat per iOS/Android™.L'app consente di:•Attivazione/disattivazione della funzione•Find MyHeadset•Visualizzare la guida dell'utentePer prestazioni ottimali, installare l'app BackBeat su tutti i dispositivi associati all'auricolare.Alla prima accensione dell'auricolare, viene avviata la procedura di associazione.1Accendere la cuffia premendo il pulsante centrale fino a quando non viene emessa la richiestavocale di associazione e il LED non lampeggia rosso e blu.2® sul telefono e avviare la ricerca di nuovi dispositivi.•iPhone > Impostazioni > Bluetooth > On*•Android > Impostazioni > Bluetooth > On > Ricerca*NOTA *I menu possono variare a seconda del dispositivo.3Selezionare "PLT serie BBFIT350 ".Se richiesto, immettere quattro zeri (0000) come codice o accettare la connessione.Una volta completata l'associazione, viene emesso l'avviso vocale "pairing successful"(associazione riuscita) e l'indicatore luminoso smette di lampeggiare.Esistono due modi per impostare la modalità di associazione sull'auricolare. Scegliere:•Con l'auricolare acceso, tenere premuti i pulsanti di aumento (+) e riduzione (-) del volume fino a quando non viene emesso l'avviso vocale "Associazione".•Con l'auricolare spento, tenere premuto il pulsante centrale fino a quando non viene emesso l'avviso vocale "Associazione".NOTA È possibile collegare fino a 2 dispositivi all'auricolare.AssociazioneProcedura di associazioneModalità di associazioneLo sportello che copre la porta di ricarica si trova sul lato sinistro del controller in linea. Aprirlo aiutandosi con l'unghia. Per prestazioni ottimali, caricare completamente la batteria prima dell' ricarica completa degli auricolari può richiedere fino a 2 ore. Durante la carica, l'indicatore luminoso è rosso e si spegne una volta che la ricarica è completa.Una ricarica di 15 minuti dell'auricolare consente di ascoltare musica per un massimo di un'ora.Per ottenere un audio di ottima qualità, è essenziale una corretta aderenza al canale auditivo.Provare i copriauricolari in tre diverse dimensioni per trovare quello più adatto. Per una miglioreaderenza, è possibile utilizzare copriauricolari di dimensioni diverse da un orecchio all'altro.L'incavo del copriauricolare destro è più grande del copriauricolare sinistro.1Prova del copriauricolare Inserire gli auricolari nelle orecchie e assicurarsi che il supporto perorecchio sia saldamente posizionato nell'orecchio per una migliore stabilità.scegliere quello più comodo che offre l'audio migliore.2Rimozione del copriauricolare Per rimuovere il copriauricolare, tirarlo con decisione.3Sostituzione del copriauricolare Premere il copriauricolare nel cuscinetto contrassegnato con "L" o "R" con l'incavo sul copriauricolare di gomma verso l'alto e l'incavo in plastica sollevato nelcuscinetto.Ricarica e montaggioRicaricaRicarica rapidaRegolazione4Pulizia del copriauricolare Quando è necessario, pulire i copriauricolari con una salvietta imbevuta di alcol o un batuffolo di cotone immerso in alcool isopropilico.Esistono 2 modi per utilizzare la clip fermacavetto al fine di rendere stabile l'auricolare.•FissaggioPassare il cavo dell'auricolare dietro al collo e fissare la clip all'abito indossato.•Regolazione della lunghezzaAccorciare il cavo in eccesso con la clip.Predisposizione del dispositivoPer accendere il dispositivo, premere il pulsante centrale per 2 secondi fino a quando non viene emesso l'avviso vocale "Acceso". Per spegnere il dispositivo, premere il pulsante centrale per 4secondi fino a quando non viene emesso l'avviso vocale "Spento".Premi il tasto (+) o (-) per aumentare o diminuire il volume.Ascoltate la musica, i podcast, le indicazioni di navigazione e altro audio in streaming sul dispositivo.NOTA La funzionalità varia in base all'applicazione.Riproduzione o pausa dell'audio Toccare il pulsante centrale.Passaggio al brano successivo Premere per 2 secondi il pulsante di aumento (+) del volume.Riproduzione del brano precedente Premere il pulsante di riduzione del volume fino a quando non viene emesso il tono di conferma per ricominciare il brano corrente. Premere due volte il pulsante (bisogna quindi attendere l'emissione di due toni di conferma successivi) per andare alla traccia precedente.Se l'auricolare perde il collegamento Bluetooth con il telefono in uso, tenta automaticamente di ristabilirlo.In caso di esito negativo, toccare una volta qualsiasi tasto o stabilire la connessione manualmente tramite il Bluetooth del telefono. Se l'auricolare rimane fuori dal raggio d'azione per più di 90minuti, si attiva la modalità DeepSleep.Toccare il pulsante centrale.Toccare due volte il pulsante centrale per chiamare l'ultimo numero composto.Durante una conversazione, tenere premuto i pulsanti di aumento e riduzione del volume finchénon viene emesso l'avviso vocale di attivazione o disattivazione dell'esclusione microfono. Quando l'esclusione microfono è attiva, viene ripetuto un avviso ogni 15 minuti.Informazioni di baseAccensione o spegnimentoRegolare il volumeMusica e altroRiconnessioneRisposta e termine di una chiamataRipetere l'ultimo numeroEsclusione del microfonoSiri, Google Now ™, Cortana Tenere premuto il pulsante centrale per 2 secondi finché non viene emesso il tono. Attendere la richiesta del telefono per attivare la selezione vocale, la ricerca e altri controlli vocali dello smartphone.Rispondere alle chiamate da due dispositivi è facile.Mentre è in corso una chiamata, il secondo dispositivo associato emette una notifica sonora per la chiamata in arrivo.Per rispondere a una seconda chiamata dall'altro dispositivo, toccare innanzitutto il pulsante centrale per terminare la chiamata in corso, quindi toccare nuovamente lo stesso pulsante per rispondere alla nuova chiamata. Se si sceglie di non rispondere alla seconda chiamata, questa viene trasferita alla segreteria.Il dispositivo emette avvisi vocali che informano circa le variazioni di stato. Ad esempio:"Power on" (Acceso)"Pairing successful" (Associazione riuscita)"Phone 1 connected" (Telefono 1 collegato)"Nessun telefono è collegato""Mute on" (Esclusione microfono attivata)Se gli auricolari vengono lasciati accesi ma fuori dal raggio d'azione del telefono a cui sonoassociati per 90 minuti, preservano la carica della batteria passando in modalità DeepSleep.Una volta che il dispositivo ritorna entro il raggio d'azione del cellulare, premere il pulsante centrale per uscire dalla modalità DeepSleep.Caratteristiche della cuffiaAssistente vocaleRisposta alle chiamate da un secondo dispositivoComandi vocaliModalità DeepSleepSupportoULTERIORI INFORMAZIONI/supportPlantronics, Inc.Plantronics B.V.345 Encinal Street Santa Cruz, CA 95060 United States Scorpius 171 2132 LR Hoofddorp Netherlands© 2018Plantronics, Inc. Bluetooth è un marchio registrato di Bluetooth SIG, Inc. e il suo uso da parte di Plantronics è concesso su licenza. Apple e Siri sono marchi di Apple, Inc., registrati negli Stati Uniti e in altri paesi. Tutti gli altri marchi sono di proprietà dei rispettivi proprietari.Brevetti in attesa di approvazione.213118-16 (12.18)。
接线端子板TB351-RU/TB351-RU(B)1基本说明
TB351-RU/TB351-RU(B)(TB351-RU带欧插,TB351-RU(B)不带欧插)端子板为8路端子板,可供单卡或2块互为冗余的FW351使用。
输入信号如为配电信号需在端子板上加配电模块;输入信号如为不配电电流信号或电压信号则不需再配置配电模块。
TB351-RU/TB351-RU(B)端子板可实现8路电压/电流信号的输入处理,任一路信号均可单独通过“通道电压/电流输入选择跳线”设置为电压输入或电流输入。
在处理电流信号时,端子板先通过一个250Ω精密电阻(0.5‰精度)把电流信号转换为电压信号再做其它处理。
同时,TB351-RU/TB351-RU(B)端子板也可另外配置PM-351I配电模块实现配电功能,任一路信号均可单独通过“配电选择跳线”设置为配电或不配电。
每个PM-351I模块都可实现四路信号的配电输出,因此TB351-RU/TB351-RU(B)端子板在8路信号全为配电信号时,须配置2个PM-351I模块。
若只有(小于)4路配电信号,其余为标准信号输入,则只需配置1个配电模块。
2使用说明
2.1端子板外观图
TB351-RU/TB351-RU(B)端子板结构外形如图 2-1所示。
图 2-1 TB351-RU/TB351-RU(B)端子板结构外形图
2.2接插件说明
TB351-RU/TB351-RU(B)端子板接插件说明如表 2-1所示:
表 2-1 TB351-RU/TB351-RU(B)端子板接插件说明
标号说明
DB1 第一块卡数据连线插座
DB2 第二块卡数据连线插座
J1 8通道接线端子
J3 外配电端子
J4、J5 配电模块插槽
PGND 为卡件屏蔽地,通过汇流条,良好接入大地
2.3跳线说明
TB351-RU/TB351-RU(B)端子板跳线说明如表 2-2所示。
表 2-2 TB351-RU/TB351-RU(B)端子板跳线说明
标号说明使用
JP1 第1路电流/电压选择跳线跳1-2:电流输入;跳2-3:电压输入
JP2 第2路电流/电压选择跳线跳1-2:电流输入;跳2-3:电压输入
JP3 第3路电流/电压选择跳线跳1-2:电流输入;跳2-3:电压输入
JP4 第4路电流/电压选择跳线跳1-2:电流输入;跳2-3:电压输入
JP5 第5路电流/电压选择跳线跳1-2:电流输入;跳2-3:电压输入
JP6 第6路电流/电压选择跳线跳1-2:电流输入;跳2-3:电压输入
JP7 第7路电流/电压选择跳线跳1-2:电流输入;跳2-3:电压输入
JP8 第8路电流/电压选择跳线跳1-2:电流输入;跳2-3:电压输入
JP9 第1路配电选择跳线跳1-2:配电;跳2-3:不配电
JP10 第2路配电选择跳线跳1-2:配电;跳2-3:不配电
JP11 第3路配电选择跳线跳1-2:配电;跳2-3:不配电
JP12 第4路配电选择跳线跳1-2:配电;跳2-3:不配电
JP13 第5路配电选择跳线跳1-2:配电;跳2-3:不配电
JP14 第6路配电选择跳线跳1-2:配电;跳2-3:不配电
JP15 第7路配电选择跳线跳1-2:配电;跳2-3:不配电
JP16 第8路配电选择跳线跳1-2:配电;跳2-3:不配电JP17~JP20 内/外配电方式选择跳线跳1-2:内配电;跳2-3:外配电
JP23~JP24 配电输出24V/25.5V选择跳线跳1-2:配电输出24V;跳2-3:配电输出25.5V
z JP17、JP18、JP19、JP20对应端子板配电方式选择,四个跳线必须同时处于1-2或2-3位置。
z JP23、JP24用于选择配电输出电压,两个跳线必须同时处于1-2或2-3位置。
2.4端子定义及接线
表 2-3 TB351-RU/TB351-RU(B)端子板接线端子说明
定义定义
电压/电流信号配电信号
端子序号
电压/电流信号配电信号
CH1+ CH1- 1 11 CH6+ CH6-
CH1- CH1+ 2 12 CH6- CH6+
CH2+ CH2- 3 13 CH7+ CH7-
CH2- CH2+ 4 14 CH7- CH7+
CH3+ CH3- 5 15 CH8+ CH8-
CH3- CH3+ 6 16 CH8- CH8+
CH4+ CH4- 7 17 - 24V A(+)
CH4- CH4+ 8 18 - 24A(-)
CH5+ CH5- 9 19 -- 24VB(+)
CH5- CH5+ 10
20 -- 24VB(-)
z CHX+表示第X路通道正端,CHX-表示第X路通道负端。
例如第1路通道的正、负端为:CH1+、CH1-。
z“24V A(+)、24A(-)”和“24VB(+)、24VB(-)”表示外配电时两路冗余的24V输入电源,在内配电方式下无需接线。
3资料版本说明
表 3-1版本升级更改一览表
资料版本号输出时间更改说明
TB351-RU/TB351-RU(B)使用手册(V1.0)。