java webservice axis2简单开发实例
- 格式:doc
- 大小:109.50 KB
- 文档页数:11

javaWebService测试⼩例⼦在朋友的帮助下,写出了⼀个webService的⼩例⼦,这个webService是基于axis2写的,写出来,作为备忘。
⾸先去Apache官⽅下载axis,我⽤的是axis2-1.2这个版本,最新是axis2-1.3的版本,但是1.3需要JDK1.5的⽀持,我本机是JDk1.4,所以我⽤axis2-1.2作为ws(web service)的服务。
把下载的war包放到tomcat的webapps⽬录,启动tomcat服务,在浏览器地址栏输⼊http://localhost:8080/axis2/(根据每个⼈的tomcat配置的不同,这个路径可能不同),如果出现下⾯界⾯就说明ws服务没有问题了。
下⾯编写java的ws服务先编写服务器端的,从最简单的hello,world开始,⼯程如下图:Hello.javapackage com;public class Hello {public String hw() {return "hello,world";}}在再src下⾯建⼀个meta-inf的⽂件夹,创建⼀个services.xml的⽂件,⽂件内容如下:<service name="Hello"><Description>helloword example description</Description><parameter name="ServiceClass" locked="false">com.Hello</parameter><operation name="hw"><messageReceiver class="org.apache.axis2.rpc.receivers.RPCMessageReceiver" /></operation></service>在上⾯的xml描述中,com.Hello是指你建⽴的类名称,hw是对应的⽅法,Hello是对应的服务名称。
Axis2发布webservice总结详细例子demo本人测试用的了tomcat 下面能够正常使用在was和WebLogic下面应该是版本不兼容的问题,一直启动失败在was直接部署axis2.war包错误信息用到的jar包axis2-1.5.4-war.zip axis2-1.5.4-bin.zip编写webservice首先下载jar包上面已经有了解压缩bin包目录如下写接口的时候可以一个jar包不需要客户端调用的时候需要用的lib目录下面的所有jar包解压缩war包将axis2.war导入到Eclipse里面找到axis2.xml并修改下面配置修改<parameter name="userName">wangxz</parameter><parameter name="password">123456</parameter>这两个配置是axis2后台管理员的账号和密码用于部署和更新webservice <parameter name="hotdeployment">true</parameter><parameter name="hotupdate">true</parameter>这里个配置是热部署和热更新的意思设置为true<!--~ Licensed to the Apache Software Foundation (ASF) under one ~ or more contributor license agreements. See the NOTICE file ~ distributed with this work for additional information~ regarding copyright ownership. The ASF licenses this file~ to you under the Apache License, Version 2.0 (the~ "License"); you may not use this file except in compliance ~ with the License. You may obtain a copy of the License at~~ /licenses/LICENSE-2.0~~ Unless required by applicable law or agreed to in writing,~ software distributed under the License is distributed on an~ "AS IS" BASIS, WITHOUT WARRANTIES OR CONDITIONS OF ANY~ KIND, either express or implied. See the License for the~ specific language governing permissions and limitations~ under the License.--><axisconfig name="AxisJava2.0"><!-- ================================================= --><!-- Parameters --><!-- ================================================= --><parameter name="hotdeployment">true</parameter><parameter name="hotupdate">true</parameter><parameter name="enableMTOM">false</parameter><parameter name="enableSwA">false</parameter><parameter name="EnableChildFirstClassLoading">false</parameter><!--Uncomment if you want to enable file caching for attachments --> <!--parameter name="cacheAttachments">true</parameter><parameter name="attachmentDIR"></parameter><parameter name="sizeThreshold">4000</parameter--><!--Uncomment if you want to plugin your own attachments lifecycle implementation --><!--<attachmentsLifecycleManagerclass="org.apache.axiom.attachments.lifecycle.impl.LifecycleManagerIm pl"/>--><!--Uncomment if you want to enable the reduction of the in-memory cache of WSDL definitions --><!--In some server environments, the available memory heap is limited and can fill up under load --><!--Since in-memory copies of WSDL definitions can be large, some steps can be taken--><!--to reduce the memory needed for the cached WSDL definitions. --> <!--parameter name="reduceWSDLMemoryCache">true</parameter--><!--This will give out the timout of the configuration contexts, inmilliseconds--><parameter name="ConfigContextTimeoutInterval">30000</parameter><!--During a fault, stack trace can be sent with the fault message. The following flag will control --><!--that behavior.--><parametername="sendStacktraceDetailsWithFaults">false</parameter><!--If there aren't any information available to find out the fault reason, we set the message of the exception--><!--as the faultreason/Reason. But when a fault is thrown from a service or some where, it will be --><!--wrapped by different levels. Due to this the initial exception message can be lost. If this flag--><!--is set, then Axis2 tries to get the first exception and set its message as the faultreason/Reason.--><parametername="DrillDownToRootCauseForFaultReason">false</parameter><parameter name="userName">wangxz</parameter><parameter name="password">123456</parameter><!--To override repository/services you need to uncomment following parameter and value SHOULD be absolute file path.--><!--ServicesDirectory only works on the following cases--><!---File based configurator and in that case the value should be a file URL (http:// not allowed)--><!---When creating URL Based configurator with URL file:// --><!--- War based configurator with expanded case , --><!--All the other scenarios it will be ignored.--><!--<parameter name="ServicesDirectory">service</parameter>--><!--To override repository/modules you need to uncomment following parameter and value SHOULD be absolute file path--><!--<parameter name="ModulesDirectory">modules</parameter>--><!--Following params will set the proper context paths for invocations. All the endpoints will have a commons context--><!--root which can configured using the following contextRoot parameter--><!--<parameter name="contextRoot">axis2</parameter>--><!--Our HTTP endpoints can handle both REST and SOAP. Following parameters can be used to distinguiush those endpoints--> <!--In case of a servlet, if you change this you have to manually change the settings of your servlet container to map this --><!--context path to proper Axis2 servlets--><!--<parameter name="servicePath">services</parameter>--><!--<parameter name="restPath">rest</parameter>--><!-- Following parameter will completely disable REST handling in Axis2--><parameter name="disableREST"locked="false">false</parameter><!-- Following parameter will suppress generation of SOAP 1.2 bindings in auto-generated WSDL files --><parameter name="disableSOAP12"locked="true">false</parameter><!--POJO deployer , this will alow users to drop .class file and make that into a service--><deployer extension=".class"directory="pojo" class="org.apache.axis2.deployment.POJODeployer"/><deployer extension=".jar"directory="servicejars"class="org.apache.axis2.jaxws.framework.JAXWSDeployer"/> <deployer extension=".jar"directory="transports"class="org.apache.axis2.deployment.TransportDeployer"/><!--CORBA deployer , this will alow users to invoke remote CORBA services through Axis2--><!--<deployer extension=".xml" directory="corba" class="org.apache.axis2.corba.deployer.CorbaDeployer"/>--><!--<deployer extension=".jsa" directory="rmiservices" class="org.apache.axis2.rmi.deploy.RMIServiceDeployer"/>--><!-- Following parameter will set the host name for the epr--><!--<parameter name="hostname" locked="true"></parameter>--><!-- If you have a front end host which exposes this webservice using a different public URL --><!-- use this parameter to override autodetected url --><!--<parametername="httpFrontendHostUrl">https://someotherhost/context</parameter>--><!--By default, JAXWS services are created by reading annotations. WSDL and schema are generated--><!--using a separate WSDL generator only when ?wsdl is called. Therefore, even if you engage--><!--policies etc.. to AxisService, it doesn't appear in the WSDL. By setting the following property--><!--to true, you can create the AxisService using the generated WSDL and remove the need for a--><!--WSDL generator. When ?wsdl is called, WSDL is generated in the normal way.--><parameter name="useGeneratedWSDLinJAXWS">false</parameter><!-- The way of adding listener to the system--><!-- <listener class="org.apache.axis2.ObserverIMPL">--><!-- <parameter name="RSS_URL">http://127.0.0.1/rss</parameter>--><!-- </listener>--><threadContextMigrators><threadContextMigratorlistId="JAXWS-ThreadContextMigrator-List"class="org.apache.axis2.jaxws.addressing.migrator.EndpointContextMapM igrator"/></threadContextMigrators><!-- ================================================= --><!-- Message Receivers --><!-- ================================================= --><!--This is the default MessageReceiver for the system , if you want to have MessageReceivers for --><!--all the other MEP implement it and add the correct entry to here , so that you can refer from--><!--any operation --><!--Note : You can override this for a particular service by adding the same element with your requirement--><messageReceivers><messageReceiver mep="/2004/08/wsdl/in-only"class="org.apache.axis2.receivers.RawXMLINOnlyMessageReceiver"/> <messageReceiver mep="/2004/08/wsdl/in-out"class="org.apache.axis2.receivers.RawXMLINOutMessageReceiver"/><messageReceiver mep="/2006/01/wsdl/in-only"class="org.apache.axis2.receivers.RawXMLINOnlyMessageReceiver"/> <messageReceiver mep="/2006/01/wsdl/in-out"class="org.apache.axis2.receivers.RawXMLINOutMessageReceiver"/> <messageReceiver mep="/ns/wsdl/in-only"class="org.apache.axis2.receivers.RawXMLINOnlyMessageReceiver"/> <messageReceiver mep="/ns/wsdl/in-out"class="org.apache.axis2.receivers.RawXMLINOutMessageReceiver"/> </messageReceivers><!-- ================================================= --><!-- Message Formatter --><!-- ================================================= --><!--Following content type to message formatter mapping can be used to implement support for different message --><!--format serialization in Axis2. These message formats are expected to be resolved based on the content type. --><messageFormatters><messageFormattercontentType="application/x-www-form-urlencoded"class="org.apache.axis2.transport.http.XFormURLEncodedFormatter"/> <messageFormatter contentType="multipart/form-data"class="org.apache.axis2.transport.http.MultipartFormDataFormatter"/> <messageFormatter contentType="application/xml"class="org.apache.axis2.transport.http.ApplicationXMLFormatter"/> <messageFormatter contentType="text/xml"class="org.apache.axis2.transport.http.SOAPMessageFormatter"/> <messageFormatter contentType="application/soap+xml"class="org.apache.axis2.transport.http.SOAPMessageFormatter"/> </messageFormatters><!-- ================================================= --><!-- Message Builders --><!-- ================================================= --><!--Following content type to builder mapping can be used to implementsupport for different message --><!--formats in Axis2. These message formats are expected to be resolved based on the content type. --><messageBuilders><messageBuilder contentType="application/xml"class="org.apache.axis2.builder.ApplicationXMLBuilder"/><messageBuilder contentType="application/x-www-form-urlencoded"class="org.apache.axis2.builder.XFormURLEncodedBuilder"/><messageBuilder contentType="multipart/form-data"class="org.apache.axis2.builder.MultipartFormDataBuilder"/> </messageBuilders><!-- ================================================= --><!-- Transport Ins --><!-- ================================================= --><!-- The default configuration assumes that AxisServlet only receives requeststhrough HTTP. To allow HTTPS as well, configure a second AxisServletListenerwith name="https" and specify the port parameter on both receivers.For more information, please have a look at the servlet transport documentation:/axis2/java/core/docs/servlet-transport.html--><transportReceiver name="http"class="org.apache.axis2.transport.http.AxisServletListener"/><!--Uncomment if you want to have TCP transport support--><!--transportReceiver name="tcp"class="org.apache.axis2.transport.tcp.TCPServer"><parameter name="port">6060</parameter-->><!--If you want to give your own host address for EPR generation--> <!--uncomment the following paramter , and set it as you required.--> <!--<parameter name="hostname">tcp:///ws</parameter>--> <!-- /transportReceiver --><!-- ================================================= --><!-- Transport Outs --><!-- ================================================= --><!--Uncomment if you want to have TCP transport support--><!--<transportSender name="tcp"class="org.apache.axis2.transport.tcp.TCPTransportSender"/>--><transportSender name="local"class="org.apache.axis2.transport.local.LocalTransportSender"/> <transportSender name="http"class="monsHTTPTransportSender"> <parameter name="PROTOCOL">HTTP/1.1</parameter><parameter name="Transfer-Encoding">chunked</parameter><!-- If following is set to 'true', optional action part of the Content-Type will not be added to the SOAP 1.2 messages --><!-- <parameter name="OmitSOAP12Action">true</parameter> --> </transportSender><transportSender name="https"class="monsHTTPTransportSender"> <parameter name="PROTOCOL">HTTP/1.1</parameter><parameter name="Transfer-Encoding">chunked</parameter> </transportSender><!-- Please enable this if you need the java transport --><!-- <transportSender name="java"class="org.apache.axis2.transport.java.JavaTransportSender"/> --><!-- ================================================= --><!-- Global Modules --><!-- ================================================= --><!-- Comment this to disable Addressing --><module ref="addressing"/><!--Configuring module , providing parameters for modules whether they refer or not--><!--<moduleConfig name="addressing">--><!--<parameter name="addressingPara">N/A</parameter>--><!--</moduleConfig>--><!-- ================================================= --><!-- Clustering --><!-- ================================================= --><!--To enable clustering for this node, set the value of "enable" attribute of the "clustering"element to "true". The initialization of a node in the cluster is handled by the classcorresponding to the "class" attribute of the "clustering" element. It is also responsible forgetting this node to join the cluster.--><clusteringclass="org.apache.axis2.clustering.tribes.TribesClusteringAgent"enable="false"><!--This parameter indicates whether the cluster has to be automatically initalizedwhen the AxisConfiguration is built. If set to "true" the initialization will not bedone at that stage, and some other party will have to explictly initialize the cluster.--><parameter name="AvoidInitiation">true</parameter><!--The membership scheme used in this setup. The only values supported at the moment are"multicast" and "wka"1. multicast - membership is automatically discovered using multicasting2. wka - Well-Known Address based multicasting. Membership is discovered with the helpof one or more nodes running at a Well-Known Address. New members joining acluster will first connect to a well-known node, register with the well-known nodeand get the membership list from it. When new members join, one of the well-knownnodes will notify the others in the group. When a member leaves the cluster oris deemed to have left the cluster, it will be detected by the Group MembershipService (GMS) using a TCP ping mechanism.--><parameter name="membershipScheme">multicast</parameter><!--The clustering domain/group. Nodes in the same group will belong to the same multicastdomain. There will not be interference between nodes in different groups.--><parameter name="domain">wso2.carbon.domain</parameter><!--When a Web service request is received, and processed, before the response is sent to theclient, should we update the states of all members in the cluster? If the value ofthis parameter is set to "true", the response to the client will be sent only afterall the members have been updated. Obviously, this can be time consuming. In some cases,such this overhead may not be acceptable, in which case the value of this parametershould be set to "false"--><parameter name="synchronizeAll">true</parameter><!--The maximum number of times we need to retry to send a message to a particular nodebefore giving up and considering that node to be faulty--><parameter name="maxRetries">10</parameter><!-- The multicast address to be used --><parameter name="mcastAddress">228.0.0.4</parameter><!-- The multicast port to be used --><parameter name="mcastPort">45564</parameter><!-- The frequency of sending membership multicast messages (in ms) --><parameter name="mcastFrequency">500</parameter><!-- The time interval within which if a member does not respond, the member will bedeemed to have left the group (in ms)--><parameter name="memberDropTime">3000</parameter><!--The IP address of the network interface to which the multicasting has to be bound to.Multicasting would be done using this interface.--><parameter name="mcastBindAddress">127.0.0.1</parameter><!-- The host name or IP address of this member --><parameter name="localMemberHost">127.0.0.1</parameter><!--The TCP port used by this member. This is the port through which other nodes willcontact this member--><parameter name="localMemberPort">4000</parameter><!--Preserve message ordering. This will be done according to sender order.--><parameter name="preserveMessageOrder">true</parameter><!--Maintain atmost-once message processing semantics--><parameter name="atmostOnceMessageSemantics">true</parameter><!--Properties specific to this member--><parameter name="properties"><property name="backendServerURL" value="https://${hostName}:${httpsPort}/services/"/><property name="mgtConsoleURL" value="https://${hostName}:${httpsPort}/"/></parameter><!--The list of static or well-known members. These entries will only be valid if the"membershipScheme" above is set to "wka"--><members><member><hostName>127.0.0.1</hostName><port>4000</port></member><member><hostName>127.0.0.1</hostName><port>4001</port></member></members><!--Enable the groupManagement entry if you need to run this node as a cluster manager.Multiple application domains with different GroupManagementAgent implementationscan be defined in this section.--><groupManagement enable="false"><applicationDomain name="apache.axis2.application.domain"description="Axis2 group"agent="org.apache.axis2.clustering.management.DefaultGroupManagementA gent"/></groupManagement><!--This interface is responsible for handling management of a specific node in the clusterThe "enable" attribute indicates whether Node management has been enabled--><nodeManagerclass="org.apache.axis2.clustering.management.DefaultNodeManager"enable="true"/><!--This interface is responsible for handling state replication. The property changes inthe Axis2 context hierarchy in this node, are propagated to all other nodes in the cluster.The "excludes" patterns can be used to specify the prefixes (e.g. local_*) orsuffixes (e.g. *_local) of the properties to be excluded from replication. The pattern"*" indicates that all properties in a particular context should not be replicated.The "enable" attribute indicates whether context replication has been enabled--><stateManagerclass="org.apache.axis2.clustering.state.DefaultStateManager"enable="true"><replication><defaults><exclude name="local_*"/><exclude name="LOCAL_*"/></defaults><contextclass="org.apache.axis2.context.ConfigurationContext"><exclude name="local_*"/></context><contextclass="org.apache.axis2.context.ServiceGroupContext"><exclude name="local_*"/></context><contextclass="org.apache.axis2.context.ServiceContext"><exclude name="local_*"/></context></replication></stateManager></clustering><!-- ================================================= --><!-- Phases --><!-- ================================================= --><phaseOrder type="InFlow"><!-- System predefined phases --><phase name="Transport"><handler name="RequestURIBasedDispatcher"class="org.apache.axis2.dispatchers.RequestURIBasedDispatcher"><order phase="Transport"/></handler><handler name="SOAPActionBasedDispatcher"class="org.apache.axis2.dispatchers.SOAPActionBasedDispatcher"><order phase="Transport"/></handler></phase><phase name="Addressing"><handler name="AddressingBasedDispatcher"class="org.apache.axis2.dispatchers.AddressingBasedDispatcher"><order phase="Addressing"/></handler></phase><phase name="Security"/><phase name="PreDispatch"/><phase name="Dispatch" class="org.apache.axis2.engine.DispatchPhase"><handler name="RequestURIBasedDispatcher"class="org.apache.axis2.dispatchers.RequestURIBasedDispatcher"/> <handler name="SOAPActionBasedDispatcher"class="org.apache.axis2.dispatchers.SOAPActionBasedDispatcher"/> <handler name="RequestURIOperationDispatcher"class="org.apache.axis2.dispatchers.RequestURIOperationDispatcher"/> <handler name="SOAPMessageBodyBasedDispatcher"class="org.apache.axis2.dispatchers.SOAPMessageBodyBasedDispatcher"/> <handler name="HTTPLocationBasedDispatcher"class="org.apache.axis2.dispatchers.HTTPLocationBasedDispatcher"/> <handler name="GenericProviderDispatcher"class="org.apache.axis2.jaxws.dispatchers.GenericProviderDispatcher"/ ><handler name="MustUnderstandValidationDispatcher"class="org.apache.axis2.jaxws.dispatchers.MustUnderstandValidationDis patcher"/></phase><phase name="RMPhase"/><!-- System predefined phases --><!-- After Postdispatch phase module author or service author can add any phase he want --><phase name="OperationInPhase"><handler name="MustUnderstandChecker"class="org.apache.axis2.jaxws.dispatchers.MustUnderstandChecker"><order phase="OperationInPhase"/></handler></phase><phase name="soapmonitorPhase"/></phaseOrder><phaseOrder type="OutFlow"><!-- user can add his own phases to this area --><phase name="soapmonitorPhase"/><phase name="OperationOutPhase"/><!--system predefined phase--><!--these phase will run irrespective of the service--><phase name="RMPhase"/><phase name="PolicyDetermination"/><phase name="MessageOut"/><phase name="Security"/></phaseOrder><phaseOrder type="InFaultFlow"><phase name="Addressing"><handler name="AddressingBasedDispatcher"class="org.apache.axis2.dispatchers.AddressingBasedDispatcher"><order phase="Addressing"/></handler></phase><phase name="Security"/><phase name="PreDispatch"/><phase name="Dispatch" class="org.apache.axis2.engine.DispatchPhase"><handler name="RequestURIBasedDispatcher"class="org.apache.axis2.dispatchers.RequestURIBasedDispatcher"/><handler name="SOAPActionBasedDispatcher"class="org.apache.axis2.dispatchers.SOAPActionBasedDispatcher"/> <handler name="RequestURIOperationDispatcher"class="org.apache.axis2.dispatchers.RequestURIOperationDispatcher"/> <handler name="SOAPMessageBodyBasedDispatcher"class="org.apache.axis2.dispatchers.SOAPMessageBodyBasedDispatcher"/> <handler name="HTTPLocationBasedDispatcher"class="org.apache.axis2.dispatchers.HTTPLocationBasedDispatcher"/> <handler name="GenericProviderDispatcher"class="org.apache.axis2.jaxws.dispatchers.GenericProviderDispatcher"/ ><handler name="MustUnderstandValidationDispatcher"class="org.apache.axis2.jaxws.dispatchers.MustUnderstandValidationDis patcher"/></phase><phase name="RMPhase"/><!-- user can add his own phases to this area --><phase name="OperationInFaultPhase"/><phase name="soapmonitorPhase"/></phaseOrder><phaseOrder type="OutFaultFlow"><!-- user can add his own phases to this area --><phase name="soapmonitorPhase"/><phase name="OperationOutFaultPhase"/><phase name="RMPhase"/><phase name="PolicyDetermination"/><phase name="MessageOut"/><phase name="Security"/></phaseOrder></axisconfig>。
如何将基于Axis2的Web Service集成到自己的webapp本文主要描述如何使用Apache开源项目Axis提供的API来实现Web Services并集成到我们的应用程序当中。
本文的读者应有JAVA web 应用开发基础。
应该具有看过WSDL,SOAP,XML等的基本规范。
熟悉Eclipse+MyEclipse开发环境。
一、环境准备使用Axis来开发Web services 需要准备 web 服务器,Axis API。
本文使用的Web container 是Tomcat5.5, Axis API 采用版本2。
1.1软件下载准备Tomcat下载地址:/download-55.cgi#5.5.20Axis标准包:/ws/axis2/1_5_1/axis2-1.5.1-bin.zipAxis War包:/ws/axis2/1_5_1/axis2-1.5.1-war.zip Eclipse+MyEclipse:可以到官方网站下载(本文为3.3+6.5GA)1.2安装A.首先搭建开发环境,需要将下载到的Eclipse解压缩到一个目录。
B.安装MyEclipse6.5GA。
然后启动MyEclipse。
C.下面开始搭建Web Services的部署环境。
将下载的tomcat包解压缩到一个目录。
完成web container的安装。
E.将axis2.war包拷贝到tomcat安装目录下的webapps目录中。
F.启动Tomcat(windows 下为TOMCA_HOME/bin中的startup.bat;Linux,unix环境为startup.sh文件),打开浏览器输入并访问:http://ip:port/axis2来查看。
(如果没有进行配臵文件的修改此地址应该为http://localhost:8080/axis2),如果能看到下面的页面则说明已经安装完成。
二、Quick Start环境准备好后,先从一个简单的例子开始。
Axis2.x WebService上次介绍了axis1.x的用法,这次继续上次的,将叙述axis2的用法。
Axis1.x在线博文:/hoojo/archive/2010/12/20/1911349.html一、准备工作1、开发准备首先需要下载axis2的相关jar包,到axis的官方网站即可获得开发的依赖包。
下载地址:/axis2/java/core/download.cgi现在最高的版本是1.5.4的然后你需要下载官方提供的axis的eclipse插件工具,可以帮助我们打包(aar)及其生产客户端调用代码。
下载页面:/axis2/java/core/tools/index.htmlService Archive Wizard - Eclipse Plug-inCode Generator Wizard - Eclipse Plug-in2、安装eclipse插件如果你的eclipse插件安装成功后,会看到如下效果:3、分析axis2-bin文件目录结构下载下来的axis2的依赖库,其中有一个axis2-1.5.3-bin.zip的库文件,目录结构如下:bin文件夹是axis2的常用工具,其中有将wsdl文件转换成客户端调用的wsdl2java工具及将java转换成wsdl文件的工具conf是axis2的配置文件lib运行所要的依赖库repository是发布过的axis服务和文件sample是示例webapp是web文件和jsp页面等4、我们需要将下载下来的axis2-1.5.3-war.zip中的axis2.war这个文件放在我们的tomcat目录下,启动tomcat就会把war文件转成一个可以跑起来的axis2的项目。
Tomcat启动后,在浏览器中输入:http://localhost:8080/axis2/你可以看到二、Axis2的简单WebService示例注意,上面的HelloWorldService是没有package的。

使用axis2构建WebService服务以下文档将介绍是使用Tomcat6.0和Apache Axis2开发、部署和测试一个简单的WebService服务。
本文示例为最简单数据类型。
下一章将介绍复杂数据类型的传输。
WebService让一个程序可以透明地调用互联网程序,不管具体的实现细节。
只要WebService公开了服务接口,远程客户端就可以调用服务。
WebService是基于http协议的组建服务,WebService是分散式应用程序的发展趋势。
1.工作环境MyEclipse6.0.1 + JDK1.6 + Axis2-1.3其中Axis2-1.3需要下载Binary Distribution和WAR这两个文件。
目前Axis2的最高版本已到达1.5.2.安装Axis2将下载的Axis2-1.3 W AR文件解压缩,得到axis2.war文件。
将其拷贝到%Tomcat安装目录%webapps下即可。
3.检验安装启动(或重新启动)Tomcat,在地址栏中输入:http://localhost:8080/axis2点击Validate,显示Axis2 Happiness Page4.WebService中的服务器端(1)新建Java工程(2)新建服务器类,建立Hello.javapackage cn.hxyh.webservice;public class Hello {public String getHello() {System.out.println("Hello Service received");return"Hello world!" ;}}(3)在./bin下建立META-INF目录,新建service.xml文件<service name="Hello"><Description>helloword example description</Description><parameter name="ServiceClass"locked="false">cn.hxyh.webservice.Hello</parameter><operation name="getHello"><messageReceiverclass="org.apache.axis2.rpc.receivers.RPCMessageReceiver" /></operation></service>(4)打包生成aar文件在命令符环境下,将目录转到./bin。
使用axis2进行WebService的开发使用axis2进行WebService的开发Apache Axis2 是Apache Axis SOAP 项目的后继项目。
此项目是Web 服务核心引擎的重要改进,目标是成为Web 服务和面向服务的体系结构(Service-Oriented Architecture,SOA)的下一代平台。
axis2 WebService开发分为服务端开发与客户端开发,服务端开发为对外提供服务,客户端开发为用户调用外部接口进行业务处理。
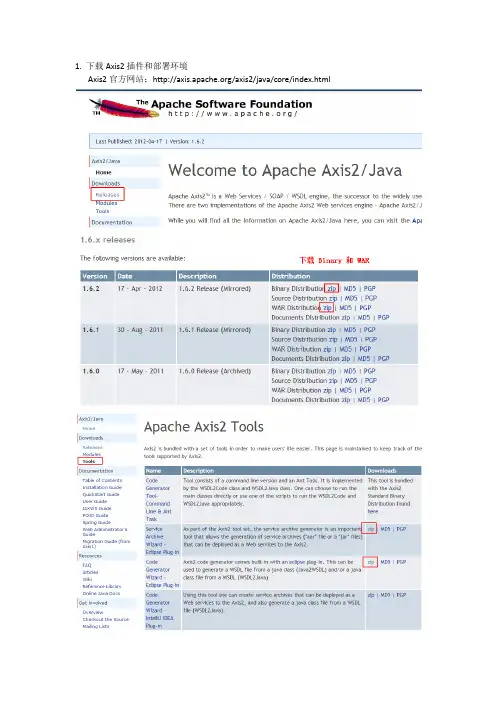
一、下载与安装1.下载下载地址:/axis2/java/core/download.cgi有以下下载列表:Binary Distribution zip | MD5 | PGPSource Distribution zip | MD5 | PGPWAR Distribution zip | MD5 | PGPDocuments Distribution zip | MD5 | PGP注:axis2-1.6.2-bin.zip里有axis2的jar包。
axis2-1.6.2-docs.zip里有详细的帮助文档。
axis2-1.6.2-src.zip里是源代码。
axis2-1.6.2-war.zip里是axis的管理平台,放到tomcat可直接使用。
注:本文用bin包进行命令行使用axis2,管理平台使用的是war包。
2.安装配置将axis2-1.6.2-bin.zip解压到本地目录D:\axis2-1.6.2设置环境变量。
【注:前提需要配置java环境变量】AXIS2_HOME 设置值D:\axis2-1.6.2Path 添加值%AXIS2_HOME%\bin二、服务端编写1.创建服务端的java项目testAsixServer。
编写类City与类User代码如下:[java] view plain copy package com.hsinghsu.model; public class City { private int cityCode;private String cityName; public int getCityCode() { return cityCode; } public void setCityCode(int cityCode) { this.cityCode = cityCode; } public String getCityName() { return cityName; } public void setCityName(String cityName){ this.cityName = cityName; } } [java] view plain copy package com.hsinghsu.model; public class User { private int id; private String name; private String password;private City city; public int getId(){ return id; } public void setId(int id) { this.id = id; } public String getName() { return name; } public void setName(String name){ = name; } public String getPassword() { return password; } public void setPassword(String password) { this.password = password; } public City getCity(){ return city; } public void setCity(City city) { this.city =city; } }编写服务类UserService。
【wayfoon】最近公司要求实现一个webservice调用,之前也接触过,但只是看看,没有动手试试,于是现在正式开始学习webservice。
之前参照网上的例子写了一个简单的say hello webservice例子。
传递的对象是string,而且只有一个方法;但实际应用中,需要传递一些复制的对象,比如:数组,集合,对象数组。
由于webservice 是通过xml来交互数据的,而且是不分平台的。
因此,java 中的List等集合类的哦是通过数组来实现的。
学习webservice最好不要从一种语言的角度(java、c#)来对待问题,如果非要看成一中语言,那看成是c语言吧。
简单的hello world 例子见/mlzry0612/articles/185209.html?opt=admin里面有详细的axis+myeclipse5.5安装部署,图文并茂。
不同myeclipse版本有所不同。
在演示例子前,你必须已经安装好了Axis,并且已经知道怎样使用axis,知道通过wsdl生成webservice代码和生成aar发布文件。
不会的话,先学习前面的hello 例子。
下面演示一个比较复杂的例子。
例子实现:输入一个string 返回得到一个对象数组(输入里面所有的元素对象),注意是对象数组。
每个对象对应一个bean 实体。
使用axis的好处是可以根据wsdl自动生成大部分代码。
因此,采用axis开发webservice 的实现关键在于生成wsdl文件的编写。
生成wsdl文件可以采用两种方式:第一种:直接新建wsdl再通过wsdl设计器来设计(也就是hello例子里面将的)如果你对wsdl不是很熟悉,而且,输入或输出的参数都非常复杂,不清楚输入输出的组成结构时,你可以采用第二种方法。
这种方式,可以让你使用你最熟悉的语言来表达你的意思。
以java为例,你可以将对个对象放到List里面来表达你要输出的值,这个在 wsdl里面是另外一种表达方式(没有List)。
1. 下载Axis2插件和部署环境Axis2官方网站:/axis2/java/core/index.html2. 为MyEclipse10安装Axis2开发插件,解压codegen-1.6.2.zip和service-1.6.2.zip,复制解压后的文件到MyEclipse10安装目录的dropins目录下,并新建一个记事本文件,命名为:axis2.link,写入内容:path=D:\\Program Files\\MyEclipse 10.1\\MyEclipse 10\\dropins。
重启MyEclipse10,即可看到Axis2插件已经安装成功3. 配置部署环境。
解压axis2-1.6.2-war.zip文件,把得到的axis2.war文件复制到Tomcat安装目录下的webapp文件夹下,并启动Tomcat。
在浏览器输入网址:http://localhost:8080/axis2/,看到如下界面,表示部署环境配置成功。
4. 开发webservice服务端。
新建web project(不能是java project)。
并添加com.server包,在包下建立两个类:DoubleArith.java和FloatArith.java,并写入以下内容。
生成Axis2服务端部署文件,DoubleArith.aar和FloatArith.aar。
先运行Axis2Server,使程序在classes文件夹下生成DoubleArith.class和FloatArith.class文件,因为这两个文件是生成aar 文件的必备文件这样就在D:\Run目录下生成DoubleArith.aar文件。
同理,可以生成FloatArith.aar。
把DoubleArith.aar和FloatArith.aar文件从D:\Run文件夹复制到Tomcat\webapp\axis2\WEB-INF\services目录下。

Axis的简单准备Axis的入门实例Axis复杂对象类型的WebServiceAxis的辅助工具发布、调用WebServiceAxis WebService会话Session的管理Axis用控制台Dos命令发布WebServiceAxis跨多个WebService管理SessionAxis用Spring的JavaBean发布WebServiceAxis异步调用WebServiceAxis 的Module模块Axis使用SoapMonitar监视WebService的请求和响应信息Version1.0 2011-03-15Axis2.x WebService上次介绍了axis1.x的用法,这次继续上次的,将叙述axis2的用法。
Axis1.x在线博文::///hoojo/archive/2010/12/20/1911349.html一、准备工作1、开发准备首先需要下载axis2的相关jar包,到axis的官方网站即可获得开发的依赖包。
下载地址::///axis2/java/core/download.cgi现在最高的版本是1.5.4的然后你需要下载官方提供的axis的eclipse插件工具,可以帮助我们打包(aar)及其生产客户端调用代码。
下载页面::///axis2/java/core/tools/index.html Service Archive Wizard - Eclipse Plug-inCode Generator Wizard - Eclipse Plug-in2、安装eclipse插件如果你的eclipse插件安装成功后,会看到如下效果:3、分析axis2-bin文件目录结构下载下来的axis2的依赖库,其中有一个axis2-1.5.3-bin.zip的库文件,目录结构如下:bin文件夹是axis2的常用工具,其中有将wsdl文件转换成客户端调用的wsdl2java工具及将java转换成wsdl文件的工具conf是axis2的配置文件lib运行所要的依赖库repository是发布过的axis服务和文件sample是示例webapp是web文件和jsp页面等4、我们需要将下载下来的axis2-1.5.3-war.zip中的axis2.war这个文件放在我们的tomcat目录下,启动tomcat就会把war文件转成一个可以跑起来的axis2的项目。
Axix2 webservice 开发教程例子简单易懂,很适合初学者。
开发环境:jdk1.6 tomcate5.0 Myeclipse5.0步骤:1.下载axis2所用包axis2-1.4.1-bin.zip 和axis2-1.4.1-war.zip并解压下载地址:/axis2/2.解压axis2-1.4.1-war.zip 将axis2.war 放到%TOME_HOME%\webapps中.启动Tomcate. IE地址输入:http://localhost:<port>/axis2/ .出现以上表示环境搭建成功。
3.下面开始开发自己的axis2 ws:创建web项目:我的项目工程名为axis2demo;将axis2-1.4.1\lib下所有jar导入。
创建一个HelloWorld.java在META-INF下建一个service.xml文件。
<?xml version="1.0" encoding="UTF-8"?><service><parameter name="ServiceClass" locked="false">com.xwx.demo.HelloWorld<poeration name="sayHello"><messageReceiverclass="org.apache.axis2.rpc.receivers.RPCMessageReceiver"/> </poeration></parameter></service>注:关于service.xml的参数配置自己baidu+google4.就开始准备一下axis2的eclispe的插件了。
axis2的eclispe插件分为2个,一个是帮助我们生成aar文件的,另一个是帮我们用wsdl文件生成stub代码的。
2011-04-05由/axis2/java/core/download.cgi下载axis2-1.4.1-bin.zip和axis2-1.4.1-war.zip(网络中诸多教程都是这个版本,便于发现问题时好解决)。
将axis2-1.4.1-war.zip解压后拷入tomcat\webapps,然后重启tomcat,tomcat会自动识别war文件并生成axis2文件夹。
然后输入http://localhost:8080/axis2/会看到欢迎界面。
由/dist/ws/axis2/tools/1_4_1/下载插件axis2-eclipse-codegen-wizard.zip和axis2-eclipse-service-archiver- wizard.zip两个文件,解压。
将这两个文件夹放入MyEclipse 8.5\dropins中,Axis2_Codegen_Wizard_1.3.0中增加2个jar backport-util-concurrent-3.1.jar、geronimo-stax-api_1.0_spec-1.0.1.jar,且修改plugin.xml增加这2个jar如图:Axis2_Codegen_Wizard_1.4.0其实是1.3.0版本文件夹改个名,且修改plugin.xml中<plugin>标签中的version为”1.4.0”通过命令行进入myeclipse.exe所在文件夹输入myeclipse.exe -vm "C:\Program Files\Java\jdk1.6.0_10\bin\java.exe" -clean -console -consoleLog -debug -vmargs -Xmx384M(注意查看自己的java路径)重启myeclipse通过开发服务端类来发布服务新建web project:sayhello首先我们先建一个包在src右键new->package,取名com在这个包下新建一个类Hellopackage com;/**服务端* @author tower**/public class Hello {public String helloworld(String name) { return"helloworld," + name;}}通过服务端类生成wsdl最终将要生成的hello.wsdl[自定义名称]放到src 目录下刷新后可见通过wsdl生成aar,发布服务再选择前述生成的wsdl,选择next点击load 最终将aar文件包输出到WEB-INF下,并命名将aar文件复制到tomcat/webapps/axis2/WEB-INF/services目录下。
开发环境Eclipse-jeeAxis2-1.5.2配置eclipse指定axis2新建一个动态web项目建立一个类菜单新建webservice选择刚才新建立的类,点击点击OK排除错误自动启动tomcat后,控制台报错现在启动服务器会抛出异常,这是因为Eclipse在自动加载生成该项目时有几个问题需要手动修复,下面分别列出:问题一:会抛出异常:ng.ClassNotFoundException:org.apache.axis2.transport.http.AxisAdminServlet是因为生动生成的web.xml文件中所指定的AxisAdminServlet包路径有错。
自动生成的源码如下:<servlet><display-name>Apache-Axis Servlet</display-name><servlet-name>AxisServlet</servlet-name><servlet-class>org.apache.axis2.transport.http.AxisServlet</servlet-class></servlet><servlet-mapping><servlet-name>AxisServlet</servlet-name><url-pattern>/servlet/AxisServlet</url-pattern></servlet-mapping><servlet-mapping><servlet-name>AxisServlet</servlet-name><url-pattern>*.jws</url-pattern></servlet-mapping><servlet-mapping><servlet-name>AxisServlet</servlet-name><url-pattern>/services/*</url-pattern></servlet-mapping><servlet><display-name>Apache-Axis Admin Servlet Web Admin</display-name><servlet-name>AxisAdminServlet</servlet-name><servlet-class>org.apache.axis2.transport.http.AxisAdminServlet</servlet-class><load-on-startup>100</load-on-startup></servlet><servlet-mapping><servlet-name>AxisAdminServlet</servlet-name><url-pattern>/axis2-admin/*</url-pattern></servlet-mapping>注意红色字体部分,我们可以去看一下所下载的Axis2的源包。
快速上手指南 - 基于Eclipse Axis2 插件的Web Service开发[最新]【优秀】(文档可以直接使用,也可根据实际需要修订后使用,可编辑推荐下载)axis2创建web service(一)axis2 是新一代的web service开发工具,它会让你的web service开发变得轻松,快捷。
下面让我们以一个实际的例子来体验一下。
首先,工欲善其事,必先利其器。
就让我们先做好一些必备的准备工作吧。
1.下载axis2 的2进制的包和war,现在的最新版本是发布时间是2021-8-25地址分别是:2.把下载后的war放入tomcat的webapps目录里,然后启动tomcat,这样war包就会自动解压为目录axis2在浏览器中输入 ://localhost:8080/axis2/,如果一切正常你会看到下面的画面3,就开始准备一下axis2的eclispe的插件了。
axis2的eclispe插件分为2个,一个是帮助我们生成aar文件的,另一个是帮我们用wsdl文件生成stub代码的。
下载地址是下载完2个压缩文件后,可以直接把解压后的文件拷贝到plugins目录中,也可以在links目录中写文件路径的方式来安装插件,安装完插件后,打开eclipse,在package explorer 中点击右键--->选择new---->other如果安装正确你会看到这样准备工作就都做好了。
接下来就是正式开发了。
axis2创建web service(二)工具都已经准备齐全了。
我们来动手做一个小例子来小试牛刀!这一节我们先利用axis2来发布一个web service 的服务,然后在下一节我们做一客户端来调用这个服务。
我们的服务很简单的,就是输入一个字符串,然后打印出一段字符串。
代码很简单,主要是测试用。
Java代码1.2.3.public class SimpleServer {4.5. /**6. * 简单的测试方法7. *8. */9. public String simpleMethod(String name) {10. return name + "Say this is a Simple method ^-^";11. }12.13.}主要的过程就是如何利用axis2的eclispe插件来发布这个服务啦。
一.在Eclipse中配置Axis2插件。
1.下载Axis2插件(Axis2官网:/axis2/java/core/download.html)2. 配置Eclipse Axis2插件把axis2-eclipse-codegen-plugin-1.7.1.zip和axis2-eclipse-service-plugin-1.7.1.zip文件里面的jar文件解压出来,放到eclipse目录下的dropins文件夹下,并新建一个txt文件,写入dropins目录的绝对路径,保存后更改文件格式为.link。
重启Eclipse,然后点击File-> New->Other->Axis2 Wizards即可看到axis2功能是否配置成功。
二.用Eclipse开发Axis2服务端1.解压axis2-1.7.1-bin.zip和axis2-1.7.1-war.zip文件,axis2-1.7.1-bin的解压文件夹随便放在一个目录下即可,axis2-1.7.1-war解压后的axis2.war文件放在tomcat目录的webapp文件夹下。
启动tomcat并输入http://localhost:8080/axis2即可看到如下画面。
2.新建Java Project,目录如下图所示(该示例主要展示了如何把配置文件也打包进aar文件),把axis2-1.7.1-bin的lib目录下的全部.jar文件(其实这些包是给客户端使用的,而且只需要其中一部分即可,为了方便才全部复制)全部复制到lib目录下,然后build path进项目中,建立如下文件:com.axis.server包下的文件AxisServer.java和User.java;resources 包下的文件application.properties。
3.生成aar文件:File->New->Other->Axis2 Wizards->Axis2 Service Archiver,并按下图流程进行即可生成aar文件。
WebService的开发模版(Axis2_15环境)Axis2差不多升级到1.5了,下载地址:://apache.etoak /ws/axis2/1_5/axis2-1.5-bin.zip://apache.etoak /ws/axis2/1_5/axis2-1.5-war.zip两个包,bin是开发包,war是部署包。
环境:axis2-1.5jdk1.5一、创建项目导创建一个Java项目,项目结构如以下图:Service└─src└─pojo└─META-INF二、导入axis2的包解压缩axis2-1.5-bin.zip到一个名目下,然后直截了当引入axis2的jar包即可。
也能够讲a xis2的包复制到lib下。
三、创建服务axis2服务的创建过程确实是写Java类。
那个地点创建一个最简单的Service,作为公布对象。
package pojo;/*** 测试Service** @author leizhimin 2020-8-4 15:48:13*/public class SimpleService {public String doSomething(String taskname) {System.out.println("MyServiceImpl is calling doSomething with "+ t askname + "!");return taskname + "is finished!";}}把创建好的SimpleService.class文件拷贝到axis的pojo下面,假如没有pojo文件夹那么自己创建一个。
四、描述服务在项目的src\META-INF文件夹下面,创建services.xml,内容如下:<service name=" SimpleService "scope="application"targetNamespace=" :/ /lavasoft.blog.51cto /"><messageReceivers><messageReceiver mep=" :// /2004/08/wsdl/in-only"class="org.apache.axis2.rpc.receivers.RPCInOn lyMessageReceiver"/><messageReceiver mep=" :// /2004/08/wsdl/in-out"class="org.apache.axis2.rpc.receivers.RPCMess ageReceiver"/></messageReceivers><parameter name="ServiceClass">pojo.SimpleService</parameter></service>服务名:SimpleService服务实现类:pojo.SimpleService生成SimpleService.aar文件,目的是类文件能够带包名进行公布服务1 d->进入到项目的〝src〞名目 执行下面命令-〝jar -cvf SimpleService.aar META-INF〞;五、部署服务将下载的axis2-1.5-war.zip解开,得到一个axis2.war,将其解压缩到tomcat的默认的w eb公布名目webapp下面,比如,在我机器上会产生F:\apache-tomcat-6.0.20\webapps \axis2的名目,名目下面确实是axis2.war里面的内容。
Web Service学习之axis看着网上的资料学习了一下,做点笔记以防以后忘记。
一、准备工作:到axis官方网站下载相应的jar包,我下的是1.4final版。
/axis/二、建立项目:直接在MyEclipse中建立了一个web项目。
将相应的jar包拷贝到lib文件夹下三、创建一个WebService服务直接创建一个类HelloClient.javaJava代码1.package com;2.3.public class HelloServer {4. public String sayHello(String name) {5. return "Hello " + name;6. }7.}axis支持两种方式创建,一种是将编写好的java文件改为*.jws文件。
个人觉得这样不好,所以就用另外一种,采用在server-config.xml文件中配置的方式。
注意:该文件位置为WEB-INF目录下Xml代码1.<?xml version="1.0"encoding="UTF-8"?>2.<deployment xmlns="/axis/wsdd/"3.xmlns:java="/axis/wsdd/providers/java">4.<globalConfiguration>5.<parameter name="adminPassword"value="admin"/>6.<parameter name="enableNamespacePrefixOptimization"7.value="false"/>8.<parameter name="dotNetSoapEncFix"value="true"/>9.<parameter name="disablePrettyXML"value="true"/>10. <parameter name="sendMultiRefs"value="true"/>11. <parameter name="sendXsiTypes"value="true"/>12. <parameter name="attachments.implementation"13. value="org.apache.axis.attachments.AttachmentsImpl"/>14. <parameter name="sendXMLDeclaration"value="true"/>15.16. <requestFlow>17. <handler type="java:org.apache.axis.handlers.JWSHandler">18. <parameter name="scope"value="session"/>19. </handler>20. <handler type="java:org.apache.axis.handlers.JWSHandler">21. <parameter name="scope"value="request"/>22. <parameter name="extension"value=".jwr"/>23. </handler>24. </requestFlow>25. </globalConfiguration>26.27. <handler name="LocalResponder"28. type="java:org.apache.axis.transport.local.LocalResponder"/>29. <handler name="URLMapper"30. type="java:org.apache.axis.handlers.http.URLMapper"/>31. <handler name="Authenticate"32. type="java:org.apache.axis.handlers.SimpleAuthenticationHandler"/>33.34. <service name="AdminService"provider="java:MSG">35. <parameter name="allowedMethods"value="AdminService"/>36. <parameter name="enableRemoteAdmin"value="false"/>37. <parameter name="className"value="org.apache.axis.utils.Admin"/>38. <namespace>/axis/wsdd/</namespace>39. </service>40.41. <service name="Version"provider="java:RPC">42. <parameter name="allowedMethods"value="getVersion"/>43. <parameter name="className"value="org.apache.axis.Version"/>44. </service>45. <SPAN style="COLOR: #ff0000"><service name="HelloServer"provider="java:RPC">46. <parameter name="allowedMethods"value="*"/>47. <parameter name="className"value="com.HelloServer"/>48. </service></SPAN>49.50. <transport name="http">51. <requestFlow>52. <handler type="URLMapper"/>53. <handler54. type="java:org.apache.axis.handlers.http.HTTPAuthHandler"/>55. </requestFlow>56. <parameter name="qs:list"57. value="org.apache.axis.transport.http.QSListHandler"/>58. <parameter name="qs:wsdl"59. value="org.apache.axis.transport.http.QSWSDLHandler"/>60. <parameter name="qs:method"61. value="org.apache.axis.transport.http.QSMethodHandler"/>62. </transport>63.64. <transport name="local">65. <responseFlow>66. <handler type="LocalResponder"/>67. </responseFlow>68. </transport>69.</deployment>web.xml文件中的配置如下Xml代码1.<?xml version="1.0"encoding="UTF-8"?>2.<web-app version="2.5"xmlns="/xml/ns/javaee"3.xmlns:xsi="/2001/XMLSchema-instance"4.xsi:schemaLocation="/xml/ns/javaee5. /xml/ns/javaee/web-app_2_5.xsd">6.<listener>7.<listener-class>8. org.apache.axis.transport.http.AxisHTTPSessionListener9.</listener-class>10. </listener>11.12. <servlet>13. <servlet-name>AxisServlet</servlet-name>14. <display-name>Apache-Axis Servlet</display-name>15. <servlet-class>16. org.apache.axis.transport.http.AxisServlet17. </servlet-class>18. </servlet>19.20. <servlet>21. <servlet-name>AdminServlet</servlet-name>22. <display-name>Axis Admin Servlet</display-name>23. <servlet-class>24. org.apache.axis.transport.http.AdminServlet25. </servlet-class>26. <load-on-startup>100</load-on-startup>27. </servlet>28.29. <servlet>30. <servlet-name>SOAPMonitorService</servlet-name>31. <display-name>SOAPMonitorService</display-name>32. <servlet-class>33. org.apache.axis.monitor.SOAPMonitorService34. </servlet-class>35. <init-param>36. <param-name>SOAPMonitorPort</param-name>37. <param-value>5001</param-value>38. </init-param>39. <load-on-startup>100</load-on-startup>40. </servlet>41.42. <servlet-mapping>43. <servlet-name>AxisServlet</servlet-name>44. <url-pattern>/servlet/AxisServlet</url-pattern>45. </servlet-mapping>47. <servlet-mapping>48. <servlet-name>AxisServlet</servlet-name>49. <url-pattern>*.jws</url-pattern>50. </servlet-mapping>51.52. <servlet-mapping>53. <servlet-name>AxisServlet</servlet-name>54. <url-pattern>/services/*</url-pattern>55. </servlet-mapping>56.57. <servlet-mapping>58. <servlet-name>SOAPMonitorService</servlet-name>59. <url-pattern>/SOAPMonitor</url-pattern>60. </servlet-mapping>61. <welcome-file-list>62. <welcome-file>index.jsp</welcome-file>63. </welcome-file-list>64.</web-app>四、部署启动tomcat:在浏览器地址栏输入http://localhost:8080/axisWebServiceServer/services可以看到已有的WebServicehttp://localhost:8080/axisWebServiceServer/services/HelloServer?wsdl 可以看到自己写的WebService五、测试调用WebServiceJava代码1.package com;2.3.import .MalformedURLException;4.import java.rmi.RemoteException;5.6.import javax.xml.rpc.ServiceException;7.8.import org.apache.axis.client.Call;9.import org.apache.axis.client.Service;11.public class HelloClient {12.13. public static void main(String[] args) {14. String status = "aaaaaaa";15. String endPoint = "http://localhost:8080/axisWebServiceServer/services/HelloServer";16. String operation = "sayHello";17. Service service = new Service();18.19. try {20. Call call = (Call) service.createCall();21. call.setTargetEndpointAddress(new .URL(endPoint));22. call.setOperationName(operation);23. String xml = (String) call.invoke(new Object[] { status });24. System.out.println(xml);25. } catch (ServiceException e) {26. e.printStackTrace();27. } catch (MalformedURLException e) {28. e.printStackTrace();29. } catch (RemoteException e) {30. e.printStackTrace();31. }32.33. }34.35.}成功!!java实现webservice实例一:首先创建个WEB工程,然后:/axis/网站下载Axis安装包.当然还依赖其他包的,我这里在附件里上传了所有应用到得包,方便大家。