EL5210中文资料(Intersil)中文数据手册「EasyDatasheet - 矽搜」
- 格式:pdf
- 大小:230.76 KB
- 文档页数:5
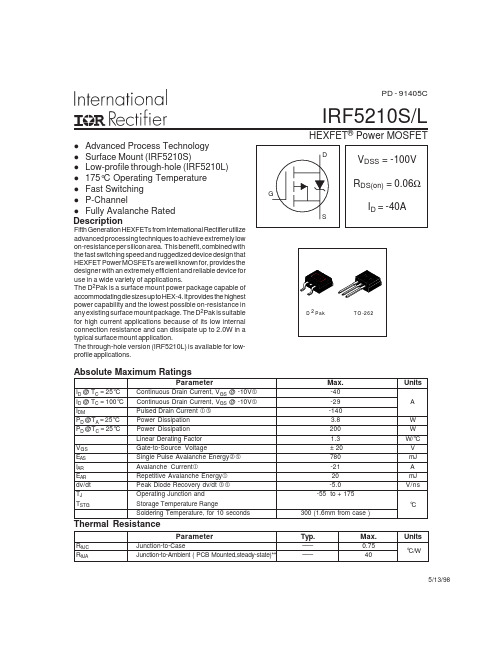
IRF5210S/LHEXFET ® Power MOSFETPD - 91405ClAdvanced Process Technology l Surface Mount (IRF5210S)l Low-profile through-hole (IRF5210L)l 175°C Operating Temperature l Fast Switching l P-Channell Fully Avalanche Rated5/13/98Absolute Maximum RatingsFifth Generation HEXFETs from International Rectifier utilize advanced processing techniques to achieve extremely low on-resistance per silicon area. This benefit, combined with the fast switching speed and ruggedized device design that HEXFET Power MOSFETs are well known for, provides the designer with an extremely efficient and reliable device for use in a wide variety of applications.The D 2Pak is a surface mount power package capable of accommodating die sizes up to HEX-4. It provides the highest power capability and the lowest possible on-resistance in any existing surface mount package. The D 2Pak is suitable for high current applications because of its low internal connection resistance and can dissipate up to 2.0W in a typical surface mount application.The through-hole version (IRF5210L) is available for low-profile applications.Description2 D PakT O -262ParameterTyp.Max.UnitsR θJC Junction-to-Case–––0.75R θJAJunction-to-Ambient ( PCB Mounted,steady-state)**–––40Thermal Resistance°C/WParameterMax.UnitsI D @ T C = 25°C Continuous Drain Current, V GS @ -10V -40I D @ T C = 100°C Continuous Drain Current, V GS @ -10V -29A I DMPulsed Drain Current -140P D @T A = 25°C Power Dissipation 3.8W P D @T C = 25°C Power Dissipation 200W Linear Derating Factor 1.3W/°C V GS Gate-to-Source Voltage± 20V E AS Single Pulse Avalanche Energy 780mJ I AR Avalanche Current-21A E AR Repetitive Avalanche Energy 20mJ dv/dt Peak Diode Recovery dv/dt -5.0V/ns T J Operating Junction and-55 to + 175T STGStorage Temperature RangeSoldering Temperature, for 10 seconds300 (1.6mm from case )°CIRF5210S/LIRF5210S/LIRF5210S/LIRF5210S/LIRF5210S/LIRF5210S/LIRF5210S/LIRF5210S/LIRF5210S/L。


Please read through this user manual before using the product and keep the manual for future reference. Product appearance and/or specifications are subject to change without notice.Before using this camera, please insert a micro SD card (class 10 card, no larger than 32GB) into the Adventure HD 5210 Wi-Fi camera. Camera functions will not work without a micro SD card inserted into the camera. Please note the camera does not include a micro SD card inside the package, the micro SD card must be purchased separately.Adventure Series by Cobra6500 W. Cortland St., Chicago, IL 607071 (773) 889-3087Table of ContentsPreface (3)Manual Disclaimer (3)Safety Precautions (3)System Requirements (4)Features (5)Camera Functi on Quick Guide Diagram (6)Accessories (8)Button Primary F unctions (9)Basic Camera Functi ons (10)Installing the Micr o S D Card (10)Battery (10)Switching Camera On and Off (11)Switching Modes & Changing Settings (11)Camera Mode s (11)Video Recor ding Mode (11)Photo Mode (12)Video Play back Mode (12)Settings Menu (13)Downloading the Adventure HD App (16)Download fr om iTunes (16)Download by iPhone (16)Android Smartphone (16)Using the Wi-Fi (17)Screen Icons (17)Video Mode Screen Icons (17)Photo Mode Screen Icons (18)Review Mode Screen Icons (19)Connecting to External Devices (20)Playback on HD TV (20)View Files on PC / MAC (20)Webcam – PC Only (20)Technical Specifications (21)Copyrig ht (22)PrefaceThis product is an action-sports camera tailored to meet the demands of today’s active lifestyles! This action camera is perfect for vehicle data recording, photography, outdoor sports, home security, and watersports. It allows you to film anytime, anywhere.Manual DisclaimerEvery effort has been made to ensure that the contents of this manual are correct and up to date. However, no guarantee is made regarding the accuracy of the contents. The manufacturer reserves the right to change the manual contents and product specifications without notice. Safety Precautions∙Do not store the product in dusty, dirty, or sandy areas, as its internal components may be damaged.∙Do not store the product in hot areas. High temperatures can shorten the life of electronic devices, damage batteries andwarp or melt certain plastics.∙Do not store the product in cold areas. When the product warms up to its normal temperature, moisture can form inside,which may damage the electronic circuits.∙Do not attempt to open the casing or attempt your own repairs.High-voltage internal components create the risk of electricshock when exposed.∙Do not drop or knock the product. Rough handling may damage the internal components.∙Do not use harsh chemicals, cleaning solvents or strong detergents to clean the product. Wipe the product witha slightly damp soft cloth.∙Do not open the battery cover while an image is being recorded. Doing so will not only make storage of the currentimage impossible, it can also corrupt other image data alreadystored on the SD card.∙If the product or any of its accessories are not working properly, please contact Cobra Electronics at(773) 889-3087. Our staff will assist you and if necessary,arrange for the product to be repaired or replaced.∙Test for proper operation before using the camera.∙Cobra Electronics is not responsible for any collisions, damage or personal injuries resulting from the use of the Adventure HDAction Camera.∙Cobra Electronics is not responsible for any legal repercussions from use of the Adventure HD Action Camera or from the sharing of footage.Cobra Electronics is not responsible for any property damage orlost/stolen Adventure HD Action Cameras.System RequirementsThe camera requires a computer with the following minimum specifications for full HD video playback:∙Windows® 7 / MAC OS X 10.8∙Intel® Core Duo™ / AMD Dual-Core CPU∙ 2 GB of RAM∙DirectX 9 compatible graphics solution∙Available hard disk spaceThe camera requires a computer with the following minimum specifications for WVGA/VGA video playback:∙Windows® Vista / MAC OS X 10.5∙Intel® / AMD Dual-Core CPU∙ 1 GB of RAM∙DirectX 9 compatible graphics solution∙Available hard disk spaceMinimum requirements for connecting the camera to a PC or Mac: ∙Standard USB 2.0 portFeaturesThe camera a nd its include d a cce ssor ie s offer a variety of features and functions including:∙ A water-resistant case that allows you to film underwater up to 30meters∙Built-in Wi-Fi: Connects camera to S martphones via Adventure HD App ∙High definition screen that displays and plays back recorded videos ∙Removable battery that is easy to replace with a spare to prolong the recording time of the camera∙Video recording while charging∙Video recording while battery powered∙HD wide-angle lens∙HDMI output∙Web camera∙Supports memory cards up to 32GB maximum storage space, class 10∙Multiple video recording formats: 1080P (interpolated) / 720P / WVGA ∙Records video in .AV I format∙Multiple photo shooting modes: Single shot, Burst, and ContinuousShooting (Time-lapse)∙Compact sizeCamera Function Quick Guide DiagramAccessoriesThe following items are included in the camera package. If any items are missing or damaged, contact Cobra immediately.∙Waterproof Camera Casing∙Adventure HD Camera∙Camera Holder∙Straight Joint Mounts x3∙J-Hook Buckle Mount∙T ripod Mount∙Basic Buckle Mount∙T ripod Mount Adapter∙Flat / Curved Adhesive Mounts∙Velcro Straps x3∙Micro USB Charging Cable∙Cleaning Cloth∙Adventure HD 5210 Instruction Manual∙Zip Ties x4 / 3M Stickers x2Button Primary FunctionsButton FunctionPower / Mode Button Turn the camera on & off.Change between Video mode,Photo mode, Playback mode,and settings menu.OK Button OK Enter and confirm settings in the settings menu.Up Button Scroll up through the settings.Scroll through videos/photos inplayback mode.Press to enter Wi-Fi mode Down Button Scroll down through thesettings.Scroll through videos/photos inplayback mode.Basic Camera FunctionsInstalling the Micro SD CardTo insert the SD card∙Find the Micro SD card slot∙Insert the card into the slot (make sure the card is facing the correct way)∙Push the card into the slot until it clicks**Note – Please use a minimum speed Class 10 card, maximum 32GB storage capacity. Cobra recommends a name brand card such as Lexar®, SanDisk®, Kingston® or Gigastone.Follow these steps in reverse order to remove the SD card**Note - Please ensure that the SD Card is inserted in the correct direction or you may damage the SD card and/or SD card reader. Battery∙Use only the type of battery that came with the camera.Using any other type ofbattery may damage the equipment and invalidate thewarranty.∙Do not short the battery terminals. The battery could overheat. ∙Do not attempt to split or peel the outer casing.∙Remove the battery if the camera is not going to be used fora long time. If the battery is left unused for more than 3months,charge the battery before use.1.Installing and Removing Batteriesa.Press on battery cap to open itb.Correctly install the battery into the camera as directed bythe +/- symbolsc.Remove Battery: Open the battery cap to take the batteryout2.Charginga.Charging can be done by either connecting the camera toa computer or USB power adapterb.Charge the camera in a vehicle by connecting it to a USBcar chargerc.The camera can record video while chargingd.The camera will charge even when it’s powered off Switching Camera On and OffPress and hold the Power / Mode button for 3 seconds to turn it on/offSwitching Modes & Changing SettingsSwitch between video recording, photo, & playback modes and the settings menu by pressing the Power / Mode button. An icon in the upper left of the screen will show the current mode.In the settings menu choose a setting with the Up/Down buttons and select with the OK button. Press the Power / Mode button to exit the settings menu.Camera ModesVideo Recording ModePress OK to start recording. A record icon in the upper leftcorner will start to flash. Press OK again to stop recording. Therecord icon will disappear.Video Recording Notes:Resolution: Higher resolutions result in larger video files.Loop Recording:When loop recording is turned on video files will be at the specified length. When the SD card is full the oldest file(s) will be deleted automatically so new files can be recorded.Exposure: In very bright environments set the Exposure Value (EV) as a positive number. For very dark environments set the EV to a negativenumber. The larger the value the greater the exposure value is compensated.Motion Detection: If motion detection is turned on, the camera will only begin recording if it detects any movement. If the camera ismov ed or if there is movement in the camera’s field of view, the camera will record a short segment and stop recording once the movement has stopped.Photo ModePress OK to take photos.Photo Notes:Exposure: In very bright environments set the Exposure Value (EV) as a positive number. For very dark environments set the EV to a negative number. The larger the value the greater the exposure value is compensated.Quick Review: After taking a photo the photo will be displayed on the screen for the selected number of seconds.Date/Time:Sets the watermark for photosVideo Playback ModePress Up/Down to scroll through the files on the SD cardPress OK to playback a video fileDuring playback press Up/Down to adjust the volumeThe Playback Mode menu allows files to be Deleted or Protected. Protected files are not deleted from the SD card as a result of loop recording or the Delete All function.Settings Menu(default setting in bold)Press Up/Down buttons to scroll through the settings and select with the OK button. Press the Mode button to go back and to exit theAuto Power Off turns the camera off after a period of inactivity Format will format the SD card and erase all data from the SD cardTo view the videos/photos on a computer, attach a USB cable to export the videos and photos onto a computer to play. Or you can take the Micro SD card out and access the files with a card reader.Downloading the Adventure HD AppDownload from iTunesClick iTunes icon to open iTunesClick iTunes Store Icon to open the iTunes StoreEnter “Adventure HD App” into the search barClick download under the Adventure HD App IconOnce it’s finished the Adventure HD App icon willshow on your home screenDownload by iPhoneClick the App Store iconClick search iconClick the search field and enterAdventure HD App, click the searchbuttonClick the icon and click downloadOnce it’s finished the Adventure HD Appicon will show on your home screenAndroid SmartphoneOpen the Google Play Store on your phoneEnter “Adventure HD App” into the search bar and hitsearchClick on the Adventure HD App icon to viewthe app pageClick the install button to install the Adventure HD App toyour phoneOnce it’s finished, the Adventure HD App willappear in your application menu.Using the Wi-FiTo enter the camera’s Wi-Fi interface, press and hold the OK button. The camera’s LCD screen will change to a Wi-Fi symbol. Once the Wi-Fi has initialized on the camera, the LCD screen will show the network name (ssid) and password (pwd) required to connect a Smartphone to the Wi-Fi.Step 1: Initialize the Wi-Fi on the cameraStep 2: On a Smartphone, enter the Wi-Fi settingsStep 3: Connect the Smartphone to the Adventure HD camera’s Wi-Fi network (network name is displayed on the camera’s LCD screen) Step 4: Enter the password displayed on the cameras LCD screenStep 5: Wait for the Smartphone to connect to the camera’s Wi-Fi Step 6: Once Wi-Fi is connected, open the Adventure HD App. The app will connect the Smartphone to the Adventure HD cameraStep 7: Once the connection is successful, the Smartphone will display what the camera sees on the screenStep 8: The camera photo/video recording can now be controlled from the SmartphoneScreen IconsVideo Mode Screen IconsIcon DescriptionIndicates that the camera is currently in video mode.Displays current battery life.Indicates that the camera is currently charging.Displays the date stamp that appears on the footage.Displays the time stamp that will appear on thefootage.Displays the current exposure value (EV) setting.Indicates that a MicroSD card needs to be insertedinto the camera.Indicates that loop recording is turned on. Alsoindicates the video duration for each recording.Indicates “Record Audio” is turned on.Indicates “Record Audio” is turned off.Indicates that a MicroSD card has been inserted intothe camera.Displays the amount of recording time that isavailable on the SD card.Displays the video resolution the camera is filming in. Photo Mode Screen IconsIcon DescriptionIndicates that the camera is currently in photo mode.Displays the current ISO setting of the camera.Indicates that auto white balance is on.Indicates that daylight white balance is on.Indicates that cloudy white balance is on.Indicates that tungsten white balance is on.Indicates that fluorescent white balance is on.Indicates that the anti-shake function is turned on.Displays current battery life.Indicates that the camera is currently charging.Displays the current exposure value (EV) setting.Indicates that the photo quality is set to “Economy”.Indicates that the photo quality is set to “Normal”.Indicates that the photo quality is set to “Fine”.Indicates that a MicroSD card needs to be insertedinto the camera.Displays the photo resolution the camera is shootingin.Displays the total number of photos that can betaken at the selected resolution.Indicates that a MicroSD card has been inserted intothe camera.Indicates that the camera is in burst mode. Review Mode Screen IconsIndicates that the camera is in review mode.Displays current battery life.Indicates that the camera is currently charging.Date stamp on footage.Date stamp on photos.File name of video.File name of photo.Press OK button for video playback. Displayedwhen reviewing a video file.Displays the photo resolution the camera isshooting in.Indicates photo playback.Time stamp on video footage.Time stamp on photos.Resolution of the video clip.Connecting to External DevicesPlayback on HD TVTurn the camera on, connect the HDMI port in the camera to the TV via an HDMI cable (not included) and choose HDMI mode on the TV. The LCD screen on the camera will turn off automatically and now all operations and functions can be seen on the TV.View Files on PC / MACConnect the camera to the computer using the included USB cable. The LCD Screen displays Mass Storage and PC Camera. Press theleft/right buttons to select Mass Storage and the OK button to confirm. Click on the camera drive and the subfolder DCIM to view videos and photos.Webcam – PC OnlyConnect the camera to the computer using the included USB cable and select PC Camera. The camera will connect to your PC and can now be setup and used as a webcam from the systems menu or from within programs and applications that use a webcam.Copyright© Copyright 2016.All rights reserved. No part of this publication may be reproduced, transmitted, transcribed, stored in a retrieval system or translated into any language or computer language, in any form or by any means, electronic, mechanical, magnetic, optical, manual or otherwise, without the prior written permission of the Cobra Electronics.© 2016 Cobra Electronics Corporation, 6500 W Cortland Street, Chicago, IL 60707 Cobra, the snake design, Adventure HD logo are proprietary t rademarks of Cobra Electronics Corporation. All other trademarks and trade names are those of their respective owners.Cobra Electronics(773) 889-3087Apple, the Apple logo, iPhone, and iPod touch are trademarks of Apple Inc., registered in the U.S. and other countries. App Store is a service mark of Apple Inc. Android, Google Play and the Google Play logo are trademarks of Google Inc.HDMI, the HDMI logo, and High-Definition Multimedia Interface are trademarks o r registered trademarks of HDMI Licensing, LLC in the United States and/or other countries.SanDisk, the SanDisk logo, Store Your World in Ours CompactFlash, Cruzer, ImageMate RescuePR SanDisk Extreme and SanDisk Ultra are trademarks of SanDisk Corporation. © 2006 SanDisk Corporation All rights reserved.Lexar is a trademark of Micron Technology, Inc.Kingston is a trademark of Kingston Technology Corporation.。
IRF5210S中文资料IRF5210S/LHEXFET ? Power MOSFETPD - 91405ClAdvanced Process Technology l Surface Mount (IRF5210S) l Low-profile through-hole (IRF5210L)l 175°C Operating Temperature l Fast Switching l P-Channell Fully Avalanche Rated5/13/98Absolute Maximum RatingsFifth Generation HEXFETs from International Rectifier utilize advanced processing techniques to achieve extremely low on-resistance per silicon area. This benefit, combined with the fast switching speed and ruggedized device design that HEXFET Power MOSFETs are well known for, provides the designer with an extremely efficient and reliable device for use in a wide varietyof applications.The D 2Pak is a surface mount power package capable of accommodating die sizes up to HEX-4. It provides the highest power capability and the lowest possible on-resistance in any existing surface mount package. The D 2Pak is suitable for high current applications because of its low internal connection resistance and can dissipate up to 2.0W in a typical surface mount application.The through-hole version (IRF5210L) is available for low-profile applications.Description2 D PakT O -262ParameterTyp.Max.UnitsR θJC Junction-to-Case–––0.75R θJAJunction-to-Ambient ( PCB Mounted,steady-state)**–––40Thermal Resistance°C/WParameterMax.UnitsI D @ T C = 25°C Continuous Drain Current, V GS @ -10V -40I D @ T C = 100°C Continuous Drain Current, V GS @ -10V -29A I DMPulsed Drain Current -140P D @T A = 25°C Power Dissipation 3.8W P D @T C = 25°C Power Dissipation 200W Linear Derating Factor 1.3W/°C V GS Gate-to-Source Voltage± 20V E AS Single Pulse Avalanche Energy 780mJ I AR Avalanche Current-21A E AR Repetitive Avalanche Energy 20mJ dv/dt Peak Diode Recovery dv/dt -5.0V/ns T J Operating Junction and-55 to + 175T STGStorage Temperature RangeSoldering Temperature, for 10 seconds300 (1.6mm from case )°CIRF5210S/LIRF5210S/LIRF5210S/LIRF5210S/LIRF5210S/LIRF5210S/LIRF5210S/LIRF5210S/LIRF5210S/L。
深圳奇弦物联科技有限公司QX5210扫码器集成手册版本v1.0免责声明使用产品前请务必认真阅读《QX5210产品手册》中的所有内容,以保障产品安全有效的使用。
请勿自行拆卸产品或撕毁设备上的封标,否则深圳奇弦物联科技有限公司不承担保修或更换产品的责任。
本手册中的图片仅供参考,如有个别图片与实际产品不符,请以实际产品为准。
对于本产品的升级和更新,深圳奇弦物联科技有限公司保留随时修改文档而不另行通知的权利。
使用本产品的风险由用户自行承担,在适用法律允许的最大范围内,对因使用或不能使用本产品所产生的损害及风险,包括但不限于直接或间接的个人损害、商业赢利的丧失、贸易中断、商业信息的丢失或任何其它经济损失,深圳奇弦物联科技有限公司不承担任何责任。
本手册的一切解释权与修改权归深圳奇弦物联科技有限公司所有。
修订记录变更日期版本版本描述责任人2022.2.24V1.0初始版本目录免责声明 (2)1.前言 (5)1.1.产品简介 (5)1.2.产品特点 (5)2.产品外观 (6)2.1.1.整体介绍 (6)2.1.2.产品尺寸图 (7)3.商品参数 (8)3.1.常规参数 (8)3.2.识读参数 (9)3.3.电气参数 (10)3.4.工作环境 (10)4.接口定义 (11)5.设备配置 (16)6.安装方法 (19)7.注意事项 (20)8.联系方式.......................................................................................................................................................错误!未定义书签。
1.前言感谢使用奇弦物联提供的QX5210扫码设备。
认真阅读本文档,可以帮助您了解此设备功能、特点、以及快速掌握设备的使用、安装方法。
1.1.产品简介QX5210扫码设备是专为门禁扫码领域研发的一款产品,具备多种输出接口,支持TTL、韦根、RS485、RS232、以太网等多种输出方式,内置继电器,适用于闸机、门禁等场景。
NE5210(280MHz)一、PIN配置二、描述NE5210是7 kΩ互阻抗宽频带,微分输出的低噪声放大器。
特别适合信号恢复光纤接收器。
一部分是适合很多其他射频程序作为一个通用获得块。
三、特性•低噪声:3.5 pa / /赫兹•单5 v电源•大带宽:280 mhz•微分输出•输入/输出阻抗低•高电源抑制比•高过载阈值电流•宽动态范围•7 kw微分互阻四、应用•光纤接收器,模拟计算机和数字计算机两种•电流电压转换器•宽带增益块•医学和科学仪器•传感器放大器•单端微分转换•低噪声射频放大器•射频信号处理五、应用信息0 到 +70 C六、绝对最大额定参数1、最大耗散是由操作环境温度和热阻决定的:qJA = 125°C / W。
2、建议使用一个上拉电阻VCC PIN二极管七、推荐的操作条件八、直流电特性最小和最大限制适用于工作温度范围在VCC = 5 v,除非另有说明。
典型的1.测试条件:输出静电压变化小于100 mv 3 mA负载电流。
R/V VCC=50.5V R/T TA=TA MAX-TA MIN %/ C f=10MHz, TA=25 C 测试电路2 pA/HzTA=25 C 测试电路2 f=100MHz f=200MHz f=300MHz f=100MHz f=200MHz f=300MHz(VCC1=VCC2) 直流测试,VCC=0.1V ,等效交流测试电路3直流测试,VCC=0.1V ,等效交流测试电路4直流测试,VCC=0.1V ,等效交流测试电路5九、交流电特性(连续的)1.寄生电容相当于约0.2 pf2.PSRR是依赖于输出引用和电路板布局在更高的频率。
最佳性能在VCC线使用射频滤波器3.保证了线性和过载测试。
4.tR上升时间定义为20 - 80%。
它保证了3 db带宽测试。
十、测试电路:测试电路2:测试电路3(连续的):测试电路4(连续的):测试电路5(连续的):测试电路6(连续的):测试电路7:十一、典型的差分输出电压和输入电流十二、NE5210测试条件:步骤1:RT在 60 A 测量RT = (VO1 – VO2)/(+60 A – (–60A))VO1在t IIN = +60A测量VO2在t IIN = –60A测量步骤2:线性度= 1 – ABS((VOA – VOB) / (VO3 – VO4))VO3 在 IIN = +120A测量VO4在 IIN = –120A测量VOA _ RT _ (_ 120_A) _ VOBVOB _ RT _ (_ 120_A) _ VOB步骤3:VOMAX = VO7 – VO8VO7 在 IIN = +260A测量VO8 在 IIN = –260A测量步骤4:IIN 测试条件VO7 – VO5 > 20mV and V06 – VO5 > 20mVVO5 在 IIN = +160A测量VO6 在 IIN = –160A测量VO7在 IIN = +260A测量VO8 在 IIN = –260A测量十三、典型的性能特性NE5210电源电流和温度的关系如图:NE5210输出偏置电压和温度的关系如图:输出电压与输入电流的关系如图:NE5210输入偏置电压与温度的关系如图:NE5210输出偏置电压与温度的关系如图:微分输出电压和输入电流的关系如图:NE5210输出偏置电压与温度的关系如图:NE5210微分输出摆动与温度的关系如图:微分输出电压与输入电流的关系如图:增益与频率:NE5210微分互阻与温度:NE5210带宽与温度:增益和相位偏移与频率的关系:NE5210典型的带宽分布:NE5210输出电阻与温度:输出电阻与频率的关系如图:NE5210电源供应拒绝比例与温度的关系:群延时:输出阶跃响应:十四、工作原理阻抗放大器被广泛用作前置放大器光纤接收器。
INDUSTRIAL POWER OVER ETHERNET SWITCHIndustrial 8G RJ45 + 2G Combo Managed PoE SwitchJetNet 5210GP-2CKorenix JetNet5210GP,the DIN-Rail type industrial Gigabit ManagedPoE Switch is designed with eight10/100/1000TX ports,two GigabitRJ-45/SFP combo ports.JetNet5210GP is the first industrialethernet switch compliance with IEEE802.3af/at/bt,each ethernetport can max supports90W for PD,and total budget up to480W*Note.JetNet5210GP is designed for operating reliably under harshenvironments,it supports one alarm relay to indicate faultconditions when any link or power failure happens,as a result,userscan quickly handle the emergency and shorten the failover time.With IEC61000-6-2/61000-6-4Heavy Industrial EMC and Tracksidecertification design,including robust enclosure and-40~75o C wideoperating temperature range,JetNet5210GP ensures highperformance under traffic control systems and other Networkapplications.Overview④8 10/100/1000 Base TX ports + 2 Gigabit RJ-45/ SFP combo④SFP ports support Digital Diagnostic Monitoring (DDM)④Compliance with IEEE 802.3af/at/bt, each port max 90W High Power PoE *Note④Total PoE Budget 480W *Note, Flexible PoE ports setting④Network Redundancy –MSR (Multiple Super Ring), ITU-T G.8032 ERPS V1/V2, RSTP, MSTP④Fully Device Management –SNMP v1/v2c/v3, RMON, Web UI, Telnet and Local Console④Friendly Device and Network Topology recovery utility –Korenix View, Korenix NMS④Layer 2 Network Performance –IEEE802.1Q VLAN, Private VLAN, Trunk, Packet Filtering, DHCP Server/Client,Traffic Prioritize, Rate Control④Advanced Security system by Port Security, Access IP list, SSH, HTTPS Login, TACACS+④Event Notification through E-mail, SNMP trap and SysLog④IEEE 802.1AB LLDP and optional Korenix NMS software for auto-topology and group management④Cisco-Like CLI, Web, SNMP/RMON for network management④Multiple event relay output for enhanced device alarm control④Hi-Pot Isolation Protection for ports and power④Railway Track Side EN50121-4 Certification④Dual 48VDC Power input④-40~75°C Wide Operating TemperatureDimensionJetNet 5210GPSpecificationTechnologyIEEE Standards IEEE 802.3 10 Base-T EthernetIEEE 802.3u 100 Base-TX Fast EthernetIEEE 802.3u 100 Base-FX Fast Ethernet FiberIEEE 802.3ab 1000 Base-TIEEE 802.3z Gigabit FiberIEEE 802.3x Flow Control and Back-pressureIEEE 802.1AB Link Layer Discovery Protocol (LLDP)IEEE 802.1p Class of Service (CoS)IEEE 802.1Q VLAN and GVRPIEEE 802.1 QinQIEEE 802.1D-2004 Rapid Spanning Tree Protocol (RSTP)IEEE 802.1s Multiple Spanning Tree Protocol (MSTP)IEEE 802.3ad Link Aggregation Control Protocol (LACP)IEEE 802.1x Port Based Network Access ProtocolIEEE802.3 af/at/bt Power over EthernetSpecificationPerformanceSwitch Technology Store and Forward Technology with 20 Gbps Switch FabricSystem Throughput29.7Mega packet per secondCPU performance MIPS-4KEc CPU running at 500 MHzSystem Memory32M Bytes flash ROM, 256M Bytes DDR3 SDRAMTransfer packet size64 bytes to 10K bytes Jumbo FrameMAC Address8K MAC address tablePacket Buffer 4.1Mbit SRAM packet memoryForwardingperformance14,880 pps for Ethernet and 148,800 pps for Fast Ethernet, 1488,100 pps for Gigabit Ethernet InterfaceEnclosure Port•10/100/1000 Mbps Ethernet port: 8 x RJ-45•Gigabit Ethernet port : 2 x RJ-45 with auto MDI/MDI-X function•100Mbps / 1000Mbps Fiber port : 2 x SFP Socket for SFP fiber transceiver with Hot-swappable and D.D.M. functions•RS-232Console port : 1 x RJ-45 for system configuration•Digital Input / Relay Output port: 4-Pin removable terminal block connector•Power input port: 4-Pin removable terminal block connectorEthernet Cable100 Base-TX: 2-pair UTP/STP Cat.5e/Cat.6 cable, EIA/TIA-568B 100-ohm (100m)1000 Base-T: 4-pair UTP/STP Cat.5e/Cat.6 cable, EIA/TIA-568B 100-ohm (100m)Digital Input Digital Input (Hi): DC 11V~30VDigital Input (Low): DC 0V~10VSupports sink type signal input with photo-coupler isolationRelay Output Dry Relay output: 1A / DC 24VSupports Multiple Events Binding trigger function.Diagnostic Indicators•1000Mbps RJ-45 port: Link /Activity (Green on, Green Blinking),1000Mbps (Yellow)•SFP port: Link/Activity (Green on, Green Blinking)•Power: System Power ready (Green on)•Sys: System Ready (Green on), System Updating (Green Blinking)•DO (Alarm): Alarm Relay Active (Red On)•R.S.: Green on (Ring normal)/Blinking (wrong ring port connective), Amber on (Ringabnormal) / Blinking (device’s ring port failed)•PoE: Green On (PD Detect/On), Off (None-Detect/Off)Power over EthernetStandard IEEE 802.3af, IEEE 802.3at, IEEE 802.3btPoE operating mode Auto Mode: IEEE802.3af/at/btForced Mode: User configured Power consumption budget control with IEEE 802.3 PoE /PDdetection, or forced without PD detectionPoE forwarding conductor IEEE 802.3 af/at: RJ-45: V+(3,6), V-(1,2) IEEE 802.3 bt: RJ-45: V+(3,4,5,6), V-(1,2,7,8)Power forwarding capability 8 Port PoE (#1-8)15W/IEEE802.3af, 30W/IEEE 802.3at, 60W-90W/IEEE 802.3bt*NotePoE System Power Budget Port-based system power budget control with first plug-in high priority mechanism PoE System Power Budget: 480Watts.*NoteManagementTelnet & Local Console Supports command line interface with Cisco-like commands and maximum 4 sessions; thetelnet interface also supports SSHSNMP Support IPv4/IPv6, v1, v2c, v3 with SNMP trap function, trap station up to 4 and can bemanually configured the trap server IP address.SNMP MIB MIBII, Bridge MIB, Ethernet-like MIB, VLAN MIB, IGMP MIB, Korenix Private MIBKorenix Utility Supports Korenix View and Korenix NMS with IEEE 802.1AB Link Layer Discovery Protocolfor device and link auto-topology discoveryNetwork Time Protocol Supports NTP protocol with daylight saving function and localized time sync function. Management IP Security IP address security to prevent unauthorized accessE-mail Warning 4 receipt E-mail accounts with mail server authenticationSystem Log Supports both Local or remote Server with authenticationIEEE 802.1x Port based network access control, RADIUS,MAB, TACACS+Network RedundancyMultiple Super Ring (MSR TM)New generation Korenix Ring Redundancy Technology, Includes Rapid Super Ring, RapidDual Homing, TrunkRing TM, MultiRing TM, SuperChain TM and backward compatible withlegacy Super Ring TM.Rapid Dual Homing (RDH TM)Multiple uplink paths to one or multiple upper switchTrunkRing TM Integrates port aggregation function in ring path to get higher throughput ring architecture MultiRing TM Couple or multiple rings; Up to 5 Gigabit rings in single switchSuperChain TM It is new ring technology with flexible and scalability, compatibility, and easyconfigurable. The ring includes 2 types of node Switch –Border Switch and Member Switch ITU-T G.8032 ERPS Support ITU-T G.8032 ERPS V1 single ring topology, and ERPS V2 multiple rings with laddertopologyRapid Spanning Tree IEEE802.1D-2004 Rapid Spanning Tree Protocol. Compatible with Legacy Spanning Treeand IEEE 802.1w multiple spanning treeLoop Protection The Loop Protection prevents any network looping caused by RSTP and MSR ring topologychangeNetwork PerformancePort Configuration Port link Speed, Link mode, current status and enable/disablePort Trunk IEEE 802.3ad port aggregation and static port trunk; trunk member up to 8 ports andmaximum 5 trunk groupsVLAN IEEE 802.1Q Tag VLAN with 256 VLAN Entries and provides 2K GVRP entries3 VLAN link modes-Trunk, Hybrid and Link accessPrivate VLAN Direct client ports in isolated/community VLAN to promiscuous port in primary VLANIEEE802.1 QinQ Supports Double VLAN Tag function for implementing Metro Network topologiesClass of Service IEEE 802.1p class of service; per port 4 priority queues.Traffic Prioritize Supports 4 physical queues, weighted fair queuing (W.R.R.) and Strict Priority scheme,which follows 802.1p CoS tag and IPv4 ToS/ DiffServ information to prioritize the traffic ofyour industrial networkIGMP Snooping IGMP Snooping v1/v2c /v3 for multicast filtering and IGMP Query mode; also supportunknown multicasting process forwarding policies-drop, flooding and forward to routerportRate Control Ingress/Egress filtering for Broadcast, Multicast, Unknown DA or All packetsPort Mirroring Online traffic monitoring on multiple selected portsPort Security Port security to assign authorized MAC to specific portDHCP DHCP Client, DHCP Server with IP & MAC Address binding, DHCP relay and port basedDHCP serverMechanicalInstallation DIN-Rail mountingCase Steel metal with Aluminum heat-dissipate panel housingIngress Protection IP31Dimension (mm)74(W) x 132(D) x 135(H) –w/o DIN Rail ClipWeight 1.2KgPower RequirementSystem power2x DC power input with polarity reverse protectionInput Range DC 48V & 50V (48-57V)Power system type Passive power systemPower Consumption PoE 240W@48V; 480W@50V *NoteEnvironmentalOperating Temperature-40 ~75o COperating Humidity0% ~ 95%, non-condensingStorage Temperature-40 ~ 85o C, 0% ~90% HumidityHi-Pot AC 1.5KV for Ethernet port and powerRegulatory ApprovalsEMC IEC/EN61000-6-2, IEC/EN61000-6-4 Heavy Industrial EMCEMI:FCC Class A, CE/ Class AEMS:IEC/EN61000-4-2, IEC/EN61000-4-3, IEC/EN61000-4-4, IEC/EN61000-4-5,IEC/EN61000-4-6, IEC/EN61000-4-8Railway Application EN50121-4Shock Compliance with IEC 60068-2-27Vibration Compliance with IEC 60068-2-6Free Fall Compliance with IEC 60068-2-32Warranty 5 years*Note:Please choose the model with “U” for supporting IEEE 802.3bt and 480W power budget.Kindly refer below order information for more details.Ordering InformationModel Name DescriptionJetNet5210GP-2C Industrial 8G RJ45 + 2G Combo Managed PoE Ethernet Switch with 240W Power Budget,-40~75o CJetNet5210GP-2C-U Industrial 8G RJ45 + 2G Combo Managed PoE Ethernet Switch with 480W Power Budget,IEEE802.3af/at/bt,-40~75o CIncludes:•JetNet 5210GP-2C Series•DIN-Rail kit•Quick Installation GuideNote: Please download User Manual from Korenix website。