TridiumN4开发BajaUX模块的开发环境设置说明
- 格式:pdf
- 大小:753.74 KB
- 文档页数:11

Make/Build环境使用手册Version:0.1.52009-10-21.spreadtrum.修订历史重要声明声明本文档中的任何内容受《中华人民XX国著作权法》的保护,所有 © 2006, 展讯通信XX,保留所有权利,但注明引用其他方的内容除外。
商标声明本文档中展讯通信XX的产品的所有商标是展讯通信XX专有,但注明属于其他公司拥有的商标除外。
在提及其他公司及其产品时将使用各自公司所拥有的商标,这种使用的目的仅限于引用。
不作保证声明展讯通信XX不对此文档中的任何内容作任何明示或暗示的陈述或保证,而且不对特定目的的适销性及适用性或者任何间接、特殊或连带的损失承担任何责任。
XX声明本文档(包括任何附件)包含的信息是XX信息。
接收人了解其获得的本文档是XX的,除用于规定的目的外不得用于任何目的,也不得将本文档泄露给任何第三方。
目录1说明62运行环境72.1编译环境及安装相关软件73编译架构84目录结构及关键脚本114.1make/build环境的关键目录结构114.2关键脚本124.2.1Makefile.rules124.2.2Makefile.modules134.2.3Makefile.third-party134.2.4Makefile.verify134.2.5Makefile134.2.6make.bat135基本命令145.1帮助145.2编译参数中 projectname 与项目编译脚本对应关系14 5.3编译整个项目[update]145.4重新编译整个项目[new]155.5清除所有编译结果[cleanall]155.6清除模块编译结果155.7编译模块155.8生成可执行文件155.9编译FDL/bootloader155.10编译NV155.11编译Resource165.12编译手机模拟器工程176其它命令206.1编译Logel工具206.2pclint 扫描206.3编译完成net send提醒功能206.4编译命令的简写206.5多线程编译206.6分布式编译216.7编译出错暂停216.8特别提醒217模块修改及项目定制227.1模块修改227.1.1模块目录结构调整227.1.2添加或删除文件227.1.3修改编译选项227.1.4新增模块237.2项目定制237.2.1创建全新的项目编译脚本237.2.2复制方式创建项目编译脚本237.2.3添加或删除模块247.2.4修改项目编译选项247.2.5客户发布及使用258第三方编译选项说明269相关使用技巧279.1查看log文件279.2makefile 编译过程中报错: No rule to make target ` XXX ', needed by `yyy'.27 9.3Makefile 中全局变量和转义宏的区分279.4Source Insight和ClearCase配置279.5鼠标右键命令行快捷方式设置309.6DOS下输入命令时用Tab键进行命令自动填充301 说明Make/Build环境中实现了项目开发和维护使用的GNU标准应用脚本,基于这些应用脚本和相关make工具,Make/Build环境可以完成项目全部代码的编译和二进制文件的生成,对其他一些需要的文件也可以在Make/Build环境中通过编译的方式产生,如fdl,bootloader,nv_parameter,resource等。

Bada系统学习-开发环境的搭建bada SDK是一个软件开发工具箱,它包括bada平台类库,文档,以及一些实例代码.bada SDK 具体包含以下内容:•平台二进制文件及类库bada二进制文件及第三方类库•头文件bada的头文件•IDE集成开发环境是基于EclipseCDT(含c/c++开发工具)以及JSDT(含javascript开发工具)•工具o Emulator(仿真模拟器)o Event Injector(事件注入器)o Tool-chain (用于编译调试的小工具)o Performance Analyzer(性能分析器)• C++,flash, andWeb的一些示例代码一些使用bada Api开发的现实应用的实例代码.如果需要更新SDK或者获取新的SDK版本,可以为bada IDE安装一个bada SDK 更新插件. 安装了这个插件后,每次IDE启动时它会自动查找SDK的最新更新. 如果在安装过程中出现警告窗口,请点击OK以下是SDK文件夹下主要内容的简要介绍:Table: Contents of the SDK folders Folder Contents Documents bada文档 Examples 一些基础应用的示例代码,每个实例项目仅讲解一个类的示例. IDE bada IDE Include 公共头文件 Model bada 类库 Resources 示例项目的图片资源文件 Samples 高级示例应用,包含整个应用包 Tools 在IDE中提供的一些可用工具,让你在创建应用功能,调试/运行应用时更高效便捷.如需了解在安装或者启动bada应用时遇到的错误码,请参考 Error Codes.bada IDEbada IDE是一个集成开发环境,为我们提供了一套开发工具,例如C++编辑,编译,调试,应用程序向导,可视化UI编辑器(用于设计桌面应用UI),潜在bug检查工具(用于在源码中追踪bug),API与特权检查工具(用于检查API以及特权的违规操作),Profiler (用于优化应用代码), JavaScrip调试器 (用于调试web应用),测试工具(用于单元测试),以及UI排序器(用于测试应用UI)bada IDE是基于EclipseCDT(含c/c++开发工具)以及JSDT(含javascript开发工具). Eclipse 提供了一整套代码编辑工具.这些工具CDT的特性有良好支持,例如语法高亮显示,代码折叠,文档选项卡,以及内容提示 (代码自动补充完成提示).IDE UI 包含多种视图工具可以通过Window > Show View or Window > Show View > Other > bada来打开.比较重要的bada需要的视图工具有:•Output(输出)将显示log日志,调试以及异常信息••资源查看器显示包含在项目中的资源文件.它还允许你快速为你的项目添加forms••Profile显示当应用执行时的一些统计信息,例如调用次数,执行时间统计等.••Problems显示build错误或者警告,内存使用检查,API,特权检查器等工具•Figure: Examples of IDE views有些视图只在特殊视图模式下才可用,要切换视图模式点击Window > Open Perspective > Other选择需要的视图模式.为 the bada IDE安装插件bada IDE插件安装步骤:•在bada IDE中选择Help > Install New Software.••在Work with下拉列表中, 选择static.bada/feature-update/作为该软件地址••选择要安装的插件并点击Next继续并完成安装•注意 bada SDK 2.0.0 还不支持Simulator(模拟器,非Emulator(仿真器),二者的区别是,前者只模拟软件的行为,而后者[Emulator]不仅模拟软件环境,还仿真硬件环境,更强大,接近真实运行环境,本翻译系列之前提到的模拟器指后者,若引起读者误解,还望见谅,随后会逐步更正). 因此,如果要开发使用早于2.0.0版本的应用,你必须要将你的应用整合到bada SDK2.0.0中更新 bada IDE检查 bada IDE 更新并通过 IDE安装的步骤为:•退出bada IDE.••选择一下一个方式执行:••如果你已经安装了JRE或者JDK,从环境变量中移除\<BADA_SDK_HOME>\IDE\jre 目录•如果你没有安装JRE 或者JDK, 把BADA SDK的 jre 目录从\<BADA_SDK_HOME>\IDE 下移至 \<BADA_SDK_HOME>.在系统环境变量,PATH 变量中添加\<BADA_SDK_HOME>\jre\bin•启动bada IDE••在bada IDE 菜单选择Help > Check for Updates.••如果找到了 bada IDE 的更新, 选中它并点击Next继续并完成安装••如果你在更新前把jre目录从 \<BADA_SDK_HOME>\IDE 移至了\<BADA_SDK_HOME> , 将其移回\<BADA_SDK_HOME>\IDE 目录下,并从环境变量PATH变量中移除\<BADA_SDK_HOME>\jre\bin 这条信息•。
Tridium_N4_开发环境设置_基础开发环境篇作者:杨超前几日看了黄工的环境设置视频录像,可能对新手来说还是有点难,这里我做了一个逐步图解的详细的环境设置文档献给大家,同时也算是自己做个笔记免得日后忘了。
本文基于黄工的一些提示,以及官方开发文档,其余为我个人的自学经验,如有错误欢迎指正。
首先还是感谢黄工的一些提示,然后是要感谢官方文档,最后要感谢翻译网站。
其次,进入N4后,它的开发工具经常会自动下载工具部件,而这些部件位于外国网站,因为一些技术性原因这个自动下载工具经常工作的不好,建议百度一些应对手段。
1.首先,你要有一份Tridium N4 , 并安装好。
2.安装JRE、JDK,参见java官网3.N4的开发环境需要设置环境变量。
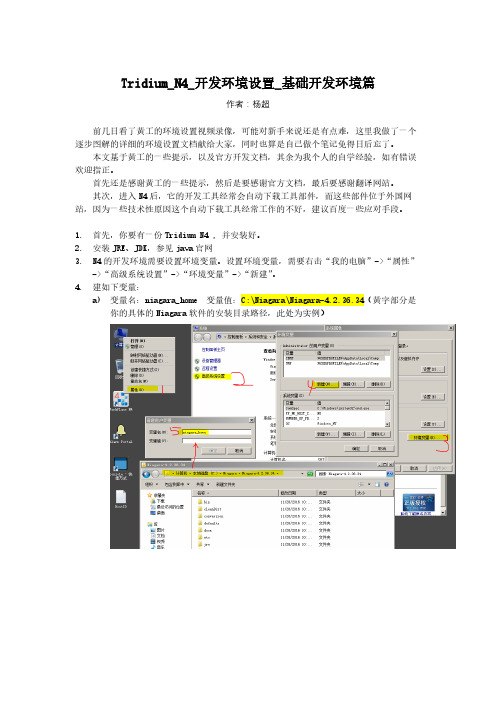
设置环境变量,需要右击“我的电脑”->“属性”->“高级系统设置”->“环境变量”->“新建”。
4.建如下变量:a)变量名:niagara_home 变量值:C:\Niagara\Niagara-4.2.36.34(黄字部分是你的具体的Niagara软件的安装目录路径,此处为实例)b)变量名:niagara_user_home 变量值:%userprofile%\Niagara4.2(黄字部分随安装版本不同而不同,具体要看C:\Users\用户名下的具体N4文件夹名,此处为实例)c)变量名:niagara_dev_home 变量值:%niagara_user_home%d)变量名:JAVA_HOME 变量值:C:\Program Files\Java\jdk1.8.0_111(黄字处为你的具体的JDK的安装目录路径,此处为实例)(此变量可选,具体是后面的IntellijIDEA用)5.进入N4安装目录里的bin目录,运行它下面的console.exe命令,建议将这个做成快捷方式放到桌面,后续教程里命令行都是通过它执行的。
6.在上条所述控制台中运行命令:gradlew 。

Quagga的安装和使⽤Quagga的安装和使⽤QUAGGA是⼀款开源的路由软件,也是zebra(已经停⽌更新)的升级维护版本。
作⽤:将linux设备变成⼀个功能完整的路由器。
⽀持的协议:rip,ospf,bgp等。
最新版本是2017.2.8⽇的1.2.0,但是在编译的时候源码出现了重定义错误(没研究源码等内容),所以在这⾥我选择的是quagga-1.1.1。
测试环境:VM 12 CentOS 6.5 64位1. Quagga的安装在CentOS下可以直接使⽤yum –y install quagga进⾏安装,也可以使⽤quagga的源代码包进⾏编译安装,如下所⽰:2. 配置zebra复制zebra的配置⽂件模板到下⾯⽬录下,并且启动zebracp /usr/share/doc/quagga-0.99.15/zebra.conf.sample /etc/quagga/zebra.conf如下图所⽰:3. 如果需要使⽤zebra进⾏⽀持OSPF和BGP等协议,还要负载ospfd和bgpd配置⽂件到下⾯的⽬录下,并且启动服务:cp /usr/share/doc/quagga-0.99.15/ospfd.conf.sample /etc/quagga/ospfd.confcp /usr/share/doc/quagga-0.99.15/bgpd.conf.sample /etc/quagga/bgpd.conf如下图所⽰:4. 添加多块⽹卡(物理机添加物理⽹卡,虚拟机添加多块虚拟⽹卡),如下:5. 配置quagga在终端下使⽤vtysh或者telnet 127.0.0.1 2601都可以进⼊quagga的控制台,如下:[root@R1 networking]# vtysh[root@R1 networking]# telnet 127.0.0.1 2601如下图:6. 使⽤OSPF协议打底,配置BGP协议发布路由,如下拓扑:测试结果如下:R1:R2:R3:R4:Selecting previously unselected package quagga-core.(Reading database ... 164946 files and directories currently installed.)Preparing to unpack .../0-quagga-core_1.2.4-1_amd64.deb ...Adding user `quagga' to group `quaggavty' ...Adding user quagga to group quaggavtyDone.Unpacking quagga-core (1.2.4-1) ...Selecting previously unselected package quagga-bgpd.Preparing to unpack .../1-quagga-bgpd_1.2.4-1_amd64.deb ...Unpacking quagga-bgpd (1.2.4-1) ...Selecting previously unselected package quagga-isisd.Preparing to unpack .../2-quagga-isisd_1.2.4-1_amd64.deb ...Unpacking quagga-isisd (1.2.4-1) ...Selecting previously unselected package quagga-ospf6d.Preparing to unpack .../3-quagga-ospf6d_1.2.4-1_amd64.deb ...Unpacking quagga-ospf6d (1.2.4-1) ...Selecting previously unselected package quagga-ospfd.Preparing to unpack .../4-quagga-ospfd_1.2.4-1_amd64.deb ...Unpacking quagga-ospfd (1.2.4-1) ...Selecting previously unselected package quagga-pimd.Preparing to unpack .../5-quagga-pimd_1.2.4-1_amd64.deb ...Unpacking quagga-pimd (1.2.4-1) ...Selecting previously unselected package quagga-ripd.Preparing to unpack .../6-quagga-ripd_1.2.4-1_amd64.deb ...Unpacking quagga-ripd (1.2.4-1) ...Selecting previously unselected package quagga-ripngd.Preparing to unpack .../7-quagga-ripngd_1.2.4-1_amd64.deb ...Unpacking quagga-ripngd (1.2.4-1) ...Selecting previously unselected package quagga.Preparing to unpack .../8-quagga_1.2.4-1_amd64.deb ...Unpacking quagga (1.2.4-1) ...Setting up quagga-core (1.2.4-1) ...Created symlink /etc/systemd/system/multi-user.target.wants/zebra.service → /lib/systemd/system/zebra.service. Setting up quagga-bgpd (1.2.4-1) ...Created symlink /etc/systemd/system/multi-user.target.wants/bgpd.service → /lib/systemd/system/bgpd.service. Setting up quagga-pimd (1.2.4-1) ...Created symlink /etc/systemd/system/multi-user.target.wants/pimd.service → /lib/systemd/system/pimd.service. Setting up quagga-ripd (1.2.4-1) ...Created symlink /etc/systemd/system/multi-user.target.wants/ripd.service → /lib/systemd/system/ripd.service. Setting up quagga-ripngd (1.2.4-1) ...Created symlink /etc/systemd/system/multi-user.target.wants/ripngd.service → /lib/systemd/system/ripngd.service. Setting up quagga-ospf6d (1.2.4-1) ...Created symlink /etc/systemd/system/multi-user.target.wants/ospf6d.service → /lib/systemd/system/ospf6d.service. Setting up quagga-isisd (1.2.4-1) ...Created symlink /etc/systemd/system/multi-user.target.wants/isisd.service → /lib/systemd/system/isisd.service. Setting up quagga-ospfd (1.2.4-1) ...Created symlink /etc/systemd/system/multi-user.target.wants/ospfd.service → /lib/systemd/system/ospfd.service. Setting up quagga (1.2.4-1) ...Processing triggers for man-db (2.8.3-2ubuntu0.1) ...lsgx@DESKTOP-OS0DFSI:~$ vtysh==========⼀、安装流程使⽤虚拟机vmware9 ubuntu12.04LTS quagga-1.1.1.tar.gz安装过程:(在相应的存放tar包的⽬录)1、 tar -xzvf quagga-1.1.1.tar.gz2、 cd quagga-1.1.13、 ./configure --enable-vtysh --enable-user=root --enable-group=root --enable-vty-group=root 上述命令为打开vty功能(CLI功能)并给予相应⽤户权限出现错误(视机器⽽定,如果机器已经安装好这些软件,就不会出现错误):error: GNU awk is required for lib/memtype.h made by memtypes.awk.BSD awk complains: awk: gensub doesn't support backreferences (subst "\1")解决办法:sudo apt-get insatll gawk安装后重新编译,通过。


展讯 build环境使用手册展讯 Build 环境使用手册一、简介展讯 Build 环境是为展讯公司开发团队提供的一套集成开发环境,旨在为开发人员提供便捷、高效的开发工具和平台。
本手册将详细介绍展讯 Build 环境的安装、配置和使用方法。
二、安装1. 下载展讯 Build 环境安装包展讯 Build 环境安装包可以从展讯公司的官方网站下载。
请确保从官方渠道下载,以确保安装包的安全性和完整性。
2. 执行安装程序双击下载的安装包,按照提示一步步进行安装。
建议选择默认安装路径,以便后续操作的顺利进行。
3. 完成安装安装完成后,会在您选择的安装路径下生成展讯 Build 环境的文件夹。
您可以在此文件夹中找到所有的开发工具和相关资源。
三、配置1. 环境变量设置为了能够方便地在任意路径下调用展讯 Build 环境,我们需要对环境变量进行一些配置。
- Windows 系统:右键点击“计算机”或“我的电脑”,选择“属性”->“高级系统设置”->“环境变量”。
在系统变量中找到“Path”,并选择“编辑”。
在弹出的窗口中,将展讯 Build 环境的安装路径添加到“Path”变量的值中,并点击“确定”保存。
- macOS / Linux 系统:在终端中输入以下命令,并将展讯 Build环境的安装路径替换为您的实际路径。
```shellexport PATH=/your/installation/path:$PATH```2. 配置开发工具根据您的开发需求,展讯Build 环境提供了多种开发工具和插件。
您可以根据需要进行安装和配置。
- IDE:展讯 Build 环境支持多种集成开发环境,如 Eclipse、Android Studio 等。
您可以根据个人喜好进行选择和安装。
- SDK:展讯 Build 环境提供了丰富的软件开发工具包,包括Android SDK、Java SDK 等。
您可以根据项目需要进行安装和配置。
déjàvuDéjà Vu X(工作组版)上手指南徐彬(simon_xb@sohu)译(在déjàvu Professional环境下)目录Déjà Vu X(工作组版)的组成 (3)项目 (3)翻译记忆 (4)术语库 (4)SGML/XML过滤器 (4)Déjà Vu工作组版使用教程 (4)创建项目 (4)翻译文件 (4)导出完成的翻译 (4)倍增生产力 (4)预翻译 (4)字数统计和统计数字 (4)Déjà Vu X Workgroup 构成项目Déjà Vu X(工作组版), 工作时面对的是项目文件。
Déjà Vu 工作组项目是一个具有特殊结构的电脑文件,Déjà Vu 工作组版能够识别、显示、管理该文件,帮助你完成翻译工作.项目包含下列内容:-翻译工作中的所有文本,包括源语文本和翻译文本,二者使用表格的样式呈现。
-左栏显示源语文本,右栏显示目标语言. 每次只显示一个目标栏。
-每个源语句子占一行. 源语文本根据一定的规则被切分为表格单元. 用户可以设定相应的规则。
-原始文档的格式和其他信息. 这些不可译信息或者隐藏于句子(表格行)之间,或者是隐藏在控制码中.项目所使用的源语文件,可以是不同的格式,只要Déjà Vu支持即可( 软件所支持的格式请参见用户手册). 这些文件可以是位于电脑的某个文件夹内,或是局域网的其他位置。
表格的行可以以不同的方式显示:-一次一个文件-或是所有的文件一起显示.两种方式下行都可以以字母顺序排列显示,或是按文档原来的顺序显示(即句子在原文中出现的顺序显示)。
你将进行翻译的工作文件称作Déjà Vu 项目。
dvprj)。
你可以在Déjà Vu 工作组主界面中创建并打开这些文件. 在同一个界面中你也能打开其他格式的文件, 包括Déjà Vu 翻译记忆文件(.dvmdb)、术语数据库文件. 和SGML/XML过滤器(。
Supporting VNF PlatformUSER GUIDE53-1004759-01© 2016, Brocade Communications Systems, Inc. All Rights Reserved.Brocade, the B-wing symbol, and MyBrocade are registered trademarks of Brocade Communications Systems, Inc., in the United States and in other countries. Other brands, product names, or service names mentioned of Brocade Communications Systems, Inc. are listed at /en/legal/ brocade-Legal-intellectual-property/brocade-legal-trademarks.html. Other marks may belong to third parties.Notice: This document is for informational purposes only and does not set forth any warranty, expressed or implied, concerning any equipment, equipment feature, or service offered or to be offered by Brocade. Brocade reserves the right to make changes to this document at any time, without notice, and assumes no responsibility for its use. This informational document describes features that may not be currently available. Contact a Brocade sales office for information on feature and product availability. Export of technical data contained in this document may require an export license from the United States government.The authors and Brocade Communications Systems, Inc. assume no liability or responsibility to any person or entity with respect to the accuracy of this document or any loss, cost, liability, or damages arising from the information contained herein or the computer programs that accompany it.The product described by this document may contain open source software covered by the GNU General Public License or other open source license agreements. T o find out which open source software is included in Brocade products, view the licensing terms applicable to the open source software, and obtain a copy of the programming source code, please visit /support/oscd.ContentsAbout This Guide (5)Zero Touch Provisioning (7)Overview (7)Limitations (7)Architecture (7)Prerequisites (8)Configuration sample (8)Zero Touch Provisioning with a Preconfigured Bootstrap Server Address (11)Overview (11)Prerequisites (11)T erminology (11)Staging Zero T ouch configuration on VNF platform (12)Setting up VNF platform for interactive bootstrap (12)Configuring the ztc.cfg file (12)Example of the ztc.cfg file (13)Bootstrap server requirements (13)Accessing bootstrap status (14)Configuring Zero T ouch Provisioning at the branch (14)Call Home (17)Overview (17)Limitations (17)Configuration sample (17)Automated Provisioning Commands (19)service netconf call-home netconf-client <host_ip_address> port <port_number> (20)service netconf call-home netconf-client <host_ip_address> disable (21)show service netconf call-home status (22)Contacting Brocade Technical Support (23)Brocade customers (23)Brocade OEM customers (23)About This GuideThis guide describes how to configure Zero T ouch Provisioning and Call Home for VNF platform.Zero Touch Provisioning•Overview (7)•Limitations (7)•Architecture (7)•Prerequisites (8)•Configuration sample (8)OverviewVNF platform systems that are shipped with Zero T ouch Provisioning enable you to deploy VNF platform automatically at the business site after you connect it to the Network Management System (NMS) network.Zero T ouch Provisioning enables you to set up VNF platform in your local or remote business site securely without the requirement of on-site network administrators.Brocade Zero T ouch Provisioning conforms to version 3 of the IETF draft titled Zero T ouch Provisioning for NETCONF Call Home, available at https:///html/draft-ietf-netconf-zerotouch-03.LimitationsThe Brocade implementation of Zero T ouch Provisioning has some limitations. Brocade Zero T ouch Provisioning does not support image upgrades to VNF platform.ArchitectureYou can refer to the IETF draft of the Zero T ouch Provisioning feature for an understanding of the general architecture and work flow. This section describes the Brocade-specific components for Zero T ouch Provisioning.The Zero T ouch Provisioning architecture consists of the following components:Vendor Specifies the Zero T ouch device supplier, such as Brocade Communications Systems, Inc., Inc. The vendor provides the serial numbers and ownership vouchers for VNF platform.Zero Touch system Specifies VNF platform. After a vendor ships VNF platform with a factory configuration and some authentication information, you can connect the system to the Zero T ouch network. VNF platform attempts the bootstrappingprocess when booting with the default factory configuration.DHCP server Specifies the DHCP server to which VNF platform attempts connection. If the connection is successful, the DHCP server dynamically assigns the network configuration parameters to VNF platform, such as IP addresses forinterfaces and services. In addition, VNF platform may discover other bootstrap servers. VNF platform sequentiallyprocesses its list of bootstrap servers, prioritizing any that might have been discovered from the DHCP server. AfterVNF platform has successfully configured itself using the bootstrapping information, it notifies the bootstrappingserver for monitoring purposes.Bootstrap server Provides the default VNF platform image and configuration to VNF platform. The bootstrap server presents a simple REST interface to VNF platform to obtain its bootstrapping information and notifies the bootstrapping serverwhen it has successfully completed the bootstrapping process.NMS Specifies the server you deploy to establish a secure NETCONF connection to VNF platform.PrerequisitesPrerequisitesFor the Zero T ouch feature to be activated, it is essential that your network includes the DHCP server, bootstrap server, and NMS. All these components are described in the Zero T ouch architecture.The following list presents some key configurations for your network to enable Zero T ouch Provisioning.•Configure the DHCP server in your network to add option 199, which provides the IP address of the bootstrap server.•Configure the bootstrap server to add VNF platform (based on the serial number) to the RESTCONF data store. The data store must be modeled as defined in the YANG module referred to in version 3 of the IETF draft titled Zero T ouch Provisioning for NETCONF Call Home, available at https:///html/draft-ietf-netconf-zerotouch-03.•Connect the Zero T ouch-designated port of VNF platform (commonly the WAN port) to the network containing the DHCP server that is ready to supply option 199. After you power on VNF platform, the VNF platform configuration is fetched and loaded into the system.Configuration sampleThe configuration embedded in VNF platform must be a complete Vyatta-configuration boot file format.-- start of response--<?xml version='1.0' encoding='UTF-8'?><configuration><config><vyatta-config>interfaces {dataplane dp0s3 {address 192.168.17.100/24address 3.3.3.3/24}dataplane dp0s4 {address 192.168.100.100/24address 2.2.2.2/24}dataplane dp0s8 {address dhcp}}service {netconfssh}system {acm {enableoperational-ruleset {rule 9985 {action allowcommand /show/tech-support/brief/group vyattaop}rule 9986 {action denycommand /show/tech-support/briefgroup vyattaop}rule 9987 {action denycommand /show/tech-supportgroup vyattaop}rule 9988 {action denyConfiguration samplecommand /show/configurationgroup vyattaop}rule 9989 {action allowcommand "/clear/*"group vyattaop}rule 9990 {action allowcommand "/show/*"group vyattaop}rule 9991 {action allowcommand "/monitor/*"group vyattaop}rule 9992 {action allowcommand "/ping/*"group vyattaop}rule 9993 {action allowcommand "/reset/*"group vyattaop}rule 9994 {action allowcommand "/release/*"group vyattaop}rule 9995 {action allowcommand "/renew/*"group vyattaop}rule 9996 {action allowcommand "/telnet/*"group vyattaop}rule 9997 {action allowcommand "/traceroute/*"group vyattaop}rule 9998 {action allowcommand "/update/*"group vyattaop}rule 9999 {action denycommand "*"group vyattaop}}ruleset {rule 9999 {action allowgroup vyattacfgoperation "*"path "*"}}}console {device ttyS0 {speed 9600}Configuration sample}login {user vyatta {authentication {encrypted-password $1$4XHPj9eT$G3ww9B/pYDLSXC8YVvazP0}level superuser}}syslog {global {facility all {level warning}}}}</vyatta-config></config><signature>I+A/RS0SntrEboQH20w/4uMwKjB3xa17ERA9NYhdp7C5umLblJq4dEzd3LuWALnPcNebaLTIH9xI Kn30l+CogkasgwrenQYQK1ugHNkCqk4cBnTe/b5Jd4k1POF9wIq7trzfQgCSfbC0Sf4EsOtHKkyA aMCyWAgxwqyxJVkBS+Q=</signature></configuration>-- end of response --Zero Touch Provisioning with a Preconfigured Bootstrap Server Address•Overview (11)•Prerequisites (11)•T erminology (11)•Staging Zero T ouch configuration on VNF platform (12)•Configuring Zero T ouch Provisioning at the branch (14)OverviewThis chapter describes an alternative Zero T ouch Provisioning that a service provide can implement.Zero T ouch Provisioning with a preconfigured bootstrap server address gives you an option to configure VNF platform during the first deployment at the business site after you connect it to the Network Management System network.For information on the architecture of Zero T ouch Provisioning, refer to Architecture on page 7. PrerequisitesZero T ouch Provisioning with a preconfigured bootstrap server address requires the following components.TABLE 1 Zero T ouch componentsTerminologyThe following list describes some of the terms that are associated with Zero T ouch Provisioning with a preconfigured bootstrap server address.•Device authentication—SSL certificate validation by the bootstrap server or VNF platform.•Activation code—Code required to activate VNF platform.•Notification—Notification sent by VNF platform after the bootstrap configuration process is completed.•Bootstrap status page—Portal on which you can verify the status of VNF platform. The status page is available only after the bootstrap server reboot is completed.Staging Zero T ouch configuration on VNF platformStaging Zero Touch configuration on VNF platformThis section describes the process of setting up the default VNF platform configuration, the configuration file details with an example, bootstrap server requirements and the way to access bootstrap status.Setting up VNF platform for interactive bootstrapThis section describes the process of setting up the default VNF platform configuration by a service provider before shipping it to an end customer. The configuration process enables VNF platform to connect to the appropriate bootstrap server when the end customer powers it on and connects it to the required network.Create the default factory configuration by using the CLI terminal to apply the manufacturer specified configuration. T o onboard a device for interactive bootstrap, perform the following steps.1.Enter the following command to create the /config/zerotouch directory:mkdir -p /config/zerotouch.2.Enter the following command to copy the ztc-config.boot file:cp config.boot /config/zerotouch/ztc-config.boot.3.Get the serial number of the device to be configured in the ztc.cfg file by entering the following command:sudo dmidecode -s system-serial-number.4.Download the IDevID private key and certificate for the serial number by using a secure mechanism. This step is optional and isused for HTTPS bootstrap servers.5.Enable the interactive bootstrap by creating the create ztc.cfg file with appropriate fields, including the bootstrap serverURL and node.Configuring the ztc.cfg fileThe ztc.cfg file is located in the /config/zerotouch/ztc.cfg directory. This file contains different fields that are used by the interactive bootstrap code. The file uses a simple option=value format. Lines that start with a hash # are ignored.The following fields are mandatory:•cert—Filename for the IDevID certificate.•priv—Filename of IDevID private key.•devid—Device serial number. Provide the number only if the IDevID certificate is not used. You must specify cert, priv or devid.•def_cfg—Location of the default factory configuration that is compared to the running configuration.•url—URL of the bootstrap server base.The following options are optional:•capath—Certificate path for validating bootstrap server certificate.•ca—Certificate chain of the bootstrap server.•noverify—Option not to verify the authenticity of the bootstrap server.•timeout—Option for the bootstrap server connection to time out in seconds (default is10 seconds).•nodel—RESTCONF node. In the character string, %devid% is replaced with devid, which was previously specified. The default string is /restconf/data/ietf-zerotouch-bootstrap-server:devices/device=%devid%.•log—Name of the log file. The default file is /run/ztc.log.Staging Zero T ouch configuration on VNF platform•debug—Name of the debug file. The default file is /run/ztc.debug.•httpd—http=1. This value is required for starting the web portal at port 8000.•docroot—Directory name for the HTTP files. The default directory is /var/www/zerotouch.•auth—File in which the HTTP server stores the activation or authorization code provided by the client. The default file is /run/ ztc.cred.•authmode—Authorization mode. The value of authmode must equal to devid.Example of the ztc.cfg fileThis section provides an example of the ztc.cfg file. The following configuration attempts to connect to the bootstrap server at: http:// 12.194.168.65/restconf/data/ietf-zerotouch-bootstrap server:devices/device=1034150093, where 1034150093 is the password.url=http://12.194.168.65/node=/restconf/data/ietf-zerotouch-bootstrap-server:devices/device=%devid%devid=1034150093def_cfg=zerotouch/ztc-config.boothttpd=1authmode=devidBootstrap server requirementsThe following section describes the requirements for the bootstrap server. The server replies with a status code of 401 when wrong authentication is provided and a status code of 200 when correct authentication is provided. An example of a configuration file that is returned from the bootstrap server follows:<?xml version='1.0' encoding='UTF-8'?><devices xmlns="urn:ietf:params:xml:ns:yang:ietf-zerotouch-bootstrap-server"><device><configuration><config><interfaces xmlns="urn::mgmt:vyatta-interfaces:1"><dataplane xmlns="urn::mgmt:vyatta-interfaces-dataplane:1"><tagnode xmlns="urn::mgmt:vyatta-interfaces-dataplane:1">dp0p4s0</tagnode><vif xmlns="urn::mgmt:vyatta-interfaces-dataplane:1"><tagnode xmlns="urn::mgmt:vyatta-interfaces-dataplane:1">2</tagnode><address xmlns="urn::mgmt:vyatta-interfaces-dataplane:1">177.168.250.12/24</address><address xmlns="urn::mgmt:vyatta-interfaces-dataplane:1">2001:1890:e040::15:250:a12/64</ address><address xmlns="urn::mgmt:vyatta-interfaces-dataplane:1">2001:1890:e040:15:250::a12/64</ address><vlan xmlns="urn::mgmt:vyatta-interfaces-dataplane:1">2</vlan></vif></dataplane></interfaces><protocols xmlns="urn::mgmt:vyatta-protocols:1"><static xmlns="urn::mgmt:vyatta-protocols-static:1"><route6 xmlns="urn::mgmt:vyatta-protocols-static:1"><tagnode xmlns="urn::mgmt:vyatta-protocols-static:1">::/0</tagnode><next-hop xmlns="urn::mgmt:vyatta-protocols-static:1"><tagnode xmlns="urn::mgmt:vyatta-protocols-static:1">2001:1890:e040:15:250::a30</tagnode> </next-hop></route6></static></protocols></config></configuration></device></devices>Accessing bootstrap statusThe Bootstrap client on Zero T ouch Provisioning runs a web server at port 8000. If the LAN address is configured as 192.168.1.1, use the http://192.168.1.1:8000 URL on a browser from a laptop that is connected to the LAN port. T o access the bootstrap status page,perform the following steps.unch a web application to access the VNF platform status page at http://192.168.0.1:8000/.NOTEThe IP address may differ based on your configuration and the setup of thedevice.2.Enter the VNF platform device ID or serial number as the username and the activation code as the password.FIGURE 1Bootstrap status pageConfiguring Zero Touch Provisioning at the branch T o configure Zero T ouch Provisioning at the branch, perform the following steps1.Connect VNF platform with default factory configuration to a bootstrap server in your network.2.Connect the WAN port to the L TE modem, to reach the bootstrap service.3.Connect an activation computer to the LAN unch a web browser to access the VNF platform status page at http://192.168.0.1:8000/ .Configuring Zero T ouch Provisioning at the branchNOTEThe IP address may differ based on your configuration and the setup of thedevice.5.Enter the VNF platform device ID or serial number as the username and the activation code as the password.FIGURE 2Bootstrap status pageVNF platform receives the bootstrap configuration from the bootstrap server after the verification of the activation code; theconfiguration is stored and saved. Then VNF platform sends HTTP notification to the bootstrap server, and the bootstrapadvertises its availability to other services.Configuring Zero T ouch Provisioning at the branchCall Home•Overview (17)•Limitations (17)•Configuration sample (17)OverviewThe Call Home feature allows VNF platform to initiate a secure connection with configured remote management systems for additional configuration or register the presence of the system.Call Home supports both the initial deployment of VNF platform and on-going management. During the Zero T ouch procedure on VNF platform, the configuration is automatically fetched and may contain the Call Home server address and the set service netconf command. The system automatically initiates a secure connection with an NMS and is ready to be further provisioned and managed by that NMS.LimitationsThe Brocade implementation of Call Home has specific limitations as discussed in this section.The following list describes those limitations:•The Call Home specification in the IETF draft supports both SSH and TLS transports. Currently, Brocade supports the SSH transport only. The SSH protocol is defined in the IETF draft The Secure Shell (SSH) Transport Layer Protocol, available athttps:///html/rfc4253.•The Call Home specification in the IETF draft supports both NETCONF and RESTCONF as configuration servers. Currently, Brocade supports NETCONF configuration servers only. The NETCONF support for SSH is defined in the IETF draft Using the NETCONF Protocol over Secure Shell (SSH), available at https:///html/rfc6242.For more information about Call Home, refer to the IETF draft NETCONF Call Home and RESTCONF Call Home, available at https:// /html/draft-ietf-netconf-call-home-08.Configuration sampleIn a scenario where the Zero T ouch procedure does not push the Call Home server address to the system, you can use the service netconf call-home netconf-client <host> port <port> command to initiate the Call Home service.Assume that a VNF platform guest is connected to a NMS server. The NMS server has an IP address of 10.0.0.1.T o configure Call Home, perform the following steps.TABLE 2 Configuring Call HomeConfiguration sampleTABLE 2 Configuring Call Home (continued)If you want to disable Call Home, you can use the service netconf call-home netconf-client <host> disable command.Automated Provisioning Commands •service netconf call-home netconf-client <host_ip_address> port <port_number> (20)•service netconf call-home netconf-client <host_ip_address> disable (21)•show service netconf call-home status (22)service netconf call-home netconf-client <host_ip_address> port <port_number>service netconf call-home netconf-client<host_ip_address> port <port_number>Enables the Call Home feature by specifying a NETCONF client and port.Syntaxset service netconf call-home netconf-client host_ip_address port port_numberdelete service netconf call-home netconf-client host_ip_address port port_numbershow service netconfCommand DefaultCall Home is disabled by default.Parametershost_ip_addressThe IPv4 or IPv6 address for a NETCONF client to which VNF platform connects for establishing Call Home.port_numberThe number of a port in the NETCONF client. The number ranges from 1 through 65,535.ModesConfiguration mode.Configuration Statementnetconf {call-home {netconf-client host_ip_address {port port_number}}}Usage GuidelinesUse this command to enable the Call Home feature by specifying a NETCONF client and port.Use the set form of the command to enable the Call Home feature.Use the delete form of the command to delete the Call Home port details.Use the show form of the command to display the details for a Call Home configuration.service netconf call-home netconf-client <host_ip_address> disable service netconf call-home netconf-client<host_ip_address> disableDisables the Call Home client.Syntaxset service netconf call-home netconf-client host_ip_address disableshow service netconfCommand DefaultCall Home is disabled by default.Parametershost_ip_addressThe IPv4 or IPv6 address for a NETCONF client to which VNF platform connnects for establishing Call Home. ModesConfiguration mode.Configuration Statementnetconf {call-home {netconf-client host_ip_address {disable}}}Usage GuidelinesUse this command to disable the NETCONF Call Home client.Use the set form of the command disable the NETCONF Call Home client.Use the show form of the command to display the details for a Call Home configuration.show service netconf call-home statusshow service netconf call-home status Displays the status of the last Call-Home operation.Syntaxshow service netconf call-home statusModesOperational mode.Usage GuidelinesCommand OutputThe show service netconf call-home status command displays the following information:Contacting Brocade Technical SupportAs a Brocade customer, you can contact Brocade T echnical Support 24x7 online, by telephone, or by e-mail. Brocade OEM customers should contact their OEM/solution provider.Brocade customersFor product support information and the latest information on contacting the T echnical Assistance Center, go to and select Support.If you have purchased Brocade product support directly from Brocade, use one of the following methods to contact the BrocadeT echnical Assistance Center 24x7.Brocade OEM customersIf you have purchased Brocade product support from a Brocade OEM/solution provider, contact your OEM/solution provider for all of your product support needs.•OEM/solution providers are trained and certified by Brocade to support Brocade® products.•Brocade provides backline support for issues that cannot be resolved by the OEM/solution provider.•Brocade Supplemental Support augments your existing OEM support contract, providing direct access to Brocade expertise.For more information, contact Brocade or your OEM.•For questions regarding service levels and response times, contact your OEM/solution provider.。
FPGA Basys3开发实验指导书安全使用规范●使用扩展接口扩展电路应用前请关闭电路板总开关,避免损坏器件。
●电路板建议在绝缘平台上使用,否则可能引起电路板损坏。
●电路使用时应防止静电。
●液晶显示器件或模块结雾时,不要通电工作,防止电极化学反应,产生断线。
●电源正负极、输入/输出端口定义时需谨慎,避免应接反引起开发板的损坏。
●保持电路板的表面清洁。
●小心轻放,避免不必要的硬件损伤目录实验一:熟悉VIV ADO编译环境(一) (1)一、实验目的 (1)二、实验内容 (1)三、实验要求 (1)四、实验步骤 (1)实验二:组合逻辑电路设计 (15)一、实验目的 (15)二、实验内容 (15)三、实验要求 (15)四、实验步骤 (15)五、实验结果 (19)实验三:时序逻辑电路设计 (21)一、实验目的 (21)二、实验内容 (21)三、实验要求 (21)四、实验步骤 (21)五、实验结果 (30)实验四:状态机 (32)一、实验目的 (32)二、实验内容 (32)三、实验要求 (32)四、实验步骤 (32)五、实验结果 (37)实验五:模块化调用 (38)一、实验目的 (38)二、实验内容 (38)三、实验要求 (38)实验六:数码管显示 (41)一、实验目的 (41)二、实验内容 (41)三、实验要求 (41)四、实验背景知识 (41)五、实验方案及实现 (43)六、实验结果 (45)实验七:交通灯 (47)一、实验目的 (47)二、实验内容 (47)三、实验要求 (47)四、实验方案及实现 (47)五、实验结果 (52)实验八:秒表的设计 (54)一、实验目的 (54)二、实验内容 (54)三、实验要求 (54)四、实验方案及实现 (54)五、实验结果 (57)实验九: 蜂鸣器演奏实验 (59)一、实验目的 (59)二、实验内容 (59)三、实验要求 (59)四、实验背景知识 (59)五、实验结果 (64)实验十:字符型LCM 驱动 (65)一、实验目的 (65)二、实验内容 (65)三、实验要求 (65)五、实验程序实现 (69)六、实验结果 (74)实验十一:VGA (76)一、实验目的 (76)二、实验内容 (76)三、实验要求 (76)四、实验背景知识 (76)五、实验结果 (80)实验十二:PS/2接口控制 (81)一、实验目的 (81)二、实验内容 (81)三、实验要求 (81)四、实验背景知识 (81)五、实验方案及实现: (84)六、实验结果 (90)实验一:熟悉VIVADO编译环境(一)一、实验目的1.熟悉VIV ADO的编译环境;2.了解在VIV ADO环境下运用Verilog HDL 语言的编程开发流程,包括源程序的编写、编译、模拟仿真及程序下载。
OMNeT++ 4.0 IDE(集成开发环境教程1教程 (4)1.1启动 OMN ET++4.0...........................................................................................................4 1.2运行OMN E T++4.0工程 (6)1.2.1打开工程 .....................................................................................................................6 1.2.2编译 ............................................................................................................................7 1.2.3运行仿真 (8)1.2.4监控仿真 ...................................................................................................................11 1.2.5结束仿真 ...................................................................................................................12 1.2.6查看仿真结果 ............................................................................................................13 1.2.7查看顺序表(Sequence Chart ..............................................................................14 1.2.8配置仿真 . (14)1.3OMN ET++4.0IDE...........................................................................................................17 1.3.1界面功能区 (18)1.3.2OMNeT++ 4.0 Project介绍 (19)图 2-1 启动 OMNeT++4.0(1 ..............................................................................................4图 2-2 启动OMNeT++ 4.0(2 ..............................................................................................4图 2-3 启动 OMNeT++ 4.0(3 ..............................................................................................5图 2-4 启动 OMNeT++ 4.0(4 ..............................................................................................5图 2-5 启动 OMNeT++ 4.0(5 ..............................................................................................6图2-6 打开工程 .......................................................................................................................7图 2-7 编译工程 .......................................................................................................................8图 2-8 编译信息 .. (8)图 2-9 运行仿真(1 (9)图 2-10 运行仿真(2 (9)图 2-11 运行仿真(3 (10)图 2-12 运行仿真(4 (10)图 2-13 运行仿真(5 (11)图 2-14 运行仿真(6 (11)图 2-15 运行仿真(7 (12)图 2-16 结束仿真(1 (12)图 2-17 结束仿真(2 (13)图 2-18 查看统计结果——矢量(1 .....................................................................................13图 2-19 查看统计结果——矢量(2 .....................................................................................14图 2-20 查看顺序表 ................................................................................................................14图 2-21 配置仿真(1 ..........................................................................................................15图 2-22 配置仿真(2 ..........................................................................................................15图 2-23 配置仿真(3 ..........................................................................................................16图 2-24 配置仿真(4 ..........................................................................................................16图 2-25 配置仿真(5 ..........................................................................................................17图 2-26 OMNEST 4.0 集成开发环境(IDE 界面 ..................................................................18图2-27 OMNeT++ 4.0 Projec 文件系统 (19)1 教程1.1 启动 OMNeT++ 4.0进行 OMNeT++ 安装目录双击运行“ migwenv.cmd ” , 在弹出的界面输入“ omnetpp ”并回车,如下图所示:图 1-1 启动 OMNeT++ 4.0(1弹出界面:图 1-2 启动 OMNeT++ 4.0(2如第一次启动仿真软件,则会被要求设置工作目录:图 1-3 启动 OMNeT++ 4.0(3 点击 OK 后即可看到欢迎界面:图 1-4 启动 OMNeT++ 4.0(4 点击选择 Workbench 后,进入 OMNeT++ IDE界面:图 1-5 启动 OMNeT++ 4.0(5至此, OMNeT++ 4.0 成功启动。
Tridium N4 开发环境设置
JavaScript开发环境篇
作者:杨超本文将教你如何设置N4的Javascript开发环境。
本文信息源自docDeveloper.pdf第77页起Building JavaScript Applications
for Niagara章节,以及自己的一些摸索,希望能对各位同行能有所助益。
首先还是要感谢docDeveloper.pdf。
本文为非完全版,少了一些安装中可能会遇到的一些小问题的提示,感兴趣者可
见论坛中原帖所写Git项目里源文件所示。
好了,接下来上正文:
1.安装Node.js,
2.安装grunt,运行Niagara目录下bin目录下的console.exe命令,开控制台,
运行 npm install -g grunt命令,
3.安装grunt-init,刚才的控制台中直接运行命令 npm install –g grunt-init
4.安装grunt-cli,刚才的控制台中直接运行命令 npm install –g grunt-cli。
5.下载 grunt-init-niagara:
6.将下载好的grunt-init-niagara模板考入grunt-init的模板文件夹下,具体
在:系统用户文件夹/AppData/Roamint/npm/node_modules/grunt-
init/templates下。
7.运行grunt-init-niagara模板:建立项目文件夹,然后在刚才的控制台中进入这
个项目文件,运行命令 grunt-init grunt-init-niagara,这时开始建立工程,模板会问你一些问题,如图所示,直接按回车则表示同意白字所示默认答案。
8.进入grunt-init-niagara模板建立的项目文件夹中,看到有build.gradle等文
件,运行npm install命令,安装另外一些必须的grunt 模块
9.安装过程中会提示安装phantomjs,这里不想麻烦的就只能慢慢等下载完,也可
以记录下它提示的下载地址和准备放到的目录,然后点Ctrl 加 C退出安装进程,然后用下载工具下载phantomjs的ZIP,然后放到它准备放到的目录里,然后重新运行npm install
10.全部安装完
11.友情提示:这时在你的项目文件夹中,会多出来一个/ node_modules文件夹,这
里面就是刚才下载安装的那一大堆东西,以后你每新建一个项目用grunt-init的grunt-init-niagara模板初始化你的项目后,运行npm install都会重新下载这一堆东西的最新版,如果你想避免这个下载的麻烦也可以,把这/ node_modules 文件夹拷贝下来,然后在新建一个项目用grunt-init的grunt-init-niagara模板初始化你的项目后把这个文件夹拷到你新项目文件夹的同样位置,然后不用再运行npm install就可以了,这时直接运行后续的grunt ci命令就可以测试了,当然这样做也有代价,就是不能保证每次项目里的这些grunt部件都是最新版本的。
12.运行grunt ci,如果参数合适,则会提示绿字的SUCCESS
13.测试的网页结果报告在上图所示最后一个红框标出来的路径下。
14.测试也会生成一个测试站点,可在N4的工作台里的stations copier里把这个站
点拷进去运行。
15.可在这个站点运行后,通过网址 localhost/module/模块名/rc/模块名.htm访问
模板自动生成的实例网页。
16.关于官方文档中的一些个人提示:
a)docDeveloper.pdf 84到85页里的BMyWebModuleWidget的代码是不全的,需
补上其NiagaraType的各个函数及这个类的构造函数。
b)必须保证TYPE相关语句在程序最下方,否则模块运行会
出错,这个不知道算不算BUG,困扰了我3天才找到,有兴趣的同学可以验证
一下。
17.如上所示,N4的Javascript开发环境设置已完毕,当然我也不确定是不是完
全,文档中还提到要开N4的dev模式,可是我试过后也没法确定我试的到底对不对,所以没在本文中列出,如有高手知道请指正。