Microscope Use's Manual(T001)
- 格式:pdf
- 大小:394.30 KB
- 文档页数:7
1. When moving your microscope, always carry it with both hands (Figure 1, below). Grasp the arm with one hand and place the other hand under the base for support.2. Turn the revolving nosepiece so that the lowest power objective lens is "clicked" into position (This is also the shortest objective lens).3. Your microscope slide should be prepared with a coverslip or cover glass over the specimen. This will help protect the objective lenses if they touch the slide. Place the microscope slide on the stage and fasten it with the stage clips. You can push down on the back end of the stage clip to open it.4. Look at the objective lens and the stage from the side (Figure 2) and turn the coarse focus knob so that the objective lens moves downward (or the stage, if it moves, goes upward). Move it as far as it will go without touching the slide!5. Now, look through the eyepiece and adjust the illuminator (or mirror) and diaphragm (Figure 3) for the greatest amount of light.6. Slowly turn the coarse adjustment so that the objective lens goes up (away from the slide). Continue until the image comes into focus. Use the fine adjustment, if available, for fine focusing. If you have a microscope with a moving stage, then turn the coarse knob so the stage moves downward or away from the objective lens.7. Move the microscope slide around so that the image is in the center of the field of view and readjust the mirror, illuminator or diaphragm for the clearest image.8. Now, you should be able to change to the next objective lenses with only minimal use of the focusing adjustment. Use the fine adjustment, if available. If you cannot focus on your specimen, repeat steps 4 through 7 with the higher power objective lens in place. Do not allow the objective lens to touch the slide!9. The proper way to use a monocular microscope is to look through the eyepiece with one eye and keep the other eye open (this helps avoid eye strain). If you have to close one eye when looking into the microscope, it's ok. Remember, everything is upside down and backwards. When you move the slide to the right, the image goes to the left!10. Do not touch the glass part of the lenses with your fingers. Use only special lens paper to clean the lenses.11. When finished, raise the tube (or lower the stage), click the low power lens into position and remove the slide.12. Always keep your microscope covered when not in use. Dust is the number 1 enemy!Remember, microscopes are expensive scientific instruments. Handle them properly and carefully and they will last for many years!。
Digital Microscope User Manual 数码显微镜用户手册(English)(中文)前言首先非常感谢贵司(您)购买了USB数码显微镜!数码显微镜应用范围非常广泛,主要有以下方面:1.工业方面A 工业检视,例如电路板、精密机械等B 印刷检视,SMT焊接检查C 纺织检视D IC表面检查2.美容方面A 皮肤检视B 发根检视C 红外理疗(特定产品)3.生物应用A 微生物观察B 动物切片观察4.其它A 扩视器,协助视障人士阅读B 宝石鉴定本数码显微镜使用简单,只需要同计算机USB接口连接就可以使用,本产品还配备测量软件,可做简单的量测,非常的方便。
为了更详细的介绍本产品,敬请耐心的阅读产下面的产品介绍,使用方法,注意事项。
目录首页 (1)前言 (2)目录 (3)各部位介绍 (4)产品规格 (4)安全警告及注意事项 (5)配件说明 (5)硬件需求 (5)安装说明 (5)驱动安装 (7)测量工具安装 (10)系统组件安装 (13)测量软件使用说明 (15)工具栏上的各图示说明 (16)标定的使用方法 (18)更多应用 (19)USB 线调焦滚轮放大倍率 金属底座按键LED 灯罩部位说明规格:规格:传感器:高性能感光芯片主控芯片:专用主控24Bit DSP放大倍率:100X-200X, 50X-400X, 50X-500X, 50X-600X, 800X, 1000X 拍照/录像:内置辅助光源:8颗白光LED 灯静态分辨率:标准640*480,最大1600*1200 数码变焦:5段式成像距离:手动调节10MM 到远景影像分辨率:标准640*480,最大1600*1200固定底座:万向金属底座光盘:内含驱动,测量软件,用户手册支持系统: WIN XP/VISTA/WIN 7 32位和64位 电源: USB (5V DC)接口支持: USB 2.0 & USB 1.1 动态帧数:30f/s照度范围:0 ~ 30000LUX 线控可调硬件需求:奔腾主频700M Hz或以上;1G硬盘CD ROM光驱;64MB内存支持语言:中文(简体),中文(繁体),英(其它语言需要定制)产品颜色:磨砂黑色,其它颜色可定制主体尺寸:112 mm (长) 33 mm (外径)单机包装重量250克安全警告及注意事项:1. 勿自行拆解本产品,以避免静电击穿精密芯片。

microscope的用法
使用显微镜的基础步骤如下:
1. 准备工作:确保显微镜和样本都是干净的。
2. 调整放大倍数:将显微镜放在合适的位置上,通常放在实验台上,并选择合适的目镜和物镜来达到所需的放大倍数。
3. 调焦:将待观察的样本放在显微镜的样本台上,并用粗调焦手轮和细调焦手轮调节镜头的距离,使样本置于清晰的焦点上。
4. 观察样本:从眼镜通过目镜观察样本。
通过移动样本台和调整焦距来定位感兴趣的区域并观察细节。
5. 调整照明:使用显微镜的照明系统,如透射光源或反射光源,以获得合适的照明条件。
6. 记录观察结果:可以使用摄像设备或手动记录来记录显微镜观察到的结构和细节。
7. 清洗和保养:在使用显微镜后,将其清洁,并根据制造商的说明进行维护,以确保其长期性能。
需要注意的是,不同类型的显微镜(如光学显微镜、电子显微镜等)有不同的操作步骤和特定要求,所以最好在使用前阅读设备的使用手册以了解具体说法。

USERS MANUALNOVEXMICROSCOPESOF THE B-RANGEEUROMEX Microscopen B.V.HOLLAND1.0 IntroductionWith your purchase of a NOVEX B-range microscope you have chosen for a quality product. The NOVEX B-range microscopes are developed for use at universities and laboratories.The maintenance requirement is limited when using the microscope in a decent manner.This manual describes the construction of the microscope, how to use the microscope and maintenance of the microscope.2.0 Index1.0 Introduction2.0 Index3.0 Construction of the microscope4.0 Functions of the microscope5.0 Preparing the microscope for use6.0 Working with the microscope7.0 Maintenance and cleaning8.0 Microscope accessories3.0 Construction of the microscopeThe names of the several parts are listed below and are indicated in fig. 1:A) Photo tube (trinocular models) L) Condenser with irisdiaphragm + filterholderB) Diopter adjustment M) Object stageC) Tube (360° rotatable) N) Slide clipD) Stand arm O) ObjectivesE) Safety device P) Revolving nosepiece for 4 objectivesF) Coaxial coarse- and fine adjustment Q) Prism housingsG) Stand base R) Eyepiece(s)H) On/Off switch S) Coaxial knobs mechanical stageI) Light intensity adjustment T) Tension controlJ) Lamp housing U) Set screw (trinocular models)K) Height adjustemnt condenser V) Photo/video switch (trinocular models)4.0 Functions of the microscopeThe stand consists of a stand arm (limb) (S), stand base (M) and an object stage (F).Hold the microscope at the top of the stand arm when it should be moved.4.1 TubeThe 360° rotatble monocular tube is equiped with a WF10x eyepiece. The binocular and trinocular have 2 eyepieces WF10x. The tube of the trinocular model can be fixed in any position by using the set screw (T).4.2 Revolving nosepiece for 4 objectivesThe revolving “reversed” nosepiece (P) can contain 4 DIN objectives (O).A)R) B)Q) C)D)P)O)N)M) E)L)K) F)J)G)H)I)Set screw (U) in the picture below is for locking the position of the rotatable head. This system is only found on the models with infinity objectives. All other models have a non-detachable head.V)U)T)S)NOVEX BTS4.3 Optical specificationsThe NOVEX B range microscopes are equipped with one or two widefield eyepieces WF10x (R) and 4 semi-plan achromatic DIN objectives 4x N.A. 0.10, 10x N.A. 0.25, S40x N.A. 0.65 and S100x N.A. 1.25 oil-immersion (O).The S40x and S100x objectives are equipped with a spring mount, to prevent damage to the frontlens and the slide.The Numeric Aperture - N.A. – of the objective is an indication for the resolving power of the objective.The total magnification can be calculated by multiplying the magnification of the eyepiece with the magnification of the objective. The magnifications are displayed in the table below:Eyepiece Objective Magnification10x 4x 40x10x 10x 100x10x 40x 400x10x 100x 1000x4.4 Object stageThe slide is placed into the clamp of the mechanical stage (N) and can be carefully moved into X- and Y- directions. Focusing the specimen is done by using the coaxial coarse- and find adjustment knobs (F).4.5 Coarse- and fine adjustmentThe coarse- and fine adjustment knobs (F) for the height adjustment of the object stage are mounted together on one (1) axle (co-axial). On one of the coarse adjustment knobs there is a graduation with intervals of 0.002 mm. This can be used to measure depths in a specimen.4.6 Abbe condenser with iris diaphragmBeneath the object stage an Abbe condenser (M) N.A. 12.5 is mounted. The condenser can be adjusted in height by means of a rack and pinion movement and knob (K). With this one can focus the light on the specimen by which the contrast can be optimised. The condenser is factory pre-centered.The iris diaphragm with filter holder is mounted beneath the condenser. The light intensity can be adjusted by changing the flexible opening4.7 Filter holderTo reach a natural colour image of the specimen one can put the blue filter in the filter holder (L). By doing this the light becomes whiter, even close to the normal daylight.4.8a Halogen illumination NOVEX B-rangeThe halogen illumination of the B-range is adjustable (I)The bulb is 6 Volt – 20 Watt. Art. nr. 86.8894.8b LED illumination NOVEX B-rangeThe LED illumination of the B-range is adjustable (I) and has re-chargable batteries.After charging the LED can be used for about 60 hours. Charging time is about 10 hours.The LED illumination has the below specifications:•LED : 20 mA, 3.5 Volt.•Charger : Prim. AC 230 Volt-50Hz, sec. DC 5.5 Volt – 200 mA .•Battery : 3 Nickel-Metal hydride batteries, AA type, 1.2 Volt 1800 mAh.5.0 Preparing the microscope for useRemove the packing and put the microscope on a flat table. The objectives are pre mounted. Connect the power cable into the power connection at the rear side of the microscope and put the plug into the mains supply. Switch on the microscope (H). Sit comfortably down behind the microscope and take a relaxed position while viewing through the eyepiece (R).6.0 Working with the microscopePlease read the following instructions to achieve the best microscope observing results.6.1 Adjustment of the eyedistance (binocular and trinocular types)Adjust the distance between the 2 tubes so it matches the distance between your eyes. The distance is adjustable from 55 – 75 mm.6.2 Setting the diopter adjustmentFocus the slide by means of the coaxial coarse- and fine adjustment (F), using the tube without diopter adjustment ring only. Now look through the other eyepiece and focus the image with the diopter adjustment ring (B).6.3 Setting the illumination•Lower the stage (M) by means of the coaxial coarse- and fine adjustment knobs (F) to the maximum.•Put a slide onto the stage in slide clip (N) with the thin cover glass pointing upwards.•The part of the slide to be exhamined should be in the center of the opening of the stage. •Turn a low power objective 4x, or 10x (O) to the slide.•Lower the condenser (L) to the maximum.•Fully open the iris diaphragm.•Raise the stage (M) by means of the coaxial coarse- and fine adjustment knobs (F) until the image becomes visible.•Focus the image by means of the coaxial coarse- and fine adjustment knobs (F).•Now close the iris diaphragm until an equal light coverage is reached.•Set the light intensity to at minimum position (I).Caution:At maximum, the light intensity of the halogen bulbcan be harmful to the eyes! For the 4x objective we therefor recommend theuse of a neutral filter•Focus the specimen.•Turn up the light intensity to the required level.•Now the microscope is set properly for the use with the 4x or 10x objective.•For high magnifications always start with the 10x objective first.•Critically focus with the fine adjustment knob (O).•In general, the higher the magnification, the higher the condenser should be set. With a magnification of 400x, the top of the condener will be about 2 mm. lower as the stage surface. •When magnification is increased, the iris diaphragm should be openen wider to reach a good balance between contrat and resolving power.•The light intensity can be adjusted with the knob (!)When changing slides, start with the 4x objective again.6.4 Safety deviceTo prevent damage to the objective lens, or breaking the slide, all types are equipped with a safety device, which should be set as follows:Move the safety device knob (E) to release the setting. Focus on the slide with the use of the 10x objective and push the knob to set the safety device. Now the object stage can not be moved upwards anymore by means of the coarse adjustment knobs.It is recommended to use slides of 1.0 – 1.2 mm thickness (product numbers: PB.5150, PB.5155, PB.5160) in combination with cover glasses of 0.13 mm or 0.17 mm thickness (product numbers: PB.5165, PB.5168).6.5 Use of the S100x oil-immersion objectiveThe B-range models are equipped with a S100x N.A. 1.25 oil immersion objective.Please follow these instructions for using this objective:•Focus the image with the S40x objective.•Turn the revolving nosepiece so the S100x objective almost reaches the click-stop.•Put a small drop of immersion oil on the centre of the slide.•Now turn the S100x objective so that you feel the click stop.•The front lens is in contact with the immersion oil.•Look through the eyepiece (R) and focus the image with the fine adjustment knobs (F).•The distance between the lens of the objective and the slide is only 0.14 mm!•In case there are small bubbles visible turn the S100x objective a couple of times left/right so that the front of the objective moves in the oil and the bubbles will disappear.•After using the S100x objective turn the table (M) with the fine adjustment knobs (F) downwards until the front lens doesn’t touch the oil any longer.•Always clean the front lens of the S100x objective with a piece of lens paper that is moistened with a drop of xylol or alcohol.•Clean the slide after use as well.The S100x can also be used without immersion oil (dry). Please be aware of the fact that in such case the resolution will be much lower!Caution:•Never put a drop of xylol or alcohol directly on the lens of the objective. It could enter the objective and dissolve the glue that holds the lenses!•Avoid oil contact with any of the other objectives!6.6 Photo and videoThe trinocular models are equipped with a vertical photo tube on which a photo or video CCD camera can be attached.By pulling out the photo/video switch (V) on the right-handed side of the trinocular head, the light pf one of the eyepieces is directed to the photo tube. The image remains visible through the other eyepiece.For adapters see 8.07.0 Maintenance and cleaningAlways place the dustcover over the microscope after use. Keep the eyepiece and objectives always mounted on the microscope to avoid dust entering the instrument.7.1 Cleaning the opticsWhen the eyepiece lens or front lens of the 10x or S40x objective are dirty they can be cleaned by wiping a piece of lens paper over the surface (circular movements). When this does not help put a drop of xylol or alcohol on the lens paper. Never put xylol or alcohol directly on the lens!When dirt is clearly visible in the field of view it resides on the lowest lens of the eyepiece. Remove the eyepiece from the tube. Clean the outside of the lens.In case there is still dust visible please check if the dust is in the eyepiece by turning it. If this is the case remove the lowest lens carefully from the eyepiece and clean it.It is not necessary – and not recommended – to clean the lens surfaces at the inner side of the objectives. Sometimes dust can be removed with high pressured air. There will never be dust in the objectives if the objectives are not removed from the revolving nosepiece.Caution:•Cleaning cloths containing plastic fibres can damage the coating of the lenses!7.2 Maintenance of the standDust can be removed with a brush. In case the stand or table is really dirty the surface can be cleaned with a non-aggressive cleaning product.All moving parts like the height adjustment or the coaxial course and fine adjustment contain ball bearings that are not dust sensitive. With a drop of sewing-machine oil the bearing can be lubricated.7.3 Changing the bulb of the NOVEX B-rangeCaution:Always remove the power cable from the mains supplybefore changing the bulb!Replacing the halogen bulb is easily done by opening the lamp-cover on the bottom of the microscope. Please follow the below procedure:•Remove the eyepiece to prevent them from falling out when the microscope is tipped over. •Gently tip over the microscope until it is resting on its limb.•Un screw the set screw of the lamp-cover and remove this cover.•After having carefully checked that the bulb is cool to the touch, remove it from its holder. DO NOT TWIST, the pins can brake off and remain stuck into the holder.•Take the fresh bulb with a tissue, and stick it into the holder.•Do not touch new halogen bulbs with your fingers, this will shorten the life time of the bulb! Catalogue number: 86.889 halogen bulb 6 Volt 20 Watt.7.4 Charging the batteries of the LED typesThe types BLMS, BLBS and BLTS are equipped with 3 rechargable NI-MH batteries AA-format 1.2 volt - and can be used independently from the mains supply.At first use the batteries should be charged. Set the On/off switch in the zero (0) position. Connect the cable from the plug transformer to the base of the microscope, and the plug transformer to the mains supply. Initial charging will take about 15 hours! During charging a red LED pilot lamp will light up on the backside of the microscope. As soon as this turns off, charging is ready.These microscopes are not only equipped with LED illumination and a simple charger. The printed circuit board has an IC processor for maximum charging of the nickel-metalhydride batteries 1.2 volt 1800 mA/h. The first 5 hours the batteries are being charged quickly – uptil 80% - after that they will be charged and decharged a little until 100% capacity is reached. This will increase the lifetime of the batteries.All next chargings will take 10 –12 hours. Upon full capacity the charger will turn itself off.When batteries are down, one can charge them and work with the microscope simultaneously.The LED types have a special condenser lens in the lamphousing, which concentrates the light beam for optimum light capacity. The field of view with the 4x and 10x objectives therefor has a light spot in the centre. With the supplied neutral filter the field of view can be equally illuminated again. This filter is placed into the filterholder (L).7.5 Changing the batteries on the LED modelsCaution:Always first pull out the plug-transformer from the mains supply!•Remove the bottom cover by unscrewing the four bolts, located in the rubber feet.•Now take of the cover of the battery compartment.•Place the new batteries in the correct order, close the cover and replace the bottom cover again.Caution:Batteries are CHEMICAL WAIST and should be disposed of as such!7.6 Tension control settingBetween the right-handed coarse adjustment knob and the microscope stand there is a ring (T)for the tension control setting. By means of turning it clock- or counter clockwise the tension of the coarse adjustment knobs can be adjusted.8.0 Microscope accessoriesEyepieces80.873 Widefield yepiece WF 15x field number 1285.882 Widefield yepiece WF 20x field number 1085.574 Widefield micrometer eyepiece WF 10x fieldnumber 18, 10 mm in 100 parts,with adjustable eyelensObjectives86.891 Semiplan achromatic DIN objective SMP 4x / N.A. 0.1086.893 Semiplan achromatic DIN objective SMP 10x / N.A. 0.2586.894 Semiplan achromatic DIN objective SMP 20x / N.A. 0.4586.897 Semiplan achromatic DIN objective SMP S40x / N.A. 0.6586.900 Semiplan achromatic DIN objective SMP S100xx / N.A. 1.25 oil-immersionPhoto- and video adapters for the trinocular types:86.817 C-mount adapter with built-in optics86.127 Camera adapter80.861 Photo eyepiece PH 2,5x – to be used with 86.12786.820 Photo tube with built-in 2,5x and 4x photo eyepiecesT-2 rings on requestOther accessories80.839 Eyeshade for 28 mm. eyepieces80.810 Stage micrometer 1 mm. in 100 parts 86.960 Wooden cabinet with handle, lock and keyThis page has been intentionally left blankB EV1。
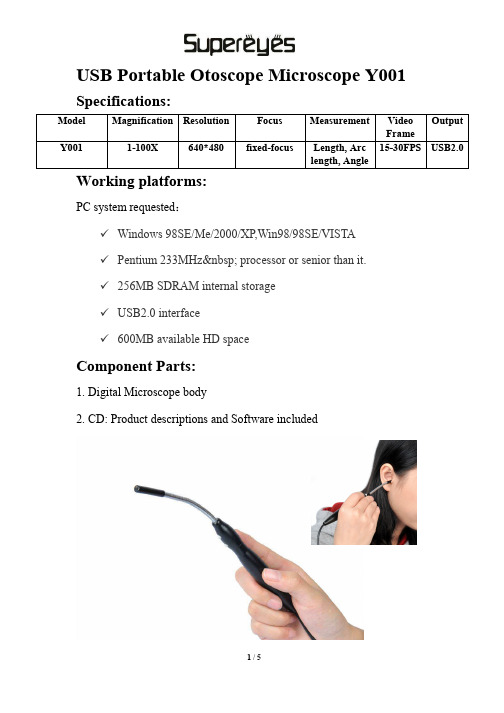
USB Portable Otoscope Microscope Y001Specifications:Output Model Magnification Resolution Focus Measurement VideoFrameY001 1-100X 640*480 fixed-focus Length, Arc15-30FPS USB2.0length, AngleWorking platforms:PC system requestedWindows 98SE/Me/2000/XP,Win98/98SE/VISTAPentium 233MHz processor or senior than it.256MB SDRAM internal storageUSB2.0 interface600MB available HD spaceComponent Parts:1. Digital Microscope body2. CD: Product descriptions and Software includedHardware Installing and Using1.Connect USB to PC interface2.Put the otoscope into the ears. Adjust the distance to get the best image vision.3.Take photos or record videos by the Supereyes software.Warn and notice!1. Don’t touch the lens and LED with your hand as it may be dangerous or destroy the lens.2. Don’t dismantle the product which can lead to malfunction or electric shock accident.3. Don’t pull out the plug or other interface with damp hand .4. Don’t link other plug to the product which may lead to accidents.5. Don’t clear the product with alcohol or organic dissolvent.6. If the lens or viseur becomes dirty, you’d better use dry non-gunny cloth or special lens paper to clear. Don’t touch the lens with hands which may produce scraping marks on its surface. Don’t apply force when clear it.7. This product is designed for indoor use please avoid exposing in the open air. Lens damage can come from over-high temperature and dampness.8. favorable use environment temperature 0°C ~ 40°C relative dampness 45% ~ 85%9. If foreign matter or water permeated into endoscope or pull out the USB immediately and send to maintain center, no dry it with hair dryer.10.When using the USB ware, avoiding people’s being stumbled or endoscope’s falling by USB.11. To avoid possible electric shock accidents, break off the power before remove the computer or display.Solution of malfunctionNoMalfunctionegPossible reasons Solution1Image blackscreen Lighting malfunctionDidn’t open the previewChoose wrong deviceDidn’t connect well withPCTurn on the lightOpen the previewChoose suitable deviceReconnect USB interface2 Image beingVaguediscolor lowframe rateDirty lensWrong focal distanceDidn’t connect well withPCLower PC configurationClick the lensAdjust focal distanceReconnect US interfaceChange to another PC3Imagedistortion Didn’t connect well withPCReconnect USB interfaceReturn to factory to maintainmicroscope malfunction4ImageflashingWrong frame rateChoose the same frame ratewith ur residence town 5Can’t be recognizedDidn’t connect well withPCmicroscope malfunctionAdd dampness of pointxReturn to factory to maintain 6Pointx: slowreaction noreaction Climate factormicroscope malfunctionStraighten the tubeReturn to factory to maintainCertificationsDisclaimerThis product’s manufacturer and retailer won’t be responsible for any products damage results from improper use. This instruction book’s contents are synchronous with current products. Manufactured by D&F Corp. we won’t be responsible for any error in contents because products update. Meanwhile we don’t undertake the obligation of update text content and information.。

As it is buffeted by changes in its internal and external environments, an organization is forced to adapt, to evolve. But organizational transformation can be a complex undertaking, especially in a setting where means are often limited. The risk of project slippage is omnipresent, and the desired outcome is far from guaranteed.To improve the chances for success, the right things must be done and, especially, done the right way. A solid overall plan is needed so projects properly align with business strategy from the outset, backed by a consistent, proven approach to solution delivery.Managing change confidentlyMacroscope is an integrated set of methods and techniques that guide your IT-enabled change initiatives. It helps you maximize their value and ensures that your business needs truly drive your IT decisions.Whether your focus is strategic planning,enterprise architecture or organizationaltransformation, Macroscope increasesyour project’s chances for success bybasing it on a proven process framework.It can also be used to integrate, deployand maintain your information systems.Macroscope is flexible and can adapt toany type of governance and change management approach—agile project management, project portfolio management, benefits realization, value management, etc. It helps you think beyond individual projects and consider all the change programs in the organization, thus allowing you to satisfy four imperatives:■do the right things;■do things the right way;■getting things done;■deliver value to the business.The results are realized benefits, no-surprises project progress and repeatable successes.An integrated approachMacroscope is organized into five domains—Vision, Architecture, Solution, Project and Benefits—which cover all aspects of the IT investment life cycle, from strategic planning through to information systems and their maintenance. Though each one targets specific objectives, these domains were developed from a global perspective. They are tightly interwoven so Macroscope can be applied wherever your needs are.■Vision: developing and confirming the business vision and integrating the IT strategy.■Architecture: enhancing business capabilities and the underlying IT. Planning the change.■Solution: designing, assembling, acquiring, implementing, maintaining and operating information systems.■Project: delivering capabilities on time, within budget and with the quality expected.■Benefits: managing portfolios of benefits realization programs to maximize the value delivered by the change initiatives.Best Practices Driving ChangeOutdated information. Unsuitable processes. Inappropriate business strategy. An organization’s capacity to grow guarantees its survival. But successfully introducing a change demands a solid approach so the results delivered are the ones expected.■The best structured andintegrated intellectualcapital on the market■30 years of experience andlessons learned■Industry best practicesWhy Macroscope?Our consultants use Macroscope to conduct their projects at our clients’. Taking ownership for yourself or implementing it in your organization gives you the advantage of not only the most comprehensive group of methods on the market, but also the support you need to use them to their fullest potential.■Custom licenses: Macroscope can be accessed via an easy to use Web interface. A corporate license lets you integrate Macroscope into your intranet and gives you access to modules of your choice, depending on your needs. And because Macroscope is being constantly improved, an update program assures you that you will always have the latest version of the methodology.Macroscope is also available online through the Fujitsu Cloud. That flexible approach to using the methodology gives you access to the latest content without having to worry about installing updates.■Customization services: Macroscope has been designed to easily adapt to different project environments and technology solutions, as well as to various frameworks and terminologies.It also includes customization features so you can adapt it to your organization, and integrate your existing best practices and processes. If necessary, our specialists can help you plan, design, develop and implement the customization you need to meet your business needs.Customization may include, among other things:–developing specific extensions to support special types of projects;–adapting learning modules to include your processes, guidelines and rules;–integrating your life cycle processes and best practices intoMacroscope;–integrating Macroscope into your intranet or employee portal;–integrating Macroscope into your workplace (e.g. integratedcontent management, version control and developmentenvironments).■Coaching and support services: We take knowledge transfer very seriously because our goal is to help our client become self-sufficient. To do that, we provide coaching, support and transition services based on proven change realization processes.An open collaboration site is also available to give Macroscope users a space for sharing knowledge. Visit it at.We build solutions together and achieve results that matter to your organization.Tangible benefits■Common terminology and concepts■Elimination of silos of misunderstanding■Reduction of project related risks■Greater compliance with ISO 9000 standards or SoftwareEngineering Institute(SEI)CMMI maturity model■Effective partnership between business users and IT teams■Reuse of know-how from one project to another■Faster skill building and greater consistency, efficiency andproductivity■Better estimates and fewer gaps between objectives and results ■Effective business solutions aligned with business strategy■Better decision-making process to select the right projects.ContactFUJITSU CANADAQuébec City: 418 840-5100 Regina: 306 545-4344 Montréal: 514 877-3301 Edmonton: 780 423-2070 Ottawa: 613 238-2697 Calgary: 403 265-6001 Toronto: 416 363-8661 Vancouver: 604 669-9077 Mississauga: 905 286-9666 Victoria: 250 479-2772 All rights reserved, including intellectual property rights. Technical data subject to modifications and delivery subject to availability. Any liability that the data and illustrations are complete, actual or correct is excluded. Designations may be trademarks and/or copyrights of the respective manufacturer, the use of which by third parties for their own purposes may infringe the rights of such owner. Macroscope is a registered trademark of Fujitsu Consulting (Canada) Inc.© 2013, Fujitsu Canada.。
Digital MicroscopeUser’s Manual(T004)IntroductionThank you for using Handheld Digital MicroscopeDigital Microscope has a wide scope of applications, such as:1. Skin detection2. Hair root detection3. Industrial inspections (such as print PCB board, precise equipment)4. Printing5. Textile6. Biologic inspection7. Antique and Jewelers inspection8. Crime scene, imprint and material evidence investigation9. OthersHandheld Digital Microscope can be connected with computer and easy to operate .Using the additional software, you can make picture capture and video recording easily.In order to make you enjoy the funny to use Handheld Digital Microscope, please read this User's Manual.ContentsIntroduction (1)Contents (1)Specification and System requirements (2)Safety Precautions (3)Component (4)Hardware installation and using (4)Difficulty resolution (5)Certificates (6)Disclaimer (7)Specification:1. Resolution: 5 MP,2592*1944,1600*1200,640*480,320*2402. Magnification: 250-2000 times3. Measurement function (special modes)4. Anti-tremble picture capture function5. Display speed: 30FPS6. Interface: USB (PC)System Requirement:The computers should be required as:OS: Windows 98SE/Me/2000/XP,Win98/98SE/VISTAXP/VISTA----Plug and playCPU: Pentium 233MHz  and aboveMemory: 256MB SDRAMInterface: USB2.0HDD storage space: 600MB and aboveSafety Precautions:1. Do not touch the lens with finger to avoid electrostatic damage.2. Do not attempt to disassemble this product yourself. Opening the covers may expose you to dangerous voltage points or other risks.3. When hands are wet, do not plug in or remove the adaptor or other connectors.4. Using or storing USB microscope , do not plug in any other cables.5. Do not clean the products with ethyl alcohol or other organic solvent camera case, painted surfaces & lens.6. If the lens is dirty, please use a kens brush on soft cloth to wipe clean. Avoid touching them with your fingers. Exercise care to avoid scratching the lens.7. Without protection, do not put microscope outdoor to avoid the lens damaging by high temperature or humidity.8. Temperature: O°C ~ 40°C and Humidity: 45%~85%.9. If liquid has entered stage, immediately turn the power off and use dryer neither. Please send to the maintenance center10. Using or storing USB microscope, need to watch all cables to avoid trip over.11. To avoid electric shock. When remove all electric PC or TV. Please pull out the power source.Compotents1. The body of digital microscope2. CD (for special function)Hardware installation and using 1.2. Choose the suitable distance between the stage and the objects, adjust the focus.3.Adjust the LED light by touch button or light controlDifficulty Resolution Items Trouble vision Reason Solution 1 blank screen LED is closed Preview is closed No suitable devicesIncorrect connection withPC Open LED Open preview Choose suitable devices Connect USB again2Picture vagueDiscoloration speed slow Dirty lens Incorrect focusing Incorrect connection with PC The Configuration of PC istoo lowClean by Lens paper Adjust focusing Connect USB again Choose new PC 3 Picture distortion Incorrect connection withPCTrouble inside ofmicroscope Connect USB again Back to repair4 Flicker picture Bad frequency Choose thesuitablefrequency 5 Can notrecognize Incorrect connection with PC Trouble inside ofmicroscope Connect USB again Back to repair6 Touch reflectslow, no reflect Climate effect Trouble inside of microscope Make the touch-bottom HumidityBack to repairCertificateDisclaimer The manufacturer and distributor of this product shall not take the responsibilities on the damages caused by the improper using of this product or other artificially damages.The content of this User manual is based on the current specification of this product. The manufacturer D&F Corp shall not take the responsibility of any inconsistent of the specification to the product for the purpose of improvements and other reasons. Meanwhile, D&F Corp do not have the obligation for updating the content and any information of this manual momentarily.。
MB.1001E NF O Q U ESos modelos binoculares tienen tubos inclinados de 45 °, distancia inter-pupilar ajustable entre 48 y 75 mm y un ajuste de ± 5 dioptrías en el tubo izquierdo os modelos trinoculares tienen tubos inclinados de 30 °, la distancia inter-pupilar es ajustable entre 48 y 75 mm y un ajuste de ± 5 dioptrías en el tubo izquierdo l cabezal trinocular tiene un divisor de haz de trayectoria de luz fija (50:50)MB.1051-LCDMB.1155 MB.1153MB.1152 MB.1051I LU M I N AC I ÓN• T odas las versiones monoculares se suministran con una iluminación LED 1W de intensidad ajustable• L as versiones binoculares y trinoculares se suministran con un sistema de iluminación NeoLED ™ 1W de intensidad ajustable• T odos los modelos tienen baterías internas recargables con un cargador de batería externo de 100-240 V / adaptador de redCO N T E N I D O I N C LU I D O• S e suministra con cargador de adaptador de red, filtro blanco, cubierta anti-polvo, manual de usuario y aceite de inmersión de 5 ml para modelos con objetivo S100x. Software incluido para modelos digitales y para los modelos LCD• Todo empacado en una caja de poliestirenoMODELOS DIGI TALESC ÁM A R A• C ámara integrada CMOS USB-2 de 1.3 MP• R esolución máxima de 1272 x 952, profundidad de color de 24 bits, hasta 30 fotogramas por segundo• S e entrega con el software ImageFocus 4, cable USB-2 y un patrón de calibración de 1 mm / 100 partes • La garantía para la cámara es de dos añosS O F T WA R E• E l software ImageFocus 4 de captura y análisis permite guardar imágenes en formatos .jpg, .tif o .bmp, así como videos en formato .avi• L as imágenes se pueden anotar y las mediciones se pueden realizar en imágenes en vivo o capturadas• C ompatible con Windows 7, 8 y 10, configuraciones de 32 y 64 bits • L a versión Mac OS Light también está disponible para capturar imágenes • L as actualizaciones se pueden descargar en nuestro sitio web PA N TA L L A LC DTodos los microscopios MicroBlue LCD vienen con una pantalla LCD de 5.6”• Resolución de la pantalla 640 x 480• Las imágenes y los videos se guardan directamente en la tarjeta SD • R esolución de imagen 2048 x 1536, 1600 x 1200, 1280 x 960, 640 x 480 en formato .JPEG• Resolución video 640 x 480 en formato .AVI• Suministrado con el programa Imagebasic et cable USB.2• Garantía de 2 años para la cámaraP R O G R A M A I M AG E B A S I C• E l programa de captura permite guardar imágenes en formato.jpg y videos en formato .avi• Compatible con Windows 7, 8 et 10, en configuraciones de 32 y 64 bits • L as actualizaciones se pueden descargar desde nuestra página web EuromexMicroscopenbv•Papenkamp20•6836BDArnhem•TheNetherlands•T+31(0)263232211•F+31(0)263232833•****************•ACCESORIOS Y REPUES TOSMB.6010 Ocular de gran campo WF10x/18 mmMB.6010-P Ocular de gran campo WF10x/18 mm con puntero MB.6010-M Ocular de gran campo WF10x/18 mm micrométrico MB.6015 Ocular de gran campo WF15x/11 mm MB.6020 Ocular de gran campo WF20x/9 mm MB.6099 Pareja de protectores de gomaMB.7004 Objetivo acromático 4x/0.10, para-focal 35 mm MB.7010 Objetivo acromático 10x/0.25, para-focal 35 mm MB.7020 Objetivo acromático 20x/0.40, para-focal 35 mm MB.7040 Objetivo acromático S40x/0.65, para-focal 35 mm MB.7060 Objetivo acromático S100x/1.25, para-focal 35 mm MB.9710 Filtro esmeriladoMB.9900 Maleta de transporte de aluminioAE.9918 Bolsa de microscopio de nylon, dimensiones 26 x 18 x 400 mm MB.9975 Adaptador de red / cargador externo 100-240 Vca / 5 Vcc (50/60 Hz)MB.9981 Recambio 1W LED MB.9991 Recambio 1W NeoLEDM O D E LO SMono Bino TrinoObjetivos máximos Objetivos 4/10/S40xObjetivo S60xObjetivo S100x Platina mecánica X-YLED NeoLED BateríasMB.1001 •3•••MB.1051•4••••MB.1651•4•••••MB.1151•4•••••MB.1052•4••••MB.1652•4•••••MB.1152•4•••••MB.1053•4••••MB.1653•4•••••MB.1153•4•••••M O D E LO SDigital LCD Digital mono Objetivos máximos Objetivos 4/10/S40x Objetivo S60x Objetivo S100x Platina mecánica X-YLED NeoLED BateríasMB.1001-LCD*•3•••MB.1051-LCD*•4••••MB.1055•4••••MB.1655•4•••••MB.1155•4•••••* modelos con pantalla LCDPB.5155 P orta-objetos de 76x26 mm., cantos pulidos(caja de 50 unidades)PB.5157-W P orta-objetos de 76x26 mm., cantos pulidos. Banda blanca(caja de 50 unidades)PB.5157-B P orta-objetos de 76x26 mm., cantos pulidos. Banda azul(caja de 50 unidades)PB.5160 P orta-objetos de 76x26 mm., cantos pulidos. Con cavidad(caja de 10 unidades)PB.5165 C ubre-objetos de 18x18mm., 0.13-0.17 mm.(caja de 100 unidades)PB.5168 C ubre-objetos de 22x22mm., 0.13-0.17 mm.(caja de 100 unidades)PB.5245 Papel de limpieza de lentes (paquete de 100 hojas)PB.5255 Aceite de inmersión, n=1.482 (25 ml.)PB.5274 Alcohol isopropilico 99% (200 ml.)PB.5275 K it de limpieza compuesto por líquido de limpieza de lentes,gamuza, papel de limpieza de lentes, cepillo, pera de aire y bastoncillos de algodón.。
Eyepiece locking set screwArm of microscope(located in center of stage)Tension adjustment Illuminator field lens housingINTRODUCTIONThank you for your purchase of a National microscope, It is a well built, precision instrument and carefully checked to assure that it reaches you in good condition. It is designed for ease of operation and years of carefree use. The information in this manual probably far exceeds what you will need to know in order to operate and maintain your microscope. However, it is provided to answer questions which might arise, and to help you avoid any maintenance expense that may be unnecessary.Carefully read instructions before operating microscope. Nomenclature used to describe components and controls are identified on opposite page of the manual.UNPACKING THE MICROSCOPEDo not discard Styrofoam container or packing materials. Save in case instrument needs to be transported or shipped for repairs. Remove microscope and dustcover from container. Remove all tape and packing material used to protect microscope during shipment. Make certain lens surfaces do not come in contact with dirt, fingerprints or oil. Damage of lens surfaces occurs when they come in contact with such contaminants, and image quality is reduced.DESCRIPTION OF COMPONENTS1. EYEPIECE LENS (ocular lens): Lens closest to the eye, magnifies the primary image formed by theobjective lens. A pointer is located in field of view, and revolves by turning the eyepiece. Use the pointer to direct attention to specific things of interest on the specimen slide.2. OBJECTIVE LENS: Lens closest to the specimen, forms the first magnified image of the specimen.3. OBJECTIVE TURRET (nosepiece): Revolving turret designed to hold objective lenses, permitschanges of magnification by rotating different powered objective lenses into optical path.4. STAGE CLIPS: Two locked-on clips hold specimen slide in place on stage.5. STAGE: Platform of the microscope where the specimen slide is placed.6. CONDENSER LENS: Built-in 0.65 N. A. condenser lens condenses light rays from substageillumination and fills the back lens element of the objective lens for optimum resolution.7. DISC DIAPHRAGM: Rotating disc located below stage, with 5 holes of various apertures, designed tohelp achieve optimum resolution of the objective lens. Smaller apertures used for lowermagnifications and larger apertures used for higher magnifications.8. SAFETY RACK STOP: When properly adjusted, controls maximum upward travel of stage whilefocusing, prevents higher power objectives from breaking specimen slides, prevents damage to objective lenses. This safety stage stop has been pre-adjusted at the factory.9. FOCUSING KNOBS: Dual focusing knobs located on each side of arm, permits precise adjustment.When turned, raises or lowers stage to bring specimen into focus.10. ILLUMINATION: Built-in substage electrical illuminator provides constant, reliable, pre-focusedillumination.OPERATION OF MICROSCOPE1. Always carry microscope by grasping arm with one hand and placing other hand under base.2. Place microscope directly in front of you in a manner which permits you to comfortably look into theeyepiece. Note that the head of microscope rotates 360º, permitting you to operate the microscope from the front or from the back, whichever is most convenient for you. It also permits convenient sharing of microscope by more than one user, by simply rotating head, without needing to move entire microscope. Most users will position the microscope with the arm facing them so that focusing knobs are most convenient to reach.3. Plug cord into a standard 120 volt AC three-wire grounded electrical outlet. Push rocker switchlocated on base to ON position. In case of equipment malfunction, see “Troubleshooting” located at back of this manual.4. Rotate focus knobs to move stage down (away) from objectives as far as possible.5. Place specimen slide, cover slip facing up, on stage with specimen centered over condenser lens inmiddle of stage.6. Rotate disc diaphragm to position the largest aperture under the hole in center of stage.7. Turn the objective turret until the 4x (smallest) objective lens clicks into position in the optical path.Note that each time you change from one objective lens to another you should turn the turret until you hear the click, which indicates that the lens is properly indexed in the optical path.8. While looking through the eyepiece, rotate focusing knobs until specimen comes into focus. If imagedoes not appear in field of view, move specimen slide slightly on stage until image appears in field of view.9. Turn the disc diaphragm, observing that different apertures affect the sharpness of the image. Turndiaphragm until sharpest possible image is obtained. When turning the disc diaphragm, you should hear a click as each aperture comes into proper position under the hole in center of stage. If aperture is not properly positioned, you will observe shadows in the field of view when looking through the microscope.10. Changing magnificationA. Note that each of the three objectives have a different color ring. This permits the teacher toinstruct the class to switch magnifications by referring to the color of the ring.B. Total magnification obtained with each objective lens is determined by multiplying themagnification of the eyepiece times the magnification of the objective. Keep in mind that asmagnification is increased, field of view (area of the specimen seen when looking through themicroscope) decreases. You will find that you use the lower magnifications at most times.Always use the lowest magnification (4x objective) when first focusing on a new specimen slide, as this low magnification provides the biggest field of view, thus making it easier to find andposition the specimen within the field of view.10x eyepiece x 4x objective = 40 times mag. (biggest field of view), field size 4.5mm10x eyepiece x 10x objective = 100 times mag. (smaller field of view), field size 1.8mm10x eyepiece x 40x objective = 400 times mag. (smallest field of view), field size 0.45 mmC. To change magnification:a) Rotate revolving nosepiece to position 10x objective into optical path. Some slight adjustmentof focusing knob may be required.b) Rotate revolving nosepiece to position 40x objective into optical path. Some slight adjustmentof focusing knob may be required.Note: Take care when rotating 40x objective into place. This is the longest lens and has a spring retractable mechanism which retracts slightly into its housing if the front of the lens comes incontact with the specimen slide while focusing the microscope. This prevents damage to the lens or slide.Objective Specification ChartMAINTENANCEWARNING: For your own safety, when servicing models with electric illuminators, turn switch to OFF position and remove plug from power source before maintaining microscope. If the power cord is worn, cut or damaged in anyway, have it replaced at once to avoid shock or fire hazard.1. OPTICAL MAINTENANCEA. Do not attempt to disassemble any lens components. Consult an expert technical servicecompany when repairs not covered by these instructions are needed.B. Prior to cleaning any lens surface, brush dirt and lint off lens surface with camel hair brush orcompressed air. Use of air in a can, available at most computer stores, is good source of cleanair.C. Do not remove eyepiece lens or objective lenses from microscope. Clean only the outer lenssurface by breathing on lens to dampen surface, then wipe with lens paper or cotton swab. Avoid wiping lens surface while dry, as lenses are scratched very easily.2. MECHANICAL MAINTENANCEA. Rack stop screw has been pre-adjusted at the factory, and should not require readjustment.However, if you do attempt readjustment, note the following: Rack stop screw is located in center of arm behind stage platform. Loosen round knurled locking nut by turning counter-clockwise.Loosen stop screw, but do not remove. Focus microscope on standard slide until sharp image is obtained. Rotate rack stop screw clock-wise until tight. Lock into position with locking nut.Needle nose pliers might be needed to loosen and retighten the round locking nut.B. Tension adjustment. This controls amount of tension in focusing mechanism and prevents stagefrom drifting down from its own weight and causing image to move out of focus during viewing.a) Tension adjustment collar is located between arm and focus knob on left side of microscope.With a 1.5 mm Allen key wrench, loosen the Allen set screw located in one of the four holeslocated on tension adjustment collar. There is a set screw in only one of these holes.b) To tighten tension, turn collar in a clock-wise direction. Use of a wide rubber band will providea better grip on the tension adjustment collar. It is advisable to leave tension as loose aspossible, tightening only enough to keep stage from drifting down and out of focus from itsown weight. Do not rest hands on stage while viewing, as weight of hands can cause imageto move in and out of focus. After adjusting, tighten the set screw to lock collar in place.C. Metal parts: Use a clean, damp cloth to remove dust or dirt from metal part followed by a dry cloth.3. ELECTRICAL MAINTENANCEWARNING: For your safety, turn switch off and remove plug from power source before replacing bulb. Make sure that illuminator housing and lamp are cool before servicing.A. Remove illuminator field lens housing by rotating in a counter-clockwise direction.B. Note that the lamp does not screw out. Remove by depressing lamp slightly and rotating in acounter-clockwise direction until it pops up slightly.C. This model requires National #800-102 115v 20 watt bulb withD.C. (double contact) mediumbayonet base. This is a bulb specific to microscopes, and should be available from the dealer from which you purchased the microscope.D. Insert new bulb, gently depress into socket and rotate clockwise. Carefully wipe new bulb toinsure that it is clean and free of all fingerprints. Any dirt or oil on lamp surface will affect light efficiency and bulb life.E. Replace illuminator field lens housing assembly.TROUBLESHOOTING PROCEDURESOPTIONAL ACCESSORIES AND PARTS:#615-045 WF 15x eyepiece w/pointer#800-102 Replacement bulb, 115v 20 watt, D.C. medium bayonet base#800-102-220V Replacement bulb, 220v 20 watt, D.C. medium bayonet base(for use in locations having 220v electrical supply)LIMITED LIFETIME WARRANTYPlease see our website, , for complete warranty details and exclusions.(Revised 7/13/09)。
显微镜显微镜物镜的命名第1部分:像场平面度/平场1 范围本文件规定了在显微镜物镜上标志“平场”的用法,并定义了一个平面物体表面像清晰区域的直径。
本文件适用于使用制造商规定的物镜、镜筒透镜和目镜组合的目视观察。
2 规范性引用文件下列文件中的内容通过文中的规范性引用而构成本文件必不可少的条款。
其中,注日期的引用文件,仅该日期对应的版本适用于本文件;不注日期的引用文件,其最新版本(包括所有的修改单)适用于本文件。
ISO 8578 显微镜物镜和目镜的标志(Microscopes — Marking of objectives and eyepieces)注:G B/T 22056-2018 显微镜物镜和目镜的标志(ISO 8578:2012,MOD)ISO 10934 显微镜光学显微术术语(Microscopes — Vocabulary for light microscopy)注1:ISO 19012-1:2013的规范性引用文件ISO 10934-1,被ISO 10934代替。
ISO 10934被引用的内容与ISO 10934-1被引用的内容没有技术上的差异。
注2:GB/T 27668-××××显微镜光学显微术术语(ISO 10934:2020,MOD)。
3 术语和定义ISO 10934界定的以及下列术语和定义适用于本文件。
3.1子午结构物体tangential structured object包含垂直于物场半径的短线的物体。
3.2子午像面tangential image surface所有子午结构物体聚焦并在主像空间中清晰成像的表面,除了像散和匹兹万曲率外,忽略其它像差。
3.3弧矢结构物体sagittal structured object包含平行于物场半径的短线的物体。
3.4弧矢像面sagittal image surface所有弧矢结构物体聚焦并在主像空间中清晰成像的表面,除了像散和匹兹万曲率外,忽略其它像差。
Digital Microscope
User’s Manual(T001)
Introduction
Thank you for using Handheld Digital Microscope
Digital Microscope has a wide scope of applications, such as:
1. Skin detection
2. Hair root detection
3. Industrial inspections (such as print PCB board, precise equipment)
4. Printing
5. Textile
6. Biologic inspection
7. Antique and Jewelers inspection
8. Crime scene, imprint and material evidence investigation
9. Others
Handheld Digital Microscope can be connected with computer and easy to operate .Using the additional software, you can make picture capture and video recording easily.
In order to make you enjoy the funny to use Handheld Digital Microscope, please read this User's Manual.
Contents
Introduction (1)
Contents (1)
Specification and System requirements (2)
Safety Precautions (3)
Component (4)
Hardware installation and using (4)
Difficulty resolution (5)
Certificates (6)
Disclaimer (7)
Specification:
1. Resolution: 2 Mega Pixels
2. Magnification: 1000 times
3. Measurement function (special modes)
4. Anti-tremble picture capture function
5. Display speed: 30FPS
6. Interface: USB (PC)
System Requirement:
The computers should be required as:
OS: Windows 98SE/Me/2000/XP,Win98/98SE/VISTA
XP/VISTA----Plug and play
CPU: Pentium 233MHz  and above
Memory: 256MB SDRAM
Interface: USB2.0
HDD storage space: 600MB and above
Safety Precautions:
1. Do not touch the lens with finger to avoid electrostatic damage.
2. Do not attempt to disassemble this product yourself. Opening the covers may expose you to dangerous voltage points or other risks.
3. When hands are wet, do not plug in or remove the adaptor or other connectors.
4. Using or storing USB microscope , do not plug in any other cables.
5. Do not clean the products with ethyl alcohol or other organic solvent camera case, painted surfaces & lens.
6. If the lens is dirty, please use a kens brush on soft cloth to wipe clean. Avoid touching them with your fingers. Exercise care to avoid scratching the lens.
7. Without protection, do not put microscope outdoor to avoid the lens damaging by high temperature or humidity.
8. Temperature: O°C ~ 40°C and Humidity: 45%~85%.
9. If liquid has entered stage, immediately turn the power off and use dryer neither. Please send to the maintenance center
10. Using or storing USB microscope, need to watch all cables to avoid trip over.
11. To avoid electric shock. When remove all electric PC or TV . Please pull out the power source.
Compotents
1. The body of digital microscope
2. CD (for special function)
Hardware installation and using 1.
2. Choose the suitable distance between the stage and the objects, adjust the focus.
3.
Adjust the LED light by touch button or light control
Difficulty Resolution Items Trouble vision Reason Solution 1 blank screen LED is closed Preview is closed No suitable devices
Incorrect connection with
PC
Open LED Open preview Choose suitable devices Connect USB again
2
Picture vague
Discoloration speed slow Dirty lens Incorrect focusing Incorrect connection with PC The Configuration of PC is
too low
Clean by Lens paper Adjust focusing Connect USB again Choose new PC 3 Picture distortion Incorrect connection with
PC
Trouble inside of
microscope Connect USB again Back to repair
4 Flicker picture Bad frequency Choose the suitable
frequency
5 Can not
recognize Incorrect connection with PC Trouble inside of
microscope Connect USB again Back to repair
6 Touch reflect
slow, no reflect Climate effect Trouble inside of microscope Make the touch-bottom Humidity
Back to repair
Certificate
Disclaimer The manufacturer and distributor of this product shall not take the responsibilities on the damages caused by the improper using of this product or other artificially damages.
The content of this User manual is based on the current specification of this product. The manufacturer D&F Corp shall not take the responsibility of any inconsistent of the specification to the product for the purpose of improvements and other reasons. Meanwhile, D&F Corp do not have the obligation for updating the content and any information of this manual momentarily.。