基于Android的软件开发课件第13讲 相机 II:拍摄并处理照片
- 格式:pptx
- 大小:1.07 MB
- 文档页数:18

Android移动应用开发技术中的相机与图像处理方法随着智能手机的普及,移动应用开发成为了一个蓬勃发展的行业。
在这个行业中,相机和图像处理技术占据了重要的地位。
本文将探讨在Android移动应用开发中相机和图像处理方法的应用。
1. 相机的应用相机是手机最常用的功能之一,随时随地都可以记录下美好的瞬间。
在Android开发中,可以使用系统默认提供的相机应用,也可以自定义相机功能。
自定义相机可以为应用程序带来更多的功能和自由度。
例如,可以添加实时滤镜、调整曝光度、对焦方式等。
为了实现这些功能,需要了解Android相机API和图像处理技术。
2. 图像数据处理在Android移动应用开发中,我们需要对相机拍摄的图像数据进行处理。
有两种处理图像数据的方法:使用Bitmap类和使用OpenCV 库。
Bitmap类是Android提供的图像处理工具之一。
它可以用于图像的压缩、裁剪、缩放等基本操作。
同时,它还可以进行像素级的操作,如亮度调整、颜色滤镜应用等。
使用OpenCV库可以进行更为复杂的图像处理操作。
OpenCV是一个开源的计算机视觉库,提供了很多强大的图像处理算法和函数。
使用OpenCV可以实现人脸识别、图像分割、特征提取等高级图像处理任务。
3. 相机功能的扩展除了基本的拍照功能,相机还可以实现更多的功能扩展。
例如,人脸识别、拍摄连拍、HDR模式等等。
这些功能的实现需要深入了解Android相机API和图像处理算法。
人脸识别是一种常见的相机应用扩展功能。
通过分析图像中的人脸特征,可以实现面部表情检测、人脸识别等功能。
实现人脸识别需要使用OpenCV库中的人脸分类器和特征提取技术。
拍摄连拍是另一个常见的相机应用扩展功能。
通过一次性连续拍摄多张照片,可以捕捉到更多美丽瞬间。
实现拍摄连拍功能需要使用Android相机API中的连续拍摄模式。
HDR模式是拍摄高动态范围图像的一种技术。
通过在不同曝光条件下拍摄多张照片,然后将这些照片合成一张高质量的图像,实现更丰富的画面细节。

移动应用开发中的相机和相册集成方法随着移动应用的发展,相机和相册集成在应用中扮演了越来越重要的角色。
无论是社交媒体应用、在线购物应用还是旅游应用,用户都希望能够拍摄照片或者选择相册中的图片进行分享或者展示。
本文将介绍移动应用开发中相机和相册集成的方法,以及一些注意事项和示例。
1. 相机集成方法在移动应用中实现相机功能,可以让用户直接拍照并使用拍摄的照片。
首先,需要在应用程序的配置文件中添加相机权限。
然后,可以使用Android或者iOS提供的相机API进行开发。
对于Android应用,可以使用相机类(Camera和Camera2)来操作相机。
可以通过使用Camera类的open()方法来打开相机,通过设置预览回调函数来实时预览相机画面,并使用takePicture()方法来拍摄照片。
而对于Camera2类,可以通过CameraManager和CameraDevice等对象来实现相机功能。
对于iOS应用,可以使用AVCaptureSession、AVCaptureDevice和AVCaptureOutput等对象来实现相机功能。
可以通过创建AVCaptureSession对象来管理摄像头的输入和输出,使用AVCaptureDevice对象来控制摄像头的属性和配置,并使用AVCaptureOutput对象来获取相机输出的数据。
除了使用系统提供的相机API,还可以使用第三方库来简化相机集成的过程。
例如,在Android开发中可以使用开源库CameraKit-Android或者ZXing来实现相机功能,而在iOS开发中可以使用AVFoundation、UIImagePickerController或者第三方库如PhotoCapture来实现相机功能。
2. 相册集成方法在移动应用中实现相册集成可以让用户选择已有的照片进行分享或者展示。
与相机集成类似,相册集成也需要在应用程序的配置文件中添加对应的权限。
对于Android应用,可以使用系统提供的Content Provider来访问相册中的照片。

Android应用开发中的摄像头应用设计摄像头应用是现代移动设备中的一项重要功能,它可以让我们在随身携带的智能手机或平板电脑上拍摄照片或录制视频。
在Android 应用的开发过程中,摄像头应用的设计是一个十分重要的环节,因为它直接关系到用户的使用体验和功能性。
在本文中,我们将对 Android 应用开发中的摄像头应用设计进行探讨,重点介绍如何实现摄像头的调用、照片和视频的拍摄、预览界面的实现以及一些注意事项。
1. 摄像头调用首先,摄像头应用的设计需要调用设备上的摄像头才能实现。
在 Android Studio 中,我们可以通过使用相机 API 来实现调用摄像头。
在调用相机API 的过程中,我们需要注意以下几个关键点:(1)请求权限:在 Android 6.0 及以上版本中,权限管理已经变得非常重要。
我们需要在应用中请求相机权限,以便让用户批准应用使用硬件设备。
(2)检测摄像头:我们需要检测设备是否配备摄像头以及摄像头的数量,然后选择合适的摄像头进行调用。
(3)创建相机预览:我们需要创建一个 SurfaceView 或TextureView 来承载预览界面。
(4)调用相机:以后面介绍的拍摄功能为例,在拍摄之前需要对相机进行配置,以便获取最佳的摄像头参数。
2. 拍摄照片和视频在摄像头应用中,最基本的功能就是拍摄照片和视频了,我们需要通过相机 API 实现这些功能。
在实现这些功能的过程中,我们需要注意以下关键点:(1)拍摄照片:在拍摄照片的过程中,我们需要根据用户的需求对摄像头进行合适的配置,包括设置从相机流中获取的图像质量、照片分辨率和图片格式等参数。
有了这些参数,我们就可以拍摄出符合用户需求的照片了。
(2)录制视频:在录制视频的过程中,我们需要根据用户的需求对摄像头进行合适的配置,包括设置视频分辨率、视频编码器、音频编码器等参数。
有了这些参数,我们就可以录制出符合用户需求的视频了。
3. 预览界面的实现在调用相机并进行拍摄之前,我们需要创建一个预览界面来帮助用户准确定位相机的拍摄范围。


Android打开系统相机并拍照的2种显⽰⽅法本⽂实例为⼤家分享了Android打开系统相机并拍照的具体实现代码,供⼤家参考,具体内容如下⽬标效果:第⼆张为点击第⼀个按钮拍照后显⽰的,⽐较模糊,第三章为点击第⼆个按钮拍照后显⽰的,⽐较清楚。
1.activity_main.xml页⾯设置布局。
activity_main.xml页⾯:<RelativeLayout xmlns:android="/apk/res/android"xmlns:tools="/tools"android:layout_width="match_parent"android:layout_height="match_parent"tools:context=".MainActivity" ><Buttonandroid:id="@+id/btnOpenCamera"android:layout_width="match_parent"android:layout_height="wrap_content"android:layout_marginTop="10dp"android:text="拍照⽴即显⽰" /><Buttonandroid:id="@+id/btnSavePhoto"android:layout_width="match_parent"android:layout_height="wrap_content"android:layout_marginTop="60dp"android:text="拍照存储后显⽰" /><ImageViewandroid:id="@+id/ivShowPicture"android:layout_width="match_parent"android:layout_height="match_parent"android:layout_centerHorizontal="true"android:layout_marginTop="130dp" /></RelativeLayout>2.MainActivity.java页⾯打开相机并获取传递回来的数据,两种⽅式第⼀个⽐较模糊,适合⼩图,第⼆个清楚些。
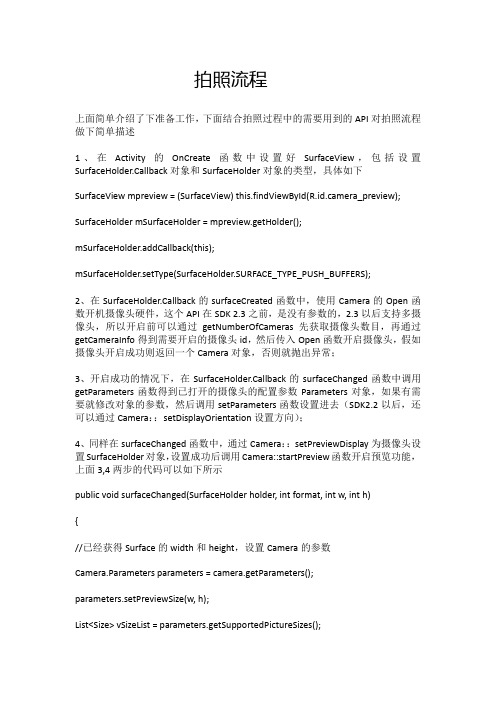
拍照流程上面简单介绍了下准备工作,下面结合拍照过程中的需要用到的API对拍照流程做下简单描述1、在Activity的OnCreate函数中设置好SurfaceView,包括设置SurfaceHolder.Callback对象和SurfaceHolder对象的类型,具体如下SurfaceViewmpreview = (SurfaceView) this.findViewById(R.id.camera_preview); SurfaceHoldermSurfaceHolder = mpreview.getHolder();mSurfaceHolder.addCallback(this);mSurfaceHolder.setType(SurfaceHolder.SURFACE_TYPE_PUSH_BUFFERS);2、在SurfaceHolder.Callback的surfaceCreated函数中,使用Camera的Open函数开机摄像头硬件,这个API在SDK 2.3之前,是没有参数的,2.3以后支持多摄像头,所以开启前可以通过getNumberOfCameras先获取摄像头数目,再通过getCameraInfo得到需要开启的摄像头id,然后传入Open函数开启摄像头,假如摄像头开启成功则返回一个Camera对象,否则就抛出异常;3、开启成功的情况下,在SurfaceHolder.Callback的surfaceChanged函数中调用getParameters函数得到已打开的摄像头的配置参数Parameters对象,如果有需要就修改对象的参数,然后调用setParameters函数设置进去(SDK2.2以后,还可以通过Camera::setDisplayOrientation设置方向);4、同样在surfaceChanged函数中,通过Camera::setPreviewDisplay为摄像头设置SurfaceHolder对象,设置成功后调用Camera::startPreview函数开启预览功能,上面3,4两步的代码可以如下所示public void surfaceChanged(SurfaceHolder holder, int format, int w, int h){//已经获得Surface的width和height,设置Camera的参数Camera.Parameters parameters = camera.getParameters();parameters.setPreviewSize(w, h);List<Size>vSizeList = parameters.getSupportedPictureSizes();for(intnum = 0; num<vSizeList.size(); num++){Size vSize = vSizeList.get(num);}if(this.getResources().getConfiguration().orientation != Configuration.ORIENTATION_LANDSCAPE){//如果是竖屏parameters.set("orientation", "portrait");//在2.2以上可以使用//camera.setDisplayOrientation(90);}else{parameters.set("orientation", "landscape");//在2.2以上可以使用//camera.setDisplayOrientation(0);}camera.setParameters(parameters);try {//设置显示camera.setPreviewDisplay(holder);} catch (IOException exception) {camera.release();camera = null;}//开始预览camera.startPreview();}5、假设要支持自动对焦功能,则在需要的情况下,或者在上述surfaceChanged 调用完startPreview函数后,可以调用Camera::autoFocus函数来设置自动对焦回调函数,该步是可选操作,有些设备可能不支持,可以通过Camera::getFocusMode 函数查询。
Android移动应用开发技术中的相机与图像处理方法移动应用开发的爆炸性增长使得我们现在几乎可以在任何地方使用手机进行各种操作。
而在移动应用中,相机和图像处理是非常重要且常见的功能。
本文将介绍Android移动应用开发中的相机和图像处理方法,帮助读者了解如何在Android应用中实现高质量的照片拍摄和图像处理。
一、相机调用与基础设置在Android开发中,调用相机是实现拍摄功能的首要步骤。
通过调用系统相机应用,我们可以让用户进行照片拍摄。
在调用相机之前,我们需要在文件中添加相机权限。
在代码中,我们可以使用Intent来启动相机应用,并指定照片的保存路径和其他一些参数。
同时,我们还可以通过设置相机预览界面的布局来提供更好的用户体验。
二、照片拍摄与后处理照片拍摄是移动应用中最基础也是最常见的功能之一。
在拍摄照片时,我们可以调用相机应用来实现。
然而,有时我们需要对拍摄的照片进行后处理,以提升照片的质量或添加特效。
在Android开发中,我们可以使用一些库来实现图像的处理和编辑,如OpenCV和Glide等。
通过这些库,我们可以实现图像的裁剪、旋转、滤镜等操作。
三、图像处理与滤镜效果图像处理和滤镜效果可以为移动应用增添更多的创意和娱乐性。
在Android开发中,我们可以使用图像处理算法和滤镜库来实现各种有趣的效果。
例如,我们可以使用图像处理算法来实现图像的边缘检测、颜色增强等操作。
而通过滤镜库,我们可以为照片添加黑白、复古、漏光等各种滤镜效果。
这些功能可以帮助我们在移动应用中创建出令人惊艳的图像效果。
四、相机和图像处理的性能优化在移动应用中,性能优化是非常重要的,尤其是在相机和图像处理方面。
由于拍摄和处理照片可能会消耗大量的系统资源,我们需要注意在代码中进行性能优化。
其中一项重要的优化技术是使用异步任务来处理图像,以避免阻塞主线程造成应用的卡顿。
此外,我们还可以使用缓存机制来减少对图像资源的重复加载,从而提升应用响应速度。
Android实现Camera2预览和拍照效果简介⽹上对于 Camera2 的介绍有很多,在 Github 上也有很多关于 Camera2 的封装库,但是对于那些库,封装性太强,有时候我们仅仅是需要个简简单单的拍照功能⽽已,因此,⾃定义⼀个 Camera 使之变得轻量级那是⾮常重要的了。
(本⽂并⾮重复造轮⼦, ⽽是在于学习 Camera2API 的基本功能, 笔记之。
)学习要点:使⽤ Android Camera2 API 的基本功能。
迭代连接到设备的所有相机的特征。
显⽰相机预览和拍摄照⽚。
Camera2 API 为连接到 Android 设备的各个相机设备提供了⼀个界⾯。
它替代了已弃⽤的 Camera 类。
使⽤ getCameraIdList 获取所有可⽤摄像机的列表。
然后,您可以使⽤ getCameraCharacteristics,并找到适合您需要的最佳相机(前 / 后⾯,分辨率等)。
创建⼀个 CameraDevice.StateCallback 的实例并打开相机。
当相机打开时,准备开始相机预览。
使⽤ TextureView 显⽰相机预览。
创建⼀个 CameraCaptureSession 并设置⼀个重复的 CaptureRequest。
静像拍摄需要⼏个步骤。
⾸先,需要通过更新相机预览的 CaptureRequest 来锁定相机的焦点。
然后,以类似的⽅式,需要运⾏⼀个预捕获序列。
之后,它准备拍摄⼀张照⽚。
创建⼀个新的 CaptureRequest 并调⽤ [capture] 。
完成后,别忘了解锁焦点。
实现效果环境SDK>21Camera2 类图代码实现CameraPreview.java/*** Created by shenhua on 2017-10-20-0020.* Email shenhuanet@*/public class CameraPreview extends TextureView {private static final String TAG = "CameraPreview";private static final SparseIntArray ORIENTATIONS = new SparseIntArray();//从屏幕旋转转换为JPEG⽅向private static final int MAX_PREVIEW_WIDTH = 1920;//Camera2 API 保证的最⼤预览宽⾼private static final int MAX_PREVIEW_HEIGHT = 1080;private static final int STATE_PREVIEW = 0;//显⽰相机预览private static final int STATE_WAITING_LOCK = 1;//焦点锁定中private static final int STATE_WAITING_PRE_CAPTURE = 2;//拍照中private static final int STATE_WAITING_NON_PRE_CAPTURE = 3;//其它状态private static final int STATE_PICTURE_TAKEN = 4;//拍照完毕private int mState = STATE_PREVIEW;private int mRatioWidth = 0, mRatioHeight = 0;private int mSensorOrientation;private boolean mFlashSupported;private Semaphore mCameraOpenCloseLock = new Semaphore(1);//使⽤信号量 Semaphore 进⾏多线程任务调度private Activity activity;private File mFile;private HandlerThread mBackgroundThread;private Handler mBackgroundHandler;private Size mPreviewSize;private String mCameraId;private CameraDevice mCameraDevice;private CaptureRequest.Builder mPreviewRequestBuilder;private CaptureRequest mPreviewRequest;private CameraCaptureSession mCaptureSession;private ImageReader mImageReader;static {ORIENTATIONS.append(Surface.ROTATION_0, 90);ORIENTATIONS.append(Surface.ROTATION_90, 0);ORIENTATIONS.append(Surface.ROTATION_180, 270);ORIENTATIONS.append(Surface.ROTATION_270, 180);}public CameraPreview(Context context) {this(context, null);}public CameraPreview(Context context, AttributeSet attrs) {this(context, attrs, 0);}public CameraPreview(Context context, AttributeSet attrs, int defStyleAttr) {super(context, attrs, defStyleAttr);mFile = new File(getContext().getExternalFilesDir(null), "pic.jpg");}@Overrideprotected void onMeasure(int widthMeasureSpec, int heightMeasureSpec) {super.onMeasure(widthMeasureSpec, heightMeasureSpec);int width = MeasureSpec.getSize(widthMeasureSpec);int height = MeasureSpec.getSize(heightMeasureSpec);if (0 == mRatioWidth || 0 == mRatioHeight) {setMeasuredDimension(width, height);} else {if (width < height * mRatioWidth / mRatioHeight) {setMeasuredDimension(width, width * mRatioHeight / mRatioWidth);} else {setMeasuredDimension(height * mRatioWidth / mRatioHeight, height);}}}public void onResume(Activity activity) {this.activity = activity;startBackgroundThread();//当Activity或Fragment OnResume()时,可以冲洗打开⼀个相机并开始预览,否则,这个Surface已经准备就绪if (this.isAvailable()) {openCamera(this.getWidth(), this.getHeight());} else {this.setSurfaceTextureListener(mSurfaceTextureListener);}}public void onPause() {closeCamera();stopBackgroundThread();}public void setOutPutDir(File file) {this.mFile = file;}public void setAspectRatio(int width, int height) {if (width < 0 || height < 0) {throw new IllegalArgumentException("Size can't be negative");}mRatioWidth = width;mRatioHeight = height;requestLayout();}public void setAutoFlash(CaptureRequest.Builder requestBuilder) {if (mFlashSupported) {requestBuilder.set(CaptureRequest.CONTROL_AE_MODE,CaptureRequest.CONTROL_AE_MODE_ON_AUTO_FLASH);}}public void takePicture() {lockFocus();}private void startBackgroundThread() {mBackgroundThread = new HandlerThread("CameraBackground");mBackgroundThread.start();mBackgroundHandler = new Handler(mBackgroundThread.getLooper());}private void stopBackgroundThread() {mBackgroundThread.quitSafely();try {mBackgroundThread.join();mBackgroundThread = null;mBackgroundHandler = null;} catch (InterruptedException e) {e.printStackTrace();}}/*** 处理⽣命周期内的回调事件*/private final TextureView.SurfaceTextureListener mSurfaceTextureListener = new TextureView.SurfaceTextureListener() { @Overridepublic void onSurfaceTextureAvailable(SurfaceTexture texture, int width, int height) {openCamera(width, height);}@Overridepublic void onSurfaceTextureSizeChanged(SurfaceTexture texture, int width, int height) {configureTransform(width, height);}@Overridepublic boolean onSurfaceTextureDestroyed(SurfaceTexture texture) {return true;}@Overridepublic void onSurfaceTextureUpdated(SurfaceTexture texture) {}};/*** 相机状态改变回调*/private final CameraDevice.StateCallback mStateCallback = new CameraDevice.StateCallback() {@Overridepublic void onOpened(@NonNull CameraDevice cameraDevice) {mCameraOpenCloseLock.release();Log.d(TAG, "相机已打开");mCameraDevice = cameraDevice;createCameraPreviewSession();}@Overridepublic void onDisconnected(@NonNull CameraDevice cameraDevice) {mCameraOpenCloseLock.release();cameraDevice.close();mCameraDevice = null;}@Overridepublic void onError(@NonNull CameraDevice cameraDevice, int error) {mCameraOpenCloseLock.release();cameraDevice.close();mCameraDevice = null;if (null != activity) {activity.finish();}}};/*** 处理与照⽚捕获相关的事件*/private CameraCaptureSession.CaptureCallback mCaptureCallback = new CameraCaptureSession.CaptureCallback() { private void process(CaptureResult result) {switch (mState) {case STATE_PREVIEW: {break;}case STATE_WAITING_LOCK: {Integer afState = result.get(CaptureResult.CONTROL_AF_STATE);if (afState == null) {captureStillPicture();} else if (CaptureResult.CONTROL_AF_STATE_FOCUSED_LOCKED == afState ||CaptureResult.CONTROL_AF_STATE_NOT_FOCUSED_LOCKED == afState) {Integer aeState = result.get(CaptureResult.CONTROL_AE_STATE);if (aeState == null || aeState == CaptureResult.CONTROL_AE_STATE_CONVERGED) {mState = STATE_PICTURE_TAKEN;captureStillPicture();runPreCaptureSequence();}}break;}case STATE_WAITING_PRE_CAPTURE: {Integer aeState = result.get(CaptureResult.CONTROL_AE_STATE);if (aeState == null ||aeState == CaptureResult.CONTROL_AE_STATE_PRECAPTURE ||aeState == CaptureRequest.CONTROL_AE_STATE_FLASH_REQUIRED) {mState = STATE_WAITING_NON_PRE_CAPTURE;}break;}case STATE_WAITING_NON_PRE_CAPTURE: {Integer aeState = result.get(CaptureResult.CONTROL_AE_STATE);if (aeState == null || aeState != CaptureResult.CONTROL_AE_STATE_PRECAPTURE) {mState = STATE_PICTURE_TAKEN;captureStillPicture();}break;}}}@Overridepublic void onCaptureProgressed(@NonNull CameraCaptureSession session,@NonNull CaptureRequest request,@NonNull CaptureResult partialResult) {process(partialResult);}@Overridepublic void onCaptureCompleted(@NonNull CameraCaptureSession session,@NonNull CaptureRequest request,@NonNull TotalCaptureResult result) {process(result);}};/*** 在确定相机预览⼤⼩后应调⽤此⽅法** @param viewWidth 宽* @param viewHeight ⾼*/private void configureTransform(int viewWidth, int viewHeight) {if (null == mPreviewSize || null == activity) {return;}int rotation = activity.getWindowManager().getDefaultDisplay().getRotation();Matrix matrix = new Matrix();RectF viewRect = new RectF(0, 0, viewWidth, viewHeight);RectF bufferRect = new RectF(0, 0, mPreviewSize.getHeight(), mPreviewSize.getWidth());float centerX = viewRect.centerX();float centerY = viewRect.centerY();if (Surface.ROTATION_90 == rotation || Surface.ROTATION_270 == rotation) {bufferRect.offset(centerX - bufferRect.centerX(), centerY - bufferRect.centerY());matrix.setRectToRect(viewRect, bufferRect, Matrix.ScaleToFit.FILL);float scale = Math.max((float) viewHeight / mPreviewSize.getHeight(),(float) viewWidth / mPreviewSize.getWidth());matrix.postScale(scale, scale, centerX, centerY);matrix.postRotate(90 * (rotation - 2), centerX, centerY);} else if (Surface.ROTATION_180 == rotation) {matrix.postRotate(180, centerX, centerY);}this.setTransform(matrix);}/*** 根据mCameraId打开相机*/private void openCamera(int width, int height) {setUpCameraOutputs(width, height);configureTransform(width, height);CameraManager manager = (CameraManager) getContext().getSystemService(Context.CAMERA_SERVICE);try {if (!mCameraOpenCloseLock.tryAcquire(2500, LISECONDS)) {throw new RuntimeException("Time out waiting to lock camera opening.");}if (ActivityCompat.checkSelfPermission(activity, Manifest.permission.CAMERA) != PackageManager.PERMISSION_GRANTED) { // TODO: Consider calling// ActivityCompat#requestPermissions// here to request the missing permissions, and then overriding// public void onRequestPermissionsResult(int requestCode, String[] permissions,// int[] grantResults)// to handle the case where the user grants the permission. See the documentation// for ActivityCompat#requestPermissions for more details.return;}manager.openCamera(mCameraId, mStateCallback, mBackgroundHandler);} catch (CameraAccessException e) {e.printStackTrace();} catch (InterruptedException e) {throw new RuntimeException("Interrupted while trying to lock camera opening.", e);}}/*** 关闭相机*/private void closeCamera() {try {mCameraOpenCloseLock.acquire();if (null != mCaptureSession) {mCaptureSession.close();mCaptureSession = null;}if (null != mCameraDevice) {mCameraDevice.close();mCameraDevice = null;}if (null != mImageReader) {mImageReader.close();mImageReader = null;}} catch (InterruptedException e) {throw new RuntimeException("Interrupted while trying to lock camera closing.", e);} finally {mCameraOpenCloseLock.release();/*** 设置相机相关的属性或变量** @param width 相机预览的可⽤尺⼨的宽度* @param height 相机预览的可⽤尺⼨的⾼度*/@SuppressWarnings("SuspiciousNameCombination")private void setUpCameraOutputs(int width, int height) {CameraManager manager = (CameraManager) getContext().getSystemService(Context.CAMERA_SERVICE);try {for (String cameraId : manager.getCameraIdList()) {CameraCharacteristics characteristics = manager.getCameraCharacteristics(cameraId);// 在这个例⼦中不使⽤前置摄像头Integer facing = characteristics.get(CameraCharacteristics.LENS_FACING);if (facing != null && facing == CameraCharacteristics.LENS_FACING_FRONT) {continue;}StreamConfigurationMap map = characteristics.get(CameraCharacteristics.SCALER_STREAM_CONFIGURATION_MAP); if (map == null) {continue;}Size largest = Collections.max(Arrays.asList(map.getOutputSizes(ImageFormat.JPEG)),new CompareSizesByArea());mImageReader = ImageReader.newInstance(largest.getWidth(), largest.getHeight(),ImageFormat.JPEG, /*maxImages*/2);mImageReader.setOnImageAvailableListener(mOnImageAvailableListener, mBackgroundHandler);int displayRotation = activity.getWindowManager().getDefaultDisplay().getRotation();// noinspection ConstantConditionsmSensorOrientation = characteristics.get(CameraCharacteristics.SENSOR_ORIENTATION);boolean swappedDimensions = false;switch (displayRotation) {case Surface.ROTATION_0:case Surface.ROTATION_180:if (mSensorOrientation == 90 || mSensorOrientation == 270) {swappedDimensions = true;}break;case Surface.ROTATION_90:case Surface.ROTATION_270:if (mSensorOrientation == 0 || mSensorOrientation == 180) {swappedDimensions = true;}break;default:Log.e(TAG, "Display rotation is invalid: " + displayRotation);}Point displaySize = new Point();activity.getWindowManager().getDefaultDisplay().getSize(displaySize);int rotatedPreviewWidth = width;int rotatedPreviewHeight = height;int maxPreviewWidth = displaySize.x;int maxPreviewHeight = displaySize.y;if (swappedDimensions) {rotatedPreviewWidth = height;rotatedPreviewHeight = width;maxPreviewWidth = displaySize.y;maxPreviewHeight = displaySize.x;}if (maxPreviewWidth > MAX_PREVIEW_WIDTH) {maxPreviewWidth = MAX_PREVIEW_WIDTH;}if (maxPreviewHeight > MAX_PREVIEW_HEIGHT) {maxPreviewHeight = MAX_PREVIEW_HEIGHT;}mPreviewSize = chooseOptimalSize(map.getOutputSizes(SurfaceTexture.class),rotatedPreviewWidth, rotatedPreviewHeight, maxPreviewWidth,maxPreviewHeight, largest);int orientation = getResources().getConfiguration().orientation;if (orientation == Configuration.ORIENTATION_LANDSCAPE) {setAspectRatio(mPreviewSize.getWidth(), mPreviewSize.getHeight());} else {setAspectRatio(mPreviewSize.getHeight(), mPreviewSize.getWidth());}Boolean available = characteristics.get(CameraCharacteristics.FLASH_INFO_AVAILABLE);mFlashSupported = available == null ? false : available;mCameraId = cameraId;return;}} catch (CameraAccessException e) {e.printStackTrace();} catch (NullPointerException e) {Log.e(TAG, "设备不⽀持Camera2");}}/*** 获取⼀个合适的相机预览尺⼨** @param choices ⽀持的预览尺⼨列表* @param textureViewWidth 相对宽度* @param textureViewHeight 相对⾼度* @param maxWidth 可以选择的最⼤宽度* @param maxHeight 可以选择的最⼤⾼度* @param aspectRatio 宽⾼⽐* @return 最佳预览尺⼨*/private static Size chooseOptimalSize(Size[] choices, int textureViewWidth, int textureViewHeight,int maxWidth, int maxHeight, Size aspectRatio) {List<Size> bigEnough = new ArrayList<>();List<Size> notBigEnough = new ArrayList<>();int w = aspectRatio.getWidth();int h = aspectRatio.getHeight();for (Size option : choices) {if (option.getWidth() <= maxWidth && option.getHeight() <= maxHeight &&option.getHeight() == option.getWidth() * h / w) {if (option.getWidth() >= textureViewWidth &&option.getHeight() >= textureViewHeight) {bigEnough.add(option);} else {notBigEnough.add(option);}if (bigEnough.size() > 0) {return Collections.min(bigEnough, new CompareSizesByArea());} else if (notBigEnough.size() > 0) {return Collections.max(notBigEnough, new CompareSizesByArea());} else {Log.e(TAG, "Couldn't find any suitable preview size");return choices[0];}}/*** 为相机预览创建新的CameraCaptureSession*/private void createCameraPreviewSession() {try {SurfaceTexture texture = this.getSurfaceTexture();assert texture != null;// 将默认缓冲区的⼤⼩配置为想要的相机预览的⼤⼩texture.setDefaultBufferSize(mPreviewSize.getWidth(), mPreviewSize.getHeight());Surface surface = new Surface(texture);mPreviewRequestBuilder = mCameraDevice.createCaptureRequest(CameraDevice.TEMPLATE_PREVIEW);mPreviewRequestBuilder.addTarget(surface);// 我们创建⼀个 CameraCaptureSession 来进⾏相机预览mCameraDevice.createCaptureSession(Arrays.asList(surface, mImageReader.getSurface()),new CameraCaptureSession.StateCallback() {@Overridepublic void onConfigured(@NonNull CameraCaptureSession cameraCaptureSession) {if (null == mCameraDevice) {return;}// 会话准备好后,我们开始显⽰预览mCaptureSession = cameraCaptureSession;try {mPreviewRequestBuilder.set(CaptureRequest.CONTROL_AF_MODE,CaptureRequest.CONTROL_AF_MODE_CONTINUOUS_PICTURE);setAutoFlash(mPreviewRequestBuilder);mPreviewRequest = mPreviewRequestBuilder.build();mCaptureSession.setRepeatingRequest(mPreviewRequest, mCaptureCallback, mBackgroundHandler);} catch (CameraAccessException e) {e.printStackTrace();}}@Overridepublic void onConfigureFailed(@NonNull CameraCaptureSession cameraCaptureSession) {}}, null);} catch (CameraAccessException e) {e.printStackTrace();}}/*** 从指定的屏幕旋转中检索照⽚⽅向** @param rotation 屏幕⽅向* @return 照⽚⽅向(0,90,270,360)*/private int getOrientation(int rotation) {return (ORIENTATIONS.get(rotation) + mSensorOrientation + 270) % 360;}/*** 锁定焦点*/private void lockFocus() {try {// 如何通知相机锁定焦点mPreviewRequestBuilder.set(CaptureRequest.CONTROL_AF_TRIGGER, CameraMetadata.CONTROL_AF_TRIGGER_START); // 通知mCaptureCallback等待锁定mState = STATE_WAITING_LOCK;mCaptureSession.capture(mPreviewRequestBuilder.build(), mCaptureCallback, mBackgroundHandler);} catch (CameraAccessException e) {e.printStackTrace();}}/*** 解锁焦点*/private void unlockFocus() {try {mPreviewRequestBuilder.set(CaptureRequest.CONTROL_AF_TRIGGER,CameraMetadata.CONTROL_AF_TRIGGER_CANCEL);setAutoFlash(mPreviewRequestBuilder);mCaptureSession.capture(mPreviewRequestBuilder.build(), mCaptureCallback,mBackgroundHandler);mState = STATE_PREVIEW;mCaptureSession.setRepeatingRequest(mPreviewRequest, mCaptureCallback,mBackgroundHandler);} catch (CameraAccessException e) {e.printStackTrace();}}/*** 拍摄静态图⽚*/private void captureStillPicture() {try {if (null == activity || null == mCameraDevice) {return;}final CaptureRequest.Builder captureBuilder =mCameraDevice.createCaptureRequest(CameraDevice.TEMPLATE_STILL_CAPTURE);captureBuilder.addTarget(mImageReader.getSurface());captureBuilder.set(CaptureRequest.CONTROL_AF_MODE,CaptureRequest.CONTROL_AF_MODE_CONTINUOUS_PICTURE);setAutoFlash(captureBuilder);// ⽅向int rotation = activity.getWindowManager().getDefaultDisplay().getRotation();captureBuilder.set(CaptureRequest.JPEG_ORIENTATION, getOrientation(rotation));CameraCaptureSession.CaptureCallback captureCallback= new CameraCaptureSession.CaptureCallback() {@Overridepublic void onCaptureCompleted(@NonNull CameraCaptureSession session,@NonNull CaptureRequest request,@NonNull TotalCaptureResult result) {Log.d(TAG, mFile.toString());unlockFocus();}};mCaptureSession.stopRepeating();mCaptureSession.abortCaptures();mCaptureSession.capture(captureBuilder.build(), captureCallback, null);} catch (CameraAccessException e) {e.printStackTrace();}}/*** 运⾏preCapture序列来捕获静⽌图像*/private void runPreCaptureSequence() {try {// 设置拍照参数请求mPreviewRequestBuilder.set(CaptureRequest.CONTROL_AE_PRECAPTURE_TRIGGER,CaptureRequest.CONTROL_AE_PRECAPTURE_TRIGGER_START);mState = STATE_WAITING_PRE_CAPTURE;mCaptureSession.capture(mPreviewRequestBuilder.build(), mCaptureCallback, mBackgroundHandler); } catch (CameraAccessException e) {e.printStackTrace();}}/*** ⽐较两者⼤⼩*/private static class CompareSizesByArea implements Comparator<Size> {@Overridepublic int compare(Size lhs, Size rhs) {return Long.signum((long) lhs.getWidth() * lhs.getHeight() -(long) rhs.getWidth() * rhs.getHeight());}}/*** ImageReader的回调对象*/private final ImageReader.OnImageAvailableListener mOnImageAvailableListener= new ImageReader.OnImageAvailableListener() {@Overridepublic void onImageAvailable(ImageReader reader) {mBackgroundHandler.post(new ImageSaver(reader.acquireNextImage(), mFile));}};/*** 将捕获到的图像保存到指定的⽂件中*/private static class ImageSaver implements Runnable {private final Image mImage;private final File mFile;ImageSaver(Image image, File file) {mImage = image;mFile = file;}@Overridepublic void run() {ByteBuffer buffer = mImage.getPlanes()[0].getBuffer();byte[] bytes = new byte[buffer.remaining()];buffer.get(bytes);FileOutputStream output = null;try {output = new FileOutputStream(mFile);output.write(bytes);} catch (IOException e) {e.printStackTrace();} finally {mImage.close();if (null != output) {try {output.close();} catch (IOException e) {e.printStackTrace();}}}}}}MainActivity.javapublic class MainActivity extends AppCompatActivity {CameraPreview cameraView;@Overrideprotected void onCreate(Bundle savedInstanceState) {super.onCreate(savedInstanceState);setContentView(yout.activity_main);cameraView = (CameraPreview) findViewById(R.id.cameraView);}@Overrideprotected void onResume() {super.onResume();cameraView.onResume(this);}@Overrideprotected void onPause() {cameraView.onPause();super.onPause();}public void takePic(View view) {cameraView.takePicture();}}activity_main.xml<?xml version="1.0" encoding="utf-8"?><android.support.constraint.ConstraintLayout xmlns:android="/apk/res/android"xmlns:app="/apk/res-auto"xmlns:tools="/tools"android:id="@+id/constraintLayout"android:layout_width="match_parent"android:layout_height="match_parent"android:background="@android:color/black"tools:context="com.shenhua.ocr.activity.Main2Activity"><com.shenhua.ocr.widget.CameraPreviewandroid:id="@+id/cameraView"android:layout_width="wrap_content"android:layout_height="wrap_content" /><Buttonandroid:layout_width="70dp"android:layout_height="70dp"android:layout_gravity="center"android:background="@drawable/ic_capture_200px"android:onClick="takePic"android:text="TAKE"app:layout_constraintBottom_toBottomOf="@id/constraintLayout"app:layout_constraintEnd_toEndOf="@id/constraintLayout"app:layout_constraintStart_toStartOf="@id/constraintLayout"app:layout_constraintTop_toTopOf="@id/cameraView"app:layout_constraintVertical_bias="0.97" /></android.support.constraint.ConstraintLayout>资源⽂件 ic_capture_200px.xml<vector android:height="24dp" android:viewportHeight="1024.0"android:viewportWidth="1024.0" android:width="24dp" xmlns:android="/apk/res/android"><path android:fillColor="#03A9F4" android:pathData="M512,512m-393.8,0a393.8,393.8 0,1 0,787.7 0,393.8 393.8,0 1,0 -787.7,0Z"/><path android:fillColor="#03A9F4" android:pathData="M512,1024C229.2,1024 0,794.8 0,512S229.2,0 512,0s512,229.2 512,512 -229.2,512 -512,512zM512,984.6c261,0 472.6,-211.6 472.6,-472.6S773,39.4 512,39.4 39.4,251 39.4,512s211.6,472.6 472.6,472.6z" </vector>其它Manifest 权限:<uses-permission android:name="android.permission.CAMERA" /><uses-feature android:name="android.hardware.camera" /><uses-feature android:name="android.hardware.camera.autofocus" />Android6.0 运⾏时权限未贴出。
Android 实现拍照、选择图片并裁剪图片功能2016/10/16 0 一、实现拍照、选择图片并裁剪图片效果按照之前博客的风,首先看下实现效果。
二、uCrop 项目应用想起之前看到的Yalantis/uCrop 效果比较绚,但是研究源码之后发现在定制界面方面还是有一点的限制,于是在它的基础上做了修改Android-Crop,把定制界面独立出来,让用户去自由设置。
下图为使用Android-Crop 实现的模仿微信选择图片并裁剪Demo。
三、实现思路比较简单的选择设备图片裁剪,并将裁剪后的图片保存到指定路径;调用系统拍照,将拍照图片保存在SD 卡,然后裁剪图片并将裁剪后的图片保存在指定路径。
流程图如下所示:四、选择框实现这里通过PopupWindow 来实现,当然也可以根据需求采用其他方式实现。
实现效果如下图所示:1. XML 布局?xml version= 1.0 encoding= utf-8 ? RelativeLayout xmlns:android= schemas.android/apk/res/android android:layout_width= fill_parent android:layout_height= wrap_content android:gravity= center_horizontal android:orientation= vertical LinearLayout android:id= @ id/pop_layout android:layout_width= match_parent android:layout_height= wrap_content android:layout_alignParentBottom= true android:background= #444 android:gravity= center_horizontal android:orientation= vertical Button android:id= @ id/picture_selector_take_photo_btn android:layout_width= match_parent android:layout_height= wrap_content android:layout_marginLeft= 10dip android:layout_marginRight= 10dip android:layout_marginTop= 10dp。
Android开发Camera2开发_1_拍照功能开发介绍 google已经在Android5.1之后取消了对Camera1的更新,转⽽提供了功能更加强⼤的Camera2.虽然新版本依然可以使⽤Camera1但是,不管是各种机型适配还是拍照参数⾃定义都是很鸡肋的.跟上最新的技术了解Camera2是必要的.关于Camera2的兼容⼀般是⽀持API22之后包括API22的Android版本,但是也发现⼀些机型(⽐如三星)在API22版本上并没有⽀持Camera2.需要使⽤的API介绍因为Camera2提供的功能更加强⼤,所以使⽤⽐Camera1会复杂许多.需要调⽤的API和回调也更多.这⾥简单介绍⼀下这些API的对应功能.好初步认识Camera2. CameraManager摄像头管理类: 主要有4个功能:1. 获取摄像头的ID2. 获取摄像头的特征信息(⽐如摄像头前后位置信息和⽀持的分辨率信息等等)3. 打开指定id的摄像头4. 打开和关闭闪光灯CameraDevice摄像头设备类: 主要功能有3个1. 创建获取数据请求类CaptureRequest.Builder(或者叫捕获请求),下⾯会介绍这个类2. 创建获取数据会话(创建预览或者拍照的会话通道)3. 关闭摄像头CameraDevice.StateCallback摄像头状态接⼝回调类: 主要是负责回调摄像头的开启/断开/异常/销毁.我们使⽤CameraManager打开指定id的摄像头时需要添加这个回调.CameraCaptureSession.StateCallback获取数据会话的状态接⼝回调类: 我们创建相机预览图像/拍照/录像都需要这个回调类,来告诉我们获取数据会话的通道状态是配置成功或者配置失败.它还负责给我们回调⼀个重要的CameraCaptureSession 提供给我们操作,这个CameraCaptureSession类我下⾯会介绍CameraCaptureSession.CaptureCallback获取数据会话的数据接⼝回调类: 负责回调获取数据的⽣命周期(⽐如开始/进⾏中/完成/失败等等),如果你并不需要对⽣命周期⾥做操作,所以有时候没有啥作⽤.但是它也是必需创建的⼀个回调接⼝类,是在创建预览图像/拍照/录像的时候添加进去,但是拍照或者录像的数据都不在这个回调接⼝⾥出来(⼀开始很容易误解,以为拍照数据会从这⾥返回).除了回调获取数据的⽣命周期,还可以在回调⽅法⾥获取拍照或者录制过程的的⼀些参数信息,⽐如图⽚的Size/分辨率等等.CaptureRequest.Builder获取数据请求配置类: 很重要,也是我们频繁操作的⼀个配置类.由CameraDevice类创建.主要负责1. 设置返回数据的surface(显⽰预览View⽐如TextureView的surface 或者照⽚ImageReader的surface)2. 配置预览/拍照/录制的拍照参数,⽐如⾃动对焦/⾃动曝光/拍照⾃动闪光/设置HZ值/颜⾊校正等等你能在系统相机上看到的功能.数据配置完成后交给CameraCaptureSession会话类,让CameraCaptureSession操作提供我们需要的数据,例如图像预览或者拍照/录制视频CameraCaptureSession获取数据会话类: 很重要,是我们频繁操作的⼀个数据会话类,⽐如创建预览/停⽌预览/拍照/录像都要它来操作,它由CameraCaptureSession.StateCallback这个接⼝回调⽅法⾥回调提供给我们. ImageReader图⽚读取类: 不属于Camera2Api的类,但是是拍照功能重要的类,照⽚的数据流由它缓存,然后我们提取保存到本地成为图⽚⽂件或者显⽰在ImageView⾥Camera2的操作流程在上⾯的API介绍⾥,你是不是对这么多的配置类/会话类/接⼝回调类感到眼花缭乱?是的,Camera2的使⽤是相当眼花缭乱的,但是我们抓住⼀条线慢慢从上⾯跟到下⾯就应该能明⽩是怎么⼀回事了.下⾯我们来简单介绍⼀些Camera2的操作流程:初始化流程:1. 初始化动态授权,这是基本操作2. 初始化⼀个⼦线程的Handler,Camera2的操作可以放在主线程也可以放在⼦线程.按例⼀般都是⼦线程⾥,但是Camera2只需要我们提供⼀个⼦线程的Handler就⾏了.3. 初始化ImageReader,这个没有初始化顺序要求,并且它有数据回调接⼝,接⼝回调的图⽚数据我们直接保存到内部存储空间,所以提前初始化提供给后续使⽤.4. 初始化TextureView,添加TextureView的接⼝回调.5. 在TextureView的接⼝回调⾥回调启⽤成功⽅法后,我们开始初始化相机管理类initCameraManager6. 然后继续初始化CameraDevice.StateCallback 摄像头设备状态接⼝回调类,先初始化提供给后续使⽤.(在这个接⼝类的开启相机的回调⽅法⾥,我们需要实现创建预览图像请求配置和创建获取数据会话)7. 继续初始化CameraCaptureSession.StateCallback 摄像头获取数据会话类的状态接⼝回调类,先初始化提供给后续使⽤.(在这个接⼝类的配置成功回调⽅法⾥,我们需要实现预览图像或者实现拍照)8. 继续初始化CameraCaptureSession.CaptureCallback 摄像头获取数据会话类的获取接⼝回调类,先初始化提供给后续使⽤.(啥都不⼲)9. 判断摄像头前后,选择对应id10. 打开指定id的摄像头11. 实现拍照逻辑流程:动态相机权限获取 >> 设置TextureView回调 >> TextureView启⽤成功回调⽅法触发 >> 选择摄像头 >> 打开相机 >> 相机开启回调⽅法触发 >> 创建CaptureRequest.Builder配置类 >> 设置配置类图像预览模式 >> 配置类导⼊需要显⽰预览的TextureView的surface >> 创建数据会话 >> 数据会话的配置成功回调⽅法触发 >> 创建预览图像 >> 预览图像显⽰成功 >> 按键点击拍照 >> 创建新的CaptureRequest.Builder配置类,添加⽬标为拍照 >> 配置类导⼊ImageReader的surface >> 数据会话使⽤这个配置类创建拍照 >> ImageReader 的接⼝类图⽚可⽤⽅法触发 >> 保存图⽚代码部分实现简单的拍照功能demopackage .demo;import android.Manifest;import android.content.Context;import android.content.pm.PackageManager;import android.graphics.ImageFormat;import android.graphics.SurfaceTexture;import android.hardware.camera2.CameraAccessException;import android.hardware.camera2.CameraCaptureSession;import android.hardware.camera2.CameraCharacteristics;import android.hardware.camera2.CameraDevice;import android.hardware.camera2.CameraManager;import android.hardware.camera2.CaptureFailure;import android.hardware.camera2.CaptureRequest;import android.hardware.camera2.CaptureResult;import android.hardware.camera2.TotalCaptureResult;import android.hardware.camera2.params.StreamConfigurationMap;import android.media.Image;import android.media.ImageReader;import android.os.Bundle;import android.os.Handler;import android.os.HandlerThread;import android.util.Log;import android.util.Size;import android.util.SparseIntArray;import android.view.Surface;import android.view.TextureView;import android.view.View;import android.widget.Button;import android.widget.Toast;import androidx.annotation.NonNull;import androidx.appcompat.app.AppCompatActivity;import androidx.core.app.ActivityCompat;import androidx.core.content.ContextCompat;import java.io.File;import java.io.FileNotFoundException;import java.io.FileOutputStream;import java.io.IOException;import java.nio.ByteBuffer;import java.util.Arrays;public class Demo2Activity extends AppCompatActivity {private static final String TAG = Camera2Activity.class.getName();private String[] permission = {Manifest.permission.CAMERA};private TextureView mTextureView; //注意使⽤TextureView需要开启硬件加速,开启⽅法很简单在AndroidManifest.xml 清单⽂件⾥,你需要使⽤TextureView的activity添加android:hardwareAccelerated="true"private Button mBtnPhotograph;private HandlerThread mHandlerThread;private Handler mChildHandler = null;private CameraManager mCameraManager; //相机管理类,⽤于检测系统相机获取相机idprivate CameraDevice mCameraDevice; //Camera设备类private CameraCaptureSession.StateCallback mSessionStateCallback; //获取的会话类状态回调private CameraCaptureSession.CaptureCallback mSessionCaptureCallback; //获取会话类的获取数据回调private CaptureRequest.Builder mCaptureRequest; //获取数据请求配置类private CameraDevice.StateCallback mStateCallback; //摄像头状态回调private CameraCaptureSession mCameraCaptureSession; //获取数据会话类private ImageReader mImageReader; //照⽚读取器private Surface mSurface;private SurfaceTexture mSurfaceTexture;private String mCurrentCameraId;private static final SparseIntArray ORIENTATIONS = new SparseIntArray();static {// /为了使照⽚竖直显⽰ORIENTATIONS.append(Surface.ROTATION_0, 90);ORIENTATIONS.append(Surface.ROTATION_90, 0);ORIENTATIONS.append(Surface.ROTATION_180, 270);ORIENTATIONS.append(Surface.ROTATION_270, 180);}@Overrideprotected void onCreate(Bundle savedInstanceState) {super.onCreate(savedInstanceState);setContentView(yout.activity_camera2);mTextureView = findViewById(R.id.textureview);mBtnPhotograph = findViewById(R.id.btn_Photograph);mBtnPhotograph.setOnClickListener(new View.OnClickListener() {@Overridepublic void onClick(View v) {try {mCameraCaptureSession.stopRepeating();//停⽌重复取消任何正在进⾏的重复捕获集在这⾥就是停⽌画⾯预览/* mCameraCaptureSession.abortCaptures(); //终⽌获取尽可能快地放弃当前挂起和正在进⾏的所有捕获。