pdf数字签名方法
- 格式:ppt
- 大小:894.00 KB
- 文档页数:37
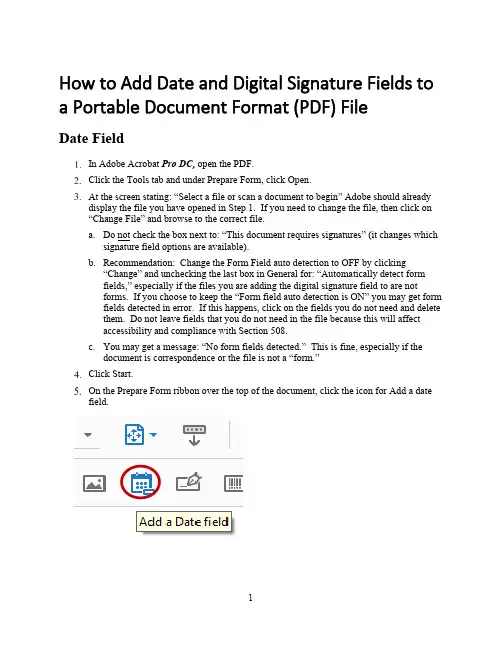
How to Add Date and Digital Signature Fields to a Portable Document Format (PDF) FileDate FieldIn Adobe Acrobat Pro DC, open the PDF.Click the Tools tab and under Prepare Form, click Open.At the screen stating: “Select a file or scan a document to begin” Adobe should alreadydisplay the file you have opened in Step 1. If you need to change the file, then click on“Change File” and browse to the correct file.a.Do not check the box next to: “This document requires signatures” (it changes whichsignature field options are available).b.Recommendation: Change the Form Field auto detection to OFF by clicking“Change” and unchecking the last box in General for: “Automatically detect formfields,” especially if the files you are adding the digital signature field to are notforms. If you choose to keep the “Form field auto detection is ON” you may get formfields detected in error. If this happens, click on the fields you do not need and deletethem. Do not leave fields that you do not need in the file because this will affectaccessibility and compliance with Section 508.c.You may get a message: “No form fields detected.” This is fine, especially if thedocument is correspondence or the file is not a “form.”Your mouse will turn into a light blue box for you to Left mouse click (and hold) > Draga box > Release mouse button (This is where you want the date stamp field in your document).Using the leader lines Release the date field under the letterhead even and centered on“OFFICE OF THE SECRETARY.” You will standardize the placement and size of box you create in Step 11.Within the Field Name properties box, enter “Date Signed” and check the box next to:“Required field.” In the bottom, right corner, click on the blue hyperlink “All Properties.”Click on the Appearance Tab and ensure the text font and font size matches your document.a.Note: Most DOI documents will be in Times New Roman and 12-point.Click on the Position Tab and ensure the Position Width is 2 inches and the PositionHeight is 0.25 inches. Click the box “Do not change height and width when changing the position.” This grays out the Width and Height fields. You may click and drag the box to center it under the Office of the Secretary, Washington, DC 20240 on the electronic letterhead, as necessary.Click on the Options Tab and change the Alignment Field to “Center” by clicking on thedrop-down menu arrow.Click on the Format Tab and scroll down to highlight “mmm d, yyyy”. Your date willappear in the “Example of current format:” field. Click Close.Close the Prepare Form Tool by clicking Close in the upper-right corner. Your date fieldappears as a light blue box. Hover your cursor in the blue date field box and the Tooltip appears, “Click to date stamp.” Again, you may click and drag to adjust placement of the field, as necessary.If you are date stamping the document, please continue to Steps 16 and 17. Otherwise,you are done creating the Date Stamp field. Proceed to “How to Add a Signature Field to a PDF”.Click in the date field and a drop-down menu arrow appears. Click on the drop-downarrow for a calendar to choose your date.Congratulations! You have date stamped your document. Now, proceed to adding adigital signature field to your PDF file.Digital Signature FieldIn the Digital Signature Properties, dialog box, click on the General Tab enter “Click toClick on the Appearance Tab, leave the font size default to Auto. The font defaults to Helvitica. You can scroll down to change the font to Times New Roman.If you just added the Date Field, Adobe remembers… Uncheck the box “Do not changeheight and width when changing the position.” On the Position Tab ensure the Position Width is 3 inches and the Position Height is 0.40 inches. Recheck the box “Do notchange height and width when changing the position.” This grays out the Width and Height fields. Click Close.a.NOTE: If you have more than one signature in your file (e.g., a “Through” line), youmust give each digital signature field a unique name. Repeat Steps 5-11 for eachsignature required. Click Close after adding each signature field.8.Close the Prepare Form Tool by clicking Close in the upper-right corner. Your signaturefield appears as a light blue box with the red “Sign here” flag. Hover your cursor in the blue date field box and the Tool Tip appears, “Click to sign, check box to lock document (Click to sign)”. Again, you may click and drag to adjust placement of the field, asnecessary.Congratulations! You have added a digital signature field.Save your document, adjusting the file name by adding “ready for signature”. Thisassists with version control.Run the Accessibility Checker Click Start Checking.The Accessibility Checker Menu appears on the left side of the document.Open all the arrows next to headings in bold, which indicates accessibility issues.You must address all issues marked with a question mark and red “X”.To correct the “Title Failed”, right click on it and click FixIn the Description Window, uncheck “Leave As Is” and enter the document Title. Youcan repeat for Subject, Author and Keywords if you wish. Click OK.The Title Failed changes to Title Passed.To correct the Tagged annotations – Failed, click on the Tag panel, highlight the main“Tags” at the top, right-click and select FindIn the Find Element dialog box, click on the dropdown menu, select “UnmarkedAnnotations,” then select the radio button next to Search Document, and click “Find.”The date field you added is highlighted. Click “Tag Element,” select “Form” in the“Type” field, and click OK. The next, if any, unmarked annotated field is automatically highlighted. As you can see, the digital signature field you added is now highlighted. The Find Element dialog box remains open until you close it; therefore, click “Tag Element” and “Form” should already be selected, then click OK. The Find Complete dialog box opens. Click OK and click Close in the Find Element dialog box.Rerun the Accessibility Checker by selecting “Full Check” and clicking “StartChecking.” Three manual checks should be displayed: Logical Reading Order – Needs manual check, Color contrast – Needs manual check, and Navigation links – Needs manual check. The logical reading order and color contrast will be in the Document heading and Navigation links will be in the Page heading. Click Close to close the Accessibility tool. Click the “X” in the upper-right corner of the Accessibility Checker to close the report.Save the file and continue to the “Fixing Reading Order for the Date and DigitalSignature Fields” to finalize the PDF file for digital signature.Fixing Reading Order for Date and Digital Signature FieldsThe Reading Order panel opens. Make sure the box next to: “Display like elements in a single block” is unchecked.You will notice tagged items in the PDF file are displayed in grey blocks with acorresponding number in the upper-left corner to the number listed in the Order panel. The date and digital signature fields are at the bottom of the order for Page 1. In this example, they are numbers 29 and 30. The fields need to be moved so a user using assistive technology has the date field read after the letterhead and the digital signature field read after the full name of the signatory official. To move the date field, you will hold your left mouse button and drag it above the word, “Memorandum” and release your left mouse button.Repeat the same steps for moving the digital signature before the signatory official’s title.Close the Reading Order dialog box by clicking “Close,” then close the Order panel byclicking the “X” in the upper-right corner.Save your file. It is recommended to add “Ready for Signature” to your filename toensure version control and decipher the final PDF to send to the signatory official. Congratulations! Your PDF file is ready for the signatory official’s digital signature. Asa reminder, the signatory official will select the date she or he is signing the PDF filefirst, then click on the digital signature field to digitally sign and click “Lock document after signing.”。

PDF怎么添加数字签名?这款编辑器软件很多人都说好用PDF文件怎么添加数字签名?其实,要给PDF文件添加数字签名,我们可以选择把这份文件转换成PDF格式的文件,再通过PDF编辑器给这份PDF文件添加数字签名。
那么,给PDF文件添加数字签名,我们可以选择哪一款PDF编辑器呢?另外,我们又该如何使用PDF编辑器给PDF文件添加数字签名呢?试试“迅捷PDF编辑器”,这款PDF编辑器软件很多人都说好用。
接下来,我们就以“迅捷PDF编辑器”为例子,往下找寻给PDF文件添加数字签名的具体方法步骤吧。
必备工具:迅捷PDF编辑器获取方法:在电脑百度上输入“迅捷PDF编辑器”并搜索,进入软件官网就可以免费获取第一步:在电脑上下载、安装好“迅捷PDF编辑器”后,双击运行该软件。
打开软件后,点击页面左上方的【文件】-【打开】,在弹出来的框中找到需要添加数字签名的PDF文件。
点击框中的【打开】按钮,把PDF文件打开。
第二步:需要添加数字签名的PDF文件在“迅捷PDF编辑器”中打开后,点击页面上方菜单栏处的【文档】。
在【文档】下拉框中找到【数字签名】,点击其中的【放置签名】以创建新的签名域并签名。
●第三步:点击【放置签名】后,点击并拉动鼠标,创建新的签名域。
●第四步:松开鼠标后,会弹出一个签名文档的设置页面。
在这里,完成对数字签名的各项设置。
完成设置后,点击设置页面的【确定】按钮,如此便完成数字签名的设置啦(或者直接点击【数字签名】中的【签名文档】,完成设置)。
第五步:最后,把已经添加数字签名的PDF文件保存起来就可以啦。
看完小编的分享内容,各位小伙伴是否已经知道如何使用“迅捷PDF编辑器”给PDF文件“迅捷PDF编辑器”还有更多其它PDF编辑功能哦。
添加数字签名了呢?除了添加数字签名,对这款软件感兴趣的小伙伴们,记得到软件官网下载、安装下来哦。
PDF签名及数字证书配置详细教程数字签名与传统的手写签名一样,必须验证签署文件中签名人身份的真实性。
采用数字签名文件必须确认以下两点:一是文件的确是由签名者签署;二是文件内容自签发后到收到为止未曾作过任何修改。
在Acrobat中,如果需要对某个文档进行数字签名,那签名人必须首先具有一个指定的数字身份,数字身份就像身份证一样,这个数字身份可以自己创建,也可以由可信的第三方供应商提供。
在Acrobat中提供了三种数字证书的创建方法:第一种方法:使用缺省的安全证书方式自行创建数字身份,创建的数字身份文件被存储成后缀为.Pfx文件,在这种方式下,可以选择由密码来保护数字身份文件,这种方式只适合小规模企业,在大的环境中,验证签名的证书交换存在问题;第二种方法:由Windows的安全授权机构提供的数字身份,主要特点是申请管理证书及验证签名比较方便,无需重新投入费用,但只适合在企业内部使用,与其它企业建立相互信任关系比较困难;第三种方法:由可信的数字证书认证中心来提供。
一般官方场合使用的数字身份都是由可信的数字证书认证中心发放的。
数字证书认证中心会发放一个私钥文件 (Sk)和一个数字身份文件。
数字身份文件包含身份拥有者的公共密钥(公钥Pk)、名称,发证机构名称、数字身份证号,以及发证机构的数字签名等信息,但每年的投入费用相当昂贵。
1、申请个人数字证书备注:个人数字证书由公司证书服务器统一颁发,通过域帐号进行申请,要养成离开电脑后锁定计算机的习惯,域密码必须妥善保管,以防止被他人冒用申请证书;证书同样也必须妥善保管,以防被他人盗用;个人数字证书有限期为2年,过期后需要重新申请(Windows XP之后版本的操作系统证书过期后会自动续订更新证书)。
Windows XP之后版本的操作系统通过公司域登录后会自动注册个人数字证书,Windows 2000版本操作系统必须手工申请公司颁发的个人数字证书,查看数字证书是否注册成功,方法如下:打开IE浏览器,在“菜单”->“Internet选项”->“工具”->“内容”点击“证书”如果在个人证书列表中没有你以你域帐号描述的证书,请使用以下方法手工申请证书。
PDF线性化、优化、保护、数字签名好帮⼿—PLOP DS您是不是还在为PDF⽂件的线性化和优化发愁呢?您是不是还在为如何为PDF⽂件的保护和数字签名苦恼呢?如果是,那么请您了解⼀下PDFlib公司的PDFlib PLOP DS吧。
PLOP DS是⼀个基于PDFlib PLOP的多功能⼯具,它可以对PDF⽂档进⾏线性化,优化,修复,分析及加密、解密等操作。
扩展版本的PLOP DS新增了对PDF⽂档进⾏数字签名的功能。
PDF数字签名可以使⽤Adobe Acrobat 及Adobe Reader进⾏验证,⽽不需要额外的校验软件。
PDFlib PLOP DS数字签名技术介绍:由于PDFlib PLOP DS使⽤PDF标准格式的签名,从⽽可以直接通过Adobe Reader或Acrobat验证。
PLOP DS的签名⽀持如下功能:PLOP DS可以从内存、磁盘⽂件或⼀个固定的硬件标识符中,读取签名者的数字ID(即证书和对应的专⽤密匙)。
这个数字ID可以为PDF⽂档⽣成⼀个密码签名。
PLOP DS可以在现有的签名字段中创建签名或是⽣成新的签名字段。
该签名可设置为不可见,也可显⽰在在页⾯中的特定位置。
在Acrobat中,还可以显⽰签名的多个基本属性,例如签名原因,位置,联系信息等。
PLOP DS⽀持Acrobat 9及以下的所有PDF版本。
它可以使签名与加密相结合(⽤户密码,主密码或许可)PLOP使⽤了SHA-1数字签名加密算法来⽣成签名,并⽀持RSA和DSA签名算法,其密匙长度可达4096位。
PDFlib PLOP DS功能亮点:多重加密引擎PLOP DS最⼤程度的⽀持多重加密引擎,即⽣成数字签名的组件:内置的引擎可⽤于所有的平台。
它在PLOP DS中实现了所需的加密功能,⽽不依赖任何的外部设备。
这个内置引擎⽀持基于软件的数字ID,并同时具有PKCS#12和PFX两种证书格式。
在Windows系统中PLOP DS使⽤了Microsoft Cryptographic API (CAPI)作为加密引擎,因此可以使⽤Windows提供的加密基础结构。
pdf签署标准
PDF 签署标准是指用于确保数字文档的真实性、完整性和不可否认性的一组规范和要求。
以下是PDF 签署标准的一些基本要求:1. 数字证书:签署PDF 文件需要使用数字证书,数字证书是由证书颁发机构(CA)颁发的电子证书,用于验证签署者的身份和数字签名的有效性。
2. 哈希值:PDF 签署标准要求对文档进行哈希计算,生成唯一的哈希值。
哈希值是一种数字指纹,用于确保文档的完整性。
3. 数字签名:数字签名是一种电子签名,用于证明签署者对文档的认可和同意。
数字签名包括签署者的身份信息、签署日期和时间等。
4. 时间戳:PDF 签署标准要求使用时间戳来记录签署日期和时间。
时间戳是一种数字证明,用于证明签名的时间和日期。
5. 验证:PDF 签署标准要求对数字签名进行验证,以确保签名的有效性和真实性。
验证包括检查数字证书的有效性、哈希值的完整性和数字签名的正确性等。
6. 存储:签署后的PDF 文件需要妥善存储,以确保其安全性和可用性。
存储方式包括本地存储、云端存储等。
PDF 签署标准是一组严格的规范和要求,用于确保数字文档的真实性、完整性和不可否认性。
在使用PDF 签署时,应遵循相关的标准和规范,以确保签署的有效性和可靠性。
密信电子文档全自动数字签名和加密解决方案彻底解决电子文档(电子合同)的可信和安全问题!现状分析1992年Adobe公司正式发布了PDF格式文件并大力推广文档电子化,1999年Adobe Acrobat和Adobe阅读器开始支持数字签名技术,意在推广电子文档的可信化。
根据Adobe官网介绍,英文Electronic Signature(电子签名)是一个泛术语,准确的中文全称应为:电子方式签名,指的是表明接受协议或记录的任何电子过程,典型的电子方式签名常见的身份验证方法是验证电子邮件地址,如果需要提高安全性,则需要使用多因素身份验证。
电子方式签名应该使用安全流程控制来证明签名过程,用户收到的已签名文档应包含签名过程审计报告。
如果用户设置了使用手写签名图样,电子方式签名存在一个无法验证手写签名或图章的图片是否的确是签名者本人的签名或是否的确是该单位的图章的问题。
合同签署各方只能要么相信此签名图片,要么通过其他方式去验证签名图片的真实性。
这是电子方式签名的不足之处。
而英文Digital Signature(数字签名)则是Electronic Signature(电子签名)的一种特定类型,可以说是一种改进型的更加可信的电子方式签名,准确的中文全称应为:数字方式签名,简称:数字签名,以区分电子方式签名。
数字签名是使用数字证书来验证签名者的身份,并通过密码算法将签名者身份绑定到文档中来证明签名行为的不可否认,已签名文档无需包含签名过程审计报告,签名者的身份验证则由证书颁发机构(CA)或信任服务提供商(TSP)完成。
总之,数字签名是一种基于证书的电子签名,符合最严格的法律法规-并为签名者的身份提供最高级别的保证。
目前国外主流的厂商如DocuSign和Adobe Sign都是采用电子方式签名实现合同在线签署,仅验证签署各方电子邮件地址后就可以完成合同签署,但是为了保证签名后的合同电子文件不会被篡改,用户签署完成后再用签名服务平台的PDF签名证书对合同文件进行数字签名。
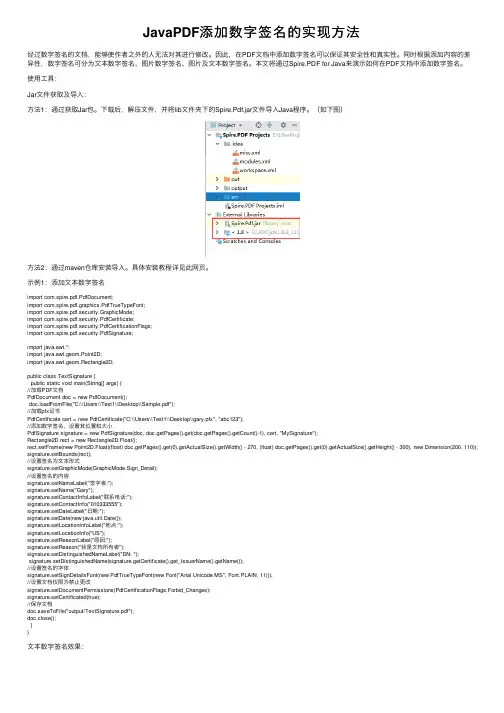
JavaPDF添加数字签名的实现⽅法经过数字签名的⽂档,能够使作者之外的⼈⽆法对其进⾏修改。
因此,在PDF⽂档中添加数字签名可以保证其安全性和真实性。
同时根据添加内容的差异性,数字签名可分为⽂本数字签名、图⽚数字签名、图⽚及⽂本数字签名。
本⽂将通过Spire.PDF for Java来演⽰如何在PDF⽂档中添加数字签名。
使⽤⼯具:Jar⽂件获取及导⼊:⽅法1:通过获取Jar包。
下载后,解压⽂件,并将lib⽂件夹下的Spire.Pdf.jar⽂件导⼊Java程序。
(如下图)⽅法2:通过maven仓库安装导⼊。
具体安装教程详见此⽹页。
⽰例1:添加⽂本数字签名import com.spire.pdf.PdfDocument;import com.spire.pdf.graphics.PdfTrueTypeFont;import com.spire.pdf.security.GraphicMode;import com.spire.pdf.security.PdfCertificate;import com.spire.pdf.security.PdfCertificationFlags;import com.spire.pdf.security.PdfSignature;import java.awt.*;import java.awt.geom.Point2D;import java.awt.geom.Rectangle2D;public class TextSignature {public static void main(String[] args) {//加载PDF⽂档PdfDocument doc = new PdfDocument();doc.loadFromFile("C:\\Users\\Test1\\Desktop\\Sample.pdf");//加载pfx证书PdfCertificate cert = new PdfCertificate("C:\\Users\\Test1\\Desktop\\gary.pfx", "abc123");//添加数字签名,设置其位置和⼤⼩PdfSignature signature = new PdfSignature(doc, doc.getPages().get(doc.getPages().getCount()-1), cert, "MySignature");Rectangle2D rect = new Rectangle2D.Float();rect.setFrame(new Point2D.Float((float) doc.getPages().get(0).getActualSize().getWidth() - 270, (float) doc.getPages().get(0).getActualSize().getHeight() - 300), new Dimension(200, 110)); signature.setBounds(rect);//设置签名为⽂本形式signature.setGraphicMode(GraphicMode.Sign_Detail);//设置签名的内容signature.setNameLabel("签字者:");signature.setName("Gary");signature.setContactInfoLabel("联系电话:");signature.setContactInfo("010333555");signature.setDateLabel("⽇期:");signature.setDate(new java.util.Date());signature.setLocationInfoLabel("地点:");signature.setLocationInfo("US");signature.setReasonLabel("原因:");signature.setReason("我是⽂档所有者");signature.setDistinguishedNameLabel("DN: ");signature.setDistinguishedName(signature.getCertificate().get_IssuerName().getName());//设置签名的字体signature.setSignDetailsFont(new PdfTrueTypeFont(new Font("Arial Unicode MS", Font.PLAIN, 11)));//设置⽂档权限为禁⽌更改signature.setDocumentPermissions(PdfCertificationFlags.Forbid_Changes);signature.setCertificated(true);//保存⽂档doc.saveToFile("output/TextSignature.pdf");doc.close();}}⽂本数字签名效果:⽰例2:添加图⽚数字签名import com.spire.pdf.PdfDocument;import com.spire.pdf.graphics.PdfImage;import com.spire.pdf.graphics.PdfTrueTypeFont;import com.spire.pdf.security.GraphicMode;import com.spire.pdf.security.PdfCertificate;import com.spire.pdf.security.PdfCertificationFlags;import com.spire.pdf.security.PdfSignature;import java.awt.*;import java.awt.geom.Point2D;import java.awt.geom.Rectangle2D;public class ImageSignature {public static void main(String[] args) {//加载PDF⽂档PdfDocument doc = new PdfDocument();doc.loadFromFile("C:\\Users\\Test1\\Desktop\\Sample.pdf");//加载pfx证书PdfCertificate cert = new PdfCertificate("C:\\Users\\Test1\\Desktop\\gary.pfx", "abc123");//添加数字签名,设置其位置和⼤⼩PdfSignature signature = new PdfSignature(doc, doc.getPages().get(doc.getPages().getCount()-1), cert, "MySignature");Rectangle2D rect = new Rectangle2D.Float();rect.setFrame(new Point2D.Float((float) doc.getPages().get(0).getActualSize().getWidth() - 250, (float) doc.getPages().get(0).getActualSize().getHeight() - 300), new Dimension(170, 150)); signature.setBounds(rect);//设置签名为图⽚形式signature.setGraphicMode(GraphicMode.Sign_Image_Only);signature.setSignImageSource(PdfImage.fromFile("C:\\Users\\Test1\\Desktop\\Image.png"));//设置签名的字体signature.setSignDetailsFont(new PdfTrueTypeFont(new Font("Arial Unicode MS", Font.PLAIN, 11)));//设置⽂档权限为禁⽌更改signature.setDocumentPermissions(PdfCertificationFlags.Forbid_Changes);signature.setCertificated(true);//保存⽂档doc.saveToFile("output/ImageSignature.pdf");doc.close();}}图⽚数字签名效果:⽰例3:添加图⽚及⽂本数字签名import com.spire.pdf.PdfDocument;import com.spire.pdf.graphics.*;import com.spire.pdf.security.GraphicMode;import com.spire.pdf.security.PdfCertificate;import com.spire.pdf.security.PdfCertificationFlags;import com.spire.pdf.security.PdfSignature;import java.awt.*;import java.awt.geom.Point2D;import java.awt.geom.Rectangle2D;public class TextAndImageSignature {public static void main(String[] args) {//加载PDF⽂档PdfDocument doc = new PdfDocument();doc.loadFromFile("C:\\Users\\Test1\\Desktop\\Sample.pdf");//加载pfx证书PdfCertificate cert = new PdfCertificate("C:\\Users\\Test1\\Desktop\\gary.pfx", "abc123");//添加数字签名,设置其位置和⼤⼩PdfSignature signature = new PdfSignature(doc, doc.getPages().get(doc.getPages().getCount()-1), cert, "MySignature");Rectangle2D rect = new Rectangle2D.Float();rect.setFrame(new Point2D.Float((float) doc.getPages().get(0).getActualSize().getWidth() - 350, (float) doc.getPages().get(0).getActualSize().getHeight() - 170), new Dimension(300, 170)); signature.setBounds(rect);//设置签名为图⽚加⽂本模式signature.setGraphicMode(GraphicMode.Sign_Image_And_Sign_Detail);//设置签名的内容signature.setNameLabel("签字者:");signature.setName("Gary");signature.setContactInfoLabel("联系电话:");signature.setContactInfo("010333555");signature.setDateLabel("⽇期:");signature.setDate(new java.util.Date());signature.setLocationInfoLabel("地点:");signature.setLocationInfo("US");signature.setReasonLabel("原因:");signature.setReason("我是⽂档所有者");signature.setDistinguishedNameLabel("DN: ");signature.setDistinguishedName(signature.getCertificate().get_IssuerName().getName());signature.setSignImageSource(PdfImage.fromFile("C:\\Users\\Test1\\Desktop\\Image.png"));//设置签名的字体 signature.setSignDetailsFont(new PdfTrueTypeFont(new Font("Arial Unicode MS", Font.PLAIN, 11)));//设置⽂档权限为禁⽌更改signature.setDocumentPermissions(PdfCertificationFlags.Forbid_Changes);signature.setCertificated(true);//保存⽂档doc.saveToFile("output/TextAndImageSignature.pdf");doc.close();}}图⽚及⽂本数字签名效果:以上就是本⽂的全部内容,希望对⼤家的学习有所帮助,也希望⼤家多多⽀持。


Adobe Acrobat 5.0的数字签名功能Acrobat 5.0是Adobe公司的电子交换文档PDF的制作器。
pdf文档在国外应用的非常广泛,经常用于网络上的文档交换,一些书籍的电子版文档就是用他制作的,例如宝典系列等等。
Acorbat的功能非常强大,今天我们主要讨论的是它的数字签名功能。
Acrobat5现在支持数字签名。
数字签名就像传统的手写签名,表示个人或实体已签署文档。
数字签名可以是手写签名、标志或其它图形,或简单解释签名目的的文本等几种格式之一。
根据签名处理程序,签名甚至可能是不可见的。
单击签名工具就可以在文档中的指定位置进行数字签名。
通过数字签名,可以验证你的文档是否被修改过。
并且是否已经签署通过。
当别人拿来被签名的文档的时候,只要对方把用户证书email来,就可以验证他们的数字签名了。
目录一、Adobe Acrobat 5.0的安装二、如何实现数字签名(一)、制作签名档(二)、转换待签文档(三)、如何签名(四)、验证签名有效性三、文档的安全属性一、Adobe Acrobat 5.0的安装安装过程非常简单,您只需要请选中并运行安装目录下的SETUP.EXE 程序,Acrobat就开始进行安装。
安装时您会遇到如下窗口,请在窗口中填写个人相关信息,注意,“序号”可以在安装目录下名为“SN”的文本文件中找到,如图1-1;图1-1后面出现的窗口无需进一步设置,只要连续点击“下一步”或“是”之类的按钮即可完成安装。
返回二、如何实现数字签名初次运行Acrobat,将会弹出注册窗口,请选择“请不要再显示此对话框”后点击“继续”按钮,如下图;Acrobat安装完成后会自动在Microsoft Word、Microsoft Excel等应用窗口的左上角添加将指定文档或表格转换成PDF格式文件的控件,如下图;下面的内容将详细讲述如何实现数字签名;返回(一)、制作签名档1.在纸上手写您的签名,并将这张带有您的签名的纸张放入扫描仪扫描;2.用图像工具处理该扫描文件,并将自己的签名尽可能大的转换成一个PDF文件,下图2-1为一个扫描后的签名PDF文件;图2-13.重新打开Acrobat程序,并选中“工具”——〉“自签名安全”——〉“登录”,开始制作自己的签名档,如图2-2;图2-24.选中“登录”后,将弹出如下对话框,我们在此窗口选择“新建用户配置文件”,如图2-3;图2-35.在弹出的新窗口中输入个人的相关信息,请注意,“姓名”、“组织名称”和“部门”均不支持中文输入,“国家”栏可通过下拉菜单选中CN-中国,并按要求设置该签名档的密码,密码位数不少于6位,填写如下图2-4,请记住该密码,否则您将无法使用该签名档;图2-46.点击“确定”后,弹出选择此配置文件的存放位置的窗口,选择好后点击“保存”,如图2-5;图2-57.此时弹出窗口,要求您进一步配置您的签名配置文件,如加载您的手写体签名等等,请选择“用户配置”按钮,如图2-6;图2-68.弹出“自签名安全”窗口,该窗口中包含了该签名档的所有信息,如图2-7;图2-79.选择“签名外观”,并在窗口中选中“导入图形”,如图2-8;图2-810.点击“PDF文件…”按钮,出现选择手写体签名扫描文件的窗口,我们选中第二步建立的“张三的签名.pdf”文件,如图2-9;图2-911.点击“选择”按钮后,出现如下图2-10窗口;图2-1012.点击确定按钮后,出现以下窗口,在“标题”栏填写名字,我们可以视需要钩选下方的“显示”项,张三的签名无需“显示”中的任何项,因此全部不钩选,如图2-11,签名的预览情况如下;图2-1113.点击“确定”,回到窗口图2-12;图2-1214.点击“关闭”即完成了张三的签名档的制作。
pdf知识点总结一、PDF的基本概念1.PDF是什么PDF全称为Portable Document Format,即“便携式文档格式”,是由Adobe公司开发的一种用于电子文档的文件格式,其特点是可以独立于应用软件、硬件、操作系统进行查看和打印。
2.PDF的特点(1)跨平台性:PDF格式可以在多种操作系统中进行查看和编辑。
(2)文件保密性:PDF格式支持密码保护和权限设置,能够保护文档内容的安全。
(3)独立性:PDF文档的格式不会随着不同设备的显示而发生变化,保持固定的排版和格式。
(4)易于打印:PDF文档可以通过打印机进行输出,并且能够保持打印格式的一致性。
二、PDF文件的创建和编辑1.PDF的创建(1)通过专业的PDF编辑软件(如Adobe Acrobat、Foxit PhantomPDF等)创建PDF文件。
(2)通过将其他格式的文件(如Word、Excel、PPT等)转换为PDF格式。
(3)在Mac系统中,可以通过打印功能将文件直接保存为PDF格式。
2.PDF的编辑(1)通过专业的PDF编辑软件对PDF文件进行文本、图片、表格等内容的编辑。
(2)通过添加、删除、合并、拆分页面等操作修改PDF文件的页面内容。
(3)通过添加标注、批注等功能对PDF文件进行标记和评论。
三、PDF文件的使用和管理1.PDF的浏览(1)通过PDF阅读器(如Adobe Acrobat Reader、Foxit Reader、PDF-XChange Viewer 等)进行PDF文件的浏览。
(2)通过浏览器插件(如Chrome自带的PDF浏览器插件)进行在线浏览PDF文件。
2.PDF文件的打印(1)通过打印机对PDF文件进行打印输出。
(2)可以选择单面打印、双面打印、多页打印等打印设置。
3.PDF文件的转换(1)将其他格式的文件(如Word、Excel、PPT等)转换为PDF格式。
(2)将PDF文件转换为其他格式(如Word、Excel、图片等)。
如何在PDF文档中添加数字签名在当今数字化的时代,PDF 文档因其稳定性和兼容性成为了广泛使用的文件格式。
无论是在商务合同、法律文件还是学术论文等领域,我们常常需要对 PDF 文档进行签名以确保其真实性、完整性和不可否认性。
数字签名就是一种有效的手段,它能为 PDF 文档提供更高的安全性和可信度。
那么,如何在 PDF 文档中添加数字签名呢?下面就为您详细介绍。
首先,我们需要了解什么是数字签名。
简单来说,数字签名就像是文件的“指纹”,它是通过特定的算法和加密技术生成的一段独特的代码。
这个代码与签署人的身份信息和文档的内容相关联,能够证明签署人的身份,并保证文档在签名后没有被篡改。
要在 PDF 文档中添加数字签名,我们通常有以下几种方法:方法一:使用 Adobe Acrobat 软件Adobe Acrobat 是一款功能强大的 PDF 编辑软件,它提供了完善的数字签名功能。
步骤 1:打开您需要添加数字签名的 PDF 文档。
步骤 2:在菜单栏中选择“工具”,然后点击“证书”选项。
步骤 3:在弹出的“证书”窗口中,选择“签名文档”。
步骤 4:此时会出现“签名文档”的向导页面,您可以选择“创建新的数字ID”来创建自己的数字证书,或者选择“使用现有的数字ID”来使用已经创建好的数字证书。
步骤 5:如果选择创建新的数字 ID,您需要根据提示输入相关的个人信息,如姓名、电子邮件地址等,并设置密码。
步骤 6:在完成数字证书的创建或选择后,您可以在文档中选择要签名的位置,然后输入密码进行签名。
方法二:使用在线数字签名服务如果您没有安装 Adobe Acrobat 软件,或者觉得其操作较为复杂,还可以选择使用在线数字签名服务。
步骤 1:打开您信任的在线数字签名服务网站,例如 DocuSign 、HelloSign 等。
步骤 2:注册并登录账号。
步骤 3:上传您需要添加数字签名的 PDF 文档。
步骤 4:按照网站的提示设置签名的位置、样式等参数。
扣签名的方法
扣签名是指在数字文档中添加电子签名,以确保文档的真实性和完整性。
在现代社会,越来越多的文件需要进行签名,如合同、授权书、代理文件等等。
为了方便签名,许多人选择使用扣签名的方法来完成电子签名。
下面介绍几种常用的扣签名方法。
1.使用电子签名软件
电子签名软件是一种专门用于签署电子文档的软件。
它们通常包含数字签名和时间戳功能,可以确保签名者的身份和时间。
使用电子签名软件进行扣签名十分简单,只需打开签名软件,选择要签名的文档,并填写相关信息即可。
2.使用PDF编辑器
许多PDF编辑器都包含电子签名功能。
使用PDF编辑器进行扣签名也很简单,只需打开要签名的文档,选择签名工具,然后按照提示进行签名。
与电子签名软件一样,PDF编辑器也可以对签名进行时间戳和编号,以确保签名的真实性。
3.使用云存储服务
许多云存储服务,如Google Drive、Dropbox等,都包含电子签名功能。
使用云存储服务进行扣签名也很方便,只需上传要签名的文档,然后使用云存储服务提供的签名工具进行签名即可。
使用云存储服务
进行扣签名的好处是可以在多个设备上访问签名文档,并且可以随时修改签名。
总之,扣签名是一种方便快捷的签名方法,可以在许多不同的设备上使用。
但是,在签署重要文件时,务必选择可信的签名软件或服务,并确保签名的真实性和完整性。
(19)中华人民共和国国家知识产权局(12)发明专利申请(10)申请公布号 (43)申请公布日 (21)申请号 201711164438.3(22)申请日 2017.11.21(71)申请人 杭州尚尚签网络科技有限公司地址 310012 浙江省杭州市西湖区万塘路317号华星世纪大楼2层202房(72)发明人 钱之光 吕涛 (74)专利代理机构 杭州求是专利事务所有限公司 33200代理人 陈升华(51)Int.Cl.H04L 9/32(2006.01)H04L 29/06(2006.01)G06F 21/64(2013.01)(54)发明名称针对PDF使用SM3算法和SM2算法数字签名的验证方法和系统(57)摘要本发明公开了一种针对PDF使用SM3算法和SM2算法数字签名的验证方法和系统,包括:发送端发送待验证PDF文档;接收端获取待验证PDF文档,提取使用SM3密码杂凑算法和SM2数字签名算法的数字签名,若提取成功,进行下一步;验证提取到的数字签名中的时间戳,若验证成功,进行下一步;对验证完的数字签名中的数字证书的有效性进行验证,若验证成功,进行下一步;验证使用SM3密码杂凑算法和SM2数字签名算法的数字签名,使用SM2数字签名算法的验证算法和数字证书包含的公共密钥对数字签名值进行校验。
本发明将SM3密码杂凑算法和SM2数字签名算法应用到PDF中去,使得数字签名更安全、快速和可靠。
权利要求书2页 说明书7页 附图3页CN 107947938 A 2018.04.20C N 107947938A1.一种针对PDF使用SM3算法和SM2算法数字签名的验证方法,其特征在于,包括以下步骤:1)发送端发送待验证PDF文档;2)接收端获取待验证PDF文档,提取使用SM3密码杂凑算法和SM2数字签名算法的数字签名,若无此类数字签名,则结束返回显示无此类数字签名;若提取成功,进行下一步;3)验证步骤2)提取到的数字签名中的时间戳,若验证失败,则结束返回显示时间戳签名无效,文档被篡改结果;若验证成功,进行下一步;4)对步骤3)验证完的数字签名中的数字证书的有效性进行验证,若验证失败,则结束返回显示签名证书无效;若验证成功,进行下一步;5)验证使用SM3密码杂凑算法和SM2数字签名算法的数字签名,使用SM2数字签名算法的验证算法和数字证书包含的公共密钥对数字签名值进行校验,若验证失败,则结束返回签名无效;否则验证成功,完成PDF签名的验证。
pdf签名原理
PDF签名的原理是利用数字签名技术来保证PDF文件的完整性和真实性。
具体来说,数字签名技术利用了非对称加密技术,首先使用哈希函数对原始数据进行摘要,然后使用私钥对摘要进行签名,接收者使用公钥验证签名。
由于哈希函数的不可逆性,保证了原文的真实性和完整性。
PDF签名的实现需要数字证书,数字证书包含用户的公钥和私钥,用于验证用户的身份和签名的合法性。
通过在PDF文件中添加数字签名,可以确保文件的真实性和完整性,防止被非法篡改。