Fabrication and erection of structural steelwork
- 格式:pdf
- 大小:168.85 KB
- 文档页数:21
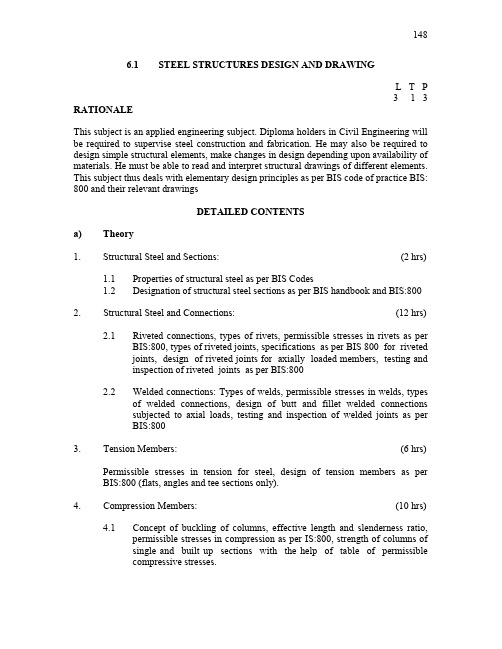
1486.1 STEEL STRUCTURES DESIGN AND DRAWINGL T P3 1 3 RATIONALEThis subject is an applied engineering subject. Diploma holders in Civil Engineering willbe required to supervise steel construction and fabrication. He may also be required to design simple structural elements, make changes in design depending upon availability of materials. He must be able to read and interpret structural drawings of different elements.This subject thus deals with elementary design principles as per BIS code of practice BIS:800 and their relevant drawingsDETAILED CONTENTSa) Theory1. Structural Steel and Sections: (2 hrs)1.1 Properties of structural steel as per BIS Codes1.2 Designation of structural steel sections as per BIS handbook and BIS:8002. Structural Steel and Connections: (12 hrs)2.1 Riveted connections, types of rivets, permissible stresses in rivets as perBIS:800, types of riveted joints, specifications as per BIS 800 for rivetedjoints, design of riveted joints for axially loaded members, testing andinspection of riveted joints as per BIS:8002.2 Welded connections: Types of welds, permissible stresses in welds, typesof welded connections, design of butt and fillet welded connectionssubjected to axial loads, testing and inspection of welded joints as perBIS:800hrs) Members: (63. TensionPermissible stresses in tension for steel, design of tension members as perBIS:800 (flats, angles and tee sections only).4. Compression Members: (10 hrs)4.1 Concept of buckling of columns, effective length and slenderness ratio,permissible stresses in compression as per IS:800, strength of columns ofsingle and built up sections with the help of table of permissiblecompressive stresses.1494.2 IS specifications for design of compression members, design of angle,struts and axially loaded columns (no built up columns); use of tackingrivets4.3 Beam and column, frame and seated connections (no design)5. Beams (8 hrs)BIS specifications for the design of simply supported steel beams including design of base plate at the ends (laterally restrained beams only), structural behaviour, deflected shapes and function of various elements of a plate girder and freehand sketching of a plate girder and its elements.6. Roof Truss (10 hrs)Form of trusses, pitch of roof truss, spacing of trusses, spacing of purlins, connection between purlin and roof covering, joint details of roof trusses, loading for roof truss, weight of roof truss, wind loads, snow loads, combination of loads, design of various elements of trussb) Steel Structures Drawing1. Preparation of a working drawing (elevation, plan, details of joints as ridge,eaves and other connections) for a riveted steel roof truss resting on a masonry wall with the given span, shape of the truss and the design data regarding the size of the members and the connections. Also calculate the quantity of steel for the truss.2. Steel connections (a,b,c,d) rivetted and (e) welded all unstiffened- Beam to beam connections (Seated and framed)- Beam to column (Seated and framed)- Column base connections (Slab base, grillage base andgussetted base)- Details of column splices- Connections of a steel bracket with flange of a column3. Detailed drawing showing plan and elevation for a riveted plate girder with thegiven design data regarding the sizes of its parts, with details at the supports and connections of stiffeners, flange angles and cover plates with the web INSTRUCTIONAL STRATEGYTeachers are expected to give simple problems for designing various steel structural members. For creating comprehension of the subject, teachers may prepare tutorial sheets, which may be given to the students for solving. It would be advantageous if150 students are taken at construction site to show fabrication and erection of steel structures. Practice of reading structural drawings is another important feature of this course.RECOMMENDED BOOKS1. Arya, AS and Ajmani, JL; "Design of Steel Structures", Roorkee, Nem Chandand Bros.2. Ram Chandra, "Design of Steel Structures", Delhi, Standard PublishersDistributors.3. Duggal SK, "Design of Steel Structures", Standard Publishers Distributors.4. Kazimi and. Jindal, “Design of Steel Structures”, Prentice Hall of India, NewDelhi5. LS Negi, ‘Design of Steel Structure”, Tata McGraw Hill, New Delhi1516.2 EARTHQUAKE RESISTANT BUILDING CONSTRUCTIONL T P3 - - RATIONALDiploma holders in civil engineering have to supervise construction of various earthquake resistant buildings. Therefore, the students should have requisite knowledge regarding terminology of earthquake and the precautions to be taken while constructing earthquake resistant buildingsDETAILED CONTENTS1. Introduction to Seismic Design Parameters (10 hrs)1.1 Introduction to Earthquakes1.2 Causes of earthquakesHypocenter1.3 Epicenter,1.4 Earthquake waves: Primary waves, secondary waves, long waves1.5 Seismic Region: Seismic zones in India1.6 Intensity and is isoseismal of an earthquake1.7 Magnitude and energy of earthquakehrs)(2 2. Performance of buildings under pastearthquakes3. Introduction to provisions of IS: 1893:2002 (4 hrs)4. Introduction to ductile detailing provisions of IS:13920 for Reinforcedhrs)(6ConcreteBuildings5. Introduction to IS:4326 for construction of earthquake resistant masonry buildings(6 hrs)6. Special construction methodologies, tips and precautions to be observed whileplanning, designing and construction of earthquake resistant buildings(8 hrs)hrs) Management (6 7. DisasterDisaster rescue, psychology of rescue, rescue workers, rescue plan, rescue bysteps, rescue equipment, safety in rescue operations, debris clearance andcasualty management152 INSTRUCTIONAL STRATEGYThe student may be taken for visit to various building construction sites where precautions related to earthquake resistant construction are being taken so that the students may appreciate the importance of the subject.RECOMMENDED BOOKS1. Elements of Earthquake Engineering by Jai Krishana and AR Chandersekaran;Sarita Parkashan, Meerut.2. Building Construction by BL Gupta and NL Arora, Satya Prakashan, New Delhi3. Manual Published by Earthquake Engineering department, IIT Roorkee1893-20024. IS139205. IS43266. IS1536.3 COMPUTER APPLICATIONS IN CIVIL ENGINEERING - IIL T P- - 3 RATIONALEComputers play a very vital role in present day life, more so, in all the professional life of engineering. In order to enable the students use the computers effectively in problemsolving, this course offers various engineering applications of computers in civil engineering.DETAILED CONTENTS1. Estimate and costing by the use of software Civil-Prothe project using Primaveraof2. Networkingtechniques3. Introduction and use of software like Auto Survey, Auto Read, Auto Water4. Introduction and use of software for regarding structural analysis and design ofbuildings1546.4 TENDERING AND VALUATIONL T P2 2 - RATIONALEA good percentage of diploma engineers start working as small contractors. They requirethe knowledge of contractorship and associated skills like estimating and costing, tendering and preparation of specifications for various types of jobs. Also diploma holders adopt valuers as their profession. To promote entrepreneurship amongst these engineers, knowledge and associated skills in above field becomes essential . Hence this subject is of great importance to diploma engineers.DETAILED CONTENTS1. Contractorship (8 hrs)- Meaning of contract- Qualities of a good contractor and their qualifications- Essentials of a contract- Types of contracts, their advantages, dis-advantages and suitability, system of payment- Single and two cover-bids; tender, tender forms and documents, tender notice, submission of tender and deposit of earnest money, security deposit, retentionmoney, maintenance period- Types of contracting firms/construction companies2. Preparation of Tender Document (12 hrs)- Exercises on writing specifications of different types of building works from excavation to foundations, superstructure and finishing operation- Exercises on preparing tender documents for the followinga) Earth workb) Masonry worksc) Construction of a small house as per given drawingd) RCC workse) Pointing, plastering and flooring155f) White-washing, distempering and paintingg) Wood work including polishingh) Sanitary and water supply installationsi) False ceiling, aluminium (glazed) partitioning of tile flooringj) Construction of an Industrial shed3. Preparation of tender documents for: ( 6 hrs)- Highways- Culverts- Layout of sewer lines4. Exercises on preparation of comparative statements for item rate contract(2 hrs)5. Valuation (4 hrs)a) Purpose of valuation, principles of valuationb) Definition of various terms related to valuation like depreciation, sinkingfund, salvage and scrap value, market value, fair rent, year’s purchase etc.c) Methods of valuation (i) replacement cost method (ii) rental returnmethodRECOMMENDED BOOKS1. Pasrija, HD; Arora, CL and S. Inderjit Singh, “Estimating, Costing and Valuation(Civil)”, Delhi, New Asian Publishers2. Rangwala, BS; Estimating and Costing”. Anand, Charotar Book Stall3. Kohli, D; and Kohli, RC; “A Text Book on Estimating and Costing (Civil) withDrawings”, Ambala Ramesh Publications4. Chakraborti, M; “Estimating, Costing and Specification in Civil Engineering”,Calcutta5. Dutta, BN; “Estimating and Costing6. STAAD – Research Engineers - USA1566.5 CONSTRUCTION MANAGEMENT AND ACCOUNTSL T P4 - - RATIONALEThis is an applied engineering subject. The subject aims at imparting basic knowledge about construction planning and management, site organisation, construction labour, control of work progress, inspection and quality control, accidents and safety and heavy construction equipment.DETAILED CONTENTSTHEORYCONSTRUCTION MANAGEMENT:hrs) 1. Introduction: (61.1 Significance of construction management1.2 Main objectives of construction management1.3 Functions of construction management, planning, organising, staffing,directing, controlling and coordinating, meaning of each of these withrespect to construction job.1.4 Classification of construction into light, heavy and industrial construction1.5 Stages in construction from conception to completion1.6 The construction team: owner, engineer and contractors, their functionsand inter-relationship1.7 Resources for construction industry: Men, machines, materials and money.2. Construction Planning: (8 hrs)2.1 Importance of construction planning2.2 Developing work break down structure for construction works2.3 Stages of construction planning- Pre-tender stage- Contract stage1572.4 Scheduling construction works by bar charts- Preparation of bar charts for simple construction work- Preparation of schedules for labour, materials, machinery andfinances for small works- Limitations of bar charts2.5 Scheduling by network techniques- Introduction to network techniques; PERT and CPM, differencesbetween PERT and CPM terminology- Developing CPM networks- Analysis of CPM networks, determining completion time,identifying critical activities and critical path, floats etc.3. Organization:(4 hrs)3.1 Types of organizations: Line, line and staff, functional and theircharacteristics3.2 Principles of organisation (only meaning and significance of thefollowing)- Span of control- Delegation of authority- Ultimate responsibility- Unity of command- Jobdefinition(4hrs) Organization:4. Site4.1 Factors influencing selection and design of temporary services for aconstruction4.2 Principle of storing and stacking materials at site4.3 Location of equipment4.4 Preparation of actual job layout for a building4.5 Organizing labour at site158hrs)(7Labour:5. Construction5.1 Conditions of construction workers in India, wages paid to workers5.2 Trade Unions connected with construction industry5.3 Important provisions of the following Acts:- Trade Union Act 1926 (as amended)- Labour Welfare Fund Act 1936 (as amended)- Payment of Wages Act 1936 (as amended)- Minimum Wages Act 1948 (as amended)- Workman Compensation Act 1923 (as amended)- Contract Labour (Regulation and Abolition)Act 1970 (as amended)hrs) Progress: (4of6. Control6.1 Methods of recording progress6.2 Analysis of progress6.3 Taking corrective actions keeping head office informed6.4 Cost time optimization for simple jobs - Direct and indirect cost, variationwith time, cost optimization7. Inspection and Quality Control: (6 hrs)7.1 Need for inspection and quality control7.2 Principles of inspection7.3 Major items in construction job requiring quality control7.4 Stages of inspection and quality control for- Earth work- Masonry- RCC- Sanitary and water supply services- Electrical services159hrs) 8. Accidents and Safety in Construction: (6causes–8.1 Accidents8.2 Safety measures for- Excavation work- Drilling and blasting- Hot bituminous works- Scaffolding, ladders, form work- Demolitions8.3 Safety campaignCONSTRUCTION EQUIPMENThrs) 9. Introduction:(4Construction economy: Factors affecting the selection of construction equipment,rolling resistance, effect of grade on required tractive effort, effect of altitude andtemperature on the performance of internal combustion engines, drawbar pull,rimpull, and acceleration10. Earth Moving Equipment: (7 hrs)Crawler and wheel tractors: their functions, types and specifications, gradability;bull dozers and their use, tractors pulled scrapers, their sizes and output; effect ofgrade and rolling resistance on the output of tractor pulled scrapers, earth loaders,placing and compacting earth fills.Power shovels: Functions, selection, sizes, shovel dimensions and clearances,output; Draglines: Functions, types, sizes, output; clamshells; safe liftingcapacities and working ranges of cranes; hoes, trenching machines: types andproduction ratesACCOUNTS11.ACCOUNTS: (8hrs) WORKPUBLICIntroduction, accounts, work- major, repair, administrative approval –expenditure, Technical sanction, allotment of funds, bill, contractor ledger,Running and final account bills complete, completion certificate & report, handreceipt, establishment-permanent, temporary-aquittance roll. WC, Establishment,MR labour, casual labour roll-duties and responsibility of different cadres,160 budget-stores, returns, direct material, road metal return, account of stock, misc.P.W. advances T & P – verification, survey , returns, account- expenditure & revenue head, remittance and deposit head, cash book, imprest account, temp advance, treasury challan.INSTRUCTIONAL STRATEGYThis is highly practice-based course and efforts should be made to relate process of teaching with direct experiences at work sites. Participation of students should be encouraged in imparting knowledge about this subject. To achieve this objective the students should be taken to different work sites for clear conception of particular topics, such as site organization, inspection of works at various stages of construction and working of earth moving equipmentRECOMMENDED BOOKS1. Shrinath, LS, "PERT and CPM - Principles and Applications", New Delhi, EastWest Press2. Harpal Singh, "Construction Management and Accounts", New Delhi, TataMcGraw Hill Publishing Company.3. Peurifoy, RL, "Construction Planning, Equipment and Methods" Tokyo, McGrawHill4. Wakhlo, ON; "Civil Engineering Management", New Delhi Light and LifePublishers5. Verma, Mahesh; "Construction Equipment and its Planning and Application6. Dharwadker, PP; "Management in Construction Industry", New Delhi, Oxfordand IBH Publishing Company.7. Gahlot PS; Dhir, BM; "Construction Planning and Management", Wiley EasternLimited, New Delhi8. MS Project – Microsoft USA9. Primavera1616.6 ENTREPRENEURSHIP DEVELOPMENT AND MANAGEMENTL T P3 - - RATIONALEEntrepreneurship Development and Management is one of the core competencies of technical human resource. Creating awareness regarding entrepreneurial traits, entrepreneurial support system, opportunity identification, project report preparation and understanding of legal and managerial aspects can be helpful in motivating technical/ vocational stream students to start their own small scale business/enterprise. Based on the broad competencies listed above, following detailed contents are arrived to develop the stated competencies.DETAILED CONTENTS(1) Entrepreneurship (4 hrs)1.1 Concept/Meaning1.2 Needof an entrepreneur1.3 Competencies/qualitieshrs)System (6 (2)SupportEntrepreneurial2.1 District Industry Centres (DICs)Banks2.2 Commercial2.3 State Financial Corporations2.4 Small Industries Service Institutes (SISIs), Small Industries DevelopmentBank of India (SIDBI), National Bank for Agriculture and RuralDevelopment (NABARD), National Small Industries Corporation (NSIC)and other relevant institutions/organizations at State level(3) Market Survey and Opportunity Identification (Business Planning) (6 hrs)3.1 How to start a small scale industry3.2 Procedures for registration of small scale industry3.3 List of items reserved for exclusive manufacture in small scale industry3.4 Assessment of demand and supply in potential areas of growthopportunitybusiness3.5 Understandingin product selection3.6 Considerations3.7 Data collection for setting up small ventures(6Preparationhrs) ProjectReport(4)4.1 Preliminary Project Report4.2 Techno-Economic feasibility report162Viability4.3 Project(5) Managerial Aspects of Small Business (8 hrs)5.1 Principles of Management (Definition, functions of management vizplanning, organisation, coordination and control5.2 Operational Aspects of Production5.3 Basic principles of financial managementTechniques5.4 Marketing5.5 Personnel and Inventory Management5.6 Importance of Communication in business(6) Legal Aspects of Small Business (6 hrs)6.1 Elementary knowledge of Income Tax, Sales Tax, Patent Rules, ExciseRules6.2 Factory Act and Payment of Wages Acthrs) considerations (6 Environmental(7)7.1 Concept of ecology and environment7.2 Factors contributing to Air, Water, Noise pollution7.3 Air, water and noise pollution standards and control7.4 Personal Protection Equipment (PPEs) for safety at work placeshrs) Miscellaneous (6 (8)8.1 Human and Industrial Relations8.2 Human relations and performance in organization8.3 Industrial relations and disputes8.4 Relations with subordinates, peers and superiors8.5 LabourWelfare8.6 Workers participation in managementRECOMMENDED BOOKS1. A Handbook of Entrepreneurship, Edited by BS Rathore and Dr JS Saini; AapgaPublications, Panchkula (Haryana)2. Entrepreneurship Development by CB Gupta and P Srinivasan, Sultan Chand andSons, New Delhi3. Environmental Engineering and Management by Suresh K Dhamija, SK Katariaand Sons, New Delhi1634. Sharma BR, Environmental and Pollution Awareness : Satya Prakashan , NewDelhi5. Thakur Kailash, Environmental Protection Law and policy in India: Deep andDeep Publications, New Delhi6. Handbook of Small Scale Industry by PM Bhandari7. Marketing Management by Philip Kotler, Prentice Hall of India, New Delhi8. Total Quality Management by Dr DD Sharma, Sultan Chand and Sons, NewDelhi9. Principles of Management by Philip Kotler TEE Publication1646.7ELECTIVES6.7.1REPAIR AND MAINTENANCE OF BUILDINGSL T P3 - - RATIONALEOne of the major concerns of a civil engineer is to take care of the building works, already constructed, in order to keep these buildings in utmost workable conditions. Usually it is being felt that the buildings deteriorate faster for want of care and proper maintenance. The buildings usually have a shabby appearance due to cracks, leakagefrom the roofs and sanitary/water supply fittings. Thus the need for teaching the subject isproper perspective has arisen making students aware of importance of maintenance of buildings.DETAILED CONTENTShrs) Maintenance (61. Needfor1.1 Importance and significance of repair and maintenance of buildings1.2 Meaning of maintenance1.3 Objectivesmaintenanceofrepair and maintenancetheinfluencing1.4 Factors2. Agencies Causing Deterioration (Sources, Causes, Effects) (6 hrs)2.1 Definition of deterioration/decay2.2 Factors causing deterioration, their classification2.2.1 Human factors causing deterioration2.2.2 Chemical factors causing deterioration2.2.3 Environmental conditions causing deterioration2.2.4 Miscellaneous factors2.3 Effects of various agencies of deterioration on various building materialsi.e. bricks, timber, concrete, paints, metals, plastics3. Maintenance Management (Principles, inspections, Practices) (6 hrs)3.1 Importance of maintenance management3.2 Organisational structure for maintennce1653.3 Building inspections and reports3.4 Maintenance budgets and estimates3.5 Specifications for maintenance jobshrs) 4. Investigation and Diagnosis ofDefects (6approach/procedure of investigation4.1 Systematic4.2 Objectives of investigation of building defects4.3 Sequence of detailed steps for diagnosis of building defects/problems4.4 Various tests for correct diagnosis of building defects4.5 Various tests on materials for investigatng defects4.6 List non-destructive tests on building elements and materials to evaluatethe condition of the building and study of three most commonly used testscauses (6hrs)root5. Defectsandtheir5.1 Define defects in buildingsclassification of defectsandimportance5.2 Describe5.3 Main causes of building defects5.4 List three main defects and their main causes in various building elements5.4.1 Foundations, basements and DPC5.4.2 Walls5.4.3 Column and Beams5.4.4 Roof and Terraces5.4.5 Joinery5.4.6 Decorative and protective finishes5.4.7 Services5.5 Defects caused by dampness(6hrs)andprotection6. Materials for Repair, maintenance6.1 Basic characteristics of repair materials6.2 Compatibility aspects of repair materials166typesof repair materialsvarious6.3 List6.4 State characteristics of:6.4.1 Anti corrosion coatings6.4.2 Adhesives/bonding aids6.4.3 Repair mortars6.4.4 Curing compounds6.4.5 Joints sealants6.4.6 Waterproofing systems for roofs6.4.7 Protective coatings6.5 Selection procedure of repair materials for specific job7. Remedial Measures for Building Defects (12 hrs)considerations7.1 Preventivemaintenance7.2 Precautions during repair and maintenance7.3 Surface preparation for repairmethodsrepair7.4 Crack7.4.1 Epoxy injection7.4.2 Grooving and sealing7.4.3 Stitching7.4.4 Adding reinforcement and grouting7.4.5 Flexible sealing by sealant7.5 Repair of surface defects of concrete7.5.1 Bug holes7.5.2 Form tie holes7.5.3 Honey comb and larger voids7.6 Repair of corrosion in RCC elements7.6.1 Steps in repairing7.6.2 Prevention of corrosion in reinforcement7.7 Material placement techniques with sketches7.7.1 Pneumatically applied (The gunite techniques)7.7.2 Open top placement7.7.3 Pouring from the top to repair bottom face7.7.4 Birds month7.7.5 Dry packing7.7.6 Form and pump7.7.7 Preplaced – aggregate concrete7.7.8 Trowel applied method1677.8 Repair of DPC against Rising Dampness7.8.1 Physical methods7.8.2 Electrical methods7.8.3 Chemical methods7.9 Repair of walls7.9.1 Repair of mortar joints against leakage7.9.2 Efflorescence removal7.10 Waterproofing of wet areas and roofs7.10.1 Water proofing of wet areas7.10.2 Water proofing of flat RCC roofs7.10.3 Various water proofing systems and their characteristics7.11 Repair of joints in buildings7.11.1 Sealing of joints7.11.2 Types of sealant and their characteristics7.12 Repair and maintenance of public health Services7.12.1 Low pressure7.12.2 Cisterns defects, blocked drains, damaged china ware7.12.3 Maintenance of GI Pipes7.12.4 Repair of traps7.12.5 Repair of overhead and underground water tanks INSTRUCTIONAL STRATEGYThis is very important course and efforts should be made to find damaged/defective work spots and students should be asked to think about rectifying/finding solution to the problem. Visits to work site, where repair and maintenance activities are in progress can be very useful to students.RECOMMENDED BOOKS1. Nayak, BS; "Maintenance Engineering for Civil Engineers", Khanna Publishers,Delhi2. Ransom, WH; "Building Failures - Diagnosis and Avoidance", Publishing E andF.N. Span3. Hutchinson, BD;etc, "Maintenance and Repair of Buildings", Published byNewness - Butterworth1686.7.2 ENVIRONMENTAL ENGINEERINGL T P3 - - RATIONALECivil Engineering diploma holders must have the knowledge of different types of environmental aspects due to development activities so that they may help in maintainingthe ecological balance and control pollution. They should also be aware of the environmental laws for effectively combating environmental pollution. The class room instructions should be supplemented by field visits to show the pollution caused by urbanization and the combatment measures being adopted at site. Extension lectures by experts may be encouraged.DETAILED CONTENTS1. Environment and Ecology (4 hrs)Definition and understanding of environment and ecology concept, ecosystem andtypes of ecosystems, energy flow in an ecosystem, food chain, ecologicalpyramids, consortium and ecological balance, important biogeo chemical andmaterial cycles, (water, carbon, sulphur, oxygen and nitrogen etc)2. Protection of Environment (2 hrs)Importance of clean environment, control of environmental pollution with respectto air, land and water. Conservation of natural resources, environmentaleducation and awareness3. Water Pollution (8 hrs)Causes of pollution in surface and underground water; BIS standards for waterquality, preventive measures to control water pollution, harmful effects ofdomestic wastes and industrial effluent, BIS standards for waste water disposal,measures to combat pollution due to waste water, eutrophication of lakesPollution (6hrs) 4. AirDefinition, principal air pollutants, atmospheric parameters influencing airpollution, types of air contaminants and their sources, effects of air pollution onhuman beings, plants, animals and economic effects, automobile pollution, BISambient air quality standards and measures to combat air pollution。
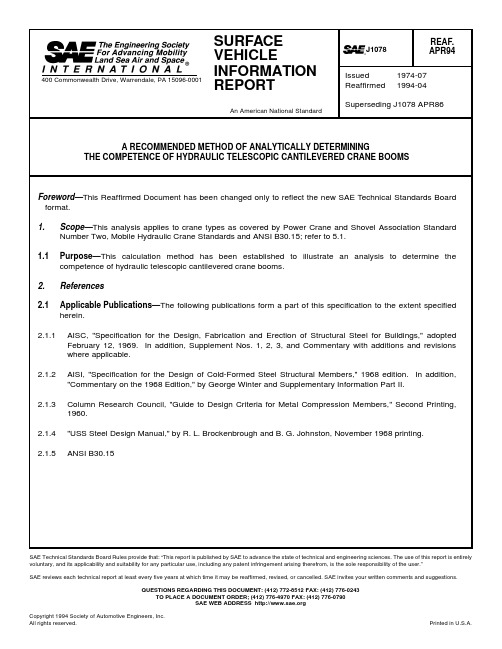
SAE Technical Standards Board Rules provide that: “This report is published by SAE to advance the state of technical and engineering sciences. The use of this report is entirely voluntary, and its applicability and suitability for any particular use, including any patent infringement arising therefrom, is the sole responsibility of the user.”SAE reviews each technical report at least every five years at which time it may be reaffirmed, revised, or cancelled. SAE invites your written comments and suggestions.QUESTIONS REGARDING THIS DOCUMENT: (412) 772-8512 FAX: (412) 776-0243TO PLACE A DOCUMENT ORDER; (412) 776-4970 FAX: (412) 776-0790SAE WEB ADDRESS 2.1.6N OMENCLATUREa =Clear distance between transverse stiffeners on side plate; also the ratio of the material yield of the webto the material yield of the compression flangeA =Actual area of sectionA e =Total effective area of section used in calculating F a (refer to Appendix E for illustration)A f =Area of compression flangeA i =Area based on inside dimensions of section (refer to Appendix E for illustration)A m =Area based on mean dimensions of section (refer to Appendix E for illustration)A o =Area based on outside dimensions of section (refer to Appendix E for illustrationA st =Cross-sectional area of stiffener or pair of stiffenersA w =Area of both websb =Actual width of stiffened and unstiffened compression elements whether flange or web (refer toAppendix F for illustration)b e =Effective width of stiffened compression element (refer to Appendix E for illustration)b f =Actual flange width (refer to Appendix E for illustration)b m =Mean width of section or b w - t w (refer to Appendix E for illustration)b w =Overall width of section (refer to Appendix E for illustration)C t =Distance from neutral axis to extreme tension fiber of box section (refer to Appendix E for illustration)C c =Distance from neutral axis to compressive fiber of box section (refer to Appendix E for illustration)C b =Bending coefficient dependent upon moment gradient; equal to (see Equation 1)(Eq. 1)but not more than 1.3 (refer to Appendix C for illustration)C c =Column slenderness ratio dividing elastic and inelastic buckling equal to (see Equation 2)(Eq. 2)C'c =Effective column slenderness ratio dividing elastic and inelastic buckling equal to (see Equation 3)(Eq. 3)C m =Coefficient applied to bending term in the interaction formula and dependent upon column curvaturecaused by applied moments; use 0.85C mx =0.85C my =0.85C v =Ratio of "critical" web stress, according to linear buckling theory, to the shear yield stress of webmateriald =Overall depth of section (refer to Appendix E for illustration)D =Factor depending upon type of transverse stiffenersE =Modulus of elasticity 29 500 ksif =Computed axial and bending compression stress on appropriate flange or webf a =Computed axial stress based on total section areaf b =Computed bending stress about the appropriate axisf c =Sum of the computed axial and side bending compressive stressesf bx =Computed bending stress about the x-x axisf by =Computed bending stress about the y-y axisf s =Sum of the computed torsional and vertical shear stressf v =Computed average web or flange shear stressf vs =Total shear transfer of stiffener(s), kips per inch of lengthF a =Allowable axial stress permitted in the absence of a bending momentF b =Allowable bending stress for the appropriate axisF bx =Allowable bending stress about the x-x axis if this bending moment alone existed1.75 1.05M xmin M xmax ---------------- 0.3M xmin M xmax ----------------2++π2E F y σrc –()⁄π2E Q s Q a F y σre –()----------------------------------------F'bx =Allowable bending stress in compression flange of box sections as reduced for hybrid sections orbecause of large web depth-to-thickness ratioF by =Allowable bending stress about the y-y axis if this bending moment alone existedF'e =Euler stress divided by factor of safety; equal to (see Equation 4)(Eq. 4)F'ex =Same as F'e about the x-x axisF'ey =Same as F'e about the y-y axisF v =Allowable web shear stressF y =Specified minimum yield stress of material being used, based on "yield stress" or yield strength,whichever is applicableg =Wind load, lb/in 2, g = 0.004 (mph)2/144G =Shear modulus of elasticity 11 300 ksih =Clear distance between flanges (refer to Appendix E for illustration)h m =Mean height of section d − (t c + t t )/2 (refer to Appendix E for illustrationh v =Vertical height of horizontal stiffenerH o =Height to boom foot pin from groundH p =Height to center of pressure on boomH r =Reference height at which wind velocity is measured (20 ft in U.S.)I x =Area moment of inertia about the x-x axisI y =Area moment of inertia about the y-y axisI st =Moment of inertia of a pair of intermediate stiffeners, or a single intermediate stiffener, with reference toan axis in the plane of the webI xe =Effective moment of inertia about the x-x axisI ye =Effective moment of inertia about the y-y axisJ =Torsional constant; equal to (refer to Appendix D for other equations) (see Equation 5)(Eq. 5)k =Coefficient relating linear buckling strength of a plate to its dimensions and conditions of edge supportK =Effective length factor, for cantilevered section use the value 2 unless a smaller one can be justifiedK t =Torsional length factor for cantilevered sections, use the value 4/3I =Dimensional lengths of boomL =Distance from tip to section in questionL b =Actual unbraced length of section in the plane of bendingM =Bending moment about the appropriate axisM 1 =Constant moment load about the x-x axis resulting from eccentric loading on the headM 2 =Constant moment load about the y-y axis resulting from the side loading on the headM xmin =Smaller moment at end of unbraced length of beam-column at tipM xmax =Larger moment at end of unbraced length of beam-column at section in questionM x =Bending moment about the x-x axisM y =Bending moment about the y-y axisN =Number of parts of linep =Wind velocity exponentP =Externally applied load at the tipP a =Axial load applied to sectionP x =Lateral loading component (side load)P y =Vertical loading componentP z =Axial loading componentQ a =Ratio of effective profile area of an axially loaded member to its total profile area of A e /A12π2E 23Kl r ⁄()2-------------------------4b m ()2h m ()22h m t w ----------b m t c ------b m t t ------++--------------------------------------Q s =Axial stress reduction factor for unstiffened elements of a section; refer to Appendix Fr =Radius of gyration for appropriate axisr b =Radius of gyration about the axis of concurrent bending, computed on the basis of actual cross-sectional areaR =Load radius from centerline of rotation to centerline of loadR h =Hoist cylinder reactionR x =Reaction loads in the lateral directionR y =Reaction loads in the vertical directionR z =Reaction loads in the axial directionS x =Strong axis section modulus with c taken to the compressive sideS y =Weak axis section modulus with c taken to the compressive sideS xe =Effective strong axis section modulus with c taken to the compressive sideS ye =Effective weak axis section modulus with c taken to the compressive sidet =Thickness of flange or web in compression (refer to Appendix E for illustration)t c =Thickness of compression flange (refer to Appendix E for illustration)t t =Thickness of tension flange (refer to Appendix E for illustration)t w =Thickness of web (refer to Appendix E for illustration)T =Torsional momentV p =Wind velocity (mph) at center of pressure height H pV r =Wind velocity (mph) at reference height H rV x =Statical shear load on section in the lateral directionV y =Statical shear load on section in the vertical directionw =Component weight, lb/inW =Total component weightx =Subscript relating symbol to strong axis bendingY =Ratio of yield stress of web steel to that of yield stress of stiffener steely =Subscript relating symbol to weak axis bendingz =Subscript relating symbol to axial loadingα =Boom centerline elevation angle relative to a horizontal plane, or the ratio of web yield stress to flange yield stressθ =Angle between a line perpendicular to the boom axis and the hoist cylinder axisσrc =Residual compressive stress, equal to 0.5 F y in lieu of specific information on steel usedu =Poisson's ratio—equal to 0.33.Criteria—Calculations shall include the dead weight loads, rated load and a minimum side load of 2% of therated load at the rated load radius. The side load provides for "normal" conditions of machine operation. In addition, the effect of the wind on the boom should be considered, as is provided for in the calculations.3.1The factors of safety used herein are the recommended factors of the AISC "Specification for the Design,Fabrication and Erection of Structural Steel for Buildings," adopted February 12, 1969.3.2The boom shall be deemed competent when the solution of the interaction equations provided herein yield avalue equal to or less than one (1.0).4.Loads and Forces4.1The 2% side load provides for "normal" conditions of boom motion. No allowances have been made fordynamic loads, duty cycle operation, effects of the wind on the load lifted or operations other than lifting crane service.4.2All forces and loads are expressed in pounds. Dimensions are in inches. Stresses both allowable andcalculated are in units of ksi. Also, the modulus of elasticity is expressed in units of ksi.5.Analytical Determination of Stresses and Critical Loads5.1Applicability—This analysis is applicable to multisectioned "box" type booms, which are totally enclosed andcantilevered beyond the base section.5.2Basis for Analysis—The equations presented in this analysis are based on laterally unsupported beamcolumn formulas, the solution of which are combined in interaction equations. In determining the section properties, the effective width of the plates in compression are used. The areas covered in this analysis consist of axial and torsional loading, bidirectional bending, and panel buckling. Of primary importance in the analysis are the compressive stress calculations.The work of this committee is not intended to cover all design concepts, but rather a basic system. However, other design configurations may use alternative calculation methods when substantiated with suitable test data.5.3Summary—Where strain gage results are available they should be used to supplement the analytical data.6.Load Moment Diagrams and Equations6.1Assumptions Used on Load Moment Equations6.1.1Wind force is negligible on head (should include effects if jib used).6.1.2Torque is created by the side load P on the head (would also be applicable for a jib).6.1.3Equations are still applicable if jib used but dimensions, weights, and center of gravity to be adjustedaccordingly.6.1.4P y = P cos α; P z = P sin α6.1.5Winch rope fleet angle and angle relative to boom is negligible.6.1.6Wind force is uniformly distributed along the exposed length of the side of the section with its reaction at thecenter (is a valid assumption since each section considered individually).6.1.7That the dimensions are to the reaction points and that the tips of each section beyond these points are smallin length and will not affect the validity of the equations.6.1.8That the axial stresses produced by the friction forces due to the section reaction ponts from one to the nextare small in comparison to the other stresses, that the section support cylinders carry the axial loads.6.1.9That equations and formulations appearing in the foregoing analysis are for the boom in the extendedposition —Figure 1, Figure 2, Figure 3, Figure 4, Figure 5, Figure 6, Figure 7. Partially retracted positions will require reformulation of some equations; as an example in Figure 4 when I11 is zero or negative the cylinder no longer takes the axial load at the section being considered. The moment equations would then appear as those written for reference Figure 3. Similar changes would appear in the axial load, reactions, and shear force equations.FIGURE 1—LOADING DIAGRAM—BOOM ASSEMBL YFIGURE 2—LOAD MOMENT DIAGRAM—HEAD SECTIONFIGURE 3—LOAD MOMENT DIAGRAM—TIP SECTIONFIGURE 4—LOAD MOMENT DIAGRAM—ALTERNA TE TIP SECTIONFIGURE 5—LOAD MOMENT DIAGRAM—INTERMEDIATE SECTIONFIGURE 6—LOAD MOMENT DIAGRAM—INTERMEDIATE SECTIONFIGURE 7—LOAD MOMENT DIAGRAM—BASE SECTION6.2Refer Figure 2—Load Moment Equations—Reaction of Head Forces on Tip Section (see Equations 6, 7,8, and 9)M OMENT (Equation 6)(Eq. 6)A XIAL L OAD (Equation 7)(Eq. 7)S HEAR L OADS (Equation 8)(Eq. 8)S IDE L OAD (Equation 9)(Eq. 9)M 1P y 11P z 12P N14W 1+⁄15α16αsin +cos []M 2P x 11T P x 12==–+=R Z1P N P Z +⁄W 1αsin +=V x R x1P x V y R y1W 1αP y+cos =–==–=P x 0.02P =6.3Refer Figure 3—Load Moment Equations for Tip Section at Section Z1 - Z1 (see Equations 10, 11, 12, 13,14, 15, and 16)M OMENTS (Equation 10)(Eq. 10)A XIAL L OAD ON P IN (Equation 11)(Eq. 11)A XIAL L OAD ON S ECTION (Equation 12)(Eq. 12)V ERTICAL R EACTIONS (Equation 13)(Eq. 13)L ATERAL R EACTIONS (Equation 14)(Eq. 14)V ERTICAL S HEAR F ORCES (Equation 15)(Eq. 15)L ATERAL S HEAR F ORCES (Equation 16)(Eq. 16)NOTE—Subscripts r and L refer to right and left of Section Z 1 - Z 16.4Refer Figure 4—Load Moment Equations for Alternate Tip Section at Section Z 1 - Z 1 (see Equation 17,Equation 18, Equation 19, Equation 20, Equation 21, Equation 22, Equation 23)M x M 1R y1170.5W 2α172cos 1718+----------------------------------------M y M 2R x1170.5gd 1172T P x 12=++=++=P z2P z1W 2αsin +=P ar R z1W 2α171718+-----------------; P aL W 2α181718+------------------sin =sin +=R y3M x 18------0.5W 2α181718+-----------------; R y2R y1R y3W 2αcos ++=cos –=R x3M y 18------; R x2R x1R x3gd 117++==V yr R y1W 2α171718+-----------------; V yL R y3W 2α181718+------------------cos +=cos +=V xr R x1gd 117; V xL R x3=+=M OMENTS (Equation 17)(Eq. 17)A XIAL L OAD ON C YLINDER S UPPORT (Equation 18)(Eq. 18)A XIAL L OAD ON S ECTION (Equation 19)(Eq. 19)V ERTICAL R EACTIONS (Equation 20)(Eq. 20)L ATERAL R EACTIONS (Equation 21)(Eq. 21)V ERTICAL S HEAR F ORCES (Equation 22)(Eq. 22)L ATERAL S HEAR F ORCES (Equation 23)(Eq. 23)NOTE—Subscripts r and L refer to right and left of Section Z1 - Z16.5Refer Figure 5—Load Moment Equations for Intermediate Section at Section Z 2 - Z 2 (see Equation 24,Equation 25, Equation 26, Equation 27, Equation 28, Equation 29, Equation 30)M OMENTS (Equation 24)(Eq. 24)M x M 1R y1170.5W 2α1721718+------------------cos W 3α111R x2110M y M 2R x1170.5gd 117++2T P x 12==+−cos +++=R z2R z1W 2αsin +=P ar P aL W 2181718+-----------------αsin ==R y3M x18------0.5W 2α181718+-----------------; R y2R y1R y3W 2αW 3αcos +cos ++=cos –=R x3M y18------; R x2R x1R x3gd 117++==V yr R y1W 2α171718+-----------------W 3α; V yL R y3W 2α181718+------------------cos +=cos +cos +=V xr R x1gd 117; V xL R x3=+=M x R y2112R y3117W 6α116cos 0.5W 5α1122112113+----------------------W 5α119P x3119118–()M y R x2112R x3117–0.5gd 21122T P x 12=+=+−sin +−cos ++–=A XIAL L OAD ON C YLINDER S UPPORTS (Equation 25)(Eq. 25)A XIAL L OAD ON S ECTION (Equation 26)(Eq. 26)V ERTICAL R EACTIONS (Equation 27)(Eq. 27)L ATERAL R EACTIONS (Equation 28)(Eq. 28)V ERTICAL S HEAR F ORCES (Equation 29)(Eq. 29)L ATERAL S HEAR F ORCES (Equation 30)(Eq. 30)NOTE—Subscripts r and L refer to the right and left of Section Z 2 - Z 26.6Refer Figure 6—Load Moment Equations for Intermediate Section at Section Z 3 - Z 3 (see Equation 31,Equation 32, Equation 33, Equation 34, Equation 35, Equation 36, Equation 37)M OMENTS (Equation 31)(Eq. 31)A XIAL L OAD ON C YLINDER S UPPORTS (Equation 32)(Eq. 32)A XIAL L OAD ON S ECTION (Equation 33)(Eq. 33)R z3R z2W 3W 4+()α; R z4R z3W 5αsin +=sin +=P ar P aL R z3W 5α113112113+-----------------------sin +==R y5M x113-------W 4α114113--------cos 0.5W 5α; R y4R y2R y3–R y5αW 4W 5W 6++()cos ++=cos ––=R x5M y113-------; R x4R x2R x3–R x5gd 2112++==V yr R y2R y3W y αW 5α112112113+-----------------------V yL R y5W 4αW 5α113112113+-----------------------cos +cos +=cos +cos +–=V xr R x2R x3gd 2112; V xL R x5=+–=M x R y4120R y5125W 9α1240.5W 8α1202120121+----------------------W 8α127R z5127126)M y R x4120R x5125–0.5gd 31202T P x 12=+=–(+−sin +−cos +cos +–=R z5R z4W 6W 7+()α; R z6R z5W 8αsin +=sin +=P ar P aL P z5W 8α121120121+-----------------------sin +==V ERTICAL R EACTIONS (Equation 34)(Eq. 34)L ATERAL R EACTIONS (Equation 35)(Eq. 35)V ERTICAL S HEAR F ORCES (Equation 36)(Eq. 36)L ATERAL S HEAR F ORCES (Equation 37)(Eq. 37)NOTE—Subscripts r and L refer to right and left of Section Z 3 - Z 36.7Refer Figure 7—Load Moment Equations—Base Section at Section Z 4 - Z 4 (see Equation 38, Equation 39,Equation 40, Equation 41, Equation 42, Equation 43, Equation 44, Equation 45, Equation 46)M OMENTS (Equation 38)(Eq. 38)A XIAL L OAD ON C YLINDER S UPPORT (Equation 39)(Eq. 39)A XIAL L OAD ON S ECTION (Equation 40)(Eq. 40)V ERTICAL S HEAR F ORCE (Equation 41)(Eq. 41)R y7M x 121W 7–----------------------α122121-------0.5W 8α121120121+-----------------------R y6R y4R y5–R y7αW 7W 8W 9++()cos ++=cos –cos =R x7M y121-------; R x6R x4R x5–R x7gd 3120++==V yr R y4R y5–W 9αW 8α120120121+-----------------------V yL R y7W 7αW 8α121120121+-----------------------cos +cos +=cos +cos +=V xr R x4R x5gd 3120; V xL R x7=+–=M x R y6128R y71330.5w 12α1282128129+-----------------------M y R x6128R x7133–0.5gd 41282T P x 12=+=cos +–=R z7R z6W 9W 10+()αsin +=P ar P aL W 12α128128129+-----------------------sin ==V yr R y6R y7–W 12α128128129+-----------------------V yL R y8r R y8L W 10W 11+()αW 12α128128129+-----------------------cos +cos ++=cos +=L ATERAL S HEAR F ORCE (Equation 42)(Eq. 42)H OIST C YLINDER R EACTIONS (Equation 43)(Eq. 43)P IVOT P IN L OADINGL ATERAL R EACTION (Equation 44)(Eq. 44)A XIAL R EACTIONS (Equation 45)(Eq. 45)V xr R x6R x7–gd 4128; V xL R x8gd 4129–=+=R h R y6128129+()R y7129133+()–W 10132αW 11131αcos 136αsin –()W 12130αcos 136αsin –()R –z7136135–()++cos +[]129136134–an θcot ----------------------–⁄θcos =R x8R x6R x7gd 4128129+()+–=R z8r R h θsin 2------------------R x6128129+137----------------------R x7129133+137----------------------- –R z7W 11W 12+()αsin –2-------------------------------------------------------------–0.5gd 4128129+()2137-------------------------------------------------R z8L R h θsin 2------------------R x6128129+137-----------------------–R x7129133+137----------------------- R z7W 11W 12+()αsin –2-------------------------------------------------------------–0.5gd 4128129+()2137-------------------------------------------------–+=++=V ERTICAL R EACTIONS (Equation 46)(Eq. 46)NOTE—Subscripts r and L refer to right and left of Section Z 4 - Z 47.Calculation Procedure 7.1Step 1—Preliminary Dataa.Provide description of geometry and loading, such as boom length, working radius, boom angle, ratedload, etc.b.Identify boom arrangement.1.Generate shear and moment diagrams.2.Solve for forces and moments from Section3.c.Identify boom section for analysis.1.Determine material properties.2.Determine section properties.7.2Step 2—Calculation of Section Properties, Based on Compressive Stresses, the Actual Stress, and the Allowable Stress7.2.1T O D ETERMINE S ECTION P ROPERTIESa.Determine if plates in compression are fully effective at yield.1.For vertical bending loads compute the b/t ratio for the compressive flange.2.For side bending loads compute the b/t ratio for the compressive web.3.For axial loads compute the b/t ratio for both webs and both flanges. If b/t ≤ 184/√f, where f = 0.6F y ,then the entire section will be fully effective at yield. The properties can then be computed based on the actual section. Proceed to 7.2.2 for the allowable stress computations. If b/t > 184/√f, for any or all plates, the section may still be fully effective for the actual stress. AISC (1.9.2.2)b.Determine if plates in compression are fully effective at the actual pute actual stresses based on full section properties.1.1 For compression flange, f = f a + f bx 1.2 For compression web, f = f a + f bx 1.3 For axial (all plates), f = f aUse this calculated stress for f and recompute the b/t ratios.R y8r 0.5R h θcos R y7R y6–W 10W 11W 12++()αcos –+[]P x 12136–137--------------------–gd 4128129+()136137--------R y8L 0.5R h θR y7R y6–W 10W 11W 12++()αcos –+cos []+P x 12136–137--------------------–gd 4128129+()136137--------=+=NOTE—For the axial case the effective widths will be different. Refer to Appendix E.If b/t ≤ 184/√f, for all plates, the entire section is fully effective at a stress level 1.67 times the actual stress. Proceed to 7.2.2 for the allowable stress computations. If b/t > 184/√f, for any one or all plates,the section is not fully effective for stress level f and an effective width calculation must be made for each plate that exceeds this ratio.c.Determine effective width of plates that have b/t ratio greater than 184/√f.1.Calculate the effective width of plates which are not fully effective accordingly:where:f is the actual stress computed from 7.2.1.B.1.1, 7.2.1.B.1.2, and 7.2.1.B.1.3 from the previousparagraph2.Calculate new section properties A e , S xe , and S ye based on the effective widths b e .NOTE—The effective widths be used in computing A e do not require an iterative solution because the stressf a is based on the actual area A.3.Recompute new stress levels based on new properties.4.Recompute new effective widths based on new stress levels.5.Continue until stress level stabilizes—approximately three iterations. Proceed to 7.2.2 for theallowable stress computations.7.2.2T O D ETERMINE A LLOWABLE S TRESSES a.Allowable axial stress F aNOTE—If the stress is a tensile value, then F a = 0.6F y , proceed to 7.2.2B.1.Factor Q awhere:A e equals the effective area of all stiffined elements, both flanges and webs, corresponding to the actual stressIf all plates are fully effective Q a = 1.2.Factor Q s ; see Appendix F to determine if this computation must be made. Applies to outstandingplates free on one edge.3.where:Q s Q a ≤ 1.0b c 253t f -----------150.3b t ⁄()f -------------------– AISC (C3-1)=Q a effective area A e ()actual area A ()------------------------------------------------- AISC (C4)=C c π2EQ s Q a F y σrc –()--------------------------------------- AISC (C5)=pute (KL/r) of both axis and use the largest KL/r value for the F a calculation5.If (KL/r) < C'c —inelastic range6.If (KL/r) ≥ C'c —elastic rangeNOTE—L as used previously is the distance from the outer end of the section in question to the point wherethe stresses are to be calculated in that section.b.Allowable compressive bending stresses F b for x and y directions considering lateral torsional buckling.1.Inelastic lateral buckling checkwhere:K t = 4/3L = distance from tip to section in questionCRC p. 101M xmin = the moment at the tipM xmax = the moment at the section in question at LNOTE—Clockwise moments are positive. Counterclockwise moments are negative. Refer to Appendix C forfurther discussion.r I A---=F a Q s Q a 1σrc KL r ⁄()2F y C c ()2-----------------------------–F y 5338KL r ⁄C c ------------- 18KL r ⁄C c -------------3⁄–⁄+⁄-------------------------------------------------------------------------------------- AISC (C5-1)=F a 12π2E23KL r ⁄()2--------------------------- AISC (1.5-2)=KL r ⁄() equiv. 5.1K t LS xJI y------------------------C b ⁄ CRC(4.7)=C b 1.75 1.05M xmin M xmax ---------------- 0.3M xmin M xmax ----------------2 ; 1.0C b 1.3≤≤++=pute first check on allowable compressive stresses.2.1F bx = 0.6F y F by = 0.6F y2.2 F by = 0.6F y2.3 F bx = 170 000/(KL/r)2 equiv. AISC (1.5-6b)F by = 0.6FyIf there are unstiffined elements on the section that result in a value for Q s less than 1, then F b shall be the smaller value 0.6F y Q s or that provided by 7.2.2.B.2.1, 7.2.2.B.2.2, and 7.2.2.B.2.3 multiplied by Q s ,whichever is applicable.c.Determine if a further reduction in F bx is required 1.If web (h/t) > 760/√F bx , then:If web (h/t) > 760 √5.4 / √F bx and horizontal stiffeners are used and placed at 0.4 the distancebetween the compression flange and the neutral axis as measured from the compression flange (refer to Appendix G) then:2.And if the section is a hybrid, F bx in either flange shall not exceed the previous orwhere:a = F y of web/F y of flangeIf (KL/r) equiv. 102 000F y ---------------------≤If 102 000F y ---------------------KL r ------- equiv. 51 000F y-----------------F bx F y 23-- 5.1K t LS x F y 1 530 000 C b JI y -----------------------------------------------–0.6F y AISC(1.5-6a)≤=≤<If KL r ------- equiv 510 000F y--------------------->F bx F bx 1.00.0005A w A f ------h t --760F bx------------–– AISC (1.10-5)=F bx F bx 1.00.0005A w A f ------h t --760 5.4F bx ----------------------––=F bx F bx 12A w A f ⁄()3a a 3–()+122A w A f ⁄+----------------------------------------------------------AISC (1.10-6)=7.3Step 3—Solution to the Interaction Equation(s) for the Compressive StressesNOTE—The actual stresses f bx and f by are based on the effective section properties, if applicable, S xe and S ye .The axial stress f a is based on the total area (A) of the section. Also, the f a term may be positive for some sections. Refer to 7.2.2A.1.If f a /F a ≤ 0.15, then compute2.If f a /f a > 0.15, then compute both 2.1 and 2.22.1 2.2where:C mx = C my = 0.85 Do for both x and y axes using their corresponding r b .7.4Step 4—Calculation of the Actual and Allowable Shear Stress in the Webs 7.4.1I. T O D ETERMINE T HE A CTUAL S TRESSES —where:bt = the area of one webAm = the area based on the mean dimensions of the section. Refer to Appendix E.7.4.2II. T O D ETERMINE T HE A LLOWABLE S HEAR S TRESS F V a.No stiffeners on the web plates if 1.h/t < 260 and/orf a F a -----f bx F bx --------f byF by-------- 1.0 AISC (1.6-2)≤++f a0.6F y --------------f bx F bx --------f by F by-------- 1.0 AISC (1.6-1b)≤++f aF a -----C mx f bx 1f a F ex --------–F bx --------------------------------C my f by 1f a F ey --------– F by -------------------------------- 1.0 AISC (1.6-1a)≤++F e 12π2E23KL br b ---------2-------------------------=f a V y 2bt ⁄T 2A mt⁄+=h t 14 000F y F y 16.5+()--------------------------------------- AISC (1.10.2)≤⁄。
第三部分:外文翻译结构设计背景Background for Structural Design1. Practice versus TheoryWe hear much of the conflict between theory and practice. Actually, of course, there will be no conflict between good theory and good practice, although the two frequently seem at cross-purposes, particularly when both are bad. Bad theory develops from unjustifiably crude assumptions, while bad practice follows unjustifiably crude methods. When theory can be based upon correct premises and practice can be controlled by one who understands the theory involved, the two will agree. Nevertheless, there are certain considerations of practice that must be allowed to control design, particularly to facilitate construction. A few of the many problems that should influence the thinking of the designer and of the construction engineer will be discussed.2. Analytical CalculationsSince analysis precedes design, it will be useful to think over the process of analysis from the point of view of the practical designer. Analysis, to serve a useful purpose, must finally reach expression in terms of tons of steel, cubic yards of concrete, and board feet of structural timber. It is useless for the analyst or the designer to expect the construction engineer to worry about increasing the unit stress in a steel beam by a few hundred pounds per square inch above the allowable stress by the shifting of a partition. The field man knows that there are decisions he will have to make during erection that may influence the stress to a greater extent than the amount mentioned. For the same reason, he is not likely to be sympathetic when the blueprint carries a statement that a field connection is to be welded at a distance of 5 j ^ in. from a sheared edge.The accuracy of field work is seldom greater than a tolerance of in. and a sheared edge is far from a planed edge at best. The designer will cultivate the respect of the field man by avoiding such inconsistencies.With these considerations in mind, we may conclude that there is little reason for a designer to use log tables in making his usual calculations. A slide rule will provide all requisite accuracy; also, such calculations will actually command greater confidence. However, this does not justify the substitution of crude guesses for accurate analysis or for careful design calculations.Theory of ElasticityThere is no tool that has proved of greater value to the designer than the theory of elasticity. On the other hand, it is worth remembering that the significance of the word elasticity automatically rules out the effect of plastic flow or "yield". Hence, the distribution of stresses presented by this theory is the picture that would apply before any single particle had passed the yield point. As soon as any part of the structure begins to yield, the distribution of stress will change. Generally speaking, we find that plastic yielding tends to equalize stresses by a redistribution of moments, shears, and fiber stresses. The accomplished designer will be able to interpret and use the results of mathematical studies based upon the theory of elasticity, but he will not fail to readjust his ideas of structural action to allow for the influence of yielding beyond the elastic limit.3. DuctilityThis property has been mentioned as one which helps to reduce stress concentrations. For instance, according to the theory of elasticity, a small hole in a simple tension member will produce a stress concentration of three times the average unit stress in the member. Photo-elastically it hasbeen possible to measure stress concentrations around a hole of more than twice the average stress in the member. It is therefore surprising that rivet holes do not seem to reduce the ultimate static strength of a tension member (steel) by more than the influence of the reduction of effective area. The explanation must be that the steel around the rivet hole flows and thus permits a redistribution of stress so that the maximum unit stress at fracture is little greater than the average unit stress. There are innumerable similar conditions to be evaluated in structural design. All "stress raisers", such as notches, holes, threads, and cross-sectional changes, are best eliminated, but, if they are unavoidable, some reduction of their objectionable features will tie obtained from ductility.4. Cleavage or Brittle FractureA type of fracture not seen very frequently in buildings and bridges is a brittle running crack without visible yielding or plastic flow of the adjacent material. Many ships, tanks, and other steel plate structures, particularly when welded, have been destroyed by brittle fracture. When test coupons are cut from material adjacent to a brittle crack and pulled in uniaxial tension in a testing machine at room temperature, the material will usually stretch 20 percent or more in length before fracturing. Coupons removed from a weld adjacent to a brittle fracturing are likely to show even greater ductility than die parent metal. Hence, we can hardly blame either the weld or the plate itself for permitting the crack to progress catastrophically after its initiation. By checking the point of initiation, one invariably finds a stress concentration, such as a corner, a hole, or an arc strike in welding, but such concentrations of stress exist in other structures where brittle fracture does not occur.Lengthy investigations have isolated several factors that tend to produce a catastrophic brittle fracture if a small crack is initiated by a pointof high stress concentration. One significant embrittling factor is low temperature. Steels usually become brittle at a temperature well below zero degrees Fahrenheit. It is significant, however, that any temperature well below freezing will embrittle certain structural steels. The temperature below which given steel loses a significant fraction of its ductility or energy absorption before fracture, as measured by the Charpy test, is called its "transition temperature". We have learned that steels which have a transition temperature above the temperature of exposure in service are inherently subject to brittle fractured. The author observed a beam, attached to a wall column that fractured without visible ductile deformation when the wall was opened in winter for repair. The beam had served for thirty years while protected from winter temperatures by the heat of the building. Doubtless its transition temperature was above the temperature of the exposure.A second embrittling factor is triaxiality of tensile stresses. Theoretically a cube of any ductile material will lose all of its ductility and will fracture by pure cleavage if it is subjected to equal tensions of sufficient magnitude in any three perpendicular directions. Such perfection of triaxial tension is not likely to occur in a structure, but unequal tensions in three perpendicular directions are not uncommon. Any plate may be subject to biaxial tension; biaxial stress; in fact, is the usual reason for its existence. Then, as the author has shown, a third tension stress perpendicular to the plate at its mid-depth will develop from Poisson's ratio at the exact end of any tiny crack in the plate. Hence, at the end of any tiny crack-like imperfection in a plate or weld a condition of triaxial tension occurs that without doubt is an embrittling factor along with low temperature. If the imperfection develops into a visible crack, the triaxiality of tension continues to redevelop right at the end of theextending crack and thus encourages it to progress as a britde running fracture.A third embritting factor is any hidden stress that tends to build up the general tensile stress field since brittle fracture naturally does not occur under low stresses. Such hidden stresses are those due to changes in temperature of one part of a structure without equal temperature change for other integral parts, and also the residual stresses due to rolling, cooling, straightening, or forced fit during erection.A fourth embritting factor has been established by tests of prestrained material. It has been found by Mylonas and Drucker that a compressive prestrain of two or three percent across a notch followed by a relatively low tension in the same direction (less than one half of the yield tension) reduces residual ductility and may produce a brittle fracture.The four embrittling factors mentioned above are low temperature, triaxiality of tension, hidden stress fields that raise the anticipated level of stress, and loss of ductility due to prestraining in compression. Stress concentrations may be involved in the latter three factors. Each of these factors exists in some degree in every structure. In large plate structures, such as ships and tanks, the factors of embrittlement tend to combine to a dangerous degree. The designer needs to be aware of their inherent danger so that he may reduce by good design the possibility that such factors may combine to initiate a catastrophic fracture.5. The Factor of SafetySome writers have considered the factor of safety to be based upon ultimate strength, while others feel that the ratio of the elastic limit to the working stress is in reality the factor of safety. The latter point of view is certainly the more significant, but neither presents a correct picture. Theengineer is always willing to let the actual stress approach nearly the elastic limit. The range between the working stress and the elastic limit is mainly an allowance to cover unknown or partially unknown stresses.(1).Fabrication and Erection StressesIt is no secret that structural steel is handled rather roughly in the shop and in the field. Rivet holes seldom line up perfectly; hence they must be pulled into line. Welding warps and buckles the structure and leaves high residual stresses. During fabrication, bent shapes are straightened as a standard part of the fabrication process, and, of course, the elastic limit must be passed to accomplish this. The mere punching of a hole distorts the surrounding material and leaves high residual stresses. The writer is convinced that these processes will result in a structure having stresses, under the design loading, that reach the elastic limit over small areas. Such a structure would be highly unsafe if it were not constructed of a ductile material such as structural steel.(2).Knowledge of LoadsOne of the undeterminable factors in design may be the loading itself. Dead load can be estimated quite accurately, but live loading, wind, and impact, as well as traction, sway, and other inertia forces are extremely variable. Then there is the influence of temperature and the action of settling supports that often damage an otherwise well-designed structure. The engineering designer makes a sincere effort to evaluate the probable loads, but even his best judgment is unable to cope with the situation in all cases. One purpose, then, of the factor of safety is to provide some reasonable allowance for possible increased loading.(3).Knowledge of MaterialsMost design is based upon specifications that assume certain properties for the structural materials. The common specified minimum elastic limit for structural steel of one type is 33,000 lb/in2. This lower limit is controlled by mill tests. A batch of steel rolled into structural shapes has a number of coupons cut from it for testing. If we make thousands of such tests for a single batch of steel, a few will turn up that show a yield point considerably below 33,000 lb/in2. However, the chance is small that a limited number of mill tests will happen to locate the small amount of weak material. One who understands the theory of sampling is not surprised that constant strength of a product such as structural steel is not even approached. Many factors must be controlled in producing steel, each factor being permitted to vary within a limited range. These factors therefore combine to produce a variable product.6. Fabrication MethodsIt is the responsibility of the designer to understand fabrication methods and to fit each particular design to the fabrication facilities available. For instance, it is undesirable to select a beam that is longer than rolled sections stocked in local warehouses or longer than the possible situations that may need to be controlled for safe structure fabrication shop can handle properly. It is worth noting that each central warehouse provides the draftsmen in its vicinity with a list of maximum sizes of materials that are readily available. Special sizes may not he obtainable for months, even at an increased cost per pound. The designer should work with the shop man so that the resulting structure will be economical. An edge can often be finished by grinding, by milling, or, possibly, simply by burning. Knowledge of relative costs is necessary if one is to reach a proper decision.Field ErectionThe designer usually has more difficulty in cooperating with the field organization than with the shop. The reason is that field conditions are never under complete control. The weather, the soil, the kind of labor obtainable, and the vagaries of nature all combine at times to plague the field engineer so that he finds it difficult, if not impossible, to follow the exact plan presented to him. On the other hand, construction engineers are so versatile that they can usually accomplish the result desired even though some changes become necessary. The responsibility again falls upon the designer to consider the influence of all possible field conditions upon his design. Some designs must be made so that the structure can be erected by unskilled labor, while other structures may be dependent upon the services of welders and craftsmen of highly specialized qualifications. The writer knows of one bridge that was designed for transportation on the backs of camels and another that was brought to the site by airplanes. Even freight car or truck transportation introduces certain limitations that must be observed as to the over-all size or length of a given piece. possible situations that may need to be controlled for safe structural design. Standard sets of specifications are prepared under the sponsorship of the technical societies. Over a period of years such specifications have been written arid rewritten many times. The profession as a whole has used each specification and has either accepted or rejected it. Therefore, a standard set of specifications may be accepted to represent the best information available on the subject as of the date when it was written.7. Cost as a Major FactorThe previous discussion leads to the inevitable conclusion that only an economical design can be a good design. The designer will accomplish little if his structures are seldom built because of excessive cost. Therefore, the designer must balance himself between the danger of unsafe practiceon the one hand and over conservatism on the other. His best approach to the solution of this problem is to learn everything possible from the detailer, the shop man, and the construction engineer. If he knows the tolerances, clearances, and allowances introduced by the detailer, the sizes, tools and methods used by the shop, and the shapes, weights, and fits desired by the field organization, his designing is likely to be successful.In the study of costs, it is interesting to observe that certain structures commonly used in foreign countries are seldom used in the United States. There are the highest labor costs in the world, which explains the requirement of machine production in the United States. Slender structures are more likely to be found in Europe, where the high costs of material and low cost of labor make weight reduction important, a fact that is particularly evident in the field of reinforced concrete.8. SpecificationsAll structural design is controlled by specifications. Even if no limitation is placed upon the designer, he will still be very likely to depend upon a standard set of specifications for guidance. All large cities have building codes that specify not only working stresses and qualities of materials and workmanship, but such general features as window area, hallway widths, and fire provisions for a building, and similar features of other structures. The designer will follow the specifications of the local building code by necessity, but he will also usually follow the provisions of standard sets of specifications (AREA, AWS,ACI)for his own guidance. It is impossible for anyone designer to have experienced all of the al design. Standard sets of specifications are prepared under the sponsorship of the technical societies. Over a period of years such specifications have been written arid rewritten many times. The profession as a whole has used each specification and has either accepted or rejectedit. Therefore, a standard set of specifications may be accepted to represent the best information available on the subject as of the date when it was written.9. Structural FailuresThere are a great many minor structural failures, but unless there is loss of life or oilier newsworthy features about a particular failure, it never comes to the attention of anyone except the firm that repairs the damage. Frequently, the owner requests that no publicity be given to failure. Many failures are caused by improper details. It has been a habit of " handbook designers" to select members of ample size and then to connect them together inadequately. Most building failures due to wind can be traced to this weakness. Undoubtedly, this is due to the fact that member selection is often quite simple, while joint design requires a greater understanding of stress analysis.(1). SettlementCertainly the most common source of building failures is foundation settlement. The design problem involved is not to prevent settlement, which can never be done, but to obtain uniform settlement so that the structure will not be stressed thereby. For instance, if all footings of a building settle the same amount, the building will be uninjured. However, unless uniform settlement is certain, the designer should make an allowance for unequal settlement in his analysis. Hence, the ideal structure for such a location may be one that is flexible or deformable rather than rigid or ever stiff. For this reason, the simple span structure has long been pointed to as the ideal where unequal settlement is anticipated.(2).Excessive DeflectionA common error in design is to select a beam or truss properly for strength but to fail to check its load deflection. Excessive flexibility may produce cracked plaster, permit vibration amplitude to build up, or even lead to collapse. Complete collapse often results from excessive flexibility of flat roofs. The dead-load deflection produces a low spot in the roof that collects water or ice. The increased water or ice load produces further deflection which allows more water or ice to collect. The process of self- destruction is certain to continue to the point of collapse if the span is rather great, because a small added deflection produces a significant increase in water loading. The solution is either to increase stiffness to meet specifications or to camber the roof so heavily that water can never collect on it.10. ConclusionAll things considered, it is remarkable that catastrophic failures occur so seldom in structures. This fact has led many engineers to feel that absolute safety can be guaranteed by proper specifications. However, we have seen that both the loads and the strength of structural materials, members and joints are governed by the theory of probability. Therefore, although one might be able to design a structure with a probability of failure as low as one in a million, it is never possible to reduce the probability of failure for a complex structural assemblage to zero.。

质量管理的工程英语口语常用句型关于质量管理的工程英语口语常用句型质量管理QUALITY CONTROL1 Total Quality Control(TQC) is a better quality control system.全面质量管理(简称TQC)是一种较好的质量管理体系。
2 TQC over the project will be strengthened.对于这个工程的全面质量管理将要加强。
3 To maintain the best quality of the construction work is the important responsibility of the field controllers.保持施工工作的优良质量是现场管理人员的重要职责。
4 We possess skilled technician and complete measuring and test instruments used to ensure the quality of engineering .我们拥有熟练的技术力量和齐全的检测手段,可以确保工程质量。
5 Field inspection work is handled (executed, directed )by our Inspection Section.现场检查工作由我们的检查科管理(实施、指导)。
6 Our site quality inspector will report to the Project Manager everyday.我们的现场质量检查员将每天向工程项目经理汇报。
7 I want to see the certificate of quality (certificate of manufacturer, certificate of inspection, certificate of shipment, material certificate, certificate of proof).我要看看质量证书(制造厂证书、检查证明书、出口许可证书、材料合格证、检验证书)。

Chapterc2 合同Contract第一节建筑合同的种类Types of Construction Contract一、按计价机制分类的合同(Contracts according to Pricing Mechanism) (一)总价合同/ 包干合同/ 总包合同(Lump Sum Contract)承包商同意实施全部指定的工程,以获得一笔预先规定的总款项。
[kən'sent]The contractor consents to execute the entire specified work for a stated total sum.(二)成本补偿合同(Cost Reimbursement Contract)雇主承诺支付承包商主要成本/直接成本,也就是施工中使用到的实际人工费、设备费、材料费。
The client undertakes to pay the contractor the prime cost: that is, the actual cost of labor, plant and materials utilized in the execution of the works.除了直接成本外,承包商还被付有代替开办费和利润的一笔约定款额。
In addition to the prime cost, the contractor is paid an agreed sum to cover establishment charges and profit.(三)单价合同(Unit Price Contract)即使没有给出合同价,但由于双方就适用于该工程的费率达成一致,因此对于成本是有一定控制的。
There is some control over cost because the parties agree on the rates which will apply to the work even though there is no contract sum. (四)计量合同(Measurement Contract)在本合同协定下,工程的单价是可提前预算的,但总价只能到工程完工时估量、估价来确定。

Title: Project X Construction ProjectDate of Issue: [Insert Date]Closing Date for Submission of Bids: [Insert Date]Pre-bid Meeting: [Insert Date, Time, and Venue]Opening Date for Bids: [Insert Date and Time]Contact Information:- Name: [Insert Name]- Position: [Insert Position]- Company: [Insert Company Name]- Address: [Insert Address]- Email: [Insert Email]- Phone: [Insert Phone Number]I. IntroductionThis document serves as the official invitation for bids for the construction of Project X. The project is located at [Insert Project Location]. The scope of work includes, but is not limited to, the construction of [Insert Specific Details of the Project, e.g., a building, road, bridge, etc.].The owner of the project, [Insert Owner's Name/Company], invites all eligible contractors to submit their bids for the construction of Project X. This invitation is subject to the terms and conditions set forth in this document.II. Scope of WorkThe scope of work for Project X is as follows:1. [List all the specific tasks and activities to be performed, e.g.]- Site preparation and clearing- Foundation construction- Structural steel fabrication and erection- Concrete work- Masonry work- Roofing and waterproofing- Interior and exterior finishing works- Electrical and mechanical installations- Landscape and hardscape works- Final inspection and handover2. [Include any special requirements or conditions, e.g.]- Compliance with local building codes and regulations- Use of eco-friendly materials and practices- Provision of health and safety plansIII. Bid DocumentsThe bid documents include the following:1. General Instructions:- This section contains general information about the bidding process, including the closing date, opening date, and the procedure for submitting bids.2. Technical Specifications:- Detailed technical specifications for the construction work, including materials, methods, and standards to be followed.3. Drawings and Plans:- Complete set of drawings and plans for the project, including architectural, structural, and engineering plans.4. Bill of Quantities:- Detailed list of materials, labor, and equipment required for the project, along with their quantities.5. Contract Conditions:- Terms and conditions of the contract, including payment terms, performance bond requirements, insurance, and dispute resolution procedures.IV. Bidding Requirements1. Eligibility:- Bidders must be registered and licensed to perform constructionwork in the relevant jurisdiction.2. Pre-bid Meeting:- Bidders are required to attend the pre-bid meeting, where any questions regarding the bid documents will be addressed.3. Bid Security:- Bidders must submit a bid security of [Insert Amount] in the formof a bank guarantee or cash deposit.4. Bid Format:- Bids must be submitted in the format specified in the bid documents, including the bid price, terms of payment, and other relevant information.5. Submission of Bids:- Bids must be submitted to the designated address by the closingdate and time mentioned in the bid documents.V. Evaluation CriteriaBids will be evaluated based on the following criteria:1. Price:- The bid with the lowest price will be considered, provided it meets all technical requirements.2. Technical Qualifications:- The bidder's experience, technical expertise, and relevant project references will be evaluated.3. Financial Stability:- The bidder's financial statements and track record will be reviewed to ensure financial stability.4. Quality of Work:- The bidder's reputation for quality work and adherence to specifications will be considered.VI. Contract AwardThe contract will be awarded to the bidder whose bid is deemed to be the most advantageous to the owner, considering price, technical qualifications, financial stability, and quality of work.VII. Closing RemarksThe owner reserves the right to reject any or all bids and to cancel the bidding process at any time without giving any reason. All bidders are responsible for ensuring that they receive all addenda and amendments to the bid documents.By submitting a bid, the bidder acknowledges that they have read, understood, and agreed to all the terms and conditions set forth in this invitation for bids.VIII. Appendices- Appendix A: List of Pre-bid Meeting Attendees- Appendix B: List of Questions and Answers from Pre-bid Meeting- Appendix C: Bid Security FormPlease ensure that all documents are completed accurately and submitted by the closing date. Failure to comply with the terms and conditions of this invitation for bids may result in disqualification.Thank you for your interest in Project X Construction Project.[Company Seal][Owner's Name/Company][Address][City, State, ZIP Code][Email][Phone Number]。
外文原文Response of a reinforced concrete infilled-frame structure to removal of twoadjacent columnsMehrdad Sasani_Northeastern University, 400 Snell Engineering Center, Boston, MA 02115, UnitedStatesReceived 27 June 2007; received in revised form 26 December 2007; accepted 24January 2008Available online 19 March 2008AbstractThe response of Hotel San Diego, a six-story reinforced concrete infilled-frame structure, is evaluated following the simultaneous removal of two adjacent exterior columns. Analytical models of the structure using the Finite Element Method as well as the Applied Element Method are used to calculate global and local deformations. The analytical results show good agreement with experimental data. The structure resisted progressive collapse with a measured maximum vertical displacement of only one quarter of an inch mm). Deformation propagation over the height of the structure and the dynamic load redistribution following the column removal are experimentally and analytically evaluated and described. The difference between axial and flexural wave propagations is discussed. Three-dimensional Vierendeel (frame) action of the transverse and longitudinal frames with the participation of infill walls is identified as the major mechanism for redistribution of loads in the structure. The effects of two potential brittle modes of failure (fracture of beam sections without tensile reinforcement and reinforcing bar pull out) are described. The response of the structure due to additional gravity loads and in the absence of infill walls is analytically evaluated.c 2008 Elsevier Ltd. All rights reserved.Keywords: Progressive collapse; Load redistribution; Load resistance; Dynamic response; Nonlinear analysis; Brittle failure1.IntroductionThe principal scope of specifications is to provide general principles and computational methods in order to verify safet y of structures. The “safety factor ”, which according t o modern trends is independent of the nature and combination of the materials used, can usually be defined as the rati o between the conditions. This ratio is also proportional to the inverse of the probability ( risk ) of failure of th e structure.Failure has to be considered not only as overall collapse o f the structure but also as unserviceability or, according t o a more precise. Common definition. As the reaching of a “limit state ”which causes the construction not to acco mplish the task it was designed for. There are two categori es of limit state :(1)Ultimate limit sate, which corresponds to the highest value of the load-bearing capacity. Examples include local buckli ng or global instability of the structure; failure of some sections and subsequent transformation of the structure intoa mechanism; failure by fatigue; elastic or plastic deformati on or creep that cause a substantial change of the geometry of the structure; and sensitivity of the structure to alte rnating loads, to fire and to explosions.(2)Service limit states, which are functions of the use and durability of the structure. Examples include excessive defo rmations and displacements without instability; early or exces sive cracks; large vibrations; and corrosion.Computational methods used to verify structures with respect to the different safety conditions can be separated into: (1)Deterministic methods, in which the main parameters are co nsidered as nonrandom parameters.(2)Probabilistic methods, in which the main parameters are co nsidered as random parameters.Alternatively, with respect to the different use of factors of safety, computational methods can be separated into:(1)Allowable stress method, in which the stresses computed un der maximum loads are compared with the strength of the mat erial reduced by given safety factors.(2)Limit states method, in which the structure may be propor tioned on the basis of its maximum strength. This strength, as determined by rational analysis, shall not be less than that required to support a factored load equal to the sum of the factored live load and dead load ( ultimate state ).The stresses corresponding to working ( service ) conditions with unfactored live and dead loads are compared with pres cribed values ( service limit state ) . From the four poss ible combinations of the first two and second two methods, we can obtain some useful computational methods. Generally, t wo combinations prevail:(1)deterministic methods, which make use of allowable stresses . (2)Probabilistic methods, which make use of limit states. The main advantage of probabilistic approaches is that, at l east in theory, it is possible to scientifically take into account all random factors of safety, which are then combine d to define the safety factor. probabilistic approaches depend upon :(1) Random distribution of strength of materials with respect to the conditions of fabrication and erection ( scatter of the values of mechanical properties through out the structu re ); (2) Uncertainty of the geometry of the cross-section sand of the structure ( faults and imperfections due to fab rication and erection of the structure );(3) Uncertainty of the predicted live loads and dead loads acting on the structure; (4)Uncertainty related to the approx imation of the computational method used ( deviation of the actual stresses from computed stresses ). Furthermore, proba bilistic theories mean that the allowable risk can be based on several factors, such as :(1) Importance of the construction and gravity of the damage by its failure; (2)Number of human lives which can be thr eatened by this failure; (3)Possibility and/or likelihood of repairing the structure; (4) Predicted life of the structure. All these factors are related to economic and social consi derations such as:(1) Initial cost of the construction;(2) Amortization funds for the duration of the construction;(3) Cost of physical and material damage due to the failure of the construction;(4) Adverse impact on society;(5) Moral and psychological views.The definition of all these parameters, for a given saf ety factor, allows construction at the optimum cost. However, the difficulty of carrying out a complete probabilistic ana lysis has to be taken into account. For such an analysis t he laws of the distribution of the live load and its induc ed stresses, of the scatter of mechanical properties of mate rials, and of the geometry of the cross-sections and the st ructure have to be known. Furthermore, it is difficult to i nterpret the interaction between the law of distribution of strength and that of stresses because both depend upon the nature of the material, on the cross-sections and upon the load acting on the structure. These practical difficulties ca n be overcome in two ways. The first is to apply different safety factors to the material and to the loads, without necessarily adopting the probabilistic criterion. The second i s an approximate probabilistic method which introduces some s implifying assumptions ( semi-probabilistic methods ) . Aspart of mitigation programs to reduce the likelihood of mass casualties following local damage in structures, the General Services Administration [1] and the Department of Defense [2] developed regulations to evaluate progressive collapse resistance of structures. ASCE/SEI 7 [3] defines progressive collapse as the spread of an initial local failure fromelement to element eventually resulting in collapse of an entire structure or a disproportionately large part of it. Following the approaches proposed by Ellinwood and Leyendecker [4], ASCE/SEI 7 [3] defines two general methods for structural design of buildings to mitigate damage due to progressive collapse: indirect and direct design methods. General building codes and standards [3,5] use indirect design by increasing overall integrity of structures. Indirect design is also used in DOD [2]. Although the indirect design method can reduce the risk of progressive collapse [6,7] estimation of post-failure performance of structures designed based on such a method is not readily possible. One approach based on direct design methods to evaluate progressive collapse of structures is to study the effects of instantaneous removal of load-bearing elements, such as columns. GSA [1] and DOD [2] regulations require removal of one load bearing element. These regulations are meant to evaluate general integrity of structures and their capacity of redistributing the loads following severe damage to only one element. While such an approach provides insight as to the extent to which the structures are susceptible to progressive collapse, in reality, the initial damage can affect more than just one column. In this study, using analytical results that are verified against experimental data, the progressive collapse resistance of the Hotel San Diego is evaluated, following the simultaneous explosion (sudden removal) of two adjacent columns, one of which was a corner column. In order to explode the columns, explosives were inserted into predrilled holes in the columns. The columns were then well wrapped with a few layers of protective materials. Therefore, neither air blast nor flying fragments affected the structure.2. Building characteristicsHotel San Diego was constructed in 1914 with a south annex added in 1924. The annex included two separate buildings. Fig. 1 shows a south view of the hotel. Note that in the picture, the first and third stories of the hotel are covered with black fabric. The six story hotel had a non-ductile reinforced concrete (RC) frame structure with hollow clay tile exterior infill walls. The infills in the annex consisted of two withes (layers) of clay tiles with a total thickness of about 8 in (203 mm). The height of the first floor was about 190–800 m). The height of other floors and that of the top floor were 100–600 m) and 160–1000 m), respectively. Fig. 2 shows the second floor of one of the annex buildings. Fig. 3 shows a typical plan of this building, whose responsefollowing the simultaneous removal (explosion) of columns A2 and A3 in the first (ground) floor is evaluated in this paper. The floor system consisted of one-way joists running in the longitudinal direction (North–South), as shown in Fig. 3. Based on compression tests of two concrete samples, the average concrete compressive strength was estimated at about 4500 psi (31 MPa) for a standard concrete cylinder. The modulus of elasticity of concrete was estimated at 3820 ksi (26 300 MPa) [5]. Also, based on tension tests of two steel samples having 1/2 in mm) square sections, the yield and ultimate tensile strengths were found to be 62 ksi (427 MPa) and 87 ksi (600 MPa), respectively. The steel ultimate tensile strain was measured at . The modulus of elasticity of steel was set equal to 29 000 ksi (200 000 MPa). The building was scheduled to be demolished by implosion. As part of the demolition process, the infill walls were removed from the first and third floors. There was no live load in the building. All nonstructural elements including partitions, plumbing, and furniture were removed prior to implosion. Only beams, columns, joist floor and infill walls on the peripheral beams were present.3. SensorsConcrete and steel strain gages were used to measure changes in strains of beams and columns. Linear potentiometers were used to measure global and local deformations. The concrete strain gages were in (90 mm) long having a maximum strain limit of ±. The steel strain gages could measure up to a strain of ±. The strain gages could operate up to a several hundred kHz sampling rate. The sampling rate used in the experiment was 1000 Hz. Potentiometers were used to capture rotation (integral of curvature over a length) of the beam end regions and global displacementin the building, as described later. The potentiometers had a resolution of about in mm) and a maximum operational speed of about 40 in/s m/s), while the maximum recorded speed in the experiment was about 14 in/sm/s).4. Finite element modelUsing the finite element method (FEM), a model of the building was developed in the SAP2000 [8] computer program. The beams and columns are modeled with Bernoulli beam elements. Beams have T or L sections with effective flange width on each side of the web equal to four times the slab thickness [5]. Plastic hinges are assigned to all possible locations where steel bar yielding can occur, including the ends of elements as well as the reinforcing bar cut-off and bend locations. The characteristics of the plastic hinges are obtained using section analysesof the beams and columns and assuming a plastic hinge length equal to half of the section depth. The current version of SAP2000 [8] is not able to track formation of cracks in the elements. In order to find the proper flexural stiffness of sections, an iterative procedure is used as follows. First, the building is analyzed assuming all elements are uncracked. Then, moment demands in the elements are compared with their cracking bending moments, Mcr . The moment of inertia of beam and slab segments are reduced by a coefficient of [5], where the demand exceeds the Mcr. The exterior beam cracking bending moments under negative and positive moments, are 516 k in kN m) and 336 k in kN m), respectively. Note that no cracks were formed in the columns. Then the building is reanalyzed and moment diagrams are re-evaluated. This procedure is repeated until all of the cracked regions are properly identified and modeled.The beams in the building did not have top reinforcing bars except at the end regions (see Fig. 4). For instance, no top reinforcement was provided beyond the bend in beam A1–A2, 12 inches away from the face of column A1 (see Figs. 4 and 5). To model the potential loss of flexural strength in those sections, localized crack hinges were assigned at the critical locations where no top rebar was present. Flexural strengths of the hinges were set equal to Mcr. Such sections were assumed to lose their flexural strength when the imposed bending moments reached Mcr.The floor system consisted of joists in the longitudinal direction (North–South). Fig. 6 shows the cross section of a typical floor. In order to account for potential nonlinear response of slabs and joists, floors are molded by beam elements. Joists are modeled with T-sections, having effective flange width on each side of the web equal to four times the slab thickness [5]. Given the large joist spacing between axes 2 and 3, two rectangular beam elements with 20-inch wide sections are used between the joist and the longitudinal beams of axes 2 and 3 to model the slab in the longitudinal direction. To model the behavior of the slab in the transverse direction, equally spaced parallel beams with 20-inch wide rectangular sections are used. There is a difference between the shear flow in the slab and that in the beam elements with rectangular sections modeling the slab. Because of this, the torsional stiffness is setequal to one-half of that of the gross sections [9].The building had infill walls on 2nd, 4th, 5th and 6th floors on the spandrel beams with some openings . windows and doors). As mentioned before and as part of the demolition procedure, the infill walls in the 1st and 3rd floors were removed before the test. The infill walls were made of hollow clay tiles, which were in good condition. The net area of the clay tiles was about 1/2 of the gross area. The in-plane action of the infill walls contributes to the building stiffness and strength and affects the building response. Ignoring the effects of the infill walls and excluding them in the model would result in underestimating the building stiffness and strength.Using the SAP2000 computer program [8], two types of modeling for the infills are considered in this study: one uses two dimensional shell elements (Model A) and the other uses compressive struts (Model B) as suggested in FEMA356 [10] guidelines.. Model A (infills modeled by shell elements)Infill walls are modeled with shell elements. However, the current version of the SAP2000 computer program includes only linear shell elements and cannot account for cracking. The tensile strength of the infill walls is set equal to 26 psi, with a modulus of elasticity of 644 ksi [10]. Because the formation ofcracks has a significant effect on the stiffness of the infill walls, the following iterative procedure is used to account for crack formation:(1) Assuming the infill walls are linear and uncracked, a nonlinear time history analysis is run. Note that plastic hinges exist in the beam elements and the segments of the beam elements where moment demand exceeds the cracking moment have a reduced moment of inertia.(2) The cracking pattern in the infill wall is determined by comparingstresses in the shells developed during the analysis with the tensile strength of infills.(3) Nodes are separated at the locations where tensile stress exceeds tensile strength. These steps are continued until the crack regions are properly modeled.. Model B (infills modeled by struts)Infill walls are replaced with compressive struts as described in FEMA 356 [10] guidelines. Orientations of the struts are determined from the deformed shape of the structure after column removal and the location of openings.. Column removalRemoval of the columns is simulated with the following procedure. (1) The structure is analyzed under the permanent loads and the internal forces are determined at the ends of the columns, which will be removed.(2) The model is modified by removing columns A2 and A3 on the first floor. Again the structure is statically analyzed under permanent loads. In this case, the internal forces at the ends of removed columns found in the first step are applied externally to the structure along with permanent loads. Note that the results of this analysis are identical to those of step 1.(3) The equal and opposite column end forces that were applied in the second step are dynamically imposed on the ends of the removed column within one millisecond [11] to simulate the removal of the columns, and dynamic analysis is conducted.. Comparison of analytical and experimental resultsThe maximum calculated vertical displacement of the building occurs at joint A3 in the second floor. Fig. 7 shows the experimental andanalytical (Model A) vertical displacements of this joint (the AEM results will be discussed in the next section). Experimental data is obtained using the recordings of three potentiometers attached to joint A3 on one of their ends, and to the ground on the other ends. The peak displacements obtained experimentally and analytically (Model A) are in mm) and in mm), respectively, which differ only by about 4%. The experimental and analytical times corresponding to peak displacement are s and s, respectively. The analytical results show a permanent displacement of about in mm), which is about 14% smaller than the corresponding experimental value of in mm).Fig. 8 compares vertical displacement histories of joint A3 in the second floor estimated analytically based on Models A and B. As can be seen, modeling infills with struts (Model B) results in a maximum vertical displacement of joint A3 equal to about in mm), which is approximately 80% larger than the value obtained from Model A. Note that the results obtained from Model A are in close agreement with experimental results (see Fig. 7), while Model B significantly overestimates the deformation of the structure. If the maximum vertical displacement were larger, the infill walls were more severely cracked and the struts were more completely formed, the difference between the results of the two models (Models A and B) would be smaller.Fig. 9 compares the experimental and analytical (Model A) displacement of joint A2 in the second floor. Again, while the first peak vertical displacement obtained experimentally and analytically are in good agreement, the analytical permanent displacement under estimates the experimental value.Analytically estimated deformed shapes of the structure at the maximumvertical displacement based on Model A are shown in Fig. 10 with a magnification factor of 200. The experimentally measured deformed shape over the end regions of beams A1–A2 and A3–B3 in the second floorare represented in the figure by solid lines. A total of 14 potentiometers were located at the top and bottom of the end regions of the second floor beams A1–A2 and A3–B3, which were the most critical elements in load redistribution. The beam top and corresponding bottom potentiometerrecordings were used to calculate rotation between the sections where the potentiometer ends were connected. This was done by first finding the difference between the recorded deformations at the top and bottom of the beam, and then dividing the value by the distance (along the height of the beam section) between the two potentiometers. The expected deformed shapes between the measured end regions of the second floor beams are shown by dashed lines. As can be seen in the figures, analytically estimated deformed shapes of the beams are in good agreement with experimentally obtained deformed shapes.Analytical results of Model A show that only two plastic hinges are formed indicating rebar yielding. Also, four sections that did not have negative (top) reinforcement, reached cracking moment capacities and therefore cracked. Fig. 10 shows the locations of all the formed plastic hinges and cracks.。
国家“十二五”重点图书出版工程《海洋工程设计手册—海上施工分册》编译工作正式启动继《海洋工程设计手册—风险评估分册》编译工作完成以后,上海交通大学出版社和上海熔圣船舶海洋工程技术有限公司启动《海洋工程设计手册》系列图书第二本《海洋工程设计手册—海上施工分册》编译工作。
《海洋工程设计手册》系列图书是由上海交通大学船舶海洋与建筑工程学院的多位教授、专家针对国内海洋工程行业发展对基础技术图书的需要而确定的出版选题。
《海上施工分册》是《海洋工程设计手册》系列图书之一,已经列入国家“十二五”重点图书出版工程。
未来五年,将会有一批国内外顶级的海工类著作纳入到这一出版工程中,为我国的海洋工程行业发展提供基础技术支撑,也必将为行业的发展产生深远的影响。
《海洋工程设计手册—海上施工分册》的主要内容来自国际海洋工程界公认的权威著作——英国Taylor&Francis出版集团的《Construction of Marine and Offshore Structures》。
该书系统、全面的阐述了离岸和深海施工的各个方面,其中包括:海洋建筑物的材料和建造、海洋和离岸施工设备、海洋作业、海洋和离岸建筑物的桩柱施工、离岸平台:钢套管架和微型桩、海洋和离岸施工建造技术的其他应用、海底管路的铺设、塑料及复合管路和电缆、海洋建筑物的维修、深海中的施工建造等经典篇章。
该书的编译出版将填补国内海洋工程行业在海上施工领域的学术著作的空白,为从事海上施工的专业人员提供权威的参考和借鉴。
《海洋工程设计手册——海上施工分册》编译出版工作由上海交通大学出版社和上海熔圣船舶海洋工程技术有限公司共同负责。
《海洋工程设计手册—海上施工分册》目录第0章引言Introduction0.1概述General0.2地理Geography0.3生态环境Ecological Environment0.4法定管辖Legal Jurisdiction0.5离岸施工建造的各方关系与次序Offshore Construction Relationships and Sequences0.6典型的海洋建筑物及其合约Typical Marine Structures and Contracts0.7设计与施工建造的相互影响Interaction of Design and Construction第1章海洋和离岸施工建造的物理环境因素Physical Environmental Aspects of Marine and Offshore Construction 1.1概述General1.2距离与深度Distances and Depths1.3静水压与浮力Hydrostatic Pressure and Buoyancy1.4温度Temperature1.5海水和海洋空气的界面化学Seawater and Sea-Air Interface Chemistry1.5.1海洋微生物Marine Organisms1.6海流Currents1.7海浪和涌浪Waves and Swells1.8风和风暴Winds and Storms1.9潮汐和风暴潮Tides and Storm Surges1.10雨、雪、雾、浪花、大气结冰和闪电Rain,Snow,Fog,Spray,Atmospheric Icing,and Lightning1.11海冰和冰山Sea Ice and Icebergs1.12地震活动、海震和海啸Seismicity,Seaquakes,and Tsunamis1.13水灾Floods1.14冲刷Scour1.15淤积和推移质Siltation and Bed Loads1.16怠工和恐怖行为Sabotage and Terrorism1.17船舶交通Ship Traffic1.18火灾和烟气Fire and Smoke1.19意外事件Accidental Events1.20全球变暖Global Warming第2章岩土因素:海底土和海积土Geotechnical Aspects:Seafloor and Marine Soils 2.1概述General2.2密实砂Dense Sands2.13泥土的液化Liquefaction of Soils2.4石灰质砂Calcareous Sands2.5海底的冰碛物和冰砾Glacial Till and Boulders on Seafloor2.6超固结淤泥Overconsolidated Silts2.7海底永久冻土和笼形包含化合物Subsea Permafrost and Clathrates2.8北极松软淤泥和粘土Weak Arctic Silts and Clays2.9冰蚀和冰举丘Ice Scour and Pingos2.10沼气Methane Gas2.11泥浆和粘土Muds and Clays2.11.1粘土的水下斜率Underwater Slopes in Clays2.11.2打桩“准备”Pile Driving“Set-Up”2.11.3短期承载强度Short-Term Bearing Strength2.11.4疏浚Dredging2.11.5取样Sampling2.11.6渗透Penetration2.11.7粘土的固结;强度的改进Consolidation of Clays;Improvement in Strength 2.12珊瑚和类似源于生物的土壤:胶结土、冠岩Coral and Similar Biogenic Soils;Cemented Soils,Cap Rock 2.13非胶结砂岩Unconsolidated Sands2.14水下沙丘(“巨型沙丘”)Underwater Sand Dunes("Megadunes")2.15基岩露头Bedrock Outcrops2.16鹅卵石Cobbles2.17深海砂砾沉积Deep Gravel Deposits2.18海底淤泥Seafloor Oozes2.19海底不稳定性和下陷;浊流Seafloor Instability and Slumping;Turbidity Currents2.20冲刷和腐蚀Scour and Erosion2.21总结Concluding Remarks第3章海上施工建造的生态和社会影响Ecological and Societal Impacts of Marine Construction 3.1概述General3.2油类和石油产品Oil and Petroleum Products3.3有毒化学品Toxic Chemicals3.4受污染的泥土Contaminated Soils3.5施工废弃物Construction Wastes3.6水体浑浊Turbidity3.7沉积物运移、冲刷和腐蚀Sediment Transport,Scour,and Erosion3.8空气污染Air Pollution3.9海洋生物:哺乳动物和鸟类、鱼类及其他生物群Marine Life:Mammals and Birds,Fish,and Other Biota3.10蓄水层Aquifers3.11噪声Noise3.12高速公路、铁路、驳船和空中交通Highway,Rail,Barge,and Air Traffic3.13现有建筑物的保护Protection of Existing Structures3.14液化作用Liquefaction3.15公众安全和第三方船舶Safety of the Public and Third-Party Vessels3.16考古问题Archaeological Concerns第4章海洋建筑物的材料和建造Materials and Fabrication for Marine Structures4.1概述General4.2用于海洋环境的钢制建筑物Steel Structures for the Marine Environment4.2.1钢材料Steel Materials4.2.2装配与焊接Fabrication and Welding4.2.3结构钢的安装Erection of Structural Steel4.2.4钢结构的涂层和防腐Coatings and Corrosion Protection of Steel Structures4.2.5高性能钢High Performance Steels4.3结构混凝土Structural Concrete4.3.1概述General4.3.2混凝土搅拌料和性能Concrete Mixes and Properties4.3.2.1高性能混凝土——“流动混凝土”High Performance Concrete—“Flowing Concrete”4.3.2.2低密度结构混凝土Structural Low-Density Concrete4.3.2.3超高性能混凝土Ultra-High Performance Concrete(UHPC)4.3.3混凝土的输送和填筑Conveyance and Placement of Concrete4.3.4养护Curing4.3.5钢的增强Steel Reinforcement4.3.6预拉伸钢筋和配件Prestressing Tendons and Accessories4.3.7埋置Embedments4.3.8海洋混凝土的涂层Coatings for Marine Concrete4.3.9施工缝Construction Joints4.3.10成型和支撑Forming and Support4.3.11公差Tolerances4.4钢筋混凝土混合结构Hybrid Steel-Concrete Structures4.4.1混合结构Hybrid Structures4.4.1复合材料施工Composite Construction4.5塑料、合成材料、复合材料Plastics and Synthetic Materials,Composites4.6钛Titanium4.7岩石、砂和柏油-沥青材料Rock,Sand,and Asphaltic-Bituminous Materials第5章海洋和离岸施工设备Marine and Offshore Construction Equipment5.1概述General5.2航道中的基本运动Basic Motions in a Seaway5.3浮力、吃水和干舷Buoyancy,Draft,and Freeboard5.4稳性Stability5.5破损控制Damage Control5.6驳船Barges5.7起重船Crane Barges5.8离岸浮吊(全回转式)Offshore Derrick Barges(Fully Revolving) 5.9半潜式驳船Semisubmersible Barges5.10自升式施工驳船Jack-Up Construction Barges5.11下水驳船Launch Barges5.12双体载驳船Catamaran Barges5.13挖泥船Dredges5.14铺管船Pipe-Laying Barges5.15供给船Supply Boats5.16起抛锚船Anchor-Handling Boats5.17拖船Towboats5.18钻探船Drilling Vessels5.19交通艇Crew Boats5.20浮式混凝土搅拌船Floating Concrete Plant5.21塔式起重机Tower Cranes5.22特种设备Specialized Equipment第6章海洋作业Marine Operations6.1拖曳Towing6.2系泊用具和锚Moorings and Anchors6.2.1系泊缆Mooring Lines6.2.2锚Anchors6.2.2.1浮锚Drag Anchors6.2.2.2桩锚Pile Anchors6.2.2.3推进锚Propellant Anchors6.2.2.4吸力锚Suction Anchors6.2.2.5驱动板锚Driven-Plate Anchors6.2.3系泊系统Mooring Systems6.3海上重载搬运Handling Heavy Loads at Sea6.3.1概述General6.4海上人员运输Personnel Transfer at Sea6.5水下干预、潜水、水下作业系统、遥控机器人和机械手Underwater Intervention,Diving,Underwater Work Systems,Remote-Operated Vehicles (ROVs),and Manipulators6.5.1潜水Diving6.5.2遥控机器人Remote-Operated Vehicles(ROVs)6.5.3机械手Manipulators6.6水下混凝土填筑和灌浆Underwater Concreting and Grouting6.6.1概述General6.6.2水下混凝土拌合料Underwater Concrete Mixes6.6.3混凝土的水下填筑Placement of Tremie Concrete6.6.4水下灌筑用的特殊外加剂Special Admixtures for Concreting Underwater6.6.5灰浆侵入聚集???Grout-Intruded Aggregate6.6.6泵送混凝土和砂浆Pumped Concrete and Mortar6.6.7基底灰浆Underbase Grout6.6.8用于将力从桩传递到套管和导管架腿柱的灰浆Grout for Transfer of Forces from Piles to Sleeves and Jacket Legs6.6.9低强度水下混凝土Low-Strength Underwater Concrete6.6.10小结Summary6.7近海测量、导航和海底测量Offshore Surveying,Navigation,and Seafloor Surveys6.8暂时性浮力增大Temporary Buoyancy Augmentation第7章海底改造和改良Seafloor Modifications and Improvements7.1概述General7.2坡度和位置的控制Controls for Grade and Position7.2.1现有条件的确定Determination of Existing Conditions7.3海底清淤、障碍物搬移和水准测量Seafloor Dredging,Obstruction Removal,and Leveling7.4坚硬物质和岩石的挖掘和搬移Dredging and Removal of Hard Material and Rock7.5水下装料的填筑Placement of Underwater Fills7.6松软土的固结和强化Consolidation and Strengthening of Weak Soils7.7预防液化Prevention of Liquefaction7.8冲刷保护Scour Protection7.9总结Concluding Remarks第8章海洋和离岸建筑物桩柱的安装施工Installation of Piles in Marine and Offshore Structure8.1概述General8.2钢管桩的制造Fabrication of Tubular Steel Piles8.3桩的运输Transportation of Piling8.4桩柱的安装施工Installing Piles8.5增强穿透深度的方法Methods of Increasing Penetration8.6插入桩Insert Piles8.7锚固于岩石或硬质地层Anchoring into Rock or Hardpan8.8高承载力桩测试Testing High Capacity Piles8.9H型钢桩Steel H Piles8.10增强桩的刚度和承载力Enhancing Stiffness and Capacity of Piles8.11预应力混凝土圆筒桩Prestressed Concrete Cylinder Piles8.12海上中转站的桩的搬运和定位Handling and Positioning of Piles for Offshore Terminals 8.13钻孔桩和灌浆桩Drilled and Grouted Piles8.14引孔沉管灌注桩、竖井Cast-in-Drilled-Hole Piles,Drilled Shafts8.15其他施工经验Other Installation Experience8.16特殊土中的施工Installation in Difficult Soils8.17改进打入桩承载力的其他方法Other Methods of Improving the Capacity of Driven Piles 8.18槽壁、正割壁和切线壁Slurry Walls,Secant Walls,and Tangent Walls8.19钢板桩Steel Sheet Piles8.20振动打桩机Vibratory Pile Hammers8.21微型桩Micropiles第9章港口、河流和港湾建筑物Harbor,River,and Estuary Structures9.1概述General9.2港口建筑物Harbor Structures9.2.1类型Types9.2.2桩支撑建筑物Pile-Supported Structures9.2.2.1钢桩Steel Piles9.2.2.2混凝土桩Concrete Piles9.2.2.3沉桩施工Installation9.2.2.4斜桩Batter(Raker)Piles9.2.2.5桩定位Pile Location9.2.2.6水力打桩Jetting9.2.2.7打桩穿过障碍物或坚硬物质Driving Through Obstructions or Very Hard Material9.2.2.8固定桩Staying of Piles9.2.2.9桩头连接物Head Connections9.2.2.10混凝土甲板Concrete Deck9.2.2.11防护装置Fender System9.2.3隔板、???Bulkheads,Quay Walls9.2.3.1说明Description9.2.3.2板桩隔板Sheet Pile Bulkheads9.2.3.3沉箱???隔板Caisson Quay Walls9.3河流建筑物River Structures9.3.1说明Description9.3.2板桩格形结构Sheet Pile Cellular Structures9.3.3“提升安装”预浇筑混凝土壳体——“在潮湿中”施工“Lift-In”Precast Concrete Shells—“In-the-Wet”Construction9.3.4浮动安装混凝土建筑物Float-In Concrete Structures9.3.4.1概述General9.3.4.2预制Prefabrication9.3.4.3下水Launching9.3.4.4施工Installation9.3.4.5水准基座Leveling Pads9.3.4.6底层填料Underfill9.4水上桥墩的基础Foundations for Overwater Bridge Piers9.4.1概述General9.4.2开口沉箱Open Caissons9.4.3气动沉箱Pneumatic Caissons9.4.4重力基座沉箱(箱形沉箱)Gravity-Base Caissons(Box Caissons)9.4.5桩支撑箱形沉箱Pile-Supported Box Caissons9.4.6大直径管桩Large-Diameter Tubular Piles9.4.6.1钢制管桩Steel Tubular Piles9.4.6.2预应力混凝土管桩Prestressed Concrete Tubular Piles9.4.7桩至基础座(桩冒)的连接Connection of Piles to Footing Block(Pile Cap)9.4.8引孔沉管灌注竖井(桩)CIDH Drilled Shafts(Piles)9.4.9围堰Cofferdams9.4.9.1钢制板桩围堰Steel Sheet Pile Cofferdams9.4.9.2围堰施工期间的液化作用Liquefaction During Cofferdam Construction9.4.9.3斜坡上的围堰Cofferdams on Slope9.4.9.4深水围堰Deep Cofferdams9.4.9.5轻便式围堰Portable Cofferdams9.4.10桥墩的保护结构Protective Structures for Bridge Piers9.4.11钟状墩Belled Piers9.5水底预制隧道(管)Submerged Prefabricated Tunnels(Tubes)9.5.1说明Description9.5.2钢-混凝土复合式隧道管片的预制Prefabrication of Steel-Concrete Composite Tunnel Segments9.5.3全混凝土管片的预制Prefabrication of All-Concrete Tube Segments9.5.4槽沟的处理Preparation of Trench9.5.5管片安装Installing the Segments9.5.6底层填料和回填材料Underfill and Backfill9.5.7入口连接Portal Connections9.5.8桩支撑隧道Pile-Supported Tunnels9.5.9水底悬浮隧道Submerged Floating Tunnels9.6风暴潮挡闸Storm Surge Barriers9.6.1说明Description9.6.2“威尼斯”风暴潮挡闸Venice Storm Surge Barrier9.6.3“东斯凯尔德”风暴潮挡闸Oosterschelde Storm Surge Barrier9.7水流控制建筑物Flow-Control Structures9.7.1说明Description9.7.2温度控制仪Temperature Control Devices第10章沿岸建筑物Coastal Structures10.1概述General10.2出海与入海Ocean Outfalls and Intakes10.3防波堤Breakwaters10.3.1概述General10.3.2抛石防波堤Rubble-Mound Breakwaters10.3.3沉箱式防波堤和沉箱式人工岛Caisson-Type Breakwaters and Caisson-Retained Islands10.3.4板桩格形防波堤Sheet Pile Cellular Breakwaters10.4海上中转站Offshore Terminals第11章离岸平台:钢导管架和芯桩???Offshore Platforms:Steel Jackets and Pin Piles11.1概述General11.2钢导管架的装配Fabrication of Steel Jackets11.3卸载、固定和运输Load-Out,Tie-Down,and Transport11.4从运输驳船上搬动钢导管架;吊起;下水Removal of Jacket from Transport Barge;Lifting;Launching 11.5导管架的倒转Upending of Jacket11.6海底安装Installation on the Seafloor11.7桩和导管的安装Pile and Conductor Installation11.8甲板安装Deck Installation11.9实例Examples11.9.1实例1——皇都Example1—Hondo11.9.2实例2——科纳克Example2—Cognac11.9.3实例3——赛尔维扎Example3—Cerveza第12章混凝土离岸平台:重力基座建筑物Concrete Offshore Platforms:Gravity-Base Structures12.1概述General12.2施工建造的各阶段Stages of Construction12.2.1阶段1——施工建造水池Stage1—Construction Basin12.2.2阶段2——基础木阀的施工建造Stage2—Construction of Base Raft12.2.3阶段3——驳出Stage3—Float-Out12.2.4阶段4——深水施工位置的系泊Stage4—Mooring at Deep-Water Construction Site12.2.5阶段5——深水位置处的施工建造Stage5—Construction at Deep-Water Site12.2.6阶段6——竖井的施工建造Stage6—Shaft Construction12.2.7阶段7——拖曳至深水配合位置Stage7—Towing to Deep-Water Mating Site12.2.8阶段8——甲板建筑物的施工建造Stage8—Construction of Deck Structure12.2.9阶段9——甲板的运输Stage9—Deck Transport12.2.10阶段10——为甲板配合而将下部结构沉入水中Stage10—Submergence of Substructure for Deck Mating12.2.11阶段11——甲板配合Stage11—Deck Mating12.2.12阶段12——连接Stage12—Hookup12.2.13阶段13——拖曳至安装施工位置Stage13—Towing to Installation Site12.2.14阶段14——现场安装施工Stage14—Installation at Site12.2.15阶段15——导管的安装施工Stage15—Installation of Conductors12.3施工建造的替代概念Alternative Concepts for Construction12.4底基层施工建造Sub-Base Construction12.5平台重新安置Platform Relocation12.6混凝土-钢混合平台Hybrid Concrete-Steel Platforms第13章永久性浮式建筑物Permanently Floating Structures13.1概述General13.2混凝土浮式建筑物的预制Fabrication of Concrete Floating Structures13.3混凝土性能对浮式建筑物的特殊重要性Concrete Properties of Special Importance to Floating Structures13.4施工建造和下水Construction and Launching13.5浮式混凝土桥梁Floating Concrete Bridges13.6浮式隧道Floating Tunnels13.7半潜平台Semi-Submersibles13.8驳船Barges13.9浮式飞机场Floating Airfields13.10永久性浮式服务建筑物Structures for Permanently Floating Service13.11小游艇船坞Marinas13.12大型船舶停泊码头Piers for Berthing Large Ships13.13浮式防波堤Floating Breakwaters13.14浮标配合Mating Afloat第14章海洋和离岸施工建造技术的其他应用Other Applications of Marine and Offshore Construction Technology 14.1概述General14.2单点系泊Single-Point Moorings14.3铰接柱Articulated Columns14.4海底基盘Seafloor Templates14.5水下储油船Underwater Oil Storage Vessels14.6拖缆布置、系泊浮标和海底部署Cable Arrays,Moored Buoys,and Seafloor Deployment14.7海洋热能变换Ocean Thermal Energy Conversion14.8低温液化天然气和液化石油气的海上进出口中转站Offshore Export and Import Terminals for Cryogenic Gas-LNG and LPG14.8.1概述General14.9海上风能基础Offshore Wind-Power Foundations14.10波浪发电建筑物Wave-Power Structures14.11潮汐发电站Tidal Power Stations14.12屏障墙Barrier Walls14.13防波堤Breakwaters第15章海底管路的铺设Installation of Submarine Pipelines15.1概述General15.2常规S形铺管船Conventional S-Lay Barge15.3底拖法Bottom-Pull Method15.4卷筒式铺管船Reel Barge15.5水面浮标Surface Float15.6受控式水下悬浮(受控式海面浮标)Controlled Underwater Flotation(Controlled Subsurface Float)15.7受控式底拖曳Controlled Above-Bottom Pull15.8平台的J形管法J-Tube Method from Platform15.9驳船J形铺管J-Lay from Barge15.10包含可折叠式浮标的S形曲线S-Curve with Collapsible Floats15.11束管Bundled Pipes15.12定向钻井(水平钻井)Directional Drilling(Horizontal Drilling)15.13冰下铺管Laying Under Ice15.14管路的保护:掩埋和覆盖岩石Protection of Pipelines:Burial and Covering with Rock 15.15管路的支撑Support of Pipelines15.16液化天然气和液化石油气的低温管路Cryogenic Pipelines for LNG and LPG第16章塑料及复合管路和电缆Plastic and Composite Pipelines and Cables16.1复合材料和塑料制海底管路Submarine Pipelines of Composite Materials and Plastics16.1.1高密度聚乙烯管路High Density Polyethylene Pipelines16.1.2纤维增强玻璃管Fiber-Reinforced Glass Pipes16.1.3复合柔性管路和立管Composite Flexible Pipelines and Risers16.2电缆铺设Cable Laying第17章干舷施工Topside Installation17.1概述General17.2模块装配Module Erection17.3连接装置Hookup17.4全甲板的巨型模块和运输Giant Modules and Transfer of Complete Deck17.5浮标上甲板建筑物Float-Over Deck Structures17.5.1输送和安装施工Delivery and Installation17.5.2Hi甲板方式???Hi-Deck Method17.5.3法国“智能”系统French"Smart"System17.5.4万都平台The Wandoo Platform17.5.5其他方式Other Methods第18章海洋建筑物的维修Repairs to Marine Structures18.1概述General18.2管理维修的原则Principles Governing Repairs18.3钢制建筑物的维修Repairs to Steel Structures18.4锈蚀钢制构件的维修Repairs to Corroded Steel Members18.5混凝土建筑物的维修Repairs to Concrete Structures18.6基础的维修Repairs to Foundations18.7火灾破损Fire Damage18.8管路维修Pipeline Repairs第19章加固现有建筑物Strengthening Existing Structures19.1概述General19.2离岸平台、中转站、构件和装配件的加固Strengthening of Offshore Platforms,Terminals,Members and Assemblies 19.3增加现有桩的轴向承载力Increasing Capacity of Existing Piles for Axial Loads19.4在土壤和建筑物的相互作用中增加桩和建筑物的横向承载力Increasing Lateral Capacity of Piles and Structures in Soil-Structure Interaction 19.5混凝土壁的穿透深度Penetrations Through Concrete Walls19.6抗震改进Seismic Retrofit第20章拆除和救捞Removal and Salvage20.1离岸平台的拆除Removal of Offshore Platforms20.2带桩建筑物的拆除(中转站、栈桥、浅水平台)Removal of Piled Structures(Terminals,Trestles,Shallow-Water Platforms) 20.3桩支撑钢制平台的拆除Removal of Pile-Supported Steel Platforms20.4混凝土重力基座离岸平台的拆除Removal of Concrete Gravity-Base Offshore Platforms20.5救助技术的新发展New Developments in Salvage Techniques20.6港口建筑物的拆除Removal of Harbor Structures20.7沿岸建筑物的拆除Removal of Coastal Structures第21章可构造性Constructibility21.1概述General21.2离岸建筑物的施工建造阶段Construction Stages for Offshore Structures21.3可构造性原理Principles of Constructibility21.4制造的设施和方法Facilities and Methods for Fabrication21.5下水Launching21.5.1下水驳船Launch Barges21.5.2运输提升Lifting for Transport21.5.3干船坞内的施工Construction in a Graving Dock or Drydock21.5.4水坞中的施工Construction in a Basin21.5.5从船台或下水驳船中下水Launching from a Ways or a Launch Barge21.5.6压砂Sand Jacking21.5.7转入Rolling-In21.5.8牵引减弱Jacking Down21.5.9通过压舱法使驳船下水Barge Launching by Ballasting21.6浮标式装配和接合Assembly and Jointing Afloat21.7材料选择及程序Material Selection and Procedures21.8施工建造程序Construction Procedures21.9通道Access21.10公差Tolerances21.11测量控制Survey Control21.12质量控制和保证Quality Control and Assurance21.13安全性Safety21.14施工建造的控制:反馈和修正Control of Construction:Feedback and Modification 21.15应变规划Contingency Planning21.16手册Manuals21.17现场施工建造参照表On-Site Instruction Sheets21.18风险和可靠性评价Risk and Reliability Evaluation第22章深海中的施工建造Construction in the Deep Sea22.1概述General22.2对深海作业的思考及其现象Considerations and Phenomena for Deep-Sea Operations 22.3深海施工建造技术Techniques for Deep-Sea Construction22.4用于深海的材料性能Properties of Materials for the Deep Sea22.5深海平台:顺应式建筑物Platforms in the Deep Sea:Compliant Structures22.5.1说明Description22.5.2拉索塔Guyed Towers22.5.3顺应式(柔性)塔Compliant(Flexible)Tower22.5.4铰接塔Articulated Towers22.6张力腿平台Tension-Leg Platforms(TLP's)22.7SPAR平台SPARS22.8船形浮式生产储卸装置Ship-Shaped FPSOs22.9深海系泊Deep-Water Moorings22.10深海海底的施工建造作业Construction Operations on the Deep Seafloor22.11深海管道铺设Deep-Water Pipe Laying22.12海底完井Seafloor Well Completions22.13深海桥墩Deep-Water Bridge Piers第23章北极海洋建筑物Arctic Marine Structures23.1概述General23.2海冰和冰山Sea Ice and Icebergs23.3大气条件Atmospheric Conditions23.4北极海底和土工技术Arctic Seafloor and Geotechnics23.5海洋学内容Oceanographic23.6生态思考Ecological Considerations23.7物流与作业Logistics and Operations23.8北极近海中的土方工程Earthwork in the Arctic Offshore23.9冰结构Ice Structures23.10北极的钢制和混凝土建筑物Steel and Concrete Structures for the Arctic23.10.1钢制塔平台Steel Tower Platforms23.10.2沉箱式人工岛Caisson-Retained Islands23.10.3浅水重力基座沉箱Shallow-Water Gravity-Base Caissons23.10.4自升式建筑物Jack-Up Structures23.10.5底部浇铸的深水建筑物Bottom-Founded Deep-Water Structures23.10.6浮式建筑物Floating Structures23.10.7油气井保护器和海底基盘Well Protectors and Seafloor Templates 23.11建筑物在北极的部署Deployment of Structures in the Arctic23.12现场安装施工Installation at Site23.13冰况测量与冰的管理Ice Condition Surveys and Ice Management23.14耐久性Durability23.15可构造性Constructibility23.16管路施工Pipeline Installation23.17北极动态Current Arctic DevelopmentsReferencesIndex。
The serviceability of a product or structure utilizing the type of information presented herein is,and must be,the sole responsi-bility of the builder/user. Many variables beyond the control of The James F. Lincoln Arc Welding Foundation or The Lincoln Electric Company affect the results obtained in applying this type of information. These variables include,but are not limited to,welding procedure,plate chemistry and temperature,weldment design,fabrication methods,and service requirements.This guide makes extensive reference to the AWS D1.1 Structural Welding Code-Steel,but it is not intended to be a comprehen-sive review of all code requirements,nor is it intended to be a substitution for the D1.1 code. Users of this guide are encouraged to obtain a copy of the latest edition of the D1.1 code from the American Welding Society,550 N.W. LeJeune Road,Miami,Florida 33126,(800) 443-9353.Fabricators’and Erectors’Guide toWelded Steel ConstructionBy Omer W. Blodgett,P.E.,Sc.D.R. Scott FunderburkDuane K. Miller,P.E.,Sc.D.Marie Quintana,P.E.This information has been provided byThe James F. Lincoln Arc Welding Foundationto assist the general welding industry.Copyright © 1999Fabricators’and Erectors’Guide toWelded Steel ConstructionTable of Contents1Introduction . . . . . . . . . . . . . . . . . . . . . . . . . . . . . . . . . . . . . . . . . . . . . . . .1 2Welding Processes . . . . . . . . . . . . . . . . . . . . . . . . . . . . . . . . . . . . . . . . . . . .12.1SMAW . . . . . . . . . . . . . . . . . . . . . . . . . . . . . . . . . . . . . . . . . . . . . . .12.2FCAW . . . . . . . . . . . . . . . . . . . . . . . . . . . . . . . . . . . . . . . . . . . . . . . .32.3SAW . . . . . . . . . . . . . . . . . . . . . . . . . . . . . . . . . . . . . . . . . . . . . . . . .62.4GMAW . . . . . . . . . . . . . . . . . . . . . . . . . . . . . . . . . . . . . . . . . . . . . . .82.5ESW/EGW . . . . . . . . . . . . . . . . . . . . . . . . . . . . . . . . . . . . . . . . . . .10 3Welding Process Selection . . . . . . . . . . . . . . . . . . . . . . . . . . . . . . . . . . . .113.1Joint Requirements . . . . . . . . . . . . . . . . . . . . . . . . . . . . . . . . . . . . .113.2Process Capabilities . . . . . . . . . . . . . . . . . . . . . . . . . . . . . . . . . . . . .123.3Special Situations . . . . . . . . . . . . . . . . . . . . . . . . . . . . . . . . . . . . . .12 4Welding Cost Analysi s . . . . . . . . . . . . . . . . . . . . . . . . . . . . . . . . . . . . . . .14 5Welding Procedures . . . . . . . . . . . . . . . . . . . . . . . . . . . . . . . . . . . . . . . .155.1Effects of Welding Variables . . . . . . . . . . . . . . . . . . . . . . . . . . . . . .155.2Purpose of Welding Procedure Specifications (WPSs) . . . . . . . . . . .175.3Prequalified Welding Procedure Specifications . . . . . . . . . . . . . . . .185.4Guidelines for Preparing Prequalified WPSs . . . . . . . . . . . . . . . . . .205.5Qualifying Welding Procedures By Test . . . . . . . . . . . . . . . . . . . . . .205.6Examples . . . . . . . . . . . . . . . . . . . . . . . . . . . . . . . . . . . . . . . . . . . .225.7Approval of WPSs . . . . . . . . . . . . . . . . . . . . . . . . . . . . . . . . . . . . . .22 6Fabrication and Erection Guidelines . . . . . . . . . . . . . . . . . . . . . . . . . . .236.1Fit-Up and Assembly . . . . . . . . . . . . . . . . . . . . . . . . . . . . . . . . . . . .236.2Backing and Weld Tabs . . . . . . . . . . . . . . . . . . . . . . . . . . . . . . . . . .236.3Weld Access Holes . . . . . . . . . . . . . . . . . . . . . . . . . . . . . . . . . . . . .246.4Cutting and Gouging . . . . . . . . . . . . . . . . . . . . . . . . . . . . . . . . . . . .256.5Joint and Weld Cleaning . . . . . . . . . . . . . . . . . . . . . . . . . . . . . . . . .256.6Preheat and Interpass Temperature . . . . . . . . . . . . . . . . . . . . . . . . . .256.7Welding Techniques . . . . . . . . . . . . . . . . . . . . . . . . . . . . . . . . . . . . .266.8Special Welding Conditions . . . . . . . . . . . . . . . . . . . . . . . . . . . . . . .296.9Weld Metal Mechanical Properties . . . . . . . . . . . . . . . . . . . . . . . . . .296.10Intermixing of Weld Deposits . . . . . . . . . . . . . . . . . . . . . . . . . . . . .337Welding Techniques and Variables . . . . . . . . . . . . . . . . . . . . . . . . . . . . .357.1SMAW . . . . . . . . . . . . . . . . . . . . . . . . . . . . . . . . . . . . . . . . . . . . . .357.2FCAW-ss . . . . . . . . . . . . . . . . . . . . . . . . . . . . . . . . . . . . . . . . . . . . .367.3FCAW-g . . . . . . . . . . . . . . . . . . . . . . . . . . . . . . . . . . . . . . . . . . . . .377.4SAW . . . . . . . . . . . . . . . . . . . . . . . . . . . . . . . . . . . . . . . . . . . . . . . .387.5GMAW . . . . . . . . . . . . . . . . . . . . . . . . . . . . . . . . . . . . . . . . . . . . . .397.6ESW/EGW . . . . . . . . . . . . . . . . . . . . . . . . . . . . . . . . . . . . . . . . . . .40 8Welder Qualification . . . . . . . . . . . . . . . . . . . . . . . . . . . . . . . . . . . . . . . .40 9Weld Cracking . . . . . . . . . . . . . . . . . . . . . . . . . . . . . . . . . . . . . . . . . . . .409.1Centerline Cracking . . . . . . . . . . . . . . . . . . . . . . . . . . . . . . . . . . . . .419.2Heat Affected Zone Cracking . . . . . . . . . . . . . . . . . . . . . . . . . . . . . .429.3Transverse Cracking . . . . . . . . . . . . . . . . . . . . . . . . . . . . . . . . . . . .44 10Weld Quality and Inspection . . . . . . . . . . . . . . . . . . . . . . . . . . . . . . . . .4410.1Weld Quality . . . . . . . . . . . . . . . . . . . . . . . . . . . . . . . . . . . . . . . . . .4410.2Weld Quality and Process-Specific Influences . . . . . . . . . . . . . . . . .4610.3Weld Inspection . . . . . . . . . . . . . . . . . . . . . . . . . . . . . . . . . . . . . . . .46 11Arc Welding Safet y . . . . . . . . . . . . . . . . . . . . . . . . . . . . . . . . . . . . . . . . .49Fabricators’and Erectors’Guide to Welded Steel Construction1Introduction/BackgroundThis Fabricators’and Erectors’Guide to Welded Steel Construction has been produced by The Lincoln Electric Company in order to help promote high quality and cost-effective welding. This guide is not to be used as a sub-stitute for the AWS D1.1 Structural Welding Code,or any other applicable welding code or specification,and the user bears the responsibility for knowing applicable codes and job requirements. Rather,this document incorporates references to the D1.1-96 code,and adds explanation,clarification,and guidelines to facilitate compliance with the code. At the time of writing,this guide reflects the current industry views with respect to steel fabrication,with specific emphasis on the new pro-visions that have been recently imposed for fabrication of structures designed to resist seismic loads. These provi-sions are largely drawn from the Federal Emergency Management Administration (FEMA) Document No. 267,produced by the SAC Consortium,whose members include the Structural Engineers Association of California,Applied Technology Council,and California Universities for Research and Earthquake Engineering. Another cited document is the AWS D1 Structural Welding Committee’s Position Statement on the Northridge earthquake. Research is still underway,and additional provisions may be found that will further increase the safety of welded steel structures. The user of this document must be aware of changes that may occur to codes published after this guide,specific job requirements,and various interim recommendations that may affect the recommendations contained herein.The January 1994 Northridge earthquake revealed a number of examples of lack of conformance to D1.1 code mandated provisions. Lack of conformance to code provisions,and the poor workmanship revealed in many situations,highlight the need for education. This docu-ment is one attempt to assist in that area.The information contained herein is believed to be cur-rent and accurate. It is based upon the current technolo-gy,codes,specifications and principles of welding engineering. Any recommendations will be subject to change pending the results of ongoing research. As always,it is the responsibility of the Engineer of Record,and not The Lincoln Electric Company,to specify the requirements for a particular project. The prerogative to specify alternate requirements is always within the authority of the Engineer of Record and,when more restrictive requirements are specified in contract docu-ments,compliance with such requirements would super-sede the preceding recommendations. Acceptance of criteria by the Engineer of Record that are less rigorous than the preceding does not change the recommendations of The Lincoln Electric Company.2Welding ProcessesA variety of welding processes can be used to fabricateand erect buildings. However,it is important that all par-ties involved understand these processes in order to ensure high quality and economical fabrication. A brief description of the major processes is provided below.2.1SMA WShielded metal arc welding (SMAW),commonly known as stick electrode welding or manual welding,is the old-est of the arc welding processes. It is characterized by versatility,simplicity and flexibility. The SMAW process commonly is used for tack welding,fabrication of miscellaneous components,and repair welding. There is a practical limit to the amount of current that may be used. The covered electrodes are typically 9 to 18 inch-es long,and if the current is raised too high,electrical resistance heating within the unused length of electrode will become so great that the coating ingredients may overheat and “break down,”potentially resulting in weld quality degradation. SMAW also is used in the field for erection,maintenance and repairs. SMAW has earned a reputation for depositing high quality welds dependably.It is,however,slower and more costly than other meth-ods of welding,and is more dependent on operator skill for high quality welds.The American Welding Society (AWS) publishes a vari-ety of filler metal specifications under the jurisdiction of the A5 Committee; A5.1 addresses the particular require-ments for mild steel covered electrodes used with the shielded metal arc welding process. The specification A5.5 similarly covers the low alloy electrodes.1For welding on steels with minimum specified yield strengths exceeding 50 ksi,all electrodes should be of the low hydrogen type with specific coatings that are designed to be extremely low in moisture. Water,or H2O,will break down into its components hydrogen and oxygen under the intensity of the arc. This hydrogen can then enter into the weld deposit and may lead to unac-ceptable weld heat affected zone cracking under certain conditions. Low hydrogen electrodes have coatings comprised of materials that are very low in hydrogen. The low hydrogen electrodes that fit into the A5.1 classi-fication include E7015,E7016,E7018,and E7028. The E7015 electrodes operate on DC only. E7016 electrodes operate on either AC or DC. The E7018 electrodes oper-ate on AC or DC and include approximately 25% iron powder in their coatings; this increases the rate at which metal may be deposited. An E7028 electrode contains approximately 50% iron powder in the coating,enabling it to deposit metal at even higher rates. However,this electrode is suitable for flat and horizontal welding only. Under the low alloy specification,A5.5,a similar format is used to identify the various electrodes. The most signifi-cant difference,however,is the inclusion of a suffix letter and number indicating the alloy content. An example would be an “E8018-C3”electrode,with the suffix “-C3”indicating the electrode nominally contains 1% nick-el. A “-C1”electrode nominally contains 2.5% nickel.In AWS A5.1,the electrodes listed include both low hydrogen and non-low hydrogen electrodes. In AWS D1.1-96,Table 3.1,Group I steels may be welded with non-low hydrogen electrodes. This would include A36 steel. For Group II steels and higher,low hydrogen elec-trodes are required. These steels would include A572 grade 50. For most structural steel fabrication today,low hydrogen electrodes are prescribed to offer additional assurance against hydrogen induced cracking. When low hydrogen electrodes are used,the required levels of pre-heat (as identified in Table 3.2 of D1.1-96) are actually lower,offering additional economic advantages to the contractor.All the low hydrogen electrodes listed in AWS A5.1 have minimum specified notch toughnesses of at least 20 ft. lb. at 0°F. There are electrode classifications that have nonotch toughness requirements (such as E6012,E6013, E6014,E7024) but these are not low hydrogen elec-trodes. Although there is no direct correlation between the low hydrogen nature of various electrodes and notch toughness requirements,in the case of SMAW electrodes in A5.1,the low hydrogen electrodes all have minimum notch toughness requirements.Care and storage of low hydrogen electrodes— Low hydrogen electrodes must be dry if they are to perform properly. Manufacturers in the United States typically supply low hydrogen electrodes in hermetically sealed cans. When electrodes are so supplied,they may be used without any preconditioning; that is,they need not be heated before use. Electrodes in unopened,hermeti-cally sealed containers should remain dry for extended periods of time under good storage conditions. Once electrodes are removed from the hermetically sealed container,they should be placed in a holding oven to minimize or preclude the pick-up of moisture from the atmosphere. These holding ovens generally are electri-cally heated devices that can accommodate several hun-dred pounds of electrodes. They hold the electrodes at a temperature of approximately 250-300°F. Electrodes to be used in fabrication are taken from these ovens.Fabricators and erectors should establish a practice of limiting the amount of electrodes discharged at any given time. Supplying welders with electrodes twice a shift — at the start of the shift and at lunch,for example — minimizes the risk of moisture pickup. However,the optional designator “R”indicates a low hydrogen elec-trode which has been tested to determine the moisture content of the covering after exposure to a moist envi-ronment for 9 hours and has met the maximum level per-mitted in ANSI/AWS A5.1-91. Higher strength electrodes will require even more rigorous control.Electrodes must be returned to the heated cabinet for overnight storage.Once the electrode is exposed to the atmosphere,it begins to pick up moisture. The D1.1 code limits the total exposure time as a function of the electrode type (D1.1-96,paragraph 5.3.2.2,Table 5.1). Electrodes used to join high strength steels (which are particularly sus-ceptible to hydrogen cracking) must be carefully cared for,and their exposure to the atmosphere strictly limited.2Some electrodes are supplied in cardboard containers. This is not commonly done for structural fabrication, although the practice can be acceptable if specific and appropriate guidelines are followed. The electrodes must be preconditioned before welding. Typically,this means baking them at temperatures in the 700 to 900°F range to reduce moisture. In all cases,the electrode manufactur-er’s guidelines should be followed to ensure a baking procedure that effectively reduces moisture without dam-age to the covering. Electrodes removed from damaged hermetically sealed cans should be similarly baked at high temperature. The manufacturer’s guidelines should be consulted and followed to ensure that the electrodes are properly conditioned. Lincoln Electric’s recommen-dations are outlined in Literature # C2.300.Redrying low hydrogen electrodes— When containers are punctured or opened so that the electrode is exposed to the air,or when containers are stored under unusually wet conditions,low hydrogen electrodes pick up mois-ture. The moisture,depending upon the amount absorbed,impairs weld quality in the following ways:1.If the base metal has high hardenability,even a small amount of moisture can contribute to underbead cracking.2.A small amount of moisture may cause internal poros-ity. Detection of this porosity requires X-ray inspec-tion or destructive testing.3.A high amount of moisture causes visible external porosity in addition to internal porosity. Proper redry-ing restores the ability to deposit quality welds. The proper redrying temperature depends upon the type of electrode and its condition (D1.1-96,paragraph 5.3.2.4,Table 5.1).2.2FCA WFlux cored arc welding (FCAW) uses an arc between a continuous filler metal electrode and the weld pool. The electrode is always tubular. Inside the metal sheath is a combination of materials that may include metallic pow-der and flux. FCAW may be applied automatically or semiautomatically.The flux cored arc welding process has become the most popular semiautomatic process for structural steel fabri-cation and erection. Production welds that are short,that change direction,that are difficult to access,that must be done out-of-position (e.g.,vertical or overhead),or that are part of a short production run,generally will be made with semiautomatic FCAW.The flux cored arc welding process offers two distinct advantages over shielded metal arc welding. First,the electrode is continuous. This eliminates the built-in starts and stops that are inevitable with shielded metal arc welding. Not only does this have an economic advantage because the operating factor is raised,but the number of arc starts and stops,a potential source of weld disconti-nuities,is reduced.Another major advantage is that increased amperages can be used with flux cored arc welding,with a corre-sponding increase in deposition rate and productivity.With the continuous flux cored electrodes,the tubular electrode is passed through a contact tip,where electrical energy is transferred to the electrode. The short distance from the contact tip to the end of the electrode,known as electrode extension or “stickout,”limits the build up of heat due to electrical resistance. This electrode extension distance is typically 3/4 in. to 1 in. for flux cored elec-trodes,although it may be as high as two or three inches.Within the category of flux cored arc welding,there are two specific subsets:self shielded flux core (FCAW-ss) and gas shielded flux core (FCAW-g). Self shielded flux cored electrodes require no external shielding gas. The entire shielding system results from the flux ingredients contained within the core of the tubular electrode. The gas shielded versions of flux cored electrodes utilize an externally supplied shielding gas. In many cases,CO2is used,although other gas mixtures may be used,e.g., argon/CO2mixtures. Both types of flux cored arc weld-ing are capable of delivering weld deposits that meet the quality and mechanical property requirements for most structure applications. In general,the fabricator will uti-lize the process that offers the greatest advantages for the particular environment. Self shielded flux cored elec-trodes are better for field welding situations. Since no3externally supplied shielding gas is required,the process may be used in high winds without adversely affecting the quality of the deposit. With any of the gas shielded processes,wind shields must be erected to preclude inter-ference with the gas shield in windy weather. Many fab-ricators have found self shielded flux core offers advantages for shop welding as well,since it permits the use of better ventilation.Individual gas shielded flux cored electrodes tend to be more versatile than self shielded flux cored electrodes, and in general,provide better arc action. Operator appeal is usually higher. While the gas shield must be protected from winds and drafts,this is not particularly difficult in shop fabrication situations. Weld appearance and quality are very good. Higher strength gas shielded FCAW elec-trodes are available,while current technology limits self shielded FCAW deposits to 90 ksi tensile strength or less. Filler metals for flux cored arc welding are specified in AWS A5.20 and A5.29. A5.20 covers mild steel elec-trodes,while A5.29 addresses low alloy materials. Positive polarity is always used for FCAW-g,although the self shielded electrodes may be used on either polar-ity,depending on their classification. Under A5.29 for alloy electrodes,a suffix letter followed by a number appears at the end. Common designations include “Ni1”indicating a nominal nickel content in the deposited metal of 1%. The letter “M”could appear at the end of the electrode classification. If this is done,the electrode has been designed for operation with mixed shielding gas,that is an argon-CO2blend that consists of 75 - 80% argon. Other suffix designators may be used that indicate increased notch toughness capabilities,and/or diffusible hydrogen limits.Table 2.1describes various FCAW electrodes listed in AWS A5.20 and A5.29. Some of the electrodes have minimum specified notch toughness values although oth-ers do not. Some are gas shielded,while others are self shielded. Some are restricted to single pass applications, and others have restrictions on the thickness for their application. The electrical polarity used for the various electrodes is also shown. For critical applications in buildings that are designed to resist seismic loading as determined by the Engineer of Record,only electrodes that are listed in Table 2.1 as having the required mini-mum specified notch toughness levels should be used.The corresponding Lincoln Electric products are also shown.Shielding gases for FCA W-g— Most of the gas shield-ed flux cored electrodes utilize carbon dioxide for the shielding media. However,electrodes may also be shielded with an argon-CO2mixture. All gases should be of welding grade with a dew point of -40°F or less. The carbon dioxide content is typically 10% to 25%,with the balance composed of argon. This is done to enhance welding characteristics. In order to utilize the argon based shielding gases,arc voltages are typically reduced by two volts from the level used with carbon dioxide shielding.The selection of shielding gas may affect mechanical properties,including yield and tensile strength,elonga-tion,and notch toughness. This is largely due to the dif-ference in alloy recovery—that is,the amount of alloy transferred from the filler material to the weld deposit.Carbon dioxide is a reactive gas that may cause some of the alloys contained in the electrode (Mn,Si and others) to be oxidized,so that less alloy ends up in the deposit.When a portion of this active carbon dioxide is replaced with an inert gas such as argon,recovery typically increases,resulting in more alloy in the weld deposit.Generally,this will result in higher yield and tensile strengths,accompanied by a reduction in elongation.The notch toughness of the weld deposit may go up or down,depending on the particular alloy whose recovery is increased.Storing FCAW electrodes — In general,FCAW elec-trodes will produce weld deposits which achieve hydrogen levels below 16 ml per 100 grams of deposit-ed metal. These electrodes,like other products which produce deposits low in hydrogen,must be protected from exposure to the atmosphere in order to maintain hydrogen levels as low as possible,prevent rusting of the product and prevent porosity during welding. The recommended storage conditions are such that they maintain the condition of 90 grains of moisture per pound of dry air. Accordingly,the following storage conditions are recommended for FCAW electrodes in their original,unopened boxes and plastic bags.45Table 2.1 FCAW Electrode ClassificationFor best results,electrodes should be consumed as soon as practicable. However,they may be stored up to three years from the date of manufacture. The Lincoln distrib-utor or sales representative should be consulted if there is a question as to when the electrodes were made.Once the electrode packaging is opened,Innershield and Outershield electrodes can be subject to contamination from atmospheric moisture. Care has been taken in the design of these products to select core ingredients that are essentially resistant to moisture pick-up; however, condensation of the moisture from the atmosphere onto the surface of the electrode can be sufficient to degrade the product.The following minimum precautions should be taken to safeguard product after opening the original package. Electrode should be used within approximately 1 week after opening the original package. Opened electrode should not be exposed to damp,moist conditions or extremes in temperature and/or humidity where surface condensation can occur. Electrodes mounted on wire feeders should be protected against condensation. It is recommended that electrode removed from its original packaging be placed in poly bags (4 mil minimum thick-ness) when not in use.In the case of FCAW-s,excessively damp electrodes can result in higher levels of spatter,poorer slag cover and porosity. FCAW-g electrodes will display high moisture levels in the form of gas tracks,higher spatter and poros-ity. Any rusty electrode should be discarded.Products used for applications requiring more restrictive hydrogen control — The AWS specification for flux cored electrodes,ANSI/AWS A5.20,states that “Flux cored arc welding is generally considered to be a low hydrogen welding process.”To further clarify the issue,this specification makes available optional supple-mental designators for maximum diffusible hydrogen levels of 4,8 and 16 ml per 100 grams of deposited weld metal.Some Innershield and Outershield products have been designed and manufactured to produce weld deposits meeting more stringent diffusible hydrogen require-ments. These electrodes,usually distinguished by an “H”added to the product name,will remain relatively dry under recommended storage conditions in their original, unopened package or container.For critical applications in which the weld metal hydro-gen must be controlled (usually H8 or lower),or where shipping and storage conditions are not controlled or known,only hermetically sealed packaging is recom-mended. Innershield and Outershield electrodes are available in hermetically sealed packages on a special order basis.Once the package has been opened,the electrode should not be exposed to conditions exceeding 80% relative humidity for a period greater than 16 hours,or any less humid condition for more than 24 hours. Conditions that exceed 80% RH will decrease the maximum 16 hour exposure period.After exposure,hydrogen levels can be reduced by con-ditioning the electrode. Electrodes may be conditioned at a temperature of 230ºF ± 25ºF for a period of 6 to 12 hours,cooled and then stored in sealed poly bags (4 mil minimum thickness) or equivalent. Electrodes on plastic spools should not be heated at temperatures in excess of 150ºF. Rusty electrodes should be discarded.2.3SA WSubmerged arc welding (SAW) differs from other arc welding processes in that a layer of fusible granular material called flux is used for shielding the arc and the molten metal. The arc is struck between the workpiece and a bare wire electrode,the tip of which is submerged in the flux. Since the arc is completely covered by the flux,it is not visible and the weld is made without the flash,spatter,and sparks that characterize the open-arc processes. The nature of the flux is such that very little smoke or visible fumes are released to the air. Typically,the process is fully mechanized,although semi-automatic operation is often utilized. The electrode is fed mechanically to the welding gun,head,or heads. In semi-automatic welding,the welder moves the gun,usually equipped with a flux-feeding device,along the joint.Maximum % Ambient Temperature Relative Humidity Degrees F Degrees C60 - 7016 - 218070 - 8021 - 276080 - 9027 - 324590 - 10032 - 38306。
FABRICATION AND ERECTION OF STRUCTURAL 41STEELWORK1.0 INTRODUCTIONThe steel-framed building derives most of its competitive advantage from the virtues of prefabricated components, which can be assembled speedily at site. Unlike concreting, which is usually a wet process conducted at site, steel is produced and subsequently fabricated within a controlled environment. This ensures high quality, manufacture offsite with improved precision and enhanced speed of construction at site.The efficiency of fabrication and erection in structural steelwork dictates the success of any project involving steel-intensive construction. Current practices of fabrication and erection of steel structures in India are generally antiquated and inefficient. Perhaps, this inadequate infrastructure for fabrication is unable to support a large growth of steel construction. In India, the fabrication and erection of structural steelwork has been out of the purview of the structural designer. Nevertheless, in the future emerging situation, the entire steel chain, i.e. the producer, client, designer, fabricator and contractor should be able to interact with each other and improve their efficiency and productivity for the success of the project involving structural steelwork. Hence it becomes imperative that structural designers also must acquaint themselves with all the aspects of the structural steel work including the “fabrication and erection,” and that is the subject matter of the present chapter to briefly introduce good fabrication and erection practices.2.0 FABRICATION PROCEDUREStructural steel fabrication can be carried out in shop or at the construction site. Fabrication of steelwork carried out in shops is precise and of assured quality, whereas field fabrication is comparatively of inferior in quality. In India construction site fabrication is most common even in large projects due to inexpensive field labour, high cost of transportation, difficulty in the transportation of large members, higher excise duty on products from shop. Beneficial taxation for site work is a major financial incentive for site fabrication. The methods followed in site fabrication are similar but the level of sophistication of equipment at site and environmental control would be usually less. The skill of personnel at site also tends to be inferior and hence the quality of finished product tends to be relatively inferior. However, shop fabrication is efficient in terms of cost, time and quality.Structural steel passes through various operations during the course of its fabrication. Generally, the sequence of activities in fabricating shops is as shown in Table1. The sequence and importance of shop operations will vary depending on the type of fabrication required. All these activities are explained briefly in the subsequent parts of the section.© Copyright reservedTable 1: Sequence of activities in fabricating shops S.No. Sequence of Operation1.2.3.4.5.6.7.8.9.10. Surface cleaningCutting and machiningPunching and drilling Straightening, bending and rolling Fitting and reamingFastening (bolting, riveting and welding) FinishingQuality controlSurface treatmentTransportation2.1 Surface cleaningStructural sections from the rolling mills may require surface cleaning to remove mill scale prior to fabrication and painting.Hand preparation, such as wire brushing, does not normally conform to the requirements of modern paint or surface protection system. However in some applications manual cleaning is used and depending on the quality of the cleaned surface they are categorised into Grade St-2 and Grade St-3.Blast cleaning is the accepted way of carrying out surface preparation in a well-run fabrication shop. Abrasive particles are projected on to the surface of the steel at high speed by either compressed air or centrifugal impeller to remove rust and roughen the surface before applying the coating. By using shot or slag grits, both of which have an angular profile, surface oxides are removed and a rougher surface is obtained to provide an adequate key for metal spraying or special paint. Depending upon the increase in the quality of the cleaned surface, the blast cleaning is categorised into Grade – Sa2, Grade – Sa2½ and Grade Sa- 3.Flame cleaning is another method of surface cleaning. In this method the surface is cleaned using an oxy-acetylene torch which works on the principle of differential thermal expansion between steel and mill scale. In another method called ‘ the steel piece is immersed in a suitable acid and the scale and rust are removed.2.2 Cutting and MachiningFollowing surface preparation, cutting to length is always the first process to be carried out, and this is done by any of the following methods.2.2.1 Shearing and croppingSections can be cut to length or width by cropping or shearing using hydraulic shears. Heavy sections or long plates can be shaped and cut to length by specialist plate shears. For smaller plates and sections, machines featuring a range of shearing knives, which can accept the differing section shapes, are available.2.2.2 Flame Cutting or BurningIn this method, the steel is heated locally by a pressurised mixture of oxygen and a combustible gas such as propane, which passes through a ring of small holes in a cutting nozzle. The heat is focussed on to a very narrow band and the steel melts at 15000 C when a jet of high-pressure oxygen is released through a separate hole in the centre of the nozzle to blast away the molten metal in globules. The desired cuts are obtained quickly by this process. However due to a rapid thermal cycle of heating and cooling, residual stresses and distortion are induced and hence structural sections that are fabricated using flame cutting are treated specially in the design of structural steelwork.2.2.3 Arc Plasma CuttingIn this method, the cutting energy is produced electrically by heating a gas in an electric arc produced between a tungsten electrode and the workpiece. This ionises the gas, enabling it to conduct an electric current. The high-velocity plasma jet melts the metal of the work piece. The cut produced by plasma jet is very clean and its quality can be improved by using a water injection arc plasma torch. Plasma cutting can be used on thicknesses upto about 150 mm but the process is very slow.2.2.4 Cold SawingWhen a section cannot be cut to length by cropping or shearing, then it is normally sawn. All saws for structural applications are mechanical and feature some degree of computer control. There are three forms o f mechanical saw - circular, band and hack. The circular saw has a blade rotating in a vertical plane, which can cut either downwards or upwards, though the former is more common. Band saws have less capacity. Sections greater than 600 mm X 600 mm cannot be sawn using band saws. The saw blade is a continuous metal edged, with cutting teeth, which is driven by an electric motor. Hack saws are mechanically driven reciprocating saws. They have normal format blades carried in a heavy duty hack saw frame. They have more productivity than band saws.2.3 Punching and DrillingMost fabrication shops have a range of machines, which can form holes for connections in structural steelwork. The traditional drilling machine is the radial drill, a manually operated machine, which drills individual holes in structural steelwork. But this method has become too slow for primary line production. Therefore, larger fabricators have installed NC (Numerically Controlled) tooling, which registers and drills in response tokeyed in data. These can drill many holes in flanges and webs of rolled steel sections simultaneously. It is also possible to punch holes, and this is particularly useful where square holes are specified such as anchor plates for foundation bolts. While this method is faster compared to drilling, punching creates distortion and material strain hardening around the holes, which increase with material thickness. Its use is currently restricted to smaller thickness plates. In order to reduce the effect of strain hardening and the consequent reduction in ductility of material around punched holes, smaller size (2 mm to 4 mm lesser than final size) holes are punched and subsequently reamed to the desired size.2.4 Straightening, Bending and RollingRolled steel may get distorted after rolling due to cooling process. Further during transportation and handling operations, materials may bend or may even undergo distortion. This may also occur during punching operation. Therefore before attempting further fabrication the material should be straightened. In current practice, either rolls or gag presses are used to straighten structural shapes.Gag press is generally used for straightening beams, channels, angles, and heavy bars. This machine has a horizontal plunger or ram that applies pressure at points along the bend to bring it into alignment. Long plates, which are cambered out of alignment longitudinally, are frequently straightened by rollers. They are passed through a series of rollers that bend them back and forth with progressively diminishing deformation. Misalignments in structural shapes are sometimes corrected by spot or pattern heating. When heat is applied to a small area of steel, the larger unheated portion of the surrounding material prevents expansion. Upon cooling, the subsequent shrinkage produces a shortening of the member, thus pulling it back into alignment. This method is commonly employed to remove buckles in girder webs between stiffeners and to straighten members. It is frequently used to produce camber in rolled beams. A press brake is used to form angular bends in wide sheets and plates to produce cold formed steel members.2.5 Fitting and ReamingBefore final assembly, the component parts of a member are fitted-up temporarily with rivets, bolts or small amount of welds. The fitting-up operation includes attachment of previously omitted splice plates and other fittings and the correction of minor defects found by the inspector.In riveted or bolted work, especially when done manually, some holes in the connecting material may not always be in perfect alignment and small amount of reaming may be required to permit insertion of fasteners. In this operation, the holes are punched, 4 to 6 mm smaller than final size, then after the pieces are assembled, the holes are reamed by electric or pneumatic reamers to the correct diameter, to produce well matched holes.2.6 Fastening MethodsThe strength of the entire structure depends upon the proper use of fastening methods. There are three methods of fastening namely bolting, riveting and welding. A few decades back, it was a common practice to assemble components in the workshop using bolts or rivets. Nowadays welding is the most common method of shop fabrication of steel structures. In addition to being simple to fabricate, welded connection considerably reduce the size of the joint and the additional fixtures and plates. However, there is still a demand for structural members to be bolted arising from a requirement to avoid welding because of the service conditions of the member under consideration. These may be low temperature performance criteria, the need to avoid welding stresses and distortion or the requirement for the component to be taken apart during service e.g. bolts in crane rails or bolted crane rails.2.7 FinishingStructural members whose ends must transmit loads by bearing against one another are usually finished to a smooth even surface. Finishing is performed by sawing, milling or other suitable means. Several types of sawing machines are available, which produce very satisfactory finished cuts. One type of milling machine employs a movable head fitted with one or more high-speed carbide tipped rotary cutters. The head moves over a bed, which securely holds the work piece in proper alignment during finishing operation. Bridge specifications require that sheared edges of plates over a certain thickness be edge planed. This is done to remove jagged flame cut edges and the residual stresses at the edges. In this operation, the plate is clamped t o the bed of milling machine or a planer. The cutting head moves along the edge of the plate, planing it to a neat and smooth finish.The term finish or mill is used on detail drawings to describe any operation that requires steel to be finished to a smooth even surface by milling, planing, sawing or other machines.2.8 Surface TreatmentStructural steelwork is protected against corrosion by applying metal or paint coating in the shop or at site.2.8.1 Metal CoatingsThe corrosion protection afforded by metallic coating largely depends upon the surface preparation, the choice of coating and its thickness. It is not greatly influenced by the method of application. Commonly used methods of applying metal coating to steel surfaces are hot-dip galvanising, metal spraying, and electroplating. Electroplating is generally used for fittings and other small items.Galvanising is the most common method of applying a metal coating to structural steelwork. In this method, the cleaned and fluxed steel is dipped in molten zinc at a temperature of about 4500C. The steel reacts with molten zinc to form a series of zinc or iron alloys on its surface. As the steel workpiece is removed, a layer of relatively pure zinc is deposited on top of the alloy layers. For most applications galvanised steel does not require painting.An alternative method of applying metallic coating to structural steelwork is by metal spraying of either zinc or aluminium. The metal, in powder or wire form, is fed through a special spray gun containing a heat source, which can be either an oxy-gas flame or an electric arc. Molten globules of the metal are blown by a compressive jet on to the previously blast cleaned steel surface. No alloying occurs and the coating, which is produced, consists of porous overlapping platelets of metal. The pores are subsequently sealed, either by applying a thin organic coating which soaks into the surface, or by allowing the metal coating to weather, when corrosion products block the pores.2.8.2 Paint CoatingsPainting is the principal method of protecting structural steelwork from corrosion. Paints are usually applied one coat on top of another, each coat having a specific function or use.The primer is applied directly on to the cleaned steel surface. Its purpose is to wet the surface and to provide good adhesion for subsequently applied coats. Primers for steel surfaces are also usually required to provide corrosion inhibition. They are usually classified according to the main corrosion-inhibitive pigments used in their formulation, e.g. zinc phosphate, zinc chromate, red lead, and metallic-zinc. Each of these inhibitive pigments can be incorporated into a range of binder resins e.g. zinc phosphate alkyd primers, zinc phosphate epoxy primers, zinc phosphate chlorinated-rubber primers.The intermediate coats (or undercoats) are applied to build the total film thickness of the system. This may involve application of several coats. The finishing coats provide the first-line defence against the environment and also determine the final appearance in terms of gloss, colour etc. They also provide UV protection in exposed condition. Intermediate coats and finishing coats are usually classified according to their binders, e.g. vinyl finishes, urethane finishes.The various superimposed coats within a painting system have, of course, to be compatible with one another. They may be all of the same generic type or may be different, e.g. chlor-rubber base intermediate coats that form a film by solvent evaporation and no oxidative process, may be applied on to an epoxy primer that forms a film by an oxidative process which involves absorption of oxygen from the atmosphere. However, as a first precaution, all paints within a system should normally be obtained from the same manufacturer. The reader may refer to IS:487(1985) to know more about the surface treatment using paints.Detailed treatment of corrosion protection systems will be found in the Chapter on ‘Corrosion, fire protection and fatigue considerations of steel2.9 Welded connectionsWelding is used extensively for joining metals together and there is no doubt that it has been a most significant factor in the phenomenal growth of many industries. The different terminology used in welds are explained in IS:812(1957).A welded joint is made by fusing (melting) the steel plates or sections along the line of joint. The metal melted from each member of the joint unites in a pool of molten metal, which bridges the interface. As the pool cools, molten metal at the fusion boundary solidifies, forming a solid bond with the parent metal. When solidification completes, there is a continuity of metal through the joint.There are five welding process regularly employed namely:(i) Shielded Metal Arc Welding (SMAW)(ii) Submerged-Arc Welding (SAW)(iii) Manual Metal-Arc welding (MMA)(iv) Metal-Active Gas welding (MAG)(v) Stud weldingAll these methods of welding has been described with illustrations, in the chapter on ‘Welds - Static and Fatigue Strength - I’. Nevertheless, for the sake of completeness, these methods are briefly enumerated below.2.9.1 Methods of welding(1) Shielded Metal Arc Welding (SMAW)This is basically a semi-automated or fully automated welding procedure. The type of welding electrode used would decide the weld properties. Since this welding is carried out under controlled condition, the weld quality is normally good.(2) Submerged-Arc welding (SAW)This is fully mechanised process in which the welding head is moved along the joint by a gantry, boom or tractor. The electrode is a bare wire, which is advanced by a motor. Here again, since the welding is carried out in controlled conditions, better quality welds are obtained.(3) Manual Metal-Arc welding (MMA)This is the most widely used arc welding process and appears to be advantageous for labour intensive Indian construction practices. As it is manually operated it requires considerable skill to produce good quality welds. Hence in the case of MMA, stringentquality control and quality assurance procedures are needed. In India, the Welding Research Institute, BHEL, Trichy, Tamil Nadu, conducts periodical courses for welders and weld inspection personnel. Welders who are employed in actual fabrication are, infact, graded according to their training and skills acquired.(4) Metal-Active Gas welding (MAG)This process is sometimes referred to as Metal-Inert Gas (MIG) welding. It is also manually operated. A gas that does not react with molten steel shields the arc and the weld pool. This protection ensures that a sound weld is produced free from contamination-induced cracks and porosity. Nevertheless, this procedure also depends on the skills of the welder.(5) Stud weldingThis is an arc welding process and is extensively used for fixing stud shear connectors to beam in the composite construction. The equipment consists of gun hand tool (Fig.1(a) and 1(b)), D.C. power source, auxiliary contractor and controller. The stud is mounted into the chuck of the hand tool and conical tip of the stud is held in contact with the work piece by the pressure of a spring on the chuck. As soon as the current is switched on, the stud is moved away automatically to establish an arc. When a weld pool has been formed and the end of the stud is melted the latter is automatically forced into the steel plate and the current is switched off. The molten metal, which is expelled from the interface, is formed into a fillet by a ceramic collar or ferrule, which is placed around the stud at the beginning of the operation. The ferrule also provides sufficient protection against atmospheric contamination (Figs. 1(a) and 1(b)).This process offers an accurate and fast method for attaching shear connectors, etc with the minimum distortion. While it requires some skill to set up the weld parameters (voltage, current, arc time and force), the operation of equipment is relatively straight forward.connection (for Safety) Power Supply Unit (DC) Fig 1(a): Stud Welding (Schematic Diagram)(a) Shop welding (b) Site weldingFig.1 (b) Stud Welding on composite beam3.0 RESIDUAL WELDING STRESSES AND DISTORTION3.1 Residual welding stressesWhen a weld such as a butt weld is completed and begins to cool the hot weld and parent metal contracts longitudinally. The surrounding cold parent metal resists this contraction so that the weld is subjected to a tensile stress. This is balanced by the compressive stresses induced in the cold regions of the parent plate. These self-equilibrating forces introduce residual stresses both in the longitudinal and transverse direction. These stresses can even reach yield stress. Hence, the fabricator should adopt good fabrication practices that reduce the detrimental effect of residual stresses.3.2 Residual distortions due to welding3.2.1 Butt weldsFig. 2 shows a typical angular rotation of the plates due to a single V butt weld. This occurs because the major part of the weld is to one side of the neutral axis of the plate. This induces greater contractile stresses on that side. A double V or double U butt weld preparation reduces this distortion.Fig 2: Angular distortion of butt weldThe welding sequence for double preparation has an important influence on the resultant distortion. If a few weld runs are first made on one side, and the plate turned over and then the same number of runs are made on the second side (i.e., sequential welding), a 'balanced' weld will be produced with little distortion. This will not, of course, be possible in situations where rotation of the plate is impracticable such as a plate, which is part of a large fabrication.One aspect of butt-welding that should be noted is where back gouging is necessary to produce a full penetration weld. This can lead to distortion because the back gouging will produce bigger weld on the second side about the neutral axis of the plate. Such distortion can be reduced using an unsymmetrical weld section. Single V butt welds may produce cusping as shown in Fig.3 if the overall plate is restrained. This can be reduced by using a double V butt weld.3.2.2 Fillet weldsIn single and double fillets, shrinkage across the throat area can lead to distortion as shown in Fig.4. The distortion caused by a double fillet weld is important in box or plate girder webs where stiffeners are attached to only one side of the web. The use of a thicker plate can reduce the fillet weld angular distortion due to increased stiffness.3.3 Control of distortionSome distortion from welding is due to transverse and longitudinal contraction of weldments. Adopting suitable methods that can resist contraction can control the distortion. Weld distortion of a flat plate with a series of stiffeners on one side can be countered by elastically prebending the plates. In a similar manner two T sections can be welded, prebent back to back, to prevent final curvature in the web plate. Presetting the flange plate at an angle initially as shown in Fig.5 and Fig.6 may reduce the angular rotation due to a single fillet .Fig 3: Cusping due to transverse butt weldFig 4: Angular distortion of fillet welds (b)(a)Sometimes both presetting and prebending may be required, e.g. in plate girder fabrication where the web to flange welds are made automatically. When the welds are made manually, it is customary to put the stiffeners into the girder before the web/flange welds are made; in this way the square profile of the web to flange is maintained. Where automatic welding is employed the stiffeners cannot be put first since they would impede the progress of the automatic machine; in this presetting of the flange plates may be required. Welding should preferably be started at the centre of the fabrication and all succeeding welds from the centre outwards. This allows contraction to occur in the free condition. If the welding sequence is not chosen correctly, locked up stresses at either end of a welded portion can lead to uncorrectable distortions.Restraint procedure to reduce the effect of weld distortion should be carefully planned otherwise it can lead to solidification cracking.Fig 5: Prebending (b) Prebent T'sSpacer(a) Prebent Plate Fig 6: Preset for fillet weld3.4 Methods of correcting distortionIn general, there are two methods available to correct distortion namely:(a) applying force and (b) heatingLight sections can be corrected by applying force such as by hydraulic presses and local jacking or wedging. While heavier structures will require heating to apply stresses to reduce or eliminate the distortion. The effect of heating is similar to that of welding in which distortion results from the induced stresses. An area of steelwork will e xpand when heated but this expansion will be constrained by the surrounding cold unheated area, causing a plastic upset. On cooling, the area contracts and the element then becomes shorter, this principle can be used to correct or induce any curvature. The heat must be evenly applied right through the material, if not, unwanted curvature may occur in the plan of the section. Fig.7 shows some of the methods to induce and correct distortion. Fig.7(c) shows how it can be applied to a H section in which a camber is required. Rectangular heating across the bottom flange will shorten it compared with the top flange and hence induce camber. Since the shortening of the flange in the heated areas may tend to buckle the web adjacent to the flange, the heat is also applied to the web in a triangular manner such that the most affected part of the web contracts with the flange. In a similar manner a cambered plate may be straightened by applying triangular heating with the bases of the triangles parallel to the plate edges to be shortened. When the plate cools the heated edge will shorten and so reduce the camber. For panels in box girder webs, spot heating as shown in Fig.7(d) may be employed to reduce the concavity produced by the welding around the panel perimeter. Each spot contracts on cooling and induces a local plate shrinkage within the panel boundary and so reduces the dish. If the heat applied and the web panel thickness are such that there is a large temperature difference between the surfaces of the plate at each spot heat, then the resultant contraction on the hotter surface will produce a greater correction of the dish.Triangular heatby heating Rectangular heat input across flange7(a) Camber of beam by heating Triangles heated evenlythrough plate thickness7(b) Cambered PlateFig 7. Methods of correction of distortion3.5 Defects in weldsFaulty welding procedure can lead to defects in the welds, thereby reducing the strength of the weld.Fig.8 shows some of the common defects in welds. Some of these are:(i) Undercut(ii) Porosity(iii) Incomplete Penetration(iv) Lack of side wall fusion(v) Slag inclusions(vi) cracksAll these weld defects are discussed in the chapter on ‘Weld – Static and Fatigue strength – I’. It should be emphasised that a ‘theoretical 100% error free’ weld is not achievable in practice. While good quality welds are the priority of welders and weld inspectors, minor defects do normally creep in. Hence these defects are assessed during a weld inspection.If the defects are within acceptable limits, they are accepted. If not, alternative measures of rectification may have to be carried out. Table 2 shows nature of some of the defects and their acceptability limits.(a) Undercut(d) Lack of side wall fusion Lack of sidewall fusion。