长安悦翔1.5手动豪华型使用手册
- 格式:ppt
- 大小:5.23 MB
- 文档页数:98
长安欧尚x51.5t豪华版使用说明书全景影像系统是通过前后左右四颗摄像头采集车身周围图像,合成一幅360°俯视图,并通过车机显示屏显示出来的泊车辅助系统。
该系统能大大减小视野盲区,帮助用户顺利泊车入位,提高窄路、窄巷等场景的通过性。
全景影像可能使物体在屏幕上的轮廓变形,因此不能完全依靠影像估算本车与障碍物(车辆、行人等)的距离,请务必根据实际情况进行判断,确保安全!受全景系统分辨率限制,某些物体不能显示或不能清楚的显示,例如细隔离柱、格栅和树木等。
全景影像前后视图仍存在少量视野盲区。
要始终注意观察汽车周围。
全景影像只能在屏幕上显示二维图像,由于缺少空间深度,很难或根本不能通过全景影像识别路面上的突出物或凹坑。
打开全景整车电源为上电状态,且车速小于27Km/h。
按下全景按键开关,车机显示屏自动切换到全景视图。
挂入R档(倒车挡)时,车机显示屏自动切换到全景视图。
转向灯触发全景状态功能开启时(点击设置开启/关闭),打开转向灯,车机显示屏会切换到全景对应视图。
退出全景按键进入全景时,在车速大于30Km/h时,全景会自动退出。
在从R档(倒车挡)退出后,用户无操作20s后自动退出全景。
在非R档(倒车挡)时,点击全景界面的关闭按键,关闭全景视图,回到车机之前显示界面。
对于转向灯或雷达触发的全景,不满足触发条件后5s全景自动退出。
视图切换全景+前/后/左/右视图切换全景环视图下,点击前(A)、后(C)、左(D)、右(B)区域,单视图可分别切换到对应的全景+前/后/左/右视图。
当R档(倒车挡)切换到非R档时,视图将自动切换到全景+前视图。
全景+左右视图切换在全景+单视图下,点击车模本体(E),可以切换到全景+左右视图。
前/后单视大图切换在全景+前/后视图下,点击单视图区域,可以切换到对应方向单视大图。
单俯视大图视野角度更广。
再次点击单视大图切换回对应的全景+单视图。
泊车引导线全景+前/后视图下,全景视图及单视图中会有引导线。
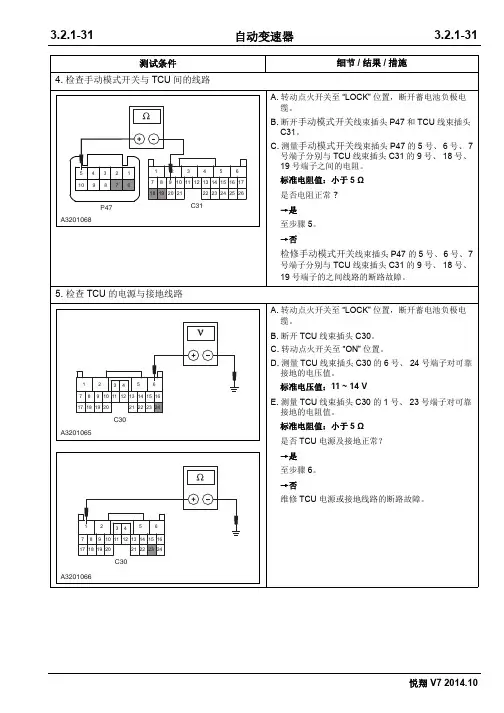
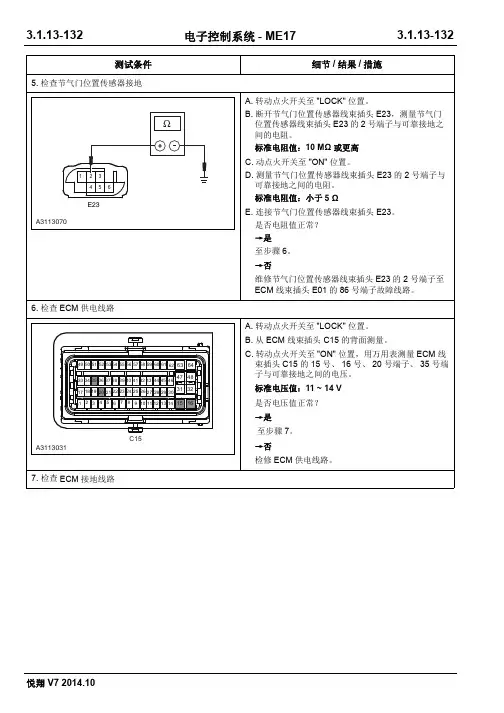
测试条件细节/结果/措施6.检查TCUA.拆卸TCU。
B.在一辆状态良好的车辆上安装TCU。
是否安装TCU后车辆状态正常?→是确认系统正常。
参考:间歇性故障诊断流程(3.1.13电子控制系统 - ME17,故障现象诊断与测试)。
→否更换TCU。
DTC诊断与测试控制模块端子列表端子号接线端子说明状态C30-10.85 BK G310接地接地C30-20.5 GN/BK制动压力控制电磁阀接地信号输出C30-30.5 BU/BK锁止控制电磁阀接地信号输出C30-40.5 GN制动压力控制电磁阀输出C30-50.5 BU锁止控制电磁阀输出C30-60.85 RD持续电源电源C30-70.3 LG/BK HCAN_L双向C30-8---C30-90.5 VT/BK离合器1压力控制电磁阀接地信号输出C30-10---C30-110.5 GY油温传感器信号输入C30-120.5 GY/BK油温传感器接地信号输入C30-13---C30-14---C30-15---C30-160.5 RD/GN换档电磁阀输出C30-170.3 LG HCAN_H双向C30-18---C30-190.5 PK/YE离合器2压力控制电磁阀接地信号输出C30-20---C30-210.5 PK/YE离合器2压力控制电磁阀输出C30-220.5 VT/GN离合器1压力控制电磁阀输出端子号接线端子说明状态C30-230.5 VT G310接地C30-240.5 BK点火开关电源(IG1)电源C31-10.5 WH/BU R档信号输入C31-2---C31-3---C31-4---C31-50.5 WH/BK车速传感器+输入C31-60.5 OG/BK涡轮转速传感器-输入C31-70.5 BU/WH D档信号输入C31-80.5 BN N档信号输入C31-90.5 YE手动换档模式开关输入C31-10---C31-11---C31-12---C31-13---C31-140.5 WH车速传感器-输入C31-15--C31-160.5 OG涡轮转速传感器+输入C31-17---C31-180.5 BU手动换档模块“-”开关输入C31-190.5 YE/BU手动换档模块“+”开关输入C31-200.5 PK/WH P档信号输入C31-21---C31-22---C31-23---C31-24---故障代码列表故障码说明是否点亮MIL灯P0974换档电磁阀S1电源短路/开路onP0973对地短路onP0980C1电磁阀电源短路onP0979对地短路/开路onP0983C2电磁阀电源短路onP0982对地短路/开路onP0999B1电磁阀电源短路onP0998对地短路/开路onP2763锁止电磁阀电源短路onP2764对地短路/开路onP0722车速传感器没有脉冲onP0720电器类故障onP0717输入轴速度传感器没有脉冲onP0715电器类故障onP0713油温传感器电源短路/开路onP0712对地短路on P0711油温保持on P0601ROM内部校验错误onP0562蓄电池电压低电压onP0563高电压on P0604RAM读/写错误onP0978电磁阀反馈电流C1电磁阀电流保持onP0981C2电磁阀电流保持on P0997B1电磁阀电流保持on P2762锁止电磁阀电流保持on P0603EPROM读/写错误on P1205换档器手动模式问题换档器手动模式问题offP0706档位传感器对地短路(多位置信号)onP0705开路(无信号)onP0766换档电磁阀故障最大压力保持(S1电磁阀压力最大或者C2电磁阀压力最小)onP0741最大压力保持(S1电磁阀压力最大或者锁止电磁阀压力最小)onP0751最小压力保持onP0762C1电磁阀故障最大压力保持on P0761最小压力保持on P0767C2电磁阀故障最大压力保持on P0766最小压力保持(C2电磁阀压力最大或者S1电磁阀压力最小)on P2708B1电磁阀故障最大压力保持on P2707最小压力保持on P0742锁止电磁阀故障锁止电磁阀保持闭合状态on P0741锁止电磁阀保持关闭状态on P0731无发动机制动C1、C2或锁止电磁阀压力最小off P1229-在D 档无动力off U0001CAN CAN 总线关闭on U0074没有CAN 信号(无应答)on U0100与ECU 失去通讯on U2081与ESP 失去通讯off -发动机速度故障off -节气门位置故障off -发动机扭矩故障off -冷却液故障off -制动踏板信号故障off -制动压力故障off -扭矩控制故障off故障码说明是否点亮MIL 灯失效保护列表DTC码部件失效保护操作失效保护解除条件P0562蓄电池电压(低电压)跛行模式5点火开关从OFF到ON 位置P0563蓄电池电压(高电压)跛行模式3点火开关从OFF到ON 位置P0601ROM(内部校验)跛行模式3点火开关从OFF到ON 位置P0603EPROM(读/写错误)TCU使用默认值作为EPROM的初始值点火开关从OFF到ON位置P0604RAM(读/写错误)跛行模式3点火开关从OFF到ON 位置P0705空档位置传感器(对电源短路/开路[无信号])跛行模式3点火开关从OFF到ON位置P0706空档位置传感器(对地短路[多个信号])跛行模式3点火开关从OFF到ON位置P0711油温传感器(油温保持)无自学习控制无锁止滑差控制无空档控制油温=80℃点火开关从OFF到ON位置P0712油温传感器(对地短路)无自学习控制无锁止滑差控制无空档控制油温=80℃点火开关从OFF到ON位置P0713油温传感器(对电源短路/开路)无自学习控制无锁止滑差控制无空档控制油温=80℃点火开关从OFF到ON位置P0715输入轴速度传感器(对电源短路/对地短路/开路)跛行模式3改变输入速度计算来源点火开关从OFF到ON位置P0717输入轴速度传感器(没有脉冲)跛行模式3改变输入速度计算来源点火开关从OFF到ON位置P0720输出轴速度传感器(对电源短路/对地短路/开路)跛行模式3改变输入速度计算来源点火开关从OFF到ON位置P0722输出轴速度传感器(没有脉冲)跛行模式3改变输入速度计算来源点火开关从OFF到ON位置P0731无发动机制动无自学习控制无自适应换档控制点火开关从OFF到ON位置P0741锁止控制电磁阀(关闭状态保持)无自学习控制无锁止控制无锁止滑差控制点火开关从OFF到ON位置P0742锁止控制电磁阀(闭合状态保持)无自学习控制无自适应换档控制C2电磁阀压力最大时扭矩限制=40N.M(仅在R档时)点火开关从OFF到ON位置P0761 C1换档控制电磁阀(最小压力保持)跛行模式2点火开关从OFF到ON位置P0762C1换档控制电磁阀(最大压力保持)跛行模式2点火开关从OFF到ON位置P0766C2换档控制电磁阀(最小压力保持)跛行模式2点火开关从OFF到ON位置P0767C2换档控制电磁阀(最大压力保持)跛行模式2点火开关从OFF到ON位置P0741换挡电磁阀S1(最大压力保持[S1压力最大或SLU压力最小])无自学习控制无锁止控制无锁止滑差控制点火开关从OFF到ON位置P0751换挡电磁阀 S1(最小压力保持)无自学习控制无自适应换档控制在1档需要发动机制动时,控制方式同2档点火开关从OFF到ON位置P0766换挡电磁阀 S1(最大压力保持[S1压力最大或SLC2压力最小])跛行模式2点火开关从OFF到ON位置P0973换挡电磁阀 S1(对地短路)跛行模式4点火开关从OFF到ON位置P0974换挡电磁阀 S1(对电源短路/开路)跛行模式4点火开关从OFF到ON位置P0978C1压力控制电磁阀[SLC1](反馈电流保持)跛行模式1点火开关从OFF到ON位置P0979C1压力控制电磁阀[SLC1](对地短路或者开路)跛行模式1点火开关从OFF到ON位置P0980C1压力控制电磁阀[SLC1](对地短路或者开路)跛行模式1点火开关从OFF到ON位置P0981C2压力控制电磁阀[SLC2](反馈电流保持)跛行模式1点火开关从OFF到ON位置DTC码部件失效保护操作失效保护解除条件P0982C2压力控制电磁阀[SLC2](对地短路或者开路)跛行模式1点火开关从OFF到ON位置P0983C2压力控制电磁阀[SLC2](对电源短路)跛行模式1点火开关从OFF到ON位置P0997B1压力控制电磁阀[SLB1](反馈电流保持)跛行模式1点火开关从OFF到ON位置P0998B1压力控制电磁阀[SLB1](对地短路或者开路)跛行模式1点火开关从OFF到ON位置P0999B1压力控制电磁阀[SLB1](对地短路或者开路)跛行模式1点火开关从OFF到ON位置P1205换档器手动模式问题无手动模式控制点火开关从OFF到ON 位置P1229在D档无动力-点火开关从OFF到ON 位置P2707B1压力控制电磁阀[SLB1](最小压力保持)跛行模式2点火开关从OFF到ON位置P2708B1压力控制电磁阀[SLB1](最大压力保持)跛行模式2点火开关从OFF到ON位置P2762锁止电磁阀[SLU](对电源短路)跛行模式1点火开关从OFF到ON位置P2763锁止电磁阀[SLU](对电源短路)无自学习控制无锁止控制无锁止滑差控制无空档控制功能无自适应换档控制SLC2最大压力限制为40 N/m(仅在R档)点火开关从OFF到ON位置P2764锁止电磁阀[SLU](对地短路或开路)无自学习控制无锁止控制无锁止滑差控制无空档控制功能无自适应换档控制SLC2最大压力限制为40 N/m(仅在R档)点火开关从OFF到ON位置U0001CAN总线中断跛行模式3点火开关从OFF到ON 位置U0074没有CAN信号跛行模式3点火开关从OFF到ON 位置DTC码部件失效保护操作失效保护解除条件数据流列表U0100与ECU 失去通讯跛行模式3点火开关从OFF 到ON 位置U2081与ESP/ABS 失去通讯无自学习控制无空档控制无自适应换档控制制动主缸压力=0点火开关从OFF 到ON 位置数据流名称点火开关“ON”发动机速度2500 rpm发动机怠速换档电磁阀S1反馈状态打开打开打开C1电磁阀反馈电流180 mA 180 mA 190 mA C2电磁阀反馈电流900 mA 900 mA 900 mA B1电磁阀反馈电流100 mA 100 mA 100 mA 锁止电磁阀命令200 mA 190 mA 190 mA 变速器输出车速0.0 RPM 0.0 RPM 0.0 RPM 变速器涡轮速度0.0 RPM 2497 RPM 712.00 RPM 变速器油油温65 deg C 77 deg C 65 deg C 电瓶电压11.99 V 14.07 V 13.74 V 发动机速度0.0 RPM 2500 RPM 785.00 RPM 发动机扭矩0.0 %10.21 %19.99 %驾驶员请求扭矩0 %10 %20 %刹车信号关闭关闭关闭加速踏板位置0 % 4 %0 %档位P 档P 档P 档应急模式无紧急模式无紧急模式无紧急模式车速0 km/h 0 km/h 0 km/h 降扭请求100.00 %100.00 %100.00 %限扭请求100.00 %100.00 %100.00 %液力变矩器当前锁止状态未锁止未锁止未锁止换档模式经济模式经济模式经济模式当前档位驻车档驻车档驻车档速比0.07.977.97故障灯信息关闭关闭关闭MIL 灯请求打开打开打开DTC 码部件失效保护操作失效保护解除条件主动测试列表诊断仪显示项目部件控制范围诊断说明换档电磁阀S1控制启用/关闭换档电磁阀S1打开/关闭控制换档电磁阀S1的工作状态C1电磁阀电流启用/关闭C1电磁阀0 ~ 2550调节值控制C1电磁阀的工作状态C2电磁阀电流启用/关闭C2电磁阀0 ~ 2550调节值控制C2电磁阀的工作状态B1电磁阀电流启用/关闭B1电磁阀0 ~ 2550调节值控制B1电磁阀的工作状态锁止电磁阀电流启用/关闭锁止电磁阀0 ~ 2550调节值控制锁止电磁阀SLU的工作状态DTC 诊断流程索引故障码说明诊断程序P0562TCU 检测到系统处于低电参考:DTC P0562 、P0563P0563TCU 检测到系统处于高电压P0601TCU 的内部ROM 故障参考:DTC P0601、P0603、 P0604P0603TCU 的内部EEPROM 故障P0604TCU 的内部RAM 故障P0705空档位置开关与电源短路或开路故障参考:DTC P0705 、P0706P0706空档位置开关与接地短路故障P0711ATF 温度传感器(OT) 油温保持参考:DTC P0711、P0712 、P0713P0712ATF 温度传感器(OT) 对地短路P0713ATF 温度传感器(OT) 对电源短路/ 开路P0715输入轴速度传感器对电源短路或对地短路/ 开路参考:DTC P0715 、P0717P0717输入轴速度传感器无信号故障P0720输出轴速度传感器对电源短路或对地短路/ 开路参考:DTC P0720、 P0722P0722输出轴速度传感器无信号故障P0731无发动机制动(C1电磁阀压力最小或C2电磁阀压力最小或锁止电磁阀压力最小)参考:DTC P0731P0741换挡电磁阀 S1最大压力保持或SLU 最小压力保持参考:DTC P0741、 P0751 、P0766、P0973、 P0974 参考:DTC P0741 、P0742 、P2762 、P2763、 P2764P0742锁止电磁阀[SLU] 闭合状态保持参考:DTC P0741、 P0742、P2762、P2763、 P2764P2762锁止电磁阀[SLU] 反馈电流保持P2763锁止电磁阀[SLU] 对电源短路P2764锁止电磁阀[SLU] 对地短路或开路P0761C1 换档控制电磁阀[SLC1] 最小压力保持参考:DTC P0761、P0762、P0978P0979、P0980P0762C1 换档控制电磁阀[SLC1] 最大压力保持P0978C1 压力控制电磁阀[SLC1] 反馈电流保持P0979C1 换档控制电磁阀[SLC1] 对地短路/ 开路P0980C1 换档控制电磁阀[SLC1] 电源短路P0766C2 换档控制电磁阀[SLC2]最大压力保持或者S1电磁阀最小压力保持参考:DTC P0766、P0767、P0982、P0983参考:DTC P0741、P0751、P0766、P0973、P0974P0767C2 换档控制电磁阀[SLC2] 最大压力保持参考:DTC P0766、P0767、P0981P0982、P0983P0981C2 换档控制电磁阀[SLC2] 反馈电流保持P0982C2 压力控制电磁阀[SLC2] 对地短路或者开路P0983C2 压力控制电磁阀[SLC2] 对电源短路P0751换档电磁阀(S1) 最小压力保持参考:DTC P0741、P0751、P0766、P0973、P0974P0766换档电磁阀(S1) 最大压力保持P0973换档电磁阀(S1) 电源短路/ 开路P0974换档电磁阀(S1) 对地短路P2707B1 压力控制电磁阀[SLB1] 最小压力保持参考:DTC P2707、P2708、P0997、P0998、P0999P2708B1 压力控制电磁阀[SLB1] 最大压力保持P0997B1 压力控制电磁阀[SLB1] 反馈电流保持P0998B1 压力控制电磁阀[SLB1] 对地短路或者开路P0999B1 压力控制电磁阀[SLB1] 对电源短路P1205换档器手动模式问题参考:DTC P1205P1229在D 档无动力参考:DTC P1229U0001CAN 总线中断参考:DTC U0001、U0074、U0100、U2081U0074没有CAN 信号U0100与ECU 失去通讯U2081与ESP/ABS 失去通讯故障码说明诊断程序DTC P0562、P05631.故障代码说明2.可能的原因3.诊断流程故障码说明定义P0562TCU 检测到系统处于低电压蓄电池常电源经过发动机舱电器中心C01的10A 保险丝EF24 后直接到达TCU 线束插头C30 的6 号端子。
长安悦翔搭载的1.5L发动机是长安汽车的自主产品,据了解,悦翔的发动机配件及保养所需材料基本上都是国产配套厂生产的,生产地多为重庆本地。
比如机油三滤以及其他油液等,零件配套厂与汽车生产厂同地区也是保证售后保养成本低的一大因素。
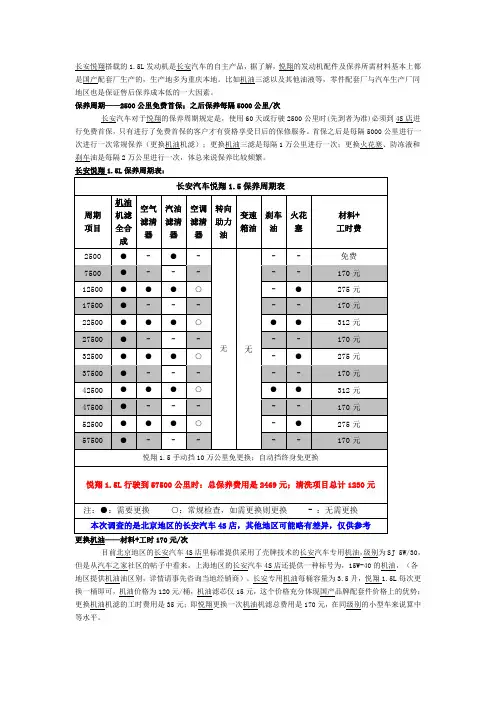
保养周期——2500公里免费首保;之后保养每隔5000公里/次长安汽车对于悦翔的保养周期规定是,使用60天或行驶2500公里时(先到者为准)必须到4S店进行免费首保,只有进行了免费首保的客户才有资格享受日后的保修服务。
首保之后是每隔5000公里进行一次进行一次常规保养(更换机油机滤);更换机油三滤是每隔1万公里进行一次;更换火花塞、防冻液和刹车油是每隔2万公里进行一次,体总来说保养比较频繁。
更换机油——材料+工时170元/次目前北京地区的长安汽车4S店里标准提供采用了壳牌技术的长安汽车专用机油,级别为SJ 5W/30,但是从汽车之家社区的帖子中看来,上海地区的长安汽车4S店还提供一种标号为,15W-40的机油,(各地区提供机油油区别,详情请事先咨询当地经销商)。
长安专用机油每桶容量为3.5升,悦翔1.5L每次更换一桶即可,机油价格为120元/桶,机油滤芯仅15元,这个价格充分体现国产品牌配套件价格上的优势;更换机油机滤的工时费用是35元;即悦翔更换一次机油机滤总费用是170元,在同级别的小型车来说算中等水平。
长安悦翔部分配件及工时费价格:工时费——常规保养项目均价35元/工时通过此次调查,特别要说明的是长安汽车在工时费上的优势。
对于国产自主品牌轿车来说,售后保养网店比合资品牌少已经是一个劣势,不过长安4S店工时费的低廉或许低于一般消费者心里的那个“标准价”,调查显示,悦翔车型的常规保养每次都是按照一个工时来计算的,价格为35元,这个常规保养可能只是一项更换机油机滤,也可能是更换机油机滤+其他滤芯+刹车油。
总而言之,只要是常规保养项目,不管多少个项目同时进行,每个小时的工时费只收35元,这个价格甚至可以与北京地区主流汽配城的工时费一比高低。

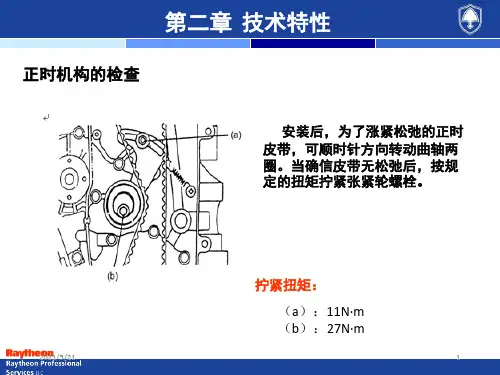
13.检查气门弹簧长度和负荷。
通用设备:游标卡尺注意:参照下表数据,检查各弹簧是否完簧会引起振动,而且由于气门座压力降低会产生漏气,导致输出功率的降低。
项目标准气门弹簧自由长度47.2~48.8mm气门弹簧预负荷235-265N为38mm14.检查气门弹簧垂直度。
通用设备:直尺注意:使用直尺和平板,根据气门弹簧端部和间隙超过下面给出的极限值,必须更换气门弹簧。
气门弹簧垂直度极限:1.44 mm组装1.使用11 mm铰刀去除气门导管孔毛边。
通用设备:11 mm铰刀2.将气门导管装入缸盖。
1 均匀加热缸盖。
注意:均匀地把缸盖加热到80℃~ 100℃之2 使用专用工具把新的气门导管压入孔内,直到专用工具接触到缸盖为止。
注意:安装后确保气门导管伸出缸盖10 mm。
注意:进排气门导管是一样的。
3.使用5.5 mm 铰刀铰气门导管孔径。
4.清理气门导管孔。
5.安装气门弹簧底座到气缸盖上。
6.使用专用工具,将新的气门杆油封安装到气门导管上。
专用工具:CA301-013注意:将机油涂抹在气门杆油封表面,然后再注意: 油封一旦拆下,不得再次使用。
注意:安装时,不得使用锤子或其他工具敲打推压专用工具。
敲打专用工具,可能会引起油封破损。
7.将气门安装到气门导管上。
注意:在安装气门到气门导管上时,将机油加8.安装气门弹簧和弹簧座。
注意:每个气门弹簧有顶端(大节距端1)和底(小节距端2)。
安装弹簧时,气门弹簧上涂有黄色色标的大节距端安置于上方,其小节距端应正确落入座孔内,不得歪斜。
9.使用专用工具,压缩气门弹簧,将气门锁块安装到气门杆凹槽内。
专用工具:CA301-011通用设备:镊子10.安装新的气缸垫。
1 拆下旧的气缸垫。
2 在配合表面涂抹适量的机油。
3 将气缸垫表面有“CHANGAN”标记的一面朝上并与曲轴皮带轮一侧相接安装在发动机缸体上。
注意:气缸垫一旦拆下,不能重复再次使用,压油孔应与曲轴箱分总成上的油孔对正。
11.安装并紧固缸盖螺栓。

悦翔销售实战手册好看—炫动设计●悦翔采用了全新的设计理念,在造形上运用了现代简洁的倒梯形几何元素,以及古代弓箭式的格栅设计,再结合丹凤眼造型的深动大灯,体现出了浓郁的欧洲风格与中国元素,车顶流畅的圆拱型线条,贯穿前后,整车造型浑然天成,车侧则采用刀锋设计的腰线,搭配水晶侧灯,拥有超强的动感元素,如同待发的箭。
而车尾造型则运用空气动力学设计出具有稳定车身效果的一体式扰流板,减少行车中的阻力。
悦翔是欧洲风格与中国元素的融合,时尚与美学的完美统一,高贵而兼具亲和力,有前卫的设计元素而又不张扬,内敛造型而不古板,代表了未来全球车辆造型所追求的主流,所以好看呀!好开—轻盈驾驭●悦翔拥有高水平的精准悬挂、高质量的平稳底盘,整车前后轴以近似1︰1的荷重布局,提供了前后排的舒适驾乘,让操控平稳随心,提升您的驾驶乐趣,并且配备了全面的安全性部件和新一代电子制动控制系统,搭载最先进的发动机与变速系统,将操控与动力做到完美的结合,直线弯道都能得心应手,所以很好开啦!好省油—绿色能耗●悦翔搭载了高效率全铝合金发动机,拥有全球最先进的技术。
搭配领先同级车的进排气系统、精准的点火系统体现出自主研发的全球领先的技术水平,采用最先进的全车轻量化车身设计与空气动力学造型设计,因此油耗仅4.5L/100KM,每公里仅需2角3分钱左右(93#汽油5.09元/升),当然省油啦!数据参考:规格对比1.5L MT 1.5L ( 1.5L MT 1.4L SL MT115050195/55 R151460/146525001401415170044056.68V3 菱悦豪华版120050195/60 R151480/146026001701490170545336.98F3 GLX-I 新白金版豪华型104045185/60 R151450/143125021501435169243426.08金刚125149150最小离地高度mm175/65 R14185/60 R14185/65 R14轮胎规格1100451425/141524101465165041556.28江淮同悦豪华型1450/14101475/1465前后轮距mm7.495.89厂方指导价RMB 万元)1120452515147517104360悦翔豪华型1105整车质量kg45油箱容积L 2480轴距mm1507车身高度mm 1690车身宽度mm 4310车身长度mm 乐风竞品话术:1.乐风的外观保守沉闷,并且在高速行驶时风噪声很大(在时速120公里时,乐风的风噪达到了78分贝,而悦翔仅66分贝),由于外形设计的缺陷,油耗也增加不少; 2. 金刚的整体造型比较生硬,空间也比较小,高速时候的风噪声也很大(时速100公里时,金刚的风噪就已经达到了75分贝)。


P R O T R A I L E R B A C K U P A S S I S T W I T H T R AI L E R R E V E R S E G U I D A N C EF-150Q U I C K S T A R T G U I D EAugust 2020First PrintingLitho in U.S.A.ML3J 19G217 RAPlease scan the QR code for additional Information about your vehicle.To put QR tags to work for you, use your mobile phone’s browser or app storeto download a QR tag reader. Then follow the directions to scan the QR tagand see your vehicle’s features come to life.IMPORTANTThe operation of the Pro Trailer BackupAssist with Trailer Reverse Guidance systemdepends on how and where you place thesticker or sensor.• DO NOT ATTEMPT TO PLACE THE STICKER OR SENSOR UNTILYOU READ THROUGH THIS GUIDE.CARD/STICKERS POCKET (SLEEVE)United StatesFord CustomerRelationship Center1-800-392-3673 (FORD)(TDD for the hearing impaired:1-800-232-5952)@FordServiceCanadaFord CustomerRelationship Centre1-800-565-3673 (FORD)(TDD for the hearing impaired:1-888-658-6805)ford.ca@FordServiceCAford.ca*IF EQUIPPEDHOW DO I USE IT?Set up this feature by following the steps in this guide. Scan the QR code on the backcover with your smartphone for more information about your vehicle.SET UP YOUR SYSTEM Page 3SELECT YOUR TRAILER TYPE Page 4POSITION YOUR TRUCK AND TRAILER Page 5SETUP OPTIONS Page 6SENSOR SETUP Page 6SETTING UP YOUR TRAILER WITH A SENSORWHAT YOU WILL NEED TO INSTALLYOUR SENSOR Page 7TRAILER SENSOR SETUP Page 8SETTING UP YOUR TRAILER WITH A STICKER*STICKER SETUP Page 9PLACING THE STICKER Page 10CALIBRATION Page 12FEATURE OPERATION USING TRAILERBACKUP ASSIST Page 13FEATURE OPERATION USING TRAILERREVERSE GUIDANCE Page 15VIEW OPERATION Page 16HITCH ANGLE GRAPHIC Page 17* This is a feature enhancement and is only available after a vehicle system update.See the Vehicle System Update chapter of your Owner's Manual for more information.TO SET UP THISFEATURE, USE THE:A Pro Trailer Backup Assist control knobB Touchscreen Information and Entertainment DisplayControl knobTouchscreenInformation andEntertainmentDisplayABPlease read this guide carefully and follow the instructions to place the sticker or install the sensor correctly. Doing so willallow you to complete the one-time trailer setup process.Setup required.See page 17 foroperation.See page 13 foroperation.If you want to useyour steering wheel:A steering wheel imageAllows you to easilytrailer to go.WHAT IS PRO TRAILER BACKUP ASSIST WITHTRAILER REVERSE GUIDANCE?The Pro Trailer Backup Assist with Trailer Reverse Guidance utilizes the control knob on your instrument panel, your steering wheel and a suite of cameras totake the guesswork out of getting your trailer positioned where you want it, quickly and easily, while you're driving in reverse.Turn the knob in the direction you want the trailer to go and the system takes over the steering to get it there. This allows you to focus on monitoring themirrors and applying the brake and accelerator. Use the cameras and on-screen guidance to make even the most difficult maneuvers simple. This guide walksyou through the setup process, calibration and operation.Below is some of the added functionality that Trailer Backup Assist with Trailer Reverse Guidance provides:TRAILER REVERSE STRAIGHTAUTO SPLITHITCH ANGLESTEER TRAILER12Select Add Trailer on the touchscreen display.Press the center button on the knob located to the right of the steering wheel to begin settingup the system.FEATURE SETUPUse the keyboard on the touchscreen to enter your trailer name, then press the return button to confirm.SET UP YOUR SYSTEMUse the images to the right to help you determine your trailer type.For example, if you have a conventional trailer, select Conventional .CONVENTIONAL TRAILER EXAMPLES NON-CONVENTIONAL TRAILER EXAMPLESThe functionality of Pro Trailer Backup Assist with Trailer Reverse Guidance is not available for Fifth Wheel and Gooseneck type trailers.SELECT YOUR TRAILER TYPENote: The system is designed to work with trailers that have a hitch point to center of axle or axles measurement of 6 -33 ft (1.85 -10.05 m). Thesystem is designed to work with drawbars that have a license plate to hitch ball center measurement of 9 -18 in (23 -46 cm) when installed.34FEATURE SETUPPOSITION YOUR TRUCK AND TRAILERRead and follow all of these steps carefully to get the best results.• Hitch your trailer to the truck and connect the electrical wiring harness. Check to make sure that the wiring is working.•Park your truck and hitched trailer on a level surface.• Make sure that the trailer and truck are in line with each other. You can do this by putting the truck in drive (D) and pulling straight forward.SETUP OPTIONSYour 2021 F-150 has two options for Pro Trailer Backup Assist with Trailer Reverse Guidance setup.Your vehicle came with a trailer sensor kit. Follow the instructions included with the kit to set up your trailer. A brief overview of sensor installation begins below.Your vehicle will be eligible to receive a vehicle system update that will allow trailers to be set up with the stickers in this kit. Once you receive the update, your display will show Place Sticker Now during setup instead of Install Sensor Now. Follow the instructions on page 9 to place the sticker.To set up a trailer with a sensor after the vehicle system update, install a sensor on your trailer and plug it into your vehicle prior to beginning trailer setup on the touchscreen.SENSOR SETUPONE-TIME SETUPOnce you input your trailer’s information into the touchscreen, it is stored for easy recall. That way, when you want to use the Pro Trailer Backup Assist with Trailer Reverse Guidance system to help you back your trailer into your desired position, you can choose it from the touchscreen. You will not have to run through this setup again unless you want to add another trailer. You can store information for up to 10 trailers within this feature.56For sensor installation instructions, please refer to the installation instructions included with the sensor kit.TRAILER SENSOR SETUPPlug in the wiring harness to the sensor and the vehicle. When you plug in the wiring harness to the 12-way connector, the red seal on the connector should not be visible when the connector is fully plugged in.For sensor installation instructions, please refer to the sensor kit.Note: Once your truck receives the vehicle system update that enables sticker setup, it will default to sticker setup. To set up a trailer with the sensor, you must install the sensor on the trailer and plug it into the vehicle prior to beginning setup on the touchscreen.The sensor must be mounted to a vertical part of the trailer that pivots when you turn your vehicle. Do not mount to a stationary surface, such as the truck side of the trailer hitch.Make sure the mounting surface is vertical and the arrows on the sensor housing are pointing up. The sensor housing must be firmly attached to the trailer so that it does not shake or wobble.78MAKE SURE YOU HAVE THE FOLLOWING ITEMS:ONE-TIME SETUPOnce you input your trailer’s information into the touchscreen, it is stored for easy recall. That way, when you want to use the Pro Trailer Backup Assist with Trailer Reverse Guidance system to help you back your trailer into your desired position, you can choose it from the touchscreen. You will not have to run through this setup again unless you want to add another trailer. You can store information for up to 10 trailers within this feature.For more information about yourvehicle, please scan the QR code belowNote: Once your truck receives the vehicle system update that enables sticker setup, it will default to sticker setup. To set up a trailer with the sensor, you must install the sensor on the trailer and p lug it in to the vehicle prior to beginning setup on the touchscreen.Place the entire sticker in the green zone on the trailer as outlined in the diagram on the next page. The sticker is in the back cover pocket of this guide.MAKE SURE YOU GATHER THE FOLLOWING ITEMS BEFORE EXITING THE VEHICLE:PLACING THE STICKERRear view cameraSticker and sticker placement card(provided inside the back cover pocket of this guide).Tape measure (not provided).910OUTSIDE THE VEHICLE• T ake the sticker placement card and the sticker from the back of this guide, and a tape measure and walk back to your trailer.• D etermine where to place the sticker. You must place it in the green zone as indicated in the diagram below.• Confirm that the sticker is visible using the touchscreen. An assistant can remain inside the vehicle to help you do this.• P • P horizontal surface.• U shown below:– – B etween 4 inches(10 centimeters) and19 inches (48 centimeters) from the trailer ball hitch.• M ake sure no hardware will obstruct the view from the camera to the sticker (jack handle, wiring, etc.).• Place the sticker.STICKER PLACEMENT DIAGRAMNote: You must place the entire sticker within the green zone. Once you place the sticker, youcannot move it. Do not attempt to re-use stickers. Use a new sticker.If you cannot find a location that meets the sticker requirements, the sensor is recommended.19 in 48 cm19 i n/ 48 c mPLACING THE STICKER4 in 10 cm4 i n/ 10 c m Note: You can calibrate within the Trailer Backup Assist or Trailer Reverse Guidance system.An area where you can safely drive forward and turn left or right is required to calibrate your system. An open parking lot is an ideal place to perform the calibration. During calibration, the system determines the trailer length. Drive straight at approximately 5 mph to align the trailer behind your vehicle.CALIBRATIONThe touchscreen provides you with instructions and will tell you when the system is ready for you to turn. Turn left or right whenever you are ready and in a safe turning area.Too shallow of a turn C orrect 90 degree turnWhen the calibration is complete, the touchscreen shows a message that calibration is complete. The feature is now ready to use. Please refer to the Feature Operation section (page 13) for information on how to operate the feature.1112USING TRAILER BACKUP ASSIST• Once you have the trailer moving in the direction you want it to go, release the knob. You control the accelerator and brakes while the system steers the truck to keep the trailer moving straight back.• The sharper you turn the knob, the sharper the trailer will turn.Note: If you attempt to accelerate beyond the system’s threshold, the system automatically limits your vehicle's speed.Note: If you use the steering wheel, you will be canceled out of the Pro Trailer Backup Assist system. A warning will appear.• As soon as you release the knob or turn it back to the center position, the vehicle starts following the trailer's path.• Turn and hold the knob continuously for sharper vehicle and trailer turns.• CAUTION: Always keep your hand close to the control knob. You may need to redirect the trailer quickly.• You may have to use the knob to correct the trailer direction while attempting to move the trailer straight back under some conditions.Note : If you need to make a sharper turn, the trailer angle limit can be increased in the touchscreen towing menu. Refer to your Owner's Manual for selecting the Trailer Angle limit setting.USING TRAILER BACKUP ASSIST• T o switch on the system, press the center button on the knob and watch the touchscreen. Use the touchscreen to select the connected trailer. The system will detect the trailer and instruct you to shift into reverse when ready.1314Use the buttons below to select the best view for backing up your vehicle and trailer. You can use these views for Pro Trailer Backup Assist or Trailer Reverse Guidance.You can select the following views by selecting the rear camera iconon the touchscreen display. The view drawer displays.(View drawer shown)*IF EQUIPPEDUSING TRAILER REVERSE GUIDANCETrailer Reverse Guidance provides informational graphics and up to 7 camera views to help you back up your trailer while you use the steering wheel to control your trailer.If you do not set up the system, you can still use the camera views. However, the hitch angle graphic, automatic view switching and straight backup mode will not be available. You will need to complete the system setup for full functionality.USING STRAIGHT BACKUP MODE WITH TRAILER REVERSE GUIDANCE• This view is only available when you are in Trailer Reverse Guidance.• This mode will show you which way to turn your steering wheel to keep your trailer backing up straight. A steering wheel icon image is shown on the touchscreen. A blue arrow will show you which way to turn your wheel to keep your trailer straight.•To activate this mode, select the rearview camera icon, then the straight backup mode icon.• To use Trailer Reverse Guidance, shift your vehicle into reverse and press the rear view camera button on the touchscreen to expand the menu.• Select the Trailer Reverse Guidance icon on the screen. You will need to select your trailer from the touchscreen.• The system will detect the trailer and display the hitch angle graphic.• The auto mode camera view is the default display. You can now use your steering wheel and the camera views to navigate yourtrailer into position.360 Degree Camera*: shows the rear camera view on the left side of the screen and the 360 degree view on the right side of the screen.Rear View Camera: shows what is behind your vehicle.R ear Split View Camera*: shows a 180 degree view of area behind your vehicle.Bed Camera*: shows the truck bed and can be used to hitch a 5th wheel or gooseneck trailer.Trailer AUX Camera*: shows a rear view camera image of what is behind your trailer. This camera needs to be purchased and installed separately.Trailer Reverse Guidance View*: shows you a view of the sides of your truck and your trailer.In auto mode, this view moves as your trailer moves so that you do not have to adjust the camera as you turn. You can use the left and right arrows to see more of the driver or passenger side. Press Auto to return to automatic camera adjustments.Takes you back to the 360 degree camera system and out of the Trailer Reverse Guidance feature.151617。
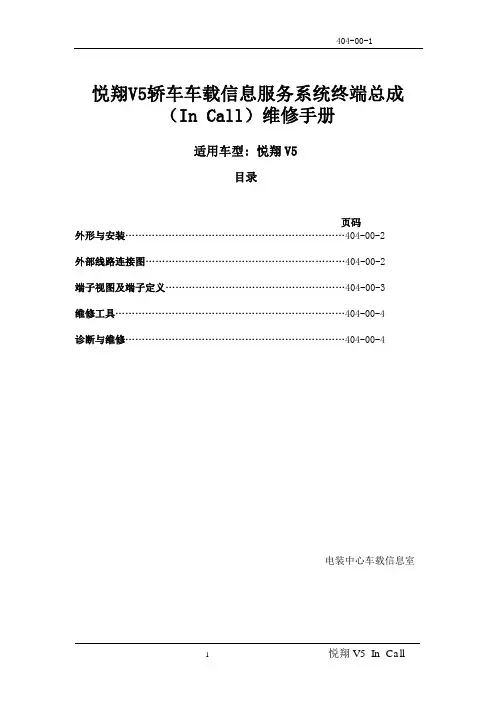
悦翔V5轿车车载信息服务系统终端总成(In Call)维修手册适用车型: 悦翔V5目录页码外形与安装…………………………………………………………404-00-2外部线路连接图……………………………………………………404-00-2端子视图及端子定义………………………………………………404-00-3维修工具……………………………………………………………404-00-4诊断与维修…………………………………………………………404-00-4电装中心车载信息室外形与安装外部线路连接图端子视图及端子定义主接插件(36PIN)车况接插件(16PIN):Pin Pin function车况接插件仅有维修工具1.万用表2.十字螺丝刀诊断与维修1. 不开机2. 扬声器无声音3. 导航无法定位4. 水温显示异常5.车门状态显示异常6. 收音机搜不到台或搜台少7. 触摸屏点击位置和响应位置不重合或点击触摸屏无反应8.不识别SD卡9.不识别U盘10.语音通话时断时续11.出现“GPS未启动”不能进入导航界面12.机器停留免责声明无法进入主界面13.系统升级说明14.技术咨询热线1. 不开机:不开机是指车辆钥匙处于ACC或ON档不自动开机后再按开机键也不能开机。
1.1问题原因:整车没对车机供电;接插件松动;车机问题。
1.2原因排查:(1)整车没对车机供电:拆下In Call终端,车辆钥匙处于ACC或ON挡,万用表处于20V 或200V直流档,用万用表测量终端A接插件对应的线束接插件的第7引脚和第4引脚是否有12V左右电压输出;测量方法为万用表黑笔接第8引脚,红表笔分别接第4引脚和第7引脚;若都有12V左右的电压输出,则转到下一步。
(2)接插件松动:把换下的车机配上新的接插件后试机,若能正常开启,则是接插件松动,若不能正常开启,则转到下一步。
(3)车机问题:更换车机后再试机,若能正常开启,则判定为车机问题。
2. 扬声器无声音2.1 问题原因:车机静音或音量为0;扬声器损坏;扬声器连接线接地;接插件松动;车机问题。
长安逸动2019款1.6手动尊享版说明书
1、启动/关闭发动机
①启动:先踩刹车,按下点火按钮。
②关闭:一定要在车辆停稳时,再次按下按钮。
发动机启动需要较大电流,会暂时关闭耗电较大的用电器。
2、打开/关闭电源
如果您只要打开点火开关而不启动发动机,操作如下:
①启动:直接按下一键启动按键,不用踩制动踏板。
②关闭:再次按下启动开关,发动机转速表指针回到OFF的位置。
3、熄火时的正确挂挡顺序
①停车→②踩住刹车→③进N挡→④松开刹车→⑤拉手刹→⑥熄火→⑦进P挡(注意:坡道停车要调换④与⑤的顺序,避免后溜;值得一提的是,⑥与⑦调换顺序也行)。
拉完手刹才进P挡的原因,原因在于先挂P挡,汽车会发生轻微的移动现象,造成锁止机构配合过度,金属疲劳加剧,下一次启动又会再次冲击。
4、应急关闭功能
紧急处理时,即使车辆正在路上跑着,也可以切断动力源。
关闭引擎的方法:短促的接连2次按下点火按钮,或者按住不松手。
3.1.13-2413.1.13-241电子控制系统- ME17油门踏板位置传感器拆卸安装1.安装顺序与拆卸顺序相反。
1.断开蓄电池负极线束。
参考:蓄电池检查(3.1.10充电系统,一般检查)。
2.断开油门踏板位置传感器总成线束插头。
3.拆卸油门踏板位置传感器总成固定螺栓,并取下油门踏板位置传感器总成。
扭矩:23 Nm3.1.13-2423.1.13-242电子控制系统- ME17机油控制阀拆卸安装1.安装顺序与拆卸顺序相反。
1.断开蓄电池负极线束。
参考:蓄电池检查(3.1.10充电系统,一般检查)。
2.断开机油控制阀线束插头。
3.拆卸机油控制阀固定螺栓。
扭矩:10 Nm4.取下机油控制阀总成。
注意:机油控制阀安装时先把控制阀推入气缸接触,不要使用安装螺栓强制把控制阀旋入孔中,安装时要保证控制阀线束接口处的卡子朝向中间位置。
3.1.14-1 3.1.14-1电子控制系统(低碳)说明与操作系统概述起停协调控制逻辑3.1.14-2 3.1.14-2电子控制系统(低碳)怠速起停功能该系统具有自动起停功能。
当车辆处于发动机怠速工作情况时(如等红灯,短暂停车等),在满足一定的条件下,起停系统将自动关闭发动机。
再次起步时,起动机自动运转并拖动发动机快速起动。
整个操作过程力求不改变驾驶员的正常的驾驶习惯,也可以通过操作起停系统主开关关闭自动起停功能。
1.起停系统主开关在驾驶舱开关控制盒上布置有一个起停功能主开关。
也称怠速起停开关。
在钥匙上电后,按一下按钮,绿灯点亮,怠速起停功能开启;再按动一次按钮,绿灯熄灭,怠速起停功能关闭。
在任何时候驾驶员都可以根据实际需要通过控制怠速起停开关来选择车辆是否要恢复到常规车的模式。
2.起停系统状态/故障指示灯在仪表盘上配备一个黄色LED指示灯。
在仪表盘上的指示灯能够为驾驶员指示起停功能的三种状态:•黄色灯熄灭:起停功能被关闭或者当前状态下允许怠速起/停;•黄色灯亮:起停功能开启,并且在当前状态下不允许怠速起/停;•黄色灯闪烁一段时间后(大约20 s左右)进入黄灯常亮状态:起停功能存在相关故障,并且不允许怠速起/停。
规格一般规格名称额定电压额定电流点烟器额定电压12 V(DC)最大电流10 A 复位时间小于 18 s 耐久性5,000 次说明与操作系统概述点烟器安装在仪表板中央控制面板下部,在使用时,将按钮按下,点烟器元件变热后自动弹出一格,拔出即可使用。
注意:工作中的点烟器温度高,防止烫伤。
在点烟器的侧面布置有前排附件电源,中央控制台后方装配附件电源,通过这个插座,可以获得12 V 的直流电源输出。
部件位置图项目说明项目说明1点烟器3附件电源2USB 和AUX 接口故障现象诊断与测试通用设备检查与确认1.确认顾客的问题。
2.目视检查是否有明显的机械或电气损坏的痕迹,是否有明显的碰撞变形痕迹。
目视检查表3.检查易于看到或能够看到的系统线路。
4.如果所观察或提出的问题的明显原因已经发现,则在进行下一个步骤之前,必须先将该原因修正。
5.如果目视检查通过,则确认故障并参考故障症状表。
数字式万用表诊断仪机械部分电气部分•控制箱面板•点烟器座•附件电源座•保险•线路•点烟器•附件电源故障症状表如果故障发生但控制模块内未存贮故障诊断代码(DTC),并且无法在基本检查中确认故障原因的,则应根据下表列出的顺序进行故障诊断及排除。
症状可能原因措施点烟器失效•保险、线路•点烟器参考:点烟器失效诊断流程。
点烟器不会自动弹起•点烟器•点烟器座•更换点烟器座•更换点烟器点烟器指示灯不亮•保险、线路•灯光组合开关•点烟器指示灯参考:点烟器指示灯不亮诊断流程。
附件电源失效•保险、线路•附件电源插座参考:附件电源失效诊断流程。
点烟器失效诊断流程点烟器指示灯不亮诊断流程4. 更换点烟器座A.转动点火开关至“LOCK”位置。
B.更换点烟器座。
参考:点烟器(4.3.4点烟器/附件电源,拆卸与安装)。
确认系统正常。
附件电源失效诊断流程测试条件细节/结果/措施5. 更换附件电源插座A.转动点火开关至“LOCK”位置。
B.更换附件电源插座。
参考:附件电源(4.3.4点烟器/附件电源,拆卸与安装)。
浅谈长安悦翔1.5L发动机怠速不稳、异常抖动杨阳【摘要】现在的电喷汽车发动机怠速不稳是常见故障.引起该故障原因众多,怠速马达故障和发动机机脚损坏会引起怠速不稳、发动机抖动的现象.科学合理地分析故障原因可以帮助我们快速找到故障点解决问题.【期刊名称】《汽车实用技术》【年(卷),期】2018(044)007【总页数】2页(P170-171)【关键词】长安悦翔;怠速不稳;发动机抖动【作者】杨阳【作者单位】四川希望汽车技师学院,四川资阳 641300【正文语种】中文【中图分类】U472.41 故障现象一辆行驶里程为9万公里的长安悦翔1.5l手动挡车型,在冷车和热车情况下均会出现发动机怠速不稳,且没有启动困难的现象,仪表盘上也没有故障灯提示。
发动机异常抖动的在挂入一档松离合起步的时候尤其明显。
2 故障原因分析2.1 发动机怠速不稳由于该车行驶里程较长各部件均有不同程度的老化,而且这种现象在任何怠速情况下都会发生无论冷热车。
怠速不稳的原因究其根本就是发动机气缸工作不平衡,造成这种现象的原因众多我们只能逐个排除最终找到故障点。
在排除故障时先从高概率故障点开始排查这样有利于我们节省时间。
可以按以下步骤进行:(1)检查蓄电池电压和发电电压及电瓶桩头连接和搭铁点连接如今的电喷车一切功能的运行都得依靠于电力才能运行。
当遇到与电有关的故障时应首先检查电源,电源不稳定会造成一些奇怪的故障特别是电瓶桩头连接不牢固虚接,和搭铁点虚接容易造成一些奇怪的故障。
所以因先排除电源对于故障点的影响。
(2)检查节气门和怠速马达是否有积碳节气门积碳和怠速马达阀门处积碳是造成发动机怠速不稳的常见原因。
节气门是发动机进气的必经之路,在怠速时开度较小节气门和怠速马达附近的油污和积碳会很明显影响到发动机怠速。
如发现有明显积碳应用化清剂清洗干净并做好节气门位置初始化。
(3)检查进气岐管上的各种软管和阀门如进气的连接软管破裂卡子松动磨损,密封圈漏气,真空管脱落造成了其他不正常的进气量会影响怠速,PVC阀开度,活性炭罐电磁阀不正常打开、EGR阀无法正常关闭或关闭不严均会造成异常进气或异常进入燃油。