Cisco交换机配置新手篇-端口配置(一)
- 格式:docx
- 大小:9.06 KB
- 文档页数:2
文档一、标识交换机二、设置口令及用户三、配置VTP (Vlan 中继协议)四、配置中继线(Trunk )五、创建、描述Vlan 及设置Vlan IP六、划分、描述及设置Vlan 端口七、配置STP(生成树协议)八、启用Vlan 间Router九、配置ACL 十、配置DHCP 中继代理十一、配置DHCP 服务器十二、配置HSRP (热备路由协议)十三、保存配置附1:命令行编辑键附2:SHOW 命令附7:ACL 例子一、标识交换机Switch#configure terminal 进入配置状态Switch(config)#hostname “ hostname” 设置Switch 名称Switch (config)#no hostname 取消Switch 名称Switch(config)#end 结束本次配置二、设置口令及用户Switch#configure terminal 进入配置状态Switch(config)#enable secret “ password” 设置特权模式口令及口令Switch(config)#no username “ username” 删除本地用户Switch(config)#service password-encryption 加密所有明文口令Switch(config)#no password-encryption 拒绝加密所有明文口令S w i t c h(c o n f i g)#e n d结束本次配置1、配置console 用户用口令Switch#configure terminal 进入配置状态Switch(config)#line console 0 进入console 口配置状态Switch(config-line)#login local 设置登录模式为本地用户验证模式Switch(config-line)#no login local 取消本地用户验证模式Switch(config-line)#end 结束本次配置或Switch#configure terminal 进入配置状态Switch(config)#line console 0 进入console 口配置状态文档Switch(config-line)#login 设置登录模式为线性登录模式Switch(config-line)#password “ password” 设置线性登录模式口令Switch(config-line)#no login 取消线性登录模式Switch(config-line)#end 结束本次配置2、配置tenlnet(vty) 用户及口令Switch#configure terminal 进入配置状态Switch(config)#line vty 0 15 进入vty 配置状态Switch(config-line)#login local 设置登录模式为本地用户验证模式Switch(config-line)#no login local 取消本地用户验证模式三、配置VTP (Vlan 中继协议)Switch#vlan database 进入vlan 数据库配置状态Switch(vlan)#vtp domain “ domainname” 设置vtp 域Switch(vlan)#vtp server|client| transparent 设置模式Switch(vlan)#vtp password “ password” 设置vtpSwitch(vlan)#no vtp password 取消vtp 口令Switch(vlan)#exit 退出vlan 数据库配置状态Switch(config)#interface range “ interface mod/port -port ” 进入端口组配置状态Switch(config-if-range)#switchport trunk encapsulation dot1q|isl| negotiate 设置干道封装模式Switch(config-if-range)#switchport mode trunk 设置端口为干道模式Switch(config-if-range)#no shutdown 启用端口Switch(config-if-range)#end 结束本次配置五、创建、描述Vlan 及设置Vlan IPSwitch#vlan database 进入vlan 数据库配置状态文档Switch(vlan)#vlan “ vlan-num ” name “ vlan-name” 建立vlan 及名称Switch(vlan)#no vlan “ vlan-num ” 删除vlanSwitch(vlan)#exit 退出vlan 数据库配置状态Switch(config-if)#description “ description ” 描述vlanSwitch(config-if)#no description 取消描述Switch(config-if)#ip address “ ip-address subnet-mask” 设置vlan 网关的ip 地址Switch(config-if)#no shutdown 启用vlanSwitch(config-if)#end 结束本次配置六、划分、描述及设置Vlan 端口Switch#configure terminal 进入配置状态Switch(config)#interface “ interface mod/port ” 进入端口配置状态Switch(config-if)#switchport mode access 设置端口为访问模式Switch(config-if)#switchport access vlan “ vlan-num ” 设置端口所属VlanSwitch(config-if)#no shutdown 启用端口Switch(config-if)#end 结束本次配置或Switch#configure terminal 进入配置状态Switch(config)#interface range “ interface mod/port -port ” 进入端口组配置状态Switch(config-if-range)#description “ description ” 描述端口Switch(config-if-range)#speed auto|100|10 设置端口速率模式Switch(config-if-range)#duplex auto|full|half 设置端口双工模式Switch(config-if-range)#switchport mode access 设置端口为访问模式Switch(config-if-range)#switchport access vlan “ vlan-num ” 设置端口所属Vlan Switch(config-if-range)#no shutdown 启用端口Switch(config-if-range)#end 结束本次配置七、配置STP(生成树协议)Switch#configure terminal 进入配置状态Switch(config)#spanning-tree portfast default 设置所有访问端口为快速模式Switch(config)#no spanning-tree portfast default 取消所有访问端口为快速模式Switch(config)#spanning-tree uplinkfast 设置上行端口为快速模式Switch(config)#no spanning-tree uplinkfast 取消上行端口为快速模式Switch(config)#end 结束本次配置或Switch#configure terminal 进入配置状态Switch(config)#interface “ interfacemod/port ” 进入端口配置状态Switch(config-if)#spanning-tree portfast 设置端口为快速模式文档Switch(config-if)#no shutdown 启用端口Switch(config-if)#end 结束本次配置或Switch#configure terminal 进入配置状态Switch(config)#interface range “ interface mod/port -port ” 进入端口组配置状态Switch(config-if-range)# spanning-tree portfast 设置端口为快速模式Switch(config-if-range)#no shutdown 启用端口Switch(config-if-range)#end 结束本次配置八、启用 Vlan 间 RouterSwitch#configure terminal 进入配置状态Switch(config)#ip routing 启用 ip 路由Switch(config)#ip route “ Destination-prefix Destination-prefix-mask Forwarding-router 's-address ” Switch(config)#end 结束本次配置九、配置 ACLSwitch#configure terminal 进入配置状态Switch(config)#interface vlan “ vlan-num ” 进入 vlan 配置状态 Switch(config-if)#ip access-group “ acl-num ” in|out 应用 acl 到 vlan Switch(config-if)#end 结束本次配置 Switch#configure terminal 进入配置状态Switch(config)#line vty 0 15 进入 vty 配置状态Switch(config-line)#access-class “ acl-num ” in|out 应用 acl 到 vtySwitch(config-if)#end 结束本次配置例:Switch(config)#access-list 101 deny ip host 192.168.2.11 host 192.168.10.21 Switch(config)#access-list 102 deny ip host 192.168.2.13 192.168.10.0 0.0.0.255 Switch(config)#access-list 103 deny ip 192.168.2.0 0.0.0.255 192.168.10.0 0.0.0.255 Switch(config)# access-list 104 deny ip 192.168.2.0 0.0.0.255 host 192.168.10.25十、配置 DHCP 中继代理Switch#configure terminal 进入配置状态Switch(config)#service dhcp 启用 dhcp 服务Switch(config)#ip dhcp relay information option 启用 dhcp 代理服务Switch(config)#interface vlan “ vlan-num ” 进入 vlan 配置状态Switch(config-if)#ip helper-address “ ip-address ” 启用 dhcp 代理服务器 ip 地Switch(config-if)#end 结束本次配置文档十一、配置 DHCP 服务器Switch#configure terminal进入配置状态Switch (config)#ip dhcp pool “ Pool-name ” 设置 dhcp 地址池名称Switch (dhcp-config)#network “ Network-num Network-mask ” 设置 dhcp 地址池 ip 围 Switch (dhcp-config)# dns-server “ ip-address ” 为客户机分配 DNS 服务器 ip 地址 Switch (dhcp-config)#netbios-name-server “ ip-address ” 为客户机分配 WINS 服务器 ip 地址Switch#configure terminal 进入配置状态Switch(config)#service dhcp 启用dhcp 服务wyz(config)#ip dhcp excluded-address “ Low-ip-address High-ip-address ” 设置保留ip 地址Switch(config-if)#end 结束本次配置十二、配置HSRP (热备路由协议)Switch#configure terminal 进入配置状态Switch(config)#interface vlan “ vlan-num ” 进入vlan 配置状态Switch(config-if)#ip address “ ip-address subnet-mask” 设置vlan 物理ip 地址Switch(config-if)#standby “ group-num ” ip “virtual-ip-address ” 设置vlan 虚拟ip 地址Switch(config-if)#standby priority “ Priority-value ” 设置路由器优先等级Switch(config-if)#standby preempt 设置hsrp 抢占功能Switch(config-if)#standby timers “ Hello-interval-in-seconds Hold-time-in-seconds ”设置hello 信息Switch(config-if)#end 结束本次配置十三、保存配置Switch#write memory或Switch#copy running-config startup-config 附1:命令行编辑键TAB 补全命令?查看可用命令Ctrl + P 粘贴历史命令Ctrl + E 将光标移至命令末尾Ctrl + F 将光标向前移动Ctrl + B 将光标向后移动Ctrl + Z 返回#命令模式Ctrl + U Clear Line and Put in BufferCtrl + W Delete Word Backwards and Put in Buffer文档Ctrl + Y Paste Buffer ContentsCtrl + X Clear Line to the Left and Put in BufferCtrl + T Flip Last 2 CharactersCtrl + J ReturnCtrl + L Refresh LineCtrl + I Refresh Line and Goto EndCtrl + K Delete everything on the Right of cursorCtrl + V Allows to type control characterCtrl + M ReturnCtrl + H Backspace Character to the LeftCtrl + R 刷新行附2:SHOW 命令Switch#show version 显示版本信息Switch #show arp | include “ ip-address” 显示ip 地址对应的mac 地址信息Switch#show mac-address-table 显示mac 地址信息Switch#show mac-address-table | include “ mac-address” 格式:xxxx.xxxx.xxxx.xxxx Switch #show mac-address-table dynamic address “ mac-address” 显示mac 地址对应的端口信息Switch#show mac-address-table dynamic interface “ interface mod/port ” 显示端口对应的mac 地址信息Switch#show tech-support 显示技术支持信息Switch#show interfaces 显示接口信息Switch#show vlan 显示vlan 信息Switch#show startup-config 显示启用配置文件Switch#show running-config 显示运行配置文件Switch#show ip route 显示ip 路由状态Switch#clear counters interface “ interface mod/port ” 清除端口计数器Switch(config)#default interface “ interface mod/port ” 恢复端口出厂设置Switch#clear interface “ interface mod/port ” 重置端口的硬件逻辑keyada#show cdp neighbors “ interface mod/port ” detail 附7:ACL 例子VLAN1 需实现以下效果:1、VLAN1 主机192.168.1.240 可以访问所有网段;2、VLAN1 其余主机可以访问除VLAN2 、VLAN3 及VLAN4 外所有网段。

Cisco交换机基本配置和Console端口连接编辑整理:尊敬的读者朋友们:这里是精品文档编辑中心,本文档内容是由我和我的同事精心编辑整理后发布的,发布之前我们对文中内容进行仔细校对,但是难免会有疏漏的地方,但是任然希望(Cisco交换机基本配置和Console端口连接)的内容能够给您的工作和学习带来便利。
同时也真诚的希望收到您的建议和反馈,这将是我们进步的源泉,前进的动力。
本文可编辑可修改,如果觉得对您有帮助请收藏以便随时查阅,最后祝您生活愉快业绩进步,以下为Cisco交换机基本配置和Console端口连接的全部内容。
交换机配置命令基础用户模式hostname# ;特权模式hostname(config)# ;全局配置模式hostname(config-if)#;交换机口令设置:1.switch〉enable ;进入特权模式2.switch#config terminal ;进入全局配置模式3.switch(config)#hostname csico ;设置交换机的主机名4.switch(config)#enable secret csico1 ;设置特权加密口令5.switch(config)#enable password csico8 ;设置特权非密口令6.switch(config)#line console 0 ;进入控制台口7.switch(config—line)#line vty 0 4 ;进入虚拟终端8.switch(config-line)#login ;虚拟终端允许登录9.switch(config—line)#password csico6 ;设置虚拟终端登录口令csico610.switch#exit ;返回命令交换机基本配置包括VLAN创建,删除,端口属性的设置,配置trunk端口,将某端口加入vlan中,配置VTP:1.switch#vlan database ;进入VLAN设置2.switch(vlan)#vlan 2 ;建VLAN 23.switch(vlan)#vlan 3 name vlan3 ;建VLAN 3并命名为vlan34.switch(vlan)#no vlan 2 ;删vlan 25.switch(config)#int f0/1 ;进入端口16.switch(config)#speed ? 查看speed命令的子命令7.switch(config)#speed 100 设置该端口速率为100mb/s (10/auto)8.switch(config)#duplex ?查看duplex的子命令9.switch(config)#duplex full 设置该端口为全双工(auto/half)10.switch(config)#description TO_PC1 这是该端口描述为TO_PC111.switch(config-if)#switchport access vlan 2 ;当前端口加入vlan 212.switch(config-if)#switchport mode trunk ;设置为trunk模式(access模式)13.switch(config—if)#switchport trunk allowed vlan 1,2 ;设置允许的vlan14.switch(config—if)#switchport trunk encap dot1q ;设置vlan 中继15.switch(config)#vtp domain vtpserver ;设置vtp域名相同16.switch(config)#vtp password ;设置发vtp密码17.switch(config)#vtp server ;设置vtp服务器模式18.switch(config)#vtp client ;设置vtp客户机模式交换机基础设置包括设置IP地址,默认网关,域名,域名服务器,配置和查看MAC地址表:1.switch(config)#interface vlan 1 ;进入vlan 12.switch(config—if)#ip address 192.168。
Cisco交换机配置总结一、用户及本地、远程登录配置1、创建用户Cisco#configure terminalCisco(config)#username admin secret ****** //建议用secret2、本地验证Cisco(config)#enable secret netadmin3、远程登录Cisco(config)#line vty 0 15Cisco(config-line)#login localCisco(config-line)#logging synchronous //同步显示,可不配二、Vlan配置1、创建vlanCisco(config)#vlan 10Cisco(config-vlan)#name xxx //给vlan取名Cisco(config-vlan)#no shutCisco(config-vlan)#exit2、配置IPCisco(config)#int vlan 10 //进入vlan接口Cisco(config-if)#ip add 192.168.0.254 255.255.255.0 //配IP,二层交换机的非管理vlan不需要配IPCisco(config-if)#no shut3、将多个端口一次性划到一个vlanHRBSH(config)#int range fa0/1 - 16 //进入多个端口HRBSH(config-if-range)#switchport access vlan 10三、Trunk配置HRBSH (config)#int gigabitEthernet 0/1HRBSH (config)#switchportHRBSH (config-if)#switchport trunk encapsulation dot1q //三层交换机需要配置HRBSH (config-if)#switchport mode trunkHRBSH (config-if)#switchport trunk allowed 85,95四、保存配置HRBSH#copy run to configHRBSH#wrHRBSH#copy run tftp //导出配置五、系统维护更改设备名:hostname查看vlan:show vlan查看当前配置:show run查看接口信息:show interface帮助:show ?删除某条配置:no查看arp表: show arp查看mac表:show mac-六、Cisco 2900系列密码破解⒈连接交换机的console口到终端或PC仿真终端。
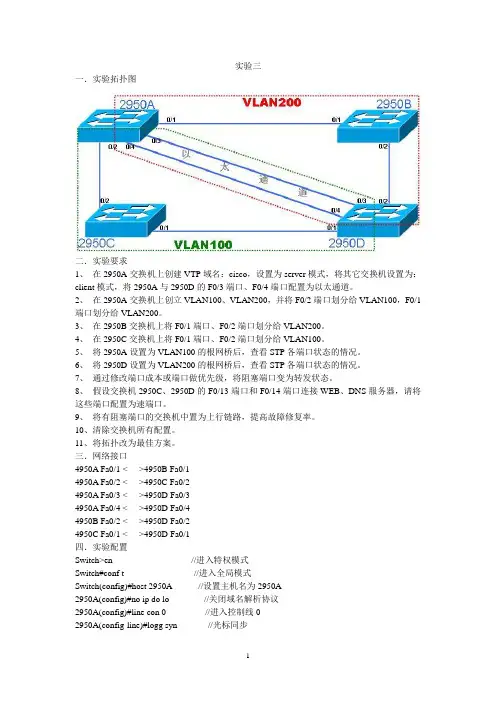
实验三一.实验拓扑图二.实验要求1、在2950A交换机上创建VTP域名:cisco,设置为server模式,将其它交换机设置为:client模式,将2950A与2950D的F0/3端口、F0/4端口配置为以太通道。
2、在2950A交换机上创立VLAN100、VLAN200,并将F0/2端口划分给VLAN100,F0/1端口划分给VLAN200。
3、在2950B交换机上将F0/1端口、F0/2端口划分给VLAN200。
4、在2950C交换机上将F0/1端口、F0/2端口划分给VLAN100。
5、将2950A设置为VLAN100的根网桥后,查看STP各端口状态的情况。
6、将2950D设置为VLAN200的根网桥后,查看STP各端口状态的情况。
7、通过修改端口成本或端口做优先级,将阻塞端口变为转发状态。
8、假设交换机2950C、2950D的F0/13端口和F0/14端口连接WEB、DNS服务器,请将这些端口配置为速端口。
9、将有阻塞端口的交换机中置为上行链路,提高故障修复率。
10、清除交换机所有配置。
11、将拓扑改为最佳方案。
三.网络接口4950A Fa0/1 <---->4950B Fa0/14950A Fa0/2 <---->4950C Fa0/24950A Fa0/3 <---->4950D Fa0/34950A Fa0/4 <---->4950D Fa0/44950B Fa0/2 <---->4950D Fa0/24950C Fa0/1 <---->4950D Fa0/1四.实验配置Switch>en //进入特权模式Switch#conf t //进入全局模式Switch(config)#host 2950A //设置主机名为2950A2950A(config)#no ip do lo //关闭域名解析协议2950A(config)#line con 0 //进入控制线02950A(config-line)#logg syn //光标同步2950A(config-line)#exec-time 0 0 //对Console口进行空闲超时时间的配置2950A(config-line)#exit //返回全局配置模式2950A(config)#end //返回特权模式2950A#vlan database //进入VLAN数据库模式2950A(vlan)#vtp domain cisco //创建名为cisco的管理域Changing VTP domain name from NULL to cisco2950A(vlan)#vtp server //设置VTP的模式为serverDevice mode already VTP SERVER.2950A(vlan)#exit //退出APPL Y completed.Exiting....//将接口设置为以太通道2950A#conf t //进入全局配置模式2950A(config)#int range fa0/3 – 4 //进入fa/3- 4接口2950A(config-if-range)#channel-group 1 mode on //加入以太网通道组1 Creating a port-channel interface Port-channel12950A(config-if-range)#no shut //开启接口2950A(config-if-range)#exit //退出//将端口设置为干道2950A(config)#int range fa0/1 – 2 //进入fa/1 – 2接口2950A(config-if-range)#switchport mode trunk //配置接口模式为trunk2950A(config-if-range)#switchport trunk encapsulation dot1q //配置封装模式2950A(config-if-range)#exit //返回全局配置模式2950A(config)#end //返回特权模式2950A#vlan database //进入VLAN数据库配置模式2950A(vlan)#vlan 100 //创建VLAN 100VLAN 100 added:Name: VLAN01002950A(vlan)#vlan 200 //创建VLAN 200VLAN 200 added:Name: VLAN02002950A(vlan)#exit //退出APPL Y completed.Exiting....2950A#conf t //进入全局配置模式2950A(config)#int fa0/2 //进入接口fa0/22950A(config-if)#switchport mode access // 配置接口模式为access2950A(config-if)#switchport access vlan 100 //将接口划分到VLAN 100 2950A(config-if)#exit //退出2950A(config)#int fa0/1 //进入接口fa0/12950A(config-if)#switchport mode access // 配置接口模式为access2950A(config-if)#switchport access vlan 200 //将接口划分到VLAN 2002950A(config-if)#exit //返回全局配置模式2950A(config)#end //返回特权模式//查看根网桥2950A#show spanning-tree //查看根网桥VLAN1Root ID Priority 32768Address cc00.06e4.0000Cost 31Port 321 (Port-channel1)Hello Time 2 sec Max Age 20 sec Forward Delay 15 secVLAN100Root ID Priority 32768Address cc00.0b60.0001This bridge is the root //显示是根网桥Hello Time 2 sec Max Age 20 sec Forward Delay 15 secVLAN200Root ID Priority 32768Address cc00.06e4.0000Cost 19Port 2 (FastEthernet0/1)Hello Time 2 sec Max Age 20 sec Forward Delay 15 sec// 查看端口信息。

交换机设置步骤1.上电-除电源线外,其它任何线缆都不要插在交换机上2.自检完成- system led绿色,其它除XPS以外的LED常亮3.按住MODE按钮不放(持续3s)4.插上网线,连接电脑(电脑端口设置为自动获取IP地址)5.进入配置页面:10.0.0.1---用户名及密码都是cisco交换机密码:cisco1 talent密码:wisdri6.电脑需要安装USB驱动7.启用talent登录输入交换机密码cisco1Switch>enable Password:Using driver version 4 for meSwitch>show vlanVLAN Name Status Ports---- -------------------------------- --------- -------------------------------1 default active Gi1/0/1, Gi1/0/2, Gi1/0/3Gi1/0/4, Gi1/0/5, Gi1/0/6Gi1/0/7, Gi1/0/8, Gi1/0/9Gi1/0/10, Gi1/0/11, Gi1/0/12Gi1/0/13, Gi1/0/14, Gi1/0/15Gi1/0/16, Gi1/0/17, Gi1/0/18Gi1/0/19, Gi1/0/20, Gi1/0/21Gi1/0/22, Gi1/0/23, Gi1/0/24Gi1/1/1, Gi1/1/2, Gi1/1/3Gi1/1/41002 fddi-default act/unsup1003 token-ring-default act/unsup1004 fddinet-default act/unsup1005 trnet-default act/unsupVLAN Type SAID MTU Parent RingNo BridgeNo Stp BrdgMode Trans1 Trans2 ---- ----- ---------- ----- ------ ------ -------- ---- -------- ------ ------1 enet 100001 1500 - - - - - 0 0 1002 fddi 101002 1500 - - - - - 0 0 1003 tr 101003 1500 - - - - - 0 0 1004 fdnet 101004 1500 - - - ieee - 0 0 1005 trnet 101005 1500 - - - ibm - 0 0Remote SPAN VLANs------------------------------------------------------------------------------Primary Secondary Type Ports------- --------- ----------------- ------------------------------------------Switch>Switch>Switch>Switch>enablePassword:Password:Password:% Bad secretsSwitch>cisco1Translating "cisco1"...domain server (255.255.255.255)% Unknown command or computer name, or unable to find computer address Switch>Switch>Switch>Switch>Switch>Switch>Switch>Switch>Switch>Switch>Switch>enablePassword:Password:Password:% Bad secretsSwitch>enablePassword:Password:Switch#Switch#Switch#Switch#configure terminalEnter configuration commands, one per line. End with CNTL/Z.Switch(config)#vlan 2Switch(config-vlan)#name plcSwitch(config-vlan)#endSwitch#Mar 29 02:33:57.955: %SYS-5-CONFIG_I: Configured from console by console Switch#configure terminalEnter configuration commands, one per line. End with CNTL/Z.Switch(config)#vlan 3Switch(config-vlan)#name levelSwitch(config-vlan)#endSwitch#Mar 29 02:36:58.747: %SYS-5-CONFIG_I: Configured from console by console Switch#configure terminalEnter configuration commands, one per line. End with CNTL/Z.Switch(config)#interface gigabitethernet1/0/1Switch(config-if)#switchport mode accessSwitch(config-if)#switchport access vlan2^% Invalid input detected at '^' marker.Switch(config-if)#switchport access vlan 2Switch(config-if)#exitSwitch(config)#interface gigabitethernet1/0/2Switch(config-if)#switchport mode accessSwitch(config-if)#switchport access vlan 2Switch(config-if)#endSwitch#Mar 29 02:48:26.503: %SYS-5-CONFIG_I: Configured from console by consoleSwitch#show ip interface briefInterface IP-Address OK? Method Status Protocol Vlan1 191.167.0.2 YES TFTP up down FastEthernet0 unassigned YES other down down GigabitEthernet1/0/1 unassigned YES unset down down GigabitEthernet1/0/2 unassigned YES unset down down GigabitEthernet1/0/3 unassigned YES unset down down GigabitEthernet1/0/4 unassigned YES unset down down GigabitEthernet1/0/5 unassigned YES unset down down GigabitEthernet1/0/6 unassigned YES unset down down GigabitEthernet1/0/7 unassigned YES unset down down GigabitEthernet1/0/8 unassigned YES unset down down GigabitEthernet1/0/9 unassigned YES unset down down GigabitEthernet1/0/10 unassigned YES unset down down GigabitEthernet1/0/11 unassigned YES unset down down GigabitEthernet1/0/12 unassigned YES unset down downGigabitEthernet1/0/13 unassigned YES unset down downGigabitEthernet1/0/14 unassigned YES unset down down GigabitEthernet1/0/15 unassigned YES unset down down GigabitEthernet1/0/16 unassigned YES unset down down GigabitEthernet1/0/17 unassigned YES unset down down GigabitEthernet1/0/18 unassigned YES unset down down GigabitEthernet1/0/19 unassigned YES unset down down GigabitEthernet1/0/20 unassigned YES unset down down GigabitEthernet1/0/21 unassigned YES unset down down GigabitEthernet1/0/22 unassigned YES unset down down GigabitEthernet1/0/23 unassigned YES unset down down GigabitEthernet1/0/24 unassigned YES unset down down GigabitEthernet1/1/1 unassigned YES unset down down GigabitEthernet1/1/2 unassigned YES unset down down GigabitEthernet1/1/3 unassigned YES unset down down GigabitEthernet1/1/4 unassigned YES unset down down Te1/1/1 unassigned YES unset down down Te1/1/2 unassigned YES unset down downSwitch#Switch#Switch#configure terminalEnter configuration commands, one per line. End with CNTL/Z.Switch(config)#interface vlan 2Switch(config-if)#Mar 29 02:52:06.646: %LINEPROTO-5-UPDOWN: Line protocol on Interface Vlan2, chan ged state to downSwitch(config-if)#ip address 10.52.40.254 255.255.255.0Switch(config-if)#endSwitch#Mar 29 02:53:30.171: %SYS-5-CONFIG_I: Configured from console by consoleSwitch#configure terminalEnter configuration commands, one per line. End with CNTL/Z.Switch(config)#interface vlan 3Switch(config-if)#Mar 29 02:54:00.672: %LINEPROTO-5-UPDOWN: Line protocol on Interface Vlan3, chan ged state to downSwitch(config-if)#ip address 10.52.41.254 255.255.255.0Switch(config-if)#endSwitch#Mar 29 02:54:28.765: %SYS-5-CONFIG_I: Configured from console by consoleSwitch#show ip interface briefInterface IP-Address OK? Method Status Protocol Vlan1 191.167.0.2 YES TFTP up down Vlan2 10.52.40.254 YES manual up down Vlan3 10.52.41.254 YES manual up down FastEthernet0 unassigned YES other down down GigabitEthernet1/0/1 unassigned YES unset down down GigabitEthernet1/0/2 unassigned YES unset down down GigabitEthernet1/0/3 unassigned YES unset down down GigabitEthernet1/0/4 unassigned YES unset down down GigabitEthernet1/0/5 unassigned YES unset down down GigabitEthernet1/0/6 unassigned YES unset down down GigabitEthernet1/0/7 unassigned YES unset down down GigabitEthernet1/0/8 unassigned YES unset down down GigabitEthernet1/0/9 unassigned YES unset down down GigabitEthernet1/0/10 unassigned YES unset down downGigabitEthernet1/0/11 unassigned YES unset down downGigabitEthernet1/0/12 unassigned YES unset down down GigabitEthernet1/0/13 unassigned YES unset down down GigabitEthernet1/0/14 unassigned YES unset down down GigabitEthernet1/0/15 unassigned YES unset down down GigabitEthernet1/0/16 unassigned YES unset down down GigabitEthernet1/0/17 unassigned YES unset down down GigabitEthernet1/0/18 unassigned YES unset down down GigabitEthernet1/0/19 unassigned YES unset down down GigabitEthernet1/0/20 unassigned YES unset down down GigabitEthernet1/0/21 unassigned YES unset down down GigabitEthernet1/0/22 unassigned YES unset down down GigabitEthernet1/0/23 unassigned YES unset down down GigabitEthernet1/0/24 unassigned YES unset down down GigabitEthernet1/1/1 unassigned YES unset down down GigabitEthernet1/1/2 unassigned YES unset down down GigabitEthernet1/1/3 unassigned YES unset down down GigabitEthernet1/1/4 unassigned YES unset down down Te1/1/1 unassigned YES unset down down Te1/1/2 unassigned YES unset down downSwitch#Switch#Switch#show vlan briefVLAN Name Status Ports---- -------------------------------- --------- -------------------------------1 default active Gi1/0/3, Gi1/0/4, Gi1/0/5Gi1/0/6, Gi1/0/7, Gi1/0/8Gi1/0/9, Gi1/0/10, Gi1/0/11Gi1/0/12, Gi1/0/13, Gi1/0/14Gi1/0/15, Gi1/0/16, Gi1/0/17Gi1/0/18, Gi1/0/19, Gi1/0/20Gi1/0/21, Gi1/0/22, Gi1/0/23Gi1/0/24, Gi1/1/1, Gi1/1/2Gi1/1/3, Gi1/1/42 plc active Gi1/0/1, Gi1/0/23 level active1002 fddi-default act/unsup1003 token-ring-default act/unsup1004 fddinet-default act/unsup1005 trnet-default act/unsupSwitch#configure terminalEnter configuration commands, one per line. End with CNTL/Z.Switch(config)#interface range gigabitethernet1/0/3 - 20Switch(config-if-range)#switch mode accessSwitch(config-if-range)#switch access vlan 2Switch(config-if-range)#endSwitch#Mar 29 02:59:22.333: %SYS-5-CONFIG_I: Configured from console by consoleSwitch#show vlan briefVLAN Name Status Ports---- -------------------------------- --------- -------------------------------1 default active Gi1/0/21, Gi1/0/22, Gi1/0/23Gi1/0/24, Gi1/1/1, Gi1/1/2Gi1/1/3, Gi1/1/42 plc active Gi1/0/1, Gi1/0/2, Gi1/0/3Gi1/0/4, Gi1/0/5, Gi1/0/6Gi1/0/7, Gi1/0/8, Gi1/0/9Gi1/0/10, Gi1/0/11, Gi1/0/12Gi1/0/13, Gi1/0/14, Gi1/0/15Gi1/0/16, Gi1/0/17, Gi1/0/18Gi1/0/19, Gi1/0/203 level active1002 fddi-default act/unsup1003 token-ring-default act/unsup1004 fddinet-default act/unsup1005 trnet-default act/unsupSwitch#configure terminalEnter configuration commands, one per line. End with CNTL/Z.Switch(config)#interface range gigabitethernet1/0/21 - 24Switch(config-if-range)#switch mode accessSwitch(config-if-range)#switch access vlan 3Switch(config-if-range)#endSwitch#Mar 29 03:01:19.388: %SYS-5-CONFIG_I: Configured from console by consoleSwitch#show vlan briefVLAN Name Status Ports---- -------------------------------- --------- -------------------------------1 default active Gi1/1/1, Gi1/1/2, Gi1/1/3Gi1/1/42 plc active Gi1/0/1, Gi1/0/2, Gi1/0/3Gi1/0/4, Gi1/0/5, Gi1/0/6Gi1/0/7, Gi1/0/8, Gi1/0/9Gi1/0/10, Gi1/0/11, Gi1/0/12Gi1/0/13, Gi1/0/14, Gi1/0/15Gi1/0/16, Gi1/0/17, Gi1/0/18Gi1/0/19, Gi1/0/203 level active Gi1/0/21, Gi1/0/22, Gi1/0/23Gi1/0/241002 fddi-default act/unsup1003 token-ring-default act/unsup1004 fddinet-default act/unsup1005 trnet-default act/unsupSwitch#configure terminalEnter configuration commands, one per line. End with CNTL/Z.Switch(config)#interface range gigabitethernet1/1/1 - 4Switch(config-if-range)#switch mode accessSwitch(config-if-range)#switch access vlan 3Switch(config-if-range)#endSwitch#Mar 29 03:05:44.921: %SYS-5-CONFIG_I: Configured from console by consoles% Type "show ?" for a list of subcommandsSwitch#show vlan briefVLAN Name Status Ports---- -------------------------------- --------- -------------------------------1 default active2 plc active Gi1/0/1, Gi1/0/2, Gi1/0/3Gi1/0/4, Gi1/0/5, Gi1/0/6Gi1/0/7, Gi1/0/8, Gi1/0/9Gi1/0/10, Gi1/0/11, Gi1/0/12Gi1/0/13, Gi1/0/14, Gi1/0/15Gi1/0/16, Gi1/0/17, Gi1/0/18Gi1/0/19, Gi1/0/203 level active Gi1/0/21, Gi1/0/22, Gi1/0/23Gi1/0/24, Gi1/1/1, Gi1/1/2Gi1/1/3, Gi1/1/41002 fddi-default act/unsup1003 token-ring-default act/unsup1004 fddinet-default act/unsup1005 trnet-default act/unsupSwitch#ip routing^% Invalid input detected at '^' marker.Switch#configure terminalEnter configuration commands, one per line. End with CNTL/Z.Switch(config)#ip routingSwitch(config)#endSwitch#Mar 29 03:09:23.922: %SYS-5-CONFIG_I: Configured from console by consoleSwitch#show ip ospfSwitch#copy running-config startup-configDestination filename [startup-config]?Building configuration...[OK]0 bytes copied in 1.217 secs (0 bytes/sec)Switch#Switch#Switch#Switch#Switch#Switch#。

Cisco交换机配置入门机型:Cisco 3750想对交换机警醒配置。
一般有两种方法:1 、控制台端口(Console ):可以直接对交换机进行配置2 、远程登录(Telnet):通过TELNET程序对已经设置了IP的交换机进行远程配置,一般等控制台端口配置好交换机的IP后才可以进行。
除了以上的两种方法外,其实还有两种方法:1 、WEB 的配置方式。
此方法只能配置一般的简单设置2 、硬件自带的应用程序。
专用的程序,一般很少用建立控制台连接到交换机一般交换机自带一根Console 线,一端连接到交换机的Comsole 口,一端连接到电脑的串行口。
打开超级终端,一般就可以连接到交换机。
具体的参数设置如下这样就可以连接到交换机了连接到交换机后,如果是第一次启动会要执行初始化操作,一般是设置交换机的名称,密码等一般的信息。
由于交换机已经初始化,如果要进行初始化操作,那就要进入特权EXEC模式,在命令提示符号下输入:setup,就会启动初始化操作。
刚才讲到了特权EXEC模式,这理就要讲一下觉换机的几种模式,不同的模式可以执行不同的操作命令,首先来说两种基本的模式。
一般为了安全考虑,CISCO将操作会话分为两个不同的访问级别:用户EXEC级别和特权EXEC级别。
用户EXEC级别只能使用有限的命令,且交换机显示Switch>提示符,不能对交换机进行配置。
看例子,处于用户EXEC级别下的状态:AITG_FrontekCoreSW>特权EXEC级别下交换机显示Switch#提示符,能对交换机进行各种配置。
看例子,处于特权EXEC级别下的状态:输入en,进入特权EXEC级别,接着输入密码,进入特权EXEC 级别AITG_FrontekCoreSW>enPassword:AITG_FrontekCoreSW#看看,提示符变了,用户在用户EXEC级别输入enable(或en),然后输入密码,就可以进入特权EXEC级别在交换机提示符下输入“?”,可以列出相应模式下交换机所支持的所有命令。
思科交换机的基本配置随着Internet的高速发展,网络规模不断膨胀,对于从事网络专业的学生熟练掌握路由器和交换机的配置已显得十分重要。
接下来是小编为大家收集的思科交换机的基本配置方法,希望能帮到大家。
思科交换机的基本配置的方法一、交换机的基本配置Author:chenchao in ZJNU从本篇文章开始,将连载大概8-9篇自己学习交换与路由的实验报告,但是怕自己能力不行,会出现错误,所以,先载两篇文章,依次为:交换机的基本配置;路由器基本配置。
本篇为交换机的基本配置,使用的仿真软件是Cisco的一款免费软件:Cisco Packet Tracer。
想学习的可以在百度自行下载。
下面开始附上实验过程:实验环境:Cisco 2950交换机1台,Console电缆1根,PC机一台,网线1根。
连接如下图所示:实验步骤:一、交换机的带外配置;1、在用户模式、特权模式、全局模式、接口模式之间转换;Switch>enableSwitch#configure terminalEnter configuration commands, one perline. End with CNTL/Z.Switch(config)#interface FastEthernet 0/1Switch(config-if)#exitSwitch(config)#exitSwitch#%SYS-5-CONFIG_I: Configured from console byconsoleSwitch#exitSwitch con0 is now availablePress RETURN to get started.Switch>2、将交换机的名称改为“student”;Switch(config)#hostname studentstudent(config)#3、为交换机各个模式设置密码“cisco”;特权模式下的密码保护student#enablestudent#configure tEnter configuration commands, one perline. End with CNTL/Z.student(config)#enable password ciscostudent(config)#enable secret cisco1远程登录口令设置student#configure tEnter configuration commands, one perline. End with CNTL/Z.student(config)#line console 0student(config-line)#line vty 0 4student(config-line)#password cisco2student(config-line)#loginstudent(config-line)#student#4、为交换机制定一个IP地址10.10.10.X/24;student#configConfiguring from terminal, memory, ornetwork [terminal]?Enter configuration commands, one perline. End with CNTL/Z.student(config)#interface vlan 1student(config-if)#ip address 10.10.10.1255.0.0.05、开启交换机的Telnet服务功能,建立Telnet用户admin,口令cisco,并制定只能从10.10.10.y/24登录Telnet服务器;student#student#configure tEnter configuration commands, one perline. End with CNTL/Z.student(config)#user admin password 0 ciscostudent(config)#6、查看配置情况;student>enablePassword:student#show running-cBuilding configuration...hostname student!enable secret 5$1$mERr$q.MA2tj.WFptzvbifq/1i.enable password cisco!!username admin password 0 ciscointerface Vlan1ipaddress 10.10.10.1 255.0.0.0!!line con 0!line vty 0 4password cisco2loginline vty 5 15login!!End二、交换机的端口配置:1、配置接口的描述、关闭借口、启动接口、配置接口的速度为100Mbps、配置接口工作模式为全双工、配置接口的流程控制;student#configure terminalEnter configuration commands, one perline. End with CNTL/Z.student(config)#interface FastEthernet0/1student(config-if)#shutdown%LINK-5-CHANGED: Interface FastEthernet0/1,changed state to administratively down%LINEPROTO-5-UPDOWN: Line protocol onInterface FastEthernet0/1, changed state to down%LINEPROTO-5-UPDOWN: Line protocol onInterface Vlan1, changed state to downstudent(config-if)#student(config-if)#exitstudent(config)#interface FastEthernet0/1student(config-if)#no shutdown%LINK-5-CHANGED: Interface FastEthernet0/1,changed state to up%LINEPROTO-5-UPDOWN: Line protocol onInterface FastEthernet0/1, changed state to up%LINEPROTO-5-UPDOWN: Line protocol onInterface Vlan1, changed state to upstudent(config-if)#speed 100student(config-if)#duplex full%LINK-5-CHANGED: Interface FastEthernet0/1,changed state to down%LINEPROTO-5-UPDOWN: Line protocol onInterface FastEthernet0/1, changed state to down%LINEPROTO-5-UPDOWN: Line protocol onInterface Vlan1, changed state to downstudent(config-if)#2、配置接口FastEthernet0/10为Access口;student#student#configure terminalEnter configuration commands, one perline. End with CNTL/Z.student(config)#interface FastEthernet0/10student(config-if)#switchport mode accessstudent(config-if)#3、配置接口FastEthernet0/12为Trunk口;student#student#configure tEnter configuration commands, one perline. End with CNTL/Z.student(config)#interface fastethernet0/12student(config-if)#switchport mode Trunkstudent(config-if)#end4、查看配置情况;!interface FastEthernet0/1duplex fullspeed100!!interface FastEthernet0/9!interface FastEthernet0/10switchport mode access!interface FastEthernet0/11!interface FastEthernet0/12switchport mode trunk!student#show running-cBuilding configuration...Current configuration : 1275 bytes!version 12.1no service timestamps log datetime msecno service timestamps debug datetime msec no service password-encryption!hostname student!enable secret 5$1$mERr$q.MA2tj.WFptzvbifq/1i. enable password cisco!!username admin password 0 cisco!!duplex fullspeed 100!interface FastEthernet0/2 !interface FastEthernet0/3 !interface FastEthernet0/4 !interface FastEthernet0/5 !interface FastEthernet0/6 !interface FastEthernet0/7 !interface FastEthernet0/8 !interface FastEthernet0/9 !interface FastEthernet0/10 switchport mode access !interface FastEthernet0/11 !interface FastEthernet0/12 switchport mode trunk!interface FastEthernet0/13 !!interface FastEthernet0/15!interface FastEthernet0/16!interface FastEthernet0/17!interface FastEthernet0/18!interface FastEthernet0/19!interface FastEthernet0/20!interface FastEthernet0/21!interface FastEthernet0/22!interface FastEthernet0/23!interface FastEthernet0/24!interface GigabitEthernet1/1 !interface GigabitEthernet1/2 !interface Vlan1ipaddress 10.10.10.1 255.0.0.0 !!line con 0!line vty 0 4password cisco2loginline vty 5 15login!!end看了“思科交换机的基本配置”还想看:。
CISCO交换机基本配置和使用概述CISCO交换机是一种常用的网络设备,用于构建局域网(Local Area Network,LAN)。
它可以通过物理线路的连接,将多台计算机或其他网络设备连接到同一个网络中,实现数据的传输和共享。
CISCO交换机的基本配置包括IP地址的配置、VLAN的配置、端口配置、安全性配置等。
接下来,我们将对这些配置进行详细说明。
首先,IP地址的配置是CISCO交换机的基本操作之一。
通过配置IP地址,我们可以对交换机进行管理和监控。
具体的配置步骤如下:1. 进入交换机的配置模式。
在命令行界面输入"enable"命令,进入特权模式。
2. 进入全局配置模式。
在特权模式下输入"configure terminal"命令,进入全局配置模式。
3. 配置交换机的IP地址。
在全局配置模式下输入"interfacevlan 1"命令,进入虚拟局域网1的接口配置模式。
然后输入"ip address 192.168.1.1 255.255.255.0"命令,配置交换机的IP地址和子网掩码。
4. 保存配置并退出。
在接口配置模式下输入"exit"命令,返回到全局配置模式。
然后输入"exit"命令,返回到特权模式。
最后输入"copy running-config startup-config"命令,保存配置到闪存中。
其次,VLAN的配置是CISCO交换机的关键配置之一。
通过配置VLAN,我们可以将交换机的端口划分为不同的虚拟局域网,实现数据的隔离和安全。
1. 进入交换机的配置模式。
同样,在特权模式下输入"configure terminal"命令,进入全局配置模式。
2. 创建VLAN。
在全局配置模式下输入"vlan 10"命令,创建一个编号为10的VLAN。
配置接口特性这一章详细说明交换机上的接口和描述怎么配置他们。
这章有以下这些内容:●理解接口类型●使用接口命令●配置二层接口●监控和维护第二层接口●配置第三从接口注意:需要完整的有关该章的语法和应用信息,请参考Catalyst 3550 Multilayer Switch Command Reference和Cisco IOS Interface Command Referencefor Release 12.1.理解接口类型这个部分描述了不同的接口类型,以及其它章节所包括的详细配置这些接口的一些参考内容。
其他章节描述了物理接口特性的配置过程。
这部分包括:•基于端口的VLAN (Port-Based VLANs)•交换端口(Switch Ports)•以太网通道端口组(EtherChannel Port Groups)•交换虚拟接口(Switch Virtual Interfaces)•被路由端口(Routed Ports)•连接接口(Connecting Interfaces)基于端口的VLAN (Port-based Vlans)一个Vlan是一个按功能、组、或者应用被逻辑分段的交换网络,并不考虑使用者的物理位置。
要更多关于Vlan的信息请看“Configuring VLANS”。
一个端口上接受到的包被发往属于同一个Vlan的接收端口。
没有一个第三层的设备路由Vlan间的流量,不同Vlan的网络设备无法通讯。
为了配置普通范围(Normal-range) Vlan(Vlan IDs 1-1005),使用命令:config-vlan模式(global) vlan vlan-id或vlan-configuration模式(exec) vlan database针对Vlan ID 1-1005的vlan-configration模式被保存在vlan数据库中。
为配置扩展范围(extended-range) Vlans (Vlan ID 1006-4094),你必须使用config-vlan模式,并把VTP的模式设为transparent透明模式。


Cisco交换机在网络届处于绝对领先地位,高端冗余设备(如:冗余超级引擎,冗余负载均衡电源,冗余风扇,冗余系统时钟,冗余上连,冗余的交换背板),高背板带宽,高多层交换速率等都为企业网络系统的高速稳定运行提供良好解决方案。
这就是为什么大型企业都选择Cisco交换机做核心层和分布层等主要网络设备。
Cisco分为高中低端交换机,分别面向不同层次。
但是多数Cisco交换机都基于Cisco自家的IOS( Internet Operating System )系统。
所以设置都是大同小异。
让我们从零开始,一步一步教大家学会用Cisco交换机。
第一步:利用电脑超级终端与交换机建立连接可进行网络管理的交换机上有一个“Console”端口,它是专门用于对交换机进行配置和管理的。
可以通过Console端口连接和配置交换机。
用 Cisco自带的Console线,RJ-45端接入Cisco交换机Console口,Com口端接入电脑Com1或Com2口,必须注意的是要记清楚接入的是那个Com口。
按照步骤开启超级终端:开始-程序-附件-通讯-超级终端(图2)图(2)点击文件-新建连接(图3)图(3)输入超级终端名称,选择数据线所连端口(注意选择Com口时候要对应Console 线接入电脑的Com口):图4图(4)确定-点击还原为默认值(图5)确定后开启交换机图(5)此时交换机开始载入IOS,可以从载入IOS界面上看到诸如IOS版本号,交换机型号,内存大小等数据当屏幕显示Press RETURN to get started的时候按回车就能直接进入交换机。
第二步:学习交换机的一些初级命令首先我们要知道Cisco配置界面分两种,一种是基于 CLI(Command-line Interface 命令行界面),一种是基于IOS(Internetwork Operting System 互联网操作系统)。
暂时我们先探讨基于IOS的Cisco交换机。
思科Cisco交换机配置——端⼝安全配置实验案例图⽂详解本⽂讲述了思科Cisco交换机端⼝安全配置实验。
分享给⼤家供⼤家参考,具体如下:⼀、实验⽬的:在交换机f0/1端⼝上设置安全配置,使PC1和PC2两台机中只有⼀台机器能够正常通信,另⼀台通信时端⼝则会⾃动关闭⼆、拓扑图如下三、实验步骤:1、先给各台主机配置IP地址(PC1、PC2、PC3)记录PC1或PC2的其中⼀台主机的mac地址2、配置交换机S1enable --进⼊特权模式config terminal --进⼊全局配置模式hostname S2 --修改交换机名为S1interface f0/1 --进⼊到f0/1端⼝shutdown --关闭f0/1端⼝switchport mode access --修改端⼝模式switchport port-security --修改端⼝为安全模式switchport port-security maximum 1 --配置mac地址最⼤数量为1switchport port-security violation shutdown --配置违反安全设置后的处理动作为关闭端⼝switchport port-security mac-address 0009.7C2D.DC67 --将PC1或PC2其中⼀台的mac地址与端⼝绑定no shutdown --激活端⼝end --返回特权模式copy running-config startup-config --保存配置3、分别测试PC1和PC2主机PingPC3主机PC1:正常PIng通PC2:不能正常Ping通违反端⼝安全导致端⼝关闭(如下图,),若想再次启动需要进⼊到f0/1端⼝先shutdown再no shutdown启动:S1:enable --进⼊特权模式config terminal --进⼊全局配置模式interface f0/1 --进⼊f0/1端⼝shutdown --关闭f0/1端⼝no shutdown --激活f0/1端⼝。
cisco端⼝安全配置详解cisco交换机端⼝的安全配置⼀、switchport port-security设置端⼝安全功能,端⼝安全的违例处理等。
使⽤该命令的no选项关闭端⼝安全的设置,或者将安全违例处理⽅式恢复成缺省值。
switchport port-security [violation {protect | restrict | shutdown}]no switchport port-security [violation]参数说明参数描述port-security 接⼝安全开关violation protect 发现违例,则丢弃违例的报⽂。
violation restrict 发现违例,则丢弃违例的报⽂并且发送trap。
violation shutdown发现违例,则丢弃报⽂、发送Trap并且关闭接⼝。
缺省配置接⼝的安全缺省是关闭的。
命令模式接⼝配置模式使⽤指导利⽤端⼝安全这个特性,可以通过限制允许访问设备上某个接⼝的MAC地址以及IP(可选)来实现严格控制对该接⼝的输⼊。
当为安全端⼝(打开了端⼝安全功能的端⼝)配置了⼀些安全地址后,则除了源地址为这些安全地址的包外,这个端⼝将不转发其它任何报。
此外,还可以限制⼀个端⼝上能包含的安全地址最⼤个数,如果将最⼤个数设置为1并且为该端⼝配置⼀个安全地址,则连接到这个⼝的⼯作站(其地址为配置的安全M地址)将独享该端⼝的全部带宽。
配置举例下⾯的例⼦是在接⼝Gigabitethernet 1/1 上打开端⼝安全功能,并设置违例处理为shutdown:Ruijie(config)# interface gigabitethernet1/1Ruijie(config-if)# switchport port-securityRuijie(config-if)# switchport port-security violation shutdown⼆、switchport port-security aging该命令为⼀个接⼝上的所有安全地址配置⽼化时间。
cisco思科交换机配置篇cisco思科交换机配置篇要进行思科交换机的配置,首先就得进入交换机的全局配置模式,在成功连接交换机并且登陆成功进入特权模式下,下面跟yjbys店铺一起来学习一下思科交换机的配置命令吧!1、输入进入全局配置模式:switch#configure terminalEnter configuration commands, one per line. End with CNTL/Z.switch(config)#switch(config)#switch(config)#这么简单的一条命令,俺们就进入到全局配置模式了,还记得上一篇中查看端口所查询到的信息中name字段下的值吗?这字段其实代表的是交换机端口的描述信息2、修改端口描述switch#switch#switch#conf terEnter configuration commands, one per line. End with CNTL/Z.switch(config)#switch(config)#int fa0/3switch(config-if)#switch(config-if)#descswitch(config-if)#description updateDescswitch(config-if)#switch(config-if)#exitswitch(config)#exitswitch#switch#show interswitch#show interfaces statuswitch#show interfaces statusPort Name Status Vlan Duplex Speed TypeFa0/1 connected 1 a-full a-100 10/100BaseTXFa0/2 h3c2.250 connected trunk a-full a-100 10/100BaseTX Fa0/3 updateDesc notconnect 1 auto auto 10/100BaseTXFa0/4 connected 1 a-full a-100 10/100BaseTXFa0/5 h3c-2.200 connected 1 a-full a-100 10/100BaseTXFa0/6 notconnect 1 auto auto 10/100BaseTX修改描述的关键命令在于,在配置模式下,进入到要修改的端口下,然后使用description + “内容”!效果应该很直观了吧,接下来就是修改端口的所在Vlan了3、修改端口Vlanswitch#switch#switch#conf tEnter configuration commands, one per line. End with CNTL/Z.switch(config)#switch(config)#int fa0/3switch(config-if)#switch(config-if)#sw acc vl 2switch(config-if)#switch(config-if)#exitswitch(config)#switch(config)#exitswitch#switch#show inter statuPort Name Status Vlan Duplex Speed TypeFa0/1 connected 1 a-full a-100 10/100BaseTXFa0/2 h3c2.250 connected trunk a-full a-100 10/100BaseTX Fa0/3 updateDesc notconnect 2 auto auto 10/100BaseTXFa0/4 connected 1 a-full a-100 10/100BaseTXFa0/5 h3c-2.200 connected 1 a-full a-100 10/100BaseTXFa0/6 notconnect 1 auto auto 10/100BaseTX逻辑和修改端口描述是一样的,对于配置来说,肯定是到了能有配置权限的地方和要配置的对象,这里修改端口Vlan的关键命令为:sw acc vl + vlantag,命令很明显被简写了,但是不影响执行,命令的全写为:switchport access vlan + vlantag还有一些对端口的简单操作,譬如修改端口的模式,4、修改端口模式switch(config-if)#switchport trunk encap dot1q ----------------设置vlan 中继的'封装协议注:dot1q就是 IEEE 802.1Q协议,是vlan的一种封装方式,是公有协议。
VLAN技术是交换技术的重要组成部分。
它将物理上直接相连的网络从逻辑上划分为多个子网。
每个VLAN有相对应的一个广播域,不同VLAN之间需要通过第三层交换技术才能通信。
三层交换技术通俗地讲,就是将路由与交换合二为一的技术。
路由器在对第一个数据流进行路由后,将会产生一个MAC地址与IP地址的映射表,当同样的数据流再次通过时,将根据此映射表直接从二层进行交换而不是再次路由,从而消除了路由器进行路由选择而造成网络的延迟,提高了数据包转发的效率。
VLAN的配置涉及到VTP,VLAN中继的配置。
VLAN中继(VLAN Trunk),在Cisco交换机初级配置之端口配置有提到,也称VLAN主干,只要是指交换机与交换机或者交换机与路由器相互连接端口上配置的中继模式(Trunk模式),中继模式允许属于不同VLAN的数据帧都可以通过中继链路传输数据。
VTP(VLAN中继协议)。
通过VTP可以保证整个网络VLAN信息的一致。
首先要知道VTP有三种模式,服务模式、客户模式和透明模式。
交换机初始状态是透明模式,它可以配置VLAN信息,可以收到VTP服务器发来的VLAN信息但并不运用到本交换机,而是直接转发到其他交换机,值得注意的是不会广播自己的VLAN 信息。
而服务器模式是可以统一配置VLAN信息,而且会自动将信息广播到网上其他交换机。
客户模式就是不能配置VLAN信息,VLAN信息都是收到服务器广播的VLAN配置。
划分VLAN的方法有三种:1 静态VLAN:这种划分方法通常是网络管理人员手动为交换机每个端口静态配置VLAN。
这种静态分配方法有它的优缺点,一旦配置好除非是网络管理人员重新设定,不然端口对应的VLAN是固定的,相对动态的配置方法来说,配置是比较麻烦,但是比较安全和容易维护。
2 动态VLAN:常用的局域网动态划分VLAN的方法有以下四种l)基于MAC地址的VLAN基于MAC地址的VLAN,是通过查询并记录端口所连计算机上网卡的MAC地址来决定端口的所属。
思科交换机配置方法(一)使能口令(enable password),口令以明文显示使能密码(enbale secret),口令以密文显示Switch.> /*用户直行模式提示符Switch.>enable /*进入特权模式Switch.# /*特权模式(进入前要输入密文)Switch.#config terminal /*进入全局配置模式Switch.(config)# /*配置模式提示符Switch.(config)# hostname Pconline /*设置主机名Pconline Pconline(config)# enable password cisco3560 /*设置使能口令为pconlinePconline(config)# enable secret cisco3560 /*设置使能密码为networkPconline(config)# line vty 0 15 /*设置虚拟终端线Pconline(config-line)# login /*设置登陆验证Pconline(config-line)# password cisco3560 /*设置虚拟终端登陆密码二、交换机VLAN设置Switch.> /*用户直行模式提示符Switch.>enable /*进入特权模式switch#vlan database ;进入VLAN设置switch(vlan)# vlan 2 ;建VLAN 2switch(vlan)#no vlan 2 ;删vlan 2switch(config)#int f0/1 ;进入网络端口1switch(config)#int giga0/1 ; 进入汇聚千兆口1switch(config-if)# duplex {auto | full | half} 设置端口为---自动/全双工/半双工switch(config-if)#switchport mode trunk ;当前端口设置为汇聚口switch(config-if)#switchport mode access ;当前端口设置为接入模式switch(config-if)#switchport trunk allowed vlan 1,2 ;设置1,2号口允许的vlan组switch(config-if)#switchport trunk vlan 2 ;设置1号口允许的vlanswitch(config-if)#switchport access vlan 2 ;当前端口加入vlan 2switch(config-if)#switchport trunk encap dot1q ;设置vlan 中继cisco网络中,交换机在局域网中最终稳定状态的接口类型主要有四种:access/ trunk/ multi/ dot1q-tunnel。
C i s c o交换机配置新手篇-端口配置(一) 上回跟大家介绍了如何正确连接交换机,今天用一些配置片段给大家介绍一下端口的配置。
鉴于网上大多数配置事例都是show-run出来的结果。
不利于新手对命令配置过程的了解,所以笔者将配置片段和注意的地方都注明了一下,希望能帮助新手尽快了解如何正确配置交换机。
在IOS输入命令时只要缩写的程度不会引起混淆,使用配置命令的时候都可以使用缩写的形式。
比如:Switch>enable,在用户模式下以en开头的命令就只有enable,所以可以缩写成Switch>en。
也可以用TAB键把命令自动补全,如Switch>en,按键盘TAB后自动补全为Switch>enable。
快捷键:
1.Ctrl+A:把光标快速移动到整行的最开始
2.Ctrl+E:把光标快速移动到整行的最末尾
3.Esc+B:后退1个单词
4.Ctrl+B:后退1个字符
5.Esc+F:前进1个单词
6.Ctrl+F:前进1个字符
7.Ctrl+D:删除单独1个字符
8.Backspace:删除单独1个字符
9.Ctrl+R:重新显示1行
10.Ctrl+U:擦除1整行
11.Ctrl+W:删除1个单词
12. Ctrl+Z从全局模式退出到特权模式
13.Up arrow或者Ctrl+P:显示之前最后输入过的命令
14.Down arrow或者Ctrl+N:显示之前刚刚输入过的命令
配置enable口令以及主机名字,交换机中可以配置两种口令
(一)使能口令(enable password),口令以明文显示
(二)使能密码(enbale secret),口令以密文显示
两者一般只需要配置其中一个,如果两者同时配置时,只有使能密码生效.
Switch.> /*用户直行模式提示符
Switch.>enable /*进入特权模式
Switch.# /*特权模式提示符
Switch.# config terminal /*进入配置模式
Switch.(config)# /*配置模式提示符
Switch.(config)# hostname Pconline /*设置主机名Pconline
Pconline(config)# enable password pconline /*设置使能口令为pconline
Pconline(config)# enable secret network /*设置使能密码为network
Pconline(config)# line vty 0 15 /*设置虚拟终端线
Pconline(config-line)# login /*设置登陆验证
Pconline(config-line)# password skill /*设置虚拟终端登陆密码
注意:默认情况下如果没有设置虚拟终端密码是无法从远端进行telnet的,远端进行telnet 时候会提示设置login密码。
许多新手会认为no login是无法从远端登陆,其实no login是代表不需要验证密码就可以从远端telnet到交换机,任何人都能telnet到交换机这样是很危险的,千万要注意。
Cisco交换机配置新手篇-端口配置(二)
配置交换机IP地址,默认网关,域名,域名服务器:
应该注意的是在交换机设置的IP地址,网关,域名等信息是为用于管理交换机而设置,与连接在该交换机上的网络设备无关,也就是说你就算不配置IP信息,把网线缆插进端口,照样可以工作。
Pconline(config)# ip domain-name /*设置域名
配置交换机端口属性:
交换机默认端口设置自动检测端口速度和双工状态,也就是Auto-speed,Auto-duplex,一般情况下不需要对每个端口进行设置。
但根据Cisco的技术白皮书,接入改端口的网络设备的信息情况下,建议直接配置相应的速度以及双工信息。
speed命令可以选择搭配10,100和auto,分别代表10Mb/s,100Mb/s和自动协商速度。
duplex命令也可以选择full, half和auto,分别代表全双工,半双工和自动协商双工状态。
description命令用于描述特定端口名字,建议对特殊端口进行描述:
假设现在接入端口1的设备速度为100Mb/s,双工状态为全双工:
Pconline(config)# interface fastethernet 0/1 /*进入接口0/1的配置模式
Pconline(config-if)# speed 100 /*设置该端口的速率为100Mb/s
Pconline(config-if)# duplex full /*设置该端口为全双工
Pconline(config-if)# description up_to_mis /*设置该端口描述为up_to_mis
Pconline(config-if)# end /*退回到特权模式
Pconline# show interface fastethernet 0/1 /*查询端口0/1的配置结果
配置交换机端口模式:
交换机的端口工作模式一般可以分为三种:Access,Multi,Trunk。
trunk模式的端口用于交换机与交换机,交换机与路由器,大多用于级联网络设备所以也叫干道模式。
Access
多用于接入层也叫接入模式。
暂时我们先介绍Trunk模式和Access模式,Multi模式等以后我们介绍VLAN设置的时候再一并介绍。
interface range可以对一组端口进行统一配置,如果已知端口是直接与PC机连接不会接路由交换机和集线器的情况下可以用spanning-tree portfast 命令设置快速端口,快速端口不再经历生成树的四个状态,直接进入转发状态,提高接入速度。
Pconline1(config)# interface range fastethernet 0/1-20 /*对1-20端口进行配置
Pconline1(config-if-range)# switchport mode access /*设置端口为接入模式
Pconline1(config-if-range)# spanning-tree portfast /*设置1-20端口为快速端口交换机可以通过自动协商工作在干道模式,但是按照要求如果该端口属于主干道应该明确标明该端口属于Trunk模式:
Pconline1(config)# interface fastethernet 0/24 /*对端口24进行配置
Pconline1(config-if)# switchport mode trunk /*端口为干道模式今天主要介绍了端口的一些基本配置和注意事项。
在以后推出的交换机中级篇配置VLAN将会大量运用,虽然都是一些简单的命令,但如果要达到专业水平,就要求能到达熟练运用的阶段。