SMS安装手册修改版
- 格式:doc
- 大小:2.88 MB
- 文档页数:27

SMS Notification extensionUser ManualSMS Notification Extension by MageComp provides facility to notify customers about variousorder status activities through text messages.Table of Content1.Configurationer Templates3.Admin Templates4.OTP verification in frontend5.Verify Mobile Number from My Account Section6.Mobile Number Verification While Creating Account7.Order Notification to customers8.Order Notification to admin9.Deactivation of Extension in Case of Emergency10.FAQs1.ConfigurationOnce you have successfully installed the extension, go to Stores → Configuration to configure the extension for use. Here you can find various settings for the extension. •SMS Notification: Enable or disable extension from here.SMS Gateway: First select your preferred SMS Gateway from the give list.After selecting your preferred SMS gateway just fill required details that is provided by your SMS Gateway provider while registration.General Section•OTP String Type: You can choose your string type from here.•OTP String Length: From here you can choose OTP String length from 0 to 10.•Button Style Class: You can add CSS class to give theme styled look and feel to extension button.•Default SMS Country: Set your preferred SMS country from here.er TemplatesOnce you are done with API configuration, you have to set text for SMS notification for various store activities. For that click on “User Templates” from the left sidebar. Here you can find various user templates notification settings.OTP at RegistrationConfirmation: Set YES to enable sign up confirmation notification for your users.Confirmation Text: Enter notification text to send your users to confirm their Mobile Number while registration.Registration NotificationNotification: Set YES to enable notification to users for their sign ups.Notification Text: Enter notification text to send your users while they sign up.OTP at My AccountNotification: Set YES to enable notification to users for updating phone number from my account.Notification Text: Enter notification text to send your usersOTP at CheckoutNotification: Set YES to enable notification to users for OTP to verify the order on checkoutNotification Text: Enter notification text to send your usersPlace Order NotificationEnable: Set YES to enable notification to send your users when they place orders. Notification Text: Enter notification text to notify your customer about order success. Invoice NotificationNotification: Set YES to enable notification to users when admin generated invoice for users’ orders.Notification Text: Enter notification text to send to users while invoice for their orders get generated.Shipment NotificationNotification: Set YES to enable notification to users when their orders get shipped. Notification Text: Enter notification text to send to users when their orders get shipped. Credit Memo NotificationNotification: Set YES to enable notification to users when admin raise credit memo Notification Text: Enter notification text to send to users when admin creates credit memo.Cancel Order NotificationNotification: Set YES to enable notification to users when order has been cancelled. Notification Text: Enter notification text to send to users when admin cancels the order. Contact NotificationNotification: Set YES to enable notification to users when they fill contact form Notification Text: Enter notification text to send to users when customer fillup the contact form.You can use various objects & variables inside Notification text. For more information you can refer guide that provided inside package.3.Admin TemplatesThe extension facilitates to send notification text to admin as well for various order activities. For that, click “Admin templates” from the left sidebar where you can find various admin notification template settings.First You need to set your Admin Mobile number to get started.1Registration NotificationNotification: Set YES to enable notification to admin when any user sign ups to store.Notification Text: Enter notification text to send to admin when users register to the website.Place Order NotificationNotification: Set YES to enable notification to admin when any user places order from the website.Notification Text: Enter notification text to send to admin when users place orders from the website.Invoice NotificationNotification: Set YES to enable invoice generation notification to admin.Shipment NotificationNotification: Set YES to enable notification to admin when order is shipped to customer.Notification Text: Enter notification text to send admin when order is successfullyshipped to store customer.Credit Memo NotificationNotification: Set YES to enable notification to admin when order is shipped to customer.Notification Text: Enter notification text to send admin when credit memo is generated successfully.Contact Inquiry Notification SettingsNotification: Set YES to enable notification to admin when any user contacts through contact us page.Notification Text: Enter notification text to send to admin when users contact through contact us page.You can use various objects & variables inside Notification text. For more information you can refer guide that provided inside package.Once you saved the Admin Templates, various store activities notification SMS will be sent to the admin.4.TP verification in frontendOnce SMS notification is configured, extension requires user to verify mobile number before placing order for the first time. Enter mobile number and click Send OTP to get OTP on the entered mobile number.After successful completion of verification, mobile number will be saved to customer account. And customer can proceed further to continue checkout process.5.Verify Mobile Number from My Account Section.After mobile verification, customers get notification in their mobile phone for each order activity from order placement to cancellation.6.Mobile Number Verification While Creating AccountAfter mobile verification, customers get notification in their mobile phone for each order activity from order placement to cancellation.7.Order Notification to customersAfter mobile verification, customers get notification in their mobile phone for each order activity from order placement to cancellation.8.Order Notification to adminAt the time of each order activity by customers, admin even gets notification in his mobile phone through SMS text.9.Deactivation of Extension in Case of EmergencyGo to app → etc → config.php and find 'Magecomp_Sms' => 1, and replace 1 with 0.If something goes wrong, please contact us at ********************•If extension is installed using composer from Magento Marketplace, then you can disable the extension by running below command.bin/magento module:disable Magecomp_Sms•Why Order Confirmation Notification is not working for my Magento store?You must have to enable "Mobile Confirmation" first for your Magento 2 store,otherwise "Order Confirmation" notification will not be work for your registeredcustomers.•Which SMS gateways are supported with SMS notification?Right now we have integrated this extension with following gateways:o Bulk SMSo SMS Globalo Gupshupo MSG91o Plivoo Twilioo MsgclubContact us with your preferable SMS gateway, we can customize the extension to integrate with required gateway.。
一.系统基本要求:1.服务器端:1.硬件:P4 1.7GHz,40G硬盘,256M内存,10-100M网卡。
2.操作系统:Win2000 server3.软件系统:MS SQL Server 20002.客户端:1.硬件:PIII 500MHz,40G硬盘,128M内存,10-100M网卡。
2.操作系统:Win2000 professional二.服务器安装步骤:1.请先确认系统中已安装SQL SERVER 2000 数据库系统。
2.运行光盘根目录下“数据库安装配置.exe”安装并配置数据库。
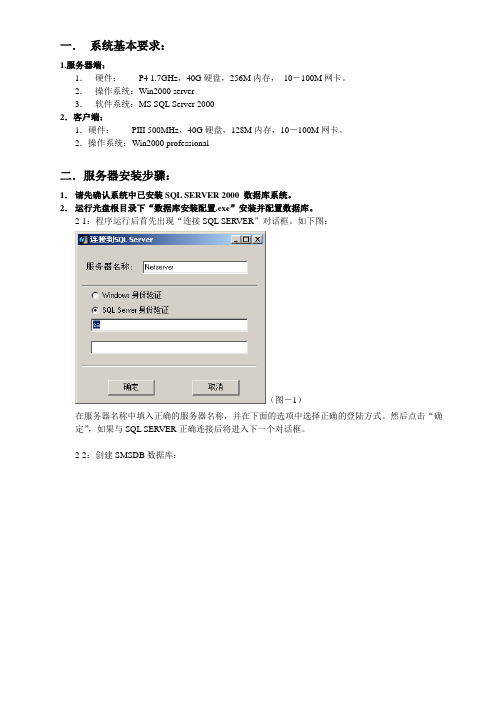
2-1:程序运行后首先出现“连接SQL SERVER”对话框。
如下图:(图-1)在服务器名称中填入正确的服务器名称,并在下面的选项中选择正确的登陆方式。
然后点击“确定”,如果与SQL SERVER正确连接后将进入下一个对话框。
2-2:创建SMSDB数据库:(图-2)在磁盘目录中选择一文件夹作为数据库文件的保存地址。
点击“确定”程序将自动创建并配置“SMSDB”数据库。
执行成功后程序将进入“创建数据库备份设备”界面:2-3:创建数据库备份设备。
(图-3)在磁盘目录中选择一文件夹作为数据库文件备份文件“SMSDB_1.bak”的存储地址。
然后点击“确定”。
如果成功将提示“数据库备份设备创建成功!退出数据库安装。
下面请按照说明配置DCOM 。
”确定后,将出现“分布式COM配置属性”界面,“数据库安装配置.exe”自动关闭。
3.配置DCOM。
数据库安装配置完成后将出现如下界面:(图-4)点选“默认属性”页,出现如下界面:(图-5)请对照该画面进行配置。
完成后再点选“默认安全机制”出现如下画面:(图-6)点击“默认访问权限”-“编辑默认值”出现如下界面:(图-7)点击“添加”按钮将“Everyone”添加为允许访问用户。
确定后回到(图-6),点击“默认启动权限”-“编辑默认值”按钮出现如下界面:(图-8)点击“添加”按钮将“Everyone”添加为允许调用用户。

iWebSMS2000使用手册一、操作说明1.1、设备安装及修改配置文件将设备安装到装有WINDOWS系统的电脑上,找到安装盘中文件夹(iWebSMS2000.sys)将其拷贝到电脑上,找到里面的iSMSServer2000.ini文件,打开修改里面的短信服务中心号码如SERVICE=8613800791500(江西移动),SERVICE表示当地短信服务中心号码,请按照该卡在当地的短信中心号码进行设置。
1.2、执行短信发送服务器短信服务中心号码修改后执行该文件夹下iSMSServer2000.exe(短信发送服务器),执行后正常情况下界面如图:(图1-1:短信发送服务器)1.3、参数设置需要更改的地方:1.3.1、提交服务器路径默认情况下写的是我们示例提供的处理程序(B/S结构,对于二次开发人员可以先部署示例测试下),该程序用来将收到的信息做保存到数据库的操作以及更新通过二次开发接口发送信息(示例中iSMSList页面显示所有收发短信列表及提交发送信息,iSMSSend页面(其调用了服务器组件iSMSClient2000接口来发送短信))的短信状态(短信服务器中提示发送成功则更新为已发),用户可以根据自己的需要来更改该程序,如果不需要该程序可以将其清空。
1.3.2、接口使用所选的国家代码当通过调用服务器组件iSMSClient2000的方法来发送短信时需要在号码前加86,此时如果选择了该复选框,则不用另外在中国移动或联通号码前加86,服务器会自动为其加上。
1.3.3、短信设备端口默认情况下短信发送服务器会自动检测到MODEM设备与电脑COM口连接的端口,如果没有检测到设备与电脑的COM口,该值会为COM8。
1.3.4、短信设备速率默认情况下以安装盘中iSMSServer2000.ini配置文件中设置的为准,一般为9600/115200。
1.3.5、其它参数设置其它的保留为默认的,更改信息后需要点右下角“确定”。

保密级别:机密传阅范围:公司内部传阅方式:word此文档禁止向公司外部传递SMS管理系统安装手册V1.0北京永新同方信息工程有限公司Beijing Novel-tongfang Information Engineering Co.,Ltd修改历史记录目录一、SMS管理系统服务器安装步骤 (4)1、安装Oracle 8.1.7服务器 (4)安装Oracle server 8.1.7 (4)安装中的注意事项 (9)2、配置Oracle 8.1.7服务器 (10)添加服务(举例说明) (10)创建用户、创建表空间 (15)导入库结构和内容 (15)启动服务SMSDB (15)3、安装CAS Manager 并配置 (15)安装CAS Manager (16)打开菜单项:配置CAS应用服务 (16)CASMANAGER相关配置 (17)注册CasManagerWrap.dll文件 (18)启动CAS接口服务器 (18)4、配置IIS服务 (18)启动Internet服务管理器 (18)在默认WEB站点中,创建虚拟目录 (19)重新启动IIS (20)5、注册midas.dll 文件 (20)二、SMS管理系统客户端安装步骤 (21)1、安装Oracle client (21)安装Oracle 客户端(注意:该客户端必须与应用服务器装在同一台机器上)21对Oracle client进行配置 (27)安装中的注意事项 (32)2、安装广东SMS管理系统应用程序 (32)分别选择相应的安装程序进行安装 (32)配置Configclient.txt文件 (34)本手册主要介绍在运行SMS客户端管理系统之前所要进行的工作,包括服务器和客户端的安装(Oracle服务器和客户端的安装及配置、CASMANAGER的安装及配置、IIS服务配置、SMS管理系统客户端安装及配置)及维护、管理工作。
一、SMS管理系统服务器安装步骤1、安装Oracle 8.1.7服务器安装Oracle server 8.1.7把Oracle安装光盘放入光驱中,自动进入安装界面,如图1所示:图1单击“下一步”,如图2所示:图2图中“目标路径”中为系统默认的安装路径(如果盘符不为D,则将其改为D,即将数据库安装在D盘。

Security Management System (SMS) Services Installation GuideRelease 14.1.0.0.0Part No. E97615-01July 2018Security Management System (SMS) Services Installation GuideOracle Financial Services Software LimitedOracle ParkOff Western Express HighwayGoregaon (East)Mumbai, Maharashtra 400 063IndiaWorldwide Inquiries:Phone: +91 22 6718 3000Fax: +91 22 6718 3001/financialservices/Copyright © 2018, Oracle and/or its affiliates. All rights reserved.Oracle and Java are registered trademarks of Oracle and/or its affiliates. Other names may be trademarks of their respective owners.U.S. GOVERNMENT END USERS: Oracle programs, including any operating system, integrated software, any programs installed on the hardware, and/or documentation, delivered to U.S. Government end users are “commercial computer software” pursuant to the applica ble Federal Acquisition Regulation and agency-specific supplemental regulations. As such, use, duplication, disclosure, modification, and adaptation of the programs, including any operating system, integrated software, any programs installed on the hardware, and/or documentation, shall be subject to license terms and license restrictions applicable to the programs. No other rights are granted to the U.S. Government.This software or hardware is developed for general use in a variety of information management applications. It is not developed or intended for use in any inherently dangerous applications, including applications that may create a risk of personal injury. If you use this software or hardware in dangerous applications, then you shall be responsible to take all appropriate failsafe, backup, redundancy, and other measures to ensure its safe use. Oracle Corporation and its affiliates disclaim any liability for any damages caused by use of this software or hardware in dangerous applications.This software and related documentation are provided under a license agreement containing restrictions on use and disclosure and are protected by intellectual property laws. Except as expressly permitted in your license agreement or allowed by law, you may not use, copy, reproduce, translate, broadcast, modify, license, transmit, distribute, exhibit, perform, publish or display any part, in any form, or by any means. Reverse engineering, disassembly, or decompilation of this software, unless required by law for interoperability, is prohibited.The information contained herein is subject to change without notice and is not warranted to be error-free. If you find any errors, please report them to us in writing.This software or hardware and documentation may provide access to or information on content, products and services from third parties. Oracle Corporation and its affiliates are not responsible for and expressly disclaim all warranties of any kind with respect to third-party content, products, and services. Oracle Corporation and its affiliates will not be responsible for any loss, costs, or damages incurred due to your access to or use of third-party content, products, or services.Table of Contents1.PREFACE ........................................................................................................................................................ 1-1 1.1I NTRODUCTION ......................................................................................................................................... 1-1 1.2A UDIENCE................................................................................................................................................. 1-1 1.3D OCUMENTATION A CCESSIBILITY ............................................................................................................ 1-1 1.4O RGANIZATION......................................................................................................................................... 1-11.5R ELATED D OCUMENTS ............................................................................................................................. 1-12.DATABASE SETUP ........................................................................................................................................ 2-1 2.1I NTRODUCTION ......................................................................................................................................... 2-1 2.2P RE-REQUISITE ......................................................................................................................................... 2-12.3D ATABASE S ETUP ..................................................................................................................................... 2-13.DOMAIN AND CLUSTER CONFIGURATION ......................................................................................... 3-1 3.1SMS D OMAIN C ONFIGURATION................................................................................................................ 3-13.1.1Prerequisites ........................................................................................................................................ 3-13.1.2Steps to Create Domain ....................................................................................................................... 3-14.DATA SOURCES CREATION ...................................................................................................................... 4-1 4.1P REREQUISITE........................................................................................................................................... 4-14.2D ATA SOURCES L IST................................................................................................................................. 4-15.DEPLOYMENTS ............................................................................................................................................ 5-1 5.1P RE-REQUISITE ......................................................................................................................................... 5-1 5.2D EPLOYMENTS L IST.................................................................................................................................. 5-15.3S TEPS TO D EPLOY AS A PPLICATION.......................................................................................................... 5-16.RESTARTS AND REFRESH ......................................................................................................................... 6-16.1R ESTARTING S ERVERS.............................................................................................................................. 6-17.LOGGING AREA ........................................................................................................................................... 7-1 7.1I NTRODUCTION ......................................................................................................................................... 7-17.1.1Logging Area ....................................................................................................................................... 7-11. Preface1.1 IntroductionThis guide would help you to install the SMS Core services on designated environment. It isassumed that all the prior setup is already done related with WebLogic 12c installation, WebLogic managed server creation and Oracle DB installation.It is recommended to use dedicated managed server for SMS Core services.1.2 AudienceThis document is intended for WebLogic admin or ops-web team who are responsible forinstalling the OFSS banking products.1.3 Documentation AccessibilityFor information about Oracle's commitment to accessibility, visit the Oracle Accessibility Program website at /pls/topic/lookup?ctx=acc&id=docacc.1.4 OrganizationThis installation user guide would allow you to install following services in same order ∙Security Management System Core Service1.5 Related Documents∙Common Core Services Installation Guide∙Day 0 Setup Guide∙LDAP Setup Guide∙Oracle Banking Trade Finance Process Management Annexure∙Oracle Banking Trade Finance Process Pre-Installation Guide∙Oracle Banking Trade Finance Process Management Services Installation Guide∙Oracle Banking Trade Finance Process Management User Interface Installation Guide∙Process Flow Services Installation Guide∙Plato Infrastructure Services Installation Guide∙Security Management System Services Installation Guide∙SSL Setup Guide2. Database Setup2.1 IntroductionIn this section you are going to setup database related configuration for SMS Installation. It isrecommended to create separate schema for SMS database setup.2.2 Pre-requisiteBefore you proceed with below setup ensure schema has been created.2.3 Database SetupTo setup DB for SMS below step need to be followed-Steps to Compile DDL’s:Collect DDL’s from both the path mentioned in From-Path section in the table and compile intorespective SMS schema.Service Name From-Path Compile ToCommonInfra\Database\DDL SMS schemaSMS-core-serviceSMS\Database\DDL SMS schemaCollect INC’’s from both the path mentioned in From-Path section in the table and compile intorespective SMS schema.Service Name From-Path Compile ToCommonInfra\Database\INC SMS SchemaSMS-core-serviceSMS\Database\INC SMS Schema[Note: To Compile DDL or INC please refer- ANNEXURE-1.docx “How to compile DDL and INC Section”]3. Domain and Cluster Configuration 3.1 SMS Domain Configuration3.1.1 Prerequisites∙Machine should have Java JDK1.8.0_171 has installed.∙Oracle Fusion Middleware 12cR2 12.2.1.3 has to be installed on themachine.3.1.2 Steps to Create DomainIt is recommended to have different managed server in one domain for sms application. ForCreating Domain and Configuration please refer to ANNEXURE-1 “How to create and ClusterConfiguration”.4. Data Sources Creation4.1 PrerequisiteBefore you proceed with below setup, ensure domain and server been created.4.2 Data sources ListThe table below lists the data sources to be created on each domain prior to deployment ofapplications onto managed servers.Data source Name Data source JNDI TargetsPLATO jdbc/PLATOSMS ServerSMS jdbc/SMSFor creating data source in refer ANNEXURE-1 “How to create Data sources section”.5. Deployments5.1 Pre-requisiteBefore you proceed with below, please make sure previous steps are completed.5.2 Deployments ListBelow table give details of the deployments required on each domain for the sms application torun.Application Archive name OSDC pathsms-core-services sms-core-services-1.0.0.war {unzip the file}SMS\App5.3 Steps to Deploy as ApplicationTo deploy application please refer ANNEXURE-1. “How to deploy section”.6. Restarts and RefreshOnce everything is deployed, restart all the managed servers. And for each application call path“/refresh” for refreshing the configuration properties.6.1 Restarting ServersTo restart the server please refer to ANNEXURE-1.”How to restart” section.7. Logging Area7.1 IntroductionThis part of the document will talk about the logs area where after deployment of SMSApplications in WebLogic server.7.1.1 Logging AreaSMS Application writes logs in the below area of the server-<WEBLOGIC_DOMAIN_CONFIG_AREA/servers/SMSAPP/logs/SMSAPP.outLet’s assume a domain has been created sms_domain with managed_server name calledSMSAPP in the following area of the server/scratch/oracle/middleware/user_projects/domains/sms_domain”. Logging area for SMS wouldbe/scratch/oracle/middleware/user_projects/domains/sms_domain/servers/SMSAPP/logs/SM SAPP.out.。
LAB SMS2003 操作手册目录资产管理 (3)客户端软硬件收集 (3)服务器端软硬件资源查看 (4)通过SMS管理控制台查看 (4)通过IE中查看客户端软硬件配置信息 (5)远程控制 (6)软件分发 (10)创建一个软件分发程序数据包 (10)创建一个软件分发的广告 (14)强制客户端与服务器端联系来得到新的广告 (17)检查软件分发的状态 (17)补丁分发 (18)下载 (18)在中央服务器上安装SMS 2003安全管理扫描工具 (18)检查服务器端安装结果 (19)设置补丁包的自动更新DP (20)配置分发扫描工具到客户端 (21)察看系统内安全补丁状态 (21)使用资源管理器察看单个计算机的补丁状态 (21)使用Web报表察看很多计算机的整体安全补丁信息 (23)搭建测试实验室 (25)使用向导分发补丁 (25)察看补丁分发结果 (34)补丁管理工作流程 (34)SMS2003 R2新功能 (35)安全漏洞扫描工具STV A (35)工具安装 (35)向客户端分发V ulnerability扫描工具 (40)客户机的执行与确认 (44)说明 (46)自定义发布工具CUPT (46)安装CUPT前的准备工作 (46)安装CUPT (47)使用CUPT导入自定义软件更新目录 (51)使用CUPT发布自定义软件更新目录 (56)使用CUPT创建自定义软件更新目录 (62)使用SMS分发ITCU扫描工具 (69)使用SMS分发软件更新 (77)自定义更新工具ITCU (69)安装CUPT前的准备工作 (69)在站点服务器上安装ITCU (69)检查安装完成后自动建立的SMS对象并完成扫描工具的部署错误!未定义书签。
文档介绍这篇文档描述LAB环境测试SMS的主要功能。
当企业需求或技术需求变化时该设计可能会被修改和优化。
参考:Operations Guide for SMS 2003 (/technet/treeview/default.asp?url=/technet/prodtechnol/sms/sms2003/m aintain/operate/opsguide/default.asp)资产管理客户端软硬件收集1.在客户端的控制面板中打开System Management. 检查SMS Inventory Agent是否已经被启用. 如果状态为Enabled, 请跳到第三步. 否则, 执行第二步.2.强制客户端于服务器端进行通讯以得到最新的服务器端配置。
CoreMail2.0 Standard EditionDoc Version 1.0API使用手册(邮件到达专用)Tebie Limited香港普智资讯科技有限公司2002.11COREMAIL2.0 C API1.Coremail API工作结构图Coremail API 在系统中的位置图。
2.API配置文件说明在Coremail系统配置中,apisvr.conf是配置Coremail API的系统文件。
具体配置如下:[Global]User="coremail" #执行程序的用户Unlimit="1" #系统执行程序是否有Unlimit设置Daemon="0" #是否为后台执行(1—yes,0—no)DebugLevel="0" #是否为Debug级别日志LogFile="/home/coremail/logs/apisvr.log" #普通日志文件路径ErrorLogFile="/home/coremail/logs/apisvrerr.log" #出错日志文件路径[SERVER SETTING]Port="2700" #服务监听端口[COMMAND SETTING]Port="2702" #服务命令端口[CLIENT SETTING]ServerIP="127.0.0.1" #API安装服务器的IP地址[welcome] #如果有此配置段则用API注册用户成功后发欢迎信,filename指定欢迎信模版filename= “欢迎信模版路径”3.CoreMail 系统提供的API包括功能1 . 增加新用户2 . 修改用户资料3 . 删除用户4 . 读取用户资料5 . 检查用户是否存在6 . 登陆用户7 . 用户退出登陆8 . 提供"临时空间",让CGI存放session信息9 . 让CGI读取自己存放的session信息10. 检查session是否已经过期11. 刷新session,防止session过期12. 认证用户密码13. 扫描病毒邮件14. 增加虚拟域15. 修改虚拟域16. 删除虚拟域17. 检查虚拟域信息18. 查询域用户总数19. 给用户过滤器添加过滤规则API 以网络接口(socket)的方式提供,即API 程序把有关功能发送给CoreMail 的API server, 然后由server 执行具体任务。
上海迅饶自动化科技有限公司Mail2SMS使用手册目录1 前言 (1)1.1声明 (1)1.2技术支持 (1)1.3版本日志 (1)2 概述 (1)2.1功能描述 (1)2.2运行环境 (2)2.3硬件参数 (2)3 部署HMAIL服务器 (2)3.1安装H M AIL服务器 (2)3.2设置H M AIL服务器 (4)3.3重启H M AIL服务器 (7)3.4测试H M AIL服务器 (7)4 使用步骤 (9)4.1邮箱设置 (9)4.2设置用户手机信息 (10)4.3测试短信模块 (11)4.4测试语音 (12)4.5将配置好的工程文件进行保存 (13)5 硬件短信猫连接 (14)6 授权 (15)1 前言1.1声明本手册属于上海迅饶自动化科技有限公司及授权许可者版权所有,保留一切权利,未经本公司书面许可,任何单位和个人不得擅自摘抄、复制本书内容的部分或全部。
由于产品版本升级或其他原因,本手册内容有可能变更。
上海迅饶自动化科技有限公司保留在没有任何通知或者提示的情况下对本手册的内容进行修改的权利。
本手册仅作为使用指导,本公司尽全力在本手册中提供准确的信息。
1.2 技术支持●技术支持邮箱:*********************●技术支持热线电话:************●网址:1.3 版本日志2.1功能描述●Mail2SMS称作短信网关,和GPRS Modem(短信猫)硬件相结合,可以实现短信报警、短信通知、短信传输数据等功能。
另外增加的声音报警功能则可以在PC上通过扬声器将报警信息发出来。
●工作原理:在用户电脑上装一个邮件服务器,告警信息通过本地网络发送至邮箱中,然后在Mail2SMS中收取邮件信息并由GPRS Modem发送短信到用户手机上。
●优点:可配置性强,操作简单,稳定可靠,邮件信息在本地网络之间传送,不需要借助于外部网络。
2.2运行环境●支持Windows XP/2000/2003/72.3 硬件参数●短信猫(GPRS Modem)是支持GSM模式的(移动和联通2G网段的Sim卡)。
NOWSMS使用NOWSMS简介====================Now SMS/MMS Gateway(NowSMS)是一套SMS和MMS的内容交付解决方案。
NowSMS是部署和开发SMS、MMS和WAP Push方案的快捷方法,可以用于Windows 2000/XP下的SMS网关、MMS网关、WAP Push网关以及多媒体消息中心。
NOWSMS的官方网站是:/,可以下载60天的试用版本来搭建自己的彩信中心;以下是NOWSMS的基本使用步骤:1: 下载并安装NowSMS2: 配置SMS/MMS Gateway以支持发送SMS和MMS3: 发送SMS以确保正确配置了Gateway4: 配置MMSC以支持发送MMS功能,并且配置可以使用MMSC的手机号列表. 5: 发送MMS以确保正确配置了MMSC6: 配置手机上的MMSC以实现彩信上行功能(如果遇到问题,可以把NOWSMS目录下的.log发给nowsms@寻求帮助)NOWSMS的基本配置====================1. 配置GSM ModemNowSMS requires a connection to an SMSC to interface with SMS and MMS networks. A SMSC connection can be a GSM Modem - A GSM modem or phone connected to a PC serial port (or to a USB port).(可通过红外与笔记本连接,我的配置是Nokia 6610 + Dell Inspiron 600m)2. 配置SMSCThe first step is to configure SMSC settings, which tell the gateway how it connects to the GSM network to send SMS.(必须保证Modem支持发送SMS功能,市面上的GPRS上网卡因为使用cmwap,不支持SMS发送,即使NOWSMS能够找到,但也无法使用NOWSMS中发送SMS和MMS的功能)3. The Now SMS/MMS Gateway installs as a Windows service. The MMSC runs as a separate service process from the gateway.(建议把service配置成手工启动的,因为如果系统启动后没有发现GSM Modem,系统将无法工作)4. Without the MMSC, you will still be able to "Send MMS Notifications"where the MMS content is stored on a separate web server, but you won't be able to use the "Send MMS Message" feature of the "web menu interface".5. The MMSC supports sending MMS messages between mobile phones, and alsosupports sending and receiving MMS messages between mobile phones and standard internet e-mail systems.6.MMSC的端口号The gateway PC must be accessible via the internet in order to use its MMSC. When a mobile phone sends or receives an MMS message, it makes an HTTP connection to an MMSC (usually through a WAP gateway). The MMSC contains an integrated HTTP server to process these connections. (Some operator WAP gateways have firewalls which prevent them from connecting to content servers that are installed on ports other than the default HTTP port of 80. Use caution when configuring the MMSC for a port other than 80, as this may prevent MMS messages from being received via some services.)7. MMSC配置Local Host Name or IP Addressspecifies the local host name or IP address of the computer that is running the MMSC service. The name or address specified here will be used to construct URLs when sending MMS messages to mobile phones.(必须确保MMSC的IP地址在本地也可以访问,因为NOWSMS在发送MMS时会验证URL的有效性;因为有些地方的外部IP是通过Firewall映射的,本地可能无法访问,建议直接绑定外部IP为第二个IP来解决这个问题)Domain Name for MMS EMail / SMTP Relay HostIt is possible to operate the MMSC without the e-mail link, leaving the "Domain Name for MMS E-Mail" and "SMTP Relay Host" fields blank.8.手机号的格式To define a MMSC user , you must define a phone number using international format(比如中国手机,格式是+8613xxxxxxxxx/ 新加坡+65xxxxxxxx)9.手机上的彩信中心Note that for a mobile phone user to use the simple MMSC integrated with thisgateway, the mobile phone user must configure their MMSC to point to the address of the MMSC, and include their user name and password in the MMSC URL. Example:http://x.x.x.x/username=passwordThe username can be either the user alias name or phone number.(在使用中发现必须是国际格式的手机号,不能用别名,否则服务器报错)10. 用NOWSMS的WAP GatewaySpecify an IP address for the WAP gateway of 213.48.20.10(this is a gateway at the Now Wireless offices).11. GSM Modem1) An external modem device, such as the Siemens MC35 or Wavecom FASTRACK.2) A PC Card installed in a laptop, such as the Sierra Wireless Aircard 7503) A standard GSM mobile phone with the appropriate cable and software driver to connect to a serial port or USB port on your computer.(Any phone that supports the "extended AT command set" for sending/receiving SMS messages can be supported by the Now SMS/MMS Gateway)A dedicated GSM modem (external or PC Card) is usually preferable to a GSMmobile phone. This is because of some compatibility issues that can exist withmobile phones.12. SMS User / MMSC UserThe “SMS Users” defines user accounts that are allowed to submit SMS and MMS messages through the gateway. (Note: Mobile phone users that connect to the MMSC to send and receive MMS messages are configured under th e “MMSC Users”)13. Long SMSIf the text message is longer than 160 characters, the gateway will automatically use concatenated SMS (“long SMS”) message support to send the entire message.13. Send MMS NotificationThe MMS Notification is sent to the recipient independent of the MMSC built-in to thegateway. The message recipient will fetch the message directly from the URL specified. As the message is not routed through the MMSC, the MMSC cannot provide dynamic content adaptation and conversion services.14. Send WAP OTA Bookmark“Send WAP OTA Bookmark” allows bookmarks to be sent to compatible mobile phones. Simply specify the WAP URL, a title for the bookmark, and a phone number towhich the bookmark should be sent.15. Send SMS URLTo send a text message via SMS, use the following URL format:http://127.0.0.1:8800/?PhoneNumber=xxx&Text=xxx1) Use either the local phone number format, or the international phone number format .2) If the international phone number format is used, note that you must substitute“%2B” for the “+” character, because of URL escaping restrictions.16. WAP PushWAP Push messages are specially formatted SMS messages that display an alertmessage to the user, and give the user the option of connecting directly to a particular URL via the mobile phone’s WAP browser.Note that there are two types of “WAP Push” messages, “Service Indication (SI)” and “Service Load (SL)”. The “SL” format can be selected by including "WAPSL=1" as a URL parameter, and does not support a “Text” parameter, while the “SI” format does. (By specification, the “SL” format was designed to tell the browser to connect to a URL without user intervention. However, for security reasons, mobile phones will always display a prompt before connecting to a URL. Therefore, the lack of a text parameter makes the “SL” format considerably less user-friendly than the “SI” format, and in practice, most users will exclusively use the “SI” format.)17. 2-Way SMSThe “2-Way” configuration contains settings relevant to the creation of 2-way applications that can receive SMS messages, and return a response based upon the content of the received SMS message. When an SMS message is received, the gateway will evaluate the content of the message, and can either execute a program, or connect to an HTTP URL, based upon the content of the message.NOWSMS连接到Operator MMSC========================================By default, the Now SMS/MMS Gateway will act as an MMSC and perform directdelivery of MMS messages to recipients using a combination of SMS and WAPtechnologies.1. 通过运营商的MMSC接收/发送MMSNowSMS can use a GSM/GPRS modem to send and receive MMS messages via an operator MMSC. The NowSMS sends and receives MMS messages using the same protocol that is used by the MMS client in a mobile phone, so it simply requires that the SIM card in your mobile phone be provisioned by your mobile operator for MMS support.1) 发送MMSWhen sending an MMS message, the NowSMS initiates a GPRS connection to the mobile operator, it then makes a connection to the operator WAP gateway, and submits the MMS message over this WAP and GPRS connection to the mobile operator’s MMSC.2) 接收MMSWhen receiving an MMS message, the gateway first receives an MMS notificationmessage via SMS. When this special notification message is received, the gateway initiates a GPRS connection to the mobile operator, and a connectionto the operator WAP gateway over GPRS, in order to retrieve the content of theMMS message from the mobile operator’s MMSC.Note: When a GSM phone or GSM modem receives an MMS message, what it actuallyreceives is an MMS notification message. The MMS notification message arrives via an SMS message (usually two concatenated SMS messages). The MMS notification message contains header information about the MMS message, plus a URL pointer (e.g., http://host/path/file.mms) to the actual MMS content.Note that you can still not use an MMS compatible phone as a GSM modem if you want to be able to receive MMS messages through the gateway. This is because an MMS compatible phone intercepts the MMS notification and tries to process it automatically, never forwarding it to the gateway. You must use a GSM/GPRS modem device to take advantage of this feature. 2. 小心运营商的限制The reason that it would not work in many installations is that the operator MMSCs were either firewalled off so that they were inaccessible from the internet, or they were on private IP addresses within the operator network.3. 配置信息You will need to determine the GPRS APN (Access Point Name), the IP address of the WAP gateway, and the MMSC Message Server URL that are used for sending/receiving MMS via your operator network.1) “WAP Gateway IP Address” should contain the IP address of the operator WAP gateway which will act as a proxy for connections to the MMSC.4. MMSC路由MMSC Routings can use MM1 –A binary format for transmitting MMS messages using HTTP POST. This is the protocol that is used for phone to phone MMS, so if you are routing messages to an operator MMSC over a GPRS connection.The “Route messages to this account for recipient phone number(s)” field is an address mask for defining which recipient phone numbers should be routed to this account. For example, “+44*” would route all messages for the UK country code (44) to this connection. When multiple address masks are defined, they should be separated by a comma only (,) and no white space characters.Note that when you are using MM1 to connect with an operator MMSC over GRPS, this “Server address” is the “MMS Server URL” that would normally be configured on a mobile phone to connect with the operator MMSC. NOWSMS中的彩信功能========================================When you send an MMS message with NowSMS, this can be done using either of the following configurations:1. Direct MMS delivery.In this configuring, NowSMS is an MMSC. The MMS message content is stored on the NowSMS, and the gateway publishes a dynamic URL for access to the MMS message content. The gateway generates an MMS notification message to the recipient device which is sent over SMS, and this notification includes a URL pointer back to the MMS message content on the NowSMS server.2.Send the message through the operator MMSC.NowSMS supports all of the major MMS related protocols, including MM7, MM4, MM1 and EAIF for this purpose. But most frequently, what we see is the use of MM1 where NowSMS makes a GPRS connection over a GSM/GPRS modem, connects to the operator WAP gateway that is designated for MMS usage by the operator, and submits the message to the operator MMSC via the WAP gateway over the GPRS connection.(The operator MMS gateway then generates the dynamic URL and MMS notification message that is ultimately received by the recipient device.) The MMS message file format consists of an MMS message binary header, followed by a multipart MIME message where the multipart message is encoded in a binary multipart format as defined by the WAP WirelessSession Protocol (WSP) specification. This binary MMS message file is stored on a web server using a MIME type of application/vnd.wap.mmsmessage and an MMS message type of m-retrieve-conf. A subset of the binary MMS header is sent as an MMS notification message (MMS message type mnotification-ind) via SMS to the mobile device together with a URL pointer to the location of the complete message.Once an MMS message file has been built and published via a web server, theMMS notification message can be sent by the gateway using the following URLformat:http://127.0.0.1:8800/?PhoneNumber=xxx&MMSURL=host/path/filename .mmsBefore sending the MMS notification message, the gateway will validate that the MMS message file is of the MIME type application/vnd.wap.mms-message, and is of the MMS message type mretrieve-conf.The MMSCOMP utility is provided to assist in the creation of MMS message files.NOWSMS的使用技巧========================================1. 查看NOWSMS日志信息在“管理工具”->“事件查看器”->“应用程序”中的日志信息,可以查看NOWSMS在启动和使用中的出错信息!如果发现“连接SMS Modem”出错,需要在SMSC中执行“Remove Service”,并重新添加"GSM Modem";(The gateway always logs when its services are started and stopped. Additionally errors are reported to the event log if a particular SMSC interface fails to initialize, and when a user account exceeds their defined message quota for sending messages.)2. 设置为Debug模式修改配置文件SMSGW.INI/MMSGW.INI,在[SMSGW]中加入Debug=Yes,这样调试信息就会写入到MMSC-yyyymmdd.LOG中,SMSDEBUG.LOG和SMSOUT-yyyymmdd.LOG中;3. 查询MMS发送情况如果在发送MMS时收到错误信息,先检查手机上MMSC的配置;然后可以查看Gateway目录下的MMSC-yyyymmdd.log;上行的MMS被存放在\MMSCDATA下的日期目录中常用术语========================================SMPP (Short Message Peer to Peer) 短消息点对点协议,网关与短消息中心之间使用SMPPCMPP (China Mobile Peer to Peer) 中国移动点对点协议,网关与SP之间使用CMPP协议OMA (Open Mobile Alliance) 开放移动联盟,OMA为移动行业提供公开标准,帮助创建符合用户需求,并能跨国家、运营商和移动终端运行的互操作性服务。
一、Centos linux操作系统的安装1.硬盘分区Swap分区 = 物理内存*2/ 分区 = 硬盘空间– Swap分区大小2.选择中文语言环境安装,并选择定制安装,定制安装中选择具体的安装包如下列图示:注:开发工具(全选);根据实际需要可以勾选windows Fileserver,ftp server。
3.安装后的配置修改vi /etc/sysconfig/network (修改文件HOSTNMAE=本计算机名称、这个名字改为和hosts中的主机名一样)vi /etc/sysconfig/i18nvi /etc/hosts (在127.0.0.1 那行的上面添加)eg: 10.20.8.70 jc.sms 前者为本机IP地址,后边为本机主机名依环境配置mkdir /opt/softmkdir /opt/soft/dbmkdir /opt/soft/webservermkdir /opt/soft/sem-agent (sem的采集程序安装后会自动生成sem用户(其主目录是/opt/sem)mkdir /opt/soft/socchmod –R 755 /opt/soft/(此配置权限根据具体用户执行需要配置,后面新建的用户宿主目录也要适应的修改。
)二、在CentOS4.6平台上安装Oracle10g目录在CentOS4.6平台上安装Oracle10g(32bit) (1)1 检测libaio-0.3.105-2.i386.rpm包是否已安装 (5)1.1 检测方法: (6)1.2 安装方法: (6)2 配置系统内核参数 (6)3 创建用户与组 (7)3.1 用root用户创建用户组 (7)3.2 用户root用户创建用户 (7)4 编辑环境变量 (7)4.1 以oracle用户登录,编辑环境变量文件 (7)4.2 以Oracle用户创建安装目录 (8)5 开始安装 (8)5.1 安装准备 (8)5.2 第一步:选择安装方法 (9)5.3 第二步:指定操作系统组 (10)5.4 第三步:选择安装类型 (11)5.5 第四步:指定安装主目录 (12)5.6 第五步:选择安装组件(1) (13)5.7 第六步:选择安装组件(2) (14)5.8 第七步:安装条件检查 (15)5.9 第八步:指定数据库管理员组 (16)5.10 第九步:选择是否建库 (17)5.11 第十步:确定开始安装 (18)5.12 第十一步:安装过程进度 (19)5.13 第十二步:配置运行环境 (19)5.14 第十三步:完成安装 (22)准备安装程序所有的安装程序都放在/opt/soft下,其中oracle系统安装程序和soc数据库实例安装脚本都在/opt/soft/db1检测libaio-0.3.105-2.i386.rpm包是否已安装1.1检测方法:rpm –qa|grep libaio1.2安装:rpm –ivh libaio-0.3.105-2.i386.rpm2配置系统内核参数将下述内容添加至/etc/sysctl.conf文件末尾kernel.sem = 250 32000 100 128 //注意中间的空格一定要有kernel.shmmax=536870912net.ipv4.ip_local_port_range = 1024 65000 //注意中间的空格一定要有net.core.rmem_default=262144net.core.rmem_max=262144net.core.wmem_default=262144net.core.wmem_max=262144fs.file-max=65536使之立即生效:sysctl –p注:根据不同的系统配置及方案要求,注意调整该部分参数值。
在安装ORACLE过程系统会检测这些系统参数配置是否合法,若有不合理的地方,可再调整。
(一边用root用户调整系统参数,一边用oracle用户安装过程中的检测配置是否合法。
)3创建用户与组3.1用root用户创建用户组groupadd dbagroupadd oinstall3.2用户root用户创建用户useradd oracle –g oinstall –G dba –d /opt/oraclepasswd oracle请注意/opt/oracle目录的权限,请一定设置为755 ,否则后面安装soc后台服务时会出现权限不足的问题。
#chmod –R 755 /opt/oracle/4编辑环境变量4.1以oracle用户登录,编辑环境变量文件vi /opt/oracle/.bash_profile将下述内容添加至文件末尾:ORACLE_BASE=/opt/oracle;export ORACLE_BASEORACLE_HOME=$ORACLE_BASE/product/10g;export ORACLE_HOMEORACLE_SID=soc;export ORACLE_SIDORACLE_TERM=xterm; export ORACLE_TERMPATH=/usr/sbin:$PATH; export PATHPATH=$ORACLE_HOME/bin:$PATH; export PATHLD_LIBRARY_PATH=$ORACLE_HOME/lib:/lib:/usr/lib;export LD_LIBRARY_PATHCLASSPATH=$ORACLE_HOME/JRE:$ORACLE_HOME/jlib:$ORACLE_HO ME/rdbms/jlib; export CLASSPATHexport NLS_LANG=AMERICAN_AMERICA.ZHS16GBK4.2以Oracle用户创建安装目录mkdir –p /opt/oracle/product/10g# chmod –R 755 /opt/oracle/product/10g/5开始安装5.1安装准备在图形界面下,以root用户执行xhost +,完后以oracle用户执行oracle10g安装程序runInstaller,安装图形界面与步骤注:路径及环境变量值并未按上述变量,实际结果应该和实际的环境变量配置直接关联,以下是标准安装过程,仅供参考用,具体要灵活把握。
5.2第一步:选择安装方法5.3第二步:指定操作系统组步骤说明:完整路径与操作系统组名都是根据环境变量值获取,如果环境变量配置正确,此处无需改变。
5.4第三步:选择安装类型(请选择企业版:后面的选择都是默认就OK,在安装中“先决条件的检查”处留意下是否需做相关配置。
)5.5第四步:指定安装主目录步骤说明:此处的安装路径由环境变量中取值而来,无需手动改变。
选择Oracle ODBC Driver组件,其他默认5.8第七步:安装条件检查步骤说明:注意检查的总体结果是否为“通过”,如果有警告或者失败的选项,注意查看日志,按照日志的提示进行后续操作,提示缺少包的则去找相应包进行安装,如果提示参数值有问题,则根据提示内容修改系统内核参数。
5.9第八步:指定数据库管理员组步骤说明:该的管理员与操作员组都从环境变量中获得。
5.10第九步:选择是否建库步骤说明:创建数据库要后续的脚本完成,此处仅安装软件。
5.11第十步:确定开始安装5.12第十一步:安装过程进度5.13第十二步:配置运行环境步骤说明:新开一个终端# iduid=0(root) g id=0(root) ……. 看这个地方是不是root用户,要保证是root。
# /opt/oracle/oranInventory/orainstRoot.sh# /opt/oracle/product/10.2/root.sh用root用户依次执行上述两个脚本,可以通ctrl+c复制执行,交互过程当中都按默认值进行回车确认,全部执行完成以后,再点击“确定”按钮。
点击退出,安装结束。
安装完毕后可以新开终端# su – oracle# sqlplus “/as sysdba”看会不会到如图出现这个界面程序安装没有问题。
5.14第十三步:完成安装三、安装数据库实例1.以oracle用户执行安装脚本,具体可参见安装包里数据库安装脚本里的readme.txt2.安装脚本运行格式: socdbinstall10g.sh $ORACLE_BASE $ORACLE_HOME $ORACLE_SID[DB_SIZE]用oracle用户登录,#su – oracle #cd /opt/soft/db/soc[oracle@smstest soc]$ ./socdbinstall10g.sh /opt/oracle /opt/oracle/product/10g soc &Running Make Database Script ...ORACLE_BASE = /opt/oracleORACLE_HOME = /opt/oracle/product/10gORACLE_SID = socDatabase size 16 G.Input ORACLE_DATA: [/opt/oracle][oracle@smstest soc]$ ./socdbinstall10g.sh /opt/oracle /opt/oracle/product/10g soc 32 & Running Make Database Script ...ORACLE_BASE = /opt/oracleORACLE_HOME = /opt/oracle/product/10gORACLE_SID = socDatabase size 32 G.Input ORACLE_DATA: [/opt/oracle]SQL*Plus: Release 10.2.0.1.0 - Production on Tue Feb 24 16:15:40 2009 Copyright (c) 1982, 2005, Oracle. All rights reserved.Connected to an idle instance.SQL> SQL> SQL> ORACLE instance started.Total System Global Area 1124073472 bytesFixed Size 1218968 bytesVariable Size 570426984 bytesDatabase Buffers 536870912 bytesRedo Buffers 15556608 bytesSQL> SQL> 2 3 4 5 6 7 8 9 10 11 12 133.$ sqlplus soc_sa_ap/isone2000看是否能进入数据库实例安装完毕注:这需要30分钟左右,需要慢慢等待(安装过程中若有错的话,可以将和此实例相关的文件、目录删除再reboot后安装即可。