爱普生机器人软件安装及使用教程
- 格式:doc
- 大小:605.50 KB
- 文档页数:16
![2024版爱普生机器人软件编程操作培训[1]](https://uimg.taocdn.com/fa676ba26394dd88d0d233d4b14e852458fb39af.webp)

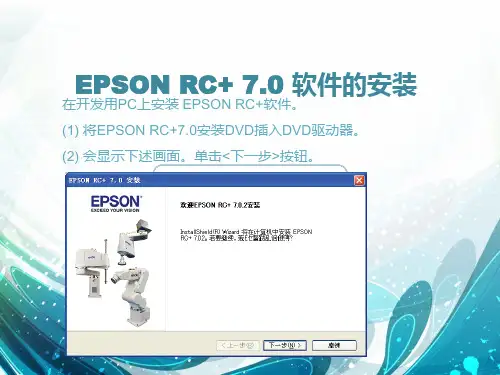
出现上面显示的界面后,按按钮。
出现上面显示的界面后,再接着按按钮。
目标驱动器不必选择,直接按按钮。
接按
按
安装完成后,将弹出下面的窗口。
按按钮完成软
此时,在用户的桌面上会出现下面两个图标
前一个图标用于软件的开发和调试,后面的图标用于对工作
流程的监视。
双击项,将打开Internet 协议(TCP/IP)属性页面,修改IP地址等项为下图的值。
按
键。
完成IP的设定。
图标,启动
在EPSON RC+ 5.0软件菜单中点击“设置”菜单项,单击选择项目。
将弹出下面“电脑与控制器通
信”页面。
点击
选择选项,按键,完成添加
网络通讯功能。
检查网线连接是否正常,正常则单击新添加的Ethernet项,按按钮,弹出下面页面。
选项表示电脑只作为监视
选项将首先中断目前和控
项目并按键切换到程
序模式。
此后EPSON RC+ 5.0软件将开始尝试连接RC170机器人控制器,连接成功后页面为下图状态。
按
修改“控制设备(O)”项目。
如果需要本机调试,可修改为PC,如需要使用按钮盒,则需要修改为“远程I/O”状态。
修改
完成后,按键关闭设置页面。
完成上面设置后,机器人已经处于可操作状态。
3. 机器人的示教
在菜单项里单击“设置”项,再单击“机器人管理器”选项。
单击控制面板,弹出下面页面
按钮:关闭机器人
按钮:启动机器人
按钮:在按下“急停”后,机器人进入锁定,必须按下
⑵.步进示教。
iprojection 操作指南iProjection是一个用于投影仪的应用程序,它可以让用户通过无线网络将其移动设备上的内容投射到投影仪上。
该应用程序适用于iOS和Android设备,并且可以与支持网络投影功能的Epson投影仪配对使用。
以下是iProjection的操作指南:1. 下载和安装,首先,您需要在您的移动设备上下载并安装iProjection应用程序。
您可以在App Store(iOS设备)或Google Play商店(Android设备)中找到该应用程序,并进行免费下载安装。
2. 连接投影仪,确保您的移动设备和Epson投影仪连接到同一个无线网络。
启动iProjection应用程序后,它将自动搜索并显示可用的Epson投影仪列表。
选择您要连接的投影仪,并进行连接。
3. 投影内容,一旦连接成功,您可以选择要在投影仪上显示的内容。
这可以是您设备上的照片、文档、网页、视频等。
通过iProjection应用程序,您可以轻松地控制投影内容的放映和播放。
4. 设置和调整,iProjection还提供了一些设置选项,您可以根据需要调整投影画面的亮度、对比度、色彩等参数。
此外,您还可以在应用程序中找到一些实用的投影工具,如倒计时器、画笔工具等。
5. 结束投影,当您完成投影时,可以通过iProjection应用程序断开与投影仪的连接,或者直接关闭应用程序。
在断开连接之前,建议您先停止投影内容的播放,以免造成不必要的干扰。
总的来说,iProjection是一个非常实用的应用程序,它为用户提供了便捷的无线投影解决方案,使移动设备和投影仪之间的连接和操作变得更加简单和高效。
希望以上操作指南能够帮助您更好地使用iProjection应用程序。
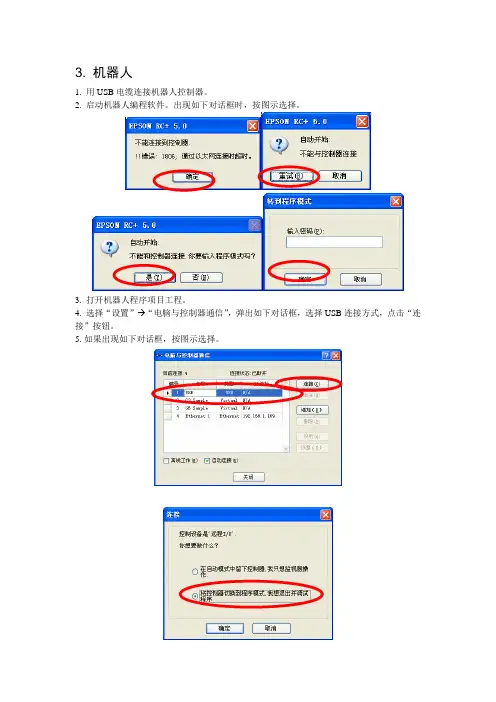
3. 机器人1. 用USB电缆连接机器人控制器。
2. 启动机器人编程软件。
出现如下对话框时,按图示选择。
3. 打开机器人程序项目工程。
4. 选择“设置” “电脑与控制器通信”,弹出如下对话框,选择USB连接方式,点击“连接”按钮。
5.如果出现如下对话框,按图示选择。
6.选择“设置” “控制器”,按下述图示设置参数。
“配置”菜单:“IP地址”设定为192.168.1.169;“控制设备”设定为远程I/O;“参数”菜单:勾选第一条“重置命令时关闭输出”“远程控制”菜单:“输入”:Start设为0、Stop设为1、Reset设为2,其余设为空闲;“输出”:全部设为空闲;“RS232”菜单:“端口1”:“波特率”:57600;“终端”:CR;“TCP/IP”菜单:“端口201”:“IP地址”:192.168.1.169;“终端”:“CR”“端口202”:“IP地址”:192.168.1.169;“终端”:“CR”7. 选择“工具” “机器人管理器”,出现如下提示下载程序的对话框。
8.点击“是”按钮,程序即被下载到机器人控制器中。
随后出现机器人管理器对话框,按如下图示设置机器人的夹爪重量和惯性参数。
“重量”:“重量”:0.500;“长度”:255.0009. 选择“工具” “控制器”,在弹出的对话框中选择“恢复控制器”,按如下图示恢复控制器数据。
该步骤主要是为了将各加工程序对应的点表文件恢复到机器人控制器中,如不需要恢复点表文件,则不必执行该步骤。
10.在CCD标定之前,可选择“运行” “显示变量”,在变量设定对话框中,手动设置CCD 已标定的标志。
(修改变量前,必须勾选变量设置对话框中的“编辑”选项。
修改变量后,按“写入”按钮)。
其他变量也可以按下表预先设定。
3 机器人DO:DO0 机器人真空产生V161DO1 CCD拍照触发ZOC11KA2DO2 CCD平台真空产生V141DO3 CCD平台真空破坏V142DO4 助焊剂泄压阀打开ZOC11KA5DO5 助焊剂上喷启动ZOC11KA6DO6 助焊剂下喷启动ZOC11KA7DO7 助焊剂水阀ZOC12KA1DO8 助焊剂气阀ZOC12KA2。
Software de programación EPSON RC+ 7.0Manipulador T3 T6VT6CPD-60432Seguridad e instalación del sistema de robot (T, VT/ EPSON RC+ 7.0) Mod.16Seguridad e instalación del sistema de robot(T, VT / EPSON RC+ 7.0)Rev.16Copyright 2017-2020 SEIKO EPSON CORPORATION.Todos los derechos reservados Seguridad e instalación del sistema de robot (T, VT/ EPSON RC+ 7.0) Mod.16iii Seguridad e instalación del sistema de robot (T, VT/ EPSON RC+ 7.0) Mod.16PRÓLOGOGracias por comprar nuestros productos de robot.Este manual contiene la información necesaria para el uso correcto del sistema derobot. Lea atentamente este manual y otros manuales relacionados antes de instalarel sistema de robot.Mantenga este manual a la mano para un acceso fácil en todo momento.GARANTÍAEl sistema de robot y las piezas opcionales se envían a nuestros clientes solo despuésde haberlos sometido a los más estrictos controles, pruebas e inspecciones de calidadpara certificar que cumplen con nuestras altas normas de rendimiento.Los productos que tengan un mal funcionamiento como resultado de lamanipulación u operación normales se repararán en forma gratuita durante elperíodo normal de la garantía. (Comuníquese con el proveedor de su región paraobtener información sobre el período de garantía).Sin embargo, se cobrarán al cliente las reparaciones en los siguientes casos (aunquesucedan dentro del período de garantía):1. Daño o mal funcionamiento provocados por un uso inadecuado que no sedescribe en este manual o por uso descuidado.2. Mal funcionamiento provocado por el desmontaje no autorizado delproducto por parte de los clientes.3. Daños debido a ajustes inadecuados o a intentos de reparación noautorizados.4. Daño provocado por desastres naturales, como terremotos, inundaciones,etc.Advertencias, precauciones, uso:1. Si el equipo asociado al sistema de robot no se usa de acuerdo con lascondiciones de uso y las especificaciones del producto descritas en losmanuales, esta garantía queda nula.2. Si no sigue las ADVERTENCIAS y PRECAUCIONES de este manual, nopodemos hacernos responsables de ningún mal funcionamiento o accidente,incluso si tienen como resultado lesiones o la muerte.3. No podemos prever todos los posibles peligros y consecuencias. Por lotanto, este manual no puede advertir al usuario de todos los posiblespeligros.Seguridad e instalación del sistema de robot (T, VT/ EPSON RC+ 7.0) Mod.16iiiMARCAS COMERCIALESMicrosoft, Windows y el logotipo de Windows son marcas registradas o marcascomerciales de Microsoft Corporation en los Estados Unidos y otros países. Otrasmarcas y nombres de productos son marcas comerciales o marcas registradas de susrespectivos titulares.NOTACIÓN DE MARCAS COMERCIALES EN ESTE MANUAL Sistema operativo Microsoft® Windows® 8Sistema operativo Microsoft® Windows® 10En todo este manual, Windows 8 y Windows 10 se refieren a los respectivos sistemasoperativos ya citados. En algunos casos, Windows se refiere en forma genérica aWindows 8 y Windows 10.AVISONinguna parte de este manual se puede copiar o reproducir sin autorización.El contenido de este manual está sujeto a cambios sin previo aviso.Notifíquenos si encuentra errores en este manual o si tiene comentarios con respectoa su contenido.FABRICANTESeiko Epson Corporation3-3-5 Owa, Suwa-shi, Nagano, 392-8502URL :/company/: http://www.epson.jp/prod/robots/Toyoshina PlantRobotics Solutions Operations Division6925 Toyoshina Tazawa,Azumino-shi, Nagano, 399-8285JapónTEL. : +81-(0)263-72-1530FAX : +81-(0)263-72-1685iv Seguridad e instalación del sistema de robot (T, VT/ EPSON RC+ 7.0) Mod.16PROVEEDORES (País/Región)América del Nortey del Sur Epson America, Inc.Factory Automation/Robotics1650 Glenn Curtiss StreetCarson, CA 90746EE. UU.TEL. : +1-562-290-5910FAX : +1-562-290-5999 CORREOELECTRÓNICO:*****************.comEuropa Epson Deutschland GmbHRobotic SolutionsOtto-Hahn-Str.4D-40670 MeerbuschAlemaniaTEL. : +49-(0)-2159-538-1800FAX : +49-(0)-2159-538-3170CORREOELECTRÓNICO:****************URL: : www.epson.de/robotsChina Epson (China) Co., Ltd.Factory Automation Division4F, Tower 1, China Central Place,81 Jianguo Road, Chaoyang District,Beijing, 100025, PRCTEL. : +86-(0)-10-8522-1199FAX : +86-(0)-10-8522-1125Taiwán Epson Taiwan Technology & Trading Ltd.Factory Automation Division15F., No.100, Song Ren Road., Xinyi Dist., Taipei City, 11073TaiwánTEL. : +886-(0)-2-8786-6688FAX : +886-(0)-2-8786-6600Seguridad e instalación del sistema de robot (T, VT/ EPSON RC+ 7.0) Mod.16vCorea Epson Korea Co., Ltd.Marketing Team (Robot Business)10F Posco Tower, Teheranro 134(Yeoksam-dong)Gangnam-gu, Seoul, 06235CoreaTEL. : +82-(0)-2-3420-6632FAX : +82-(0)-2-558-4271Sudeste Asiático Epson Singapore Pte. Ltd.Factory Automation System1 HarbourFront Place, #03-02,HarbourFront Tower One,Singapur 098633TEL. : +65-(0)-6586-5500FAX : +65-(0)-6271-2703India Epson India Pvt. Ltd.Sales & Marketing (Factory Automation)12th Floor, The Millenia, Tower A, No. 1,Murphy Road, Ulsoor, Bangalore,India 560008TEL. : +91-80-4566-5000FAX : +91-80-4566-5005Japón Epson Sales Japan CorporationFactory Automation Systems Department29th floor, JR Shinjuku Miraina Tower, 4-1-6Shinjuku, Shinjuku-ku, Tokyo 160-8801JapónTEL. :+81-(0)3-5919-5257FAX :+81-(0)3-5919-5402vi Seguridad e instalación del sistema de robot (T, VT/ EPSON RC+ 7.0) Mod.16En relación con la eliminación de la bateríaLa etiqueta con el basurero con ruedas tachado que se puede encontrar en el producto indica que este producto y las baterías incorporadas no se deben eliminar en el flujo normal de desechos domésticos. Para evitar los posibles daños ambientales o a la salud humana, separe este producto y las baterías de otros flujos de desechos para garantizar que se puedan reciclar de una manera ambientalmente correcta. Para conocer más detalles acerca de las instalaciones de recolección, comuníquese con la oficina gubernamental local o con el vendedor minorista donde compró este producto. El uso de los símbolos químicos Pb, Cd o Hg indica si estos metales se usan en la batería.Esta información solo se aplica a los clientes de la Unión Europea, de acuerdo con la DIRECTIVA 2006/66/EC DEL PARLAMENTO EUROPEO Y DEL CONSEJO DEL 6 de septiembre de 2006 acerca de las baterías y acumuladores y de las baterías y acumuladores de desecho y por la que se deroga la Directiva 91/157/EEC y la legislación, transponiéndose e implementándose en diversos sistemas legales nacionales.Para otros países, comuníquese con su gobierno local para investigar la posibilidad de reciclar su producto.El procedimiento de retiro y reemplazo de la batería se describe en los siguientes manuales:Manual del manipulador Mantenimiento: Reemplazo de la batería de litioSolo para clientes de CaliforniaLas baterías de litio de este producto contienenMaterial de perclorato: Se pueden aplicar procedimientos de manipulación especiales. Consulte la página /hazardouswaste/perchlorate (solo disponible eninglés).Seguridad e instalación del sistema de robot (T, VT/ EPSON RC+ 7.0) Mod.16viiviii Seguridad e instalación del sistema de robot (T, VT/ EPSON RC+ 7.0) Mod.16 Antes de leer este manual“T” y la “serie T” descritas en este manual corresponden a los siguientesmodelos:Serie T3Serie T6“VT” y la “serie VT” descritas en este manual corresponden al siguiente modelo:Serie VT6Los manipuladores T y de la serie T pueden utilizar el Teach Pendant (TP2 y TP3). No conecte los demás dispositivos al puerto TP , salvo los dispositivosTP2 y TP3. Conectar otros dispositivos puede provocar el mal funcionamiento del dispositivo, ya que las asignaciones de los pines son distintas. Con respecto a la compatibilidad de seguridad para la conexión de red:La función de conexión de red (Ethernet) de nuestros productos supone el uso en la red local, como la red LAN de la fábrica. No la conecte a la red externa, como Internet.Además, tome medidas de seguridad, como contra virus de la conexión de red, mediante la instalación de un software antivirus .Compatibilidad de seguridad para la memoria USB: Asegúrese de que la memoria USB no esté infectada con virus cuando se conecte al controlador.☞ NOTA☞ NOTA ☞ NOTA☞ NOTAConfiguración del sistema de controlEl sistema de manipulador de la serie T se configura con una combinación delos siguientes softwares.T3-401SFirmware del controlador Versión 7.3.51.1 o posteriorEPSON RC+ 7.0 Anterior a laversión 7.3.0Versión 7.3.1 oposteriorOKT6-602S Firmware del controlador Ver.7.3.53.0 o posteriorEPSON RC+ 7.0 Anterior a laversión 7.3.3Ver.7.3.4 oposteriorOKOK: Compatible Todas las funciones de EPSON RC+ 7.0 y el controlador estándisponibles.: Compatible La conexión está bien. Se recomienda usar las siguientes versioneso posteriores. Es posible que la pantalla o el control no funcionencorrectamente.T3-401S : EPSON RC+7.0 Ver.7.3.1T6-602S : EPSON RC+7.0 Ver.7.3.4Seguridad e instalación del sistema de robot (T, VT/ EPSON RC+ 7.0) Mod.16ixEl sistema de manipulador de la serie VT se configura con una combinación de los siguientes softwares.Firmware del controlador VT6-A901S, VT6-A901C, VT6-A901P Ver.7.4.56.2 o posteriorVT6-A901S-DC Ver.7.4.57.1 o posteriorEPSON RC+ 7.0 Anterior a laversión 7.4.6Ver.7.4.7 oposteriorOKOK: Compatible Todas las funciones de EPSON RC+ 7.0 y el controlador estándisponibles.: Compatible La conexión está bien. Se recomienda usar las siguientes versioneso posteriores. Es posible que la pantalla o el control no funcionencorrectamente.EPSON RC+ 7.0 Ver.7.4.7x Seguridad e instalación del sistema de robot (T, VT/ EPSON RC+ 7.0) Mod.16RoHS de ChinaEsta hoja y etiqueta de período de uso de protección ambiental se basan en elreglamento de China. No es necesario preocuparse por esto en otros países.产品中有害物产的名称及含量机器人型号名称T VT部件名称有害物产产汞产六价产多溴产苯多溴二苯产(Pb) (Hg) (Cd) (Cr(VI)) (PBB) (PBDE)机器人部× ○○○○○产机(产行器产元、产机产元)× ○○○○○减速机产元× ○○○○○产磁制产器× ○○○○○同步皮产○○○○○○产池产元(产池、产池固定架、产池基板)× ○○○○○密封(密封填料、油封、密封脂、产片、O型产)× ○○○○○产滑脂○○○○○○产产(M/C产产、产接产产)× ○○○○○散产片○○○○○○LED指示灯○○○○○○产路板× ○○○○○产珠产杠花产 (T系列)○○○○○○制产解除开关× ○○○○○外罩○○○○○○扎产○○○○○○原点产产○○○○○○气管接产× ○○○○○产件VT相机板产元× ○○○○○外部配产配套元件○○○○○○工具适配器(ISO法产) ○○○○○○相机安装板○○○○○○可产机械产产○○○○○○T相机安装板× ○○○○○兼容板× ○○○○○本表格依据SJ/T 11364的产定产制。

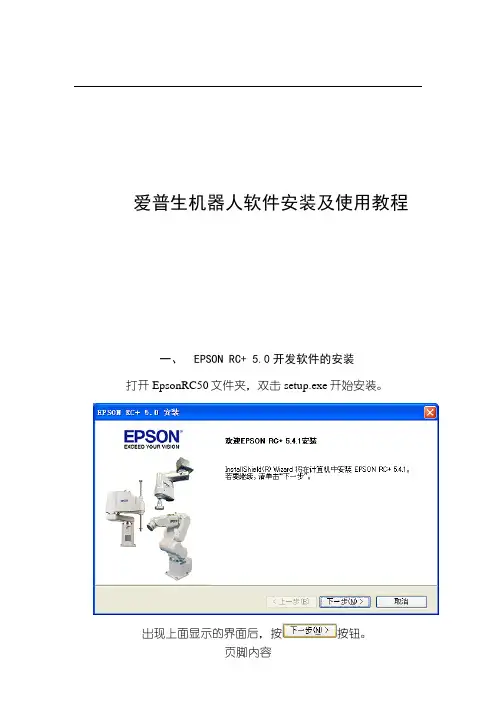
爱普生机器人软件安装及使用教程一、EPSONRC+5.0开发软件的安装打开EpsonRC50文件夹,双击setup.exe开始安装。
出现上面显示的界面后,按按钮。
出现上面显示的界面后,再接着按按钮。
目标驱动器不必选择,直接按按钮。
上面可勾选部分为手册和模拟器实例,可以按默认安装,直接按按钮进行到安装的下一步。
按按钮选择继续安装。
会出现下面的安装进度界面,大约需要等待几分钟,整个EpsonRC50软件安装完成。
安装完成后,将弹出下面的窗口。
按按钮完成软件的安装。
此时,在用户的桌面上会出现下面两个图标前一个图标用于软件的开发和调试,后面的图标用于对工作流程的监视。
二、IP地址的设置用普通网线连接机器人和开发用电脑。
打开本地连接,弹出“本地连接属性”页面。
双击项,将打开Internet协议(TCP/IP)属性页面,修改IP地址等项为下图的值。
按键。
完成IP的设定。
三、EPSONRC+5.0软件使用双击图标,启动EPSONRC+5.0软件。
1.网络通讯的设置在EPSONRC+5.0软件菜单中点击“设置”菜单项,单击选择项目。
将弹出下面“电脑与控制器通信”页面。
点击按钮。
选择选项,按键,完成添加网络通讯功能。
按钮,完成软件中连接IP的设置。
设置完成后页面显示为下图。
检查网线连接是否正常,正常则单击新添加的Ethernet项,按按钮,弹出下面页面。
选项表示电脑只作为监视器使用,不能进行程序的编制、修改等操作,不能对机器人控制点进行示教,也不能对外部I/O进行控制。
不影响已经存在的网络连接。
选项将首先中断目前和控制器的网络连接,将软件切换到程序模式,在此模式下可以进行控制程序的编制、修改工作,机器人控制点的示教和对外部I/O进行实时控制。
为了进行控制程序的编写、修改和调试,我们需要选择项目并按键切换到程序模式。
此后EPSONRC+5.0软件将开始尝试连接RC170机器人控制器,连接成功后页面为下图状态。
按按钮离开设置界面。
机器人软件安装的说明书欢迎使用我们的机器人软件!本说明书将为您详细介绍机器人软件的安装步骤和注意事项,以确保您能够顺利地安装和使用该软件。
一、系统要求在开始安装机器人软件之前,请确保您的电脑符合以下最低系统要求:- 操作系统:Windows 7及以上版本,或者Mac OS X 10.10及以上版本。
- 处理器:英特尔或AMD 1GHz以上处理器。
- 内存:至少2GB的可用内存。
- 硬盘空间:至少200MB的可用硬盘空间。
- 显示器分辨率:建议使用1024x768或更高分辨率。
二、软件安装步骤请按照以下步骤进行机器人软件的安装:1. 下载软件安装包请前往我们的官方网站(请勿在文章中出现网址链接)下载最新版本的机器人软件安装包。
确保下载的安装包与您的系统兼容并且来源可靠。
2. 打开安装包双击下载的安装包,然后根据系统提示选择安装语言并确认开始安装。
3. 安装目标路径在安装向导中,您可以选择软件的安装目标路径。
您可以接受默认路径,也可以选择其他路径进行安装。
4. 完成安装跟随安装向导的指示完成安装过程。
请耐心等待,直到安装进程完成。
三、软件使用指南以下是机器人软件的基本使用指南,帮助您更好地利用软件的功能:1. 启动软件双击机器人软件的桌面图标或者在开始菜单中找到软件并打开。
2. 注册账户首次启动软件时,您需要创建一个账户并进行注册。
请按照软件界面上的步骤完成注册过程。
3. 连接机器人在成功注册后,您需要将机器人与软件进行连接。
请按照软件提供的指示,通过USB或者Wi-Fi等方式与机器人进行连接。
4. 软件设置您可以根据个人喜好和需要对软件进行设置。
例如,设置语言、音量、互动模式等。
5. 软件功能机器人软件提供丰富的功能,例如语音识别、人脸识别、文字聊天等。
请在软件界面中探索和使用这些功能,以满足您的需求。
四、注意事项在安装和使用机器人软件时,请务必注意以下事项:1. 安全性请确保下载软件安装包的来源可信,并且避免从非官方渠道下载软件,以确保您的电脑和数据的安全。
Robot Controller Control Unit RC700RC700-ADrive Unit RC700DURC700DU-A Programming Software EPSON RC+7.0 Manipulator G1 G3 G6 G10 G20 seriesRS seriesC4 C8 C12 seriesN2 N6 seriesX5 seriesRobot System Safety and Installation (RC700 / EPSON RC+7.0) Rev.22Robot System Safety and Installation(RC700 / EPSON RC+7.0)Rev.22Copyright 2012-2019 SEIKO EPSON CORPORATION. All rights reserved. Safety and Installation (RC700 / EPSON RC+ 7.0) Rev.22 iFOREWORDThank you for purchasing our robot products.This manual contains the information necessary for the correct use of the robotsystem.Please carefully read this manual and other related manuals before installing therobot system.Keep this manual handy for easy access at all times.WARRANTYThe robot system and its optional parts are shipped to our customers only after beingsubjected to the strictest quality controls, tests, and inspections to certify itscompliance with our high performance standards.Product malfunctions resulting from normal handling or operation will be repairedfree of charge during the normal warranty period. (Please contact the supplier ofyour region for warranty period information.)However, customers will be charged for repairs in the following cases (even if theyoccur during the warranty period):1. Damage or malfunction caused by improper use which is not described inthe manual, or careless use.2. Malfunctions caused by customers’ unauthorized disassembly.3. Damage due to improper adjustments or unauthorized repair attempts.4. Damage caused by natural disasters such as earthquake, flood, etc.Warnings, Cautions, Usage:1. If the robot system associated equipment is used outside of the usageconditions and product specifications described in the manuals, thiswarranty is void.2. If you do not follow the WARNINGS and CAUTIONS in this manual, wecannot be responsible for any malfunction or accident, even if the result isinjury or death.3. We cannot foresee all possible dangers and consequences. Therefore, thismanual cannot warn the user of all possible hazards.ii Safety and Installation (RC700 / EPSON RC+ 7.0) Rev.22TRADEMARKSMicrosoft, Windows, and Windows logo are either registered trademarks ortrademarks of Microsoft Corporation in the United States and/or other countries.Other brand and product names are trademarks or registered trademarks of therespective holders.TRADEMARK NOTATION IN THIS MANUALMicrosoft® Windows® 7 Operating systemMicrosoft® Windows® 8 Operating systemMicrosoft® Windows® 10 Operating systemThroughout this manual, Windows 7, Windows 8, and Windows 10 refer to aboverespective operating systems. In some cases, Windows refers generically toWindows 7, Windows 8, and Windows 10.NOTICENo part of this manual may be copied or reproduced without authorization.The contents of this manual are subject to change without notice.Please notify us if you should find any errors in this manual or if you have anycomments regarding its contents.MANUFACTURERSeiko Epson Corporation3-3-5 Owa, Suwa-shi, Nagano, 392-8502URL :/company/: http://www.epson.jp/prod/robots/Toyoshina PlantRobotics Solutions Operations Division6925 Toyoshina Tazawa,Azumino-shi, Nagano, 399-8285JapanTEL : +81-(0)263-72-1530FAX : +81-(0)263-72-1495Safety and Installation (RC700 / EPSON RC+ 7.0) Rev.22 iiiivSafety and Installation (RC700 / EPSON RC+ 7.0) Rev.22SUPPLIERS (Country/Region)North & South AmericaEpson America, Inc.Factory Automation/Robotics 18300 Central Avenue Carson, CA 90746 USATEL : +1-562-290-5900 FAX : +1-562-290-5999E-MAIL:*****************.comEuropeEpson Deutschland GmbHRobotic Solutions Otto-Hahn-Str.4 D-40670 Meerbusch GermanyTEL : +49-(0)-2159-538-1800 FAX : +49-(0)-2159-538-3170 E-MAIL :**************** URL:: www.epson.de/robotsChinaEpson (China) Co., Ltd.Factory Automation Division 4F, Tower 1, China Central Place, 81 Jianguo Road, Chaoyang District, Beijing, 100025, PRC TEL : +86-(0)-10-8522-1199FAX: +86-(0)-10-8522-1120Taiwan Epson Taiwan Technology & Trading Ltd.Factory Automation Division15F., No.100, Songren Rd., Sinyi Dist., Taipei City, 11073 Taiwan TEL : +886-(0)-2-8786-6688FAX: +886-(0)-2-8786-6600Korea Epson Korea Co., Ltd.Marketing Team (Robot Business)10F Posco P&S Tower, Teheranro 134(Yeoksam-dong)Gangnam-gu, Seoul, 06235KoreaTEL : +82-(0)-2-3420-6692FAX : +82-(0)-2-558-4271Southeast Asia Epson Singapore Pte. Ltd.Factory Automation System1 HarbourFront Place, #03-02,HarbourFront Tower One,Singapore 098633TEL : +65-(0)-6586-5696FAX : +65-(0)-6271-3182India Epson India Pvt. Ltd.Sales & Marketing (Factory Automation)12th Floor, The Millenia, Tower A, No. 1,Murphy Road, Ulsoor, Bangalore,India 560008TEL : +91-80-4566-5000FAX : +91-80-4566-5005Japan Epson Sales Japan CorporationFactory Automation Systems Department29th floor, JR Shinjuku Miraina Tower, 4-1-6Shinjuku, Shinjuku-ku, Tokyo 160-8801JapanTEL :+81-(0)3-5919-5257FAX :+81-(0)3-5919-5402Safety and Installation (RC700 / EPSON RC+ 7.0) Rev.22 vRegarding battery disposalThe crossed out wheeled bin label that can be found on your product indicates that this product and incorporated batteries should not be disposed of via the normal household waste stream. To prevent possible harm to the environment or human health please separate this product and its batteries from other waste streams to ensure that it can be recycled in an environmentally sound manner. For more details on available collection facilities please contact your local government office or the retailer where you purchased this product. Use of the chemical symbols Pb, Cd or Hg indicates if these metals are used in the battery.This information only applies to customers in the European Union, according to DIRECTIVE 2006/66/EC OF THE EUROPEAN PARLIAMENT AND OF THE COUNCIL OF 6 September 2006 on batteries and accumulators and waste batteries and accumulators and repealing Directive 91/157/EEC and legislation transposing and implementing it into the various national legal systems.For other countries, please contact your local government to investigate the possibility of recycling your product.The battery removal/replacement procedure is described in the following manuals:Controller manual / Manipulator manual(Maintenance section)For California customers onlyThe lithium batteries in this product containPerchlorate Material - special handling may apply,See /hazardouswaste/perchlorate.vi Safety and Installation (RC700 / EPSON RC+ 7.0) Rev.22Safety and Installation (RC700 / EPSON RC+ 7.0) Rev.22 viiBefore Reading This ManualConcerning the security support for the network connection:The network connecting function (Ethernet) on our products assumes the use in the local network such as the factory LAN network. Do not connect to the external network such as Internet.In addition, please take security measure such as for the virus from the network connection by installing the antivirus software.Security support for the USB memory:Make sure the USB memory is not infected with virus when connecting to the Controller.Control System ConfigurationRobot Controller Drive Unit RC700DU is available for the following version.EPSON RC+ 7.0 Ver.7.1.0 or laterRobot Controller RC700-ARobot Controller Drive Unit RC700DU-A is available for the following version.EPSON RC+ 7.0 Ver.7.1.2 or laterManipulators can be connected with the following versions. C4 series : EPSON RC+ 7.0 Ver.7.0.0 C8 series (C8XL) : EPSON RC+ 7.0 Ver.7.1.3 C8 series (C8, C8L) : EPSON RC+ 7.0 Ver.7.1.4 C8 series (wall mounting) : EPSON RC+ 7.0 Ver.7.2.0 C12 series : EPSON RC+ 7.0 Ver.7.4.6 N2 series: EPSON RC+ 7.0 Ver.7.2.0 N6 series (N6-A1000**) : EPSON RC+ 7.0 Ver.7.3.4 N6 series (N6-A850**R) : EPSON RC+ 7.0 Ver.7.4.1G1, G3, G6, G10, G20, RS series: EPSON RC+ 7.0 Ver.7.1.2 X5 series: EPSON RC+ 7.0 Ver.7.3.0☞NOTE☞NOTEChina RoHSThis sheet and environmental protection use period label are based on theregulation in China. These are not necessary to be concerned in othercountries.viii Safety and Installation (RC700 / EPSON RC+ 7.0) Rev.22产品环保使用期限的使用条件关于适用于在中华人民共和国境内销售的电器电子产品的环保使用期限,在遵守该产品的安全及使用注意事项的条件下,从生产日期开始计算,在标志的年限内,本产品中含有的有害物质不会对环境造成严重污染或对人身、财产造成严重损害。
Quick SetupBefore using the projector, make sure you read the safety instructions in the online User’s Guide .ContentsMake sure your projector box included all of these parts:Installation optionsYou can install your projector in the following ways:•M ounted on a wall or ceiling using the direct mount (included) • Mounted on a lighting track using the optional lighting track mount (ELPMB54)•M ounted on a table or floor using the optional floor stand (ELPMB55)Note: To purchase optional mounts or other accessories, see “Optional accessories.” For more information about the mounts, see the Installation Manual that came with the mount or the online User’s Guide .Connect the projectorChoose from the following connections. See the sections below or the online User’s Guide for details.Wired networkConnect the projector to your network using an Ethernet cable. See “Settingup a wired connection” for more information.Connect one end of an HDMI cable to the projector’s HDMI port and the otherend to an HDMI port on your computer or video device.External speakersConnect one end of a 3.5 mm stereo mini-jack audio cable to the projector’s Audio Outport and the other end to your powered external speakers.Install the batteries as shown (two AA batteries).and offAccess projector menusDisplay a test pattern SD cardChange image shape and colorNavigate projector menusAccess playlists you assigned to each of the numeric buttons (1 to 9)Adjust projector focus Control projector volumeSwitch to spotlight mode Select a playlist on SD cardFor more information on using the remote control, see the online User’s Guide.Turn on your equipmentNote: Your connection method may vary depending on your setup.1C onnect your computer, video equipment, or insert an SD card.2Make sure the power cord is connected and plugged into an electrical outlet.3P ress the power button on the projector or remote control. The Status light flashes blue and then stays on.Note: To shut down the projector, press the power button twice.4If you don’t see an image, press one of the input source buttons on the Note:5Icontrol.6TExtended and press . Select your Setting up a wireless connectionFollow these steps to set up the projector for a wireless network connection.Note: For more information about using the projector on a network, see the online User’s Guide .1 P ress the Menubutton on the remote control, select the Network menu,then press.2S elect On as the Wireless LAN Power setting.3 Select Network Configuration and press .4S elect the Basic menu and press.5S elect the basic options as necessary and press .6S elect the Wireless LAN menu and press.7S elect one of the following as the Connection Mode setting: •Quick for a direct connection to a computer, tablet, or smartphone.•A dvanced to connect your projector to a wireless router or access point.8Select any other settings on the Wireless LAN menu as necessary. See the online User’s Guide for details.9When you are finished, select Complete and press , then pressagain to save your settings.10 P ress the Menu button to exit the menu system.Install the optional softwareDownload and install optional software to perform various tasks wirelessly, such as uploading content, monitoring or controlling your projector, and projecting from multiple computers.You can download the optional software and its manuals from the Epson website, as described in “Where to get help.”Setting up a wiredconnectionFollow these steps to set up the projector for a wired network connection.Note: For more information about using the projector on a network, see the online User’s Guide .1 P ress the Menu button on the remote control, select the Networkmenu, then press.2 S elect Network Configuration and press .3S elect the Basic menu and press.4S elect the basic options as necessary and press .5S elect the Wired LAN menu and press.6 C hoose IP Settings and press .7If your network assigns addresses automatically, make sure the DHCP setting is on. If not, make sure DHCP is off and enter the projector’s IP Address , Subnet Mask , and Gateway Address , as needed. Then press Esc .8 To prevent the IP address from appearing on the network standby screen, set the IP Address Display setting to Off .9When you are finished, select Complete and press , then pressagain to save your settings.10 P ress the Menu button to exit the menu system.Using web remoteYou can use a standard web browser to control the projector through thenetwork. A virtual remote control on your computer screen lets you perform many of the same functions as you can with the physical remote control.1Open your web browser and enter the IP address of the projector you want to monitor in the browser’s address box.If you’re not sure what the IP address of the projector is, turn the projector on and select Net. Info. - Wired LAN or Net. Info. -Wireless LAN from the Network menu to display the IP address of the projector. (Do not enter the leading zeroes.)2E nter EPSONWEB as the user name and admin as the password, then click OK . The Epson ®Web Control menu opens.3Select Remote . Use the on-screen buttons to operate the projector, asyou would using the remote control.Select image sourceAdjust volume Add overlay effect to imageTurn off pictureand sound Select a savedplaylistUsing the Epson iProjection appYou can project wirelessly from a mobile device (iOS or Android™) using the Epson iProjection™ app and a QR code.1U se the following QR code to download and install the Epson iProjection app.2 Connect your mobile device to the same wireless network your projector is connected to.3 Press the Menubutton on the remote control, select the Network menu,and select Display the QR Code to display a QR code.4S tart Epson iProjection on your mobile device.5U se the QR code reader feature to read the QR code displayed.6F ollow the app instructions to connect your device to the projector.For more information on setting up and using this app, visit/projectorapp (U.S.) or www.epson.ca/projectorapp (Canada).Managing contentYou can manage content from your computer using the Epson Projector Content Manager software (Windows ®), or over the network using a web browser (Epson Web Control) or the Epson iProjection app.Note: An SD card is required for managing content.Epson Projector Content ManagerWeb Browser/Epson iProjectionCreate and edit playlists and apply effects and filters√√Create custom filters √Create and edit timetable √Save project on an SD card √Convert video files √Upload video and picture files over a network √Control projector over a network√Using the Content Manager softwareThe Epson Projector Content Manager software allows you to add images and movies to playlists and save them directly to an SD card. You can easily projectyour playlist content by inserting the SD card into your projector’s card slot.Note:information, see the online Epson Projector Content Manager Operation Guide or the online User’s Guide .TroubleshootingIf you see a blank screen or the No signal message after turning on yourcomputer or video device, check the following:•M ake sure the Status light on the projector is blue and not flashing.•M ake sure all necessary cables are securely connected, or that the SD cardis inserted correctly, and the power is on for the projector and connectedvideo sources.•P ress one of the source buttons (Spotlight, HDMI, LAN, or SD) on theremote control to switch to the correct image source, if necessary.•P ress the A/V Mute button on the remote control to see if the image wastemporarily turned off.•M ake sure the image being projected is not completely black (only whenprojecting computer images).•F or images projected with Windows Media Center, reduce the screen sizefrom full screen mode.•F or images projected from applications using Microsoft® DirectX®, turn offDirectX functions.•O n Windows 7 or later, hold down the Windows key and press P at thesame time, then click Duplicate.•I f you’re using a Windows laptop, press the function key on your keyboardthat lets you display on an external monitor. It may be labeled CRT/LCD orhave an icon such as . You may have to hold down the Fn key whilepressing it (such as Fn + F7). Wait a moment for the display to appear.•I f you’re using a Mac laptop, open System Preferences and selectDisplays. Click the Arrangement tab and select the Mirror Displayscheckbox.Where to get helpManualsFor more information about using the projector, see the online manuals. Youcan view or download the manuals from the Epson website, as described below.Internet support servicesVisit /support (U.S.) or www.epson.ca/support (Canada)and search for your product to download software and utilities, view manuals,get FAQs and troubleshooting advice, or contact Epson.Telephone supportTo use the Epson PrivateLine® Support service, call (800) 637-7661. This serviceis available for the duration of your warranty period. You may also speak witha support specialist by calling (562) 276-4394 (U.S.) or (905) 709-3839 (Canada).Support hours are 6 am to 8 pm, Pacific Time, Monday through Friday, and7 am to 4 pm, Pacific Time, Saturday. Days and hours of support are subject tochange without notice. Toll or long distance charges may apply.RegistrationRegister today to get product updates and exclusive offers. You can registeronline at /webreg.Optional accessoriesFor a list of optional accessories, see the online User’s Guide.You can purchase screens or other accessories from an Epson authorized reseller.To find the nearest reseller, call 800-GO-EPSON (800-463-7766). Or you canpurchase online at (U.S. sales) orwww.epsonstore.ca (Canadian sales).EPSON is a registered trademark, EPSON Exceed Your Vision is a registered logomark, and Epson iProjection is atrademark of Seiko Epson Corporation. PrivateLine is a registered trademark of Epson America, Inc.Mac and OS X are trademarks of Apple Inc., registered in the U.S. and other countries.Android is a trademark of Google Inc.General Notice: Other product names used herein are for identification purposes only and may be trademarks oftheir respective owners. Epson disclaims any and all rights in those marks.This information is subject to change without notice.© 2018 Epson America, Inc., 3/18CPD-55365。
机器人控制器 控制单元 RC700RC700-A驱动单元 RC700DURC700DU-A编程软件 EPSON RC+7.0机器人 G1 G3 G6 G10 G20 系列RS 系列C4 C8 C12 系列N2 N6 系列X5 系列机器人系统安全与设置(RC700/EPSON RC+7.0)Rev.24机器人系统安全与设置(RC700 / EPSON RC+ 7.0)Rev.24Copyright 2012-2020 SEIKO EPSON CORPORATION. All rights reserved. 安全与设置(RC700 / EPSON RC+ 7.0) Rev.24 i前言感谢您购买本公司的机器人系统。
本手册记载了正确使用示教器所需的事项。
使用系统之前,请阅读本手册与相关手册,正确地进行使用。
阅读之后,请妥善保管,以便随时取阅。
保修本机及其选装部件是经过本公司严格的质量控制、测试和检查,并在确认性能满足本公司标准之后出厂交付的。
在交付产品的保修期内,本公司仅对正常使用时发生的故障进行免费修理。
(有关保修期方面的信息,请与当地销售商联系。
)但在以下情况下,将对客户收取修理费用(即使发生在保修期内):1. 因不同于使用说明书内容的错误使用以及使用不当而导致的故障与损伤。
2. 客户擅自改造或拆卸造成的故障。
3. 因调整不当/擅自修理而导致的损坏。
4. 因地震、洪水等自然灾害导致的损坏警告、注意、使用:1. 如果机器人或相关设备的使用超出本手册所述的使用条件及产品规格,将导致保修无效。
2. 本公司对因未遵守本手册记载的“警告”与“注意”而导致的任何故障或事故,甚至是人身伤害或死亡均不承担任何责任,敬请谅解。
3. 本公司不可能完全预见危险与故障发生的所有状况,此可预见性存在局限性。
因此,本手册不能警告用户所有可能的危险。
ii 安全与设置(RC700 / EPSON RC+ 7.0) Rev.24商标Microsoft、Windows及Windows标识为美国Microsoft Corporation在美国及其它国家的注册商标或商标。
Programming Software EPSON RC+ 7.0Manipulator T3 T6VT6Robot System Safety and Installation (T, VT/ EPSON RC+ 7.0) Rev.13Robot System Safety and Installation(T, VT / EPSON RC+ 7.0)Rev.13Copyright 2017-2019 SEIKO EPSON CORPORATION. All rights reserved Safety and Installation (T, VT / EPSON RC+ 7.0) Rev.13 iFOREWORDThank you for purchasing our robot products.This manual contains the information necessary for the correct use of the robotsystem.Please carefully read this manual and other related manuals before installing therobot system.Keep this manual handy for easy access at all times.WARRANTYThe robot system and its optional parts are shipped to our customers only afterbeing subjected to the strictest quality controls, tests, and inspections to certify itscompliance with our high performance standards.Product malfunctions resulting from normal handling or operation will be repairedfree of charge during the normal warranty period. (Please contact the supplier ofyour region for warranty period information.)However, customers will be charged for repairs in the following cases (even if theyoccur during the warranty period):1. Damage or malfunction caused by improper use which is not described inthe manual, or careless use.2. Malfunctions caused by customers’ unauthorized disassembly.3. Damage due to improper adjustments or unauthorized repair attempts.4. Damage caused by natural disasters such as earthquake, flood, etc.Warnings, Cautions, Usage:1. If the robot system associated equipment is used outside of the usageconditions and product specifications described in the manuals, thiswarranty is void.2. If you do not follow the WARNINGS and CAUTIONS in this manual, wecannot be responsible for any malfunction or accident, even if the result isinjury or death.3. We cannot foresee all possible dangers and consequences. Therefore, thismanual cannot warn the user of all possible hazards.ii Safety and Installation (T, VT / EPSON RC+ 7.0) Rev.13TRADEMARKSMicrosoft, Windows, and Windows logo are either registered trademarks ortrademarks of Microsoft Corporation in the United States and/or other countries.Other brand and product names are trademarks or registered trademarks of therespective holders.TRADEMARK NOTATION IN THIS MANUALMicrosoft® Windows® 7 Operating systemMicrosoft® Windows® 8 Operating systemMicrosoft® Windows® 10 Operating systemThroughout this manual, Windows 7, Windows 8, and Windows 10 refer to aboverespective operating systems. In some cases, Windows refers generically toWindows 7, Windows 8, and Windows 10.NOTICENo part of this manual may be copied or reproduced without authorization.The contents of this manual are subject to change without notice.Please notify us if you should find any errors in this manual or if you have anycomments regarding its contents.MANUFACTURERSeiko Epson Corporation3-3-5 Owa, Suwa-shi, Nagano, 392-8502URL :/company/: http://www.epson.jp/prod/robots/Toyoshina PlantRobotics Solutions Operations Division6925 Toyoshina Tazawa,Azumino-shi, Nagano, 399-8285JapanTEL : +81-(0)263-72-1530FAX : +81-(0)263-72-1685Safety and Installation (T, VT / EPSON RC+ 7.0) Rev.13 iiiiv Safety and Installation (T, VT / EPSON RC+ 7.0) Rev.13SUPPLIERS (Country/Region) North & SouthAmericaEpson America, Inc. Factory Automation/Robotics 1650 Glenn Curtiss Street Carson, CA 90746 USATEL : +1-562-290-5900FAX : +1-562-290-5999E-MAIL :*****************.com EuropeEpson Deutschland GmbHRobotic Solutions Otto-Hahn-Str.4 D-40670 Meerbusch GermanyTEL : +49-(0)-2159-538-1800FAX : +49-(0)-2159-538-3170E-MAIL :****************URL: : www.epson.de/robots ChinaEpson (China) Co., Ltd.Factory Automation Division 4F, Tower 1, China Central Place, 81 Jianguo Road, Chaoyang District, Beijing, 100025, PRCTEL : +86-(0)-10-8522-1199FAX : +86-(0)-10-8522-1120TaiwanEpson Taiwan Technology & Trading Ltd.Factory Automation Division 15F., No.100, Songren Rd., Sinyi Dist., Taipei City, 11073 TaiwanTEL : +886-(0)-2-8786-6688FAX : +886-(0)-2-8786-6600Korea Epson Korea Co., Ltd.Marketing Team (Robot Business)10F Posco P&S Tower, Teheranro 134(Yeoksam-dong)Gangnam-gu, Seoul, 06235KoreaTEL : +82-(0)-2-3420-6692FAX : +82-(0)-2-558-4271Southeast Asia Epson Singapore Pte. Ltd.Factory Automation System1 HarbourFront Place, #03-02,HarbourFront Tower One,Singapore 098633TEL : +65-(0)-6586-5696FAX : +65-(0)-6271-3182India Epson India Pvt. Ltd.Sales & Marketing (Factory Automation)12th Floor, The Millenia, Tower A, No. 1,Murphy Road, Ulsoor, Bangalore,India 560008TEL : +91-80-3051-5000FAX : +91-80-3051-5005Japan Epson Sales Japan CorporationFactory Automation Systems Department29th floor, JR Shinjuku Miraina Tower, 4-1-6Shinjuku, Shinjuku-ku, Tokyo 160-8801JapanTEL :+81-(0)3-5919-5257FAX :+81-(0)3-5919-5402Safety and Installation (T, VT / EPSON RC+ 7.0) Rev.13 vRegarding battery disposalThe crossed out wheeled bin label that can be found on your product indicates that this product and incorporated batteries should not be disposed of via the normal household waste stream. To prevent possible harm to the environment or human health please separate this product and its batteries from other waste streams to ensure that it can be recycled in an environmentally sound manner. For more details on available collection facilities please contact your local government office or the retailer where you purchased this product. Use of the chemical symbols Pb, Cd or Hg indicates if these metals are used in the battery.This information only applies to customers in the European Union, according to DIRECTIVE 2006/66/EC OF THE EUROPEAN PARLIAMENT AND OF THE COUNCIL OF 6 September 2006 on batteries and accumulators and waste batteries and accumulators and repealing Directive 91/157/EEC and legislation transposing and implementing it into the various national legal systems.For other countries, please contact your local government to investigate the possibility of recycling your product.The battery removal/replacement procedure is described in the following manuals:Manipulator Manual Maintenance: Replacing the Lithium BatteryFor California customers onlyThe lithium batteries in this product containPerchlorate Material - special handling may apply,See /hazardouswaste/perchlorate.vi Safety and Installation (T, VT / EPSON RC+ 7.0) Rev.13Safety and Installation (T, VT / EPSON RC+ 7.0) Rev.13 viiBefore Reading This Manual"T" and "T series" described in this manual are the following models.T3 seriesT6 series"VT" and "VT series" described in this manual are the following model. VT6 seriesT series and VT series Manipulators can use the Teach Pendant (TP2, TP3). Do not connect the other devices to TP port except TP2 and TP3. Connecting other devices may result in malfunction of the device since the pin assignments are different. Concerning the security support for the network connection:The network connecting function (Ethernet) on our products assumes the usein the local network such as the factory LAN network. Do not connect to the external network such as Internet.In addition, please take security measure such as for the virus from the network connection by installing the antivirus software .Security support for the USB memory: Make sure the USB memory is not infected with virus when connecting to the Controller.☞ NOTE ☞NOTE ☞ NOTE ☞ NOTEControl System ConfigurationT series Manipulator system are configured by a combination of the followingsoftware.T3-401S Controller FirmwareVer.7.3.51.1 or laterEPSON RC+ 7.0 Before Ver.7.3.0Ver.7.3.1 or later OKT6-602S Controller FirmwareVer.7.3.53.0 or laterEPSON RC+ 7.0 Before Ver.7.3.3Ver.7.3.4 or later OKOK: Compatible All functions of the EPSON RC+ 7.0 and the Controller areavailable.: Compatible Connection is OK. It is recommended to use the followingversions or later. Display or control may not be operatedproperly.T3-401S : EPSON RC+7.0 Ver.7.3.1T6-602S : EPSON RC+7.0 Ver.7.3.4viii Safety and Installation (T, VT / EPSON RC+ 7.0) Rev.13VT series Manipulator system are configured by a combination of the following software.VT6-A901S, VT6-A901C, VT6-A901P Controller FirmwareVer.7.4.56.2 or laterEPSON RC+ 7.0 Before Ver.7.4.6Ver.7.4.7 or later OKOK: Compatible All functions of the EPSON RC+ 7.0 and the Controller are available.: Compatible Connection is OK. It is recommended to use the following versions or later. Display or control may not be operatedproperly.EPSON RC+ 7.0 Ver.7.4.7China RoHSThis sheet and environmental protection use period label are based on the regulation in China. These are not necessary to be concerned in other countries.产品中有害物质的名称及含量机器人型号名称T VT 部件名称有害物质铅汞镉 六价铬 多溴 联苯多溴 二苯醚(Pb)(Hg)(Cd) (Cr(VI))(PBB)(PBDE)机器人部× ○ ○ ○ ○ ○电机 (执行器单元、电机单元) × ○ ○ ○ ○ ○ 减速机单元 × ○ ○ ○ ○ ○ 电磁制动器 × ○ ○ ○ ○ ○ 同步皮带 ○ ○ ○ ○ ○ ○ 电池单元(电池、电池固定架、电池基板) × ○ ○ ○ ○ ○ 密封(密封填料、油封、密封脂、 垫片、O 型环) × ○ ○ ○ ○ ○ 润滑脂 ○ ○ ○ ○ ○ ○ 电缆 (M/C 电缆、连接电缆) × ○ ○ ○ ○ ○ 散热片 ○ ○ ○ ○ ○ ○ LED 指示灯 ○ ○ ○ ○ ○ ○ 电路板× ○ ○ ○ ○ ○ 滚珠丝杠花键 (T 系列) ○ ○ ○ ○ ○ ○ 制动解除开关 × ○ ○ ○ ○ ○ 外罩 ○ ○ ○ ○ ○ ○ 扎带○ ○ ○ ○ ○ ○ 原点标记 ○ ○ ○ ○ ○ ○ 气管接头× ○ ○ ○ ○ ○ 选件VT 相机板单元× ○ ○ ○ ○ ○ 外部配线配套元件 ○ ○ ○ ○ ○ ○ 工具适配器(ISO 法兰) ○ ○ ○ ○ ○ ○ 相机安装板○ ○ ○ ○ ○ ○ 可调机械挡块 ○ ○ ○ ○ ○ ○ T相机安装板 × ○ ○ ○ ○ ○ 兼容板×○○○○○本表格依据SJ/T 11364的规定编制。
Robot Controller RC90Programming Software EPSON RC+ 7.0Manipulator LS series(LS3 / LS6 / LS20)Robot System Safety and Installation (RC90 / EPSON RC+ 7.0) Rev.13Robot System Safety and Installation(RC90 / EPSON RC+ 7.0)Rev.13Copyright 2013-2020 SEIKO EPSON CORPORATION. All rights reserved Safety and Installation (RC90 / EPSON RC+ 7.0) Rev.13 iFOREWORDThank you for purchasing our robot products.This manual contains the information necessary for the correct use of the robotsystem.Please carefully read this manual and other related manuals before installing therobot system.Keep this manual handy for easy access at all times.WARRANTYThe robot system and its optional parts are shipped to our customers only after beingsubjected to the strictest quality controls, tests, and inspections to certify itscompliance with our high performance standards.Product malfunctions resulting from normal handling or operation will be repairedfree of charge during the normal warranty period. (Please contact the supplier ofyour region for warranty period information.)However, customers will be charged for repairs in the following cases (even if theyoccur during the warranty period):1. Damage or malfunction caused by improper use which is not described inthe manual, or careless use.2. Malfunctions caused by customers’ unauthorized disassembly.3. Damage due to improper adjustments or unauthorized repair attempts.4. Damage caused by natural disasters such as earthquake, flood, etc.Warnings, Cautions, Usage:1. If the robot system associated equipment is used outside of the usageconditions and product specifications described in the manuals, thiswarranty is void.2. If you do not follow the WARNINGS and CAUTIONS in this manual, wecannot be responsible for any malfunction or accident, even if the result isinjury or death.3. We cannot foresee all possible dangers and consequences. Therefore, thismanual cannot warn the user of all possible hazards.ii Safety and Installation (RC90 / EPSON RC+ 7.0) Rev.13TRADEMARKSMicrosoft, Windows, and Windows logo are either registered trademarks ortrademarks of Microsoft Corporation in the United States and/or other countries.Other brand and product names are trademarks or registered trademarks of therespective holders.TRADEMARK NOTATION IN THIS MANUALMicrosoft® Windows® 8 Operating systemMicrosoft® Windows® 10 Operating systemThroughout this manual, Windows 8, and Windows 10 refer to above respectiveoperating systems. In some cases, Windows refers generically to Windows 8, andWindows 10.NOTICENo part of this manual may be copied or reproduced without authorization.The contents of this manual are subject to change without notice.Please notify us if you should find any errors in this manual or if you have anycomments regarding its contents.MANUFACTURERSeiko Epson Corporation3-3-5 Owa, Suwa-shi, Nagano, 392-8502URL :/company/: http://www.epson.jp/prod/robots/Toyoshina PlantRobotics Solutions Operations Division6925 Toyoshina Tazawa,Azumino-shi, Nagano, 399-8285JapanTEL : +81-(0)263-72-1530FAX : +81-(0)263-72-1685Safety and Installation (RC90 / EPSON RC+ 7.0) Rev.13 iiiiv Safety and Installation (RC90 / EPSON RC+ 7.0) Rev.13SUPPLIERS (Country/Region) North & SouthAmericaEpson America, Inc. Factory Automation/Robotics 1650 Glenn Curtiss Street Carson, CA 90746 USATEL : +1-562-290-5910FAX : +1-562-290-5999E-MAIL :*****************.com EuropeEpson Deutschland GmbHRobotic Solutions Otto-Hahn-Str.4 D-40670 Meerbusch GermanyTEL : +49-(0)-2159-538-1800FAX : +49-(0)-2159-538-3170E-MAIL :****************URL: : www.epson.de/robots ChinaEpson (China) Co., Ltd.Factory Automation Division 4F, Tower 1, China Central Place, 81 Jianguo Road, Chaoyang District, Beijing, 100025, PRCTEL : +86-(0)-10-8522-1199FAX : +86-(0)-10-8522-1125TaiwanEpson Taiwan Technology & Trading Ltd.Factory Automation Division 15F., No.100, Song Ren Road., Xinyi Dist., Taipei City, 11073 TaiwanTEL : +886-(0)-2-8786-6688FAX : +886-(0)-2-8786-6600Korea Epson Korea Co., Ltd.Marketing Team (Robot Business)10F Posco Tower, Teheranro 134(Yeoksam-dong)Gangnam-gu, Seoul, 06235KoreaTEL : +82-(0)-2-3420-6632FAX : +82-(0)-2-558-4271Southeast Asia Epson Singapore Pte. Ltd.Factory Automation System1 HarbourFront Place, #03-02,HarbourFront Tower One,Singapore 098633TEL : +65-(0)-6586-5500FAX : +65-(0)-6271-2703India Epson India Pvt. Ltd.Sales & Marketing (Factory Automation)12th Floor, The Millenia, Tower A, No. 1,Murphy Road, Ulsoor, Bangalore,India 560008TEL : +91-80-4566-5000FAX : +91-80-4566-5005Japan Epson Sales Japan CorporationFactory Automation Systems Department29th floor, JR Shinjuku Miraina Tower, 4-1-6Shinjuku, Shinjuku-ku, Tokyo 160-8801JapanTEL :+81-(0)3-5919-5257FAX :+81-(0)3-5919-5402Safety and Installation (RC90 / EPSON RC+ 7.0) Rev.13 vRegarding battery disposalThe crossed out wheeled bin label that can be found on your product indicates that this product and incorporated batteries should not be disposed of via the normal household waste stream. To prevent possible harm to the environment or human health please separate this product and its batteries from other waste streams to ensure that it can be recycled in an environmentally sound manner. For more details on available collection facilities please contact your local government office or the retailer where you purchased this product. Use of the chemical symbols Pb, Cd or Hg indicates if these metals are used in the battery.This information only applies to customers in the European Union, according to DIRECTIVE 2006/66/EC OF THE EUROPEAN PARLIAMENT AND OF THE COUNCIL OF 6 September 2006 on batteries and accumulators and waste batteries and accumulators and repealing Directive 91/157/EEC and legislation transposing and implementing it into the various national legal systems.For other countries, please contact your local government to investigate the possibility of recycling your product.The battery removal/replacement procedure is described in the following manuals:Controller manual / Manipulator manual(Maintenance section)For California customers onlyThe lithium batteries in this product containPerchlorate Material - special handling may apply,See /hazardouswaste/perchlorate.vi Safety and Installation (RC90 / EPSON RC+ 7.0) Rev.13Safety and Installation (RC90 / EPSON RC+ 7.0) Rev.13 viiBefore Reading This ManualTP port of RC90 is for the Teach Pendant TP1 and TP2. Do not connect thefollowings to TP port of RC90. Connecting to the followings may result in malfunction of the device since the pin assignments are different.OPTIONAL DEVICE dummy plugOperation Pendant OP500Operator Pendant OP500RCJog Pad JP500Teaching Pendant TP-3** seriesOperator Panel OP1For RC90, be sure to install the EPSON RC+7.0 to the development PC first, then connect the development PC and RC90 with the USB cable. If RC90 and the development PC are connected without installing the EPSON RC+7.0 to the development PC, [Add New Hardware Wizard] appears. If this wizard appears, click the <Cancel> button.Concerning the security support for the network connection:The network connecting function (Ethernet) on our products assumes the use in the local network such as the factory LAN network. Do not connect to the external network such as Internet.In addition, please take security measure such as for the virus from the network connection by installing the antivirus software .Security support for the USB memory:Make sure the USB memory is not infected with virus when connecting to the Controller. ☞NOTE ☞ NOTE ☞ NOTE ☞NOTEviii Safety and Installation (RC90 / EPSON RC+ 7.0) Rev.13 Control System ConfigurationThis manual explains with the following combinations of Controllers and software.Robot Controller RC90 with the following label attached .Label ControllerSoftwareRC90 EPSON RC+ 7.0Manual PDF for this robot system is available from EPSON RC+ 7.0 Ver. 7.0.2This option is not available for Robot Controller RC90 (EPSON RC+ 5.0) without the label.☞ NOTE☞ NOTELS3-401* RC90 controller firmware Ver.7.0.2.0 or laterEPSON RC+ 7.0 Before Ver.7.0.1Ver.7.0.2 or later OKOK: Compatible All functions of the EPSON RC+ 7.0 and the Controller are available.: Compatible Connection is OK. We recommend using EPSON RC+7.0 Ver.7.0.2 or later.Manipulator serial No. : L6**00**** LS6-602* RC90 controller firmware Ver.7.0.2.0 or laterEPSON RC+ 7.0 Before Ver.7.0.1Ver.7.0.2 or later OKOK: Compatible All functions of the EPSON RC+ 7.0 and the Controller are available.: Compatible Connection is OK. We recommend using EPSON RC+7.0 Ver.7.0.2 or later.Manipulator serial No. : L6**01**** or later LS6-502*, LS6-602*, LS6-702* RC90 controller firmware Ver.7.1.6.* or laterEPSON RC+ 7.0 Before Ver.7.1.2Ver.7.1.3 or later OKOK: Compatible All functions of the EPSON RC+ 7.0 and the Controller are available.: Compatible Connection is OK. We recommend using EPSON RC+7.0 Ver.7.1.3 or later.LS20-804*, LS20-A04* RC90 controller firmware Ver.7.1.8.* or laterEPSON RC+ 7.0 Before Ver.7.1.3Ver.7.1.4 or later OKOK: Compatible All functions of the EPSON RC+ 7.0 and the Controller are available.: Compatible Connection is OK. We recommend using EPSON RC+7.0 Ver.7.1.4 or later.China RoHSThis sheet and environmental protection use period label are based on the regulationin China. These are not necessary to be concerned in other countries.产品中有害物质的名称及含量机器人型号名称LS3 LS6 LS20系列部件名称有害物质铅汞镉六价铬多溴联苯多溴二苯醚(Pb) (Hg) (Cd) (Cr(VI)) (PBB) (PBDE)机器人× ○○○○○电机(执行器单元、电机单元)× ○○○○○减速机单元× ○○○○○电磁制动器× ○○○○○同步皮带○○○○○○电池单元(电池、电池固定架、电池基板)× ○○○○○密封(密封填料、油封、密封脂、垫片、O型环)× ○○○○○润滑脂○○○○○○电缆(M/C电缆、连接电缆)× ○○○○○散热片○○○○○○LED指示灯○○○○○○电路板× ○○○○○外罩○○○○○○滚珠丝杠花键○○○○○○制动解除开关× ○○○○○伸缩罩○○○○○○扎带○○○○○○气管接头× ○○○○○选件相机安装板× ○○○○○本表格依据SJ/T 11364的规定编制。
Robot Controller RC90-BProgramming Software EPSON RC+ 7.0Manipulator LS-B series(LS20-B, LS10-B, LS6-B, LS3-B)Robot System Safety and Installation (RC90-B / EPSON RC+ 7.0) Rev.4Robot System Safety and Installation(RC90-B / EPSON RC+ 7.0)Rev.4Copyright 2018-2019 SEIKO EPSON CORPORATION. All rights reserved Safety and Installation (RC90-B / EPSON RC+ 7.0) Rev.4 iFOREWORDThank you for purchasing our robot products.This manual contains the information necessary for the correct use of the robotsystem.Please carefully read this manual and other related manuals before installing therobot system.Keep this manual handy for easy access at all times.WARRANTYThe robot system and its optional parts are shipped to our customers only afterbeing subjected to the strictest quality controls, tests, and inspections to certify itscompliance with our high performance standards.Product malfunctions resulting from normal handling or operation will be repairedfree of charge during the normal warranty period. (Please contact the supplier ofyour region for warranty period information.)However, customers will be charged for repairs in the following cases (even if theyoccur during the warranty period):1. Damage or malfunction caused by improper use which is not described inthe manual, or careless use.2. Malfunctions caused by customers’ unauthorized disassembly.3. Damage due to improper adjustments or unauthorized repair attempts.4. Damage caused by natural disasters such as earthquake, flood, etc.Warnings, Cautions, Usage:1. If the robot system associated equipment is used outside of the usageconditions and product specifications described in the manuals, thiswarranty is void.2. If you do not follow the WARNINGS and CAUTIONS in this manual, wecannot be responsible for any malfunction or accident, even if the result isinjury or death.3. We cannot foresee all possible dangers and consequences. Therefore, thismanual cannot warn the user of all possible hazards.ii Safety and Installation (RC90-B / EPSON RC+ 7.0) Rev.4TRADEMARKSMicrosoft, Windows, and Windows logo are either registered trademarks ortrademarks of Microsoft Corporation in the United States and/or other countries.Other brand and product names are trademarks or registered trademarks of therespective holders.TRADEMARK NOTATION IN THIS MANUALMicrosoft® Windows® 7 Operating systemMicrosoft® Windows® 8 Operating systemMicrosoft® Windows® 10 Operating systemThroughout this manual, Windows 7, Windows 8, and Windows 10 refer to aboverespective operating systems. In some cases, Windows refers generically toWindows 7, Windows 8, and Windows 10.NOTICENo part of this manual may be copied or reproduced without authorization.The contents of this manual are subject to change without notice.Please notify us if you should find any errors in this manual or if you have anycomments regarding its contents.MANUFACTURERSeiko Epson Corporation3-3-5 Owa, Suwa-shi, Nagano, 392-8502URL :/company/: http://www.epson.jp/prod/robots/Toyoshina PlantRobotics Solutions Operations Division6925 Toyoshina Tazawa,Azumino-shi, Nagano, 399-8285JapanTEL : +81-(0)263-72-1530FAX : +81-(0)263-72-1495Safety and Installation (RC90-B / EPSON RC+ 7.0) Rev.4 iiiiv Safety and Installation (RC90-B / EPSON RC+ 7.0) Rev.4SUPPLIERS (Country/Region) North & SouthAmericaEpson America, Inc. Factory Automation/Robotics 1650 Glenn Curtiss Street Carson, CA 90746 USATEL : +1-562-290-5900FAX : +1-562-290-5999E-MAIL :*****************.com EuropeEpson Deutschland GmbHRobotic Solutions Otto-Hahn-Str.4 D-40670 Meerbusch GermanyTEL : +49-(0)-2159-538-1800FAX : +49-(0)-2159-538-3170E-MAIL :****************URL: : www.epson.de/robots ChinaEpson (China) Co., Ltd.Factory Automation Division 4F, Tower 1, China Central Place, 81 Jianguo Road, Chaoyang District, Beijing, 100025, PRCTEL : +86-(0)-10-8522-1199FAX : +86-(0)-10-8522-1120TaiwanEpson Taiwan Technology & Trading Ltd.Factory Automation Division 15F., No.100, Songren Rd., Sinyi Dist., Taipei City, 11073 TaiwanTEL : +886-(0)-2-8786-6688FAX : +886-(0)-2-8786-6600Korea Epson Korea Co., Ltd.Marketing Team (Robot Business)10F Posco P&S Tower, Teheranro 134(Yeoksam-dong)Gangnam-gu, Seoul, 06235KoreaTEL : +82-(0)-2-3420-6692FAX : +82-(0)-2-558-4271Southeast Asia Epson Singapore Pte. Ltd.Factory Automation System1 HarbourFront Place, #03-02,HarbourFront Tower One,Singapore 098633TEL : +65-(0)-6586-5696FAX : +65-(0)-6271-3182India Epson India Pvt. Ltd.Sales & Marketing (Factory Automation)12th Floor, The Millenia, Tower A, No. 1,Murphy Road, Ulsoor, Bangalore,India 560008TEL : +91-80-3051-5000FAX : +91-80-3051-5005Japan Epson Sales Japan CorporationFactory Automation Systems Department29th floor, JR Shinjuku Miraina Tower, 4-1-6Shinjuku, Shinjuku-ku, Tokyo 160-8801JapanTEL :+81-(0)3-5919-5257FAX :+81-(0)3-5919-5402Safety and Installation (RC90-B / EPSON RC+ 7.0) Rev.4 vRegarding battery disposalThe crossed out wheeled bin label that can be found on your product indicates that this product and incorporated batteries should not be disposed of via the normal household waste stream. To prevent possible harm to the environment or human health please separate this product and its batteries from other waste streams to ensure that it can be recycled in an environmentally sound manner. For more details on available collection facilities please contact your local government office or the retailer where you purchased this product. Use of the chemical symbols Pb, Cd or Hg indicates if these metals are used in the battery.This information only applies to customers in the European Union, according to DIRECTIVE 2006/66/EC OF THE EUROPEAN PARLIAMENT AND OF THE COUNCIL OF 6 September 2006 on batteries and accumulators and waste batteries and accumulators and repealing Directive 91/157/EEC and legislation transposing and implementing it into the various national legal systems.For other countries, please contact your local government to investigate the possibility of recycling your product.The battery removal/replacement procedure is described in the following manuals:Controller manual / Manipulator manual(Maintenance section)For California customers onlyThe lithium batteries in this product containPerchlorate Material - special handling may apply,See /hazardouswaste/perchlorate.vi Safety and Installation (RC90-B / EPSON RC+ 7.0) Rev.4Safety and Installation (RC90-B / EPSON RC+ 7.0) Rev.4 vii Before Reading This ManualTP port of RC90-B is for the Teach Pendant TP1 and TP2. Do not connectthe followings to TP port of RC90. Connecting to the followings may result inmalfunction of the device since the pin assignments are different.OPTIONAL DEVICE dummy plugOperation Pendant OP500Operator Pendant OP500RCJog Pad JP500Teaching Pendant TP-3** seriesOperator Panel OP1For RC90-B, be sure to install the EPSON RC+7.0 to the development PC first, then connect the development PC and RC90-B with the USB cable. If RC90-B and the development PC are connected without installing the EPSON RC+7.0 to the development PC, [Add New Hardware Wizard] appears. If this wizard appears, click the <Cancel> button. Concerning the security support for the network connection:The network connecting function (Ethernet) on our products assumes the usein the local network such as the factory LAN network. Do not connect to the external network such as Internet.In addition, please take security measure such as for the virus from the network connection by installing the antivirus software .Security support for the USB memory: Make sure the USB memory is not infected with virus when connecting to the Controller.☞ NOTE ☞ NOTE ☞ NOTE ☞ NOTEControl System ConfigurationThis manual explains with the following combinations of Controllers andsoftware.LS20-B**** RC90-B controller firmwareVer.7.4.5 or laterEPSON RC+ 7.0 Before Ver.7.4.4Ver.7.4.5 or later OKOK: Compatible All functions of the EPSON RC+ 7.0 and the Controller areavailable.: Compatible Connection is OK. We recommend using EPSON RC+7.0 Ver.7.4.5 or later.LS10-B**** RC90-B controller firmwareVer.7.4.2.1 or laterEPSON RC+ 7.0 Before Ver.7.4.1Ver.7.4.2 or later OKOK: Compatible All functions of the EPSON RC+ 7.0 and the Controller areavailable.: Compatible Connection is OK. We recommend using EPSON RC+7.0 Ver.7.4.2 or later.LS6-B**** RC90-B controller firmwareVer.7.4.3.1 or laterEPSON RC+ 7.0 Before Ver.7.4.2Ver.7.4.3 or later OKOK: Compatible All functions of the EPSON RC+ 7.0 and the Controller areavailable.: Compatible Connection is OK. We recommend using EPSON RC+7.0 Ver.7.4.3 or later.LS3-B**** RC90-B controller firmwareVer.7.4.4.2 or laterEPSON RC+ 7.0 Before Ver.7.4.3Ver.7.4.4 or later OKOK: Compatible All functions of the EPSON RC+ 7.0 and the Controller areavailable.: Compatible Connection is OK. We recommend using EPSON RC+7.0Ver.7.4.4 or later.viii Safety and Installation (RC90-B / EPSON RC+ 7.0) Rev.4China RoHSThis sheet and environmental protection use period label are based on the regulationin China. These are not necessary to be concerned in other countries.产品中有害物质的名称及含量机器人型号名称LS -B 系列 部件名称有害物质铅汞镉 六价铬 多溴 联苯多溴 二苯醚(Pb)(Hg)(Cd) (Cr(VI))(PBB)(PBDE)机器人× ○ ○ ○ ○ ○ 电机 (执行器单元、电机单元) × ○ ○ ○ ○ ○ 减速机单元 × ○ ○ ○ ○ ○ 电磁制动器 × ○ ○ ○ ○ ○ 同步皮带 ○ ○ ○ ○ ○ ○ 电池单元(电池、电池固定架、电池基板) × ○ ○ ○ ○ ○ 密封(密封填料、油封、密封脂、垫片、 O 型环) × ○ ○ ○ ○ ○ 润滑脂 ○ ○ ○ ○ ○ ○ 电缆(M/C 电缆、连接电缆) × ○ ○ ○ ○ ○ 散热片 ○ ○ ○ ○ ○ ○ LED 指示灯 ○ ○ ○ ○ ○ ○ 电路板 × ○ ○ ○ ○ ○ 外罩○ ○ ○ ○ ○ ○ 滚珠丝杠花键 ○ ○ ○ ○ ○ ○ 制动解除开关 × ○ ○ ○ ○ ○ 伸缩罩 ○ ○ ○ ○ ○ ○ 扎带○ ○ ○ ○ ○ ○ 气管接头 × ○ ○ ○ ○ ○ 选件相机安装板 ×○○○○○本表格依据SJ/T 11364的规定编制。
爱普生机器人软件安装及使用教程
一、EPSON RC+ 5.0开发软件的安装
打开EpsonRC50文件夹,双击setup.exe开始安装。
出现上面显示的界面后,按按钮。
出现上面显示的界面后,再接着按按钮。
目标驱动器不必选择,直接按按钮。
上面可勾选部分为手册和模拟器实例,可以按默认安装,直接按按钮进行到安装的下一步。
按按钮选择继续安装。
会出现下面的安装进度界面,大约需要等待几分钟,整个EpsonRC50软件安装完成。
安装完成后,将弹出下面的窗口。
按按钮完成软件的安装。
此时,在用户的桌面上会出现下面两个图标
前一个图标用于软件的开发和调试,后面的图标用于对工作流程的监视。
二、IP地址的设置
用普通网线连接机器人和开发用电脑。
打开本地连接,弹出“本地连接属性”页面。
双击项,将打开Internet 协议(TCP/IP)属性页面,修改IP地址等项为下图的值。
按键。
完成IP的设定。
三、EPSON RC+ 5.0软件使用
双击图标,启动EPSON RC+ 5.0软件。
1. 网络通讯的设置
在EPSON RC+ 5.0软件菜单中点击“设置”菜单项,单击选择项目。
将弹出下面“电脑与控制器通信
”页面。
点击按钮。
选择选项,按键,完成添加网络通讯功能。
点击IP地址单元项,将里面机器人控制器对应的IP改为192.168.0.1,单击按钮,完成软件中连接IP的设置。
设置完成后页面显示为下图。
检查网线连接是否正常,正常则单击新添加的Ethernet项,
按
按钮,弹出下面页面。
选项表示电脑只作为监视器使用,不能进行程序的编制、修改等操作,不能对机器人控制点进行示教,也不能对外部I/O进行控制。
不影响已经存在的网络连接。
选项将首先中断目前和控制器的网络连接,将软件切换到程序模式,在此模式下可以进行控制程序的编制、修改工作,机器人控制点的示教和对外部I/O进行实时控制。
为了进行控制程序的编写、修改和调试,我们需要选择
项目并按键切换到程序模式。
此后EPSON RC+ 5.0软件将开始尝试连接RC170机器人控制器,连接成功后页面为下图状态。
按按钮离开设置界面。
2. 控制器的设置
在菜单项里单击“设置”项,再单击“控制器”选项。
将弹出下面界面。
单击“配置”项,弹出下面界面
修改“控制设备(O)”项目。
如果需要本机调试,可修改为PC,如需要使用按钮盒,则需要修改为“远程I/O”状态。
修改
完成后,按
键关闭设置页面。
完成上面设置后,机器人已经处于可操作状态。
3. 机器人的示教
在菜单项里单击“设置”项,再单击“机器人管理器”选项。
将进入机器人管理器页面。
其中可进行多种操作,目前我们可使用控制面板、步进示教和点数据三个项目。
⑴.控制面板
单击控制面板,弹出下面页面
在此页面可以关闭或者开启机器人,在急停后可以按“重置”按钮恢复机器人的可运行状态。
按钮:关闭机器人
按钮:启动机器人
按钮:在按下“急停”后,机器人进入锁定,必须按下
按钮来解除机器人的锁定,重新进入运行
状态。
⑵.步进示教
(注:文档可能无法思考全面,请浏览后下载,供参考。
可复制、编制,期待你的好评与关注!)。