空气压缩火箭说明书
- 格式:doc
- 大小:8.10 MB
- 文档页数:2

空气火箭的原理和制作方法Rocketry has always been a fascinating field of science and engineering, and air-powered rockets, in particular, offer an exciting and educational way to explore the principles of flight. 火箭技术一直是一门令人着迷的科学和工程领域,特别是空气火箭,为探索飞行原理提供了一种令人兴奋和教育性的方式。
The basic principle behind an air-powered rocket is the use of compressed air to propel the rocket into the air. 空气火箭背后的基本原理是利用压缩空气来推动火箭进入空中。
To build an air-powered rocket, one must first gather the necessary materials, including a plastic soda bottle, a PVC pipe, a cork, an air pump, and fins made of cardboard or foam. 要制作一个空气火箭,首先必须收集必需的材料,包括一个塑料汽水瓶、一个PVC管子、一个软木塞、一个气泵以及用纸板或泡沫制作的鳍片。
Once the materials are gathered, the rocket can be assembled by drilling a hole in the center of the bottle cap, inserting a PVC pipe through the hole, and sealing it with the cork. 一旦材料准备齐全,就可以通过在瓶盖中心钻一个孔,将一个PVC管插入孔中,并用软木塞密封来组装火箭。

气火箭原理
气火箭原理是一种利用气体喷射产生推力的发动机系统。
它不同于传统的化学火箭,不依赖于燃料和氧化剂的化学反应,而是利用高压气体的喷射效应产生推力。
气火箭的原理基于牛顿第三定律,即每个作用力都有一个相等而方向相反的反作用力。
当气体从火箭的喷嘴喷出时,产生的喷射气流向后排出,使火箭具有向前的推力。
推力的大小取决于喷射气流的质量流量和速度。
为了产生高速喷射气流,气火箭通常使用高压气体源,如压缩空气或氮气。
这些气体通过喷射嘴被加速,形成高速气流并产生巨大的推力。
一种常用的喷射嘴设计是利用可调节的喷嘴孔径,通过改变喉部的面积来控制气流的速度和压力。
此外,气火箭还可以利用喷嘴的排气方式来调节火箭的姿态和推力方向。
通过控制喷嘴的方向和角度,可以实现火箭的俯仰、横滚和偏航等运动,从而实现飞行轨迹的调整和飞行控制。
总之,气火箭原理利用高速喷射气流产生的反作用力来提供推力,实现火箭的运动和控制。
它适用于各种应用领域,包括航空航天、导弹技术和科学研究等。

Si puede elegir, elija electricidadLa gama de compresores E-Air Atlas Copco ofrece todas las ventajas de un equipo accionado eléctricamente en cualquier lugar de trabajo. Los E-Air no generan emisiones, poseen unos motores resistentes y eficaces, ofrecen unos bajos niveles de ruidos y se presentan con un diseño ‘plug-and-play’ que permite usarlos en cualquier lugar.Si dispone de suministro eléctrico en el lugar de trabajo, podrá ahorrar una buena suma de dinero usando electricidad en lugar de combustible diésel, dependiendo de los precios de la energía. Los E-Air son equipos que no generan emisiones y son silenciosos , además de ser respetuosos con el medio ambiente y ofrecer una fuente eficaz de aire comprimido. Esta gama de compresores ligeros y compactos ofrece aire comprimido a caudales de 11 a 37 m³/min (106-1300 cfm).DATOS TÉCNICOS* Rendimiento de la unidad medido conforme a la norma ISO 1217, ed. 3, anexo C - 1996** Medido conforme a la norma ISO 2151: 2004 aplicando la norma ISO 9614/2NO SE REQUIERE COMBUSTIBLE DIÉSELXA(H/V/M)S 850E-550ECARACTERÍSTICAS:• Funciones de seguridad tales como indicadores de presión y parada de emergencia • Motor eléctrico de alta eficacia de régimen continuo con protección IP 54 y aislamiento de clase F • Controlador avanzado que facilita el trabajo • Protección de secuencia de fase• Diseño robusto para aplicaciones de exterior • Protección contra sobrecargas• Un solo eje que facilita su maniobrabilidad.XRHS 930E-1300ECARACTERÍSTICAS:• Funciones de seguridad tales como indicadores de presión, parada de emergencia y protección de frecuencia • Motor eléctrico de alta eficacia de régimen continuo con aislamiento de clase F • Motor de arranque Wye-Delta• Amplia tensión de alimentación 380V ±15%• El más adecuado para uso en cualquier condición climática (-25 °C a +46 °C).• Calentador anticondensación para proteger el motor • Intervalo de mantenimiento de 1000 horas• Válvulas de drenaje centralizadas para todos los líquidos• Controlador XC2003 avanzado: panel de instrumentos de fácil lectura • Diseño silencioso que ofrece un bajo nivel de ruidos • Seguro para el operario y el medio ambiente •Bastidor robusto fabricado para durarXAS 57E-77ECARACTERÍSTICAS:• Accionado por motor con protección IP54 y aislamiento de clase F • Válvula de protección contra sobrecargas• Fácil de maniobrar hacia y por el lugar de trabajo gracias a sus pequeñas dimensiones y peso ligero • Funcionamiento fiable y medioambientalmente seguro • Construcción robusta, se ha fabricado para durarOPCIONES:• Chasis con freno de estacionamiento y rueda guía • Arranque en frío a -25 °C • Montado en bastidorReduzca el coste total de propiedadOPCIONES:• Vagón remolque• Versión montada en bastidor o soporte • Arranque en fríoCatálogo de soluciones de Power TechniqueGeneradores Torres de iluminación Bombas de achique• Rompedores (2,5 – 40 kg)• Perforadoras de roca (5 – 25 kg)• Perforadoras de roca para trabajos subterráneos• Otras herramientas neumáticas• Portátiles• Transportables • Industriales• LED y HM diésel • LED eléctricas • LED de batería • Sumergibles • Superficie• Portátiles pequeñasCompresores de aireHerramientas de manoListos para usar Herramientas neumáticasVersatilidad Herramientas hidráulicasSocio productivoHerramientas motorizadas de gasolina• 1-5 m³/min • 7-12 bares • 5,5-22 m³/min • 7-20 bares• Rompedores (11 – 40 kg)• Otras herramientas hidráulicas • Centralitas• 19-116 m³/min • 10-345 bares• Rompedores y atacadores de balasto (25 kg)• Perforadoras Combi (23 Kg)*Disponibles opciones diésel y eléctricas*Disponibles múltiples configuraciones para producir energía para aplicaciones de cualquier tamaño*Disponibles opciones diésel y eléctricasEl área de negocio Power Technique de Atlas Copco está comprometida con una visión de futuro. Para nosotros, la productividad sostenible está relacionada con la previsión y anticipación a sus necesidades futuras, siempre en línea con nuestros principios medioambientales. Una perspectiva de futuro y mantenernos en la vanguardia es la única manera en que podemos asegurar ser su socio a largo plazo.Las ilustraciones y fotografías contenidas en el presente documento pueden representar productos con componentes opcionales y/o adicionales que no se incluyen en la versión estándar del producto, por lo que no se incluyen en la compra de dicho producto a no ser que el cliente compre específicamente dichos componentes opcionales/adicionales. Reservado el derecho a realizar modificaciones sin previo aviso en las especificaciones y diseño de los productos descritos en este documento. No todos los productos están a la venta en todos los mercados.2958 2210 40 © A t l a s C o p c o A i r p o w e r N V , B e l g i u m 2019. T o d o s l o s d e r e c h o s r e s e r v a d o s .Atlas Copco Power Technique /ptba。

ULTRA QUIET & OIL FREEAIR COMPRESSOROWNER'S MANUALCALIFORNIA AIR TOOLS80101.0 HP3.00 CFM @ 40 PSI2.20 CFM @ 90 PSI8.0 GALLON STEEL TANK Customer Support 1-866-409-45812TABLE OF CONTENTSINTRODUCTION __________________________________2 IMPORTANT SAFETY INSTRUCTIONS _______________3 LOCATIONS OF IMPORTANT LABELS _______________6 AIR COMPRESSOR COMPONENTS__________________7 PRE-OPERATION CHECKLIST ______________________8 Package Contents & Assembly____________________8 Inspect for Damage _____________________________9 Save Packaging ________________________________9 Compressor Location ___________________________9 Electrical Power _______________________________10 OPERATING THE AIR COMPRESSOR _______________10 Introduction __________________________________10 Assembly ____________________________________10 Test Run _____________________________________11 Daily Operation ________________________________11 MAINTENANCE _________________________________12 Draining the Air Tank ___________________________12 Changing the Air Filter__________________________12 Testing for Leaks ______________________________12 Pressure Switch _______________________________12 Cleaning _____________________________________12 STORAGE ______________________________________12 TROUBLESHOOTING ____________________________13 SPECIFICATIONS________________________________14 Electrical Circuit _______________________________14 Air Passage Drawing ___________________________14 WARRANTY ____________________________________15 PRODUCT REGISTRATION________________________17INTRODUCTIONThank you for purchasing a California Air Tools, Inc. Air Compressor.Please contact us if you have any questions.Record the model and serial numbers indicated on your air compressor’s nameplate:Model No.________________________________________ Serial No.________________________________________ Date of Purchase:_________________________________ Store/Dealer:_____________________________________3Customer Support: 1-866-409-4581How to find a local service center:Even quality built equipment might need service or repair parts. Contact the California Air T ools Customer Service Department: Phone: 1-866-409-4581Online: Please provide the information below:Model number and Serial number and specifications shown on theModel number/Serial number plate. Part number or numbers shown in the parts list section of theowner’s manual for your air compressor model. A brief description of the trouble with the air compressor.Do not return your air compressor for service or parts to the store/dealer where purchased.IMPORTANT SAFETY INSTRUCTIONSSafety Messages & Signal Words:4Customer Support: 1-866-409-45815Customer Support: 1-866-409-45816Customer Support: 1-866-409-4581LOCATIONS OFIMPORTANT LABELSRead these important labels before operating.These labels provide important safety and maintenanceinformation. These labels should be considered as permanent parts of the air compressor. Should any of these labels become illegible, damaged or removed, please contact California Air T ools Customer Service department at 1-866-409-4581 for replacements.PRODUCT LABELAB CDEFGH7Customer Support: 1-866-409-45818PRE-OPERATION CHECKLIST Package Contents & Assembly Model: 8010Package contents:Air CompressorOwner's ManualAir FilterWheel Assembly Kit2 - #54 Wheel Bolts2 - #55 Wheel4 - #56 Washers2 - #57 Nut1 - #52 Bolt2 - #50 Washers1 - #51 Cushion Foot1 - #49 NutAssembly:Install the Air Filter1. Attach the air filter to the top rear of motor head. (looking from the front to the back of the air compressor ) Screw the air filter into the motor head port that is located under the Plastic Head Cover Install the Wheel Kit1. Slide Bolt #54 through Wheel #55 .2. Slide the Bolt #54 through Washer #56 and wheel support hole located on the back bottom of the air compressor tank.3. Attached the Washer #56 and Nut #57 to the Bolt #54 and tighten firmly.4. Repeat steps 1-3 to assemble the other wheel.5. Slide Bolt #52 through Washer #50 and Cushion Foot #516. Slide Bolt #52 through cushion foot support hole located on the front bottom of the air compressor..7. Attach Washer #50 and Nut #49 to Bolt #52 firmly.9Customer Support: 1-866-409-4581AIR COMPRESSORInspect for DamageBefore using the air compressor, make sure the air tank is not damaged, inspect all parts for damage, and check that all pipes are firmly connected.Do not use the air compressor if any damage is found. Ifdamaged, have an authorized service center inspect and test the air compressor to ensure that is working properly.Save PackagingIMPORTANT : Save all outside packaging in case you ever need to return the product for service or repair.Compressor LocationUse on Flat SurfaceFor proper operation, the air compressor must be placed on a flat surface with an incline no greater than 15 degrees.Maintain a Clear AreaIt is very important that the air compressor is positioned so that there is adequate airflow around the machine. There must be at least 2 feet of obstacle-free space surrounding and above the air compressor.Use in Areas with Clean AirFor proper operation and to maximize the longevity of the air compressor, it is very important that the air drawn into the air compressor is clean. The air compressor should not be used in areas where dust or particulates are in the air. This will damage the motor and impair proper operation.IMPORTANT:Always use the air filter, properly installed.10Customer Support: 1-866-409-4581AIR COMPRESSORElectrical PowerElectrical Power RequirementsBefore using the air compressor, refer to the serial label for voltageand amperage requirements. Make sure you have a sufficient electrical supply for supporting the motor's requirements.Use a dedicated 15 Amp Circuit or a 2500 Watt (running) GeneratorLow voltage and/or an overload circuit can cause the motor's overload protection system circuit breaker to trip.Electrical Extension CordsInspect all electrical extension cords to ensure that they are free of damage.When using an extension cord, use a heavy-duty cord that is no more than 25 feet long and at least 14 e only a 3-wire extension cord that has a 3-blade grounding plug.OPERATING THE AIR COMPRESSORSave this manual for future reference.IntroductionThis air compressor features a compact structure, stable performance, a high airflow rate, easy operation andmaintenance. Because the air compressor produces no oil in the airflow, it can be used as an independent air supply machine for situations in which oil in the airflow is an issue. The motor directly drives the pistons and is able to function without lubrication for a long period of time.Assembly.1.Connect your air supply hose to a 1/4” male industrial quick connect coupler. Connect the male quick connect coupler to the female quick connect coupler located on the air compressor 2. Make sure the drainage valve is off and that the pressure switch is in the OFF position. 3. Ensure that the power supply you are going to use is operating normally. 110 Volts 60 Hertz 15 amp Outlet. 4. Insert the power supply cord into the power supply socket.11Customer Support: 1-866-409-4581AIR COMPRESSORTest RunBefore using the air compressor for the first time, complete a test run as follows:1. Turn the power switch to the OFF position. Plug the power supply cord into a power supply socket. Start the aircompressor by turning the power switch to the ON position. The pressure gauge reading will slowly rise as pressureincreases inside the air tank. When the gauge reading reaches 120 PSI (plus or minus 5 PSI), the pressure switch willautomatically turn the power off. This indicates the compressor is working normally. 2.Daily OperationStarting the compressor:1. Turn the power switch to the OFF position.2. Attach the air hose to the 1/4” Industrial Male Quick Connector3. Close the drain valve.4. Have air filter attached5. Plug the power supply cord into a power supply socket.6. Turn the power switch to the ON position.7. Let the motor run and tank fill until motor turns off.8. T o regulate the air flow.While the air compressor is running, turn “On” your tool and turn the regulator knob to the right increasing the pressure. Turn the pressure up until the desired pressure is reached. 9. Operate air tool normally.Shutting down the compressor:1. Turn the power switch to the OFF position.2. Unplug the power supply cord.3. Remove the pressure and water in the air tank through drain valve.Note: If the Air Compressor is not working properly, the pressure gauge will indicate that there is a decrease in pressure in the air tank. If there is an air leak from the compressor the pressure in the air tank decreases, the pressure switch resets and the motor automatically turns back on. If you detect an air leakage, turn the power switch to the Off position, release the air from the tank by pulling on the safety valve. Unplug the power supply cord and contact Customer Support for Assistance.Turn the power switch to the Off position, unplug the power supply cord and release the air in the air tank by opening the drain valve at the bottom of the tank. At this point proceed to the next step (daily operations).AIR COMPRESSOR MAINTENANCEDraining the Air TankThe frequency at which you should drain the air tank depends on the environmental conditions and the amount of operating time logged. The average draining frequency is every 1 to 2 days.1. Place the air compressor above a container capable of holdingwater.2. With compressed air in the air tank, slowly turn the drain valveknob to the forward (open) or straight position.The water in the air tank will drain out.3. After all of the accumulated water has drained out, turn thedrain valve knob to the closed or left position in order to avoid leakage.4. Draining the air tank protects parts from rust and corrosion. Cleaning or Changing the Air FilterThe air filter is designed to reduce noise and help prevent particulates in the air from entering and damaging the air compressor.After being used for a period of time, the air filter will become clogged. This will reduce the air intake capabilities of the air compressor, reducing performance. Therefore, the air filter must be cleaned or replaced regularly.1. Open the lid on the air filter, then remove the air filter element.2. T o clean the element blow off or brush off the dirt and dust.3. If clogged, replace with a new air filter.Testing for LeaksMake sure all connections are tight. Do not overtighten.A small leak in any hose or pipe connection will reduce the air compressor's performance.T o test for small leaks, spray a small amount of soapy water on the area suspected of leaking. If the soap bubbles, replace the broken part.CleaningClean items with a soft brush, or wipe with a moistened cloth using a biodegradable solvent.Do not use flammable liquids such as gasoline or alcohol. Always keep parts clean from dirt and dust for better performance.Pressure SwitchThe pressure switch is factory pre-set to shut off at120 PSI (plus or minus 5 PSI) and to re-start at90 PSI (plus or minus 5 PSI)STORAGEBefore storing for a prolonged period of time:1. Turn off the power supply.2. Disconnect the power cord from the power supply and wrapthe power cord around the air compressor handle to reduce the risk of damage.3. Pull the relief valve and release all the pressure from the airtank.4. Clean the air compressor to remove all dirt and dust.5. Cover the air compressor with a cover to protect the unit fromdust and moisture.6. Do not stack or store any items on top of or around the aircompressor. Damage could occur.12AIR COMPRESSOR TROUBLESHOOTING13Customer Support: 1-866-409-4581AIR COMPRESSOR SPECIFICATIONSElectrical CircuitAir Passage Drawing14Customer Support: 1-866-409-4581AIR COMPRESSOR CALIFORNIA AIR TOOLS INC. LIMITED WARRANTYThis warranty is limited to Air Compressors distributed by:California Air Tools, Inc.8560 Siempre Viva RoadSan Diego, CA 92154Limited WarrantyCalifornia Air T ools Inc. will repair or replace, free of charge, to the original retail customer who purchased a California Air T ools, Inc. Air Compressor from an authorized dealer, distributor or distributor’s dealer in North America.This warranty does not transfer to subsequent owners.California Air T ools Inc. will repair or replace, at its option, any parts of the portable air compressor that are proven by an authorized service center to be defective in material or workmanship under normal use during the applicable warranty time period as stated below. This limited warranty covers the cost of the replacement parts and labor for all defects when installed by an authorized service center. Transportation charges are the responsibility of the customer. Any part replaced under warranty becomes the property of California AirT ools Inc.All parts replaced under warranty will be considered as part of original product, and any warranty on those parts will expire coincident with the original product warranty.Limited Warranty PeriodsNon-commercial / Non-rental (personal use by a retail customer): 1 year parts and laborCommercial / Rental (usage for income, business use): 1 year parts and laborThe limited warranty period begins on the date of retail purchase by the original purchaser.Disclaimers, Limitations of Remedies & ExclusionsThis warranty gives you specific legal rights, and you may also have other rights which may vary from state to state.Disclaimer of Other WarrantiesT o the fullest extent permitted by applicable law, this limited warranty is exclusive and expressly in lieu of any and all other warranties, including, without limitation, any implied warranties of merchantability or fitness for a particular purpose or any other implied warranties that may arise from the course of dealing or usage of the trade. California Air T ools Inc. hereby declaims and excludes all other warranties. T o the extent that California Air T ools Inc. products are consumer products under applicable federal and state law with respect to any customer, the duration of any implied warranties (including but not limited to implied warranties of merchantability or fitness for a particular purpose) are limited to the shortest duration permitted by applicable law or the Limited Warranty period provided herein, whichever is longer.Limitations of RemediesCalifornia Air T ools Inc. shall not be liable to customer, or anyone claiming under customer, for any other obligations or liabilities, including but not limited to, obligations or liabilities airing out of breach of contract or warranty, negligence or other tort or any theory of strict liability, with respect to the air compressor or California Air T ools Inc. acts or omissions or otherwise. T o the fullest extent permitted by applicable law, California Air T ools Inc. shall not in any event be liable for incidental, compensatory, punitive, consequential, indirect, special or other damages, including but not limited to loss of use, loss of income, loss of time, loss of sales, injury to personal property, or liability customer incurs with respect to any other person, or any other type or form of consequential damage or economic loss.15ExclusionsIn addition to the foregoing disclaimers, limitations and terms, this limited warranty shall not apply to and does not cover accessories, nor does it cover products that are in any way subject to any of the following:1. Improper setup, installation or storage.2. Lack of proper maintenance and service.3. Accident, damage, abuse or misuse.4. Abnormal operating conditions or applications.5. Repair or modification by customer or any third party without written consent of California Air T ools Inc.6. Use under operating conditions or in applications not recommended by California Air T ools Inc.7. Normal wear.8. The use of accessories or attachments not recommended by California Air T ools Inc.9. Acts of God.The application of these exclusions will be determined at the sole discretion of California Air T ools Inc.RegistrationWarranty registration with California Air T ools Inc. is required on all products.You can mail the enclosed registration form or register on-line.Maintenance & Troubleshooting GuideCalifornia Air T ools provides Maintenance & Troubleshooting Guide on our website .Valuable information regarding set-up, operation and maintenance.Please visit our website and view these videos for beneficial information.Service or PartsWarranty is also available by keeping and showing your original receipt from the date of purchase to anAuthorized California Air T ools Service Center.For all customer service inquiries call 1-866-409-4581 or visitGo to the “Contact Us” TabClick on “Service & Parts” Buttons for the Fastest Service.16PRODUCT REGISTRATIONT o register your product, please complete the information below and mail to the mailing address at the end of this page.1. Personal Information:Full Name (Include Middle Initial):_______________________________________________________________Mailing Address:_____________________________________________________________________________City:___________________________________ State:_______________ Zip Code:_______________________Phone Number:_____________________________________________________________________________E-mail Address:_____________________________________________________________________________(Check here to receive product information and offers via e-mail)(Check here to receive product information from other companies via e-mail)2. Product Information:Date of Purchase:_____________________________________________________________(MM / DD / YYYY)Model Number:______________________________________________________________________________Serial Number:___________________________________________________________ (Found on name plate)Purchased Location:__________________________________________________________________________Purchase Price:_____________________________________________________________________________Type of Primary Use for this Product: Home Recreation Emergency Rental CommercialOther______________________________________________________________________________________Features Influencing Product Purchase: Brand Portability Power Rating Price WarrantyOther Features (describe)_____________________________________________________________________What other Power Equipment are you interested in purchasing in the future?_____________________________Thank you for registering your product.Mail to:California Air Tools8560 Siempre Viva RoadSan Diego, CA 9215417。

低压无油空Array气压缩机ZE/ZA 2-6 (1-4 bar(e)/14.5-58 psig) (30-522 kW/40-700 hp)以最低的运营成本获得持续的生产率作为许多生产工艺的基础,低压压缩空气是保证持续生产的必要因素。
阿特拉斯·科普柯系列齐全的低压无油空气解决方案兼具了高可靠性和节能性,能为各行各业的应用提供 100% 符合认证标准的无油空气。
保证您的生产连续运转可靠地供应压缩空气对确保生产的连续性至关重要,尤其是在恶劣和多尘的环境下更是如此。
每台 ZE/ZA 压缩机均按 ISO 9001 认证标准进行设计、制造和测试。
这些压缩机内置有全封闭式 IP55 电动机,确保能在多尘和潮湿的环境中十分可靠地连续运转。
降低能源成本在压缩机生命周期成本中,能耗成本可占 80%。
压缩空气的生产成本可占整个工厂总电费的 40% 以上。
ZE/ZA 系列压缩机完全符合 ISO 14001 标准,有助于降低成本:IE3/Nema 高效电机以及压缩主机的转子涂有特氟隆涂层并配有冷却夹套,使空压机能以最少的能耗产生最多的压缩空气。
集成式变速驱动 (VSD) 技术可根据空气需求自动调节压缩机流量,因此额外节能约 35%。
保护您的生产和信誉在几乎任何应用中,气源中的油污染都会导致严重的生产率问题并增加成本。
作为首家获得 ISO 8573-1 CLASS 0 (2010) 无油空压机认证的制造商,阿特拉斯·科普柯在空气纯度方面树立了新的标杆。
阿特拉斯·科普柯专注于保护关键应用并满足当今日益提高的空气质量需求,供应通过TÜV 认证的 100% 无油空气。
易于安装ZE/ZA 压缩机为一体化机组,由功能强大的控制器和可选一体式后冷却器组成,交付后即可投入使用。
完整的供货范围让您无需使用任何额外附件,并将安装工作减少到绝对最低限度,从而为您节省了时间和资金。
ZE/ZA 系列压缩机易于集成到您现有的压缩空气网络中,可以迅速起动运行。
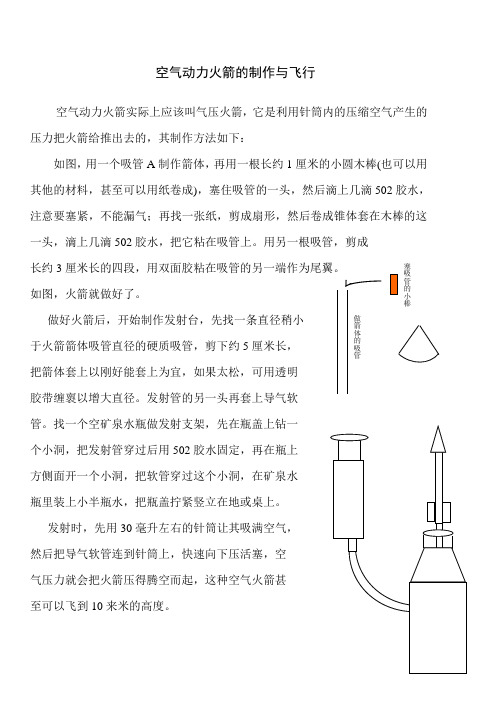
空气动力火箭的制作与飞行
空气动力火箭实际上应该叫气压火箭,它是利用针筒内的压缩空气产生的压力把火箭给推出去的,其制作方法如下:
如图,用一个吸管A制作箭体,再用一根长约1厘米的小圆木棒(也可以用其他的材料,甚至可以用纸卷成),塞住吸管的一头,然后滴上几滴502胶水,注意要塞紧,不能漏气;再找一张纸,剪成扇形,然后卷成锥体套在木棒的这一头,滴上几滴502胶水,把它粘在吸管上。
用另一根吸管,剪成
长约3厘米长的四段,用双面胶粘在吸管的另一端作为尾翼。
如图,火箭就做好了。
做好火箭后,开始制作发射台,先找一条直径稍小于火箭箭体吸管直径的硬质吸管,剪下约5厘米长,把箭体套上以刚好能套上为宜,如果太松,可用透明胶带缠褱以增大直径。
发射管的另一头再套上导气软管。
找一个空矿泉水瓶做发射支架,先在瓶盖上钻一个小洞,把发射管穿过后用502胶水固定,再在瓶上方侧面开一个小洞,把软管穿过这个小洞,在矿泉水瓶里装上小半瓶水,把瓶盖拧紧竖立在地或桌上。
发射时,先用30毫升左右的针筒让其吸满空气,然后把导气软管连到针筒上,快速向下压活塞,空
气压力就会把火箭压得腾空而起,这种空气火箭甚
至可以飞到10来米的高度。
塞
吸
管
的
小
棒做
箭
体
的
吸
管。
简易火箭发射器的制作方法引言:火箭发射器是一种能够将火箭送入大气层外空间的设备。
虽然制作一个完整的火箭发射器需要高度专业的知识和技术,但我们可以通过简化设计和使用简单的材料来制作一个简易的火箭发射器。
本文将介绍一种基于压缩空气原理的简易火箭发射器制作方法。
材料准备:1. 塑料瓶 - 选择一个耐压的塑料瓶,如二升装的饮料瓶。
2. 塞子 - 选择一个能够紧密封闭瓶口的塞子,如橡胶塞。
3. 针 - 用于打孔的细针。
4. 火药 - 选择一种能够产生足够推力的火药,如黑火药。
5. 火箭 - 选择一个小型的模型火箭。
步骤一:准备瓶子和塞子1. 清洗塑料瓶,并确保瓶子完好无损。
2. 选择一个合适大小的橡胶塞,使其能够紧密封闭瓶口。
步骤二:制作推进装置1. 使用针在塑料瓶的侧面打一个直径适中的小孔。
这个孔将用于引燃火药。
2. 在小孔旁边的底部打一个稍大的孔,这个孔将用于放置火药。
步骤三:装配火箭1. 将火药小心地放入底部的孔中,确保火药均匀分布。
2. 将火箭插入塑料瓶的瓶口,确保火箭牢固地固定在塑料瓶上。
步骤四:发射火箭1. 将塑料瓶竖直地放置在平稳的表面上。
2. 将橡胶塞紧密地插入塑料瓶的瓶口,确保没有气体泄漏。
3. 点燃火药孔,然后立即迅速远离火箭发射器。
4. 当火药燃烧时,它会产生大量的气体,推动火箭从发射器中射出。
注意事项:1. 在制作和使用火箭发射器时,请务必遵循安全操作规程,确保人身安全。
2. 在室外或开阔空地上进行火箭发射,远离易燃物体和人群。
3. 不要在有风的情况下发射火箭,以免火箭偏离轨道飞行。
4. 使用适当的防护措施,如戴手套和护目镜,以避免火药引起的伤害。
结论:通过使用简单的材料和基于压缩空气原理的设计,我们可以制作一个简易的火箭发射器。
尽管这个发射器的推力和高度限制较低,但它是一个有趣的科学实验项目,可以帮助我们更好地理解火箭发射的基本原理。
当然,如果你对火箭发射器的制作和使用感兴趣,我们强烈建议你寻求专业人士的指导和支持,确保安全性和可靠性。
压缩空气中文名压缩空气英文名分子式/ CAS号标识分子量29 UN编号1002/1003 危险货物危险性类别第2.2 类中助燃气体编号理化特性燃烧性不燃聚合危害不聚合燃烧分解物/ 稳定性稳定禁忌物/ / 危险受热后瓶内压力增大,有爆炸危险;遇硫、磷会引起爆炸;能使油脂剧烈氧化,特性危险特性甚至燃烧爆炸;本品助燃。
液态空气与可燃物或油类混合会发生爆炸。
同时空气与消也可点燃有机材料防本品不燃。
用水保持容器冷却,以防受热爆炸,急剧助长火势。
迅速切断气源,灭火方法用水喷淋保护切断气源的人员。
如果液态空气泄漏造成木材、纸张等可燃物的燃烧,首先须切断液态空气的气流,然后用水将火扑灭中国MAC 未制定标准毒性接触限值前苏联MAC 未制定标准美国TVL-TWA 未制定标准美国TVL-STEL 未制定标准人需要从空气中吸取新陈代谢所需的氧气,排出无用的二氧化碳。
人需要氧气的安全极限为15% 左右(占空气的百分比)。
氧气不足会导致呼吸困难,使中枢神经发生障碍,重者会出现生命危险。
健康当氧气浓度降至17%以下时,人出现痛苦的症状;至12%或更低时就会有生命危险;于11%时会丧危害失知觉;低于6%时,停止呼吸。
使用压缩空气作为氧气来源的潜水员或隧道工人容易患一种被称为减压病的职业病,这是由于在高压空气中工作的人员减压太快,使血液和人体组织中形成氮气泡急救应使患者脱离污染区,移至空气新鲜处,安臵并保暖。
如皮肤等冻伤,可立即用水冲洗,并送医院救治工程控制密闭操作。
提供良好的自然通风条件呼吸系统防安全防护呼吸器、氧气呼吸器或长管面具。
穿一般作业工作服。
戴一般作业防护手套。
身体防护不需要特殊防护。
当作业场所空气中氧气浓度低于百分之十八时,必须佩带空气手防护其他防护进入罐、限制性空间或其他密闭空间作业,须有人监护包装包装分类:Ⅱ包装标识: 5 包装方法:钢质气瓶、储罐本品为不燃性压缩气体,助燃。
储存于阴凉、通风仓间内。
仓温不易超过30℃. 远离火种、热源。
【四年级】气火箭
气火箭是一种利用压缩空气产生推力从而推动飞行的玩具。
它由几个组成部分组成,
包括空气泵、气缸、活塞、喷嘴以及一个可以装载水的瓶子。
我们需要准备一个瓶子,瓶子中间要有一个倒立的活塞。
将瓶子倒立放在一个平坦的
表面上,然后拿起气泵,将气泵的一端连接到瓶子上的活塞部分。
接下来,我们需要给瓶子添加一定量的水,水的重量可以让气火箭能够产生足够的重力。
然后将瓶子的盖子拧紧,确保没有水渗漏出来。
准备工作完成后,我们可以开始进行实验了。
用力将气泵的活塞向下拉动,通过活塞,压缩了瓶子内的空气。
当我们放开活塞时,瓶子内的压缩空气会推动活塞上的水,水会通
过喷嘴喷射出来,产生一个向上的推力。
火箭升空的原理是推力大于重力,即喷出的水的推力大于火箭自身的重力。
当推力大
于重力时,火箭就会往上升空。
我们可以通过不同的方法来改变气火箭的飞行高度和速度。
增加瓶子内的水量,可以
增加推力,从而让火箭升得更高。
或者减少瓶子内的水量,减小推力,让火箭飞得更远。
在进行实验时,我们也需要注意一些安全事项。
使用气泵时要小心操作,避免活塞突
然弹出造成伤害。
要远离人群和易燃物品,确保实验环境的安全。
气火箭实验是一种既有趣又有教育意义的活动。
通过这个实验,我们可以学习物理原理,了解推力和重力的关系,同时也培养了我们对科学的兴趣和探索精神。
气火箭是一种有趣的玩具,它能够让我们了解物理原理,同时也带给我们一份探索和
发现的乐趣。
希望大家在实验时能够安全,并且享受这个精彩的科学实验!。
压缩空气发电机的说明书一、前言本说明书旨在为使用者提供压缩空气发电机的使用、维护、保养等相关信息。
在使用之前,请确保您已经认真阅读并理解了本说明书。
二、产品介绍1. 压缩空气发电机是一种利用压缩空气发电的设备,通过将空气压缩至一定压力,再经过控制系统转化为电能,以供用户使用。
2. 本产品采用了先进的压缩技术和高效的发电技术,使得发电效率明显提高,同时使用起来也更加安全可靠。
3. 本产品适用于各种需要电能供应的场合,如工矿企业、医院、学校、公共交通等。
三、技术参数1. 压缩机部分:(1) 压缩介质:空气(2) 压力范围:0.7 MPa ~ 1.0 MPa(3) 压缩机排气量:XX m³/min(4) 压缩机类型:柴油/电动/气动等2. 发电机部分:(1) 额定功率:XX kW(2) 额定电压:XX V(3) 额定电流:XX A(4) 发电机类型:永磁/异步等3. 整机参数:(1) 外形尺寸:XX × XX × XX mm(2) 整机重量:XX kg(3) 噪音水平:XX dB(A)四、使用方法1. 在使用之前,请先将压缩机部分做好密封,保证压缩空气不会泄漏。
2. 开始发电前,请先将设备连接好电源并启动,待设备运行正常后即可开始供电。
3. 发电机部分若长时间不用,请务必进行保养,清理设备,并妥善保管,以免设备老化或损坏。
五、维护保养1. 发电机部分的定期保养:(1) 每隔一段时间,对发电机进行检查,确保发电机的运行正常。
(2) 检查发电机的电路连接情况是否松动,是否需要更换部件。
2. 压缩机部分的定期保养:(1) 每隔一段时间,对压缩机进行清理检查,包括滤清器、油液清理等。
(2) 检查压缩机的运行情况是否正常,及时发现问题并进行修理和更换。
六、常见故障及解决方法1. 故障:压缩机产生异常噪声。
解决方法:检查压缩机是否需要加注或更换油液,清理滤清器等。
2. 故障:发电机输出功率不足或无法输出电能。
附件6:
2014年镇江市优秀自制教(学、玩)具评选参评作品技术资料式样
一、教具名称:空气压缩火箭
二、教具制作人单位、姓名、邮编:江苏省句容市葛村中心小学黄松涛212431
三、教具装置图(图1)
图1
四、仪器特点及用途
利用了空气被压缩后具有弹性的特点,验证空气被压缩后的巨大能量。
五、制作材料
饮料瓶两个,自行车气嘴一个,硬卡纸,橡胶塞一个
六、制作方法
1.将一个饮料瓶剪下头部备用,将气嘴塞进橡胶塞中。
(图2、图3)
图2 图3
2.将橡胶塞塞进饮料瓶瓶口(图4)
图4
3.把两个饮料瓶如图连接起来(图5)
图5
4.给火箭加上一层外衣(图6)
图6
七、使用方法
1.使用支架把火箭支起来
2.给火箭打气,当达到一定程度时,火箭就会腾空而起。