AS600M系列说明书(A5)
- 格式:pdf
- 大小:1.04 MB
- 文档页数:63

阿尔法AS600M主轴伺服在数控车床上的应用摘 要:AS600M主轴伺服驱动器和ASMA主轴伺服电机是阿尔法变频技术有限公司推出的应用于高端数控机床的主轴伺服系统,该系统调速精准、低频力矩大、负载响应能力强,快速的加减速能力、宽调速范围,精确位置控制,能实现主轴定位,刚性攻丝,螺纹切削,低速绞孔等各种功能。
本文主要AS600M主轴伺服系统组成以及在数控车床上的应用,调试方法,参数设置等。
关键词:AS600M 主轴伺服 数控车床一、引言目前中国经济飞速发展,制造业的发展起着重要作用,制造的效率及产品的质量很大程度上取决于制造装备。
而数控机床在制造装备中扮演着重要角色,产品的精度直接决定于数控机床,产品的国际化直接决定数控机床的国际化。
数控机床的性能尤其是主轴的性能直接与驱动器挂钩,普通的变频主轴只有单纯的速度控制,且无论是低速力矩还是响应速度都有欠缺,有些变频器虽带有主轴定位功能,但只能做有限点定位,无法做出位置插补,调速范围也不够宽(最高转速在四五千转左右),有些同步伺服主轴虽然低速性能好,响应快,但高速弱磁依然是一大挑战,并且成本高居不下,尤其是在大功率机器上面。
因此,基于异步机的伺服主轴是一大趋势,将成为市场的主流。
二、系统介绍AS600M主轴伺服驱动器和ASMA主轴伺服电机是阿尔法变频技术有限公司推出的基于异步机的主轴伺服系统。
该系统调速精准、低频力矩大、负载响应能力强,快速的加减速能力、宽调速范围,精确位置控制,弥补了变频主轴和同步主轴的缺点,能轻松实现主轴定位,刚性攻丝,螺纹切削,低速绞孔等各种功能。
AS600M主轴伺服驱动器采用先进的闭环矢量控制,通过伺服电机内置编码器检测速度和位置,同时又将编码器信号反馈至系统,节省主轴编码器。
AS600M提供丰富的接口,具有脉冲串调速和模拟量调速功能,多通道输入输出口(接口图如图一)可编程开路集电极输出(光耦隔离)电机编码器输入至系统图一:AS600M 主轴伺服驱动器接口图三、系统组成系统由哪些部分组成,使用哪些机器,线路图等。


求质量之上乘守信誉于天下系列无功智能补偿装置山东特安电气有限公司SHANDONG TEAN ELECTRIC CO., LTD目录一、产品简介........................................ 错误!未定义书签。
二、产品型号及含义 .................................. 错误!未定义书签。
三、主要技术指标 .................................... 错误!未定义书签。
四、原理简介........................................ 错误!未定义书签。
五、接线与运行...................................... 错误!未定义书签。
六、参数设置........................................ 错误!未定义书签。
七、装置外形尺寸 .................................... 错误!未定义书签。
八、安装方法和注意事项 .............................. 错误!未定义书签。
九、相关资料........................................ 错误!未定义书签。
附一一次原理图 .................................... 错误!未定义书签。
附二安装图........................................ 错误!未定义书签。
一、产品简介随着国民经济的高速发展和人民生活水平的提高,社会对电力的需求日益增长,对供电的可靠性和供电质量提出更高的要求。
由于负荷的不断增加对电网无功的要求也随之增加。
无功功率如同有功功率一样是保证电力系统电能质量,电压质量,降低网损和安全运行不可缺少的部分。
解决好无功补偿问题对降损节能有着极为重要的意义,这是当前供电系统优先关注的缘由。
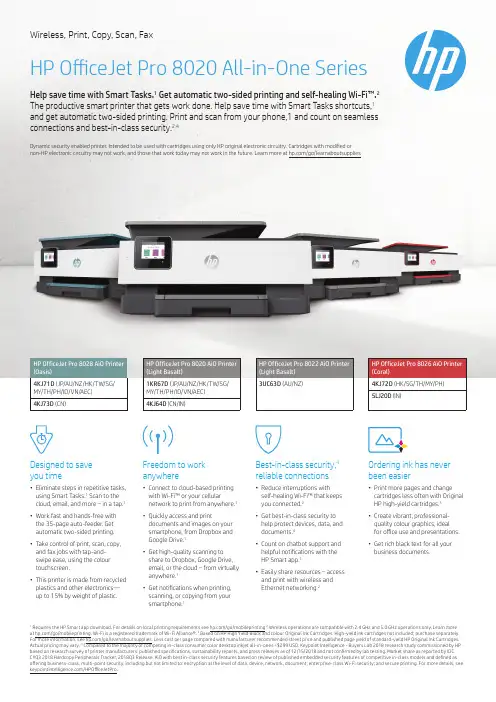
1Requires the HP Smart app download. For details on local printing requirements see /go/mobileprinting 2 Wireless operations are compatible with 2.4 GHz and 5.0 GHz operations only. Learn more at /go/mobileprinting. Wi-Fi is a registered trademark of Wi-Fi Alliance®. 3 Based on HP High Yield Black and colour Original Ink Cartridges. High-yield ink cartridges not included; purchase separately. For more information, see /go/learnaboutsupplies. Less cost per page compared with manufacturer recommended street price and published page yield of standard-yield HP Original Ink Cartridges. Actual pricing may vary. 4 Compared to the majority of competing in-class consumer color desktop inkjet all-in-ones <$299 USD. Keypoint Intelligence - Buyers Lab 2018 research study commissioned by HP based on research survey of printer manufacturers’ published specifications, sustainability reports, and press releases as of 12/15/2018 and not confirmed by lab testing. Market share as reported by IDC CYQ3 2018 Hardcopy Peripherals Tracker, 2018Q3 Release. AiO with best in-class security features based on review of published embedded security features of competitive in-class models and defined as offering business-class, multi-point security, including but not limited to: encryption at the level of data, device, network, document; enterprise-class Wi-Fi security; and secure printing. For more details, see /HPOfficeJetPro .Wireless, Print, Copy, Scan, FaxHP OfficeJet Pro 8020 All-in-One Series• Eliminate steps in repetitive tasks, using Smart Tasks.1 Scan to the cloud, email, and more – in a tap.1• Work fast and hands-free with the 35-page auto-feeder . Get automatic two-sided printing.• Take control of print, scan, copy, and fax jobs with tap-and- swipe ease, using the colour touchscreen.• This printer is made from recycled plastics and other electronics— up to 15% by weight of plastic.• Connect to cloud-based printing with Wi-Fi™ or your cellular network to print from anywhere.1• Quickly access and printdocuments and images on your smartphone, from Dropbox and Google Drive.1• Get high-quality scanning to share to Dropbox, Google Drive, email, or the cloud – from virtually anywhere.1• Get notifications when printing, scanning, or copying from your smartphone.1• Reduce interruptions with self-healing Wi-Fi™ that keeps you connected.2• Get best-in-class security to help protect devices, data, and documents.4• Count on chatbot support and helpful notifications with the HP Smart app.1• Easily share resources – access and print with wireless and Ethernet networking.2• Print more pages and change cartridges less often with Original HP high-yield cartridges.3• Create vibrant, professional- quality colour graphics, ideal for office use and presentations.• Get rich black text for all your business documents.Help save time with Smart Tasks.1 Get automatic two-sided printing and self-healing Wi-Fi™.2 The productive smart printer that gets work done. Help save time with Smart Tasks shortcuts,1 and get automatic two-sided printing. Print and scan from your phone,1 and count on seamless connections and best-in-class security.2,4Dynamic security enabled printer . Intended to be used with cartridges using only HP original electronic circuitry. Cartridges with modified or non-HP electronic circuitry may not work, and those that work today may not work in the future. Learn more at /go/learnaboutsuppliesDesigned to save you timeFreedom to work anywhereBest-in-class security,4 reliable connectionsOrdering ink has never been easierHP OfficeJet Pro 8028 AiO Printer (Oasis)HP OfficeJet Pro 8026 AiO Printer (Coral)HP OfficeJet Pro 8020 AiO Printer (Light Basalt)HP OfficeJet Pro 8022 AiO Printer (Light Basalt)Short data sheet | HP OfficeJet Pro 8020 All-in-One SeriesTechnical specificationsAIO functions Wireless, Print, Copy, Scan and FaxPrintSpeed1Black: Up to 29 ppm (draft, A4); Up to 20 ppm (ISO); Colour: Up to 25 ppm (draft, A4); Up to 10 ppm (ISO);Colour Photo (draft, Photo Paper, 10x15 cm): As fast as 49 seconds; Duplex: Up to 10 ipm (Black, A4);Up to 7 ipm (Colour, A4)Resolution Black (best): 1200 x 1200 rendered dpi; Colour (best): Up to 4800 x 1200 optimized dpi on HP Advance Photo Paper 1200 x 1200 dpi inputBorderless printing Yes, on photo paper only, (up to 210 x 297 mm)Mobile printing capability2Chrome OS; Apple AirPrint™; Wi-Fi® Direct Printing; Mopria™ CertifiedLanguage HP PCL3 GUIInk types Pigment-based (black and colour)Printer smart software features Orientation: Portrait/Landscape; Print on Both Sides: None/Flip on Long Edge/Flip on Short Edge; Page Order: Front to Back/Back to Front; Pages per Sheet: 1, 2, 4, 6, 9, 16; Quality Settings: Draft/Normal/Best; Printing Shortcuts; Print in Grayscale: Off/High Quality Grayscale/Black Ink Only; Pages per Sheet Layout: Right then Down/Down then Right/Left then Down/Down then Left; Print in Max DPI: No/Yes; HP Real Life Technologies: Off/On; Booklet: None/Booklet-Left Binding/Booklet-Right Binding; Pages to Print: Print All Pages/Print Odd Pages Only/Print Even Pages Only; Borderless Printing: Off/On; Page Borders: Off/OnScanType Flatbed, ADFTechnology Contact Image Sensor (CIS)Speed Normal, A4: Up to 8 ppm (200 ppi, b&w), Up to 3.5 ppm (200 ppi, colour)Resolution Enhanced: Up to 1200 dpi; Hardware: Up to 1200 x 1200 dpi; Optical: Up to 1200 dpiMax scanning size ADF: 215 x 355 mm (one-sided); A4, Letter (one-sided); Flatbed: 216 x 297 mmInput modes Front-panel scan, copy, fax, HP Software, EWSGrayscale levels256Bit depth24-bitFile format JPG, BMP, TIFF, PDF, RTF, TXT, PNGDigital sending features Scan to PCScanner advanced features Smart Tasks shortcuts: 1-click customizable scan to cloud destinations, email, and print, create editable,searchable documents by scanning from phone or printer; Smart Tasks destinations: Dropbox, Google Drive, Onedrive, email recipients, printCopySpeed Black (ISO): 13 cpm; Colour (ISO): 7 cpm; Black (best, A4): Up to 3 cpm; Colour (best, A4): Up to 2 cpm Resolution Black (text and Graphics): 600 dpi; Colour (text and graphics): 600 dpiCopier reduce/enlarge25 to 400%Max number of copies Up to 99Copier Settings Number of Copies; Resize; Quality; Lighter/Darker; Paper size; Paper Type; Two-sided; ID Copy, Collate; Margin shift; Enhancement; Crop; Copy previewFaxResolution Black (standard): 203 x 98 dpi; Colour (standard): 200 x 200 dpiTransmission speed3 4 seconds per pageMemory3Up to 100 pagesFax phones features Colour fax; auto reduction; auto redial; speed dial; group speed dial; junk barrier; forwarding (black only);distinctive ring; delayed send (black only); scan and fax; PC fax send and Fax to PCFax features Faxing: Yes, colour; Faxing options (ADF): Single-sided; Auto-redialling: Yes; Fax delayed sending: Yes;Distinctive ring detection supported: Yes; Fax forwarding supported: Yes; Fax polling supported: No; Auto faxreduction supported: Yes; Fax telephone mode supported: No; Junk barrier supported: Yes, requires Caller ID;Telephone handset supported: No; Remote retrieval supported: No; PC interface supported: Yes, PC fax sendand archive; Fax broadcasting, max locations: 20; Fax speed dialling, max numbers: Up to 99Fax smart softwarefeaturesDigital Fax; Fax to PC is available with Windows. Visit /support to download the latest software Display 6.86 cm (2.7 inch) Capacitive Touchscreen CGDProcessor speed 1.2 GHzMediaDuty cycle (monthly, A4)4Up to 20,000 pagesRecommended monthlypage volumeUp to 800 pagesADF capacity Standard, 35 sheetsDuplex print options Automatic (standard)Supported sizes A4, A5, A6, B5(JIS), Card (A4, Hagaki, Ofuku Hagaki); Photo (13 x 18 cm, 10 x 15 cm); Envelope (A2, C5, C6, DL.Chou #3, Chou #4); 8.5 x 13 inRecommended weights60 to 105 g/m² (plain); 220 to 280 g/m² (photo); 75 to 90 g/m² (envelope); 163 to 200 g/m² (card)Types Plain Paper, HP Photo Papers, HP Matte Brochure or Professional Paper, HP Matte Presentation Paper, HP Glossy Brochure or Professional Paper, Other Photo Inkjet Papers, Other Matte Inkjet Papers, Other Glossy Inkjet Papers,Thick Plain Paper, Light/Recycled Plain Paper, HP Tri-fold Brochure Paper, GlossyPaper handling Input: 225-sheet input tray, 35-sheet ADF; Output: 60-sheet output trayMemory Standard: 256 MB; Maximum: 256 MB DDR3 SDRAMOperating system compatibility Windows 10, 8.1, 8, 7,Windows Server 2008 R2 64-bit, Windows Server 2008 R2 64-bit (SP1), Windows Server 2012 64-bit, Windows Server 2012 R2 64-bit, Windows Server 2016, Chrome OSMinimum system requirements PC: Windows 10, 8.1, 8, 7: 1 GHz 32-bit (x86) or 64-bit (x64) processor, 2 GB available hard disk space,CD-ROM/DVD drive or Internet connection, USB port, Internet Explorer; Mac: OS X v10.11 El Capitan; macOS Sierra v10.12 (previously OS X); macOS High Sierra v10.13; 1.5 GB available space; Internet accessConnectivityConnectivity (Std) 1 Ethernet; 1 Wireless 802.11b/g/n; 1 RJ-11 FaxNetwork capabilities Yes, via built-in Ethernet; Wireless 802.11b/g/nWireless capability Yes, built-in WiFi 802.11b/g/nSupported networkprotocols9100; LPR; SNMP; SLP; Internet Printing Protocol (IPP); WS-Print; WirelessDimensions (W x D x H)5460 x 341.2 x 234 mmWeight68.2 kgEnvironmentalOperating environment Operating temperature range: 5 to 40° C; Recommended operating temperature range: 15 to 30° C;Operating humidity range: 20 to 80% RH; Recommended operating humidity range: 20 to 75% RH;Storage temperature range: -40 to 60° CAcoustics Acoustic power emissions (active, printing): 6.8 B(A) (printing at 16 ppm); Acoustic pressure emission:62 dB(A) (Draft printing at 17 ppm); Acoustic power emissions (active, copy): 6.7 B(A) (copying at 7 ppm withADF running); Acoustic power emission (ready): 2.5 B(A); Acoustic power emission (active, scan): 5.8 B(A) Power specifications Power supply type: Internal; Power supply required: Input voltage: 100 to 240 VAC (+/- 10%), 50/60 Hz(+/- 3 Hz); Typical electricity consumption (TEC): 0.20 kWh/Week; Power consumption7: Up to 21 watts(printing), 5.80 watts (ready), 1.00 watts (sleep), 0.08 watts (manual-off);What’s in the box8HP OfficeJet Pro 802X All-in-One Printer; HP 915 Setup Black Ink Cartridge; HP 915 Setup Cyan Ink Cartridge, HP 915 Setup Magenta Ink Cartridge, HP 915 Setup Yellow Ink Cartridge; User Guide; Setup poster; Power cord Warranty One-year limited hardware warranty; 24-hour, 7 days a week phone support Ordering informationNumber1KR67D4KJ64D3UC63D4KJ72D5LJ20D4KJ71D4KJ73DDescriptionHP OfficeJet Pro 8020 AiO Printer (Light Basalt)(JP/AU/NZ/HK/TW/SG/MY/TH/PH/ID/VN/AEC)HP OfficeJet Pro 8020 AiO Printer (Light Basalt)(CN/IN)HP OfficeJet Pro 8022 AiO Printer (Light Basalt)(AU/NZ)HP OfficeJet Pro 8026 AiO Printer (Coral)(HK/SG/MY/TH/PH)HP OfficeJet Pro 8026 AiO Printer (Coral)(IN)HP OfficeJet Pro 8028 AiO Printer (Oasis)(JP/AU/NZ/HK/TW/SG/MY/TH/PH/ID/VN/AEC)HP OfficeJet Pro 8028 AiO Printer (Oasis)(CN)Replacement cartridges9Number3YM18AA3YM15AA3YM16AA3YM17AA3YM22AA3YM19AA3YM20AA3YM21AA3YM23AADescriptionHP 915 Black Original Ink Cartridge(~300 pages)HP 915 Cyan Original Ink Cartridge(~315 pages)HP 915 Magenta Original Ink Cartridge(~315 pages)HP 915 Yellow Original Ink Cartridge(~315 pages)HP 915XL Black Original Ink Cartridge(~825 pages)HP 915XL Cyan Original Ink Cartridge(~825 pages)HP 915XL Magenta Original Ink Cartridge(~825 pages)HP 915XL Yellow Original Ink Cartridge(~825 pages)HP 919XL Black Original Ink Cartridge(~1,500 pages)For information on reference page output, please log on the /go/pageyieldHP Care PacksNumberUG072EUG469EUG347EUG245EDescriptionHP 3-year Next Business Day Exchange AIO/Mobile OfficeJet Printer -M SVCHP 3-year Onsite Exchange AIO/MobileOfficeJet Printer -M SVCHP 3-year Pickup Return AIO/Mobile OfficeJetPrinter -M SVCHP 3-year return AIO/Mobile OfficeJet Printer-M SVCProtect your investment with HP Care Pack. Let HP certified engineers resolve your technical issues. For more details on HP Care Pack, go to /go/cpcRecommended Papers10NumberC6818AQ6593ADescriptionHP Professional Inkjet Paper, Glossy, A4,50 sheets, 180 gsmHP Professional Inkjet Paper, Matte, A4,200 sheets, 120 gsmHP Inc officesAustraliaChinaHong KongIndiaIndonesiaMalaysiaNew ZealandPhilippinesSingaporeTaiwanThailandVietnam(613) 8833 5000(010) 6564 3888(852) 3077 2688(80) 2612 9000(62-21) 579 1088(603) 2332 3333(09) 918 9555(632) 888 5900(65) 6275 3888(02) 8722 9000(662) 353 9500(848) 3823 4151.au/in/id.my/ph.sg/th/vnFor the following countries, please fax your queries to: (65) 6275 6707 Bangladesh • Bhutan • Brunei • Cambodia • Maldives • Nepal• Pakistan • SrilankaFor more information, please visit us at /apac/homeandoffice HP Order-a-CartridgeCall HP’s Order-a-Cartridge10 service and have them conveniently delivered to your doorstep.China800 820 0851/400 820 08511Speed specifications have been updated to reflect current industry testing methods.2 Wireless performance is dependent upon physical environment and distance from the access point. Wireless operations are compatible with 2.4 GHz routers only; excludes wireless direct. Wireless direct may require driver or apps be installed and connected on wireless-enabled mobile device or PC. Wireless functionality may vary by computer and mobile operating systems, see . Separately purchased data plans or usage fees may apply. Print times and connection speeds may vary. AirPrint supports OS X v10.11 El Capitan and devices running iOS 4.2 or later and requires the printer be connected to the same network as your OS X or iOS device. AirPrint, the AirPrint Logo, iPad, iPhone, and iPod touch are trademarks of Apple® Inc. Windows is a trademark of the Microsoft group of companies.3 Based on standard ITU-T test image #1 at standard resolution. More complicated pages or higher resolution will take longer and use more memory.4 HP recommends that the number of printed pages per month be within the stated range for optimum device performance, based on factors including supplies replacement.5 Dimensions vary as per configuration6 Weight varies as per configuration7 Power requirements are based on the country/region where the printer is sold. Do not convert operating voltages. This will damage the printer and void the product warranty.8 For more information about page yields for replacement cartridges see /go/learnaboutsupplies for setup cartridges click on Setup supplies link on the same page.9Actual yield varies considerably based on content of printed pages and other factors. For details see /go/learnaboutsupplies10 Available in selected countries only.© 2021 HP Development Company, L.P. The information contained herein is subject to change without notice. The only warranties for HP products andservices are set forth in the express warranty statements accompanying such products and services. Nothing herein should be construed as constituting anadditional warranty. To the extent allowed by law, HP shall not be liable for technical or editorial errors or omissions contained herein.4AA7-4506EEP, Feb 2021, Rev.8。

安视达智能可视对讲系统产品说明书佛山安视达电子科技有限公司智能可视对讲系统产品说明书前言衷心感谢您购买AST安视达智能可视对讲系列产品。
AST安视达小区智能可视对讲系统是安视达公司根据现代住宅小区多极化﹑多样化的特点和现代家居安全防范的需求,结合当今先进的计算机技术﹑视频技术﹑数码通讯技术设计制造的小区智能系统,以楼宇可视对讲为主体,通过有针对性配置不同功能的主机和分机,附加外设的集成系统并联接计算机,组成的一个先进平台,利用先进的管理软件达到综合管理的目的,从而为住户提供安全﹑方便﹑时尚的家居环境。
我们将竭诚为您以标准的服务流程﹑专业的技术队伍为您提供周到及细致的服务。
内容包括:咨询服务﹑技术培训﹑产品维保﹑在线支持等。
版权及注册商标申明“AST安视达”为佛山市安视达电子科技有限公司所属之注册商标版权所有,未经许可不得擅自复制﹑改编和翻译目录一、AST智能可视对讲——系统示意图二、AST可视对讲系统——门口主机系列1、AST-2201A/AST-2201A-C直按式黑白/彩色可视主机2、AST-2202A/AST-2202A-C数码式黑白/彩色可视主机3、AST-2202AM/AST-2202AM-C门禁式数码黑白/彩色可视主机4、AST-2203A/AST-2203A-C数码式黑白/彩色可视主机5、AST-2203AM/AST-2203AM-C门禁式数码黑白/彩色可视主机6、AST-2204A/AST-2204A-C数码式黑白/彩色可视主机7、AST-2204AM/AST-2204AM-C门禁式数码黑白/彩色可视主机8、AST-2205A/AST-2205A-C数码式黑白/彩色可视主机9、AST-2205AM/AST-2205AM-C门禁式数码黑白/彩色可视主机10、AST-2206A/AST-2206A-C数码式黑白/彩色可视主机11、AST-2206AM/AST-2206AM-C门禁式数码黑白/彩可视主机12、AST-2209A/AST-2209A-C 立式数码黑白/彩色可视主机(大堂式主机)13、AST-2209AM/AST-2209AM-C立式门禁数码黑白/彩可视主机(大堂式主机)14、AST-1103A/AST-1103A-C黑白/彩色可视小主机15、AST-1105A/AST-1105A-C黑白/彩色可视小主机三、AST可视对讲系统——可视分机系列1、AST-2201B/AST-2201B-C黑白/彩色可视分机2、AST-2201BN/AST-2201BN-C安保型黑白/彩色可视分机3、AST-2202B/AST-2202B-C黑白/彩色可视分机4、AST-2202BN/AST-2202BN-C安保型黑白/彩色可视分机5、AST-2203B/AST-2203B-C黑白/彩色可视分机6、AST-2203BN/AST-2203BN-C安保型黑白/彩色可视分机7、AST-2204B/AST-2204B-C 黑白/彩色可视分机8、AST-2204BN/AST-2204BN-C安保型黑白/彩色可视分机9、AST-2200BR非可视兼容分机10、AST-2205B-C免提彩色可视分机11、AST-2205BN-C安保型免提彩色可视分机12、AST-2206B-C免提彩色可视分机13、AST-2206BN-C安保型免提彩色可视分机四、AST可视对讲系统——中间设备及终端设备系列1、AST-200F1/ASTF-200F2/AST-200F4/AST-200F8视频保护器2、AST-200VB视频放大器3、AST-200L网络连接器4、AST-200X主机选择器5、AST-200P18V稳压电源6、AST-200J网络集线器7、AST-RY门禁遥控器8、AST-200WA黑白/彩色围墙门口机9、AST-600M/AST-600M-C黑白/彩色管理中心机五、AST智能可视对讲——管理软件说明AST 智能可视对讲——系统示意图按钮开关探头探头探头安视达可视对讲网络示意图一级视二级一、 AST 可视对讲系统——门口主机系列1. AST —2201A AST —2201A-C外形说明:⑴ 摄像头:内装一个红外补光摄像头,可以在夜晚摄取清晰图象;⑵ 房号键:呼叫输入,采用全金属密封键盘; ⑶ 扬声器:双工通话; ⑷ 麦克风:双工通话。

Onick 600AS彩屏激光测距仪产品说明书型号: Onick 600AS 激光测高测距测角一体机一、产品用途:多功能激光测角测距仪是一种望远镜+激光测角测距的便携式光电仪器,综合了望远镜、激光测距和测角的功能,主要表现在两个方面:1、在清晰地观察物体的同时,可测量固定物体在一定范围内的距离。
具有测距精度高、测距时间短、距离显示直观(带彩色液晶屏显示)、耗电省和自动断电等优点。
2、多功能激光测角、测距仪融聚了最新科技,同时实现了目标距离和角度的测量功能。
在获得目标距离的同时,还可同时显示望远镜至目标点连线与地平面的夹角(仰角为+,俯角为-)、相对高度和水平距离。
仪器的激光发射功率小,对人眼安全;不需要合作目标,可对任意目标测距;体积小,重量轻,便于携带。
机内使用CR2-3V电池供电,购买和更换均很方便。
测距望远镜广泛适用于旅游观光,观看体育比赛、高尔夫球场、野外狩猎、野营登山、户外郊游等运动场所,是提高野外活动质量,测量目标距离的好帮手。
二、主要技术指标:⑴、测程范围: 600AS (4M - 600M) 1000AS(5M-1000M)⑵、测距误差:±0.5M(200内通常);⑶、功能包括:测角、测垂直高度、矩形面积、圆面积(直径)。
⑷、后续可增加蓝牙数据通讯功能:无;⑸、望远镜倍率: 6X;⑹、望远镜物镜孔径: 21mm;⑺、望远镜目镜孔径: 16mm;⑻、出瞳直径: 3.8mm;⑼、视场角: 7.2°;⑽、视度调节范围:±3屈光度;⑾、产品重量: 175克(不含电池);⑿、电池型号: CR2-3V锂电;⒀、液晶显示器:彩色液晶显示屏1.8寸⒁、防护等级:防雨外形尺寸:长:97mm(不含目镜),106mm(含目镜)宽:35mm高:73mm(前端),68mm(后端)三、多功能测距、测角仪附件表:。

600系列三相电力仪表(版本号:4.00)使用说明书(使用前请详细阅读此说明书)目录1、简述 (1)1.1 600的功能 (1)1.2 600功能描述 (1)1.3 600的特点 (1)2、安装、接线与配置 (2)2.1 尺寸与安装 (2)2.2 接线与配置 (3)3、界面显示说明 (5)3.1 显示模式下按键功能示意图 (5)3.2 编程模式下参数查询及修改按键功能示意图 (5)3.3 显示模式下功能显示灯指示说明 (6)4、操作说明 (6)4.1 循环显示说明 (6)4.2 键盘编程说明 (6)4.3 功能设置 (6)5、运输与贮藏 (7)6、保修期限及订货说明 (7)附表:常见故障排除 (8)1、简述1.1 600系列的功能600系列三相电力仪表是用于低压电力系统的智能化装置,该系列产品包括电流表、电压表、有功功率表、无功功率表、功率因数表、电度表等适合用户不同应用需求的仪表产品,该系列仪表可以完全替各种代指针式电力仪表,且精确度更好、性能更加稳定。
600系列三相电力仪表具有选配4路开关量输入、2路脉冲输出、RS485通讯接口,通讯协议为MODBUS通讯协议或其它指定通讯协议。
1.2 600系列功能描述1.2.2 通讯功能(扩展功能)600系列产品均可选配RS485通讯接口,通讯协议为MODBUS通讯协议或其它指定通讯协议。
可通过通讯口,可查询全部的测量监控信息。
面板带有带有LED指示灯,用于通讯收/发指示。
1.2.3 1~4路开关量输入功能(扩展功能)600系列产品均可选配1~4路开关量输入,为无源节点输入。
可在测量显示区查看开关量的状态。
1.2.4 模拟量输出功能(扩展功能)600系列部分产品可选配1~2路DC4~20mA,通过编程设置可将模拟量(DC 4-20mA)输出设置为与某一被测参数(定货时需指定)成比例的输出。
模拟量输出的最大负载为300Ω,可选择项为三相电流表的IA、IB、IC,三相电压表的UA、UB、UC。

红邦控制技术4.ABB变频器说明书ACS400ACS500ACS5105.AB变频器说明书1336PLUS II PowerFlex 4PowerFlex 406.AC Tech变频器说明书MC1000QC SCF7.BERGES变频器说明书ACM-D2/S2/S3ACM-COMPACT8.BONFIGLIOLI邦飞利变频器说明书ACT200/400ACU200/400VCB4009.CT变频器说明书Command er GP Unidrive SP Command er SE 10.Drivecon变频器说明书XS XT XR 11.EATON伊顿变频器说明书SVX9000SPX9000MVX900012.KEB科比变频器说明书F4-S F4-F F5-M 13.LG变频器说明书iS3iH3iG514、LUST路斯特变频器说明书CDD3000CDE/CDB3000CDS400015.Moeller金钟-默勒变频器说明书DV6-340DF5116.NORD诺德变频器说明书SK300ESK400ESK5xxE17.PDRIVE变频器说明书18.PE变频器说明书SD100SD250SD45019.RICH利佳/艾瑞克变频器说明书EI-MINIEI-450EI-450M20.SEW变频器说明书MOVITRAC -31C MOVIDRIV E-60B/61B MOVITRAC -0721.SIEI西威变频器说明书ARTDriveL ARTDriveG-EV22.TMT变频器说明书PLUS VTC E 23.VACON瓦控变频器说明书NX NXS NXL 24.WEG变频器说明书CTW-04CFW-08CFW-0925.阿尔法ALPHA变频器说明书ALPHA2000G ALPHA2800ALPHA330026.艾默生(原华为)变频器说明书EV1000EV2000EV300027.爱得利变频器说明书APXG3ASASN28.爱迪生Adsen变频器说明书ADS-A29.安邦信AMBITION变频器说明书G9/P9V11G1130.安川YASKAWA变频器说明书G5G7E731.安普(AMPLE)变频器说明书AMP100032.百德福BEDFORD变频器说明书B500B80133.斑科Bantek变频器说明书BLDC34.宝德电气BODE变频器说明书BEM100BEM20035.葆德BALDOR变频器说明书10111236.贝西B&C变频器说明书BC-1000BC-2000BC-2300MX-eco/pro/multi-eco/multi-pro-1MX-eco/pro/m eco/multi-pro-237.传动之星(STAR@DRIVE)变频器说明书SD-5L-G/P/YSD-5L-S SD-7L38.创杰变频器说明书ACT-V6G/P/ZACT-M739.春日(KASUGA)变频器说明书KVFC40.丹佛斯(Danfoss)变频器说明书FC51FC100FC20041.德弗(DOVOL)变频器说明书DV300DV600ST50042.德莱尔变频器说明书DVA DVM DVS43.德力西变频器说明书CDI900044.德瑞斯(DIRISE)变频器说明书DRS1000-M DRS2000DRS280045.东达变频器说明书TDS-F8TDS-V846.东洋(TOYO)变频器说明书VF61R VF6447.东元(TECO)变频器/伺服说明书7300EV7300CV7200MA48.东芝(TOSHIBA)变频器说明书VF-nC1VF-S9VF-S1149.方禾(FangH)变频器说明书TE280F66-B F66-C50.飞兆变频器说明书FG51.佛朗克(FRANCK)变频器说明书FRS2000FRB600052.佛斯特(FIRST)变频器说明书FST-500FST-550FST-60053.富凌(FULING)变频器说明书DZB60J DZB70B DZB200M54.富士(FUJI)变频器说明书FRN-G11S FRN-P11S E1S55.高士达(GOLDSTAR)变频器GS200L56.哥伦(GRET)变频器说明书GD-V557.格立特(GREAT)变频器说明书VF10VF11VF1558.海利普变频器说明书HOLIP-A/F/H/MHOLIP-C HOLIP-P59合康亿盛高压变频器说明书HIVERT通用HIVERT矢量60.泓筌变频器说明书HC1-A HC1-M61.鸿宝(HOSSONI)变频器说明书HB-G9/P9HB280-G HB280-P62.华科(HUANIC)变频器说明书HI3G/F HI9G/F63.华蓝(HLinverter)变频器说明书HL200064.汇川(INOVANCE)(默纳克NICE)变频器说明书MD300MD300A MD32065.汇菱(HUILING)变频器说明书H300066.基创变频器说明书E35067.吉纳变频器说明书MSC-3MFI-Case00/CaseA/CaseB68.加能变频器说明书ACmaster-H7IPC-MD IPC-DR69.佳川(JiaChuan)变频器说明书BP60JCRQ70.佳灵变频器说明书JB6C-T971.金肯(JINKEN)变频器说明书JK-G/P72.九德松益变频器说明书CT-200073.开拓变频器说明书KT-A6G/P74.凯迪华能变频器说明书CD200075.康沃(博世力士乐)变频器说明书S1G2G376.科陆变频器说明书CL1700CL2700CL370077.科姆龙变频器说明书KV1900KV200078.库马克变频器说明书CMK-30079.酷马(QMA)变频器说明书Q7000Q900080.乐邦变频器说明书LB60G LB90G81.乐星产电变频器说明书Starvert82.雷诺尔变频器说明书JJR1000JJR2000JJR500083.力普变频器说明书LP10084.菱科(LINGKE)变频器说明书LK600-G/P/ZSLK80085.隆兴变频器说明书LS200A LS600LS80086.路斯特(LUST)驱动器说明书AD系列CDD系列87.伦茨(Lenze)变频器说明书8200/82108220/8240823088.麦孚变频器说明书VFD-F540VCD100089.麦格米特变频器说明书MV300MV60090.美之源(MZY)变频器说明书MZY-M/Y/Z/T/L91.蒙德(MODROL)变频器说明书IMS-GF IMS-GL2IMS-GL392.米高变频器说明书Micovert2003Micovert34 0N93.明电舍(MEIDEN)变频器说明书VT230S VT230SE VT240S94.南方安华变频器说明书A100E100S10095.能士(NSA)变频器说明书NSA20NSA8096.宁茂(赫力)变频器说明书RM597.欧陆变频器/直流调速器说明书512C590+590P98.欧姆龙(OMRON)变频器说明书3G3JV3G3EV3G3FV99.欧瑞(HFinverter)(原惠丰)变频器说明书F2000-G F3000F1000-G100.派克汉尼汾(parker)变频器说明书AC650AC650V AC690+ 101.派尼尔(Pioneer)变频器说明书VF2100VF3000VF5000 102.普传(POWTRAN)变频器说明书PI97G PI7000/7100PI7500103.群倍(QUNBEI)变频器说明书QLP5000104.日搏变频器说明书RB600RB3000RB5000 105.日锋(RiFeng)变频器说明书RF200RF9000106.日虹变频器说明书CHRH-A CHRH-C CHRH-D 107.日立(HITACHI)变频器说明书SJ100L100SJ200 108.日普(RIPOW)变频器说明书RP3200109.日拓变频器说明书HL3000110.日业(SUNYE)变频器说明书SY3200111.荣信电力电子变频器说明书HVC112.瑞恩(RELIANCE)变频器说明书PSC4000/5000/DDS5000PSC7000VZ3000113.赛普(SAPPHIRE)变频器说明书SAP500G SAP300114.赛普变频器说明书SAP900G SAP300V115.三晶变频器说明书SAJ8000116.三肯(SANKEN)变频器说明书SAMCO-i SAMCO-vm05SAMCO-e117.三菱(MITSUBISHI)变频器说明书A500E500F500 118.三木(MIKI)变频器说明书V6119.三品(SANPIN)变频器说明书SKJ SPRQ-333120.三碁(SANCH)(三川)变频器说明书SA SE121.三星(SAMSUNG)变频器说明书MOSCON-E7MOSCON-F7MOSCON-F500122.森兰(SENLAN)变频器说明书SB50SB60/61SB61Z 123.山宇变频器说明书SY6000SJR2124.珊星变频器说明书F5000F6000125.深川变频器说明书SVF2000SVF3000126.神源(SYRUNS)变频器说明书SY4000SY5000127.施耐德变频器说明书ATV38ATV58-1ATV58-2 128.时代变频器说明书TVF1000TVF3000TVF5000 129.时运捷变频器说明书SuperBona-iF/iPDB-2100130.士林变频器说明书SH系列SS系列SB系列131.世通(EACON)变频器说明书EC1000EC3000EC5000 132.收获(Seoho)变频器说明书SOHO-VD SOHO-SMS133.思达(SD)变频器说明书JPSD3000-G/P/V/H134.斯德博(STOBER)变频器说明书FAS4000FDS4000MDS5000 135.四方变频器说明书C300C320E320 136.松下(PANASONIC)变频器说明书VF0VF0C VF-8Z 137.台安(TAIAN)变频器说明书E2N2V2138.台达(DELTA)变频器说明书VFD-A VFD-B VFD-F 139.台凌(TAILING)变频器说明书TL80TL100TL100H 140.腾龙变频器说明书VG3000-G/H141.天正变频器说明书TVFS9TVFG9/P9TVFG11 142.万谷(WANGU)变频器说明书VF2000143.威尔凯变频器说明书WKF WKS WKR5000 144.威科达变频器说明书V6145.威灵(WELLING)变频器说明书WELLING-G/P/F146.微能变频器说明书WIN-VB WIN-9G WIN-9F 147.韦尔变频器说明书AC30G/P/W/H148.伟创(VEICH)变频器说明书AC20AC32AC60 149.沃森(VicRuns)变频器说明书VSI9000150.西驰变频器说明书CFC1000CFC4000151.西尔康变频器说明书H3000152.西林变频器说明书EH600A EH600M EH600W 153.西门子(SIEMENS)变频器说明书MM410MM420MM430154.现代(HYUNDAI)变频器说明书N50N100N300 155.晓磊(CHXL)变频器说明书LEI2000LEI2005LEI3000 156.信捷(XINJE)变频器说明书V5/F5157.星河(XINHE)变频器说明书SD-5L158.亚泰(YT)变频器说明书YTD-G160.阳冈电子变频器说明书G1/H1/P1E1S1 161.依尔通(Emotron)变频器说明书FDU VFX VSA 162.依托(ESTAR)变频器说明书EG/EF163.亿森变频器说明书参数表164.易能变频器说明书EDS700EDS2860165.易驱变频器说明书ED2003ED2800ED3000 166.意科(IECCO)变频器说明书SINUS-N167.英泰(Invertek DRIVES)变频器说明书OptidrivePlus 3GV OptidrivePlus3GVCompactOptidriveVTC168.英威腾(INVT)变频器说明书CHV100CHV190CHF100 169.鹰垦(INK)变频器说明书SLX170.优利康变频器说明书YD3000YD5000171.尤尼康(UNICON)(原北京兰海)变频器说明书低速大扭矩无码盘有码盘172.誉强(YUQIANG)变频器说明书YQ3000-M YQ3000-A YQ3000-G 173.远川(YCDZ)变频器说明书YC-G YC-P174.正频(JPS)变频器说明书PDS PDA/H/E175.正泰(CHINT)变频器说明书NI01176.正弦(SINEE)变频器说明书SINE300SINE303SINE307 177.正阳(Zhengyang)变频器说明书ZY29/31/98ZY-812178.中源(ZYDL)变频器说明书ZY-G800ZY-G800E ZY-A900 179.中远变频器说明书MF6MF5/20MF30 180.珠峰变频器说明书DLT-G11/P11/Z181.住友(SUMITOMO)变频器说明书HF320SF320HF430 182.紫日(CHZIRI)变频器说明书ZVF7ZVF9ZVF9V 183.南海华腾(V-T)变频器说明书V5-H E5-P V6-HACS600ACS800ACS1000PowerFlex 400PowerFlex 70PowerFlex 700SE1SW1SYN10S/T SPL200/400VF5100HG VF51RG VFDBVF61CVF61VF64VFK1/VFN 1GVX9000F5-M/S iS5iHSK530E SK700E SK750ESD700EI-500EI-550EI-600EI-700EI-7001EI-8001EI Super NMOVIRET-315/328/355/380/3150IP55 PLUS IP55 E CFW-10CFW-11EV3100EV3500TD900TD1000TD2000TD3000TD3100MSE11Z9/Z11F7J7V7PC3P5/PC514ro/multi-co/multi-pro-2FC300VLT2000VLT2800VLT2900VLT3000VLT5000 HL2000DV1000DRS30007200GA7300PA7200GSVF-A5VF-A7VF-AS1DZB300BF1S FRN-FVR-E11SMini/C1SHB280-ZMD330ME280NICE3000IPC-RF9300Vector690+590C3G3HV3G3MV3G3RVF1500-GPI7600/78PI766000SJ300SJ300-EL L200L300P VZ7000MF/MS ES/ET/EF IHF/IPF SHF/SPFS500A700E700F700D700 SB70SB100SB200BT40ATV61ATV68-1ATV68-2ATV68-3SDS4000E350E380E520H320M1X M2XVF100DV700/707SV300N310S310EV300VFD-G VFD-M VFD-S VFD-VWIN-9I WIN-9LAC61-Z AC62-LEH600ZMM4406RA706SE70J300TOPVERT TOPVERT TOPVERTVSC CDX CDU MSF ED300S ED3100Optidrive E OptidriveE1OptidriveE2OptidriveMEMA 4XSINE308SINE309 ZY-P800ZVF11VFN2TD3200TD3300。

KA-600USER MANUALM SKY CO.,LTD--5F,NO.15BUILDING,GAME&AMUSEMENT PART,GANGKOU,ZHONGSHAN,GUANGDONG,CHINA Tel:0086-0760-********Fax:0086-0760-********Email:**************.cn Web:IMPORTANT!★Read the manual before operating this machine★Keep this manual for your referenceContent1.General Information---------------------------------------------------------------------------31.1Specification-------------------------------------------------------------------------------31.2Warning-------------------------------------------------------------------------------------41.3Caution--------------------------------------------------------------------------------------41.4Power supply and installation---------------------------------------------------------41.5Use-------------------------------------------------------------------------------------------41.6Maintenance------------------------------------------------------------------------------42.Parts and Functions------------------------------------------------------------------------------53.Game Instruction---------------------------------------------------------------------------------64.Background Setting Instruction---------------------------------------------------------------75.Wiring Diagram-----------------------------------------------------------------------------------86.Quick Trouble Shooting-------------------------------------------------------------------------97.Warranty------------------------------------------------------------------------------------------10Model Jungle Around Reference Code KA-600Power at rest95WPower in operation160W Dimensions(mm)1250x1250x2320mm Weight(KG)180KG Feeding voltage220V/110V Seats3Users range of ages2~6yearsFeel Magic Jungle World!Scene decoration&amusement.Touch me-interactive voice functionThree running ponies with different colors.Slowly go up and down,ensure players’safety.●Do not set the machine where it could block emergency exits.●Install the machine in a horizontal and stable surface.●Do not bend the power cord by force or place heavy objects on it.●Never plug or unplug the power cord with wet hands.●Before inspecting the machine,make sure the power is OFF.●Use always,for replacement parts,pieces authorized by M SKY.●The machine must be connected to a plug with ground.●Do not put the power cord where people walk through.●Do not lift the machine by part,could be damaged.Must be always be lift by the base.●If the power cord is damaged,please power off and contact our staff for replacement.●Use only a grounded outlet.●Check the power requirements at the installation place machine.●Do not touch the power plug with wet hands.●Use specified fuse rating.●Before introducing the coin in to the machine,be sure that the child sit correctly.●Do not rise or go down the child while the kiddie is in movement.●This machine must be operated under adult supervision.●Only one player on one seat.●Be sure to check and maintain the game regularly.●Switch off the power before cleaning or replacing the parts of the game.●Only qualified personnel to inspect or test the electronic card.●Please use clean and soft cloth to clean the game.●Prevent damaging the surface of the game,please use gentle cleanser.2.Parts and FunctionsOpen top coverShow sky projectionEmergency Stop Button Open for background settingTouch the tigers It will say:“Don’t Touch me.”3.Game Instruction4.Background setting5.Wiring DiagramBlack LCD,no picture(1)Please check whether LCD driver board cable and game box cable is connect well(2)Please check whether the18A power supply LED light is on or off.If LED light off:The power supply broken(3)Please check whether can insert coin.If no,game box has problem(4)Please check whether the fan on the game box is workingIf no,game box has problemMachine can’t move to Left or Right(1)Please check whether the cable of steering wheel LR board is connected well (2)Please add some lube on the ball bearing and push the machinehead move to Right and Left.(3)Please check whether the game can move right or left.If no,thesteering wheel brokenGame stuck during playing(1)Game box problem,send back to repair.Coin accepter can’t accept coin(1)Please change another coin selector to try(2)Please check whether coin selector cable is connected wellNo voice or low voice(1)Please check whether the speaker cable connected well.7.Warranty。
Operation manual Weather ProtectionAir Dome 600Version: 1.1 (2018-02-01) - en-us*******************************ContentsContents1Format conventions (3)2Safety (4)2.1General safety information (4)2.2Correct use (4)3Transport and storage (6)4Scope of delivery (7)5Equipment description (8)6Assembly and connection (9)6.1Mount lighting system (9)6.2Connect lighting system (9)6.3Attach rain cover (10)6.4Set up equipment (10)6.5Connect base unit (11)7Operation (12)7.1Turn on equipment (12)7.2Turn off equipment (12)8Cleaning and maintenance (13)9Technical Specs (14)10Recycling/disposal/environmental protection (15)11Contact (16)Format conventions1 Format conventionsThis manual contains recurring descriptive elements that reflect the function of certain information:One or more bolded words indicate a term that can be found exactly the same on the product.One or more italicized words indicates an index entry or an important technical term.1.Instructions are numbered.✓As are results or outcomes of these actions.Safety2 Safety2.1 General safety informationImportant information - Read documentation carefully- Only use equipment as instructed in this document - Observe notes and symbols on the product - Keep documentation on hand for later reference - Pass documentation on to the next user - Keep available near the system at all times- Observe documentation for additional components used as well Danger from electrical voltage- Only connect equipment to a grounded safety socket- The corresponding fuse must be the correct size for the equipment- Completely cut the power to the equipment before installation, cleaning, maintenance, or repairs- Do not clean equipment under running water or by immersing in liquid Proper handling- Do not make any modifications to the equipment- Do not drop equipment or expose it to severe mechanical pressure. The equipment can sustain heavy damage from the impact.- Regularly check equipment for damage. If damaged, turn the equipment off and fully dis-connect from the power supply. Contact customer service or retailer.Maintenance and repair- Do not repair equipment yourself. Contact customer service or retailer.Hot surfaces- Accessible equipment parts will heat up during operation. Keep children out of reach until the equipment has cooled off.- Accessible equipment parts will heat up during operation.2.2 Correct useThis equipment was developed for commercial use. Private use is prohibited.It may only be operated indoors or outdoors.The equipment is for the purpose of protecting small and medium-sized lighting systems from the impact of rain and other weather. The equipment may be used indoors to provide protection from rain effects. It may not be used for another purpose.This equipment is not designed to be used by persons with limited physical, sensory, or mental abilities or insufficient experience and/or insufficient knowledge, unless supervised by a person responsible for their safety or have received instructions from them on how to use the equipment.The manufacturer is not liable for damage that occurs as a result of improper use of the equipment.SafetyTransport and storage3 Transport and storageUse appropriate packaging material or the packaging material provided for storage and transport. To lift the equipment, grip it by the body with both hands.Scope of delivery4 Scope of delivery■“Air Dome 600 - Hanging Kit” suspension systemEquipment description5 Equipment description215439101Feet with loops for ground anchors 7PowerCON outlet (AC )2Velcro fastener for rain cover8Fan opening - important: keep clear 3Air pressure sensor opening - important: keep clear9M10 screws for installed equipment4DMX OUT : DMX output (3-pin/5-pin)10Camlocks for installed equipment 5DMX IN : DMX input (3-pin/5-pin)11Safety anchor for installed equipment6Safety socket (AC )1105261Feet with loops for ground anchors 6Opening for air pressure sensor - important:keep clear 2Control panel7Label3Safety anchor for suspension system 8Camlocks for installed equipment 4M10 screws for suspension system 9M10 screws for installed equipment5Dust filter10Openings for suspension system camlocksAssembly and connection6 Assembly and connection6.1 Mount lighting systemRequirement ■The lighting system is compatible with the equipment. (see chapter 9)1.Unfasten nut from M10 screw.Use a 17 mm wrench to do this, and an Allen to fix the screw in place.2.Remove M10 screw from the base unit.3.Position camlocks so that they sit in the recess.4.Set the lighting system on the base unit as follows:■Thread for M10 screw is positioned in the center■Openings for the camlocks are above the camlocks on the base unit■Inlet for the PowerCON connection is located on the side of the base unit PowerCON outlet5.To mount the lighting system on the base unit, push the camlocks against the base unit from beneathand tighten.6.Set M10 screw into the thread from beneath and tighten.e a safety cord to connect the lighting system and base unit at the loops designated for this.✓The lighting system is mounted on the base unit and can be connected.6.2 Connect lighting systemRequirement(s)■The lighting system is mounted on the base unit. (see chapter 6.1)■Compatible DMX cables for the lighting system are present.1.Connect lighting system to the base unit.■Connection with PowerCON cable: Insert plug into the safety socket.■Connection with PowerCON adapter: Insert connector at the AC outlet.2.To establish signal link, connect lighting system and base unit with DMX cable. Insert DMX cables inDMX OUT and DMX IN to do this.You can choose between a 5-pin (standardized) and 3-pin DMX connection depending on the lighting system.Assembly and connection✓The lighting system is connected to the base unit.6.3 Attach rain coverRequirement ■The lighting system is mounted. (see chapter 6.1)■The lighting system is connected to the base unit. (see chapter 6.2)1.Pull the rain cover over the lighting system as follows:■The slot-shaped opening for the rain cover is located near the base unit’s connections.This makes it easier to access the connections later on.■The rain cover’s overlapping part covers the control panel.2.Attach rain cover to the outer edge of the base unit using the Velcro fastener.3.Close the rain cover’s slot-shaped opening with the Velcro fastener.✓You can now mount the device in your desired location and operate it.6.4 Set up equipmentThe equipment can be operated in a standing or suspended position. A suspension system is required foroperation in a suspended position.Requirement(s)■The lighting system is mounted. (see chapter 6.1)■The lighting system is connected. (see chapter 6.2)■The setup location has sufficient load-bearing capacity.1.Set up base unit at desired location.2.Optional: fasten equipment to the ground with ground anchors.✓The equipment is set up and can be connected.Assembly and connection6.5 Connect base unitControl panel1Light Source Switch : ON/OFF switch for lighting system5ON/OFF service mode : Air pressure sensor display2Fan Adjust : Fan controller (4 levels)6Air pressure sensor switch 3DMX IN : DMX input (3-pin/5-pin)7MAINS IN : PowerCON inlet4DMX OUT : DMX output (3-pin/5-pin)Connect equipmentRequirements ■The lighting system is mounted on the base unit. (see chapter 6.1)■The lighting system is connected. (see chapter 6.2)1.To establish signal link, connect base unit and other devices or control with DMX cables. Insert DMXcables in DMX IN and DMX OUT to do this.You can choose between a 5-pin (standardized) and 3-pin DMX connection depending on the lighting system.2.Insert PowerCON cable in the PowerCON inlet MAINS IN on the device.3.Insert PowerCON cable plug into the socket.✓The device is now connected and can be operated.Operation7 Operation7.1 Turn on equipmentRequirements ■The equipment is fully mounted and connected.■Fan opening and air pressure sensor are not covered by other objects.1.To turn on the fan, set the Fan Adjust fan controller to one of the fan levels 1-4.The rain cover will fill with air.2.To keep the air pressure in the closed cover at a constant level, use the switch to turn on the airpressure sensor.The display ON/OFF Service Mode is blinking.3.To establish power supply to the lighting system, turn on the Light Source Switch .✓The equipment and the installed lighting system are in operation.7.2 Turn off equipment1.Turn off the lighting system with the Light source switch .2.Wait a few minutes until the lighting system has cooled off.3.Turn off air pressure sensor.The display ON/OFF service mode is no longer blinking.4.To turn off the fan, turn the Adjust fan fan controller to 0.✓The equipment is switched off.Cleaning and maintenance8 Cleaning and maintenanceThe Air Dome is a low-maintenance device. However, the surfaces will need to be cleaned at regular intervals depending on the operating environment.1.Clean surfaces with a soft, dry, and clean cloth.2.Vacuum or sweep away dust buildup on the openings for fan and air pressure sensor.3.Check the dust filter at regular intervals and replace it if necessary.✓Cleaning is finished.Technical Specs9 Technical SpecsRecycling/disposal/environmental protection10 Recycling/disposal/environmental protectionRecyclingDispose of packaging material in an environmentally responsible way according to local dis-posal regulations in effect.Dispose of remaining operating materials according to local or company disposal regulations.After decommissioning and dismounting the system or individual components, these must bedisposed of in coordination with the manufacturer according to local regulations in effect.Do not throw batteries away with household garbage. Deliver batteries to the collection points provided for such.Disposal of electronic devicesThis device is marked according to the European Directive 2012/19/EU regarding waste elec-trical and electronic equipment.Electrical and electronic devices may not be disposed of with household garbage. Their compo-nents must be recycled and disposed of separately.Return a device at the end of its service life to the manufacturer, the place it was purchased, or a public collection point equipped for such, free of charge.Contact11 ContactManufacturerGLP German Light Products, Inc. 1145 Arroyo Ave., Unit ASan Fernando, CA 91340 SupportContactContactContactGLP German Light Products, Inc.1145 Arroyo Ave., Unit ASan Fernando, CA 91340Phone: +1 818 767 8899 E-mail:******************************* Website: 。
TEACHING GUIDETeaching of the Laser Sensor Series LASFor further information please see the data sheet at /products/laser-sensors/that the distance between sensor and target should be as small as possible. MR stands for the taught measurement S-TM-101618.52123.52605101520MR <4 mm MR 6 mmMR 8 mmMR 10 mm± L i n e a r i t y (μm )Measurement range (mm)1618,52123.526012345678MR <4 mmMR 6 mm MR 8 mm MR 10 mm R e s o l u t i o n (μm )Measurement range (mm)LAS-TM-10416426894120050100150200250300350400MR 2 mm MR 50 mm MR 104 mm± L i n e a r i t y (μm )Measurement range (mm)16426894120020406080100120140160MR 2 mm MR 25 mm MR 50 mm MR 75 mm MR 104 mmR e s o l u t i o n (μm )Measurement range (mm)LAS-TM-3005012520027535000.511.52MR <25 mm MR 150 mmMR 300 mm± L i n e a r i t y (m m )Measurement range (mm)5012520027535000.10.20.30.40.50.6MR <25 mm MR 75 mm MR 150 mm MR 225 mm MR 300 mmR e s o l u t i o n (m m )Measurement range (mm)LAS-TM-5005015025035045055000,511,522,533,54MR 10 mm MR 250 mmMR 500 mm± L i n e a r i t y (m m )Measurement range (mm)5015025035045055000.20.40.60.811.21.4MR 10 mm MR 250 mm MR 500 mmR e s o l u t i o n (m m )Measurement range (mm)that the distance between sensor and target should be as small as possible. MR stands for the taught measurement S-T5-403040506070010203040506070MR 2 mm MR 20 mmMR 40 mm± L i n e a r i t y (μm )Measurement range (mm)30405060700510********MR 2 mm MR 10 mm MR 20 mm MR 30 mm MR 40 mmR e s o l u t i o n (μm )Measurement range (mm)LAS-T5-100305580105130050100150200250MR 3 mm MR 50 mmMR 100 mm± L i n e a r i t y (μm )Measurement range (mm)30558010513001020304050607080MR 3 mm MR 25 mm MR 50 mm MR 75 mm MR 100 mmR e s o l u t i o n (μm )Measurement range (mm)LAS-T5-25050112.5175237.530000.20.40.60.811.2MR 5 mm MR 100 mm MR 250 mm± L i n e a r i t y (m m )Measurement range (mm)50112.5175237.530000.050.10.150.20.250.30.350.40.45MR 5 mm MR 50 mm MR 100 mm MR 175 mm MR 250 mmR e s o l u t i o n (m m )Measurement range (mm)LAS-T5-50010022535047560000.511.522.5MR 10 mm MR 250 mm MR 500 mm± L i n e a r i t y (m m )Measurement range (mm)10022535047560000.10.20.30.40.50.60.70.80.9MR 10 mm MR 100 mm MR 250 mm MR 375 mm MR 500 mmR e s o l u t i o n (m m )Measurement range (mm)LAS-T-800200400600800100000.20.40.60.811.21.41.61.822.2MR 16 mm MR 200 mmMR 400 mm MR 600 mm MR 800 mm ± L i n e a r i t y (m m )Measurement range (mm)200400600800100000.10.20.30.40.50.6MR 16 mm MR 200 mm MR 400 mm MR 600 mm MR 800 mmR e s o l u t i o n (m m )Measurement range (mm)When teaching the measurement range, it is recommended to always select the smallest possible range, because this way the resolution is increased and the linearity error decreased. Also keep in mind that the distance between sensor and target should be as small as possible. MR stands for the taught measurement range.LAS-TB-1050556030323436384042444648± L i n e a r i t y (µm )Measurement range (mm)50556010111213141516R e s o l u t i o n (µm )Measurement range (mm)LAS-TB-4060708090100405060708090100110120130MR 30 mm MR 40 mm± L i n e a r i t y (µm )Measurement range (mm)6070809010010152025303540MR 30 mm MR 40 mmR e s o l u t i o n (μm )Measurement range (mm)LAS-TB-1001001251501752000.10.150.20.250.30.350.40.450.5MR 75 mm MR 100 mm± L i n e a r i t y (m m )Measurement range (mm)1001251501752000.020.040.060.080.100.120.140.16MR 75 mm MR 100 mmR e s o l u t i o n (m m )Measurement range (mm)TEACHING BY TEACH LINELEGEND。
电脑主机音频视频接口延长控制器 ------------使用手册北京海视科技有限公司声 明本手册依据现有信息制作,其内容如有更改,恕不另行通知。
北京海视科技有限公司在编写该手册的时候已尽最大努力保证其内容准确可靠,本手册仅作为使用指导,本手册中的所有陈述、信息和建议不构成任何明示或暗示的担保。
北京海视科技有限公司地址:北京市海淀区复兴路40号铁建大院3号楼客户服务邮箱:E-Mail:****************感谢您购买了本公司的产品,始终以质量和服务拓展市场,以忠诚守信和客户合作,您的满意就是我们公司的成功。
为了方便,正确地使用本产品,在使用前请仔细阅读说明书。
产品介绍本产品由发送器(标有VGA Extender Sender字样)和接收器(标有VGA Extender Receiver字样)组成,能通过单根网线把计算机主机的音频和视频接口延长最远达600米,用户可以在600米的远端实时接收到电脑主机的图像和声音。
同时在电脑主机的近端,也提供了一个VGA接口,用户也可以在近端使用计算机。
防雷功能:本产品已集成防雷抗干扰电路,可有效防御雷电侵袭。
本产品可以广泛应用于计算机领域和监控领域,大屏幕广告,教育,银行证劵系统等产品规格尺寸110mm(长)X 70mm(宽)X 25mm(高)重量 1.0Kg延长距离VGA-100 1 -100MVGA -200 100 -200MVGA -300 200 -300M网线规格CAT5,CAT5E,CAT6 UTP电缆,一般建议用CAT5E UTP电缆视频规格VGA, SVGA, XGA, SXGA, UXGA, LCD视频标准0.7Vpp音频规格R CA接口类型HDB15, RJ45系统支持与电脑操作系统无关发送器电源AC7.5V 1A接受器电源AC7.5V 1A防雷电指标接触放电8KV,空气放电15KV包装说明在您打开产品包装后,应该清点物品,如有遗失请与经销商联系,物品清单如下:1,发送器一个(标有VGA Extender Sender字样)2,接收器一个(标有VGA Extender Receiver字样)3,AC7.5V 1A电源适配器二个4,使用说明书一本5,质量保修卡一个,附在使用说明书上安装调试安装示意图安装步骤在安装调试前请准备好电脑主机,VGA显示器和所需长度的网线,网线应该压好RJ45头,网线两边的水晶头压线的排列方法一样,第一脚为橙白,压线的顺序为:橙白,橙,绿白,蓝,蓝白,绿,棕白,棕。
分切机操作说明书(总44页) -CAL-FENGHAI.-(YICAI)-Company One1-CAL-本页仅作为文档封面,使用请直接删除A-2700高速数字分切机说明书杭州大华工控技术有限公司2011年07月目录一、前言 (3)二、技术参数 (4)技术参数 (4)分切机总体规格 (4)放卷部份 (6)对边系统 (7)主机部份 (7)收卷部份 (8)机器的操作位置 (8)机器的使用范围与约定用途 (9)三、安全措施 (10)安全措施及危险标志 (10)其它标志 (11)事故预防 (11)危险点 (12)四、搬运及安装 (13)安装位置及搬运说明 (13)安装说明 (13)机器在安装前的贮存 (13)安装步骤 (13)五、操作盘及主要部件说明 (14)放卷控制箱 (14)主控制盘 (15)侧/L侧控制盘 (18)其他操作盘 (19)分切装置 (19)压辊 (19)收卷臂 (19)展平辊 (20)废边处理装置 (20)六、触摸屏操作........................................ 错误!未定义书签。
开机画面 ......................................... 错误!未定义书签。
主操作画面 ....................................... 错误!未定义书签。
参数设定 ......................................... 错误!未定义书签。
内侧工位电机选择.................................. 错误!未定义书签。
收卷工艺.......................................... 错误!未定义书签。
放卷工艺 ......................................... 错误!未定义书签。
配方选择 ......................................... 错误!未定义书签。
PROFESSIONAL LAUNDRYCMIS 5Certus Management Information System TMFeatures and benefits• CMIS is a software which provides laundry professionals with vital information about their washer extractors,tumble dryers and ironers. All in order to minimize costs and maximize uptime of the equipment• CMIS provides the following process information:- statistics (running hours, idle time, consumption figures*, machine usage, total consumption etc.)- process validation (print of receipt)- maintenance intervals (actions are logged)- error alerts (recommend actions)- weight of wash load**• Up to 30 machines can be installed in a network connected to a PC• All the data provided by CMIS is easily transferable to other computer programs such as Microsoft Excel• CMIS is easy to install and use. Most average-sized laundries can be fully equipped in less than one day• For latest software version please check /professionalPC requirements• A computer according to specification on page 3 should be provided by the customer at site of installation• The computer must be in operation the same time as the laundry to collect data from the laundry processCertified in accordance with ISO 9001 and ISO 14001 and approved IP 24D.* Consumption is measured in time and calculated to litres, ml or kWh by using a factory made constanttable. This table is possible to calibrate locally for best precision.** Weight of wash load only available on Clarus Control and Compass Pro Barrier washers with IWS,and Compass Pro washers with AWS (firmware version 8.14 and above).Available accessoriesDescription Quantity Product No Description/contentPC-software, kit English 1 per site988916189Software (CD), CMIS Interface PC, transformer24V DC, serial wire, manualsPC-software, kit Swedish 1 per site988916192Software (CD), CMIS interface PC, transformer24V DC, serial wire, manualsPC-software, kit German 1 per site988916193Software (CD), CMIS interface PC, transformer24V DC, serial wire, manualsPC-software, kit French 1 per site988916194Software (CD), CMIS interface PC, transformer24V DC, serial wire, manualsPC-software, kit Japanese 1 per site988916250Software (CD), CMIS interface PC, transformer24V DC, serial wire, manualsPC-software, kit Spanish 1 per site988916254Software (CD), CMIS interface PC, transformer24V DC, serial wire, manualsSoftware upgrade kit 1 per site988802254Software (CD), operating manualMachine interface, kit No. 11 per machine988916190Machine interface, wires, installation manual.For all washers with Clarus Control exceptW3400H/W4400H to W31100H/W41100H.Machine interface, kit No. 21 per machine988916191Machine interface, wires, installation ma-nual. For washers W3400H and W4400H/W4600H (– 980/1571), W3850H/W31100H andW4850H/W41100H (– 1220/730), with CPU inFront electric cabinet.Machine interface, kit No. 31 per machine988916198Com-module, installation manual. For dryerswith Selecta Control version 1.Machine interface, kit No. 41 per machine988916199Machine interface, wires, connectors, installa-tion manual. For ironers with electronic controlpanel.Machine interface, kit No. 51 per machine988916251Wires, connectors, installation manual. Fordryers T4130 and T4190.Machine interface, kit No. 61 per machine988916252Wires, connectors, installation manual. Fordryer T4300S.Machine interface, kit No. 71 per machine988916253Wires, connectors, installation manual. For alldryers with Selecta Control version 2/Com-pass Control, except T4130, T4190, T4300.Machine interface, kit No. 81 per machine988919402Machine interface, wires, installation manual.For washers and dryers with Compass Pro.Machine interface, kit No. 91 per machine988916249Machine interface, wires, installation manual.For washers W4400H, W4600H (980/1572 – )and W4850H, W41100H (1220/731 –), with CPUin rear electric cabinet.Machine interface, kit No. 101 per machine988916257Machine interface, wires, installation manual.For barrier washers with Clarus TS.(WP/WPB4700H-WP/WPB41100H,WH/WHB5500H)Network wire acc. to site988916195Reel with 100 m, 4 x 0,22 mm2 or 4 x AWG24cableWashers with Clarus ControlWashers with Compass ProDryers with Selecta Control version 1 or 2Dryers with Compass ProIroners with Electronic control panelBarrier Washers with Clarus TSShare more of our thinking at A r t. N o . 438919493E N /2017.07.05W e r e s e r v e t h e r i g h t t o a l t e r s p e c i fi c a t i o n s w i t h o u t n o t i c e ./professional。