COOLMAY EX2N-70H系列触摸屏PLC一体机用户手册
- 格式:pdf
- 大小:712.93 KB
- 文档页数:24
Please read this manual before useThank you for purchasing our high-end commercial touch interactive flat panel. The product have passed the rigorous testing before delivery, but incorrect usage may cause electric shock and fire. In order to ensure safety and extending the life of this product and providing the best performance of the machine, please read the following rules before using this product and observe the following safety instructions.In the event of any of the following conditions, unplug the machine from the outlet and ask qualified maintenance personnel for service:b. T he machine fell or the case is damaged.c. T here is obvious abnormality. You operateaccording to instructions, but the machinestill does not work.d.Foreign body or liquid enters the machine.e.There are unusual sounds or gas emitted.The machine has high pressure and itsinternal does not contain user-serviceableparts. In order to prevent the occurrence ofdanger, please do not open the case. If youneed maintenance, please ask qualifiedKeep the product in a well-ventilated area.Do not place the product in an too heated,cold and humid environment. Do not placeit under direct sunlight.a. T he power wire or power plug is damagedor worn out.Important safety instructions* The holes in the case are designed forventilation and cooling to ensure long-term reliable operation of the componentsinside the machine and prevent overheating.When placing the machine, it’s important topay attention to prevent plugging holes.* Do not place the product in embedded deviceunless there is a good ventilation device.* Do not place the unit on an unstable level. Prevent falling or damage.* Do not use the product where is closing water or wet basements andother similar environments.* Remember to unplug the power wire whencleaning. Please use a slightly damp soft clothgently wipe the machine lightly instead of liquidor spray cleaner and alcohol, solvents orammonia-containing liquid* Before using this machine, please read and understand all the instructions and indications and keep the user manual for future usage.* Do not use the parts which are not recommended by the manufacturer to avoid danger.* Power wire should be properly placed to avoid being trampled and objects squeezed.* Do not overload the power outlet or extend the length of power wire toavoid fire and electric shock.* All specifications in this manual and the packaging are subject to change without notice. If there is a slight difference between the manual and the actual operation, please take the actual operation as the standard.*When the power plug or appliance coupler is used as a disconnect device, the disconnect device should be easy to operate.* The machine should not suffer water dropletsor splashes. Do not place containers containingwater (or other liquids, etc.) on the product,because it may result in fire or electric shock.* The power plug should be fully inserted intothe power outlet. If it is loose may cause sparksand fire.* Do not place flammable and explosive materials near the product.* Please do not put any sharp objects, metal or liquid into or touch the signal connector or heat dissipation hole to avoid short circuit, damage product and electric shock.* Do not use the product immediately after moving it from a low temperature place to high temperature or facing the air conditioner. These may causecondensation inside the machine and malfunction.* Move the product carefully to avoid hit. It’s important to protect the screen section. In addition, if use trolley, it’s necessary to beware of the damage caused by the sudden braking, excessive force, and uneven ground.4Remote control ......................................................................145Processing methods for simple problems ..................................................16Catalogue3.10Fold .....................................................................143.8Sound .. (13)3.7Screen locked (13)3.6Whiteboard......................................................................123.5Preview source.............................................................123.4Menu (12)3.3 Recently application........................................................123.2Home (12)3.1Back (12)3Shortcut menu (11)2.6Upgrade ..................................................................112.5Restore (10)2.4Advanced (9)2.3Lock setting...............................................................82.2Backlight setting............................................................72.1Network (6)2Settings (6)1.2.8Apps (5)1.2.7Settings (4)1.2.6Browser (4)1.2.5Multi-screen (4)1.2.4Whiteboard (4)1.2.3Source (4)1.2.2File manager (3)1.2.1 Signal preview......................................................31.2Main functions.............................................................21.1.3Date-time . (2)1.1.2U disk access status................................................21.1.1Network status .. (2)1.1Status bar.................................................................11Home page . (1)6Product Specification .................................................................177Attachment List .. (23)3.9Backlight (13)1Home pageThe default page is Android home when the machine is powered on firstly. Android home is composed of status bar and function sectors.1.1Status barThe status bar, which is only displayed in home page and setting page, is composed of four parts as followed (from left to right): temperature, network Connection, USB Disk, Date-time. It’s just an information presentation area and cannot be operated.1.1.1Network status1.2Main functions1.1.3Date-Time1.1.2USB access statusIt is used to display the connection state of a wireless network or wired network. When the wired network icon is displayed , the wire network connection issuccessful , and the user can use the wired network operation. When the wireless network icon is displayed, the wireless network connection is successful, and the user can use the wireless network operation. When a network fails to connect, there is no network, and the user is not able to connect to the network.It is used to display the access status of an external USB disk. When the USB icon is displayed, there is a USB disk inserted and the USB flash window pop up. If there is no USB disk inserted, the USB disk icon wouldn’t be displayed.It is used to display the current date and time.There are 8 main function sectors: “signal preview”, “Source”, “File Manager” ,“White Board”, “ Multi-screen” “Browser”, “Settings”, and “APPS”. Select the function box to perform the function.1.2.1Signal preview1.2.2File ManagerThe preview window would display a corresponding thumbnail. Click “signal preview” to enter into the signal source.Click to enter the File Manager1.2.7Settings1.2.6Browser1.2.5Multi-screen 1.2.4White board1.2.3SourceClick to switch preview window signal source.Click the whiteboard to enter the whiteboard software application, which can be used for handwriting, drawing, and opening documents.Click to enter multi-screen applicationClick to open the browser, it can used to surf the Internet and search information.Click to enter settings application.1.2.8Apps²Select “APPS” to enter into the application section, which is used to display the installed applications. You can manage or open the apps.²Long press the app to uninstall the app or delete the data.2Settings²There are six kinds of settings,which includes “network”, “backlight”, “lock setting”, “advanced”, “upgrade” and “restore”.2.1NetworkSelect “Network” to connect the machine with wireless network or wired network in the network connection pop-up window.2.2BacklightSelect “Backlight ” to set the mode and brightness of backlight in the pop-up window.[Backlight model]There are 4 modes : “Standard”, “Custom”, “Auto”, “Energy Saver”. In the “Custom” mode,[Backlight brightness]You can set the volume and brightness of the system manually when in custom mode.2.3Lock SettingsSelect “Lock Settings” to set the “Lock Style”, “Unlock password” and “Automatic locking”.[Lock Style]²It contains 2 styles: “No”, “picture style”. Touch the icon ◄► to change the style.²The default style is “No”. The system is in sleep mode and you can rap the screen to wake the screen.²If it is set in “picture style”, the screen would play the carousel images when it is locked. The system is in sleep mode and you can rap the screen to wake the screen. [Unlock password]²Setting automatic lock screen will automatically enter the lock screen in the corresponding time.²The default six automatic locking time: no, ten minutes, 15 minutes, 30 minutes, 45 minutes, the custom time.Select “user defined” to set another period of time.The screen would be locked as settings.2.4AdvancedSelect “Advanced” to open the advanced settings pop-up window, including“Language”, “Input Method”, “Boot Channel”, “Source”“Boot OPS”,“Menu Hidden”,“System Time ”, “Wallpaper” .[Language]The default language is simplified Chinese. Touch the icon ◄►switch the language. [Input Method ]Select ◄►to switch the input language.[Boot Channel]²It is used to set the channel when the machine is powered on, including 3 options: “Android”, “Force Input Source”, “Remember Input Source”.Touch the icon ◄► to change the boot channel.²The “Boot Channel” is “Android” by default. The main page would be Android interface for the first time when you power on the machine. The“Source” isunchangeable when the “Boot Channel” is “Android”.²If the “Boot Channel” is “Force Input Source”, it would access the channel what is when you power off the machine last time. The “Source” is unchangeable.² If the “Boot Channel” is “Remember Input Source” , it would access the channel what you set. The “Source” is changeable.2.5RestoreIf you have done some improper operations, select "Restore" to restore the system to the default state.Select to check some information about the machine.2.6UpgradeClick “Upgrade”,it will show a pop-up,you can upgrade in local with Udisk3Shortcut MenuThe shortcut menu would appear if you touch the screen on the bottom and slide up, including 10 sectors: “Back”, “Home”, “APP”, “Menu”, “Source”, “White Board”, “Lock”, “Sound”, “Brightness” and “Fold”. The shortcut menu won’t be foldautomatically unless You need touch the fold icon to fold the menu.3.1Back²Click “Back” to return the last interface.²Clicking the “Back” button is invalid when the display is into computer mode.²Clicking the “Back” button is invalid when the display is into homepage.3.2Home²Click on "home " to enter the android home page.²Clicking the “Back” button is invalid when the interface is into the android homepage.3.3 The Recent AppClicking “the recent App” button to check which apps have been used recently.3.4MenuClicking “Menu” button to respond to the menu on the page, which cannot be u sed in the android interface.3.5SourceClicking “Source” button to pop-up signal source select popover.3.6WhiteboardClicking the “Whiteboard button”get into the usage of whiteboard software.3.7Screen Locked²Clicking the “Screen Locked” button, the screen will be locked.²Double-click the screen to unlock.If the lock password is set, you need to enter the correct number when unlocking .The password can be unlocked.3.8sound²Clicking the“sound”button to pop up the setting window of sound.²Slide and adjust the volume²Click on the left "sound" icon to switch to mute state3.9背光点击“背光”可调节屏幕亮暗操作Pack up3.10Clicking the “pack up” button to pack up the shortcut menu.4、Remotecontrol1Power supply: pressing this button to stand by under the boot case; pressing this button to start in standby case.2Mute switch: pressing the key once, the horn has no sound, and click again to sound on. 3Digital input key: selecting 0-9 of TV channels.4Channel back view key: it can show the TV channel that was watched before.5Channel DASH key: a TV channel with multiple digits selected by digital 0-9.6One button screen off: adjusting the screen brightness.7The ESC key of OPS.8Confirmation key: selecting confirm current status.9Direction select key: under the menu state, you can select up and down.10Return key.11Opening writing software12Volume add and subtract key13Channel add and subtract key14Page up key15Page down key16Function key of OPS17Signal source: channel selection key, switching signal source channel to select different signal sources according to the demand.18Menu key: displaying the main menu interface / returns to the upper level menu19Home key: return to Android home page.20Auto correction key (valid under VGA channel).21Reserved function key.22Function key of OPS.5、Processing methods for some simple problems.Symptom Possible factors SolutionThe LCD whiteboard displays with snowflake spots, accompanied by noise .1.Antenna connector looses and the cable damages.2.The antenna type is not appropriate.3. Antenna orientation or position is not correct .4.Weak signal.1.Check whether the antenna plug is loose and thecable is in good condition.2.Check antenna type (vhf/uhf).3.Adjust the direction and position of antenna.4.Try to use a signal enhancer.The screen has no display or sound ;the light does not shine.The power plug is loose and the power is notconnected.Check whether the power line is connected.The screen has no display or sound ;the light does not shine.The power plug is loose and the power is not connected. Check whether the power line is The signals are disturbed, such as cars, neon lights,hair dryers, etc.Do not use the hair dryer beside the machine andadjust the antenna direction to reduce theinterference.The LCD whiteboard gets ghosting.The signals are disturbed, such as cars, neon lights,hair dryers, etc.The signals are disturbed, such as cars, neon lights,hair dryers, etc.e high directional antenna2.Adjust antenna orientationDisplaying without color Too low color saturation adjustment.Enter the "image" setting to add color saturation.The LCD whiteboard displays without sound.1.Low volume.2.The sound is muted.1.Adjust the volume to the right volume.2.Press the mute button of the remote control tosound on.The computer has no display, indicating no signal input or red indicator flashing.Signal line looses or falls off.Check whether the signal connection line looses,falls off and reconnects.The computer displays with image offset、Incomplete screen、 overclocking and blurry image.1.Improper regulation2.Display mode is not correct.e the automatic adjustment function.2.Enter the "PC picture adjustment" to adjust thehorizontal or vertical position.e recommendation model .Remote control distance is short and out of control.1.Remote control receiving window is blocked withobjects2.The remote controller has low battery capacity.1.Moving objects to avoid blocking the remotecontrol receiving window.2.Replace battery.The browser cannot access the link.1.Wrong network parameter configuration2.Incorrect network connection.work service does not open.1.Ask the network administrator to get the availablenetwork IP address and other parameters.2.Check whether the network connection is normal3.Consult the network service providerOnline Play is not smooth. 1.Low bandwidth network.2.Buffering films or downloading other content atthe same time.1.Please upgrade your network bandwidth to higher bandwidth.2.Please try to change other VOD addresses to getUnsmooth images system halted failing to operate the machine.1.Too many programs running.2.The external environment (such as lightning,static) interferes with the normal work of themachine.1.Switch off the power supply and wait for 1 to 2minutes until reconnecting the power again, andthen switch on.6.Product Specification55"65"70"75"86"98"ParametersUSB ResolutionsBrightness Contrast Ratio Viewing Angle Configration LAN I/O PortDp Input Port OPTICAL Output PortHDMI Input Port VGA Input Port PC-AUDIO Input Port YPBPR Input Port Av I/O PortEARPHONE Output Port MEDIA USB(OPS extension)TOUCH-USB(OPS extension)TOUCH-USBRS232PC USB(OPS extension)HDMI 3(OPS extension)Bare dinmensions(mm)Packing dinmensions(mm)Gross weightInfraed touch-panel PanelAndroid SystemBack I/O PortFront InterfacesStructureTouch Style 3840 x 2160pixels1920x1080pixels1920 x 1080pixels3840 x 2160pixels3840 x 2160pixels3840 x 2160pixels300cd/m²(typ.)350cd/m²(typ.)400cd/m²(typ.)500cd/m²(typ.)260cd/m²(typ.)350cd/m²(typ.)1000:1(typ.)1100:1(typ.)5000:1(typ.)1120:1(typ.)1200:1(typ.)1300:1(typ.)178°(H) x 178°(V)178°(H) x 178°(V)178°(H) x 178°(V)178°(H) x 178°(V)178°(H) x 178°(V)178°(H) x 178°(V)IN x 1/ OUT x 11211MINI x 1MINI x 1/MINI x 11111111USB2.0 x 1/USB3.0 x 11276.5x780.2x93√1638x998.6x1121522.3x931.3x87.61764x1050.5x99.22245.8x1334.8x1181470 x 240 x 100049±1kg1660 x 280 x 109063±1kg1820 x 300 x 119072±1kg1950 x 290 x 127082±1kg2517 x 500 x 1670181±1kg√√√√√USB BF102.5±1kg1989x1194.2x972190 x 330 x 1400CPU:64 bit A53 / Fequency : 1.2GHZ / Cores : Quad core / DDR3 : 1GB eMMC:8GB / System Version:4.4.27.Attachment ListnameRemote ControlBatteryW ifi LineWhiteboard penOperation manualWarranty cardCertificate of qualification Num 1 1 12 1 1 1Power cord1 Wall mount bracket1。
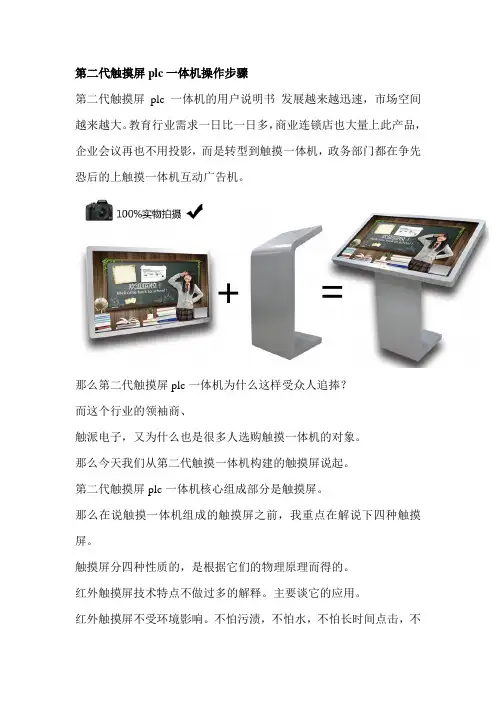
第二代触摸屏plc一体机操作步骤第二代触摸屏plc一体机的用户说明书发展越来越迅速,市场空间越来越大。
教育行业需求一日比一日多,商业连锁店也大量上此产品,企业会议再也不用投影,而是转型到触摸一体机,政务部门都在争先恐后的上触摸一体机互动广告机。
那么第二代触摸屏plc一体机为什么这样受众人追捧?而这个行业的领袖商、触派电子,又为什么也是很多人选购触摸一体机的对象。
那么今天我们从第二代触摸一体机构建的触摸屏说起。
第二代触摸屏plc一体机核心组成部分是触摸屏。
那么在说触摸一体机组成的触摸屏之前,我重点在解说下四种触摸屏。
触摸屏分四种性质的,是根据它们的物理原理而得的。
红外触摸屏技术特点不做过多的解释。
主要谈它的应用。
红外触摸屏不受环境影响。
不怕污渍,不怕水,不怕长时间点击,不怕风。
而且4四种触摸屏种,只要红外触摸屏才能做大尺寸的。
什么叫大尺寸,这里我定义为32寸以上的。
只有红外触摸屏才能做32寸以上的,现在市面上红外触摸屏能做到200寸甚至以上。
而且它还有一个特点,然后物体都可以触摸,他是靠红外灯光发色红外线技术产生触摸的。
只要是物体在上面触摸,就是将亮变暗。
只要里面灯管不坏,就一直能精准触摸。
寿命至少在6000万次点击。
品牌行业领袖用红外触摸屏行业最顶级的技术厂家。
(触派)可以精准定位触摸,不受环境影响。
可以做到4点,6点,8点,32点等等以上。
这里还普及下多点。
特别提醒多点是在win7 系统,软件商自行开发的软件下,才能看出多点效果。
如果在系统下面其实只是替代一个鼠标作用。
最多在画图软件下,才能看出多少点。
如果说8点,就8个手指同时画。
看线画的流畅不流畅,有没有跳动。
如果画线流畅,不跳动,那么这个触摸屏就2014年中考冲刺综合复习指导北京地区试题广东地区试题江苏地区试题很好。
电容触摸屏直接被大尺寸触摸一体机淘汰掉?为什么行业领导品牌触派电子不采用电容屏?因为电容屏,它的原理是根据电流强弱原理进行触摸的。


OMRONPLCEView触摸屏编程使用说明书DMP-300F型中小型水电站触摸式机组自动化屏(OMRON PLC +EView 触摸屏)编程使用说明书文件编号:HN/QF.13-0002-004版本号: A发放编号:持册人:长沙华能自控集团目录1.OMRON CJ1M系列PLC介绍 (2)1.1.CPU单元(使用CJ1M-CPU13) (2)1.2.通信单元(使用CJ1W-SCU41) (8)1.3.I/O单元 (8)1.4.模块安装及地址分配 (8)2.OMRON PLC常用编程指令 (9)2.1. 梯形图指令 (9)2.2. 位元(B IT)操纵指令 (9)2.3. 终止指令(END) (10)2.4. 定时器和计数器指令 (10)2.5. 数据移位元元元指令 (10)2.6. 数据传送指令 (11)2.7. 数据比较指令 (12)2.8. 数据转换指令 (13)2.9. BCD码运算指令 (14)2.10. 二进制元运算指令 (16)2.11. 逻辑指令 (17)2.12. 子程序和中断操纵指令 (18)2.13. 串行通信指令(PMCR) (19)3.OMRON PLC程序编辑软件 (19)3.1. CX-P ROGRAMMER中对PLC的初始化设置 (19)3.2. PLC设定 (20)3.3. CX-P ROGRAMMER中对PLC的联机操作 (20)3.4. 程序中各个子程序的用途定义 (21)4.OMRON PLC通信程序编辑软件 (21)4.1. 与PLC通信单元箱地址设定 (22)4.2. 4-2PLC协议编制软件(CX-P ROTOCOL)通信口设定 (22)4.3. PLC协议编制软件使用简单说明 (22)4.4. PLC与单元箱通信协议注意事项: (23)5.EASYVIEW触摸屏程序编辑软件 (23)5.1. 与OMRON PLC连接参数设定 (23)5.2. 一样参数设定(通过“编辑――系统参数的一样页进行设定) (23)5.3. 组件功能说明 (24)5.4. 触摸屏程序的下载 (27)5.5. 触摸屏程序调试 (27)6.水机屏PLC程序资料寄存器分配 (28)6.1. PLC内部时钟存放区(D0~D6) (28)6.2. PLC事故资料中转区(D10~D19) (28)6.3. 发生的水机操作、故障、事故报警个数存放区(D20): (28)6.4. 水机状态(遥信量)存放区(D21~D30): (28)6.5. PLC事故存放区:(D4000~D5999)共存放200条事故资料 (29)6.6. PLC与单元箱通信辅助中间寄存器: (29)6.7. PLC与单元通信中断判定辅助寄存器: (29)6.8. PLC与HMI(触摸屏)间固定使用寄存器: (29)6.9. 触摸屏及后台操作定义(无专门要求) (31)7.触摸屏模拟量显示设定 (31)8.OMRON PLC通信协议 (33)8.1. PLC使用 (33)8.2. 对时使用 (34)8.3. 单元箱使用 (34)8.4. PLC通信协议接线图 (37)1.OMRON CJ1M系列PLC介绍当前水机自动化屏大多使用OMRON CJ1M系列PLC,这种PLC为模块式,而且没有底板。
感谢您购买 C oolmay QM3G 系列一体机。
本手册主要说明该系列触摸屏PLC一体机的产品特性、一般规格和接线方法。
详细PLC编程请参见《Coolmay QM3G 系列一体机编程手册》;触摸屏部分参见《Coolmay TP 系列人机界面使用手册》。
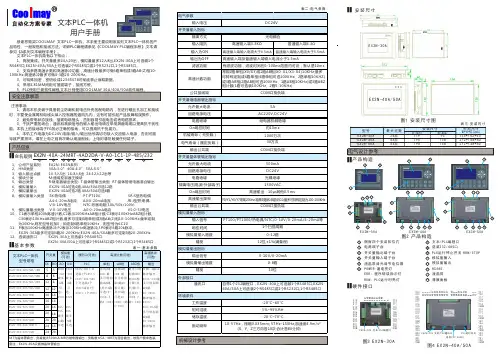
产品信息1公司产品系列 : 系列2HMI类型 43: 4.3寸 50: 5寸 70/70H D /70K : 7寸 100: 10寸3输入输出点数 16: 8入8出 24: 12入12出 38: 20入18出 44: 24入20出 60: 30入30出等4模块分类 M: 通用控制器主模块5开关量输出类型 R: 继电器输出类型; T: 晶体管(MOS 管)输出类型; RT: 混合输出6模拟量输入点数 43/50可选4路,70/HD 可选12路,70K /100可选16路 7模拟量输出点数 43/50可选2路,70/70HD /70K /100可选8路8模拟量输入类型 E : E 型热电偶K PT :PT100 PT1000:PT1000 NTC :热敏电阻(10K /50K /100K ) A0: 0-20mA电流 A4: 4-20mA电流 V5: 0-5V电压 V: 0-10V电压 V5_:-5V ~5V 电压 V _:-10~10V 电压【仅7寸和10寸的可选负电压输入】 9模拟量输出类型 A0: 0-20mA 电流 A4: 4-20mA 电流 V5: 0-5V 电压 V : 0-10V 电压 V5_:-5V ~5V 电压 V _:-10~10V 电压【仅7寸和10寸的可选负电压输出,且占用两路DA 】10. C1表示单相高速计数,C2表示AB 相计数,C3表示ABZ 相计数;11P 表示高速脉冲;P表示高速脉冲;12选装通讯口 参见【表一:基本参数】. . . . . . . . . . 常规8路,高速计数+高速脉冲总发不能超过480KHz .QM3G QM3G FH FH FH FH FH FH FH FH FH FH FH FH FH FH FH (可定制型/T 型/S 型/J 型,支持负温) 常规单相6路60KHz 或AB (Z )相2路30KHz +AB 相 1 路5KHz010KHz 100KHz Y0-Y3为100KHz ,Y4-Y7为10KHz ; 命名规则QM3G 43FH 图1 安装尺寸图QM3G -100FHQM3G -43FHQM3G -70KFH电气设计参考产品构造RUN :PLC运行指示灯COM PLC与触摸屏 : 通讯上时快闪QM3G -43FH图3图6 -70KFHQM3G 硬件接口安装尺寸机械设计参考输入为ON 输入为OFF 滤波功能高数计数功能有滤波功能,滤波时间在0-60ms范围内可设,默认是10ms开关量继电器输出指标允许最大电流回路电源电压电路绝缘On响应时间机械寿命(无负载)电气寿命(额定负载)2A /点,4A /4点 COM ,5A /8点 COM ,5A /12点 COMDC 30V以下/AC 220V以下继电器机械绝缘约10ms1000万次30万次开关量晶体管(MOS 管)输出指标允许最大电流回路电源电压电路绝缘隔离电压(电源-外部端子)On响应时间高速输出频率MOS 管: 2A /点, 4A /4点 C OM ,5A /12点C OM :MT :0.5A /点,0.8A /4点 C OM , 1.6A /12点 C OMDC24V 光耦绝缘1500VAC高速输出:10μs;其他:0.5ms 模拟量输入指标输入信号响应时间模拟量输入点数精度PT100/PT1000/热电偶/NTC/0-10V/0-5V /-10~10V /-5~5V /0-20mA/4-20mA/1个扫描周期0-16路12位模拟量输出指标输出信号模拟量输出点数精度0-5V/0-10V/0-20mA/4其他按客户要求定制信号等-10~10V /-5~5V /-20mA/0-8路12位外部接口通讯口环境条件工作温度相对湿度储存温度振动频率0°C~50°C5%~95%RH -20°C~70°C10-57Hz,振幅0.035mm; 57Hz-150Hz,加速度4.9m/s ² (X、Y、Z三方向各10次,合计各80分钟)基本参数触摸屏PLC一体机常见型号规格QM3G -43FH /50-16MR FH QM3G FH FH -70K /100-38M R QM3G FH FH --48M R 70K /100开关量模拟量(最大可选)通讯口(可选)高速计数高速脉冲DI DO AD DA 触摸屏PLC 单相AB相ABZ相输出2018242443FH /50FH:MT 为MOS 管输出;70FH /70HD 70KFH /100FH :MT 时Y0-Y3 为MOS 管输出,Y4-Y35 为晶体管输出;MR 为继电器输出;MRT 为混合输出。
Coolmay PLC、触摸屏及其它模块使用教程下方为教学视频及软件资料链接地址:一、PLC部分1.1、基本参考资料1.1.1、软件:PLC编程软件GX Developer8.52中文版编程软件GX_Works2编程软件GX Developer-8.86Q三菱PLC学习软件FX-TRN-BEG-CUSB转232驱动USB转485驱动1.1.2、文档:(D)CX2N_FX2NC_DX2N(S)系列PLC编程手册V7.41版三菱FX编程手册Coolmay产品选型目录Coolmay系列PLC产品画册顾美产品答疑100问(更新中)三菱-顾美指令对照表PLC抗干扰处理办法1.2、PLC的基本使用1.2.1、顾美PLC特点及优势介绍视频:顾美PLC特点及优势介绍顾美CX2N系列PLC1.2.2、PLC编程软件使用介绍视频:PLC编程软件使用介绍三菱编程软件GX8.52安装讲解1.2.3、PLC硬件结构认识视频:PLC硬件结构认识文档:CX2N(-HM)系列可编程控制器(PLC)用户手册FX2NC系列可编程控制器(PLC)用户手册EX2N系列PLC用户手册2014版DX2N系列PLC用户手册1.2.4、PLC程序下载介绍视频:PLC程序下载介绍1.2.5、PLC输入输出信号接线介绍视频:PLC输入输出信号线接线介绍1.3、PLC的开关量编程1.3.1、PLC内部软元件介绍视频:PLC内部软元件介绍1.3.2、PLC基本编程指令介绍视频:PLC基本编程指令介绍1.3.3、PLC开关量逻辑编程视频:PLC开关量逻辑编程案例:PLC实用案例恒压供水一拖三1.3.4、定时器和计数器使用讲解视频:定时器和计数器使用讲解1.3.5、组合位元件使用视频:组合位元件使用1.3.6、INC、DEC指令使用视频:INC、DEC指令使用1.3.7、加减乘除四则运算视频:加减乘除四则运算1.3.8、PWM脉宽调制说明文档:PWM脉宽调制1.4、高速输入及输出1.4.1、PLC高速计数功能及指令编程文档:COOLMAY系列PLC高速计数/高速脉冲用法指南案例:四路高速脉冲输出例程视频:PLC高速计数功能及指令编程1.4.2、编码器与PLC连接实现高速输入视频:编码器与PLC连接实现高速输入1.4.3、PLC控制步进电机原理认识视频:PLC控制步进电机原理认识1.4.4、PLC、步进电机与驱动器接线方法视频:PLC、步进电机与驱动器接线方法1.4.5、PLSY系统讲解及效果演示视频:PLSY系统讲解及效果演示1.4.6、PLC控制步进电机正反转讲解视频:PLC控制步进电机正反转讲解1.4.7、PLC脉冲输出指令讲解视频:PLC脉冲输出指令讲解1.4.8、PLC定位指令讲解视频:PLC定位指令讲解1.5、模拟量部分1.5.1、模拟量的基本概念视频:模拟量的基本概念1.5.2、模拟量的编程文档:模拟量用法指南视频:模拟量的编程1.5.3、模拟量的案例视频:模拟量的案例案例:模拟量输入输出演示PID输出实例300度1.5.4、PID的应用介绍视频:PID的应用介绍1.5.5、模拟量的修正视频:模拟量的修正1.6、时钟与特殊加密1.6.1、PLC时钟功能应用视频:PLC时钟功能应用1.6.2、PLC特殊加密功能视频:PLC特殊加密功能1.7、通讯部分1.7.1、通讯基础视频:通讯基础1.7.2、通讯协议(RS)视频:通讯协议(RS)1.7.3、通讯协议(MODBUS RTU)文档:MODBUS通信协议使用手册视频:MODBUS协议(PLC带多屏)案例:PLC与变频器通讯案例PLC与电子秤通讯例程PLC MODBUS与台达变频器通信主机例程MODBUS组网例程屏带多PLCPLC做主机带触摸屏从机组态王485讯通TEST组态王6.53和顾美PLC编程口通信的简单例子48点PLC对48点PLC扩展例程80点PLC对80点PLC扩展例程二、触摸屏部分2.1、HMI产品选型及硬件介绍文档:CoolmayHMI触摸屏使用手册视频:HMI产品选型及硬件介绍2.2、HMI软件安装及程序下载软件:触摸屏编辑软件HMI V5.61软件:触摸屏数据库浏览器-可打开历史曲线/列表/报警数据软件:Coolmay组态软件---CoolMayDCS For NET V5.61(软件版本不断更新,请到官网/下载最新版本)文档:触摸屏程序下载方法和下载问题解决办法Win8/Win10系统触摸屏自带驱动安装步骤Win7/Win8/Win10触摸屏下载驱动安装步骤视频:HMI软件安装及程序下载触摸屏程序无法下载问题解决案例:触摸屏打印机例程2.3、HMI元件用法视频:HMI元件用法2.4、HMI寄存器、指示灯、位操作开关的用法视频:HMI寄存器、指示灯、位操作开关的用法2.5、HMI动态图片制作视频:HMI动态图片制作2.6、HMI画面跳转案例:PLC控制触摸屏画面跳转例程视频:HMI画面跳转2.7、HMI用户权限设置视频:HMI用户权限设置2.8、HMI报警设置案例:报警记录表设置方法视频:HMI报警设置2.9、HMI蜂鸣器报警设置案例:蜂鸣器报警视频:HMI蜂鸣器报警设置2.10、HMI配方的设置案例:配方测试视频:HMI配方的设置2.11、HMI实时曲线的讲解案例:实时曲线视频:HMI实时曲线的讲解2.12、HMI历史曲线的制作案例:历史曲线例程视频:HMI历史曲线的制作2.13、HMI历史资料列表设置案例:历史资料列表视频:HMI历史资料列表设置2.14、HMI宏种类的介绍视频:HMI宏种类的介绍2.15、HMI宏应用指令视频:HMI宏应用指令2.16、触摸屏加密(用户权限)设置方法案例:触摸屏用户权限(密码)设置视频:触摸屏加密(用户权限)设置方法2.17、U盘下载触摸屏程序方法视频:U盘下载触摸屏程序方法2.18、触摸屏笔针校准的设置方法文档:校准触摸屏(笔针)步骤视频:触摸屏笔针校准的设置方法2.19、位操作开关、指示灯图片的添加方法视频:位操作开关、指示灯图片的添加方法2.20、触摸屏程序读取步骤文档:触摸屏程序读取设置步骤视频:触摸屏程序读取步骤2.21、触摸屏键盘大小选择视频:触摸屏键盘大小选择2.22、触摸屏人机界面参数选择视频:触摸屏人机界面参数选择2.23、触摸屏选装网口与电脑通讯设置文档:顾美触摸屏网口与电脑通讯设置步骤2.24、触摸屏USB摄像头画面设置文档:顾美触摸屏USB摄像头画面设置步骤2.25、触摸屏自动同步PLC时间案例:触摸屏自动同步PLC时间2.26、触摸屏XY趋势图用法案例:触摸屏XY趋势图2.27、触摸屏接串口扫描枪例程案例:触摸屏接串口扫描枪例程三、顾美配套模块部分3.1、CM-WIFI模块软件:CM-VCOM虚拟串口软件文档:顾美CM-WIFI模块说明书视频:CM-WIFI模块-AP模式设置方法CM-WIFI模块-STA(远程)模式设置方法PLC和触摸屏之间通过CM-WIFI模块连接方式3.2、CM-NET模块软件:CM-NET以太网模块设置软件CM-VCOM虚拟串口软件文档:CM-NET以太网模块说明书视频:CM-NET模块设置方法3.3、CM-GPRS模块软件:CM-GPRS模块设置软件CM-VCOM虚拟串口软件文档:CM-GPRS模块说明书视频:CM-GPRS模块-网络透传模式CM-GPRS模块-短信透传模式案例:CM-GPRS短信透传模式设置3.4、CX-4G模块软件:CX-4G模块设置软件CM-VCOM虚拟串口软件文档:CX-4G模块说明书视频:顾美4G模块视频3.5、CX-WIFI-2NET模块文档:CX-WIFI-2NET模块说明书3.6、CM-RFM模块文档:CM-RFM射频模块说明书视频:CM-RFM射频模块设置3.7、CM放大模块文档:Coolmay放大模块使用手册放大模块规格参数和特点视频:顾美放大模块3.8、电源模块文档:COOLMAY CM/CX系列电源模块用户手册四、其它视频、软件和文档4.1、文本的使用软件:彩色文本软件HMEditer V3.80EX2N-30B/40B、HW-40B文本编辑软件:HW40BEditer.rar 文档:HM-30B彩色文本说明书HW-40B说明书4.2、文本一体机的使用文本软件:COOLMAY_30A文本编辑软件COOLMAY_40A文本编辑软件COOLMAY_50A文本编辑软件文本文档:EX2N-A系列文本编辑软件使用手册PLC文档:EX2N-A系列文本PLC一体机用户手册EX2N-B系列文本PLC一体机用户手册4.3、触摸屏一体机的使用PLC文档:触摸屏PLC一体机编程手册顾美触摸屏PLC一体机用户手册V7.3版4.4、真彩文本一体机的使用文本文档:CM-HM真彩文本一体机彩色文本的8个功能键定义4.5、智能家居案例案例程序:3房2厅例程更多软件、手册下载地址请在顾美科下载更多精彩内容请关注顾美科技微信公众号COOLMAY919注意事项:由于优酷观看教学视频默认为高清,请手动选择超清播放视频下载方式:(1)网页下载:点击下载—下载本视频—选择保存路径和画质(如为超清视频需在优酷客户端播放)(2)客户端下载:。
深圳市顾美科技有限公司PLC和一体机模拟量使用指南2013年10月第一版前言深圳市顾美科技有限公司开发生产的Coo l may系列PLC和PLC一体机将模拟量/温度模块集成在PLC主板上,可以按客户要求定制,大大降低客户的使用和维护成本。
以下就各个系列的PLC和PLC一体机的模拟量的使用分别说明。
PLC和一体机因模拟量的不同可分两类:A类:EX2N-70H,EX2N-40A/50A,DX2NTB类:EX2N-43H,EX2N-30A/30B/40B,EX2N/EX2NS/DX2N/DX2NS/FX2NC以下分别以A类,B类产品分别代替上述产品进行说明。
第一部分模拟量输入A类产品均可选做12路模拟量(温度)输入8路模拟量输出。
B类产品可以中DX2NS/EX2NS PLC,EX2N-40B文本一体机可选做8路模拟量(温度)输入4路模拟量输出;EX2N/DX2N/FX2NC型PLC可选做4路模拟量(温度)输入2路模拟量输出。
1.模拟量输入选型模拟量(温度)输入类型如下表所示,可根据客户需要选做。
表一:模拟量输入类型PLC内部集成的变送器,是上表9种类型中的其中一种或者几种混合,订购时可选择其中一种或多种混合定购。
z温度传感器的选型根据我们产品的特点,给客户提出以下建议:1.尽量选用适合温度量程且量程较小的传感器。
比如一般测温是几十度,最高温不超过120度的,选用NTC10k热敏电阻比选用热电偶精度会更好一些。
测温100多度,最高温不超过200度的,用NTC50k。
2.如果传感器到PLC的线距较长,在PT100和其他传感器都可以用的情况下,建议不要用Pt100.一般来说,NTC类型线损比较小。
3.如果对温度精度要求比较高,热电偶是最后一个选择。
用热电偶一般都需要客户根据实际情况进行修正。
z热电偶的运用为保证测量精度,E和K型热电偶变送器内部具有冷端温度检测传感器,因此被测温度读数不会低于冷端温度。
使用热电偶时,内部已经做冷端处理,测量以冷端(室温)为基准,即最低测量温度为控制箱所处温度。
提供触摸屏技术支持,为工业自动化人员提供必要的信息,解决小事情、大问题。
采用手动系统参数设置、通用指示灯、女性满级编辑器、硬件配方数据创建秸秆配方存储器、配方数据传输元件的触摸屏、以及留言板安全级打印功能键之间上传和下载配方数据。
输出报告输出事件关于屏幕打印故障系统预留寄存器地址串行通信和驱动器串行通信通信驱动程序介绍连接方法用户手册变频和伺服触摸屏人机界面通信终端连接引脚图一台机器多屏和一屏多机触摸屏连接方式主控从一对多的通信协议和触摸屏地址关系的检查和示例,附录系统信息附录故障排除附录硬件概述附录产品规范附录硬件系统结构图指南阅读MT500系列人机界面的简易工具500的配置文本,软件操作简单,功能强大。
我希望这本书能让用户更方便地使用。
以下是本手册的简要介绍。
每章:第一章Easy Builder 500的安装:触摸屏与PLC的软件安装及连接方法介绍;第二章制作最简单的项目:如何制作一个简单的项目给用户一个初步的印象。
第三章Easy-Builder软件包:介绍Easy-Builder的相关软件和用户界面。
章节窗口:由于easy builder 500完全基于窗口思维,因此用户了解easy builder 500是必不可少的。
第五章easybuilder500的基本设计方法:介绍easybuilder500的基本操作方法,这是使用easybuilder500最基本的方法。
第6章部件:各部件的详细说明。
该组件的用户实现了触摸屏和PLC的控制和监控、报警和列表功能。
第7章系统参数:设置项目参数、外观和硬件属性,建议用户阅读第8章公式数据:如何实现工程项目中公式的功能强大的打印功能大致可分为丝网打印、报表打印和事件打印。
第十二章系统预留寄存器地址:特殊功能可通过“系统预留寄存器”实现。
第13章串行通信与PLC驱动程序:介绍了串行通信的概念。
第14章PLC连接方式:详细说明PLC与MT500的连接。
第15章MT500触摸屏一机多屏,多机一屏连接:如何实现“一机多屏”(一机多屏)和“一屏多屏”连接方式计算机第16章主从通信协议:主从通信协议详细说明第17章存储器AP通信builder500用户,第一章和第二章的内容将带您进入Wein V EW触摸屏人机界面的美丽世界;第三章第四、五、六、七章将为您提供初步了解;第十章和第十五章将为您提供更多的应用程序;对于部分用户,第八章、第九章,第10章和第11章是专门为他们设计的。
感谢您购买 COOLMAY MT 系列触摸屏。
本手册主要说明MT 系列触摸屏的产品特性、一般规格、硬件接口和软件设置方法等。
详细编程请参见《COOLMAY 触摸屏使用手册》。
触摸屏的主要特点:1、提供大量的矢量图库及支持自建图库2、高精度/高可靠性的电阻式触摸面板3、支持各种格式静态图片及GIF 动画4、支持windows 所提供的所有字体5、6万TFT 真彩显示器6、支持配方功能和数据存储、U 盘导出数据7、自带一个RS232和一个RS485通讯口8、基本版可竖屏显示9、可选装网口或音频10、基本版(基于WINCE 5.0系统)和升级版(基于WINCE 7.0系统)可选11、MT6037H /MT6050H (A )灰色/金色/银色面板可选,黑色/白色底壳可选 12、MT6037H /MT6050H (A )可墙体安装,可应用于智能家居/工业等领域产品信息1、 公司产品系列 MT 系列触摸屏2、 HMI 尺寸 6037:3.5寸 6043: 4.3寸 6050: 5寸 6070: 7寸 6100: 10寸3、 版本 H : 基本版 HV : 基本版竖屏;HA /HAS : 升级版 HAV /HAVS : 升级版竖屏4、 网口 W : 网口(选装)5、 音频 Y : 音频(选装)命名规则MT 123456070图1 安装尺寸图MT6100HAMT6043HMT6070H(A/AS)电气设计参考产品构造COM :PLC 与触摸屏 通讯上时快闪安装尺寸机械设计参考规格参数触摸屏用户手册表三:安装尺寸型 号安装尺寸外形尺寸W*H*D(mm)A(mm)B(mm)MT6050H(A)MT6070H(A/AS)MT6100HA13719426172138180146*88*25212*148*40275*194*36电源用端子台 USB 口PWR :通电指示灯触摸屏编程口液晶屏RS232/RS485网口(选装) ◆◆◆◆YW H--6143257图2 产品构造※ 更多规格批量客户可定制MT6043H(A)MT6070H(A/AS)MT6100HAMT6037H背面图MT6050H背面图型号MT6037H 3.5"TFT 液晶屏 4.3"TFT 液晶屏7.0"TFT 液晶屏10.2"TFT 液晶屏MT6043H(A)MT6070H(A/AS)MT6100HA 320*240480*272800*480/1024*6001024*60088*88*25mm 134*102*30mm 212*148*40mm 275*194*36mm 72*72mm 119*93mm 194*138mm 261*180mm 73*56mm 97*56mm 154*87mm 222*133mm 300cd/m²300cd/m²300cd/m²300cd/m²LED LED LED LED 128MB Flash ROM 65536真彩4线电阻屏100mA/24V150mA/24V200mA/24V280mA/24VCOM1: RS232 COM2: RS485400:1H 系列: ARM9内核 640MHz HA(S)系列: Cortex A8 720MHz-1GHz20ms 以内有电源失效检测12-24VDC ±10%<150mA @24VDC 符合EN50081-2和EN50082-2标准符合FCC Class A电压1500Vp -p ,脉冲周期1μs ,持续1s 10-25Hz (X 、Y 、Z 方向2G 30分钟)超过10M Ω@500VDC工程塑料ABS +PC 500VAC 1分钟IP65(前面板)0~50℃20~90%RH -20~70℃显示屏分辨率外形尺寸安装开孔尺寸显示尺寸亮度背光类型存储器颜色触摸面板功耗通讯端口对比度CPU 容许掉电USB??系统诊断供电电源认证FCC 兼容性抗干扰测试防震测试绝缘电阻外壳材料耐压测试防护等级工作环境温度工作环境湿度存储温度65536真彩4线电阻屏65536真彩4线电阻屏65536真彩4线电阻屏0.3kg0.33kg0.54kg0.7kg重量MT6050H(A)5.0"TFT 液晶屏800*480146*88*25mm 137*72mm 108*65mm 300cd/m²LED 150mA/24V65536真彩4线电阻屏0.33kg128MB Flash ROM 128MB Flash ROM 128MB Flash ROM 128MB Flash ROMH 系列: 64MB HA(S)系列: 128M运行内存121264357643572264357673541234657侧面四个安装扣位孔888888MT6037H 727288*88*25MT6043H(A)11993134*102*30MT6037H硬件接口◆FG 0V 24V触摸屏232/485口触摸屏下载口USB口网口COM1/COM2MT6043H(A)/MT6043KH(A)/MT6050KH(A) COM口引脚定义管脚号信号描述23TXDRXD 发送接收5地线GNDRS232通讯口定义RS485通讯口定义16BA485-485+MT6043H(A)背光寿命60000小时60000小时60000小时60000小时60000小时以太网口可选装万年历输入电压有常规为DC24±10%VDC ,也可以特别做成DC12V /DC5V 电源输入墙体安装镶嵌安装墙体安装镶嵌安装MT6050H(A)型号MT6037H MT6043H(A)MT6070H(A/AS)MT6100HAMT6050H(A)自然风冷冷却方式接上表FG 0V 24V 触摸屏485口USB口触摸屏下载口触摸屏232/485口网口(选装)(同COM1中的485口)COM1/COM2MT6070H(A/AS ) COM口引脚定义管脚号信号描述23TXDRXD 发送接收5地线GNDCOM1 RS232通讯口定义COM1/COM2 RS485通讯口定义16BA 485-485+MT6070H(A/AS)FG 0V 24V USB口触摸屏下载口网口(选装)触摸屏232/485口COM1MT6100HACOM口引脚定义管脚号信号描述23TXDRXD 发送接收5地线GNDRS232通讯口定义RS485通讯口定义16BA 485-485+MT6100HA* 编程软件触摸屏:CoolMayHMI 触摸屏编程软件* 详细资料参考《CoolMayHMI 触摸屏使用手册》温馨提示.......................................................01产品特点.......................................................02产品信息.......................................................03 电气参数......................................................04 机械设计参考................................................05 产品构造.......................................................06 硬件接口.......................................................07软件参数设置................................................08 与个厂牌联机说明.........................................09 抗干扰处理...........................................10 编程参考.......................................................11资料参考. (12)深圳市顾美科技有限公司 86960332 26051858 26400661营销QQ:800053919邮箱:**************.com 网址:2018/02 版目 录1、请在确认了本产品的电源电压范围(常规产品电源仅限24V?DC!建议电源的 输出功率为18W及以上)和正确接线之后再通电,以避免损坏。