示波表USB接口及PC310A软件用户手册
- 格式:pdf
- 大小:471.49 KB
- 文档页数:31
逻辑分析仪UsbeeAXPro中文说明书USBEE AX示波器逻辑分析仪使用说明书1. 简介USBEE AX示波器逻辑分析仪是一款基于PC的高性价比的电路分析调试工具。
全面兼容和支持“USBee AX Pro”上位机软件。
能够实现示波器,逻辑分析仪等等很多功能。
注意:不正确的使用会造成设备损坏和人员伤害!使用中:●保证GND线与你的目标板地电位相连;●数字信号地接DGND.数字通道DCH0 - 7,正常测试电压范围为0-8V;●模拟信号地接AGND.模拟通道ACH1 的电压范围-10到+10V;x10是+/-100V; x0.2是+/-2V.●注意ACH1,x10和x0.2不可同时接,比如测5V信号是接AGND和ACH1,x10和x0.2悬空;●数字通道DCH0 - 7保护电压(不损坏仪器,但测试结果不正确)最大为10v;●模拟通道保护电压为ACH1:+/-100v;x10:+/-300v;x0.2:+/-10v。
但不要长时间保持。
●D3V3是仪器提供的输出3.3v的接口,可对外提供不超过100mA的电流输出。
●USBEE AX的数字通道能够驱动输出,在使用前一定不要超过电压和电流范围;●先将USBEE AX连接到PC,再运行软件。
电脑系统要求●Windows 8.1/7/ XP或者Windows 操作系统;●Pentium以上处理器;●USB2.0高速接口,不支持USB1.1全速端口工作;设备清单●USBEE AX设备一台;●测试杜邦线一排10根(可选带测试夹);●USB连接线一条;●光盘(软件和说明文档,也可从商品描述页面提供的链接下载);设备工作在最高的采样速度时,对USB带宽和处理器资源要求较高,为了保证稳定工作:●不要在PC上连接其它USB高速设备;●最好不要在软件采样和输出信号时运行其它的程序。
2.安装USBEE AX PRO 的步骤:1. 安装软件前请勿连接硬件。
2.安装USBEE AX PRO 软件。

USB300/USB320USB300/USB320数字存储示波卡数字存储示波卡数字存储示波卡使用说明书使用说明书第一章概述USB300 2CH-80MHz-8bits-256Ksa 数字存储示波卡USB320 2CH-10MHz-12bits-128Ksa数字存储示波卡是一种双通道、高精度的数字存储示波卡,为我公司USB200/USB220产品的升级产品,将它插入计算机USB口上,再运行DsoView2.0虚拟示波器软件,便可组成一台价格便宜、人机界面友好、性能优良的数字存储示波器。
它具有数据采集、测量信号、过程监测、多种触发等功能,因此也大量应用于高速的数据采集系统、自动控制系统。
USB300主要性能指标最大采样率:80MHz单台通道数:并行双通道+外触发通道IAD分辨率:8bit,系统精度:≤±1%(直流)存储容量:64Ksa/CH,可扩展到512Ksa/CH量程:±100mV~±20V(共分8挡)输入方式:BNC单端双极性电压输入输入阻抗:1MΩ;输入电容≤25PF输入信号带宽:0Hz~20MHz通道间相位差:≤1°(0Hz~2MHz)带内波动:≤±0.5dB(0Hz~1MHz)时基范围:80MHz~1KHz分16挡耦合方式:AC/DC触发模式:正常、自动、单次触发边沿:上升、下降触发模式:正常、自动、单次触发通道:CHA、CHB、EXT通道间隔离度:≥60Db尺寸:187mm×112mm重量:0.2KgUSB320主要性能指标最大采样率:10MHz单台通道数:并行双通道+外触发通道AD分辨率:12bit,系统精度:≤±0.5%存储容量:每通道最大128Ksa/CH量程:±200mV~±40V(共分8挡)输入方式:BNC单端双极性电压输入输入阻抗:1MΩ;输入电容≤25PF输入信号带宽:0Hz~10MHz通道间相位差:≤1°(0Hz~2MHz)带内波动:≤±0.1Db(0Hz~1MHz)时基范围:10MHz~500Hz分15挡耦合方式:AC/DC触发模式:正常、自动、单次触发边沿:上升、下降触发模式:正常、自动、单次触发通道:CHA、CHB、EXT通道间隔离度:≥80dB尺寸:187mm×112mm重量:0.2Kg主要功能★ 自检功能★ 波形存储、恢复★ 波形运算:加、减、反向★ 高级功能:FFT频谱分析、数字滤波、平均等★ 自动测定:最大值、最小值、均方值、平均值、峰峰值、占空比★ 光标测量时间和电压★ 外部触发同步★ 支持二次开发第二章第二章 硬件安装1、 最低配置最低配置:PI 及其兼容机,1024X768显示器,128M 内存、Windows2000/XP 操作系统。


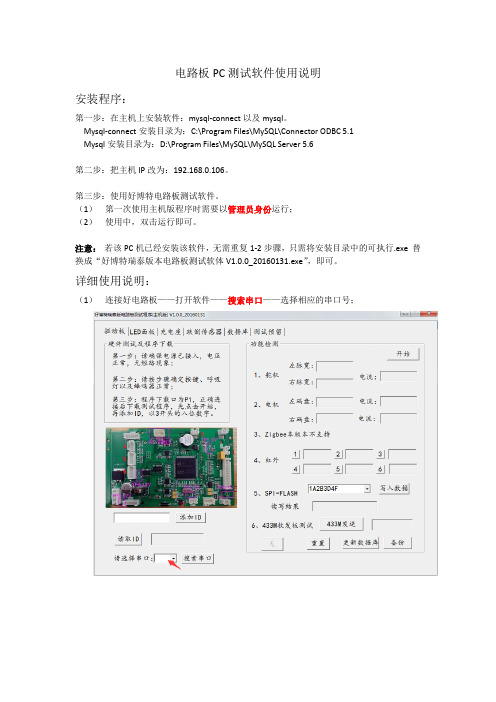
电路板PC测试软件使用说明安装程序:第一步:在主机上安装软件:mysql-connect以及mysql。
Mysql-connect安装目录为:C:\Program Files\MySQL\Connector ODBC 5.1Mysql安装目录为:D:\Program Files\MySQL\MySQL Server 5.6第二步:把主机IP改为:192.168.0.106。
第三步:使用好博特电路板测试软件。
(1)第一次使用主机版程序时需要以管理员身份运行;(2)使用中,双击运行即可。
注意:若该PC机已经安装该软件,无需重复1-2步骤,只需将安装目录中的可执行.exe 替换成“好博特瑞泰版本电路板测试软体V1.0.0_20160131.exe”,即可。
详细使用说明:(1)连接好电路板——打开软件——搜索串口——选择相应的串口号;2、进入所测电路板页面——点击开始——输入添加ID——顺序测试电路板——更新数据库;(2)每一个测试板页面中的读取ID,可读取当前电路板写进去的ID。
(3)数据库页面中:a、查询ID是查询所有已测电路板的ID;b、查询测试信息,可以选择其中一个ID查询信息,都不选择时默认查询所有测试信息;c、删除按钮是删除前面对话框里面所输的ID以及其所对应的测试信息;d、所列举查询信息中,可以双击ID修改,再单击显示区以更新修改。
注意事项:(1)点击完按钮之后,测试结果需要等待片刻才会出现;(2)测试完一块板子之后,请点击更新数据库;(3)一天或者一个节点测试工作完成之后,请在主机版本上点击备份数据库;(4)其中ID,驱动板是3XXXXXXX,LED面板是2XXXXXXX,充电座是7XXXXXXX,跌倒传感器是0X XX XX;(5)查询测试信息,测试信息按最新的排到最上面。

第一章概述示波器波形基础示波器是用来测量和显示电压与时间关系的仪器,它用图表和曲线图的形式显示,例如下图是一典型的示波器图形,它反映的是一变化电压信号输入检测端子时的波形。
通常从左到右阅读示波器图形,图中的曲线,叫“踪迹线”,从“A”点开始,电压是0V。
经过0.25ms以后,到达“B”点。
电压上升到波峰0.8V。
经过0.75ms,到达“C”点,电压下降到波谷-0.8V。
经过1ms以后,电压回到0V。
新的周期开始。
这种信号叫正弦波信号。
在你以后的测量中会经常碰到的。
你可以调节示波器纵坐标和横坐标的单位刻度,纵坐标刻度是电压范围(在大多数情况下,示波器是用来测量电压的)。
横坐标的刻度叫时间基数,在测量时通常用秒或毫秒、微秒来表示。
示波器可以显示出所有电子信号的5种判定尺度分析电子信号的5种参数,就能够判定这个电子信号的波形是否正常。
这五个参数指标是幅值信号--------最高的电压值频率--------信号循环的时间形状----------信号的外形模样脉宽--------信号的占空比阵列--------信号的重复特性示波器的最基本功能是点火示波器汽车电控系统示波器汽车万用表Picoscope 示波器元件组成PICO示波器是由PicoScope 3000汽车用示波器和汽车专用的软件组成。
PCO(电脑示波器)由手提电脑或台式电脑操作,具有更强大的诊断和测量功能。
可以适应现代汽车不同传感器或执行器的需求。
如果你需要更多信息,可以登陆 查询。
PicoScope示波器为两通道(3223),以下为各组成元件:软件安装PicoScope汽车用软件适用于windows98SE、ME、2000或XP中1.把CD光盘插入电脑CD-ROM,如果CD能自动运行,表示自动安装,进入步骤5。
2.按“开始”按扭,然后选择“运行”。
3.类型d:\index(d盘:是指CD-ROM)4.按“确定”键5.点击(software)6.点击“install picoScope automotive software”(安装PicoSope)软件。
TBS1000C 系列示波器用户手册077-1580-01Copyright © Tektronix.保留所有权利。
许可软件产品由 Tektronix、其子公司或提供商所有,受国家版权法及国际条约规定的保护。
Tektronix 产品受美国和外国专利权(包括已取得的和正在申请的专利权)的保护。
本文中的信息将取代所有以前出版的资料中的信息。
保留更改技术规格和价格的权利。
TekVPI 和 e*Scope 是 Tektronix, Inc. 的注册商标。
TEKTRONIX 和 TEK 是 Tektronix, Inc. 的注册商标。
泰克联系信息Tektronix, Inc.14150 SW Karl Braun DriveP.O. Box 500Beaverton, OR 97077USA(美国)有关产品信息、销售、服务和技术支持:■在北美地区,请拨打 1-800-833-9200。
■其他地区用户请访问查找当地的联系信息。
目录TEKTRONIX SOFTWARE LICENSE AGREEMENT (vii)重要安全信息 (xiii)常规安全概要 (xiii)产品上的符号和术语 (xvi)合规性信息 (xvii)EMC 合规性 (xvii)安全标准 (xviii)环境注意事项 (xx)前言主要特点 (1)本手册中使用的约定 (1)安装打开示波器包装 (3)操作要求环境要求 (7)电源要求 (8)TPP0100、TPP0200 系列 10X 无源探头信息 (8)将探头连接到示波器 (8)补偿探头 (9)将探头连接到电路 (9)标配附件 (10)可选附件 (11)技术规格 (11)性能图 (11)熟悉示波器打开示波器电源 (13)更改用户界面语言 (15)更改日期和时间 (20)受支持的探头类型 (24)进行测量时减少静电损坏 (25)进行功能检查 (25)什么是 Autoset(自动设置)(自动设置查询) (29)探头和接地导线端部 (29)获得设置的屏幕帮助 - 各功能帮助 (30)信号路径补偿 (SPC) (33)示波器简介功能 (34)采样示波器概念采样和采集概念 (35)采集模式概念 (37)触发概念 (38)触发斜率和电平概念 (39)可用触发类型 (40)触发耦合 (41)触发模式 (41)自动“未触发滚动”触发模式 (41)正常触发模式 (42)释抑触发模式 (42)触发延迟采集模式 (42)设置通道输入参数设置输入信号耦合 (43)反转输入信号 (44)设置示波器带宽 (45)设置探头类型(电压或电流) (46)设置探头衰减系数 (47)快速将探头衰减系数设置为 1X 或 10X (48)为电压探头设置测量电流模式 (49)设置输入信号垂直偏置 (50)设置波形垂直位置 (51)垂直位置和垂直偏置之间的差异 (51)设置通道相差校正 (52)相差校正提示 (53)触发设置在波形边沿上触发 (55)根据特定脉冲宽度触发 (57)发生欠幅脉冲时触发 (59)设置触发模式 (61)使用辅助输入触发外部信号 (62)采集设置使用自动设置 (63)自动设置提示 (64)如何启用/禁用示波器中的自动设置 (65)如何更改自动设置密码 (66)开始和停止采集 (68)设置采集模式 (69)设置采集触发延迟时间 (70)设置记录长度 (72)使用滚动显示模式 (73)滚动模式提示 (74)将示波器设置为出厂默认值 - 默认设置 (75)波形显示设置显示和删除波形 (77)设置波形余辉 (78)波形余晖提示 (79)XY 显示模式 (80)XY 显示模式提示 (81)设置背光亮度 (82)分析波形进行自动测量 (83)自动测量提示 (84)进行测量屏幕截图 (85)屏幕截图测量提示 (86)自动测量描述 (87)频率测量描述 (87)时间测量描述 (88)幅度测量描述 (90)面积测量描述 (91)仅对波形的一部分进行测量(选通) (92)如何启用/禁用示波器中的测量 (94)使用光标进行手动测量 (96)光标类型 (100)如何启用/禁用示波器中的光标 (101)创建数学波形 (103)数学波形提示 (104)使用 FFT 查看信号频率信息 (105)FFT 提示 (109)关于 FFT 窗口 (110)FFT 和显示波形假波现象 (112)显示参考波形 (113)参考波形提示 (113)如何查看长记录长度波形(缩放) (114)如何平移波形 (115)如何更改测量密码 (116)保存数据将屏幕图像保存到文件 (119)关于已保存图像文件格式 (120)保存波形数据 (120)保存示波器设置信息 (121)使用 Save File(保存文件)按钮将文件保存至 USB (123)关于波形数据文件 (124)调出数据调出示波器设置信息 (125)调出波形数据 (126)使用 USB 文件辅助功能文件辅助窗格概述 (129)更改 U 盘上的默认文件保存位置 (131)默认保存文件夹位置规则 (132)在 U 盘上新建文件夹 (132)文件夹创建提示 (133)从 U 盘上删除文件或文件夹 (133)在 U 盘上重命名文件或文件夹 (135)文件、文件夹重命名提示 (136)关于自动生成文件名称 (136)图像设置和波形文件提示 (136)从示波器内存中清除数据 (TekSecure)设置或查看 USB 设备端口参数禁用 USB 设备端口 (139)选择与 USB 设备端口连接的设备 (140)查看 USBTMC 信息 (141)附录Installing new firmware on the oscilloscope (143)运行诊断测试 (144)有关仪器的教学和培训的课件 (146)课件文件内容信息 (146)从 U 盘中加载课件文件 (147)处理错误消息 (148)运行课件实验实例 (148)保存课件实验结果 (150)示波器控件 (151)导航控件 (151)水平控件 (154)触发控件 (155)垂直控件 (155)使用菜单系统 (156)前面板连接器 (160)后面板连接器 (160)图形用户界面元素 (161)标记通道 (167)保证技术规格 (169)清洁 (169)日常保养 (169)清洁 (169)默认示波器设置(默认设置) (170)不会由默认设置重置的示波器设置 (171)物理固定示波器 (172)环境注意事项 (172)产品报废处理 (172)设备回收 (172)TEKTRONIX SOFTWARE LICENSE AGREEMENTThis End User Agreement (“Agreement”) is an agreement between Tektronix,Inc., an Oregon corporation, and its corporate affiliates, subsidiaries, anddivisions as applicable (collectively, “Tektronix,”“we,”“us,” or“our”) and You (including any entity or organization you represent,collectively, “Customer” or “You”). Please read this Agreement carefully asthis Agreement governs the terms and conditions under which You are permittedto use Tektronix’s software and services.THE SOFTWARE, ENCODED OR INCORPORATED WITHIN EQUIPMENTOR ACCOMPANYING THIS AGREEMENT, IS FURNISHED SUBJECT TOTHE TERMS AND CONDITIONS OF THIS AGREEMENT. BY INDICATINGYOUR ACCEPTANCE OF THESE TERMS BY SELECTING AN "ACCEPT”OR SIMILAR BUTTON IN A SOFTWARE MENU, OR BY RETAINING THESOFTWARE FOR MORE THAN THIRTY DAYS OR USING THESOFTWARE IN ANY MANNER YOU (A) ACCEPT THIS AGREEMENTAND AGREE THAT YOU ARE LEGALLY BOUND BY ITS TERMS; AND(B) REPRESENT AND WARRANT THAT: (I) YOU ARE OF LEGAL AGETO ENTER INTO A BINDING AGREEMENT; AND (II) IF YOU ARE AREPRESENTATIVE FOR A CORPORATION OR OTHER LEGAL ENTITY,YOU HAVE THE RIGHT, POWER, AND AUTHORITY TO ENTER INTOTHIS AGREEMENT ON BEHALF OF SUCH ENTITY AND BIND SUCHENTITY TO ITS TERMS. IF YOU DO NOT AGREE TO THE TERMS OFTHIS AGREEMENT, TEKTRONIX WILL NOT AND DOES NOT LICENSETHE SOFTWARE TO YOU AND YOU MUST NOT DOWNLOAD,INSTALL, OR USE THE SOFTWARE. UNITED STATES GOVERNMENTCUSTOMERS OR END-USERS MAY REQUEST A GOVERNMENTADDENDUM TO THIS AGREEMENT.NOTWITHSTANDING ANYTHING TO THE CONTRARY IN THISAGREEMENT OR YOUR ACCEPTANCE OF THE TERMS ANDCONDITIONS OF THIS AGREEMENT, NO LICENSE IS GRANTED(WHETHER EXPRESSLY, BY IMPLICATION, OR OTHERWISE) UNDERTHIS AGREEMENT TO ANY SOFTWARE THAT YOU DID NOT ACQUIRELAWFULLY OR THAT IS NOT A LEGITIMATE, AUTHORIZED COPY OFTEKTRONIX’S SOFTWARE. THIS AGREEMENT EXPRESSLYEXCLUDES ANY RIGHTS CONCERNING SUCH ILLEGITIMATE COPIES.IF THESE TERMS ARE NOT ACCEPTABLE, THE UNUSED SOFTWAREAND ANY ACCOMPANYING DOCUMENTATION SHOULD BERETURNED PROMPTLY TO TEKTRONIX (WITHIN 30 DAYS OFPURCHASE) FOR A FULL REFUND OF THE LICENSE FEE PAID. (FORINFORMATION REGARDING THE RETURN OF SOFTWARE ENCODEDOR INCORPORATED WITHIN EQUIPMENT, CONTACT THE NEARESTTEKTRONIX SALES OFFICE.)DEFINITIONS“Equipment” means Tektronix equipment that the Software is encoded orincorporated within or installed onto.LICENSESubject to the terms and conditions of this Agreement, Tektronix grants You anon-exclusive, non-transferable license to the Software, as followsTEKTRONIX SOFTWARE LICENSE AGREEMENTYou may:e the Software with the Equipment, or if the Software is not encoded orincorporated in any Tektronix equipment, on no more than one machine at atime; and2.Copy the Software for archival or backup purposes, provided that no morethan one (1) such copy is permitted to exist at any one time, and providedthat each copy includes a reproduction of any patent or copyright notice orrestrictive rights legend that was included with the Software, as receivedfrom Tektronix;3.Fully transfer the Equipment to a third party but only if prominentlyaccompanied by this End User License Agreement, and such third-partyrecipients agree to be bound by the terms of this Agreement; and4.Integrate Tektronix products that contain the Software into a system and sellor distribute that system to third parties, provided that those third parties arebound by the terms of this Agreement, and provided that You (i) do notseparate the Software from any Equipment it is incorporated into, (ii) do notretain any copies of the Software, and (iii) do not modify the Software.You may not:e the Software other than for its intended purpose as provided above in thesection “You may,” or in conflict with the terms and restrictions of thisAgreement;2.Distribute or transfer the Software to any person or organization outside ofYour organization without Tektronix’s prior written consent, except inconnection with a permitted use authorized in “You may” paragraphs 3 or4 above;3.Decompile, decrypt, disassemble, or otherwise attempt to derive the sourcecode, techniques, processes, algorithms, know-how, or other information(collectively “Reverse Engineer”) from the Software or permit or induceany third party to do so, except to the limited extent allowed by directlyapplicable law or third party license (if any), and only to obtain informationnecessary to achieve interoperability of independently created software withthe Software;4.Modify, translate, adapt, or create derivative works of the Software, or mergethe Software with any other software;5.Copy the documentation accompanying the Software;6.Remove any copyright, trademark, or other proprietary notices from theSoftware or any media relating thereto; or7.Export or re-export, directly or indirectly, the Software or Equipment, anyassociated documentation, or systems created in accordance with “Youmay” section 4 above, to any country to which such export or re-export isrestricted by law or regulation of the United States or any foreigngovernment having jurisdiction without the prior authorization, if required, ofthe Office of Export Administration, Department of Commerce, Washington,D.C. and the corresponding agency of such foreign government;e the Software or Equipment in any manner or for any purpose thatinfringes, misappropriates, or otherwise violates any intellectual propertyrights or other proprietary rights of any person, or any applicable laws;e the Software or Equipment in a network or system with other products orservices that are incompatible, insecure or not compliant with applicablelaws;10.Bypass, circumvent, damage or otherwise interfere with any security or otherfeatures of the Software or Equipment designed to control the manner inwhich they are used, or harvest or mine Tektronix’s proprietary content or information from the Software or Equipment.THE SOFTWARE MAY NOT BE USED, COPIED, MODIFIED, MERGED, OR TRANSFERRED TO ANOTHER EXCEPT AS EXPRESSLY PERMITTED BY THESE TERMS AND CONDITIONS.FEEDBACKIf You provide feedback to Tektronix concerning the functionality and performance of the Software or Equipment, including without limitation identifying potential errors and improvements, any comments, questions, suggestions, or the like ("Feedback"), Tektronix is free to use such Feedback without any attribution, compensation, or restriction in any manner to improve or enhance its products, irrespective of any other obligation or limitation between the Parties governing such Feedback. You hereby grant Tektronix an irrevocable, worldwide, perpetual, royalty-free license to use Your Feedback for any purpose whatsoever and waive any moral rights You may have in the Feedback. Tektronix is not obligated to use Your Feedback.OWNERSHIPTitle to the Software and all copies thereof, but not the media on which the Software or copies may reside, shall remain with Tektronix or others from whom Tektronix has obtained a respective licensing right.GOVERNMENT NOTICEIf the Software or any related documentation is acquired by or for an agency of the U.S. Government, the Software and documentation shall be considered “commercial computer software” or “commercial computer software documentation” respectively, as those terms are used in 48 CFR §12.212,48 CFR §227.7202, or 48 CFR §252.227-7014, and are licensed with only those rights as are granted to all other licensees as set forth in this Agreement.TERMThe license granted herein is effective until terminated. The license may be terminated by You at any time upon written notice to Tektronix. The license may be terminated by Tektronix if You fail to comply with any term or condition and such failure is not remedied within fifteen (15) days after notice hereof from Tektronix. Upon termination by either party, You shall return to Tektronix or destroy, the Software and all associated documentation, together with all copies in any form.IF YOU TRANSFER, DISTRIBUTE, OR OTHERWISE MAKE AVAILABLE ANY COPY, MODIFICATION, OR MERGED PORTION OF THE SOFTWARE WITHOUT THE AS EXPRESS PERMISSION OF THESE TERMS AND CONDITIONS OR PRIOR WRITTEN CONSENT OF TEKTRONIX, YOUR LICENSE WILL BE IMMEDIATELY AND AUTOMATICALLY TERMINATED.LIMITED WARRANTYTektronix does not warrant that the functions contained in the Software will meet Your requirements or that the operation of the Software will be uninterrupted, secure, or error-free.EXCEPT AS SEPARATELY PROVIDED IN A WRITTEN WARRANTY FROM TEKTRONIX, THE SOFTWARE IS PROVIDED “AS IS”WITHOUT ANY WARRANTY OF ANY KIND, EXPRESS OR IMPLIED, INCLUDING BUT NOT LIMITED TO, THE WARRANTIES OF MERCHANTABILITY, FITNESS FOR A PARTICULAR PURPOSE, TITLE, QUIET ENJOYMENT, AND NON-INFRINGEMENT.THE SOFTWARE IS NOT DESIGNED OR INTENDED FOR USE IN HAZARDOUS ENVIRONMENTS REQUIRING FAIL-SAFE PERFORMANCE INCLUDING WITHOUT LIMITATION, IN THE OPERATION OF NUCLEAR FACILITIES, AIRCRAFT NAVIGATION OR COMMUNICATION SYSTEMS, AIR TRAFFIC CONTROL, WEAPONS SYSTEMS, DIRECT LIFE-SUPPORT MACHINES, OR ANY OTHER APPLICATION IN WHICH THE FAILURE OF THE SOFTWARE COULD LEAD TO DEATH, PERSONAL INJURY OR SEVERE PHYSICAL OR PROPERTY DAMAGE (COLLECTIVELY "HAZARDOUS ACTIVITIES"). TEKTRONIX AND ITS AFFILIATES, LICENSORS, AND RESELLERS EXPRESSLY DISCLAIM ANY EXPRESS OR IMPLIED WARRANTY OF FITNESS FOR HAZARDOUS ACTIVITIES.LIMITATION OF LIABILITYIN NO EVENT SHALL TEKTRONIX, ITS AFFILIATES, LICENSORS, OR RESELLERS BE LIABLE FOR: (1) ECONOMICAL, INCIDENTAL, CONSEQUENTIAL, INDIRECT, SPECIAL, PUNITIVE OR EXEMPLARY DAMAGES, WHETHER CLAIMED UNDER CONTRACT, TORT OR ANY OTHER LEGAL THEORY, (2) LOSS OF OR DAMAGE TO YOUR DATA OR PROGRAMMING, LOSS OF PROFITS, BUSINESS INTERRUPTION, OR OTHER PECUNIARY LOSS ARISING FROM THE USE OF (OR INABILITY TO USE) THE SOFTWARE, (3) PENALTIES OR PENALTY CLAUSES OF ANY DESCRIPTION, (4) ANY DAMAGE, CLAIMS, OR LOSSES RESULTING FROM THE USE OF THE SOFTWARE IN CONJUNCTION WITH OTHER PRODUCTS OR SERVICES (INCLUDING THIRD-PARTY PRODUCTS OR SERVICES); OR (5) INDEMNIFICATION OF YOU OR OTHERS FOR COSTS, DAMAGES, OR EXPENSES RELATED TO THE GOODS OR SERVICES PROVIDED UNDER THIS LIMITED WARRANTY, EVEN IF TEKTRONIX OR ITS AFFILIATES, LICENSORS, OR RESELLERS HAVE ADVANCE NOTICE OF THE POSSIBILITY OF SUCH DAMAGES. BECAUSE SOME STATES/JURISDICTIONS DO NOT ALLOW THE EXCLUSION OR LIMITATION OF LIABILITY FOR CONSEQUENTIAL OR INCIDENTAL DAMAGES, SOME OF THE ABOVE LIMITATIONS MAY NOT APPLY TO YOU, BUT THEY SHALL APPLY TO THE MAXIMUM EXTENT PERMITTED BY LAW. NOTWITHSTANDING ANYTHING HEREIN TO THE CONTRARY, IN NO EVENT SHALL TEKTRONIX’S TOTAL AGGREGATED LIABILITY TO YOU FOR ALL DAMAGES IN ANY ONE OR MORE CAUSES OF ACTION EXCEED THE AMOUNT RECEIVED BY TEKTRONIX FROM YOU FOR THE SOFTWARE OR EQUIPMENT.You are solely responsible for Your data. You must back up Your data before Tektronix or a third party performs any remedial, upgrade, or other work on Your systems, including any Equipment. If applicable law prohibits exclusion of liability for lost data, then Tektronix will only be liable for the cost of the typical effort to recover the lost data from Your last available back up.SECURITY DISCLAIMERThis Software and its associated Equipment are not designed or intended to be used with unsecure networks. You acknowledge that use of the Equipment may rely upon certain networks, systems, and data communication mediums that are not controlled by Tektronix and that may be vulnerable to data or security breaches, including, without limitation, internet networks used by Your internet providers and the databases and servers controlled by Your internet providers. Tektronix shall not be liable for any such breaches, including without limitation, damages and/or loss of data related to any security breach, and disclaims all warranties, including any implied or express warranties that any content will be secure or not otherwise lost or altered.For the avoidance of doubt, if You choose to connect this Software or Equipment to a network, it is Your sole responsibility to provide and continuously ensure a secure connection to that network. You agree to establish and maintain appropriate measures (e.g., firewalls, authentication measures, encryption, anti-virus applications, etc.) to protect the Software and Equipment and any associated data against security breaches including unauthorized access, destruction, use, modification, or disclosure. Notwithstanding the foregoing, You shall not use any Products in a network with other products or services that are incompatible, insecure or not compliant with applicable laws.THIRD-PARTY DISCLAIMERThe Software may contain software owned by third parties and obtained under a license from those parties (“Third Party Software”). Your use of such Third Party Software is subject to the terms and conditions of this Agreement and the applicable Third Party Software licenses. Except as expressly agreed otherwise, third parties do not warrant the Third Party Software, do not assume any liability with respect to its use, and do not undertake to furnish any support or information relating thereto.GENERALUnless the Customer is the United States Government, this Agreement contains the entire agreement between the parties with respect to the use, reproduction, and transfer of the Software, and shall be governed by the laws of the state of Oregon.You shall be responsible for any taxes that may now or hereafter be imposed, levied or assessed with respect to the possession or use of the Software or the rights and licenses granted under this Agreement, including any sales, use, property, value added, and excise taxes, and similar taxes, duties, or charges. Any waiver by either party of any provision of this Agreement shall not constitute or be deemed a subsequent waiver of that or any other portion.You may not assign this Agreement or any right or obligation under this Agreement, or delegate any performance, without Tektronix’s prior written consent. This section does not prohibit You from transferring the Equipment in accordance with Subsections 3 and 4 of the Section titled “You may” above.All questions regarding this Agreement should be directed to the nearest Tektronix Sales Office.重要安全信息本手册包含用户必须遵守的信息和警告,以确保安全操作并保证产品安全。
Operation Manual of USB Data Logger(Version: 1.31)1. Introduction: (3)1.1 Features: (3)1.2 USB temperature data logger: (3)1.3 LCD symbols display instructions: (4)1.4 USB temperature humidity data logger: (4)1.5 LCD symbols display instructions: (5)1.6 Button instructions: (5)1.7 Install battery: (5)1.8 Install USB data logger: (6)2 Quick Start (7)3 Connecting the Logger to PC (7)4. Setting Up the Logger to Record Data (8)5. Download data from the logger (10)6. Delete all the logs from the logger (11)7. Data Listing Window (11)8. Exporting Logger Data (12)9. File List (13)1.Introduction:HE170 USB series has USB interface, enjoying elegant appearance and compact construction, specially designed for refrigerator and cold-chain transportation as well as container transport applications. HE170 USB series adopts friendly USB interface, friendly mounting bracket and the screws. HE170 USB series can show temperature/temperature and humidity simultaneously as well as the battery indication. The OK key can help to check the Max/Min/Current value and the upper and lower limits.1.1Features:l Waterproof and dustproof standard IP67, resisting moisture, dew-point temperature and dust.l Temperature and humidity limit can be set. LED lights when the setting value being exceeded.l Ultra-lower consumption design, 1/2AA 3.6V Li battery, working for 12 months and easy to install your battery.l Transfer logging data to PC through software and can be saved as different types to ensure the existence.l Adopt high sensitive sensor, enjoy fast response and high accuracy.1.2USB temperature data logger:8①LCD display②Button③LED warming light when the temperature value exceeds the setting limits.④USB connection port.⑤Waterproof ring.⑥Battery replacement position.⑦Waterproof transparent cover.⑧Fixed bracket.1.3LCD symbols display instructions:①HI symbol display shows being the temperature upper limit setting status.②LO symbol display shows being the temperature lower limit setting status.③Battery power indication.④MIN symbol display shows being the minimum temperature value checkingstatus.⑤MAX symbol display shows being the maximum temperature value checkingstatus.⑥LOG symbol display shows being the logging status.⑦(Celsius and Fahrenheit)⑧Temperature value symbol display.1.4USB temperature humidity data logger:8①LCD display.②Button.③LED warming light when the temperature and humidity values exceed thesetting limits.④USB connection port.⑤Waterproof ring.⑥Battery replacement position.⑦Waterproof transparent cover.⑧Fixed bracket.1.5LCD symbols display instructions:①HI symbol display shows being the temperature and humidity upper limitssetting status.②LO symbol display shows being the temperature and humidity lower limitssetting status.③MAX symbol display shows being the maximum temperature and humidity valueschecking status.④MIN symbol display shows being the minimum temperature and humidity valueschecking status.⑤Battery power indication.⑥Units symbol display:(Celsius and Fahrenheit)humidity unit⑦Temperature and humidity values symbol display.1.6Button instructions:1.6.1:Press this button for long to 5seconds can turn on/off thecancheck the MAX, MIN, High and low warming limits values as well as the current value under the working status.1.7Install battery:1.7.1Firstly, use your tool ① to open the battery back cover ②, then installyour battery ③.1.8 Install USB data logger:1.8.1 Use screw ② to fix the bracket ① onto the wall and then install the datalogger as follows:2Quick StartFollow the procedure below to quickly start using your data logger:1. Connect the data logger to a free USB port on the computer.2. Start T oAnalyzer U software on the PC.3. From the toolbar select Connect.4. Then you can setup or download data, delete data from the logger.5. Unplug the cable from the logger, and then the logger is in stop mode.6. Press OK for about five seconds, the logger will be power on (LOG mode) or off (OFFmode).Note: The logger has three modes:1. LOG: In the mode, the logger samples and records data timely.2. OFF: In this mode, the logger stops to sample and record, and the LCD display is off. 3Connecting the Logger to PCT o connect the logger to the computer, follow these steps:1. Connect the USB cable to the logger and to a free USB port on the computer.2. If you are connecting the logger to the PC for the first time, the logger willautomatically be recognized and installed on the computer.3. Start T oAnalyzer U analysis software.4. Click the icon4.S etting Up the Logger to Record DataT o set the logger to start recording data, click thel: Synchronize the PC time to the logger.l Name: Gives a name to the logger.l Type: The device type.l Model: The device model.l Serial No: Every logger has a SN with 10 characters. The length must be 10.l LOG Intervals(s): The interval of recording.l Log Count: The count of the logs that the logger has recorded.l Memory capacity: The total capacity of the logger memory. One reading includes time and three channels’ data.l T emperature Unit: The selection of C and F.l Start Mode: There are three start modes: No Delay / Delay / Timer.No Delay: The logger will start to log immediately.Delay: The logger will start to log after a delay time.Timer: The will start to log at a specific time.Note: If the logger is OFF, the logger cannot record any logs.Calibrate the logger: The logger is factory calibrated to an accuracy given in the device specifications. However, there may be times when you wish to adjust the calibration of your logger. T oAnalyzer provides you with the ability to perform a single point offset calibration. This calibration can be used to increase the accuracy of the logger for a restricted data range.l CH1 offset: The offset of channel one.l CH2 offset: The offset of channel two. (If the logger is temperature logger, the CH2 and CH3 are useless.)l CH3 offset: The offset of Dew Point.5.D ownload data from the logger.T o get the recorded logs from the logger, connect the logger to your computer and clickthe6.D elete all the logs from the logger.T o erase all data from the logger, connect to the logger, and then clickbutton on the toolbar, and then the data listing window is shown below.The data pane lists the data samples collected by the logging device.The column width of each column is adjustable by using the left mouse button and dragging the column the desired width.8.E xporting Logger DataY ou can use ToAnalyzer to export sample data to a text file or to a Microsoft Excel file or BMP file.ll。