实验2 UI界面开发--布局管理器的使用
- 格式:doc
- 大小:253.50 KB
- 文档页数:6

一、实验目的通过本次实验,掌握Java Swing框架中常用的布局管理器,如FlowLayout、BorderLayout、GridLayout、GridBagLayout等,并学会如何使用这些布局管理器对窗口进行合理布局,提高GUI应用程序的界面设计能力。
二、实验环境1. 开发工具:Eclipse2. 开发语言:Java3. 环境配置:Java Development Kit(JDK)版本为1.8三、实验内容1. 流式布局(FlowLayout)2. 边界布局(BorderLayout)3. 网格布局(GridLayout)4. 网格袋布局(GridBagLayout)四、实验步骤1. 流式布局(FlowLayout)(1)创建一个窗口,并设置窗口标题为“FlowLayout”。
(2)在窗口中添加四个按钮,分别为“Button1”、“Button2”、“Button3”和“Button4”。
(3)设置窗口的布局管理器为FlowLayout。
(4)运行程序,观察窗口布局效果。
2. 边界布局(BorderLayout)(1)创建一个窗口,并设置窗口标题为“BorderLayout”。
(2)在窗口中添加四个标签,分别为“North”、“South”、“East”和“West”。
(3)设置窗口的布局管理器为BorderLayout。
(4)运行程序,观察窗口布局效果。
3. 网格布局(GridLayout)(1)创建一个窗口,并设置窗口标题为“GridLayout”。
(2)在窗口中添加四个按钮,分别为“Button1”、“Button2”、“Button3”和“Button4”。
(3)设置窗口的布局管理器为GridLayout,并设置每行和每列的组件数量为2。
(4)运行程序,观察窗口布局效果。
4. 网格袋布局(GridBagLayout)(1)创建一个窗口,并设置窗口标题为“GridBagLayout”。

实验2 android的界面设计(控件与布局)学时:4学时一、实验目的:1、了解Android编程原理2、掌握界面控件设计3、了解和熟悉常用控件的使用、界面布局等内容。
二、实验内容:1.基本控件的制作:(1)TextView的制作:a)体会Autolink,依次更换属性:web/phone/all/email/b) 制作跑马灯效果android:ellipsize 设置当文字过长时,该控件该如何显示。
有如下值设置:”start”—-省略号显示在开头;”end”——省略号显示在结尾;”middle”—-省略号显示在中间;”marquee”——以跑马灯的方式显示(动画横向移动)android:marqueeRepeatLimit 在ellipsize 指定marquee 的情况下,设置重复滚动的次数,当设置为marquee_forever 时表示无限次。
android:focusableInTouchMode:是否在触摸模式下获得焦点。
android:focusable 控件是否能够获取焦点(2)EditView制作(a) maxLength:最大输入长度属性(b) singleLine:多行文本框(c) inputType:限制输入文本类型(d) hint:设置提示信息2.布局设计(1) LinearLayout布局:(2)Relative Layout:(3)Table Layout3.建立一个如图所示的图形界面:4.用ListView制作如图界面(图片自定) (将该题以你的学号命名,发给你班的学习委员,以班为单位统一发给我,我的邮箱为:****************):5.用expandablelistview制作如下界面:6.对话框制作:(2)部分程序代码:protected void dialog() {AlertDialog.Builder builder = new Builder(Main.this);builder.setMessage("确认退出吗?");builder.setTitle("提示");builder.setPositiveButton("确认", new OnClickListener() { @Overridepublic void onClick(DialogInterface dialog, int which) { dialog.dismiss();Main.this.finish();}});builder.setNegativeButton("取消", new OnClickListener() {@Overridepublic void onClick(DialogInterface dialog, int which) {dialog.dismiss();}});builder.create().show();}//在onKeyDown(int keyCode, KeyEvent event)方法中调用此方法public boolean onKeyDown(int keyCode, KeyEvent event) {if (keyCode == KeyEvent.KEYCODE_BACK && event.getRepeatCount() == 0) {//点后退键的时候,为了防止点得过快,触发两次后退事件dialog();}return false;}(2)界面如下:部分代码:Dialog dialog = new AlertDialog.Builder(this).setIcon(android.R.drawable.btn_star).setTitle("喜好调查").setMessage("你喜欢李连杰的电影吗?").setPositiveButton("很喜欢",new OnClickListener() {@Overridepublic void onClick(DialogInterface dialog, int which) {// TODO Auto-generated method stub Toast.makeText(Main.this, "我很喜欢他的电影。

实验二Android程序UI界面设计【目的】Android程序设计基础。
熟悉各种UI控件并且进行UI设计。
【要求】1、了解Android程序设计基础2、掌握各种UI控件的基本功能和用法3、掌握UI设计的方法4、完成【课堂练习】5、完成【课后作业】并且提交实验报告【原理】1、掌握各种控件的基本功能和用法。
常用的控件包括:TextView:Button:ImageView:ImageButton:ProgressBar:RadioButton:2、了解各种布局Layout的基本功能和用法。
多种Layout:AbsoluteLayoutFrameLayoutGridView LinearLayoutListLayoutRadioGroupTableLayout···【参考过程】1、新建一个名为Ex02的Android Project。
2、双击Layout->main.xml文件,即可切换到UI设计界面(默认布局为LinearLayout),增加所需控件,如:Button。
3、将Form Widgets中的Button拖入屏幕中,如图1所示。
图14、从Graphical Layout切换至main.xml,可以看见代码中已新增了Button的xml代码,如图2所示。
图25、修改控件的属性:方法一:单击Button,在窗口下方的properties一栏中修改对应的属性,如:background,text,size等。
(如果没有properties一栏出现,右击Button,打开“Show In”->“Properties”即可。
)图3方法二:直接在main.xml文件中修改。
如修改Button的文本内容,则输入android:text=”Yes, I do!”,如图4所示。
图4再次切换回Graphical Layout预览页面,则看到Button的文本内容已经被修改,如图5所示。

QtCreator布局管理器的使用布局管理器是用于在应用程序用户界面中自动排列和定位窗口部件的工具。
Qt Creator提供了多种布局管理器,以满足不同的需求。
使用布局管理器可以使窗口部件自动适应不同的窗口大小和分辨率,并确保它们以一致的方式进行布局。
在设计器中,可以通过拖放的方式将窗口部件添加到窗口区域。
布局管理器可以使用以下几种方式进行设置:1. 垂直布局管理器(QVBoxLayout):它可以将窗口部件垂直排列。
在设计器中,拖放一个垂直布局管理器到窗口区域,并将要排列的窗口部件添加到该布局管理器中。
在布局管理器的属性窗口中,可以设置间距和对齐方式。
2. 水平布局管理器(QHBoxLayout):它可以将窗口部件水平排列。
操作方式类似于垂直布局管理器。
3. 网格布局管理器(QGridLayout):它将窗口部件以网格的形式排列。
在设计器中,拖放一个网格布局管理器到窗口区域,并使用布局管理器的属性窗口设置网格的行数和列数。
然后,将窗口部件添加到该布局管理器中的指定位置。
4. 堆叠布局管理器(QStackedLayout):它将窗口部件叠放在一起,只显示当前活动的窗口部件。
在设计器中,拖放一个堆叠布局管理器到窗口区域,并将要堆叠的窗口部件添加到该布局管理器中。
在布局管理器的属性窗口中,还可以设置部件的拉伸因子、大小约束和边距等属性。
布局管理器还提供了一些方法,可以通过编程方式修改布局以及窗口部件的属性。
例如,可以使用addLayout(方法将一个布局管理器添加到另一个布局管理器中,以创建更复杂的布局。
另外,布局管理器还支持对窗口部件进行扩展、收缩和隐藏等操作。
例如,可以使用addStretch(方法将一个弹簧部件添加到布局管理器中,使其占据剩余空间。
还可以使用addWidget(方法将一个窗口部件添加到布局管理器中。
总之,Qt Creator提供了丰富的布局管理器,并且使用它们非常方便。
通过使用布局管理器,可以轻松创建自适应和易于管理的用户界面。
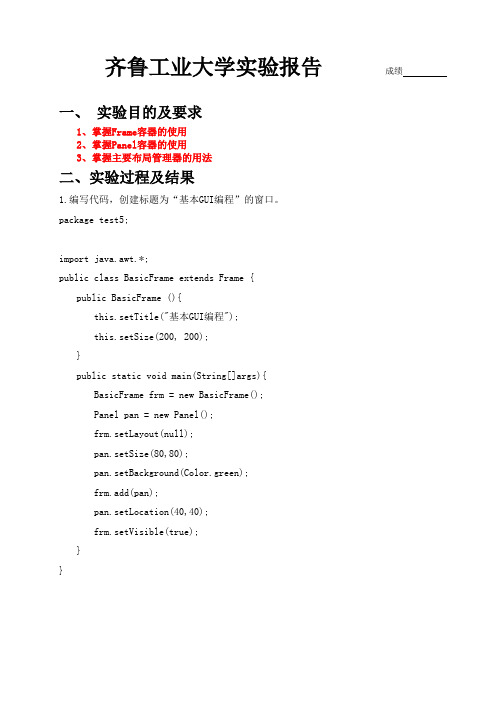
齐鲁工业大学实验报告成绩一、实验目的及要求1、掌握Frame容器的使用2、掌握Panel容器的使用3、掌握主要布局管理器的用法二、实验过程及结果1.编写代码,创建标题为“基本GUI编程”的窗口。
package test5;import java.awt.*;public class BasicFrame extends Frame {public BasicFrame (){this.setTitle("基本GUI编程");this.setSize(200, 200);}public static void main(String[]args){BasicFrame frm = new BasicFrame();Panel pan = new Panel();frm.setLayout(null);pan.setSize(80,80);pan.setBackground(Color.green);frm.add(pan);pan.setLocation(40,40);frm.setVisible(true);}}2.编写代码,使用按钮排出BorderLayout布局的五个方向package test5;import java.awt.*;public class BorderFrame extends Frame {public BorderFrame(){this.setTitle("BorderLayout布局");this.setSize(200, 200);}public static void main(String[] args){BorderFrame frm = new BorderFrame();Button btn1 = new Button("北");Button btn2 = new Button("南");Button btn3 = new Button("中");Button btn4 = new Button("西");Button btn5 = new Button("东");frm.add("North", btn1);frm.add("South", btn2);frm.add("Center", btn3);frm.add("West", btn4);frm.add("East", btn5);frm.setSize(200,200);frm.setVisible(true);}}3.…三、实验总结及收获。

Android 实验设计实验二:界面设计:控件与布局08计应 08386038 胡巍巍【目的】Android编程基础,UI设计。
【要求】1、了解Android编程原理2、掌握界面控件设计3、掌握控件的事件处理编程【原理】1.熟悉各种控件的基本功能常用控件包括:TextView,EditText,Button,ImageView:ImageButton,ProgressBar,Radio button:2.了解各种布局Layout的应用多种Layout: AbsoluteLayout FrameLayout GridViewLinearLayout ListLayout RadioGroupTableLayout ………【实验过程】新建一个Project,并对其布局文件进行简单修改。
1.New 一个 Android project:Project Name: Practice,Application name:Project,Build Target勾选Android 2.2,Package name:com.eoeAndroid.Practice ,Create Activity:Practice ,Min SDK Version:8. 然后点击Next→Finish。
2.Finish后,Eclipse Platform左边Package Explorer栏中出现了我们刚才新建的project。
根据实验要求在layout main.xml中修改布局文件(我选的是相对布局relative layout),增加所需控件。
分析实验要求后,对要求添加的控件按照从上到下,从左到右的顺序添加。
布局xml实现如下:<?xml version="1.0"encoding="utf-8"?><RelativeLayout xmlns:android="/apk/res/android"android:orientation="horizontal" //默认控件水平排列android:layout_width="fill_parent" //相对布局的有效范围android:layout_height="fill_parent"android:background="#ffffff"> //背景颜色<TextView android:id="@+id/text1" //第一个文本控件android:layout_width="wrap_content" //控件宽度和高度有文本决定android:layout_height="wrap_content"android:text="@string/hello"/>//文本内容:hello所定义的字符串<TextView android:id="@+id/text2" //第二个文本控件android:layout_width="wrap_content" //同上android:layout_height="wrap_content"android:layout_below="@id/text1"//这里实现text2布局在text1的下方android:text="Hello,It's Huweiwei's Android Project !"//内容android:textStyle="bold"/>//文本字体样式,这里是粗体<EditText android:id="@+id/ET1"android:layout_width="fill_parent"android:layout_height="wrap_content"android:layout_below="@id/text2"android:hint="Input what you want to say to TA"android:shadowColor="#ff0000"/>//边框阴影眼测<TextView android:id="@+id/text3"android:layout_width="wrap_content"android:layout_height="wrap_content"android:layout_below="@id/ET1"android:text="Do you miss Miss TA^0^?"android:textStyle="bold"/><RadioGroup android:layout_width="wrap_content"//这里定义了一对单项android:layout_height="wrap_content" //选择,水平排列android:checkedButton="@+id/RB1"android:orientation="horizontal"android:layout_below="@id/text3"android:id="@+id/menu"><RadioButton android:id="@+id/RB1"android:layout_width="wrap_content"android:layout_height="wrap_content"android:text="Yes!^0^)/"android:textStyle="normal"android:textColor="#000000"/><RadioButton android:id="@+id/RB2"android:layout_width="wrap_content"android:layout_height="wrap_content"android:textColor="#000000"android:text="No~(T_T)"android:textStyle="normal"/></RadioGroup><TextView android:id="@+id/text4"android:layout_width="wrap_content"android:layout_height="wrap_content"android:layout_below="@id/menu"android:text="Button,Do you want to marry with ImageView?"android:textStyle="bold"/><ImageView android:id="@+id/IM1"android:layout_width="wrap_content"android:layout_height="wrap_content"android:layout_below="@id/text4"android:src="@drawable/icon"/>//图像来源<Button android:id="@+id/button1"android:layout_width="wrap_content"android:layout_height="wrap_content"android:layout_toRightOf="@id/IM1"//button1安置在IM1的左侧,并且android:layout_alignTop="@id/IM1"//与IM1并排android:text="Yes T do !"android:textColor="#0000ff"/><TextView android:id="@+id/text6"android:layout_width="wrap_content"android:layout_height="wrap_content"android:layout_below="@id/text4"android:layout_toRightOf="@id/button1"android:visibility="invisible"android:layout_marginTop="10dip" //在文本上方预留10dip的空间android:text="Congratulations!"android:textStyle="bold"/><TextView android:id="@+id/text5"android:layout_width="wrap_content"android:layout_height="wrap_content"android:layout_below="@id/button1"android:visibility="invisible" //设置text5默认情况下不可见android:text="Years later their son was born~,It'sImageButton~"android:textStyle="bold"/><ImageButton android:layout_below="@+id/text5"android:id="@+id/ImageButton01"android:layout_width="wrap_content"android:layout_height="wrap_content"android:visibility="invisible"android:src="@drawable/icon"></ImageButton></RelativeLayout>以上完成了对各个控件的布局,由于是第一次使用xml文件进行布局工作,对控件的各种属性都不了解,因此我并没有采用拖拉的方法编写xml文件,而是一句句的编写,这虽然会花费相当长的时间,但我觉得这是值得的,因为在这个过程中,我知道了控件的每个属性的不同值决定控件怎样的特性,还有不同的控件之间的关系如何用他们的属性表示,这对以后的工作会有很大帮助的。
首先对菜单进行完善。
1.我们在上一次的基础上再加入一些常用菜单。
“文件”的子菜单如下图。
中间的分割线可以点击Add Separator添加。
“编辑”子菜单的内容如下。
“帮助”子菜单的内容如下。
2.我们在动作编辑器中对各个菜单的属性进行设置。
如下图。
3.我们拖动“新建”菜单的图标,将其放到工具栏里。
拖动“新建”菜单的图标。
将其放到菜单栏下面的工具栏里。
4.我们再添加其他几个图标。
使用Append Separator可以添加分割线。
5.最终效果如下。
如果需要删除图标,可以在图标上点击右键选择Remove action即可。
下面简述一下布局管理器。
(这里主要以垂直布局管理器进行讲解,其他类型管理器用法与之相同,其效果可自己验证。
)1.在左边的器件栏里拖入三个PushButton和一个Vertical Layout(垂直布局管理器)到中心面板。
如下图。
2.将这三个按钮放入垂直布局管理器,效果如下。
可以看到按钮垂直方向排列,并且宽度可以改变,但高度没有改变。
3.我们将布局管理器整体选中,按下上面工具栏的Break Layout按钮,便可取消布局管理器。
(我们当然也可以先将按钮移出,再按下Delete键将布局管理器删除。
)4.下面我们改用分裂器部件(QSplitter)。
先将三个按钮同时选中,再按下上面工具栏的Lay Out Vertically in Splitter(垂直分裂器)。
效果如下图。
可以看到按钮的大小可以随之改动。
这也就是分裂器和布局管理器的分别。
5.其实布局管理器不但能控制器件的布局,还有个很重要的用途是,它能使器件的大小随着窗口大小的改变而改变。
我们先在主窗口的中心拖入一个文本编辑器Text Edit。
这时直接运行程序,效果如下。
可以看到它的大小和位置不会随着窗口改变。
下面我们选中主窗口部件,然后在空白处点击鼠标右键,选择Layout->Lay Out in a Grid,使整个主窗口的中心区处于网格布局管理器中。
实验2、View及布局管理器的使用
一、实验目的
1、了解View类、ViewGroup的作用
2、掌握常用布局管理器的使用
3、掌握XML界面控制的设计方法
4、从本周起,以后每次小课的实验内容,要求上传FTP。
二、实验步骤
1、线性布局的例子,补充代码,使程序运行效果如下所示
图1 线性布局
LinearlayoutDemo.java代码不用做任何修改,直接通过main.xml文件控制UI 界面。
下面是布局文件main.xml中的内容,请补充完整,实现图1中的界面:<?xml version="1.0"encoding="utf-8"?>
<LinearLayout xmlns:android="/apk/res/android"
android:layout_width="fill_parent"
android:layout_height="fill_parent"
android:orientation="vertical">//排列方式(horizontal水平排列,vertical垂直排列)
<TextView
android:id="@+id/firstText"
android:layout_width=" fill_parent "
android:layout_height="wrap_content"
android: layout_weight ="2"//设置所占相对宽度
android:background="#aa0000"
android:gravity="center_vertical"//设置主件对齐方式
android:singleLine="true"//若为true,看不到的文字用……表示
android:text=" 广州大学华软软件学院"
android:textSize="15pt"/>
<TextView
android:id="@+id/secondText"
android:layout_width="fill_parent"
android:layout_height="wrap_content"
android: layout_height ="1"
android:background ="#0000aa"
android:gravity ="center_vertical"
android:text="软件工程系"
android:textSize="15pt"/>
</LinearLayout>
2、相对布局管理器的使用,补充代码,使程序运行的效果如下图所示:
图2相对布局运行效果
RelativeLayoutDemo.java中的源代码如下所示:
下面是布局文件main.xml中的内容,请补充完整,实现图2中的界面:<?xml version="1.0"encoding="utf-8"?>
<RelativeLayout xmlns:android="/apk/res/android"
android:layout_width="fill_parent"
android:layout_height="fill_parent"
>
<!--该TextView文本框下边设置15dip页边距-->
<TextView
android:id="@+id/label"
android:layout_width="fill_parent"
android:layout_height="wrap_content"
android:text="Type here:"
android:textSize="12pt"
android:textStyle="bold"
android:textColor="#AA0000"
android:layout_marginBottom ="15dip"/>
<EditText
android:id="@+id/entry"
android:layout_width="fill_parent"
android:layout_height="wrap_content"
android:background="@android:drawable/editbox_background"
android:layout_above="@id/label"/>
<!--”OK”按钮左边设置10px页边距-->
<Button
android:id="@+id/ok"
android:layout_width="wrap_content"
android:layout_height="wrap_content"
android:layout_below="@id/label"
android:layout_alignParentRight="true"
android:layout_marginLeft ="10dip"
android:text="OK"/>
<!--Cancel按钮为于id为“ok”的按钮左边,而且两个按钮顶部对齐--> <Button
android:layout_width="wrap_content"
android:layout_height="wrap_content"
android:layout_alignBaseline="@+id/ok"
android:layout_toLeftOf ="@+id/ok"
android:layout_alignTop ="@+id/ok"
android:text="Cancel"/>
</RelativeLayout>
3.布局管理器的嵌套,编写程序,在模拟器中实现如下的效果界面,选择合适的布局管理器。
图3 布局管理器综合运用效果图
提示:
1、所示界面最外层的布局管理是线性布局,接着放置了一个TextView 组
件,用于显示一句话,如图中所示。
2、接着是嵌入了一个框架布局,4个TextView叠在一起,颜色的属性值
从外到内依次为:#0000bb、#004433、#00aa00、#00dddd。
3、最后嵌入了一个表格布局,放置了两行的按钮如图所示,且第2列设
置属性为stretchColumns。