环境气象仪使用说明书
- 格式:docx
- 大小:273.75 KB
- 文档页数:5
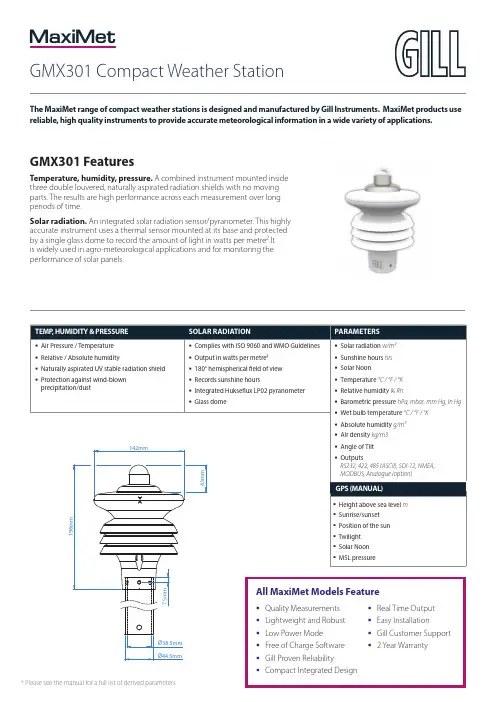
环境温湿度测量仪使用说明书一、产品概述环境温湿度测量仪是一款用于测量环境中温度和湿度的便携式仪器。
其具备精确测量、便捷携带和操作简单等特点,广泛应用于工业生产、农业、医疗、仓储等领域。
本使用说明书旨在帮助用户正确地操作和使用环境温湿度测量仪。
二、产品特点1. 精确测量:环境温湿度测量仪采用高精度传感器,可以准确测量环境中的温度和湿度。
2. 显示直观:仪器配备大屏幕液晶显示屏,可以清晰地显示当前的温湿度数值。
3. 数据记录:环境温湿度测量仪内置数据记录功能,可以记录一段时间内的温湿度变化。
4. 报警提示:仪器设有报警功能,当温湿度超出设定范围时,会发出警报提醒用户。
5. 多种单位显示:用户可以根据需要选择温湿度的显示单位,如摄氏度/华氏度、相对湿度/露点等。
三、使用步骤1. 打开电源:长按仪器侧面的电源开关按钮,待显示屏亮起后松开按钮,仪器即开机完毕。
2. 设置测量模式:通过方向键选择温度或湿度测量模式,并按确认键进行确认。
3. 选择显示单位:在测量模式确认后,通过方向键选择温湿度的显示单位,并按确认键进行确认。
4. 进行测量:将仪器的温湿度测量头置于要测量的环境中,并等待数秒,待数值稳定后,记录显示屏上的温湿度数值。
5. 数据记录:若需要记录一段时间内的温湿度变化,按下仪器上的记录按钮即可开始记录。
待记录结束后,再次按下记录按钮停止记录。
6. 报警设置:若需要设置温湿度报警范围,按下仪器上的报警设置按钮,通过方向键设置报警上下限,并按确认键进行确认。
7. 关闭仪器:长按电源开关按钮,直到显示屏关闭,仪器即关机完毕。
四、注意事项1. 仪器对温湿度测量环境有一定的要求,请确保测量环境相对稳定,避免阳光直射、大风吹拂等干扰因素。
2. 使用过程中请轻拿轻放,避免剧烈震动或摔落,以免损坏仪器。
3. 仪器需要定期校准,以保证测量结果的准确性,建议每半年进行一次校准。
4. 若长时间不使用该仪器,请取出电池,以免电池漏液损坏仪器。
手持气象仪使用方法
嘿,咱聊聊手持气象仪使用方法呗。
这手持气象仪啊,用起来还挺方便的呢。
首先呢,拿到手持气象仪,先看看说明书呗。
了解一下各个按钮是干啥的,别瞎按一通。
就像你买了个新手机,总得先看看说明书,知道咋用吧。
然后呢,打开气象仪。
一般都有个开关按钮,按一下就开了。
屏幕上会显示各种数据,比如温度、湿度、气压啥的。
这时候你可以拿着气象仪到处走走,看看不同地方的气象情况。
接着,如果你想测量风向,那就得把气象仪举起来,让它对着风的方向。
它上面可能有个小箭头啥的,指示风向。
你可以站在不同的位置,感受一下风是从哪个方向吹来的。
就像你放风筝的时候,得看看风向,好让风筝飞得更高。
还有啊,如果你想测量降雨量,那可能得等下雨的时候。
有些手持气象仪有个小杯子啥的,可以收集雨水,然后测量降雨量。
不过这得等下雨,有点靠运气哦。
要是你想知道什么时候日出日落,有些气象仪也能显示呢。
你可以设置一下地点啥的,它就能告诉你当地的日出日落时间。
就像你计划去看日出,得先知道啥时候太阳出来吧。
举个例子哈,我有个朋友喜欢户外运动,他就买了个手持气象仪。
有一次他去爬山,带着气象仪。
一路上他可以随时看看温度、湿度,还能知道风向。
他说这可太方便了,能让他更好地准备装备,也能让他更安全地爬山。
所以啊,手持气象仪使用方法不难,只要多试试,就能用好它。
mdo34 使用手册一、产品概述MDo34是一款多功能数据记录仪,设计精巧,操作简单。
它可对各种环境参数进行实时监测、记录和报警,广泛应用于气象、农业、环保等领域。
MDo34以其卓越的性能和稳定的品质,为用户提供准确可靠的数据支持。
二、主要特点高精度数据采集:MDo34采用先进的传感器技术,确保数据的准确性和可靠性。
大容量存储:内置大容量存储芯片,可长时间记录数据。
多种报警功能:具有超限报警功能,及时提醒用户采取相应措施。
多种通讯方式:支持Wi-Fi、蓝牙等多种通讯方式,方便数据传输。
防水设计:外壳防水,适应各种恶劣环境。
三、使用方法开箱与安装:打开包装,取出MDo34主机,按照说明书上的步骤进行安装。
请确保放置平稳,无振动。
电源连接:将电源线插入MDo34主机,确保连接牢固。
请使用指定电源,避免电压过高或过低。
传感器连接:根据需要,将各类传感器连接到MDo34主机上。
确保传感器与主机接口紧密连接,防止松动或脱落。
开始使用:打开电源开关,等待设备自检完成。
此时,MDo34将开始采集并记录数据。
数据查看与导出:通过Wi-Fi或蓝牙连接设备到电脑或其他移动设备,使用配套软件查看数据或将其导出为Excel等格式进行分析。
报警设置:根据需要,设置各传感器的报警阈值。
当数据超过设定阈值时,MDo34将发出报警提示。
数据导出与备份:定期将存储芯片中的数据导出并备份,以防数据丢失。
保养与维护:定期检查设备外观及各部件是否正常。
如发现异常,请及时联系专业人员进行维修。
四、注意事项请勿在设备运行时随意拆卸或改装MDo34。
请在设备附近保持干燥,避免水滴溅入。
在使用过程中,请勿随意更改设备设置或连接未经测试的传感器。
如长时间不使用设备,请定期通电检查以确保设备正常工作。
EMM-03(04)型环境监测仪气象仪安装使用说明书北京市广达世纪科技有限公司目录1.0 前言2.0 用途3.0主要技术参数4.0 气象参数传感器4.1 05103V型风向风速监测仪(电压输出)05103L 型大气压传感器(电流输出)4.2.1 HD9408T 大气压传感器4.2 41002型鳃状多层盘状防辐射罩4.3.1 41372VC/VF型湿度/温度传感器4.3.2 41372L型温湿度变送器4.3.3 WS313A1T5温湿度变送器4.5 EMM-03(04)型环境监测气象仪显示器1.0 前言EMM-03(04)型环境监测气象仪是北京市广达世纪科技有限公司根据大气环境质量监测的需要采用美国YOUNG公司和意大利DELTAOHM公司的高精度,坚固耐用工业气象传感器组成。
EMM-03型环境监测气象仪监测风向WD、风速WS、空气温度T、空气相对湿度RH、大气压力BP五参数。
EMM-04型环境监测气象仪监测风向WD、风速WS,空气温度T、空气相对湿度RH、大气压力BP、太阳辐射SR和雨量RG等七参数特点:△每种气象传感器都是高精度,坚固耐用工业级气象传感器△每种传感器都带有电压(0-1VDC或0-5VDC)或电流(4-20maDC)信号输出,很容易与控制系统,遥控部件数、数据记录仪和显示器相连接。
△每种传感器均由8-24VDC或12-30VDC直流电流供电系统,统一供电12VDC△根据用户要求配置电缆长度△传感器的电子元件用海水级环氧树脂密封,用于全天候环境保护和很长的使用寿命。
△根据用户要求,可以配置显示器亦可配置数据记录器△每种传感器可以单独使用或多种传感器联合使用。
2.0 用途EMM-03(04)型环境监测气象仪是为大气环境质量监测专门配套的小环境气候的气象参数,可以用于大气环境质量固定监测站,亦大气环境质量可移动监测站(监测车上)。
亦可用于任何需要小环境气候监测的场所,该气象仪为连续自动监测气象仪,监测数据可根据要求自动记录或自动传输。

安装、使用产品前,请阅读使用维护说明书DZQ03A便携气象仪使用维护说明书长春希迈气象科技股份有限公司二○一三年一月目次1 概述 (1)2 主要战术技术指标和使用要求 (1)3 系统组成和主要功能 (2)4 操作使用 (8)5 故障分析与排除 (10)6 维护保养 (12)7 运输与贮存 (15)8 齐套性 (15)9 售后服务 (16)1 概述DZQ03A便携气象仪(以下简称便携仪)为机动、便携式压、温、湿、风综合自动地面气象观测仪器,主要由组合传感器、主机和三角架组成,可实现数据采集、处理、存储和显示等功能,配有RS-232(或RS-485)接口可与上位机进行实时通信。
具有精度高、时效快、功耗低、整体结构合理、操作使用方便等特点。
可广泛应用于野外机动条件下的气象环境监测。
2 主要技术指标和使用要求2.1 主要技术指标2.1.1 气压测量范围:500 hPa~1100 hPa;最大允许误差:±0.3 hPa;分辨力:0.1 hPa。
2.1.2 气温测量范围:-40 ℃~50 ℃;最大允许误差:±0.3 ℃;分辨力:0.1 ℃。
2.1.3 地表温度测量范围:-45 ℃~85 ℃;最大允许误差:±0.5 ℃;分辨力:0.1 ℃。
2.1.4 相对湿度测量范围:0~100 %RH;最大允许误差:±5 %RH;分辨力:1 %RH。
2.1.5 风向测量范围:0 °~360 °;最大允许误差:±5 °;分辨力:1 °;起动风速:≤0.5 m/s。
2.1.6 风速测量范围:0.5 m/s ~ 30 m/s;最大允许误差:±(0.5+0.03V) m/s;分辨力:0.1 m/s;起动风速:≤0.5 m/s。
2.1.7系统工作可靠性(MTBF):3000 h。
2.2 使用要求2.2.1 工作环境温度:-40 ℃~50 ℃; 相对湿度:0~100 %RH ;组合传感器抗风强度: 35 m/s 。
Met One Instruments, IncCorporate Sales & Service: 1600 NW Washington Blvd. Grants Pass, OR 97526Tel (541) 471-7111 Fax (541) 471-7116 ******************GT-324 M ANUALCopyright NoticeGT-324 Manual© Copyright 2018 - 2020 Met One Instruments, Inc. All Rights Reserved Worldwide. No part of this publication may be reproduced, transmitted, transcribed, stored in a retrieval system, or translated into any other language in any form by any means without the express written permission of Met One Instruments, Inc.Technical SupportShould you require support, please consult your printed documentation to resolve your problem. If you are still experiencing difficulty, you may contact a Technical Service representative during normal business hours—7:00 a.m. to 4:00 p.m. Pacific Standard Time, Monday through Friday.Voice: (541) 471-7111Fax: (541) 471-7116E-Mail: ******************Mail: Technical Services DepartmentMet One Instruments, Inc.1600 NW Washington BoulevardGrants Pass, OR 97526NOTICECAUTION—Use of controls or adjustments or performance ofprocedures other than those specified herein may result inhazardous radiation exposure.WARNING—This product, when properly installed and operated, isconsidered a Class I laser product. Class I products are notconsidered to be hazardous.There are no user serviceable parts located inside the cover of this device.Do not attempt to remove the cover of this product. Failure to comply with this instruction could cause accidental exposure to laser radiation.Table of Contents1.Introduction (4)2.Setup (4)2.1.Unpacking (4)yout (7)2.3.Default Settings (8)2.4.Initial Operation (8)er Interface (8)4.Operation (8)4.1.Power Up (8)4.2.Sample Screen (9)4.3.Sampling (10)5.Settings Menu (11)5.1.View Settings (11)5.2.Edit Settings (12)6.Serial Communications (15)6.1.Connection (15)mands (15)6.3.Real Time Output (16)ma Separated Value (CSV) (16)7.Maintenance (17)7.1.Charging the Battery (17)7.2.Service Schedule (18)7.3.Flash Upgrade (19)8.Troubleshooting (19)9.Specifications (20)Warranty / Service Information (21)1. IntroductionThe GT-324 is a small lightweight four channel hand held particle counter. Key features include:∙Simple user interface with multifunction rotary dial (rotate and press)∙8 hours continuous operation∙ 4 count channels. All channels are user selectable to 1 of 7 preset sizes:(0.3μm, 0.5μm, 0.7μm, 1.0μm, 2.5μm, 5.0μm and 10μm)∙Concentration and total count modes∙Fully integrated temperature/relative humidity sensor∙Password protection for user settings2. SetupThe following sections cover unpacking, layout and performing a test run to verify operation.2.1. UnpackingWhen unpacking the GT-324 and accessories, inspect the carton for obvious damage. If the carton is damaged notify the carrier. Unpack everything and make a visual inspection of the contents. Standard items (included) are shown inFigure 1 – Standard Accessories. Optional accessories are shown inFigure 2 – Optional Accessories.ATTENTION:The included USB drivers must be installed before connecting the GT-324 USB port to your computer. If the supplied drivers are not installed first, Windows may install generic drivers that are not compatible with this product. See section 6.1.To install USB drivers:Insert the Comet CD. The install program should run automatically and display the screen below. If an AutoPlay pop-up window appears, select “Run AutoRun.exe”. Finally, select “USB Drivers” to start the install process.Figure 1 – Standard AccessoriesGT-324MOI P/N: GT-324MOI P/N: 390031 USB CableMOI P/N: 500787 GT-324 ManualMOI P/N GT-324-9800 Calibration CertificateMOI P/N: GT-324-9600CDMOI P/N: 80248Carrying CaseMOI P/N: 8517Particle View Software CDMOI P/N ParticleViewMOI P/N: 400113IsoKinetic ProbeMOI P/N 83117Zero FilterMOI P/N G3111Flow MeterMOI P/N: 9801Figure 2 – Optional Accessories2.2. LayoutThe following figure shows the layout of the GT-324 and provides a description of the components.Figure 3 – GT-324 Layout2.3. Default SettingsThe GT-324 comes with the user settings configured as follows.2.4. Initial OperationThe battery should be charged for 2.5 hours prior to use. Refer to Section 7.1 of this manual for battery charging information.Complete the following steps to verify proper operation.1. Press the Power key for 0.5 seconds or more to turn on power.2. Observe the Startup screen for 3 seconds then the Sample screen (Section 4.2)3. Press Start / Stop key. The GT-324 will sample for 1 minute and stop.4. Observe the counts on the display5. Rotate the Select dial to view other sizes6. The unit is ready for use3. User InterfaceThe GT-324 user interface is composed of a rotary dial, 2 button keypad and an LCD display. The keypad and rotary dial are described in the following table.4. OperationThe following sections cover the basic operation of GT-324.4.1. Power UpPress the Power key to power up the GT-324. The first screen shown is the Startup Screen (Figure 4). The Startup Screen displays the product type and company website for approximately 3 seconds before loading the Sample Screen.4.1.1. Auto Power OffThe GT-324 will power down after 5 minutes to preserve battery power providing the unit is stopped (not counting) and there is no keyboard activity or serial communications.4.2. Sample ScreenThe Sample Screen displays sizes, counts, count units, and time remaining. The time remaining is displayed during sample events. The Sample Screen is shown in Figure 5 below.Channel 1 (0.3 ) is displayed on Sample Screen Line 1. Rotate the Select dial todisplay channels 2-4, battery status, ambient temperature, and relative humidity on line 2 (Figure 6).4.2.1. Warnings / ErrorsThe GT-324 has internal diagnostics to monitor critical functions such as low battery, system noise and an optical engine failure. Warnings / errors are displayed on Sample Screen Line 2. When this occurs, simply rotate the Select dial to view any size on the top line.A low battery warning occurs when there is approximately 15 minutes of sampling remaining before the unit stops sampling. A low battery condition is shown in Figure 7 below.Excessive system noise can result in false counts and reduced accuracy. The GT-324 automatically monitors system noise and displays a warning when the noise level is high. The primary cause of this condition is contamination in the optical engine. Figure 7 shows the Sample screen with a System Noise warning.Count Units (Section 4.3.3)Time RemainingA sensor error is reported when the GT-324 detects a failure in the optical sensor. Figure 9 shows a sensor error.4.3. SamplingThe following sub-sections cover sample related functions.4.3.1. Starting/StoppingPress the START/STOP key to start or stop a sample from the Sample Screen. Depending on the sample mode, the unit will either run a single sample or continuous samples. Sample modes are discussed in Section 4.3.2.4.3.2. Sample ModeThe sample mode controls single or continuous sampling. The Manual setting configures the unit for a single sample. The Continuous setting configures the unit for nonstop sampling.4.3.3. Count UnitsThe GT-324 supports total counts (TC), particles per cubic foot (CF), particles per cubic meter (M3) and particles per liter (/L). Concentration values (CF, /L, M3) are time dependent. These values may fluctuate early in the sample; however, after several seconds the measurement will stabilize. Longer samples (e.g. 60 seconds) will improve concentration measurement accuracy.4.3.4. Sample TimeSample time determines the sample duration. Sample time is user settable from 3 to 60 seconds and is discussed in Sample Timing below.4.3.5. Hold TimeThe hold time is used when Samples is set for more than one sample. The hold time represents the time from the completion of the last sample to the start of the next sample. The hold time is user settable from 0 – 9999 seconds.4.3.6. Sample TimingThe following figures depict the sample timing sequence for both manual and continuous sampling. Figure 10 shows the timing for manual sample mode. Figure 11 shows the timing for continuous sample mode. The Start section includes a 3 second purge time.Figure 10 – Manual Sample Mode//Figure 11 – Continuous Sample Mode5. Settings MenuUse the Settings Menu to view or change configuration options.5.1. View SettingsPress the Select dial to navigate to the Settings Menu. Rotate the Select dial to scroll through the settings in the following table. To return to the Sample screen, press Start/Stop or wait 7 seconds.The Settings menu contains the following items.5.1.1. View Sample HistoryPress the Select dial to navigate to the Settings Menu. Rotate the Select dial to the History selection. Follow the steps below to view sample history. To return to the Settings Menu, press Start/Stop or wait 7 seconds.5.2. Edit SettingsPress the Select dial to navigate to the Settings Menu. Rotate the Select dial to scroll to the desired setting then press the Select dial to edit the Setting. A blinking cursor will indicate edit mode. To cancel edit mode and return to the Settings Menu, pressStart/Stop.Edit mode is disabled when the GT-324 is sampling (see below).5.2.1. Password FeatureThe following screen is displayed if you attempt to edit a setting when the password feature is enabled. The unit will remain unlocked for a period of 5 minutes after a successful password unlock code is entered.6. Serial CommunicationsSerial communications, firmware field upgrades and real time output are provided via the USB port located on the side of the unit. 6.1.ConnectionATTENTION:The included USB driver CD must be installed before connecting the GT-324 USB port to your computer. If the supplied drivers are not installed first, Windows may install generic drivers that are not compatible with this product.To install USB drivers:Insert the USB Drivers CD. The install program should run automatically and display the screen below. If an AutoPlay pop-up window appears, select “Run AutoRun.exe”. Finally, select “USB Drivers” to start the install process.6.2. CommandsThe GT-324 provides serial commands for accessing stored data and settings. The protocol is compatible with terminal programs such as Comet, Putty or Windows HyperTerminal.The unit returns a prompt (‘*’) when it receives a carriage return to indicate a good connection. The following table lists the available commands and descriptions.Note:For proper communication, set the virtual COM port baud rate to 384006.3. Real Time OutputThe GT-324 outputs real time data at the end of each sample. The output format is a comma separated values (CSV). The following sections show the format.6.4. Comma Separated Value (CSV)A CSV header is included for multiple record transfers like Display All Data (2) or Display New Data (3).CSV Header:Time, Location, Sample Time, Size1, Count1 (units), Size2, Count2 (units), Size3, Count3 (units), Size4, Count4 (units), Ambient Temperature, RH, StatusCSV Example Record:31/AUG/2010 14:12:21, 001,060,0.3,12345,0.5,12345,5.0,12345,10,12345,22.3, 58,000<CR><LF>Note: Status bits: 000 = Normal, 016 = Low Battery, 032 = Sensor Error, 048 = Low battery and Sensor Error.7. MaintenanceWARNING:There are no user serviceable components inside this instrument. The covers on this instrument should not be removed or opened for servicing, calibration or any other purpose except by a factory-authorized person. To do so may result in exposure to invisible laser radiation that can cause eye injury.7.1. Charging the BatteryTo charge the battery, connect the battery charger module AC power cord to an AC power outlet and the battery charger DC plug to the socket on the side of the GT-324. The universal battery charger will work with power line voltages of 100 to 240 volts, at 50/60 Hz. The battery charger LED indicator will be Red when charging and Green when fully charged. A discharged battery pack will take approximately 2.5 hours to fully charge.There is no need to disconnect the charger between charging cycles because the charger enters a maintenance mode (trickle charge) when the battery is fully charged.7.2. Service ScheduleAlthough there are no customer serviceable components, there are service items which ensure the proper operation of the instrument. Table 1 shows the recommended service schedule for the GT-324.7.2.1. Flow Rate TestThe sample flow rate is factory set to 0.1cfm (2.83 lpm). Continued use can cause minor changes in flow which can reduce measurement accuracy. A flow calibration kit is available separately that includes everything needed to test and adjust the flow rate. To test the flow rate: remove the Isokinetic inlet. Attach the tubing connected to the flow meter (MOI# 9801) to the instrument inlet. Start a sample, and note the flow meter reading. The flow rate should be 0.10 CFM (2.83 LPM) 5%.If the flow is not within this tolerance, it can be adjusted by a trim pot located in an access hole in the side of the unit. Turn the adjustment pot clockwise to increase the flow and counter-clockwise to decrease the flow.7.2.1. Zero Count TestAir leaks or debris in the particle sensor can cause false counts which may result in significant count errors when sampling in clean environments. Perform the following zero count test weekly to ensure proper operation:1. Attach zero count filter to the inlet nozzle (PN G3111).2. Configure the unit as follows: Samples = MANUAL, Sample Time = 60 seconds,Volume = Total Count (TC)3. Start and complete a sample.4. The smallest particle size should have a count <= 1.desired.7.2.2. Annual CalibrationThe GT-324 should be sent back to Met One Instruments yearly for calibration and inspection. Particle counter calibration requires specialized equipment and training. The Met One Instruments calibration facility uses industry accepted methods such as ISO.In addition to calibration, the annual calibration includes the following preventative maintenance items to reduce unexpected failures:∙Inspect filter∙Inspect / clean optical sensor∙Inspect pump and tubing∙Cycle and test the battery∙Verify RH and Temperature measurements7.3. Flash UpgradeFirmware can be field upgraded via the USB port. Binary files and the flash program must be provided by Met One Instruments.8. TroubleshootingWARNING:There are no user serviceable components inside this instrument. The covers on this instrument should not be removed or opened for servicing, calibration or any other purpose except by a factory-authorized person. To do so may result in exposure to invisible laser radiation that can eye injury.The following table covers some common failure symptoms, causes and solutions.9. SpecificationsFeatures:Size Range:Count Channels:Size Selections: Accuracy: Concentration Limit: TemperatureRelative HumidityFlow Rate:Sampling Mode: Sampling Time:Data Storage: Display:Keyboard:Status Indicators: Calibration Measurement: Method:Light Source: Electrical:AC Adapter/Charger: Battery Type:Battery Operating Time: Battery Recharge Time: Communication: Physical:Height:Width:Thickness:Weight Environmental: Operating Temperature: HumidityStorage Temperature:0.3 to 10.0 microns4 channels preset to 0.3, 0.5, 5.0 and 10.0 μm 0.3, 0.5, 0.7, 1.0, 2.5, 5.0 and 10.0 μm± 10% to traceable standard3,000,000 particles/ft3± 2 °C± 3%0.1 CFM (2.83 L/min)Single or Continuous3 – 60 seconds2200 records2 line by 16-character LCD2 button with rotary dialLow BatteryNIST, ISOLight scatterLaser Diode, 35 mW, 780 nmAC to DC module, 100 – 240 VAC to 8.4 VDC Li-ion rechargeable Battery8 hours continuous use2.5 hours typicalUSB Mini B Type6.25” (15.9 cm)3.65” (9.3 cm)2.00” (5.1 cm)1.6 lbs – (0.73 kg)0º C to +50º C10 – 90%, noncondensing-20º C to +60º CWarranty / Service InformationGT-324 Manual Page 21 GT-324-9800 Rev C。
RYSWPH1系列环境监测仪自动气象站中文操作使用说明书(第四章)(2)北京瑞亿斯科技有限公司三.湿度传感器●湿度传感器可用来精确测量土壤、空气的湿度,广泛应用于气象、勘探、农业、林业、制造业、畜牧业等领域。
●湿度传感器可分为土壤湿度传感器和空气湿度传感器。
1.土壤湿度传感器土壤湿度传感器是一款高精度、高灵敏度的测量土壤湿度的传感器。
利用标准的湿敏元件可以精确测量一定面积的土壤湿度,利于采取措施让农作物更好地生长。
土壤湿度传感器土壤湿度传感器应用环境●规格指标²测量范围:8-42%(可精确测量)²准确度:±1%²温度范围:工作温度:0~65℃²贮藏温度:-20~70℃²重量:525g●输出方式²电流:4~20mA²电压:0.25~5V(可选)²供电:5 -18VDC 10-15mA²尺寸:9.5³3.8³24cm●校准和维护土壤湿度传感器应根据其使用时间和精度要求进行定期维护和校准,但需在指定授权的情况下进行。
敏感元件长期暴露在一些化学物质中,可能改变它的性能,缩短使用寿命。
应及时更换。
●突出特点²安装简单,可水平及垂直放置²精度高,功耗低²体积小巧,便于携带2.空气湿度传感器:空气湿度传感器可用来测量空气湿度,感应部件采用高分子薄膜湿敏电容,位于杆头部,这种具有感湿特性的电介质其介电常数随相对湿度而变化。
空气湿度传感器空气湿度传感器应用环境●仪器用途:气象观测、环境控制、露点测量、干燥处理、暖房、植物栽培、博物馆、展览会(馆)、纸张制造、存储、过程控制、养殖控制、纺织制造、存储●推荐使用:可配专用的防辐射罩,保护传感器免受太阳辐射和雨淋。
防辐射罩的机械结构,使得传感器安装及维护非常简单。
无须将防辐射罩拆下,即可对传感器进行安装及校准。
白色外表面可以反射阳光直接照射能量。
环境生态部工作人员的环境监测设备与仪器使用方法环境监测是环境管理的重要组成部分,用于评估和控制环境质量。
环境生态部工作人员在执行环境监测任务时,需要熟练掌握各种环境监测设备与仪器的使用方法。
本文将介绍几种常见的环境监测设备与仪器以及它们的正确使用方法。
一、大气监测仪器1.气象站气象站是用于监测大气的温度、湿度、气压、风速和风向等参数的仪器。
使用时,工作人员应根据气象站的使用说明书进行搭建和设置,并确保仪器放置在合适的位置,远离遮挡物或热源等干扰因素。
2.空气质量监测仪空气质量监测仪用于测量大气中的有害气体浓度以及微尘颗粒的含量。
使用时,工作人员应正确安装监测仪器,确保仪器与大气接触充分,并按照使用手册进行操作,保证监测结果的准确性。
二、水质监测设备1.水样采集器水样采集器主要用于采集各个水源的水样,以进行水质调查和分析。
使用时,工作人员应使用洁净的容器和工具采集水样,并注意防止污染。
2.水质分析仪水质分析仪用于测量水样中的各种物理、化学和生物指标。
使用前,工作人员应校准仪器,并按照使用手册指导进行样品准备、操作和数据处理等步骤。
三、土壤监测仪器1.土壤采样器土壤采样器用于采集土壤样品,以检测土壤的组成和污染情况。
使用时,工作人员应选择合适的采样器,根据采样点的特点进行采样,并注意采样时的卫生和安全。
2.土壤分析仪土壤分析仪用于测量土壤中的养分含量、重金属含量等指标。
使用前,工作人员应进行仪器的校准和准备样品,然后按照使用手册操作仪器进行分析。
四、噪声监测仪器1.噪声计噪声计用于测量环境中的噪声水平。
使用时,工作人员应根据监测要求选择合适的噪声计,并按照使用手册进行设置和操作。
同时,需注意仪器的放置位置以及避免其他干扰因素的影响。
2.音频分析仪音频分析仪用于对噪声的频率和幅度进行分析。
使用前,工作人员应校准仪器并设置相应参数,然后按照使用手册进行样品采集和分析。
总结:环境生态部工作人员在进行环境监测时,需要具备熟练的使用环境监测设备与仪器的能力。
环境监测设备使用说明书一、设备介绍环境监测设备是一种用于测量和监控环境参数的工具,主要用于检测空气质量、水质污染、噪音水平等方面。
该设备采用先进的传感技术和数据处理技术,能够准确地测量和分析环境中的各项指标,并提供相应的数据报告。
本说明书旨在帮助用户正确使用环境监测设备。
二、安全注意事项1. 使用前请认真阅读说明书,并按照说明操作设备。
2. 使用时请确保设备处于稳定的工作环境。
3. 在使用过程中,严禁拆卸设备或改动设备内部零部件。
4. 设备操作过程中请佩戴相应的防护设备,避免直接接触有害物质。
5. 如发现设备有异常情况,请立即停止使用,并联系专业人员进行维修。
三、设备操作步骤1. 检查设备是否完好无损,并接通电源。
2. 按照设备屏幕上的指示进行相应的设置,如日期、时间、监测参数等。
3. 将设备放置在待监测的位置,并确保设备与外部干扰物保持一定距离。
4. 开始监测后,设备将自动记录并存储数据,可通过设备屏幕或连接电脑进行实时查看。
5. 监测结束后,可根据需要导出监测数据,并进行相应的数据分析和报告生成。
四、设备维护保养1. 每次使用前,请检查设备是否正常,并保持设备清洁干燥。
2. 定期检查设备传感器的灵敏度,并根据需要进行校准。
3. 如设备长时间不用,建议存放在干燥通风处,并定期进行开机运行以保持设备状态。
4. 如设备损坏或有故障,请联系正规维修人员进行维修。
五、常见问题解答1. 问:如何判断设备是否准确?答:用户可通过与其他准确设备对比数据来判断。
2. 问:设备是否可用于户外环境监测?答:是的,设备可适应室内和室外各种复杂环境。
3. 问:如何导出设备数据?答:用户可将设备通过USB线连接至电脑,并按照设备指示进行操作。
4. 问:设备是否可用于长期连续监测?答:是的,设备具备长时间连续监测的能力,并具有数据自动存储功能。
六、其他说明本设备为高精度监测设备,请在正规环境监测操作指导下使用,并及时更新设备固件以获得更好的性能和体验。
手持式气象站使用说明书目录1、产品简介 (1)2、功能特点 (2)3、技术参数 (2)4、安装使用方法 (3)4.1传感器的安装 (3)4.2电池的安装 (3)4.3按键功能说明 (4)5、菜单说明 (4)5.1温度、湿度、风速、风向、时间及电池电量显示 (4)5.2参数修改 (4)5.2.1本机地址、存储间隔、语言设置及参数复位设置 (4)5.2.2系统时间设置 (5)6、软件的使用 (5)6.1软件的安装 (5)6.2软件的运行设置及使用方法 (7)6.3数据的导出方法 (11)7、注意事项 (12)8、附表风力(风速)等级表 (13)9、联系方式 (13)1、产品简介手持式气象站是一款携带方便,操作简单,集多项气象要素于一体的可移动式气象观测仪器。
系统采用精密传感器及智能芯片,能同时对风向、风速、大气压、温度、湿度五项气象要素进行准确测量。
内置大容量FLASH存储芯片可存储至少一年的气象数据;通用USB通讯接口,使用配套的USB线缆即可将数据下载到电脑,方便用户对气象数据的进一步处理分析。
本仪器可广泛应用于气象、环保、机场、农林、水文、军事、仓储、科学研究等领域。
2、功能特点●128×64大屏幕液晶显示温度、湿度、风速、气压值;●特制的风向刻度盘(16个方位)及指针用来指示实时风向;●大容量数据存储,最多可存储40960条气象数据(数据记录间隔可在1~240分钟之间设置);●通用USB通讯接口,方便数据下载;●系统语言可在中文和英文之间切换;●只需三节5号干电池供电;低功耗设计,长时间待机;●结构设计科学合理,方便携带。
3、技术参数气象参数测量要素测量范围精度分辨率单位风速0~45±0.30.1m/s风向16方位±1方位1方位方位大气温度-50~80±0.3℃0.1℃相对湿度0~100%±50.1%RH大气压力10~1100±0.30.1hPa电源5号干电池(3节)通讯USB存储4万条数据主机尺寸160mm×70mm×28mm整机尺寸405mm×100mm×100mm 重量约0.5Kg工作环境-20℃~80℃;5%RH~95%RH4、安装使用方法SETO N/O F F16.mm70.00 m m4.1传感器的安装(1)将风速传感器部件插入到手持气象仪顶部的传感器接口,并将固定螺盖顺时针拧紧。
用于优化室内控制的精确气象测量正如气象那样不可预测,对某些操作运行,如建筑物的自然冷却、高智能建筑物自动化系统以及温室中的通风控制等,实时局部气象数据十分之重要。
一种依赖于密集气象网络系统的替代方案就是使用现场可靠的多参数气象站。
那些小型气象站已经演化发展,变得更加价廉物美且更加可靠。
相关气象测量包括温度、相对湿度(RH)、湿球温度、露点、风速和风向、太阳辐射、大气压力、二氧化碳以及各种降水状态 (雨、雪、冻雨、冰雹等)。
用来测量各个此类参数的仪器可单独购买或者一起购买。
参数和组合仪器的选择将根据应用情 况来确定测量室外参数在大多数应用中,单个室外湿度和温度组合发射器是控制建筑物通风系统各个设置点的唯一参考点。
传感器的选择往往被人们忽略,然而这却是一个重要的环节,建筑物或使用维护负责人必须在建筑或项目的整个生命期间坚持使用传感器。
建议使用防尘、防化学品以及不受冷凝影响的湿度传感器。
最低建议精度为±3%相对湿度(最佳为±2%或更好);温度变化可接受范围为±1°C (±2°F)。
为了确保读数正确,湿度和温度发射器最好沿着建筑物的北向侧安装,以防阳光直射。
建议使用太阳辐射罩来防止阳光照射。
该装置最好安装在远离干燥器排风口或冷凝风机的排气处。
另外,该装置最好安装在常规平均积雪上方至少30厘米(12英寸)处。
自然通风系统中,压力差促使建筑物中新鲜空气的循环。
可通过改变风速和/或风向的方式来获得压力差。
通过监控风速和风向来打开或关闭风口或遮光栅格,以便促进新鲜空气的流动。
另外还可通过测量风速和风向来控制自动化百叶窗、窗帘、天窗以及可收缩屋顶,从而避免大风条件下造成的严重损害。
为了优化性能,风速计和风向标应安装在能防止空气流通的障碍物上方至少1.2米(4英尺)处。
一般情况下,将它们安装在杆子或柱子的端部。
另外,也可以在屋顶上方安装电视天线或管子。
可使用浪涌保护器来预防装置遭到电击。
DZQ6型便携式自动气象站说明书中环天仪(天津)气象仪器有限公司目录一、TYQ200采集器说明 (1)1.1采集器总体功能概述 (1)1.1.1数据采集部分 (1)1.1.2采集器支持的通信接口 (1)1.2采集器硬件技术指标 (1)1.2.1测量部分技术指标 (1)1.2.2电气技术指标 (2)1.3设备的安装与参数设置 (3)1.3.1接线图 (3)1.3.2设备的启动 (5)1.3.3设置参数的软件说明 (5)二、传感器的介绍及安装 (8)2.1DHC1型温湿度传感器 (8)2.1.1安装 (8)2.1.2 维护 (8)2.2XFY3-1型强风计 (9)2.2.1概述 (9)2.2.2工作原理 (9)2.3雨量传感器 (10)2.3.1概述 (10)2.3.2安装 (11)2.4气压传感器 (11)2.4.1 安装 (11)2.4.2 维护 (12)三、初次使用的基本流程 (12)一、TYQ200采集器说明1.1采集器总体功能概述1.1.1数据采集部分可以通过设置更改雨量值的系数,并且能够采集实时温度、风向、风速、湿度和气压等要素。
1.1.2采集器支持的通信接口该采集器自身具备无线数据通信功能,可支持中国移动的GSM/GPRS无线网络,采集器具体包含如下三种通信工作模式。
1.GPRS实时在线方式(只采用GPRS上报通信方式)通过GPRS发送数据,可以任意设置1~60分钟的数据上报时间间隔。
需要注意的是在设置参数时,有几方面是必须要设置的,即中心站IP地址、中心端口号、GPRS 接入点(为用户提供GPRS服务的服务商)。
2.短信方式(通过短信自动上报通讯数据)正点时刻自动通过短信方式,将正点数据发送到短信中心,这里必须要设置的是中心号码。
3.短信备份方式(以GPRS通讯为主要通讯方式,SMS为备份通讯方式)GPRS正常时,以GPRS通讯方式上报数据;当GPRS掉线等通讯不正常超过3分钟时,自动切换为SMS短信方式将小时数据上报到短信中心。
XZC2-2D型数字气象仪使用说明书北京同德创业科技有限公司感谢您选择本产品!本产品依据中华人民共和国机械行业标准—JB/T9468-1999制造生产。
本产品已通过计量器具型式批准。
本产品关键部件为风速风向传感器。
在安装使用前请仔细阅读《使用说明书》并请妥善保存,以备日后查阅。
目录一、主要用途 (3)二、显著特点 (3)三、显示术语 (3)四、技术指标 (3)五、基本原理 (5)六、键盘功能 (6)七、操作方法 (7)八、故障判断 (10)九、维护保养 (11)十、安装程序 (11)十一、安装方法 (12)十二、贮存环境 (12)十三、保证期限 (12)十四、装箱清单 (13)十五、订货须知 (13)十六、附图说明一、主要用途本仪器主要用于各种类型的舰船、海洋石油钻井平台以及海洋口岸气象台站,通过有线遥测迅速提供准确的气象数据:1.瞬时合成风速与瞬时合成风向。
2.2分钟平均合成风速与2分钟平均合成风向。
3.瞬时真风速与真风向。
4.2分钟平均真风速与2分钟平均真风向。
5.空气温度与空气相对湿度。
6.大气气压。
二、显著特点1.先进的计算机技术与传感器技术,仪器的可靠性大为提高。
2.大屏汉字显示可同时显示多项测量数据。
3.全中文菜单。
人机对话功能屏幕显示,使用更直观。
方便的健盘操作方式,可人工输入舰船的航速、航向。
4.参数单元采用320×240点阵液晶显示,即使在夜间或灯火管制的情况下,也能清晰地显示测量数据。
5.通过了“军检”和“船检”,显示出仪器的高质量。
6.独特的声、光大风报警功能,其报警风速值可根据用户要求任意预置。
7.仪器配有微型打印机,用户可根据需要把测量数据自动或手动打印存档。
其打印时间可根据用户要求任意预置。
8.仪器配有外接[GPS].卫星定位系统接口;用户可根据[GPS]协议提供数据预置。
9.仪器配有气压接口,可根据需要对实地进行测量。
10.数据存储功能,仪器配有大容量的存储器,可实时的存储、打印。
操作规程环境监测仪器操作环境监测仪器是现代环境科学研究和环境管理中不可或缺的工具之一。
为了保证环境监测仪器的准确性和可靠性,我们需要按照一定的操作规程进行仪器的操作。
本文将介绍环境监测仪器操作的一般步骤和注意事项。
一、准备工作1. 环境监测仪器应存放在干燥、通风良好的地方,远离任何可能对仪器造成损害的物质或环境因素。
2. 在使用环境监测仪器之前,务必查看仪器的电源和电池电量是否充足,如有不足应及时更换或充电。
3. 清理仪器表面的灰尘和污渍,确保仪器外部干净整洁。
二、操作步骤1. 打开环境监测仪器的电源,等待仪器自检完成。
在等待期间,不要操作其他按钮或者移动仪器。
2. 根据监测需求选择适当的监测项目和参数设置。
不同的环境监测仪器具有不同的功能和参数,应根据实际情况进行调整。
3. 将仪器传感器与监测样品充分接触,确保获取准确和可靠的监测数据。
面对监测样品,应按照仪器的说明书或指导进行正确操作。
4. 操作仪器时,应注意避免与其他电磁设备或干扰源的干扰。
尽量选择无干扰的环境进行监测。
5. 如果需要在不同位置进行监测,应先关闭仪器,然后按照步骤1重新启动仪器,确保数据的连续性和准确性。
6. 监测结束后,及时关闭电源,并按照仪器的存放要求将仪器归位。
三、注意事项1. 操作环境监测仪器需要具备一定的专业知识,应由经过培训并熟悉仪器操作的人员进行。
2. 在操作过程中,应严格按照操作规程进行,避免随意调整参数或操作仪器的其他按钮。
3. 避免将环境监测仪器暴露在恶劣的环境条件下,例如高温、低温、高湿度等,以免损坏仪器或影响监测结果的准确性。
4. 定期对环境监测仪器进行校准和维护,保证仪器的准确性和稳定性。
5. 在操作过程中,如发现仪器出现异常或故障,应及时停止使用并联系专业人员进行维修和处理。
结论环境监测仪器的操作规程对于获取准确、可靠的监测数据至关重要。
在操作环境监测仪器时,应遵循准备工作、操作步骤和注意事项,以确保仪器的正常运行和监测结果的准确性。
环境气象仪使用说明书
气象变化是影响农业生产的最大因素,我们国家自古就有风调雨顺一说,这里的风、雨其实都是气象里面的一种,只要风调雨顺农业收成就会更好,这也说明了气象对农业的影响力。
举个例子,比如种西瓜的瓜农,就希望西瓜成长期不要有太多过于频繁的降水或者突然的冰雹气象,因为这两各因素对西瓜的成长影响很大,传统模式农民了解气象都得靠天气预报,或者经验观察。
在现代化农业生产中,为了更好的了解,掌握当地的气象变化,我们托普云农研发了环境气象仪,可以监测当地小范围的气候环境变化,以便可以做到更多的防护措施。
托普云农环境气象仪被广泛应用于设施农业、林业、园艺、畜牧业等领域,该仪器可以快速测定温度、湿度、光照强度、光合有效辐射、风向风速、雨量、CO2浓度、土壤温度、土壤水分、土壤PH、土壤EC电导等环境气象参数。
今天我们介绍一下环境气象仪手持机的功能特性:
1、小巧美观便于携带,轻触式按键,大屏幕点阵式液晶显示,全中文菜单操作。
2、一键式切换,可以手动记录也可脱离电脑随时设置采样间隔,自动记录数据并存储。
3、交直流两用,既可拿到野外随时测量采集数据,也可长时间放置记录地点。
4、带GPS定位功能,数据自动采集、实时实地显示地点的地理坐标(经纬
度信息)并保存。
5、带语音播报功能,可对超限值进行语音报警设置,对超标的参数实时普通话语音播报,可直接播报出实时的环境参数值(选配)。
6、数据保存功能强大,带语音报警功能、GPS功能最多可储存12000组数据。
7、既可在主机上查看数据,也可导入计算机进行查看。
意外断电后,已保存在主机里的数据不丢失。
8、探头具有一致性,不同气象参数的传感器接口可以互换,不影响精度。
9、将传感器插入主机后,便可手动搜索到多种不同类别的传感器(类似于U盘和电脑相联接能自动感
10、仪器具有256通道同时检测的扩展功能,可以实现多点同步检测,可按需要自行组合。
11、固定式农业环境监测系统工作原理:
12、固定式农业环境监测系统/便携式无线墒情综合监测仪/便携式无线农业气象远程监测系采用GPRS或GSM传输方式,主要适合于长距离之间数据的收发。
GPRS通讯方式是采集点采集数据后,通过GPRS或GSM上传网络,用户可利用任意一台可以上网的电脑登陆并查看数据,稳定可靠,解决了同行业利用移动无线IP传输通讯经常掉线的麻烦。
数据稳定可靠无需担心突然断线,通讯费用按流量计费,适用于数据量大的应用模式。
手持农业气象监测仪也可称为环境气象仪、农业气象监测仪、农业气象记录仪,手持农业气象监测仪型号包括:TNHY-4型 /TNHY-5型 / TNHY-6型 / TNHY-7型 / TNHY-8型 / TNHY-9型 / TNHY-10型 /TNHY-11型
一、托普云农环境气象仪技术参数:
记录容量:设备内部Flash可存储近3万条数据,标配4G内存卡可无限存储,亦可与Flash中数据同时存储。
记录时间间隔:5分到99小时
经度:0~180°
纬度:0~90°
语音播报:中文普通话
工作电源:3.7V锂电池供电
工作电流:待机功耗10mA,其他功耗根据配置而定
三、托普云农环境气象仪型号列表注意:PH在系统里未集成。
以下参数可按
客户要求随意搭配。
型号仪器功能
TNHY-4温度、湿度、光照强度、CO2浓度,可选配语音报警功能。
TNHY-5温度、湿度、光照强度、光合有效辐射、CO2浓度,可选配语音报警功能。
TNHY-6温度、湿度、光照强度、CO2浓度、土壤温度、土壤水份,可选配语音报
警功能。
TNHY-7温度、湿度、光照强度、光合有效辐射、CO2浓度、土壤温度、土壤水份,可选配语音报警功能。
TNHY-8温度、湿度、光照强度、光合有效辐射、CO2浓度、土壤温度、土壤水份、土壤盐分,可选配语音报警功能。
TNHY-9温度、湿度、光照强度、光合有效辐射、CO2浓度、土壤温度、土壤水份、土壤紧实度、土壤盐分,可选配语音报警功能。
TNHY-10温度、湿度、光照强度、光合有效辐射、CO2浓度、土壤温度、土壤水份、风向、风速、雨量,可选配语音报警功能。
TNHY-11温度、湿度、光照强度、光合有效辐射、风向风速、雨量、CO2浓度、土
壤温度、土壤水份、土壤紧实度、土壤盐分,可选配语音报警功能。
TNHY-12温度、湿度、光照强度、光合有效辐射、风向风速、雨量、CO2浓度、土
壤温度、土壤水份、土壤PH、土壤盐分,土壤紧实度,可选配语音报警功能。
TNHY-13温度、湿度、光照强度、光合有效辐射、总辐射、风向风速、雨量、CO2
浓度、土壤温度、土壤水份、土壤PH、土壤盐分,土壤紧实度,可选配语音
报警功能。
型号仪器功能
TNHY-4-G具备TNHY-4所有功能外加配GPS定位功能
TNHY-5-G具备TNHY-5所有功能外加配GPS定位功能
TNHY-6-G具备TNHY-6所有功能外加配GPS定位功能
TNHY-7-G具备TNHY-7所有功能外加配GPS定位功能
TNHY-8-G具备TNHY-8所有功能外加配GPS定位功能
TNHY-9-G具备TNHY-9所有功能外加配GPS定位功能
TNHY-10-G具备TNHY-10所有功能外加配GPS定位功能
TNHY-11-G具备TNHY-11所有功能外加配GPS定位功能
TNHY-12-G具备TNHY-12所有功能外加配GPS定位功能
TNHY-13-G具备TNHY-13所有功能外加配GPS定位功能
四、托普云农环境气象仪功能特点:
1、小巧美观便于携带,轻触式按键,大屏幕点阵式液晶显示,全中文菜单操作。
2、采集设置:在无人看守的情况下使用,可设置定时采集,也可手动采集。
自动记录数据并存储。
3、交直流两用,内置锂电池供电:3.7v4Ah锂电池,具有充电保护、电压过低提示功能。
也可长时间放置记录地点。
4、带GPS定位功能,可实时显示采集点经纬度并保存。
(选配)
5、带语音播报功能,可对超限值进行语音报警设置,对超标的参数实时普通话语音播报,亦可直接播报出实时的环境参数值。
6、数据保存功能强大,设备内部Flash可存储最近3万条数据,标配4G内存卡可无限存储,亦可与Flash中数据同时存储。
7、既可在主机上查看数据,也可导入计算机进行查看。
8、意外断电后,已保存在主机里的数据不丢失。
9、探头具有一致性,主机可通过集线器接入不同类型的传感器,互不影响精度。
10、将传感器插入主机后便可手动搜索到多种不同类别的传感器(类似于U 盘和电脑相联接能自动感应)。
11、仪器具有32通道同时检测的扩展功能,可以实现多点同步检测,可按需要自行组合。
12、有线RS485通讯,传感器通讯电缆最远可以达到100米
13、低功耗设计,增加系统监控和保护措施,防止电源短路或外部干扰而损坏,避免系统死机。
五、托普云农环境气象仪上位机软件功能:
1、显示每种参数过程曲线趋势,最大值、最小值、平均值显示查看,放大、缩小功能。
2、具有设置超限区域着色功能,显示更直观,为客户带来更多便捷。
3、可将存储记录的数据以EXCEL格式备份保存,方便以后调用。
4、每种参数的报表、曲线图均可选择时段查询查看,并可通过计算机打印。
5、曲线坐标均可自行设置和移动,分析历史走向更清晰、时间把握更明朗。
其他气象仪器:温室小管家、温湿光三参数记录仪、二氧化碳记录仪、土壤温度记录仪、光合有效辐射计、积温积光仪、农林小气候信息采集系统
公司简介:
浙江托普云农科技股份有限公司
农业物联网、农业信息化综合解决方案服务商
托普云农潜心十二年致力于中国农业信息化发展,同时提供面向土壤、农业气象、种子、植物生理、植物保护、粮油食品等监测检测精准农业仪器装备。
迄今为止已获国家发明专利5项、实用新型专利42项,软件著作权70余项,软件登记证书18项,被评为国家高新技术企业、杭州市院士工作站,研发实力强!受到多位行业专家及行业领导认可,智能硬件及农业信息化应用遍及全国!
上市公司(股票代码:833692)、大品牌,质量信得过、售后有保障!。