飞利浦fac01sa1说明书
- 格式:docx
- 大小:11.34 KB
- 文档页数:1

2 Series plaque control1 mode 1 brush headHX6211/05Removes up to 6X more plaque**than a manual toothbrushOffers you superior plaque removal at the push of a buttonProvides a superior clean you can see and feelSonicare dynamic cleaning action drives fluid between teeth Removes up to 7x more plaque than a manual toothbrush Angled brush head for better access to back teethBetter cleaning in hard-to-reach areas than a manual brush Guides you to follow dentist recommendationsSmarTimer helps you meet recommended brushing time Quadpacer interval timer encourages thorough brushing Offers a customized brushing experienceEasyStart program helps you adjust from a manual toothbrush Recommended by dental professionals world wide Better plaque removal to help reduce cavities Safe on orthodontics, dental work and veneersHighlightsHelps reduce cavitiesProvides better plaque removal and access to back teeth; brushing twice a day every day with this brush can help reduce cavitiesUp to 7x better plaque removalRemoves up to 7x more plaque than a manual toothbrush for a superior cleanSonic technologyOur sonic technology creates a uniquedynamic cleaning action that drives fluid deep between teeth and along the gumline for a thorough-yet-gentle cleanSafe and gentleThe gentle motion of this Philips Sonicare power toothbrush is safe for dental work,including orthodontics, implants and veneers,so you can brush without worry.Better access to back teethThis plaque-removing toothbrush has a slim,angled brush head which provides betteraccess to back teeth and hard-to-reach places.Better in hard-to-reach areasThe slim, angled neck and easy-grip handle of this toothbrush helps with better cleaning in hard-to-reach areas than a manual toothbrushEasyStartThe EasyStart feature adjusts the power level of the toothbrush over the first 14 uses to help you get used to the Sonicare experience,streamlining the transition from a manual toothbrushSmarTimerThis Philips Sonicare power toothbrushfeatures a special SmarTimer to help you meet the dentist-recommended brushing time of two minutesQuadpacerFeatures a Quadpacer interval timer to help encourage thorough brushing of the entire mouth. The toothbrush beeps every 30seconds, signifying it's time to move to another area of the mouth.SpecificationsModesClean: For exceptional everyday clean Items includedHandles: 1 2 Series plaque control Brush heads: 1 ProResults plaque control Charger: 1Travel case: 1Design and finishingColor: Pastel pink Cleaning performanceSpeed: Up to 31000 brush movement/minPerformance: Removes up to 6X more plaque*Health benefits: Helps reduce cavitiesTimer: Quadpacer and SmarTimerEase of useBrush head system: Easy click-on brush headsBrushing time: Up to 2 weeksBattery indicator: Light shows battery statusHandle: Slim ergonomic designT echnical specificationsBattery: RechargeableBattery type: NiMHOperating time (full to empty): Up to 2 weeksPowerVoltage: 110-220 VServiceWarranty: 2-year limited warranty* Removes up to 7x more plaque vs. a manual toothbrush© 2021 Koninklijke Philips N.V.All Rights reserved.Specifications are subject to change without notice. Trademarks are the property of Koninklijke Philips N.V. or their respective owners.Issue date 2021‑05‑28 Version: 2.0.1。

AC4002AC4004在以下位置注冊產品及獲取支援/welcome使用手冊41繁體中文繁體中文42繁體中文435 將濾網 4 (HEPA 濾網) 裝回產品。
注意: 請確認有拉片的那一側朝向自己。
6 將濾網 3 (活性碳濾網) 裝回產品。
7 僅限 AC4004:將濾網 2 (全效濾網) 安裝於濾網 1 (前層濾網) 後方。
注意: 請確認濾網 2 (全效濾網) 前側,即有拉片的那一側朝向前層濾網。
8 將濾網 1 (前層濾網) 裝回產品。
注意: AC4004:請確認全效濾網是安裝於前層濾網的後方。
.注意: 請確認有兩個凸出部分的那一側朝向自己。
注意: 請確認所有扣鉤皆已正確裝入產品。
繁體中文44繁體中文485 若要取出濾網 3 (活性碳濾網),抓住濾網拉片,朝向自己拉出。
6 若要取出濾網 4 (HEPA 濾網),抓住濾網拉片,朝向自己拉出。
7 丟棄需要更換的濾網,拆開新濾網的包裝。
8 將濾網 4 (HEPA 濾網) 裝回產品。
注意: 請確認有拉片的那一側朝向自己。
9 將濾網 3 (活性碳濾網) 裝回產品。
10 僅限 AC4004:將濾網 2 (全效濾網) 重新安裝於濾網 1 (前層濾網) 後方。
注意: 請確認全效濾網正面朝向前層濾網。
繁體中文52繁體中文54繁體中文55繁體中文56© 2012 Koninklijke Philips Electronics N.V. All rights reserved.4222 002 73127 12172。

SW7700™ Lucas lm Ltd.English 6简体中文 25IntroductionCongratulations on your purchase and welcome to Philips! To fully benefit from the support that Philips offers, register your product at/welcome .Please read this user manual, as it contains information about the features of this shaver as well as some tips to make shaving easier and more enjoyable.General description (Fig. 1)1Shaving unit with hair chamber2On/off button3Replacement reminder4Cleaning reminder5Travel lock symbol6Unplug for use symbol7Battery status indicator8Socket for small plug9Click-on precision trimmer attachment 10Supply unit11Small plug12PouchImportant safety informationRead this important information carefully before you use the appliance and its accessories and save it for future reference. The accessories supplied may vary for different products.6EnglishDanger-Keep the supply unit dry.Warning -To charge the battery, only use the detachable supply unit (HQ8505) provided with theappliance.-The supply unit contains a transformer. Do not cut off the supply unit to replace it with another plug, as this causes a hazardous situation.-This appliance can be used by children aged from 8 years and above and persons withreduced physical, sensory or mental capabilities or lack of experience and knowledge if they have been given supervision or instruction concerning use of the appliance in a safe way and understand the hazards involved. Children shall not play with the appliance. Cleaning and user maintenance shall not be made bychildren without supervision.-Always unplug the shaver before you clean it under the tap.-Always check the appliance before you use it.Do not use the appliance if it is damaged, as this may cause injury. Always replace adamaged part with one of the original type.-Do not open the appliance to replace the rechargeable battery.7EnglishCaution-Never immerse the cleaning system or the charging stand in water and do not rinse it under the tap.-Never use water hotter than 60°C to rinse the shaver.-Only use this appliance for its intended purpose as shown in the user manual.-For hygienic reasons, the appliance should only be used by one person.-Never use compressed air, scouring pads,abrasive cleaning agents or aggressive liquids such as petrol or acetone to clean theappliance.-If your shaver comes with a cleaning system,always use the original Philips cleaning fluid (cartridge or bottle, depending on the type of cleaning system).-Always place the cleaning system on a stable,level and horizontal surface to prevent leakage.-If your cleaning system uses a cleaning cartridge, always make sure the cartridge compartment is closed before you use the cleaning system to clean or charge the shaver.-When the cleaning system is ready for use, do not move it to prevent leakage of cleaning fluid.-Water may drip from the socket at the bottom of the shaver when you rinse it. This is normal and not dangerous because all electronics are enclosed in a sealed power unit inside the shaver.-Do not use the supply unit in or near wallsockets that contain an electric air freshener to prevent irreparable damage to the supply unit.8EnglishElectromagnetic fields (EMF)-This Philips appliance complies with allapplicable standards and regulations regarding exposure to electromagnetic fields.General-This shaver is waterproof. It is suitable for use in the bath or shower and for cleaning under the tap. For safety reasons, the shaver cantherefore only be used without cord.-The supply unit is suitable for mains voltages ranging from 100 to 240 volts.-The supply unit transforms 100-240 volts to a safe low voltage of less than 24 volts.When you press the on/off button for the very first time, all display indications light up in sequence.Charge the shaver before use.Quick charge: When the battery is empty and you connect the shaver to a wall socket, the lights of the battery status indicator light up white one after the other repeatedly. When the battery contains enough energy for one shave, the bottom light of the battery status indicator starts flashing white slowly.9EnglishWhile the shaver continues to charge, first thebottom light of the battery status indicator flasheswhite and then lights up white continuously. Thenthe second light flashes and lights upcontinuously, and so on until the shaver is fullycharged.Battery fully chargedNote: This shaver can only be used without a cord.When the battery is fully charged, all lights of thethe battery status indicator light up whitecontinuously.Note: When you press the on/off button during orafter charging, the 'unplug for use' symbol lights upto indicate that the shaver is still connected to thewall socket.Note: When the battery is full, the display switchesoff automatically after 30 minutes.Battery lowWhen the battery is almost empty, the bottom lightof the battery status indicator flashes orange.Remaining battery chargeThe remaining battery charge is shown by thelights of the battery charge indicator that light upcontinuously.10EnglishClean the shaver after every shave for optimal performance (see 'Cleaning and maintenance'). When you switch off the shaver, the cleaning reminder flashes to remind you to clean the shaver.You can lock the shaver when you are going to travel. The travel lock prevents the shaver from being switched on by accident (see 'Activating the travel lock').For maximum shaving performance, replace the shaving heads every two years. The shaver is equipped with a replacement reminder which reminds you to replace the shaving heads. The replacement reminder flashes to indicate that you have to replace the shaving heads (see 'Replacing the shaving heads').Note: After replacing the shaving heads, you need to reset the replacement reminder by pressing theon/off button for 7 seconds.ChargingCharge the shaver before you use it for the firsttime and when the display indicates that thebattery is almost empty.Charging takes approx. 1 hour. A fully chargedshaver has a shaving time of up to 60 minutes.Note: You cannot use the shaver while it ischarging.Charging with the supply unit1Make sure the shaver is switched off.2Put the small plug in the shaver and put thesupply unit in the wall socket.The display of the shaver indicates that theshaver is charging.3After charging, remove the supply unit from thewall socket and pull the small plug out of theshaver.in the bath or shower.-Use this shaver for its intended household useas described in this manual.-For hygienic reasons, the shaver should only beused by one person.-Trimming is easier when the skin and hair aredry.Note: This shaver can only be used without a cord.1To switch the shaver on or off, press the on/off button once.The replacement symbol lights up continuously when the shaver is switched on.Skin adaptation periodYour first shaves may not bring you the result you expect and your skin may even become slightly irritated. This is normal. Your skin and beard need time to adapt to any new shaving system. To allow your skin to adapt to this new appliance, we advise you to shave regularly (at least 3 times a week) and exclusively with this appliance for a period of 3 weeks.For the best results on skin comfort, pre-trim your beard if you have not shaved for 3 days or longer. Dry shaving1Switch the shaver on.2Move the shaving heads over your skin in circular movements to catch all hairs growing in different directions. Exert gentle pressure for a close, comfortable shave.Note: Do not press too hard, this can cause skin irritation.3Switch off and clean the shaver after each use.The display lights up for a few seconds to show the battery status.Wet shavingFor a more comfortable shave, you can also use this shaver on a wet face with shaving foam or shaving gel.1Apply some water to your skin.2Apply shaving foam or shaving gel to your skin. 3Rinse the shaving unit under the tap to ensure that the shaving unit glides smoothly over your skin.4Switch the shaver on.5Move the shaving heads over your skin in circular movements to catch all hairs growing in different directions. Exert gentle pressure for a close, comfortable shave.Note: Do not press too hard, this can cause skin irritation.Note: Rinse the shaving unit regularly to ensure that it continues to glide smoothly over yourskin.6Dry your face.7Switch off the shaver and clean it after eachuse.Note: Make sure that you rinse all foam or shavinggel off the shaver.Using the click-on attachmentRemoving or attaching the click-on attachment1Make sure the shaver is switched off.3Hold the trimmer perpendicular to the skin and move it downwards while exerting gentlepressure.4Switch off and clean the trimmer after use.You can lock the shaver when you are going to travel. The travel lock prevents the shaver from being switched on by accident.1Press the on/off button for 3 seconds to enter the travel lock mode.While you activate the travel lock, theindications on the display light up briefly. When the travel lock is activated, the travel locksymbol flashes.1Press the on/off button for 3 seconds.While you deactivate the travel lock, the indications on the display light up briefly. When the travel lock is deactivated, the travel lock symbol flashes and goes out. The shaver switches on and is now ready for use again.Note: The shaver unlocks automatically when it is connected to wall socket.Cleaning and maintenance-Regular cleaning guarantees better shavingresults.-Never clean, remove or replace the shaving unitwhile the shaver is switched on.-Do not apply pressure to shaving head combs.-Do not touch shaving heads with hard objectsas this may dent or damage the precision-madeslotted combs.-Do not use abrasives, scourers or aggressiveliquids such as gasoline or acetone to clean theshaver.Cleaning the shaver under the tapClean the shaver after every shave for optimal5Rinse the shaving head holder under a warm tap.6Carefully shake off excess water and let the shaving head holder air dry completely.7Attach the shaving head holder to the bottompart of the shaving unit (‘click’).Clean the trimmer after each use.1Switch the shaver on.2Rinse the trimmer under a warm tap.3After cleaning, switch off the shaver.4Carefully shake off excess water and let the attachment air dry completely.Tip: For optimal performance, lubricate theteeth of the attachment with a drop of sewingmachine oil regularly.ReplacementReplacing the shaving headsSwitch the shaver off.Pull the shaving head holder off the bottompart of the shaving unit.Turn the retaining ring anticlockwise and lift itoff the shaving head.Repeat this process for the other retaining rings.Place them aside in a safe place.Remove the shaving heads from the shavinghead holder.Discard the used shaving heads immediately toavoid mixing them with the new shaving heads.8To reset the replacement reminder, press and hold the on/off button for approx. 7 seconds.Store the shaver in the pouch.Note: Always let the shaver dry before you store itin the pouch.Ordering accessoriesTo buy accessories or spare parts, visit/service or go to yourPhilips dealer. You can also contact the PhilipsConsumer Care Center in your country (see theinternational warranty leaflet for contact details).The following accessories are available:-SH70 Philips shaving heads-RQ111 Philips beard styler-RQ585 Philips cleansing brush-RQ560, RQ563 Philips cleansing brush heads-HQ8505 supply unitNote: The availability of the accessories may differby country.Recycling-Do not throw away the product with the normalhousehold waste at the end of its life, but handit in at an official collection point for recycling.By doing this, you help to preserve theenvironment.21English-This product contains a built-in rechargeablebattery which shall not be disposed of withnormal household waste. We strongly adviseyou to take your product to an official collectionpoint or a Philips service centre to have aprofessional remove the rechargeable battery.-Follow your country’s rules for the separatecollection of electrical and electronic productsand rechargeable batteries. Correct disposalhelps prevent negative consequences for theenvironment and human health.Removing the rechargeable shaver batteryfront and back panel in the bottom of theappliance. Remove the back panel.2Remove the front panel.3Unscrew the two screws at the top of the inner panel and remove the inner panel.4Remove the rechargeable battery with ascrewdriver.22EnglishWarranty and supportIf you need information or support, please visit/support or read theinternational warranty leaflet.Warranty restrictionsThe shaving heads (cutters and guards) are notcovered by the terms of the international warrantybecause they are subject to wear. TroubleshootingShaverProblem Possible cause SolutionThe appliance does not work when I press the on/off button.The appliance is stillattached to the wallsocket. For safetyreasons, theappliance can onlybe used withoutcord.Unplug the appliance andpress the on/off button toswitch on the appliance.The rechargeablebattery is empty.Recharge the battery.The travel lock isactivated.Press the on/off button for3 seconds to deactivate thetravel lock.The shaving unit issoiled or damagedto such an extentthat the motorcannot run.Clean the shaving headsthoroughly or replacethem. Also see 'Hairs or dirtobstruct the shaving heads'for a detailed description ofhow to clean the shavingheads thoroughly.The appliance does not shave as well as it used to.The shaving headsare damaged orworn.Replace the shaving heads.23EnglishProblem Possible cause SolutionHairs or dirt obstruct the shaving heads.Clean the shaving heads in the regular way or clean them thoroughly.To clean the shaving heads thoroughly, remove the shaving heads from the shaving head holder one by one (see 'Replacement'). Then separate the cutter from its guard and rinse each matching set under the tap.After rinsing, place the cutter back into its corresponding guard.Finally, put the shaving heads back into the shaving head holder (see 'Replacement').I replaced the shaving heads,but the replacement reminder is still showing.You have not resetthe replacement reminder.To reset the replacement reminder, press and hold the on/off button for approx. 7 seconds.Water is leaking from the bottom of the appliance.During cleaning,water may collect between the inner body and the outer shell of the appliance.This is normal and not dangerous because allelectronics are enclosed in a sealed power unit inside the appliance.24English介绍感谢您的惠顾,欢迎光临飞利浦! 为了让您能充分享受飞利浦提供的支持,请在 /welcome 上注册您的产品。
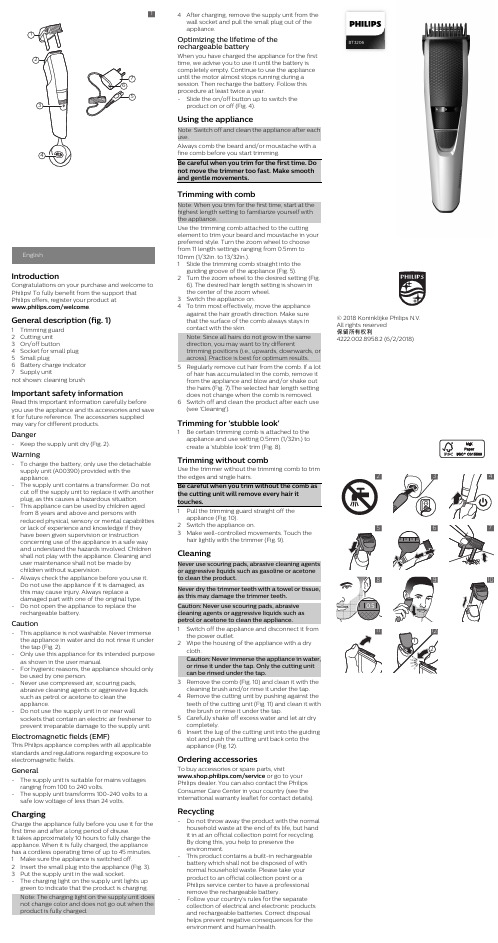
EnglishIntroductionCongratulations on your purchase and welcome to Philips! To fully benefit from the support that Philips offers, register your product at/welcome.General description (fig. 1)1Trimming guard2Cutting unit3On/off button4Socket for small plug5Small plug6Battery charge indcator7Supply unitnot shown: cleaning brushImportant safety informationRead this important information carefully before you use the appliance and its accessories and save it for future reference. The accessories supplied may vary for different products.Danger-Keep the supply unit dry (Fig. 2).Warning-To charge the battery, only use the detachable supply unit (A00390) provided with theappliance.-The supply unit contains a transformer. Do not cut off the supply unit to replace it with another plug, as this causes a hazardous situation.-This appliance can be used by children aged from 8 years and above and persons withreduced physical, sensory or mental capabilities or lack of experience and knowledge if theyhave been given supervision or instructionconcerning use of the appliance in a safe wayand understand the hazards involved. Children shall not play with the appliance. Cleaning and user maintenance shall not be made bychildren without supervision.-Always check the appliance before you use it.Do not use the appliance if it is damaged, asthis may cause injury. Always replace adamaged part with one of the original type.-Do not open the appliance to replace the rechargeable battery.Caution-This appliance is not washable. Never immerse the appliance in water and do not rinse it under the tap (Fig. 2).-Only use this appliance for its intended purpose as shown in the user manual.-For hygienic reasons, the appliance should only be used by one person.-Never use compressed air, scouring pads, abrasive cleaning agents or aggressive liquidssuch as petrol or acetone to clean theappliance.-Do not use the supply unit in or near wall sockets that contain an electric air freshener to prevent irreparable damage to the supply unit. Electromagnetic fields (EMF)This Philips appliance complies with all applicable standards and regulations regarding exposure to electromagnetic fields.General-The supply unit is suitable for mains voltages ranging from 100 to 240 volts.-The supply unit transforms 100-240 volts to a safe low voltage of less than 24 volts. ChargingCharge the appliance fully before you use it for the first time and after a long period of disuse.It takes approximately 10 hours to fully charge the appliance. When it is fully charged, the appliance has a cordless operating time of up to 45 minutes. 1Make sure the appliance is switched off.2Insert the small plug into the appliance (Fig. 3). 3Put the supply unit in the wall socket.-The charging light on the supply unit lights up green to indicate that the product is charging.Note: The charging light on the supply unit does not change color and does not go out when the product is fully charged.from 11 length settings ranging from 0.5mm to10mm (1/32in. to 13/32in.).1Slide the trimming comb straight into theguiding groove of the appliance (Fig. 5).2Turn the zoom wheel to the desired setting (Fig.6). The desired hair length setting is shown inthe center of the zoom wheel.3Switch the appliance on.4To trim most effectively, move the applianceagainst the hair growth direction. Make surethat the surface of the comb always stays inthe brush or rinse it under the tap.5Carefully shake off excess water and let air drycompletely.6Insert the lug of the cutting unit into the guidingslot and push the cutting unit back onto theappliance (Fig. 12).Ordering accessoriesTo buy accessories or spare parts, visit/service or go to yourPhilips dealer. You can also contact the PhilipsConsumer Care Center in your country (see theinternational warranty leaflet for contact details).Recycling-Do not throw away the product with the normalhousehold waste at the end of its life, but handit in at an official collection point for recycling.By doing this, you help to preserve theenvironment.-This product contains a built-in rechargeablebattery which shall not be disposed of withnormal household waste. Please take yourproduct to an official collection point or aPhilips service center to have a professionalremove the rechargeable battery.-Follow your country’s rules for the separatecollection of electrical and electronic productsand rechargeable batteries. Correct disposalhelps prevent negative consequences for theenvironment and human health.BT3206© 2018 Koninklijke Philips N.V.All rights reserved选择,长度范围在 0.5 毫米到 10 毫米(1/32 英寸到13/32 英寸)之间。

H-SERIES FUEL TRANSFER PUMPS FR1200, FR2400, FR4200, FR4400, FR600, SD1200, SD600Installation and Operation ManualTable of Contents Limited Warranty PolicyFill-Rite Company warrants the goods manufactured shall be free from defects of materials and workmanship. Specific warranty details for individualproducts can be found at .Thank You!Thank you for your loyalty to the Fill-Rite ® brand of fuel transfer pumps.Your safety is important, so please read and thoroughly understandthe procedures set forth in this manual. In addition, please save theseinstructions for future reference and record the model, serial number,and purchase date of your fuel transfer pump. Protect yourself as wellas those around you by observing all safety instructions and adhering toall danger, warning, and caution symbols. Please register your Fill-Rite ®product via /product_registration .IMPORTANT RETURN POLICYPlease do not return this product to the store . For all warranty and productquestions, please contact Fill-Rite Technical Support at 1 (800) 720-5192 or ***********************************(M-F,8AM–5PMET).Limited Warranty Policy .......................................................................2About This Manual ...............................................................................2Symbols and Definitions ......................................................................3Before You Begin .................................................................................3Safety Information ...............................................................................4Installation ..........................................................................................512V DC and 24V DC Wiring Instructions ...............................................7115V AC Wiring Instructions ................................................................10Operation Instructions .......................................................................12Security .............................................................................................12Troubleshooting Guide .. (12)Specifications and Models ..................................................................14Performance Curves ...........................................................................17Accessories ........................................................................................19Pump Service Kits (21)Certifications (22)Motor Tag (22)Before You BeginAbout This ManualFrom initial concept and design through final production, your Fill-Rite fuel transfer pump is built to provide years of trouble-free use. To ensure the safety of yourself and those around you, it is critical that this manual is read in its entirety prior to attempting to install or operate your new purchase. We strongly urge that any installer and operator become familiar with the terms, diagrams, and technical data in this manual and pay close attention to warningsymbols and definitions. At Fill-Rite, your satisfaction with our products is paramount. If you have questions or need assistance with your product, please contact Fill-Rite Technical Support at 1 (800) 720-5192 (M-F, 8am-5pm ET).• Adjustable Electrical Junction Box Rotates 180 degrees to provide ease of electrical wiring installation in tight quarters no matter the inlet bung location • Reliable, Heavy-Duty Power Switch Lever Features a cast metal stop that withstands heavy use in themost rugged environments • Locking Bar Defense Elongated bar simplifies the pad locking process to prevent theft • Focused Component Weight Reduction Preserves expected heavy-duty performance while improving installation ease • Premium Paint ShieldAn exemplary corrosion resistant barrier for long field life• Thermally Protected MotorPrevents overheating to ensure maximum motor life• Telescoping Inlet Metal Suction Pipe*Adjustable from 20 to 34 inches in length, allowing for universalinstallation on a multitude of tank sizes and shapes*Not included with SD models• Intake Strainer SafeguardProtects the pump by blocking particles created by contamination• Certifications – UL, cULFueling RequirementsThe Fill-Rite FR1200, FR2400, FR4200, FR4400, FR600 as well as SD1200 and SD600 models are designed and approved for use with the followingflammable and combustible fluids: gasoline and gasoline blends up to 15% or E15, diesel, biodiesel blends up to 20% or B20, kerosene, and mineral spirits. Please take all necessary precautions when handling flammable liquids.Power Source RequirementsDepending on the Fill-Rite model, supply line power will either be 12V DC, 24V DC, or 115V AC. The pump motor nameplate located next to the switch lever will provide detailed electrical information. Please refer to the appropriate electrical instructions found starting on Page 7 (DC power) or Page 10 (AC power).Items that may be needed for installation:Steel pipe wrench 14-24", open end wrench or socket (7/16", 11mm), T-25 Torx driver, utility knife, angle grinder or hacksaw (optional), wire cutters, wire stripper/crimper, and thread sealant (optional).NOTE : Fill-Rite provides Teflon ® tape for all models as listed on Page 16.H-Series Fuel Transfer Pumps Have the Following FeaturesSafety InformationTo ensure a safe installation and proper equipment operation, please read, understand, and adhere to all DANGER/WARNING/CAUTION and other NOTICES.Installation1-2"Min.1-2"Min.Stationary Tank For stationary fuel tanks, the pump mounts to the tank bung by way of the pump inlet flange. Given the different sizes of stationary fuel tanks, a custom suction or inlet pipe may be necessary. We recommend 1” NPTblack iron pipe that is extended to a length of at least 1-2” from the bottom of the tank, with the bottom of the pipe cut to an angle between 30-45 degrees for improved flow.A stationary tank must be equipped with a vent cap. (Diagram 1)Mobile TankFor mobile fuel tanks, the pump mounts to the tank bung by way of the pump inlet flange.For Telescoping Steel Suction PipeAllow telescoping tube to extend fully to the bottom of the tank. For Custom or PVC Suction PipeTo avoid penetrating the tank, we recommend leaving a minimum of 1-2”of the pipe off the bottom of tank. We further recommend cutting thesuction pipe to a 30-45 degree angle for improved flow.The mobile tank must be equipped with a vent cap. (Diagram 2)Vent CapVent CapInstallation ProcedureStep 1: (Optional) Inlet Flange RemovalLoosen (4) 1/4" bolts using 7/16" wrench or socket. Detach inlet bung from pump, retain bolts, screen, and gasket.Step 2: Using either included suction pipe or custom pipe, threadpipe into inlet bung 1.5 to 2.5 turns past hand tight with pipe wrench.Use appropriate sealant for fuel transfer.Step 3: Thread inlet bung with attached suction pipe onto tank 1.5 to2.5 turns past hand tight. Use appropriate sealant for fuel transfer.Step 4: (Only if Step 1 utilized) Place screen in screen pocket on the inletbung, mount gasket, then place pump on tank bung. Align holes and insert(4) 1/4" bolts and tighten with 7/16" wrench to 40 in.-lbs. minimum.Step 5: Remove junction box cover via (2) T-25 screws and locate wires.DC Voltage: 2 wires, Black and Red; AC Voltage: 3 wires, Black, White,and Green which is attached to internal ground screw. Ensure that gasket remains in place upon re-attachment of junction box.† opening into junction*. For AC models, attach40 in-lbs. The nozzle boot has two available position placements.* Black cable gland only included with DC models†1/2" NPT to cable gland, bronze fitting per ATEX on HE Models(2) T-25 SCREWS JUNCTION BOX CAP GASKETGASKETTANK BUNG SCREEN ½" NPTCONDUIT HOLE, THREADED JUNCTION BOX CAP (CAN BE ROTATED 180°)EARTH GROUNDSYMBOLHOLE POSITION POSTStep 712V DC and 24V DC Wiring InstructionsFR1200 / FR2400 / FR4200 / FR4400 / SD1200 Series DC Transfer PumpInstructions Before Proceeding with DC WiringThe pump needs to be electrically bonded to a vehicle frame for mobile tanks or a ground rod for stationary tanks. To electrically bond pump for mobile application, remove the external factory installed green bonding screw located on the junction box cover (Diagram 3). Insert this screw through eyelet of furnished green bonding wire assembly and refasten it securely to the junction box. The other end of the wire is to be stripped of insulation and the bare wire securely bonded to the vehicle or on/off road trailer frame for mobile tanks (Diagram 4). For bonding with stationary tanks, attach a ground wire to a ground rod and the tank itself (Diagram 5). The distance may be greater than the supplied grounding wire.DC Wiring Instructions Diagram 5ATTACH GROUND WIRE TO GROUND ROD1. Remove pump’s electrical junction box cover and straighten the red and black wire.2. Screw the furnished cable connector into 1/2" NPT conduit opening on the junction box.3. Strip 3" of the outer covering from one end of the furnished electrical supply cable.* Be careful not to damage the black and red wire insulation.4. Loosen cable connector nut and pass the stripped end of the furnished cable through the cable connector. Tighten the cable connector nut.5. Strip 1/2" of the insulation from the ends of the red and black cable wires. Using the furnished wire nuts, connect the cable wires to the pump wires matching the colors. IMPORTANT: Be sure no bare wire is exposed.6. Fold wires into junction box and replace, making sure the cover gasket is in place. Make sure all screws are seated so there is no space between the frame and the junction box (see Step 6 diagram on Page 6). *12 AWG cable not supplied with pump only models ATTACH GROUND WIRE TO VEHICLE BODY½" NPT CONDUIT HOLE, THREADED JUNCTION BOX CAP (CAN BE ROTATED 180°)EARTH GROUNDSYMBOLDiagram 4Mobile Tank Wiring to a Vehicle Electrical System1. Before electrical installation, place the switch lever into the OFF position to prevent accidental spillage once power is engaged to the motor.2. Pass the electrical wires to the source of the vehicle power system, supporting as necessary and protecting them from sharp edges, heat, or anything that could cause damage.3. To determine if the vehicle electrical system is negative (-) or positive (+) ground, check the battery marking of the terminal that is wired to the vehicle frame or motor block. The red wire from the pump will connect to positive battery post and the black wire from the pump will connect to negative battery post. These instructions focus on COMMON negative ground systems. UNCOMMON positive systems are a rare occurrence. Reference the drawing on Page 9 for information on positive ground systems.4. Fill-Rite requires installing a fuse holder and fuse (not provided) for protection of the purchased pump. Attach one end of the fuse holder to the end of the ungrounded wire, making a solid connection. The other end of the fuse holder is then attached to the ungrounded side of the battery, as close to the battery as possible. Make a solid electrical connection to the grounded side of the battery with the remaining wire. Utilizing a battery terminal connection (not provided by Fill-Rite) is required for completion of the electrical circuit.5. Check all connections to make sure they are connected per instructions and all electrical codes. Install fuse (30 amp fuse for 12V DC; 20 amp fuse for 24V DC) into the fuse holder. Installation is now complete.Stationary Tank Wiring1. Before electrical installation, place the switch lever into the OFF position to prevent accidental spillage once power is engaged to the motor.2. Fill-Rite requires installing a fuse holder and fuse (not provided) for the protection of the purchased pump.3. Attach one end of the fuse holder to the red pump wire, as close to the battery or power source as possible. Make a solid connection to the positive terminal of the power source with the other end of the fuse holder. Make a solid connection with the black pump wire to the negative terminal of the power source.4. Check all connections to make sure they are connected per instructions and all electric codes.5. Install fuse (30 amp fuse for 12V DC; 20 amp fuse for 24V DC) into the fuse holder.6. The installation is now complete.Positive Ground System (Uncommon)This electrical system is uncommon within most vehicles utilizing a 12V DC power source. The chassis of the vehicle is connected to the positive (+) terminal of the battery.Fuse to be located outside of hazardous area, as close to the power source as possible. If the wiring from the power source to the pump is greater than 18', refer to the applicable Electrical Code (national, international, or local) to ensure the wire is of the correct size for the application.Negative Ground System (Common) This electrical system is common within most vehicles utilizing a 12V DC power source. In this instance, the positive battery terminal supplies power to all devices such as the ignition system. The negative (-) terminal is connected to the vehicle’s frame. Fuse to be located outside of hazardous area, as close to the power source as possible. If the wiring from the power source to the pump is greater than 18', refer to the applicable Electrical Code (national, international, or local) to ensure the wire is of the correct size for the application.FUSE FUSECOMMON UNCOMMON30 amp fuse for 12V DC 20 amp fuse for 24V DC 30 amp fuse for 12V DC 20 amp fuse for 24V DC Mobile Tank Wiring to a Non-Vehicle SystemWhile rare, there are instances where a 12V or 24V DC Fill-Rite fuel pump does not operate from a vehicle’s electrical system. In these cases, we recommend calling Fill-Rite Technical Support at 1 (800) 720-5192 (M-F, 8am-5pm ET) to discuss your specific situation. Most of these applications will require equipment not supplied by Fill-Rite. In addition, we want to ensure that the circuit will be able to handle the necessary power requirements of the pump.115V AC Wiring Instructions for FR600 / SD600 AC Fuel Transfer Pumps115V AC Wiring Procedure1. Remove the junction box cover and straighten the wires to make sure the stripped wire ends are accessible outside the junction box.2. Install rigid conduit and appropriate wiring from power source to the junction box to maintain the explosion-proof integrity.3. Connect the pump wires to the power supply lines according to the wiring diagram. Be certain to properly insulate the connections with the appropriate wire nuts or other connectors. NOTE : The ground wire MUST be connected. Ground wire connection is inside the junction box (Diagram 6b).4. Fold the wires back into the junction box and replace the cover, making sure the cover gasket is in place.115V AC Pump Junction Box (FR/SD600 Series AC Fuel Transfer Pumps)115V AC Wiring Diagram for FR/SD600 AC Fuel Transfer Pumps.A ground wire must be included within the supply line power cable.This wire must be connected to the ground screw terminal on the inside of the junction box surface.Diagram 6a Diagram 6b115V AC Wiring Diagram INTERNAL GROUND SCREWSwitch Level Installation InstructionsEffective March 7, 2022, the fuel transfer pump on/off switch lever will need to be installed in the field. Please see Figure 1 for a visual guide on the proper installation of this lever.Figure 1Security1. If equipped, reset meter to “0” (do not reset while in use as this3. Move the switch lever to the “ON” position to power the pump (Diagram 7).4. Insert the dispensing nozzle into the container to be filled.5. Operate the nozzle to dispense fluid; release nozzle when thedesired amount of fluid has been dispensed.6. Move switch lever to the “OFF” position (Diagram 8) to turnoff the pump.7. Remove the dispensing nozzle from the container being filled andstore it in the nozzle boot.Operation InstructionsTroubleshooting The following troubleshooting guide is provided to offer basic diagnostic assistance in the event you encounter abnormal service from your Fill-Rite fuel transfer pump. If you have questions, please feel free to contact Fill-Rite Technical Support at 1 (800) 720-5192 (M-F, 8am-5pm ET) or byemail at *************************.Please disconnect all power supply sources from either your AC or DC pump prior to performing any service or maintenance,as well as relieve any pressure within either the suction tube or discharge hose. Failure to do so can result in damage to the "ON" Position "OFF" PositionYour Fill-Rite fuel transfer pump is equipped with a locking link located next to the switch lever for security. With the pumpturned off and the nozzle in the stored position, a padlock can be inserted throughthe locking link and the nozzle handle.Fill-Rite recommends a commercial gradelaminated steel padlock with an adjustableshackle (Diagram 9).Diagram 7Diagram 8Diagram 9SWITCH LEVERNOZZLE BOOT SWITCH LEVERNOZZLE BOOTTroubleshooting (continued)Specifications and Models† Warranty details can be found at *HE pump only models have BSPP outlets*Power cord not included in pump only modelsA series of fuel transfer pumps with UL/cUL, ATEX, IECEx, CE, EAC, and INMETRO certifications that are compatible with gasoline, diesel fuel, blended fuels such as biodiesel up to 20%, gasoline with up to 15% ethanol, mineral spirits, and kerosene.| H-SERIES FUEL TRANSFER PUMPS INSTALLATION AND OPERATION MANUALFR4200 (Dimensions displayed in inches)3.44.32.58.413.011.14.28.42.54.311.813.7FR1200, FR2400, FR4400, FR600, SD1200, and SD600 (Dimensions displayed in inches)H-Series Model Information: FR1200, FR2400, FR4200, FR4400, FR600, SD1200, SD600H-Series Model Information: FR1200, FR2400, FR4200, FR4400, FR600, SD1200, SD600 (continued)HE-Series Model Information: FR1200E, FR2400E, FR4200E, FR4400E2400 Series Performance Curve4400 Series Performance CurveMETER STRAIGHT PIPE FILTER HEADSTRAIGHT PIPEProper Accessory Configuration AccessoriesAccessories (continued)2122*KIT120BD not called out in diagram abovePump Service KitsFIL-MN-712v.3InstallationPump must be installed in compliance with EN 60079-14 or IEC 60079-14, as applicable.Material of ConstructionMaterials of construction of the external surface of the unit: painted steel, painted cast iron, painted aluminum, zinc plated steel.Materials of construction of the wetted parts: cast iron, zinc plated steel, 300 series stainless steel, bronze, carbon, ceramic, polyester, fiber, fluorocarbon, buna.Repair and MaintenanceContact the place of purchase for warranty repair and maintenance.Specific Conditions of Use1. Consult the manufacturer if dimensional information on the flameproof joints isnecessary.2. ISO Class 4.6, M5 hex-head screws (Yield Stress 240 MPa) shall be used to replacethe DC Motor terminal cover fasteners.3. ISO Class 8.8, M6 hex-head screws (Yield Stress 640 MPa) shall be used to replace the DC Motor motor tie-rod fasteners.4. An electrically conductive hose and nozzle must be used with flammable liquids.To minimize static electricity buildup, always keep the nozzle in contact with thecontainer being filled during the fueling process.Motor Tag InformationThe motor tag on your Fill-Rite pump contains important technical and performance information. Be certain this label remains affixed to the pump at all times.Safety Testing ApprovalsThe Fill-Rite line of pumps have been safety tested for regulatory compliance. This product family is approved by UL/cUL. For the “E” series products they are approved to ATEX, IECEx, INMETRO, EAC, and CE.2809The following standards were used to show compliance in the European Union:EN IEC 60079-0:2018, Ed 7 “Explosive atmospheres – Part 0: Equipment – General requirements”EN 60079-1:2014, Ed 7 “Explosive atmospheres – Part 1: Equipment protection by flameproof enclosures “d””EN ISO 80079-36:2016, Ed 1 “Explosive atmospheres – Part 36: Non-electrical equipment for explosive atmospheres – Basic method and requirements”EN ISO 80079-37:2016, Ed 1 “Explosive atmospheres – Part 37: Non-electrical equipment for explosive atmospheres – Non electrical type of protection constructional safety “c”, control of ignition source “b”, liquid immersion “k”” Directive 2014/34/EU – Equipment and protective systems intended for use in potentially explosive atmospheres.Directive 2011/65/EU – Restrictions of the use of certain hazardous substances in electrical and electronic equipment.The following standards were used to show compliance for IECEx certification:IEC 60079-0:2017, Ed 7 IEC 60079-1:2014, Ed 7Motor Tag InformationThe Motor Tag on your Fill-Rite pump contains important technical and performance information. Be certain this label remains affixed to the pumpat all times.II 2 G Ex db h IIA T5 or T6 Gb FM19ATEX0019X IECEx FMG19.0013XEx db IIA T5 or T6 GbFill-Rite Company 8825 Aviation Drive Fort Wayne, Indiana 46809 USAT 1 (800) 720-5192 1 (260) 747-7524 F 1 (800) 866-4681 | | 。

切断电源1基本操作切断电源开机/待机开关并不会切断监护仪的交流电源。
要切断电源,请拔掉电源电缆。
断电之后的监护如果监护仪断电时间少于一分钟,则监护会继续进行,所有当前活动的设定保持不变。
如果监护仪断电时间超过一分钟,则监护仪的反应取决于您的配置。
如果将自动默认设为是,当恢复供电时,会载入默认设定简档。
如果将自动默认设为否,只要能够在 48 小时之内恢复供电,就会保留所有当前生效的设定。
自动默认设定在“配置模式”中完成。
联网监护可以将监护仪与联网的信息中心相连接,这可通过使用任何一款选配接口完成:•标准有线 LAN•无线 LAN•IntelliVue 设备遥测系统 (IIT)警告请不要将病人监护仪连接到标准医院网络。
此外,如果 IntelliVue X2 或 MP5 配备有 IIT,并在“信息中心”申报为遥测设备,当其与主监护仪配对后就可以确保数据连续性。
断开与主监护仪的连接后,它可在转运期间继续监护病人并向信息中心中的相同屏区提供连续的数据。
(请参见第 247 页上的“为一个病人指定两个设备”。
)如果监护仪连接到网络,则有一个网络符号显示在左上角,在病床标名旁边。
请参见有关“护理组”、监护设备和网络技术信息的细节。
♦MP20/MP30/MP40/MP50 - 选择监护仪信息行进入设定菜单,然后选择床头信息。
♦MP60/MP70/MP80/MP90 - 在监护仪信息行中选择病床标名。
请注意与有线网络上的监护仪相比,无线网络连接的监护仪在有些网络功能方面可能受到限制。
如果使用标准医院网络,将无法保证打印功能和数据导出正常运行。
使用远程应用程序如果监护仪和“飞利浦应用项目服务器”相连,则可远程访问托管在应用服务器上的应用项目,并在病床旁监护仪屏幕上显示它们和进行操作。
应用服务器提供门户技术,以允许通过 Web 浏览器、终端仿真程序或客户机应用程序来访问信息。
可访问的应用项目取决于应用服务器的配置:有关详细信息,请参见设备文档。
FlexCare Platinum ConnectedEnglish 6简体中文 17繁體中文 26IntroductionCongratulations on your purchase and welcome to Philips! To fully benefit from the support that Philips offers, register your product at /welcome .Important safety informationRead this important information carefully before you use the appliance and save it for future reference.Danger-Keep the charger away from water. Do not place or store it over or near water contained in a bathtub, washbasin, sink etc. Do not immerse the charger in water or any other liquid. After cleaning,make sure the charger is completely dry before you connect it to the wall socket.Warning-The mains cord cannot be replaced. If the mains cord is damaged,discard the charger.-Always have the charger replaced with one of the original type in order to avoid a hazard.-Do not use the charger outdoors or near heated surfaces.-If the appliance is damaged in any way (brush head, toothbrush handle or charger), stop using it. This appliance contains no serviceable parts. If the appliance is damaged, contact theConsumer Care Center in your country (see chapter 'Warranty and support').Caution-Do not clean the brush head, the handle and/or the charger in the dishwasher.-If you have had oral or gum surgery in the previous 2 months,consult your dentist before you use the toothbrush.-Consult your dentist if excessive bleeding occurs after using this toothbrush or if bleeding continues to occur after 1 week ofuse.Also consult your dentist if you experience discomfort or pain when you use the Philips Sonicare.6English-The Philips Sonicare toothbrush complies with the safetystandards for electromagnetic devices. If you have a pacemaker or other implanted device, contact your physician or the device manufacturer of the implanted device prior to use.-If you have medical concerns, consult your doctor before you use the Philips Sonicare.-This product has only been designed for cleaning teeth, gums and tongue. Do not use it for any other purpose. Stop using theproduct and contact your doctor if you experience any discomfort or pain.-The Philips Sonicare toothbrush is a personal care device and is not intended for use on multiple patients in a dental practice or institution.-Stop using a brush head with crushed or bent bristles. Replace the brush head every 3 months or sooner if signs of wear appear.-Do not use other brush heads than the ones recommended by the manufacturer.-If your toothpaste contains peroxide, baking soda or bicarbonate (common in whitening toothpastes), thoroughly clean the brush head with soap and water after each use.This prevents possible cracking of the plastic.Electromagnetic fields (EMF)This Philips appliance complies with all applicable standards and regulations regarding exposure to electromagnetic fields.Your Philips Sonicare (Fig. 1)1Hygienic travel cap2Brush head with unique identifier3Handle4Sensors5Power on/off button6Bluetooth7Intensity level indicator8Intensity level button (+ and -)9Brushing modes7English10Mode button11Battery level indicator12Travel charger-Not shown: Travel caseNote: The content of the box may vary based on the model purchased.Preparing for useAttaching the brush head1Align the brush head so the bristles point in the same direction as the front of the handle (Fig. 2).2Firmly press the brush head down onto the metal shaft until it stops.Note: Philips Sonicare brush heads are imprinted with icons to easily identify your brush head (Fig. 4).Charging your Philips Sonicare1Put the plug of the charger in a wall socket.2Place the handle on the charger.The flashing light of the battery level indicator indicates that the toothbrush is charging (Fig. 5).Note: It takes at least 24 hours to fully charge the battery.Using the applianceBluetooth connectivityBefore you start the connectivity procedure, make sure your mobile device runs on Bluetooth 4.0 or higher.Note: For the latest information on device compatibility, please visit the App Store or Google Play.8EnglishConnecting your toothbrush1When used in connected mode, the Philips Sonicare app gives you the opportunity to receive real-time feedback on brushing, store and share brushing data with your dentist (if you so choose), and receive personalized coaching. If you wish to use the toothbrush in unconnected mode, the toothbrush will still function. To use the toothbrush in connected mode, please follow the instructions below.2Download the Philips Sonicare app from the Apple App Store or Google Play Store.3Confirm Bluetooth is switched on on your mobile device before you open the app. Check the settings on your mobile device to switch on Bluetooth.4To connect the toothbrush to the app, switch onthe toothbrush by pressing either the power on/off button or the brushing mode button. Make sure the toothbrush is not on the charger when you switch it on.5Open the Sonicare app.6Follow the Sonicare app instructions displayed on your mobile device. The app automatically connects with the toothbrush. If the toothbrush does not connect, follow the troubleshooting steps provided in the app.Note: For optimal data capture, keep your mobile device close during brushing.Brushing instructions1Wet the bristles and apply a small amount of toothpaste.2Place the toothbrush bristles against the teeth at a slight angle (45degrees), pressing firmly to make the bristles reach the gumline or slightly beneath the gumline (Fig. 6).Note: Keep the center of the brush in contact with the teeth at all times.3Press the power on/off button to turn on the Philips Sonicare.9English4Apply light pressure to maximize Philips Sonicare’s effectiveness and let the Philips Sonicare toothbrush do the brushing for you.Do not scrub.5Gently move the brush head slowly across the teeth in a small back and forth motion so the longer bristles reach between your teeth. Continue this motion throughout the brushing cycle.6To clean the inside surfaces of the front teeth, tilt the brush handle semi-upright and make several vertical overlapping brushing strokes on each tooth (Fig. 7).Note: To make sure you brush evenly throughout the mouth,divide your mouth into 6 sections using the BrushPacer feature (see chapter ‘Features’).7Follow the Sonicare app's brushing guidance combined with the BrushPacer and begin brushing in section 1 (upper right teeth) and brush for 20 seconds before you move to section 2 (upper front teeth). Continue doing this for section 3 till 6 to ensure even brushing in all 6 segments of the mouth (Fig. 8).Note: When using the White mode, two additional 20 second intervals can be used for polishing your front teeth.8The Philips Sonicare app helps to address any missed spots by guiding you to spend 20 seconds in the areas you missed during brushing.Your Philips Sonicare toothbrush is safe to use on:-Braces (brush heads wear out sooner when used on braces)-Dental restorations (fillings, crowns, veneers)Note: Ensure that braces or dental restorations are properly adhered and not compromised. If not, braces or dental restorations may be damaged when they come into contact with the brush head.Note: When the Philips Sonicare toothbrush is used in clinical studies,the handle should be fully charged and the Easy-start feature deactivated.Brushing modesNote: When the toothbrush is switched on, you cannot toggle between modes.10English1Prior to turning on the Sonicare, press the mode button to toggle between modes.-The selected brushing mode illuminates.-Once a brushing mode has been selected, it remains active until another brushing mode is selected.Clean modeStandard mode for superior teeth cleaning.White mode2 minutes of alternating between White and Massage, with an additional 40 seconds to polish your visible front teeth.Deep CleanProvides an invigorating of deep massage to deliver an exceptionally clean experience.Intensity levels per mode-Low: 1 LED indicator light.-Medium: 2 LED indicator lights.-High: 3 LED indicator lights.Note: to adjust the intensity level to the next higher or lower level, you can press the + button to increase intensity or the - button to decrease intensity at any time during the brushing cycle.Pressure SensorA change in vibration (and a slight change in sound) alerts you when you apply too much pressure while brushing. See chapter ‘Features’.Battery status (when handle is not on charger)- 1 yellow LED indicates a low charge.- 3 green LEDs indicate a full charge.Note: If you hear two sets of five beeps and the yellow LED of the battery level indicator flashes, your Sonicare will turn off until placed on the charger, where it will start to recharge.Note: Your Sonicare will not be able to run a brushing routine until it is fully recharged.Note:To keep the battery fully charged at all times, you may keep your Sonicare on the charger when not in use.11EnglishFeaturesPressure SensorThis Philips Sonicare model comes with the Pressure Sensor feature activated. The Pressure Sensor works in all 3 modes and at all 3intensity levels.Activating or deactivating the Pressure Sensor feature 1Attach the brush head to the handle.2Place the handle in the plugged-in charger.-To deactivate Pressure Sensor:Press and hold the power on/off and mode button for 2 seconds.You hear 1 beep to indicate that the Pressure Sensor feature has been deactivated.-To activate Pressure Sensor:Press and hold the power on/off and mode button for 2 seconds.You hear 2 beeps to indicate that the Pressure Sensor feature has been activated.BrushPacer-The BrushPacer is an interval timer that has a short beep and pause to remind you to brush the 6 sections of your mouth.Depending on the brushing mode or brushing routine you have selected, the BrushPacer beeps at different intervals during the brushing cycle. See the ‘Brushing instructions’ sections (Fig. 8).To deactivate or reactivate the BrushPacer feature:1Place the handle with a brush head attached in the plugged-in charger.2Press and hold the mode button until:a You hear 1 beep to indicate the BrushPacer has beendeactivated.b You hear 2 beeps to indicate the BrushPacer has beenactivated.12EnglishSmartimerThe Smartimer indicates that your brushing cycle is complete by automatically turning off the toothbrush at the end of the brushing cycle.Dental professionals recommend brushing no less than 2 minutes twice a day.Easy-startThis Philips Sonicare comes with the Easy-start deactivated.The Easy-start feature gently increases the power over the first 14brushings to help you get used to the brushing with the Philips Sonicare.Note: Each of the first 14 brushings must be at least 1 minute in length to properly advance through the Easy-start ramp-up cycle.Activating or deactivating the Easy-start feature1Attach the brush head to the handle.2Place the handle in the plugged-in charger.-To activate Easy-start:Press and hold the power on/off and mode button for 2 seconds.You hear 2 beeps to indicate that the Easy-start feature has been activated.-To deactivate Easy-start:Press and hold the power on/off and mode button for 2 seconds.You hear 1 beep to indicate that the Easy-start feature has been deactivated.Note: Using the Easy-start feature beyond the initial ramp-up period is not recommended and reduces Philips Sonicare effectiveness in removing plaque.Note: Each of the first 14 brushings must be at least 1 minute in length to properly move through the Easy-start ramp-up cycle.Cleaning13EnglishToothbrush handle1Remove the brush head and rinse the metal shaft area with warmBrush head1Rinse the brush head and bristles after each use (Fig. 10).2Remove the brush head from the handle and rinse the brush head connection with warm water at least once a week. Rinse the travel cap as often as needed.Charger1Unplug the charger before you clean it.2Wipe the surface of the charger with a damp cloth. Make sure you remove any toothpaste or other residue from the charger surfaces.StorageIf you are not going to use the product for a long time, unplug it, clean it (see chapter 'Cleaning') and store it in a cool and dry place away from direct sunlight.Replacement Brush head-Replace Philips Sonicare brush heads every 3 months to achieve optimal results.Note: The Sonicare App will tell you when it is time to replace your brush head. (See in-app Help section)-Use only Philips Sonicare replacement brush heads.Recycling-Do not throw away the product with the normal household waste at the end of its life, but hand it in at an official collection point for recycling. By doing this, you help to preserve the environment.14English-This product contains a built-in rechargeable battery which shall not be disposed of with normal household waste. Please take your product to an official collection point or a Philips service center to have a professional remove the rechargeable battery.-Follow your country’s rules for the separate collection of electrical and electronic products and rechargeable batteries. Correct disposal helps prevent negative consequences for theenvironment and human health.Removing the rechargeable battery(standard) screwdriver. Observe basic safety precautions when you follow the procedure outlined below. Be sure to protect your eyes,hands, fingers, and the surface on which you work.1To deplete the rechargeable battery of any charge, remove the handle from the charger, turn on the Philips Sonicare and let it run until it stops. Repeat this step until you can no longer switch on the Philips Sonicare.2Insert a screwdriver into the slot located at the bottom of thehandle and turn counterclockwise to release the bottom cap (Fig.11).3Hold the handle upside down and push down on the shaft to release the internal components of the handle (Fig. 12).4Insert the screwdriver under the circuit board, next to the battery connections, and twist to break the connections. Remove the circuit board and pry the battery from the plastic carrier (Fig. 13).The rechargeable battery can now be recycled and the rest of the product discarded appropriately.Warranty and supportIf you need information or support, please visit/support or read the international warranty leaflet.15EnglishWarranty restrictionsThe terms of the international warranty do not cover the following:-Brush heads.-Damage caused by use of unauthorized replacement parts.-Damage caused by misuse, abuse, neglect, alterations or unauthorized repair.-Normal wear and tear, including chips, scratches, abrasions,discoloration or fading.Hereby, Philips Consumer Lifestyle BV declares that the radio equipment type Bluetooth LE is in compliance with Directive 2014/53/EU.The full text of the EU declaration of conformity is available at the following internet address: /support16English简介感谢您的惠顾,欢迎光临飞利浦! 为了让您能充分享受飞利浦提供的支持,请在 /welcome 上注册您的产品。
有疑问?请联系飞利浦以下情况将不能获得免费服务1. 使用不当引起的人为损坏,例如接入不适当电源、使用不适当配件、不适当之安装、不依说明书使用、错误使用或疏忽而造成损坏等。
因运输及其他意外而造成之损坏。
非经本公司认可之维修和改装。
其他因不可抗力(如自然灾害、电压异常等)造成的损坏。
2. 一般家庭以外使用(如工业、商业用)而造成的损坏。
3. 正常使用引起的产品老化、磨损等,但不影响产品的正常使用。
●此证仅在中国境内有效。
●保修证作为在规定期限及条件之内进行免费维修的保证,并不限制消费者的法定权利。
网上保修注册:1) 登陆/support2) 在“其他支持”目录下找到“保修登记”,点击“保修登记”进入登记 界面。
3) 点击“开始保修登记”。
服务须知:SERVICE INFORMATION:For after-sales and maintenance service,please call service hot line 4008 800 008.Any comments and enquiries during the service,please contact our Philips Consumer Lifestyle Customer Care Service Office.Philips(china)Investment Co.,Ltd. Philips Consumer LifestylePhilips Innovation Campus Shanghai NO.1 Building,NO.10,Lane 888 Tian Lin Road Shanghai,P.R.C.200233 Fax:+86 21 5445 2663如需要此产品的售后服务,请拨打服务热线4008 800 008如在维修服务过程中有任何意见,欢迎致函飞利浦优质生活服务办事处解决疑难。
飞利浦(中国)投资有限公司飞利浦优质生活客户服务部中国上海市田林路888弄10号飞利浦创新科技园1号楼邮政编码:200233传真:(021)5445 26634222.2.26.9。
飞利浦fac01sa1说明书
使用说明
A:充电
1、将开关钮向下推【能看见“OFF”标记】。
2、用滑动板使充电头从剃须刀推出来。
然后插入墙壁上的电源插头。
绿色指示灯会亮。
3、剃须刀可以在100V-240V之间的电压连接充电。
4、剃须刀在充电8小时后会充满自停。
5、剃须刀充满电后连续工作时间约30分钟。
6、充电后用滑动板将充电头移回剃须刀里。
7、为了保证蓄电池的长寿,请注意:a在环境温度5-35度之间进行充电以及储存剃须刀,b 不要将剃须刀长久的与电源连接。
B:进行剃须
1、确保剃须刀充分的充电。
2、切勿让水或者其他液体进入剃须刀。
3、皮肤干燥时剃须效果最佳。
因此最好在洗脸前或洗脸后过一段时间再使用剃须刀。
4、使用时将剃须刀刀头放在皮肤上快速移动,既进行圆周运动又进行无循环运动。
另外可用另外的空手绷紧皮肤。
5、胡须出现的更多能剃的更短,颈部的毛发同样的可以剃掉。
6、请注意:您的皮肤可能需要2-4个星期的时间不能完全适应此独特飞利浦剃须刀系统。
7、剃须结束后将保护盖盖好。