换相控制器说明书
- 格式:doc
- 大小:407.50 KB
- 文档页数:14


80-4281-05Rev. 03PURPOSEThe purpose of these instructions is to provide a step-by-step method for replacing the Beck Group 22 Control End assembly. The control end is located on the rear face of the drive beneath the Handswitch.The screws and washers included in T able 1 are provided as part of the replacement kit in the event that some are lost while servicing the drive. The subassemblies listed in T able 2 are included with the control end assembly.The replacement control end assembly has been fully calibrated at the factory. This replacement procedure will return the drive to a close approximation of its original calibration. Do not calibrate the drive until this procedure is complete, and then only if necessary. Refer to Beck Instruction Manual 80-4280-02 for calibration instructions. REQUIRED TOOLS1/2” socket3/32” hex driverT orque wrenches appropriate for 12 lb-in (1 N•m) and 10 lb-ft (14 N•m)Fine point marker3/16” flat-tipped screwdriverGrounding strapPROCEDURERefer to Fig. 1 for component identification.Remove the old control end assembly:1. Remove power from the drive.2. Remove the control end cover, using care not to bendthe control shaft or damage the position-sensingassembly inside.3. Disconnect the control end assembly electricalcircuits by unplugging the three multi-pin connectorsfrom the drive. Two connectors lead from the switchsubassembly and the other connector leads fromthe Printed Circuit board. T o disconnect the switchsubassembly connnectors, use a 3/16” flat-tippedscrewdriver to press the release tab straight back (seeFig. 1) and pull the plug out of its socket. The connectorleading from the P.C. board slides off with modest force.4. Loosen the two outermost setscrews on the coupling.Do not loosen the inner setscrews.5. Use a fine point marker to note the position of thecontrol end relative to the drive body. Mark the drive’sface immediately adjacent to the top of the notch (seeFig. 2).6. Loosen (do not remove) the four mounting clamp buttonhead screws (3/8” long) and slide the top clamp up overthe edge of the shoulder in the body, immediately abovethe stator flange (see Fig. 2). Snug one of the screws tohold the clamp up while replacing the assembly. Allowthe bottom clamp to hang by the screws.7. Slide the control end assembly away from the drivebody until it clears the control end shaft.Install the new assembly:8. Inspect the control end gasket and replace as necessary.If the gasket’s condition is good, skip Steps 9–13.9. Protect the CPS-4 with a static-free cover.10. Clean the mating face of the drive body to remove anyremaining gasket material and adhesive. Use cautionnot to damage or bend the control shaft. Ensure thatthe mating surface is free from damage (such as dentsor gouges).11. Apply a thin film of gasket adhesive (Scotch™ 847 orequivalent) to the body’s mating face to adhere thegasket.12. Press the new gasket into place.13. Remove the protective cover from the CPS-4. REPLACEMENT INSTRUCTIONSCONTROL END ASSEMBLY, CPS-4REPLACEMENT KIT P/N 12-8061-05 & 12-8061-35MODEL GROUP 22E L E C T R I C A C T U A T O R SF O R I N D U S T R I A L P R O C E S S C O N T R O L14. Slide the new assembly onto the shaft, turning thecoupling (if necessary) to align the assembly with the shaft. Align notch in the stator with the locating pin situated to the left of the control end shaft (see Fig. 2). 15. Loosen the clamp screw to allow the top clamp to drop into place over the upper rim of the stator. Rotate the assembly as necessary to align the top of the notch with the mark made earlier on the drive face. Snug the screws down on the plate. Raise the bottom clamp into position and snug the screws down. Check the clamps for proper shoulder clearance and tighten the screws to 12 lb-in (1 N•m) torque. 16. Plug the pin connectors into their respective sockets. 17. Tighten the outer 2 setscrews on the coupling. Thescrew on the flat of the shaft must be tightened first to properly align the assembly. T orque screws to 12 lb-in (1 N•m).Test for proper operation: 18. Connect power to the drive.19. Modulate the demand signal to run the drive through itsfull range of motion. Verify the correct drive response. 20. Modulate the signal to several intermediate levels andnote if the drive attains the proper position. 21. If the drive responds correctly, replace the control endcover, tighten the cover bolts to 10 lb-ft (14 N•m) torque, and return the drive to service. 22. If the drive does not respond correctly, refer to thetroubleshooting and calibration sections of BeckInstruction Manual 80-4280-02.3/1411 TERRY DRIVE NEWTOWN, PENNSYLVANIA 18940 USAPHONE:215-968-4600FAX:215-860-6383E-MAIL:********************HAROLD BECK & SONS, INC.Made in USAFigure 2SWITCH ASSEMBLYPIN CONNECTOR PRINTEDCIRCUIT BOARDPress tabs straight back torelease connectorsKEEPER ASSEMBLYPINCONNECTORSSWITCH CAMSM ark actuator face to locatenotch a lignnotch with locating pinB utton h ead S crewS (4)S tator f langel ift claMp over Shoulder。

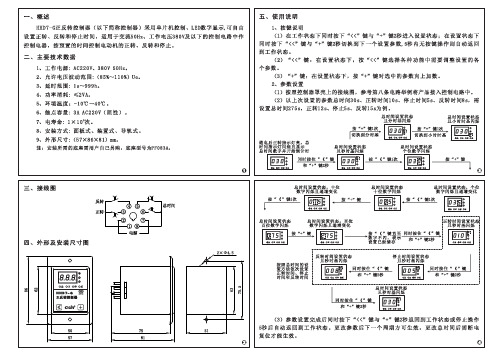

HAT220A/HAT240A 双电源自动切换控制器使用说明书郑州众智科技股份有限公司目录1 概述 (2)2 性能及特点 (2)3 技术参数 (3)4 面板操作说明 (4)5 面板操作 (4)5.1 延时调节 (4)5.2 恢复出厂延时值 (5)6 可编程参数及范围 (5)7 操作控制 (6)8 接线端子功能 (7)9 典型应用图 (7)10 外形及安装尺寸 (7)11 常见故障及排除方法 (7)1 概述双电源自动切换智能控制器以微处理器为核心,可精确检测两路三相电压、两路单相电压,或两路两相电压,对出现的电压异常(失电、过压、欠压)做出准确的判断,经延时后控制ATS切换。
控制器具有一路电源异常延时后发出起动发电机组信号功能。
2 性能及特点该控制器可对两路三相电压、单相电压(既可以是两路市电、两路发电、也可以是一路市电一路发电)也可以对两路两相电压进行检测及ATS控制。
其性能特点如下:★实现了计算机的编程控制,可以利用计算机进行电压异常延时,切换优先级,发电机组停机延时,电压修正等功能,完全图形化界面操作。
当用电脑编程时,必须将控制器前面板打开,然后用SG72接口模块(USB转LINK)通过PC机测试软件进行编程。
关于计算机软件的操作参见HAT220A/HAT240A测试软件说明书。
★I路电源或II路电源正常延时可设置(范围0~60秒)。
发电机组起动延时可设置(范围0~90秒);★I路电源或II路电源异常延时可设置(范围0~60秒)。
发电机组停机延时可设置(范围0~90秒);★通过面板按键可进行“I路电源优先”、“自动/手动”、“无优先”、“II路电源优先”设置,确保I路电源优先供电、II路电源优先供电或无优先方式供电以及检修用;★两路N线分离设计;★面板LED可清楚显示开关工作状态;★I、II路电源切换继电器(CLOSE 1#、CLOSE 2#)的输出触点容量为16A 250VAC/16A 28VDC,均为无源触点,可直接用于驱动开关转换等;★发电机组起动继电器(GENS START)的输出触点容量为7A 250VAC/7A 28VDC,为无源常闭触点;★具有极强的抗电磁干扰能力,适合在强电磁干扰的复杂环境中使用;★模块化结构设计,阻燃ABS塑料外壳,插拔式接线端子,体积小,结构紧凑,安装维护十分方便。

1.9kW Single-Phase Switched Automatic Transfer Switch PDU, 2 120V L5-20P / 5-20P Inputs, 16 5-15/20R Outputs, 1U, TAAMODEL NUMBER:PDUMH20ATNETDescriptionThis Switched Automatic Transfer Switch / ATS PDU provides a redundant power option for single-corded network devices. Dual input cords support separate connection to primary and secondary power sources. The ATS will normally maintain continuous output to all outlets as derived from the primary input cable. If the primary power source becomes unstable or fails altogether, the ATS will switch over to the secondary power source until the primary input is restored and stable. The Java-free LX Platform HTML5-based network interface enables full remote access for PDU status monitoring and email notifications via secure web browser, SNMP, telnet or SSH. It supports 10/100 Mbps auto-sensing for optimum communication with an Ethernet network. Optional EnviroSense2 modules (sold separately) provide a variety of environmental monitoring capabilities. Protocols supported include HTTP, HTTPS, SMTP, SNMPv1, SNMPv2, SNMPv3, telnet, SSH, FTP, DHCP and NTP. Switched PDU features include individually controllable output receptacles and built-in network interface. Super-fast switchover between primary and secondary power sources occurs within milliseconds. ATS functionality is supported by any two compatible AC power sources, regardless of phase angle, to support a variety of advanced redundant power networking applications. Enables fault tolerant hot-swappable UPS protection when used with a single UPS and fully redundant UPS protection when each cord is connected to a separate UPS system. In a two-UPS environment, the primary input cable must be supported by a full time sine wave UPS with zero transfer time. The SmartOnline® series is highly recommended for use as the primary UPS in a two-UPS application. ATS configurations utilizing separate mains circuits, backup generators and even separate utility power grid feeds are fully supported. On-board ATS processor constantly evaluates power quality on both input sources to prevent transfer to the secondary source when unavailable or of lower quality than the primary source. Front input LEDs display primary or secondary power availability.Features20A 120V Power Distribution Unit (PDU) with LX Platform network interface, Auto-Transfer Switch (ATS) and Switched outlets (Agency de-rated to 16A)qProvides a redundant A/B power option for non-redundant networking equipment with a single input power cordqSwitched PDU features enable programmable or real-time power control of individual outlets via built-in network interfaceqDigital display continuously reports total output power consumption in ampsq16 switched NEMA 5-15/20R outletsq1U horizontal rack-mount form factor; 14.5 in. / 36.8 cm depthq Highlights1.9kW 120V ATS / SwitchedPDU, Single phase 20A 120VqEnables redundant A/B poweroption for single-corded network devicesqSeparate primary & secondaryinputs connect to any twocompatible power sourcesq1U horizontal rackmount; 2 L5-20P / 5-20P inputs; 16 5-15/20R outletsqPre-installed WEBCARDLX with latest version of PADM20 for IP-based Auto Probe featureqPackage IncludesATS / Switched PDU withattached L5-20P input powercordqDetachable C19 to NEMA L5-20P 12 ft/3.6m secondary inputcordqTwo NEMA L5-20R to NEMA 5-20P plug adaptersqInstallable 1U mountingbracketsqUser manual with warrantyinformationqSpecificationsSet of two 12 ft. / 3.6m NEMA L5-20P input cables with set of two 5-20P adapters support connection to separate PRIMARY and SECONDARY inputsqATS circuits normally maintain output sourced from the primary input cable; As primary input power fails or becomes unstable, the ATS will switch to maintain output sourced from the secondary input cable until power on the primary input is restored and stableqATS configurations enable fault-tolerant, hot-swappable UPS protection when used with a single UPS and fully redundant UPS protection when each cord is connected to a separate UPS system (in a two-UPS environment, the primary input cable must be supported by an online UPS with zero transfer time similar to SmartOnline series)qAdvanced ATS configurations utilizing separate mains circuits, backup generators and even separate out of phase utility power grid feeds are fully supportedqOn-board ATS processor constantly evaluates power quality on both inputs to prevent transfer to the secondary source when unavailable or of lower quality than the primary sourceqSuper-fast switchover between primary and secondary power sources occurs in 2-7 milliseconds q Pre-installed WEBCARDLX with the latest version of PowerAlert Device Manager firmware (PADM20)provides enhanced remote management capabilitiesqPADM20 and PowerAlert Element Manager (PAEM) form a powerful tool for expanding maintenance functions in large installations, including firmware update checks and backup and restoration of device configurationsqIP-based Auto Probe detects lost connectivity and restores service autonomouslyq Optional EnviroSense2 modules (sold separately) provide a variety of environmental monitoring capabilitiesqOutlets are factory programmed for sequential turn-on at 250 millisecond intervals as the PDU is first energizedqFront panel LEDs confirm power availability on both input linesq Compliant with the Federal Trade Agreements Act (TAA) for GSA Schedule purchasesq© 2023 Eaton. All Rights Reserved. Eaton is a registered trademark. All other trademarks are the property of their respective owners.。
f2a交流电机控制器说明书
f2a交流电机控制器是一种用于控制交流电动机的设备,它通常用于工业生产中的机械设备、风力发电机组、电梯等领域。
以下是关于f2a交流电机控制器的详细说明:
1. 功能介绍,f2a交流电机控制器主要功能是控制交流电动机的启动、停止、速度调节和方向控制。
它可以实现电机的平稳启动和停止,并且可以根据需要调节电机的转速和方向。
2. 技术参数,f2a交流电机控制器的技术参数包括额定电压、额定电流、控制方式、保护功能等。
用户在使用时需要根据实际情况选择合适的型号,以确保设备的正常运行。
3. 接线说明,f2a交流电机控制器的接线说明包括电源接线、电机接线、控制信号接线等内容。
用户在安装和使用时需要严格按照接线说明进行操作,以确保安全可靠。
4. 使用注意事项,f2a交流电机控制器在使用过程中需要注意防水防潮、避免过载、定期检查设备运行状态等。
此外,还需要注意设备的维护保养,定期清洁和润滑以延长设备的使用寿命。
5. 故障排除,f2a交流电机控制器可能会出现各种故障,如启动失败、速度不稳定等。
在出现故障时,用户需要根据说明书中的故障排除方法进行检查和处理,或者及时联系售后服务人员进行维修。
总的来说,f2a交流电机控制器是一种功能强大、使用方便的设备,能够有效控制交流电动机的运行,提高设备的稳定性和可靠性。
用户在使用前应详细阅读说明书,按照要求正确安装和操作,以确保设备的正常运行和安全使用。
使用说明TU510A自动转换控制器HM1043CR1Harsen®序号版本日期修改审批修改内容1 HM1043CR1 2011.1.1 P.L 新发行概述 ……………………………………………………………………………………………………………… 1. 智能控制器外形结构与连线………………………………………………….………………………… 2. 操作面板………………………………………………………………………………………………… 3. 安装指南………………………………………………………………………………………………… 4. 控制与操作说明………………………………………………………………………………………… 5. 测量和显示数据………………………………………………………………………………………… 6. 警告……………………………………………………………………………………………………… 7. 参数设置………………………………………………………………………………………………… 8. 通讯功能………………………………………………………………………………………………… 9. 技术参数…………………………………………………………………………………………………. 10. 故障排除………………………………………………………………………………………………….1 2 12 15 16 19 20 21 23 26 27概述:TU510A控制器是一种集测量显示、控制、三遥等功能为一体的自动转换控制器,该控制器有三种型号:TU510A-MG/MM/GG,分别用于市电与发电、市电与市电或发电与发电等双电源系统的自动转换控制。
具有:l微机控制,全数字化技术;l通过面板按键设定控制器运行方式;l通过LED直观显示ATS的运行状态,控制器运行模式;l通过面板LED数码管显示和按键,设定运行参数;l通过LED显示测量数据,包括电压、频率;l通过RS485通讯口和PC连接(需RS485/RS232接口转换器),可读写、修改所有设定值和数据。
一、产品简介1、面板多只LED指示灯,显示SCR电力调整器的工作状态及故障原因,方便有故障时及时进行维修。
2、PC板采用SMD贴片原件,抗干扰性佳,故障率低,绝无任何干扰现象。
3、内含缓启动功能,急速变化时更平稳使原件更耐用。
4、比例式线性输出,控温精确,精度0.3%符合各种负载要求。
5、整机采用铝合金,体积小散热效果佳,100%的引导风扇气流散热。
6、输入方式:4-20mA DC1-5V DC2-10V三种方式由P1 JUMP自由切换选择不需更换主机。
7、全系列加装高速保险丝及过热停止输出保护开关,保护电力调整器。
8、使用环境温度-10℃~45℃,湿度90%以下不结露。
9、PC板AC1 AC2端子输入电源电压AC200~240V。
10、主电源与PC板工作电压无相序先后关系,使用方便(50HZ~60HZ自动辨识)。
11、安装于密闭式控制箱内须有空气对流孔及冷却排风扇,如散热不良请低于70%功率使用,否则会造成电力控制器过热保护功能启动而停止输出。
12、工作中请不定时检查风扇的工作状态是否正常,如果不正常需排除风扇故障后再投入正常使用。
二、调整器使用说明输入信号INPUT:功能调整:使用万用表测量+ -端子电阻BIAS ( VR4) 最小输出量4~20mA 输入阻抗250ΩMAX (VR5) 最大输出量DC1~5V 输入阻抗30KΩVR1 VR2 VR3均不需做调整DC2~10V 输入阻抗12KΩ(图一接点信号控制)(图二电压、电流信号控制)图三电压、电流、输出由VR调整控制)指示灯功能PWL PC板工作电源指示(主电源通电时亮)IN 温控表输入信号(随温控表输出信号大小变化)OUT SCR输出指示(随SCR输出量大小变化)(零位闪烁)ERR 故障指示(SCR超温)(SCR超温时亮,改善通风效果)FB 故障指示(主电源异常)RUSV(图四CTH系列产品面板示意及指示灯功能说明)注意事项:●建议使用前先用3只电灯泡(功率≥100W )星形接法(共点不接零)做负载调试正常再投入使用。
XY-Q200系列智能换相开关技术使用说明书(V1.06)广西星宇智能电气有限公司GUANGXI XINGYU SMART ELECTRIC CO.,LTD目录第一篇行业背景 (1)1.1 三相不平衡的概念 (1)1.2 三相不平衡的危害 (1)1.3 治理三相不平衡的传统方法 (2)第二篇产品简介 (3)2.1 系统概述 (3)2.2 系统组成 (3)2.3 系统功能 (3)2.4 系统优势 (4)2.5 技术参数 (4)第三篇技术原理 (6)3.1 平衡原理 (6)3.2 不掉电换相原理 (7)第四篇使用说明 (8)4.1 XY-Q210主控开关使用说明 (8)4.2 XY-Q220换相开关使用说明 (10)4.3 手机APP软件 (12)第五篇工程设计说明 (13)5.1 结构与安装方式 (13)5.2 安装方案 (16)5.3 CT技术要求 (16)5.4 系统安装接线图 (16)第一篇行业背景1.1 三相不平衡的概念图1-1 三相负荷分时曲线图1)定义三相不平衡是指在电力系统中三相电流(或电压)幅值不一致,且幅值差超过规定范围。
造成三相不平衡的主要原因是三相负荷不均衡,属于基波负荷配置问题。
2)计算方法和规定《国家电网公司企业标准(Q/GDW519-2010)配电网运行规程》中第8.7.4条规定:不平衡度计算式:(最大电流–最小电流)÷最大电流×100%国网标准:三相负荷不平衡度不应大于15%,只带少量单相负荷的三相变压器,中性线电流不应超过额定电流的25%。
1.2 三相不平衡的危害三相负载不平衡问题对电力系统、用户供电等都带来了严重的危害。
主要表现在以下几个方面:增加变压器损耗增加线路损耗配变出力减小,降低了配变利用率变压器发热,严重时甚至会烧毁变压器容易导致过压、低压,影响用电设备的正常工作我国的低压配电网点多面广、结构复杂,并且随着人们生活水平的不断提高,负荷性质日趋多样化、负荷波动越发显著,使低压台区变三相不平衡问题越发突出。
目录
产品简介
1 SKDH-□B型三相电动机换相控制器
1.1 型号说明 (1)
1.2 技术参数 (1)
1.3 安装要求 (2)
1.4 外形尺寸 (2)
1.5 应用线路 (2)
1.6 指示说明 (3)
1.7 注意事项 (3)
2 SKDHK-□BZ型三相电动机换相控制器
2.1 型号说明 (4)
2.2 技术参数 (4)
2.3 安装要求 (4)
2.4 外形尺寸及重量 (5)
2.5 应用线路 (5)
2.6 指示说明 (6)
2.7 注意事项 (6)
3 SKDHK—□(□×□)— B G型三相电动机换相控制柜
3.1 型号说明 (7)
3.2 技术参数 (7)
3.3 安装要求 (8)
3.4 外形尺寸 (8)
3.5 控制系统图 (8)
3.6 注意事项 (9)
4. 典型应用 (9)
5. 常见故障现象及处理方法 (9)
附图1 SKD H-7.5~75BZ接线原理图 (11)
附图2 电动单梁悬挂起重机无触点换相控制器部分电气系统图 (12)
产品简介:
在电气传动设备中,经常需要对三相电动机进行正、反转运行控制。
由于传统换相电路普遍工作在转换频繁、操作频率高的工作状态,使接触器触点电烧现象十分严重。
我公司研制产品:三相电动机换相控制器采用晶闸管作为交流开关,控制电动机的起动、停止及正反转运行。
控制线路采用电压过零触发及电子与机械互锁技术,降低电动机在起动瞬间的冲击电流,保证换相的可靠性,避免换相失败。
它具有无触点、无噪音、无火花、使用寿命长等优点。
广泛应用于频繁换相、操作频率高,以三相异步电动机为拖动动力的机械设备上。
如:冶金、化工、石油、纺织、造纸等行业。
1 SKDH-□B型三相电动机换相控制器
SKDH-□B型三相电动机换相控制器为模块化结构,控制电机功率范围7.5kW 以下,其控制电源内置。
正、反转运行可用模块内部提供的控制电压进行控制,也可用外加电平信号进行控制。
具有体积小,安装使用方便等优点。
1.1 型号说明:
SKDH - □ B
设计序号
电机功率
三相电动机换相模块
*AC-53a是指控制鼠笼型电动机。
1.3 安装要求:
▲环境温度:-20℃~+40℃
▲相对湿度:<90%无冷凝或滴水
▲远离金属粒子、导电性灰尘和腐蚀性气体
为保证换相控制器的正常工作,使用时需在其底基板上均匀涂抹导热硅脂后加装散热器。
建议加装的散热器型号见下表。
1.4 外形尺寸:
1.5 应用线路:
端子说明:
R、S、T:三相电输入端
U、V、W:三相电输出端
+:内置12V电源正端
-:内置12V电源负端
A1:正转控制输入(直流12V控制)
A2:反转控制输入(直流12V控制)
★注意:SKDH-□B型三相电动机换相控制器的内部电压信号和外加电平信号两种控制方式只能选择其一!
1.6 指示说明:
“指示灯”:为双色发光指示,红色定义为“正转指示”,绿色定义为“反转指示”。
1.7 注意事项:
★SKDH-□B型三相电动机换相控制器的输入端T与输出端W为直通;
★客户在使用时建议在R、U间及S、V间加装压敏电阻(820V/5KA),限制过电压保护内部的晶闸管;
★“正转”控制输入与“反转”控制输入应互锁。
检修设备及电动机时必须断开电源进线开关,避免触电!
注意!
2SKDHK-□BZ型三相电动机换相控制器
SKDHK-□BZ型三相电动机换相控制器为组件式结构,控制电机功率范围:7.5~75kW。
具有直流和交流两种控制方式,直流控制适用于近距离操作,交流控制适用于远距离操作。
用户可根据具体需要进行选择。
2.1 型号说明:
SKDH -□BZ
设计序号
电机功率
三相电动机换相组件
*AC-53a是指控制鼠笼型电动机。
2.3 安装要求:
▲环境温度:-20℃~+40℃
▲相对湿度:<90%无冷凝或滴水
▲远离金属粒子、导电性灰尘和腐蚀性气体
为了达到预定的设计性能和使用寿命,必须垂直安装SKD HK -□B 型三相电动机换相控制器,并需确保其周围有足够的空间以便散热:控制器的上下预留空间不小于200mm ;两侧预留空间不小于15mm ;正面预留空间不小于20mm 。
2.4 外形尺寸及重量
:
SKDH-7.5~
22B
SKDH-30~75B
2.5 应用线路:
端子说明:
R、S、T:三相电输入端
U、V、W:三相电输出端
N:系统零线
Z:正转控制输入(交流220V控制)
F:反转控制输入(交流220V控制)
+V:内置12V电源正端
A1:正转控制输入(直流12V控制)
A2:反转控制输入(直流12V控制)
正、反转辅助触点:正转、反转动作时对应此继电器吸合。
无源触点容量:5A/250V AC HK-7.5~75BZ内部接线原理图见附图1
★注意:SKDH-□BZ型三相电动机换相控制器的交流和直流两种控制方式
只能选择其一!
2.6 指示说明:
“电源指示”:绿色LED为工作电源指示;
“正转指示”:正转运行时,该红色LED亮;
“反转指示”:反转运行时,该红色LED亮。
2.7 注意事项:
★SKDHK-□BZ型三相电动机换相控制器已内置电阻(20Ω/5W)电容(0.1uF/450VAC)吸收回路及压敏电阻(820V/5KA);
★“正转”控制输入与“反转”控制输入应互锁。
检修设备及电动机时必须断开电源进线开关,避免触电!
注意!
3 SKDH-□(□×□)-BG型三相电动机换相控制柜
此换相控制柜为柜式结构,控制电机功率范围:60~315kW。
具有直流和交流两种
控制方式,直流控制适用于近距离操作,交流控制适用于远距离操作。
用户可根据具体需要进行选择。
3.1 型号说明
SKDH -□(□×□)- B G
柜式GGD
B系列
每路换相控制器功率
回路数:1、4、8
总功率(最大电机功率315kW)
换相控制器
注:1.回路数可分为:1路、4路、8路;
2.回路数为1时,控制电机功率范围:90~315kW
3.回路数为4时,控制电机功率范围:30~75kW×4
4.回路数为8时,控制电机功率范围:7.5~22kW×8
可根据用户需要定制:回路个数及每个回路的功率等级
3.2 技术参数
3.3 安装要求
▲环境温度:-20℃~+40℃
▲相对湿度:<90%无冷凝或滴水
▲远离金属粒子、导电性灰尘和腐蚀性气体3.4 外形尺寸
3.5 控制系统图
图中每个回路中用户控制按钮接线参见附图
3.6 注意事项
★“正转”控制输入与“反转”控制输入应互锁。
检修设备及电动机时必须断开电源进线开关,避免触电!
4 典型应用
附图2是在电动单梁悬挂起重机中的典型应用,此控制方案采用SKDH -□B 型及HK -□BZ 型三相电动机换相控制器,实现了对起升机构、小车行走机构及大车行走机构的无触点控制(仅供参考)。
5 常见故障现象及处理方法
SKDHK-BZ 型换相控制器故障一览表
注意!。