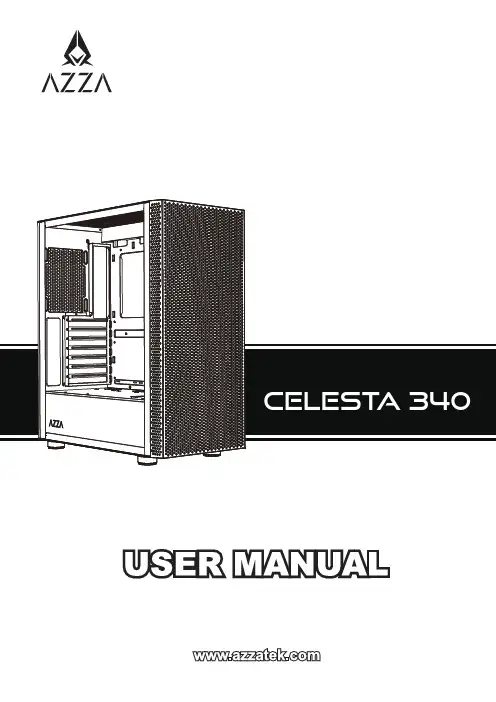
世界级大师MOD阿尔萨斯GT、原来机箱可以这样用
- 格式:docx
- 大小:957.02 KB
- 文档页数:14
备战《魔兽世界:争霸艾泽拉斯》高性能主机应该这么装作者:来源:《电脑报》2018年第31期AMD平台有优势,应当是首选其实《魔兽世界:争霸艾泽拉斯》对于PC的配置要求还算是比较亲民的,推荐配置只要求处理器为Core i7 4770/FX-8310、8GB内存容量、GTX 960/R9 280显卡以及70GB SSD空间就行了,组装一套中端游戏平台就能满足游戏的需求。
虽说该游戏增加了对DX12 API的支持,但DX12模式目前只支持AMD显卡,再加上DX12可以更好地支持多线程,显然玩《魔兽世界:争霸艾泽拉斯》得选择AMD平台才行。
处理器方面,站长推荐锐龙 5 2600X,这款处理器拥有6核12线程的高配置,基础频率3.6GHz,最高频率可以达到4.2GHz。
与同价位上的竞争对手Core i5 8500相比,不仅在单核性能上不落下风,而且在多线程性能上完胜对手,还能更好地支持DX12模式,所以锐龙 5 2600X算是玩《魔兽世界:争霸艾泽拉斯》的首选处理器。
考虑到DX12模式目前只支持AMD显卡,所以站长选择了RX580来与锐龙 5 2600X搭配。
近期RX 580的价格非常吸引人,高配版产品也就2000元上下,比GTX 1060 6GB便宜,性价比不错。
本次给大家推荐的是迪兰RX580 8G DEVIL恶魔,这款产品比之前站长经常推荐的RX 580 8G X-Serial 战神的定位更高,追求的是极致的性能和散热,但价格仅多了50元,购买价值更高。
显卡1411MHz~1439MHz的核心频率是RX 580中最高的,为了保证充沛的供电,还采用了8相供电配以1上2下的MOS管的设计。
散热方面,显卡拥有4根8mm热管+1根6mm热管的配置,再加上2个8cm风扇,散热性能也很不错。
使用A卡还有一大优势在于可以使用FreeSync技术,搭配价格便宜的FreeSync显示器,可以获得无撕裂、卡顿的完美画面,游戏体验更上一层楼。
LTP工具说明1LTP测试套件 (4)1.1简介 (4)1.2源目录结构 (4)2LTP安装 (5)2.1下载 (5)2.2编译 (5)2.3安装说明 (7)3LTP测试套件结构说明 (7)3.1概述 (7)3.2目录介绍 (8)3.3LTP执行原理 (8)4LTP测试套件测试内容 (9)4.1LTP测试套件测试内容 (9)4.1.1commands (9)4.1.2kernel (10)4.1.3kdump (10)4.1.4network (10)4.1.5realtime (10)4.1.6open_posix_testsuite (11)4.1.7misc (11)4.2.1commands模块内容描述及实现方法 (11)4.2.2kernel (14)4.2.3network (22)4.2.4open_posix_testsuite (25)4.2.5realtime (26)5LTP测试套件配置详细 (27)5.1networktests.sh脚本配置 (27)5.2networkstress.sh配置 (32)5.3open_posix_testsuite测试套件 (36)5.4realtime配置 (37)5.5mm脚本的配置 (38)5.6io脚本配置 (38)5.7filecaps的配置 (39)5.8tpm_tools的配置 (40)5.9tcore的配置 (40)5.10io_floppy的配置 (40)5.11io_cd的配置 (40)5.12cpuhotplug的配置 (41)5.13adp.sh的配置 (42)5.14autofs1.sh和autofs4.sh的配置 (43)5.15exportfs.sh的配置 (43)5.17ltpdmmapper.sh的配置 (44)5.18ltpfslvm.sh的配置及要求 (45)5.19ltpfsnolvn.sh的配置及要求 (46)5.20ltp-scsi_debug.sh的配置及要求 (46)5.21sysfs.sh的配置及要求 (46)5.22rpctirpc的配置及要求 (47)5.23test_selinux.sh的配置及要求 (49)5.24smack的配置和要求 (50)5.25perfcounters的配置及要求 (51)5.26can的配置及要求 (51)5.27test_robind.sh的配置 (52)6LTP测试套件使用说明 (52)6.1概述 (53)6.2初始测试 (54)6.2.1runltp使用说明 (54)6.2.2runalltests.sh脚本说明 (57)1 LTP测试套件1.1 简介LTP(LinuxTest Project)是SGI、IBM、OSDL和Bull合作的项目,目的是为开源社区提供一个测试套件,用来验证Linux系统可靠性、健壮性和稳定性。
战警gt10标准版机箱战警gt10标准版机箱是一款性能卓越、外观时尚的电脑机箱,它采用了高质量的材料和精湛的工艺,为用户提供了良好的使用体验。
本文将对战警gt10标准版机箱的设计特点、性能参数、使用方法等进行介绍,希望能够帮助用户更好地了解和使用这款产品。
首先,我们来看一下战警gt10标准版机箱的外观设计。
这款机箱采用了全透明侧板设计,可以展示内部硬件的运行状态,同时还配备了RGB灯效系统,可以通过控制器调节灯效,营造出炫酷的视觉效果。
机箱正面设计简洁大气,采用了金属拉丝工艺,给人一种高贵典雅的感觉。
整体外观设计时尚大方,适合各种场合的使用。
其次,我们来了解一下战警gt10标准版机箱的性能参数。
这款机箱支持ATX、M-ATX、ITX等主流主板规格,内部空间宽敞,可以容纳多款显卡和散热器,满足不同用户的硬件搭配需求。
机箱顶部和底部都配备了磁吸式除尘网,有效阻止灰尘进入机箱内部,保持硬件设备的清洁。
此外,机箱还预留了大量散热孔位,保证了内部硬件的良好散热效果,让电脑长时间运行时也能保持稳定性能。
再者,我们来介绍一下战警gt10标准版机箱的使用方法。
在安装硬件时,用户首先需要打开机箱侧板,根据自己的硬件搭配需求选择合适的安装位置,安装主板、显卡、硬盘等设备。
在连接电源线时,需要注意将线缆整齐地隐藏在机箱背面,以保证整体线路的美观和空气流通的畅通。
安装完成后,用户可以根据自己的喜好调节灯效系统,打造出个性化的电脑外观。
总的来说,战警gt10标准版机箱是一款外观时尚、性能卓越的电脑机箱,它不仅具有良好的散热性能和扩展性,还具备炫酷的灯效系统,能够满足用户对于电脑外观和性能的追求。
希望本文的介绍能够帮助用户更好地了解和使用这款产品,为用户的电脑搭建提供更多的选择和参考。
User GuideEVGA Z97 StingerSpecs & Initial Installation(Part 1)- 1 -Table of ContentsBefore you Begin (3)Parts Not in the kit (4)Intentions of the kit (4)Motherboard Specifications ...................................................................................................................... 5-6 Unpacking and Parts Descriptions (7)Equipment (7)Hardware Legend (8)PCI-E Slot Breakdown (9)Rear I/O Panel legend (10)Preparing the Motherboard (11)Installing the CPU ................................................................................................................................... 11-12 Installing the Cooling Device . (12)Installing System Memory (DIMMs) (13)Compliance Information (14)- 2 -Before You Begin…Welcome to a new class of high performance motherboards that boast 4th and 5th Generation Intel® Core™ Processor compatibility. The Z97 platform takes you to anew level of performance and efficiency. We have refined the GUI BIOS interface, reimagined power VRM that focuses on efficiency, added MPCIE support and loadedwith features like Creative Sound Core3D quad-core audio processor, Intel Gigabit LAN, native SATA 6G/USB 3.0 and more. All sitting on a 10 layer PCB to improve performance and efficiency.Did we also mention that this motherboard is designed for the overclocker? Built fromthe ground up to give you all the essentials that you need for overclocking, with a GUIBIOS that is focused on functionality, ultra high quality components and robust PCI-E3.0 and memory trace layout.With these features and more, it is clear that the EVGA Z97 motherboards areengineered to exceed the best.- 3 -Parts NOT in the KitThis kit contains all the hardware necessary to install and connect your newEVGA Z97 Stinger Motherboard. However, it does NOT contain the followingitems that must be purchased separately in order to make the system fullyfunctional and install an Operating System:Intel Socket 1150 ProcessorDDR3 System MemoryCPU Cooling DevicePCI Express Graphics CardPower SupplyHard Drive or SSDKeyboard / MouseMonitor(Optional) Optical DriveEVGA assumes you have purchased all the necessary parts needed to allow forproper system functionality. For a full list of supported CPUs on thismotherboard, please visit /support/motherboardIntentions of the KitThis kit provides you with the motherboard and all connecting cables necessaryto install the motherboard into a PC case.When replacing a motherboard in a PC case, you will need to reinstall anoperating system even though the current storage drive may already have oneinstalled.- 4 -EVGA Z97MotherboardMotherboard SpecificationsSize:mITX form factor of 6.7 inches x 6.7 inchesMicroprocessor support:Intel Socket 1150 ProcessorOperating Systems:Supports Windows 8 / 7Contains Intel Z97 chipsetSystem Memory support:Supports Dual channel DDR3 up to 2666MHz+.Officially supports up to 16GB of DDR3 memory.USB 2.0 Ports:6x from Intel Z97 PCH – 4x externalSupports hot plugSupports wake-up from S1 and S3 modeSupports USB 2.0 protocol up to a 480 Mbps transmission rateUSB 3.0 Ports:6x from Intel Z97 PCH – 4x external, 2x internalSupports transfer speeds up to 5GbpsBackwards compatible USB 2.0 and USB 1.1 supportSATA Ports:Intel Z97 PCH Controller4x SATA 3 Ports up to 6G (600 MB/s) data transfer rate- Support for RAID 0, RAID 1, RAID 0+1, RAID 5, AND RAID 101x eSATA port on rear I/O panel- 5 -Onboard LAN:1x Intel i217 Gigabit Ethernet PHYSupports 10/100/1000 Mb/sec EthernetOnboard Audio:Creative Core3D Quad-Core Audio Processor (CA0132)Supports 6-channel (5.1) audioSupports Optical OutputPCI-E 3.0 Support:Low power consumption and power management featuresPower Functions:Supports ACPI (Advanced Configuration and Power Interface)Supports S0 (normal), S1 (power on suspend), S3 (suspend to RAM), S4 (Suspend to disk - depends on OS), and S5 (soft - off)Expansion Slots:1x PCI-E 16x slot1x MPCIE/MSATA slot1x Display Port (Full size)1x HDMI Port (Full size)- 6 -- 7 -Unpacking and Parts DescriptionsEquipmentThe following accessories are included with the EVGA Z97 Stinger Motherboard:The EVGA Z97 Stinger MotherboardThis PCI-E motherboard contains the Intel Z97 chipset.I/O ShieldInstalls in the system case to block radio frequencytransmissions, protect internal components from dust, foreign objects, and aids in proper airflow within the chassis.2x SATA 3G/6G Data CablesUsed to support the SATA protocol and each one connects a single drive to the motherboard.I/O CoverThis optional cover attaches to the PCB and covers the I/O areaInstallation CDContains drivers and software needed to setup the motherboard.User ManualThe user manual you are reading right now!- 8 -Intel Z97 Stinger MotherboardThe EVGA Z97 Stinger Motherboard with the Intel Z97 and PCH Chipset. Figure 1 shows the motherboard and Figure 2 shows the back panel connectorsFIGURE 1. Z97 Stinger Motherboard Layout1. CPU Socket 1150 7. Intel SATA 6G/3G Ports 13. Reset Button2. Intel Z97 Southbridge 8. Front Panel Connectors 14. PCI-E Slot 16x/8x3. CPU Fan Header (1 amp PWM) 9. Debug LED / CPU Temp Monitor 15. Mini PCI-E/mSATA4. DDR3 Memory DIMM Slots 1-2 10. USB 3.0 Headers 16. Back Panel Connectors (Figure 2)5. 24-pin ATX power connector 11. CMOS Battery 17. 8 pin EPS Connector6. Fan Headers (1 amp DC) 12. Power Button 18. Removable BIOS ChipPCI-E Slot BreakdownPCI-E Lane DistributionPE1 – x16- 9 -- 10 -Figure 2. Chassis Rear Panel Connectors1. USB2.0 4. eSata 7. HDMI 2. USB3.05. NIC Port 8. Optical Out3. BIOS/CMOS Reset6. Display Port9. Analog Audio Output JacksAnalog Audio Port Breakdown 2/2.1 (Channel)4.0/4.1 (Channel)5.1 (6 Channel) Blue Line in Line In Line in Green Line Out/ Front Speaker/ Front Speaker/ Speaker Out Speaker+Sub Out Speaker+Sub Out Pink Mic InMic InMic InBlack Rear Speaker OutRear Speaker Out OrangeCenter/Voice channel- 11 -Preparing the MotherboardInstalling the CPUBe very careful when handling the CPU. Hold the processoronly by the edges and do not touch the bottom of theprocessor. Note: Use extreme caution when working with the CPU,not to damage any pins in the CPU socket on themotherboard!Use the following procedure to install the CPU onto the motherboard:Remove the plastic protective socket cover by pulling it straight up. Be sure not to damage any of the pins inside the socket.Unhook the socket lever by pushing down and away from the socket.Pull the socket lever back and the load plate will lift. Open the load plate and make sure not to damage any of the pins inside the socket.Note: After removing the CPU socket cover, it is recommended to store it incase you ever need to transport your motherboard. If you ever remove theCPU, it is highly recommended to reinstall the socket cover.Align the notches on the CPU to the notches in the Array socket.Lower the processor straight down into the socket.Note: Make sure the CPU is fully seated and level inthe socket.Lower the load plate so it is resting on the CPU.Installing the CPU Cooling DeviceThere are many different cooling devices that can be used with thismotherboard. Follow the instructions that come with your cooling assembly.- 12 -- 13 -Installing System Memory (DIMMs)Your Z97 Stinger has (2) 240-pin slots for DDR3 memory. These slots support 2GB, 4GB and 8GB DDR3 DIMMs. There must be at least one memory slot populated to ensure normal operation.The Intel Z97 chipset supports dual channel memory; supports amaximum of 16GB of DDR3 and up to 2666MHz+ in dual channelconfiguration. It is required to populate slot 1 first. Board will notboot if slot 1 is not populated.Use the following procedure to install DIMMs. Note that there isonly one gap near the center of the DIMM slots. This slot matchesthe slot on the DIMM to ensure the component is installed properly.Unlock a DIMM slot by pressing the module clips on both sides outward. Align the memory module to the DIMM slot, and insert the module vertically into the DIMM slot, pressing straight down to seat themodule. The plastic clips at top side of the DIMM slot automaticallylock the DIMM into the connector.Note:The memory controller on most Haswell and Broadwell CPUs runs at adefault frequency of 1600MHz. To achieve memory speeds above 1600+may require manual setting of the memory timings, frequency and voltagesand/or overclocking of the CPU.Refer to the memory manufacturer specifications for the recommendedmemory timings. For overclocking support you can visit our forums:/Compliance InformationFCC Compliance InformationThis device complies with FCC Rules Part 15. Operation is subject to the following two conditions: (1) This device may notcause harmful interference, and (2) this device must accept any interference received, including interference that maycause undesired operation. This equipment has been tested and found to comply with the limits for a Class B digital device, pursuant to Part 15 of the FCC Rules. These limits are designed to provide reasonable protection against harmful interference in a residential installation. This equipment generates, uses and can radiate radio frequency energy and, ifnot installed and used in accordance with the manufacturer’s instructions, may cause harmful interference to radio communications. However, there is no guarantee that interference will not occur in a particular installation. If this equipment does cause harmful interference to radio or television reception, which can be determined by turning the equipment off and on, the user is encouraged to try to correct the interference by one or more of the following measures:(1) Increase the separation between the equipment and signal source, or (2) connect the equipment to an outlet on acircuit different from that to which the signal source is connected. Consult the dealer or an experienced computer technician for help. The use of shielded cables for connection of peripheral devices to the PC systems is required toensure compliance with FCC regulations. Changes or modifications to this unit not expressly approved by the party responsible for compliance could void the user’s authority to operate the equipment.CE Compliance InformationGeneric Radiation Interference Standard for Information Technology Equipment. (EN 55022: 2006, Class B), (EN 61000-3-2: 2006), (EN 61000-3-3: 1995 + A1: 2001 + A2: 2005). Warning: This is a Class B product. In a domestic environmentthis product may cause radio interference in which case the user may be required to take adequate measure. GenericImmunity Standard for Information Technology Equipment. (EN 55024: 1998 + A1: 2001 + A2: 2003).Trademark & Copyright Information2001-2014 EVGA Corp. EVGA, the EVGA logo and combinations thereof are trademarks of EVGA Corp. All brand names, company names, service marks, logos, and trademarks of the company, or its affiliates or licensors are trademarks or registered trademarks of the company or its subsidiaries, affiliates or licensors in the US and other countries. Other company, products and service names may be trademarks or service marks of others. EVGA reserves the right to terminate this license if there is a violation of its terms or default by the Original Purchaser. Upon termination, for any reason, all copies of Software and materials must be immediately returned to EVGA and the Original Purchaser shall beliable to CORP for any and all damages suffered as a result of the violation or default.Legal InformationAll material including but not limited to, text, data, design specifications, diagnostics, graphics, logos, reference boards,files, images, drawings, and software including this document and the software itself (together and separately) is owned, controlled by, licensed to, or used with permission by EVGA Corporation and is protected by copyright, trademark, andother intellectual property rights. All is being provided “as is”, EVGA Corporation makes no warranties, whether expressor implied, statutory or otherwise with respect to the materials and expressly disclaims all implied warranties of non-infringement, merchantability, and fitness for a particular purpose. In no event shall the liability of EVGA Corporation forclaims arising from the use of the materials by anyone exceed the original purchase price of the materials (or replacementof the materials at EVGA Corporation’s option). All information furnished is believed to be accurate and reliable. However,EVGA Corporation assumes no responsibility for the consequences of use of such information or for any infringement ofpatents or other rights of third parties that may result from its use, or use of the Software. No license is granted by implication or otherwise under any patent or patent rights of EVGA Corporation except as expressly provided herein. All specifications mentioned in this publication are subject to change without notice.Ver. 2- 14 -。

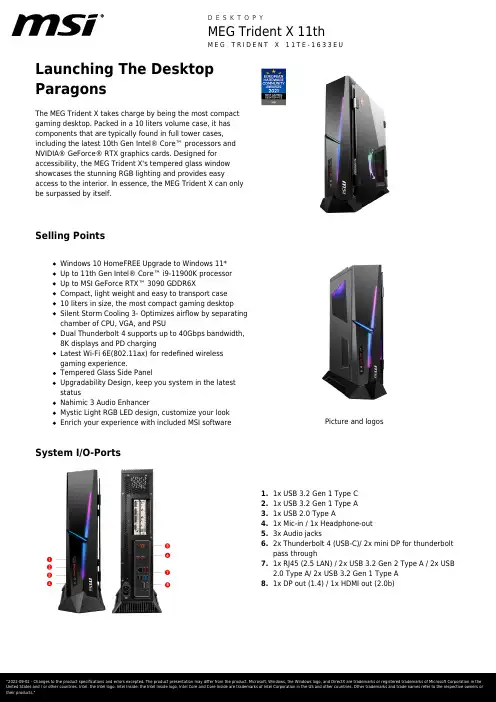
Launching The DesktopParagonsThe MEG Trident X takes charge by being the most compactgaming desktop. Packed in a 10 liters volume case, it hascomponents that are typically found in full tower cases,including the latest 10th Gen Intel® Core™ processors andNVIDIA® GeForce® RTX graphics cards. Designed foraccessibility, the MEG Trident X's tempered glass windowshowcases the stunning RGB lighting and provides easyaccess to the interior. In essence, the MEG Trident X can onlybe surpassed by itself.Selling PointsWindows 10 HomeFREE Upgrade to Windows 11*Up to 11th Gen Intel® Core™ i9-11900K processorUp to MSI GeForce RTX™ 3090 GDDR6XCompact, light weight and easy to transport case10 liters in size, the most compact gaming desktopSilent Storm Cooling 3- Optimizes airflow by separatingchamber of CPU, VGA, and PSUDual Thunderbolt 4 supports up to 40Gbps bandwidth,8K displays and PD chargingLatest Wi-Fi 6E(802.11ax) for redefined wirelessgaming experience.Tempered Glass Side PanelUpgradability Design, keep you system in the lateststatusNahimic 3 Audio EnhancerMystic Light RGB LED design, customize your lookEnrich your experience with included MSI software Picture and logosSystem I/O-Ports1.1x USB 3.2 Gen 1 Type C2.1x USB 3.2 Gen 1 Type A3.1x USB 2.0 Type A4.1x Mic-in / 1x Headphone-out5.3x Audio jacks6.2x Thunderbolt 4 (USB-C)/ 2x mini DP for thunderboltpass through7.1x RJ45 (2.5 LAN) / 2x USB 3.2 Gen 2 Type A / 2x USB2.0 Type A/ 2x USB3.2 Gen 1 Type A8.1x DP out (1.4) / 1x HDMI out (2.0b)SpecificationOperating Systems Windows Windows 10 HomeBEZPŁATNE uaktualnienie do systemu Windows 11*Processor CPU model Intel Core i9-11900K CPU Clock 3.5GHzCPU Cores8CPU TDP125WCPU Cache16 MB Intel® Smart Cache CPU Threads16CPU Cooling Air coolingChipset Motherboard Chipset Z590Discrete Graphics VGA I/O Port HDMIx1, Display Portx3Graphics CardGeForce RTX 3080 VENTUS 3X PLUS 10G OCLHRGraphics Card VRAM10GMemory Memory Capacity64GB(32GB*2) Memory Type DDR4 SDRAM Memory Speed1600(3200)MHz Memory Module Form Factor U-DIMM Memory Slot (Total/Free)2/0Memory Max Capacity Max 64GBStorage Total SSD Storage Capacity1TBTotal HDD Storage Capacity2TB*1M.2 Slot (1) Installed SSD1TB*1M.2 Slot (1) Interface PCIe GEN4x4 NVMe M.2 Slot (1) Form Factor M.2-2280 M-KEY M.2 slots (Total/Free)2/1HDD (1) RPM5400RPMHDD (1) Form Factor 2.5 inch 7mm HDD (1) Interface SATA GEN33.5" Drive Bays (Total/Free)0/2.5" Drive Bays (Total/Free)2/1ODD(Type)N/AODD Height N/AODD Type N/ACommunications LAN Controller Realtek RTL 8125B Wireless LAN Controller INTEL/AX210.NGWG.NV Wireless LAN standard802.11a/b/g/n/ac/ax 2x2+BT Bluetooth Version 5.2Audio Audio Codec Realtek ALC1220P Audio Support7.1 Channel HD AudioI/O Ports (Front)Thunderbolt N/A USB 480Mbps (USB 2.0)1 USB 5Gbps (USB 3.2 Gen 1 Type-A)1 USB 5Gbps (USB 3.2 Gen 1 Type-C)1 Audio Mic-In (Front)1 Audio-Out (Front)1I/O Ports (Rear)USB 10Gbps (USB 3.2 Gen 2 Type-A)2USB 5Gbps (USB 3.2 Gen 1 Type-A)2USB 480Mbps (USB 2.0 Type A)2Thunderbolt OptionalLAN Ports (RJ45)1WiFi Antenna2HDMI™1x (v2.0b)DP out1x (v1.4a)Thunderbolt mini DisplayPort-in2x (for Thunderbolt passthrough) Audio Jack Total (Rear)3Flash BIOS Button1Power Rated Wattage750WEfficiency Rating80PLUSE GLOD Form factor SFXPower Supply Type POWER SUPPLYIn The Box Keyboard Interface N/A Mouse Interface N/A Power Cord1 AC Adaptor N/A Warranty Card1 Quick Guide5 User Manual N/A VESA Mount kit N/A Keyboard N/A Mouse N/ARegulatory Compliance Storage Operating Temperature Range0° C ~ 35° C ; -20° C ~ 60° C Storage Operating Humidity Range0% ~ 85%;0% ~ 90%CertificationsFCC(Class B)CB/CEUL(CUL)BSMIVCCIRCM(C-Tick)Dimension & Weight Product Dimensions (WxDxH) (mm)396.57 x 137.06 x 410.39 Product Dimensions (WxDxH) (inch)15.61 x 5.4 x 16.16 Inside Carton Dimensions (WxDxH) (mm)532 x 230 x 501Inside Carton Dimensions (WxDxH) (inch)20.94 x 9.06 x 19.72 Outer Carton Dimensions Standard (WxDxH)(mm)N/AOuter Carton Dimensions Standard (WxDxH)(inch)N/AWeight (Net kg)7.15Weight (Gross kg)10.2Product Volume (Liters)10.36Warranty Warranty24months Barcode Info EAN4719072802585。
目录NetLinx系列主控器 - 3 -NetLinx系列主控器型号及参数 - 3 -NI-700小型主控器 - 3 -NI-900小型主控器 - 4 -NI-2100主控器 - 5 -NI-2100/ICS主控器 - 6 -NI-3100主控器 - 8 -NI-3100/ICS主控器 - 9 -NI-3101-SIG主控器 - 11 -NI-4100主控器 - 12 -NetLinx系列主控卡 - 14 -NXC-IRS4 红外控制卡 - 14 -NXC-COM2 RS-232/422/485控制卡 - 14 - NXC-VOL4 音量控制卡 - 14 -NXC-REL10 继电器控制卡 - 15 -NXC-I/O10 输入/输出控制卡 - 15 -NXS-NMS网络模块盒 - 15 -Axcess系列控制器 - 16 -AXB-REL8继电器控制器 - 16 -AXB-VOL3音量控制器 - 16 -AXB-IRS4红外控制器 - 16 -AXB-DMX512灯光控制器 - 17 -AXB-MIDI音量控制器 - 17 -Modero ViewPoint无线触摸屏系列 - 18 -无线双向触摸屏 - 18 -5.2寸彩色无线触摸屏:MVP-5200i(带VOIP内部对讲) - 18 -5.2寸彩色无线触摸屏:MVP-5150 - 19 -8.4寸彩色无线触摸屏:MVP-8400i(带VOIP内部对讲) - 20 -8.4寸彩色无线触摸屏:MVP-8400 - 22 -红外无线宽屏触摸屏 - 23 -5.2寸红外宽屏触摸屏:MVP-5100 - 23 -Modero桌面式有线触摸屏系列 - 24 -Modero宽屏触摸屏 - 24 -7寸桌面宽屏触摸屏:NXT-CV7 - 24 -10寸桌面宽屏触摸屏:NXT-CV10 - 26 -Modero VG系列触摸屏 - 27 -12寸桌面宽屏触摸屏:NXT-1200VG (RGB/VIDE0输入 - 27 -15寸桌面宽屏触摸屏:NXT-1500VG (RGB/VIDE0输入 - 28 -17寸桌面宽屏触摸屏:NXT-1700VG (RGB/VIDE0输入 - 29 -Modero嵌入式有线触摸屏系列 - 31 -Modero嵌入式宽屏触摸屏 - 31 -4.3寸嵌入式宽屏触摸屏:NXD-430(横向 - 31 -4.3寸嵌入式宽屏触摸屏:NXD-435(横向 - 32 -4.3寸嵌入式宽屏触摸屏:NXD-435P(纵向 - 33 -5寸嵌入式宽屏触摸屏:NXD-500i(带VOIP内部对讲) - 34 -7寸嵌入式宽屏触摸屏:NXD-700Vi(带VOIP内部对讲) - 35 -10寸嵌入式宽屏触摸屏:NXD-1000Vi(带VOIP内部对讲) - 36 -Modero 嵌入式VG系列触摸屏 - 37 -12寸嵌入式触摸屏:NXD-1200VG (RGB/VIDE0输入 - 37 -15寸嵌入式触摸屏:NXD-1500VG (RGB/VIDE0输入 - 39 -17寸嵌入式触摸屏:NXD-1700VG (RGB/VIDE0输入 - 40 -NetLinx系列主控器NetLinx系列主控器型号及参数NI-700小型主控器 1路红外接收端口1路红外/红外穿行端口2路RS-232/422/485端口,支持双向300–115200波特率传输速率4路I/O输入输出端口,额定200毫安,触点闭合或TTL逻辑输入提供2种通信网络:AXLink总线和以太网(TCP/IP),AXLink 4芯总线网络(20.8Kbps),可连接255个Axles设备,线路长度达3000英尺提供12VDC的设备电源。
Table of Contents...........................................................................1Important Safety Instructions ................................................................................3Package Contents Installing the Monitor Arm/Base.................................................................................................4Wall Mount Installation Instructions ...........................................................................................7 ........................................................................8External Control Buttons ......................................................................................9Main Menu ..............................................................................................................10Input ......................................................................................................................10Audio Adjust ..................................................................................................................................................................................................................10Picture Mode 11Color Adjust ..........................................................................................................12Manual Image Adjust .....................................................................................................................................................................................................13Setup Menu 13..............................................................................................................PC Timing 16.........................................................................................................Video Timing 17............................................................................................................................................................................................................SpecificationsSupported Timing Requirements and Safety Notice1516.................................................................................Product Outline Dimensions 17Adjusting the Monitor (5)Requirements and Safety NoticeFCC Safety NoticeThis product has been tested and determined to be meeting the limits for a Class B digital device and incompliance with Part 15 of the FCC Regulations. These requirements are set to reasonably protect the home installation environment from hazardous interference. This product will generate, use and emit radio frequency energy. Failure to install and use it as instructed may cause hazardous interference to radio communication.However, we cannot guarantee zero interference for certain installation methods. If this product has caused hazardous inteference to radio or TV reception (turn on or turn off this product to for confirmation), the user may try to make adjustment with the following methods:•Re-adjust the angle and position of the reception antenna.•Increase the distance between the device and receiver.•Do not use the power sockets of the device and receiver together.•If assistance is needed, contact the distributor or a professional radio/TV technician.CE Compliance StatementCooler Master Technology Inc. hereby declares that the monitor conforms to the following key standards and other related provisions:EMC Directive 2014/30/EU, Low Voltage Directive 2014/35/EU, RoHS Directive 2011/65/EU and Directive 2009/125/EC establishing a framework for the setting of eco-design requirements for energy-related products.Note:To prevent damage of the monitor, do not lift the monitor from the support base.Note: Shielded cableTo comply with the EMC requirements, a shielded cable must be used for connection between this product and any other computer device. Note:The monitor is exclusively used in the video and image display of information acquired from electronic devices. Note: PeripheralsOnly a peripheral device (I/O device, terminal, printer, etc.) that has been certified and met the Class B limits can be sold together with this product. If this product is used together with any other uncertified peripheral device, it may cause interference to radio and TV reception.WarningAny change or modification not approved by the original manufacturer may lead to the user losing the right to operate this product. Such authorization is given by the Federal Communications Commission.Requirements for UseThis product meets the limits under Part 15 of the FCC Regulations. When operating this product, please meet the following two requirements: (1) This product may not generate hazardous interference; and (2) This product must accept any interference signal received, including The following local Manufacturer/Importer is responsible for this declaration. interference that is likely to lead to unexpected operation. Disposal of Waste Equipment by Home Users in EUIf this symbol appears on a product and its package, it indicates that the product cannot be disposed of together with other household waste. You have to deliver the waste equipment to a designated recycling center for recycling of waste electrical and electronic equipment. Proper sorting and recycling of resources during the disposal of waste equipment is helpful for protecting natural resources and ensuring that resource recycling can protect human health and environment. For detailed information about recycling centers where waste equipment is disposed of, contact the local municipal office, cleaning service or the store where the purchased product is found.Note: Canadian usersThis Class B digital device complies with Canadian ICES-003 specifications.Remarque à I’intention des utilisateurs canadiensCet appareil numrique de la classe B est conforme à la norme NMB-003 du Canada限用物質含有情況標示聲明書Please read the following instruc ons carefully.1. To clean the LCD monitor screen:Turn o ff the LCD monitor and unplug the power cord.Spray a non-solvent cleaning solu on onto a rag and clean the screen gently.2. Do not place the LCD monitor near a window. Exposing the monitor to rain, moisture or sunlight can severely damage it.3. Do not apply pressure to the LCD screen. Excessive pressure may cause permanent damage to the display.4. Do not remove the cover or a empt to service this unit yourself.5. Store the LCD monitor in a room with a temperature of -20° to 60° C (- 4° to 140° F). Storing the LCD monitor outside this range may result in permanent damage.6. Immediately unplug your monitor and call an authorized technician if any of the following circumstances occur:• Monitor to PC signal cable is frayed or damaged.• Liquid spills onto the LCD monitor or the monitor is exposed to rain. • The LCD monitor or case is damaged.An authorized technician should perform servicing of any nature Important Safety InstructionsSupport stand HDMI cable(OptionalInstalling the Monitor Arm/BaseMASTERPLUS+Using the MasterPlus+ app, you can fully customize the ARGB lighting built into the Halo stand. *Please visit https:/// for more details.Adjusting the MonitorFor the best results, it is recommended to look directly at the front of the monitor and makeany adjusts as necessary.Ensure that the monitor is mounted upright on the stand base.When adjusting the monitor viewing angles, avoid touching the screen and hold the stand in order to prevent it from falling over.100mm1mmVESA : 100 x 100 mmScrews : M4 x 10 mm Wall Mount Installation Instructions1234External Control Buttons①NOTE: Power light; Blue = ON;Orange = Power Saving.NOTE:The following content is for general reference only. Actual product specifications may vary.The OSD Menu and OSD Quick-Menu Symbol explanations and their functional uses are stated below.Select : Enters the highlighted submenu or edits the selected menu entry.Back : Goes back to the previous menu or exits editing an entry.Exit : Closes the OSD menu.Up : Moves the highlight up.Left: Moves the highlight to the left .Right : Moves the highlight to the right .Down : Moves the highlight down.Increase : Increase OSD setting.Decrease : Decrease OSD setting.Short press to turn on the monitor and Long press to turn off.When the OSD menu is activated,pull up/down/left/right the button to adjust the settings you need.When finished, you can pull the Button Back to return to the previous level or use the Button Exit to close the OSD menu .Menu/Navi/OK buttonSpecificationsIf you have any question regardin *Specifications are subject to change without notice.**The screen may flicker and other uncomfortable phenomena when the Motion Clearness function is enabled .***Measure a screen brightness of 200 nits without audio/USB/Card reader connection.g use of the monitor, please visit: https:///warrantySupported Timing*The timing can be supported while Type C 3.0 mode off.Product Outline DimensionsVideo Timing。
Der Intel Montagemechanismus für CPU-Kühler sieht es vor, dass sich das Mainboard bei der Montage durchbiegt. Aus diesem Grund empfehlen wir,GarantieDieses ARCTIC Produkt beinhaltet eine eingeschränkte Garantie von 6 Jahren. Weitere Informationen finden Sie unter warranty.arctic.ac Die Wärmeleitpaste ist auf dem Kühlkörper bereits voraufgetragen. Wenn der Kühler ein zweites Mal montiert werden muss, wird die Verwendung von MX-4 von ARCTIC dringend empfohlen. Nur unsere Wärmeleitpaste garantiert die optimale Leistung in Verbindung mit der Oberfläche unserer Kühlkörper.Kein Teil dieses Handbuchs einschließlich der darin beschriebenen Produkte darf in jeglicher Form oder mit jeglichen Mitteln vervielfältigt, übertragen, in einem Abfragesystem gespeichert oder in eine andere Sprache übersetzt werden, mit Ausnahme vonDokumentation, die der Käufer zu Sicherungszwecken aufbewahrt oder dies wurde durch die ARCTIC (HK) Ltd. ausdrücklich schriftlich genehmigt. Unter keinen Umständen sind die Führungskräfte oder Angestellten von ARCTIC (HK) Ltd. für indirekte Schäden, Neben- oder Folgeschäden verantwortlich, die aus jeglichen Mängeln oder Fehlern in diesem Handbuch oder Produkt entstehen.ARCTIC Switzerland AGwww.arctic.acMontageanleitungInstallation Manual: www.arctic.ac/fileadmin/alpine11gtrev2/manual_en.pdf Montageanleitung: www.arctic.ac/fileadmin/alpine11gtrev2/manual_de.pdf Guide d’installation: www.arctic.ac/fileadmin/alpine11gtrev2/manual_fr.pdf Manual de instalación: www.arctic.ac/fileadmin/alpine11gtrev2/manual_es.pdf Manual de Instalação: www.arctic.ac/fileadmin/alpine11gtrev2/manual_pt.pdf Installationsmanual: www.arctic.ac/fileadmin/alpine11gtrev2/manual_se.pdfInstala ční p říru čka: www.arctic.ac/fileadmin/alpine11gtrev2/manual_cz.pdf Telepítési kézikönyv: www.arctic.ac/fileadmin/alpine11gtrev2/manual_hu.pdf Instrukcja monta żu: www.arctic.ac/fileadmin/alpine11gtrev2/manual_pl.pdf Installatiehandleiding: www.arctic.ac/fileadmin/alpine11gtrev2/manual_nl.pdfРуководство пользователя: www.arctic.ac/fileadmin/alpine11gtrev2/manual_ru.pdf Manuale di installazione: www.arctic.ac/fileadmin/alpine11gtrev2/manual_it.pdfITWärmeleitpaste kann mit einem Taschentuch vorsichtig entfernt werden.。
CNC Machined for exacting tolerances of +/- .001”The Factory Engineered foundation for building Finished lifter bores Valley machined to accept factory roller lifter guides and lifter guide retainerThreaded core and galley plugs (straight thread port plugs with O-ring)Siamese bore with thick cylinder wallsDrilled coolant crossover holes to aid coolingBOSS Blocks are fully compatible with the original 302 and 351W blocks and includes the following features:Designed to use stock type timing cover, timing coverM-6059-D351 recommended (includes fuel pump provision)Compatable with factory 302 or 351W oil pan designs Retains clutch cross shaft pivot hole Original style oil filter locationOriginal motor mount boss locations Original bell housing patternBlocksBOSS BlocksBlock M-6010-BOSS302M-6010-B302BB M-6010-BOSS35192 Bore Size as delivered 3.990” - 3.995” 4.115” - 4.120” 3.990” - 3.995”Cooling Cross Drilled Yes No YesMaximum Bore Size 4.125Sonic test for greater than4.1254.125Maximum Stroke recommended 3.400” 3.400” 4.000”Main Bearings 2.250” (same as stock 302) 2.250” (same as stock 302) 2.750” (same as stock 351W)Ma Deck Thickness.500” - .560”.500” - .560”.500” - .560”Head Bolt Size1/2-13 UNC1/2-13 UNC1/2-13 UNCLifter Bore Size.8753” - .8768”.8753” - .8768”.8753” - .8768”Weight175 lbs.175 lbs.195 lbs.Maximum Displacement363 cubic inches363 cubic inches427 cubic inchesRecommended PartsHead Gaskets M-6051-S331, M-6051-CP331, M-6051-R351,M-6051-B341M-6051-R351M-6051-S331, M-6051-CP331, M-6051-R351,M-6051-B341Cam Bearings M-6261-J351 or M-6261-R351Head Stud Kit Head stud kit M-6014-Z304, M-6014BOSSHead Bolt Kit Head bolt kit M-6065-BOSSRear Seal 1 piece rear seal M-6701-B351Block M-6010-BOSS35192BB M-6010-BOSS35195M-6010-BOSS351BB Bore Size as delivered 4.115” - 4.120” 3.990” - 3.995” 4.115” - 4.120” Cooling Cross Drilled No Yes NoMaximum Bore Size Sonic test for greater than4.125”4.125Sonic test for greater than4.125”Maximum Stroke recommended 4.000” 4.250” 4.250”Main Bearings 2.750” (same as stock 351W) 2.750” (same as stock 351W) 2.750” (same as stock 351W)Ma Deck Thickness.500” - .560”.500” - .560”.500” - .560”Head Bolt Size1/2-13 UNC1/2-13 UNC1/2-13 UNCLifter Bore Size.8753” - .8768”.8753” - .8768”.8753” - .8768”Weight195 lbs.205 lbs.205 lbs.Maximum Displacement427 cubic inches454 cubic inches454 cubic inchesRecommended PartsHead Gaskets M-6051-R351M-6051-S331, M-6051-CP331, M-6051-R351,M-6051-B341M-6051-R351Cam Bearings M-6261-J351 or M-6261-R351Head Stud Kit Head stud kit M-6014-Z304, M-6014BOSSHead Bolt Kit Head bolt kit M-6065-BOSSRear Seal 1 piece rear seal M-6701-B351The Factory Engineered foundation for building power and race winning performance Blocks。
以前也见过mod机箱无数,一直没动春心,上个月发神经冲动要搞一个牛x点的机箱来用,你们懂的,男人其实跟女人一样,每个月都可以有那么几天冲动,MOD这个不是我在行的,就拜托了我要好的朋友XK操刀,计划搞一个红黑主题的机箱。
一共二点要求:
一:自己是个车迷,正遇上《极品飞车15》刚刚发售,攒这套机子也是为了玩期盼已久的《极品飞车15》,一定要融入赛车元素。
二:外观一定要拉风,一定要炫酷无比,超越那些“灰头土脸”,打着什么游戏专属旗号的品牌机。
XK真名叫邢凯,是MOD圈子里的名人了,相信人是他的也不在少数,他是德国Deutsche CasemodMeisterschaft全德PC改装改造大赛,亚洲唯一受邀的选手,比赛总积分欧洲排名第四的高手;和他认识是偶然在朋友的生日party上,在人是后不长的时间里已经见证了他数款MOD机箱的诞生,国内少见效率以及素质兼备的高端玩家啊。
先给朋友打个广告:-) 以上就是我最喜欢的一款的作品,中国风的台机,散热排和机箱巧妙的采用了木质的外壳设计,看起来古香古色的,中国味儿十足。
下面则是这次计划的整机效果图,都是邢凯的功劳啊
使用的是阿尔萨斯的机箱,阿尔萨斯是金河田今年力推的高端品牌,主打高端玩家市场,邢凯说这个机箱的底子不错挺适合拿来mod的,而且需要进行的改动部分不是很大,另外机箱的钢板比较厚,整体的重量有二十多斤,厚实的机箱在mod之后,也能保持足够的支撑,保障机型不会变形
前置面板经过了小小改动,把两个硬盘笼的风扇换成了台达的三页风扇,形成上下流通的散热风道。
位于两个台达暴力扇之间的是Antec前置高级多媒体管理中心,一样还是黑色的面板,在它上面的是MODer 3.5 自定义LCD监控模块面板,水冷、风扇和温度监控于一体的控制面板,很实用的玩意,整体看起来如同跑车的内饰。
水冷的冷排安装在机箱的顶部,配合了两个红色的ENERMAX(安奈美)红色Apollish风扇,在超频的时候能够在静音下完成CPU和主板的散热。
同时在顶部融入赛车中常见的碳纤维材质,更接近我想达到的目标,点睛般令MOD整体动感十足。
主板CPU平台方面,则是用我已有的ASUS ROG玩家国度系列R3E X58主板和Intel I7 980X,为了保障视觉效果,我直接抛弃了金士顿神条内存,通过渠道弄来了CORSAIR 复仇者4G*3
12G套装。
经过一周的多时间的等待,订货的水冷、风扇、追加的Kingpec金胜60G ssd等陆续到货,经过一个月的时间,就见到了上面大家看到的MOD机箱,机箱整体上没进行太大的改动。
华硕的GT480双卡SLI显得比较紧凑,在空调房里面散热暂时不会有神马问题,迟一些有条件还是另外搞一套水冷头回来换上去
电源也是阿尔萨斯的1500W电源,配上效果非常好
德国AquaComputercuplexkryos XT CPU水冷头,第一版的,内部的水道很漂亮,有兴趣的可以自己百度一下,水冷系统除CPU之外则全部采用了优秀的Bitspower的产品,包括为主板订制的Bitspower AIX58NSE3南北桥一体化水冷头,接头,水箱、D5水泵套件等,充分提升了一整套水冷的性能以及安全性。
Bitspower AIX58NSE南北桥一体的水冷散热模块,当然,CPU供电的mos同样安置了冷头,搭配ASUS华硕一直走的高端支线ROG的LOGO,珠联璧合。
视觉上高级感科技感十足啊。
红色的制冷液配合红黑相间的订制电源包线看起来有种暴力美学的美感
海盗船复仇者4G*3的12G的内存套装的气场也很足啊~
红色的ENERMAX(安奈美)Apollish风扇,红色LED的,背面一个,顶部还有三部,静音表现我很满意,只有15-25dBA,在日常环境的情况下,基本上听不到噪音,夜间效果同样华丽无比,与整个作品整体相当的搭配。
在外设方面,键盘采用了低调的德国cherry红轴G80_3000 3494 红轴,另购了红色KFORCE键帽,红轴,又与键盘上面的红色樱桃logo很衬,当然,和侧板上的Aersze GT logo组成一个相同风格的主题机器,真是哪个角度都透露出一丝“骚”气。
显示器方面选择了Benq的V2410,另外一台BENQ V2410还在路上,暂时先拿了一个BENQ V2410来试试效果,外观上继续沿用赛车条纹之后,整体依旧很搭。
机器运行状态部分的图片改天再放一个上来给大家看看,最后的总数还没算,不过两三万应该是有的,e~。